EG Oahu 500MX User manual

ELECTRIC BICYCLE OWNER’S MANUAL
For Owners of EG Oahu 500M and Maui 500M Electric Bicycle
Table of Contents
Descriptions: Page
Installation Instructions 2
How to install the bicycle out of the box 2
Operation Instructions 3
How to operate the Electric Bicycle 3
About the Brake Safety Feature on all EG Electric Bikes
How to Operate the Display Unit
How to read the Battery Meters and about the Li-on Battery 6
Care Instructions 6
Battery 6
Storage, Maintenance and Transport 7
Battery 7
Charger 7
Charger 7
Accessories 7
Electric Motor and Battery Features 8
Charging the Battery 8
Repair and Service 8
Inspection of the Bearings and Maintenance 9
Serial Numbers to your EG Electric Bike 9
How to detach the rear wheel of the Electric bike 9
1

INSTALLATION INSTRUCTIONS
How to install the bicycle out of the box
1. Unpack the bicycle from the box and cut all the ties that held the bicycle together during
shipping.
2. Install the handle bar by inserting the handlebar stem into the head tube. An Allen key is
supplied to install the handle bar stem.
3. Adjust the handlebar by loosening the nut holding the handlebar and then re-tightening it with
the included Allen wrench.
4. ! WARNING: Do NOT over tighten nut against the fork; for you will risk damaging your
suspension fork.
5. The front and rear LED/reflector run on the main Li-on battery, and is operated via the light
button on the handlebar display unit.
6. Install the pedals to the bike. Each of the pedals has a letter indicating which side it needs to
be installed to. R=Right and L=Left. Install them using the provided wrench.
7. ! WARNING: Before riding the bicycle ensure the main Li-on battery is properly installed and
locked in before riding the bicycle. If the Battery is not firmly locked onto the rear rack, it may
slide off the rack and cause damage to the battery.
8. Insert the battery into the rear rack and lock in your battery with provided key. Ensure that the
rails are properly aligned below the battery. Ensure that the battery is locked in by lightly
tugging on the battery to ensure it will not slide out.
2

OPERATION INSTRUCTIONS
How to operate the Electric Bicycle
The Electric bicycle can be operated in 3 different modes: Manual, Pedal Assist and Throttle Modes
1. Manual Mode –
To use your bike in full Manual mode, simply make sure the Display on the bike is “OFF”
and then, pedal the bicycle normally as you would any bicycle. Your motor is geared such
that forward motion is never hampered by the motor
2. Pedal Assist (PAS) Level 1 – 5
To use your bike in Pedal assist levels 1 thru 5, simply turn on the battery power to the
electric bike by turning the key clockwise to the “ON” position.
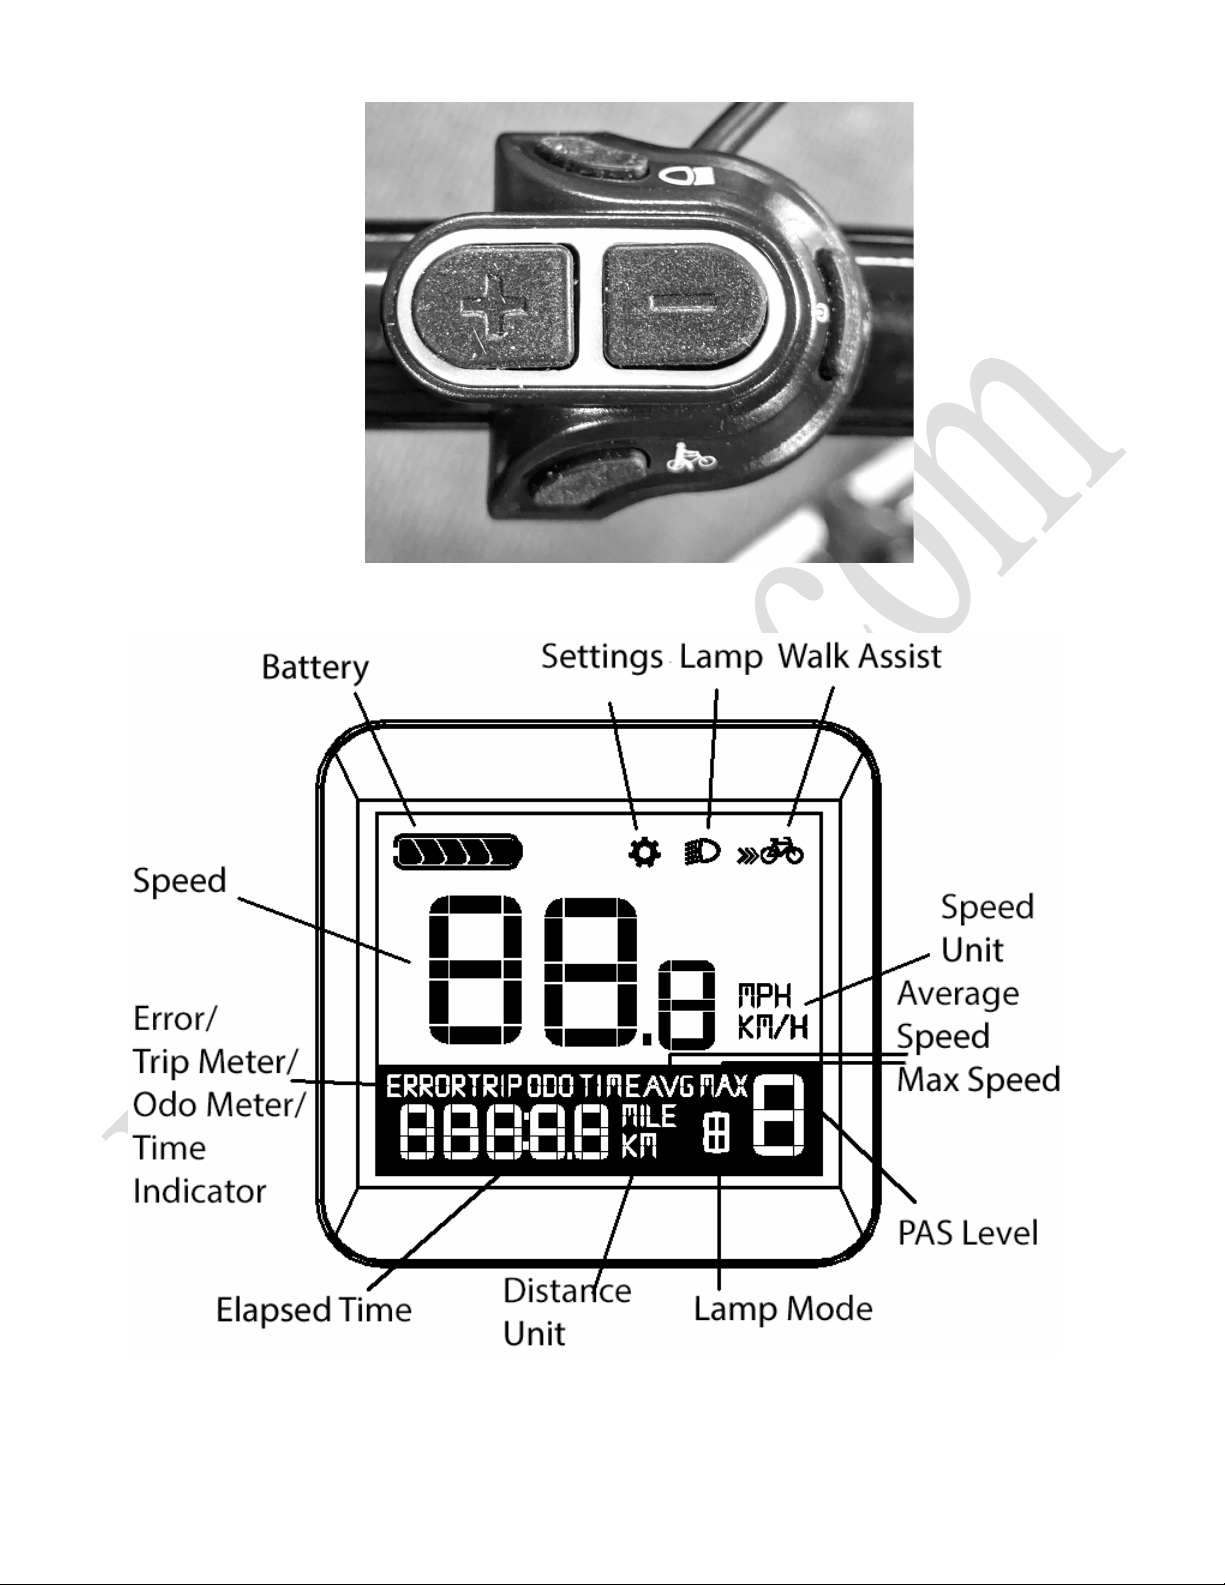
Press “Power/M” button on the pad located to the left of the handlebar to turn “ON” the
system. Pedal the bicycle normally as you would any bicycle.
The motor will stop if the brake lever is depressed even if you are still peddling the bicycle.
The motor will stop when you stop peddling in this mode.
When the system is first switched “ON” it will default to start in the “PAS Level 1”.
You can adjust the desired speed and power usage by pressing “+” or “-” buttons to the
desired PAS level and operate your E-Bike as you normally would any bicycle.
In “PAS Level 1”, the system will provide you with the most “miles per charge” of battery
power use among the PAS modes and the slowest speed among the PAS levels.
In “PAS Level 5”, the system will provide you the lowest “miles per charge” of battery power
use among the PAS modes and the highest speed available among the PAS levels.
2b.Pedal Assist (PAS) and hrottle on demand (PAS Level 0)–
To put your bike in NO Pedal assist and “Throttle on demand” mode only, switch “ON” the
bike’s electrical system by pressing the “Power/M” button on the Pad located to the left of
the handlebar and then press “-” button on the pad until “0” appears on the LCD screen.
Pedal the bicycle normally as you would any bicycle.
In this mode, the motor will only function with the use of the throttle.
In this mode level, the PAS function has been turned off.
! CAUTION: This mode can still achieve a speed of 20 MPH. User discretion is advised
The motor will stop if the brake lever is depressed even if you are have the throttle
depressed/engaged.
This mode will give you a Moderate to low “miles per charge” of battery power use among
the pedal assist modes, depending on your throttle use.
Holding down the throttle in this mode is essentially the same as placing your bike in PAS
Level 5 and running the motor.
To switch back to pedal assist modes, press the “+” button until you reach the desired PAS
level.
3. hrottle Mode –
To ride the bike fully on “Electric Mode”, switch “ON” the bike by pressing the “Power/M”
button on the Pad located to the left of the handlebar.
Place the PAS on any level you desire, because while the thumb throttle is engaged, the
PAS mode is not active and has no effect on the speed or power of the electric motor.
3

Depress the thumb throttle in any increments of power you desire to power the motor of the
bicycle and it will take off as demanded.
This mode can be used in conjunction with any of the above modes as the amount of motor
power supplied while twisting the thumb throttle overrides all PAS modes the system is set
to.
You can engage this mode whenever you want as long as the system is turned “ON”.
While peddling will lighten the motor load and assist lower the demand on the electric
motor, you do not need to pedal in this mode of operation.
! CAUTION: This mode is designed to achieve a speed of 20 MPH. User discretion is
advised
The motor will NOT stop when you stop peddling while the thumb throttle is engaged.
The motor will stop if the brake lever is depressed even if the thumb throttle is engaged.
! CAUTION: Remember to let go of the thumb throttle when getting on or off the bike
weather or not the brake levers are engaged.
In this mode, the electric bike will use the most amount of battery power it will use the most
amount of battery power compared to any PAS modes on this bike.
This mode will give you the least “miles per charge” compared to any of the above modes
of operation
To assist the motor from a dead stop in this mode, it is suggested to gear down to lower
gears before stopping your bike.
About the Brake Safety Feature on all EG Electric Bikes
ALL our electric bikes make use of a wired brake lever kill switch for safety purposes. When
the brake lever is engaged, it sends a kill signal to the controller to disable the motor under
all circumstances and condition. This will ensure the motor does not continue to spin when
you need the bicycle to stop.
How to Operate the Display Unit
Pressing “Power/M” button turns ON the electrical system to your bike.
Pressing and releasing “Power/M” button once the system is ON toggle between Odo =
Odometer, Trip = Tripmeter, Max = Max speed, AVG = Average Speed and Time = Total time
since last reset
Pressing and holding “Power/M” button for 3 seconds will turn OFF the system
Pressing “+” or “-” adjusts the PAS mode to the desired levels as indicated to the right of the
display.
Pressing and holding “LAMP” button for 3 seconds cycles through Auto (A) or ON/OFF the
LED Head and Tail lamp. When it’s dark out the light will come on automatically, when you
press this button it will turn the lights OFF. OR when it’s daylight out, pressing this button will
turn the lights ON
Pressing and holding “Walk assist” button will engage the walk assist. The motor will keep
turning as long as the button is held down.
Pressing and holding “-” button while on Max Speed, AVG or Trip will zero out the meter.
4

5
This manual suits for next models
1
Table of contents
Other EG Bicycle manuals