Eico 60 Fusion IF User manual

Käyttöohjeet
INDUKTIOLIESITASO
DK
SE
NO
FI
User instructions
INDUCTION GLASSCERAMIC COOKTOP
EN
INDUKTIONSKOGEPLADE
Brugsanvisning
Bruksveiledning
INDUKSJONSKOKEPLATE
INDUKTIONSHÄLL
Betjäningsmanual
Eico 60 Fusion IF

2
Max Power : 7.4 kW
Eico 60 Fusion IF
Fig. 1
4 mm
480 mm
550 mm
30
49
520 mm
590 mm
R 4
560 mm
490 mm
50
4 mm
480 mm
550 mm
30
49
520 mm
590 mm
R 4
526 mm
596 mm
490 mm
560 mm
3mm
6
mm
R 7mm

3
~ 2 mm
min. 50 mm
53
mm
20 mm
7
3PCLIOBIUE1.2
43PCLIOBIUE1
Fig. 4/B
NO YES
23
30 mm
A
40 mm
B
Fig. 4/A
Fig. 2
Fig. 3
Fig. 4

4
Induction
A
B
Fig. 5
Fig. 6
≤ Ø 90 mm
≥ Ø 110 mm
≤ Ø 70 mm
≥ Ø 90 mm
≤ Ø 90 mm
≥ Ø 110 mm

5
Fig. 7
A
A1
B
F
C D
E1E4
E2E3
B1
F1
F2
F4
F3
D
1
0 0
00
00
EN_Command
A_Power on Key
B_Power level-and Timer setting range with
Bar graph (B1)
C_Booster key
D_Pause key with LED (D1)
E_Cooking zone selection and power level
display (E1 - E2- E3 - E4)
F_Timer select key and timer display with
LED assign to cooking zone (F1 - F2- F3 - F4)
DK_Command
A_Tænd-/sluk-knap
B_Indstilling af eektniveau og timer med
søjlegrak (B1)
C_Booster-tast
D_Pausetast med LED (D1)
E_Valg af kogeplade og eektniveaudisplay
(E1 - E2- E3 - E4)
F_Tast til valg af timer og timerdisplay med
LED tildelt til kogeplade (F1 - F2- F3 - F4)
SE_Kommando
A_Strömknapp
B_Inställningsområde för eektnivå och
timer med stapeldiagram (B1)
C_Boost-knapp
D_Pausknapp med lysdiod (D1)
NO_Styring
A_På-tast
B_Eektnivå og Timerinnstilling med stol-
pegraf (B1)
C_Booster-tast
D_Pausetast med LED (D1)
E_Valg av kokesone og eektnivå-display
(E1 - E2- E3 - E4)
F_Timervalgtast og timerdisplayemed
LED-tildeling til kokesone (F1 - F2- F3 - F4)
FI_Komento
A_Päällä/pois näppäin (ON/OFF)
B_Tehotason ja ajastimen asetusalue
pylväskaavion kanssa (B1)
C_Tehostinnäppäin
D_Taukonäppäin ja merkkivalo (D1)E_Keit-
toalueen valinta ja tehotason näyttö (E1
- E2- E3 - E4)
F_Ajastimen valintanäppäin ja ajastinnäyttö
sekä merkkivalo keittoalueelle (F1 - F2- F3
- F4)
E_Display för val av kokzon som visar eekt-
nivån (E1 – E2 – E3 – E4)
F_Knapp för val av timer som visar timern
med lysdiod tänd för den valda kokzonen (F1
– F2 – F3 – F4)

6
Fig. 8
35 24 1
NL2 L1
2P+N
L1
35 24 1
L2
2P
230V
L1
35 24 1
N
1P+1N
Land Mains Connection Cable
diameter
Cable Protection
calibre
NO
DK
FI
FI
S
DK S
400V~
50/60 Hz
230V~
50/60 Hz
230V~
50/60 Hz
2 Ph + N
2 Ph
1 Ph + N
4 x 1.5 mm²
3 x 2.5 mm²
3 x 2.5 mm²
H 05 VV - F
H 05 RR - F
H 05 VV - F
H 05 RR - F
H 05 VV - F
H 05 RR - F
16 A*
25 A*
25 A*
4Zones
( *) calculated with the simultaneous factor following the standard EN 60 335-2-6/1990

7
35 24 1
NL2 L1
2P+N
L1
35 24 1
L2
2P
230V
L1
35 24 1
N
1P+1N
Fig. 9

8
Induction Hob user instructions EN
GENERAL INFORMATION
Carefully read this use and maintenance manual, where
important information about installation, use and mainte-
nance safety is provided. Keep this manual for future ref-
erence. Any installation operation (electric connections)
shall be performed by specialized personnel, in compli-
ance with all standards and regulations in force.
SAFETY WARNING
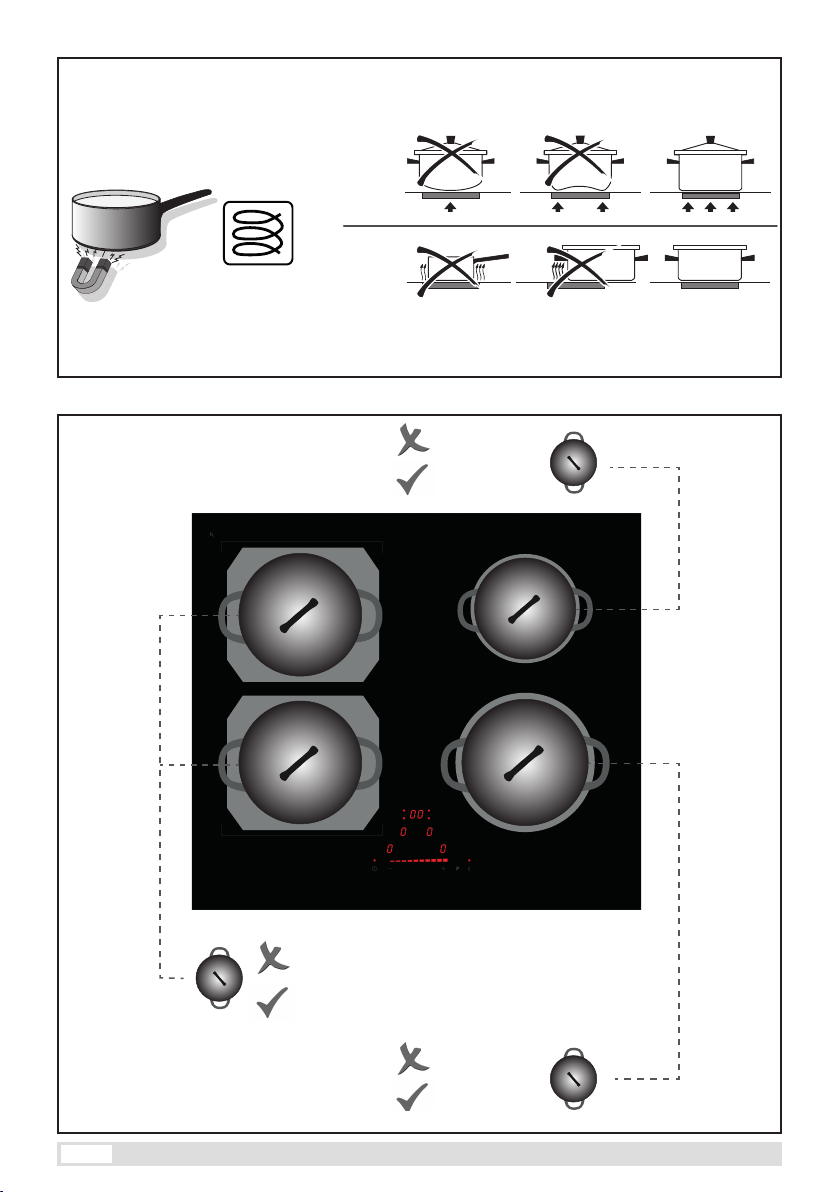
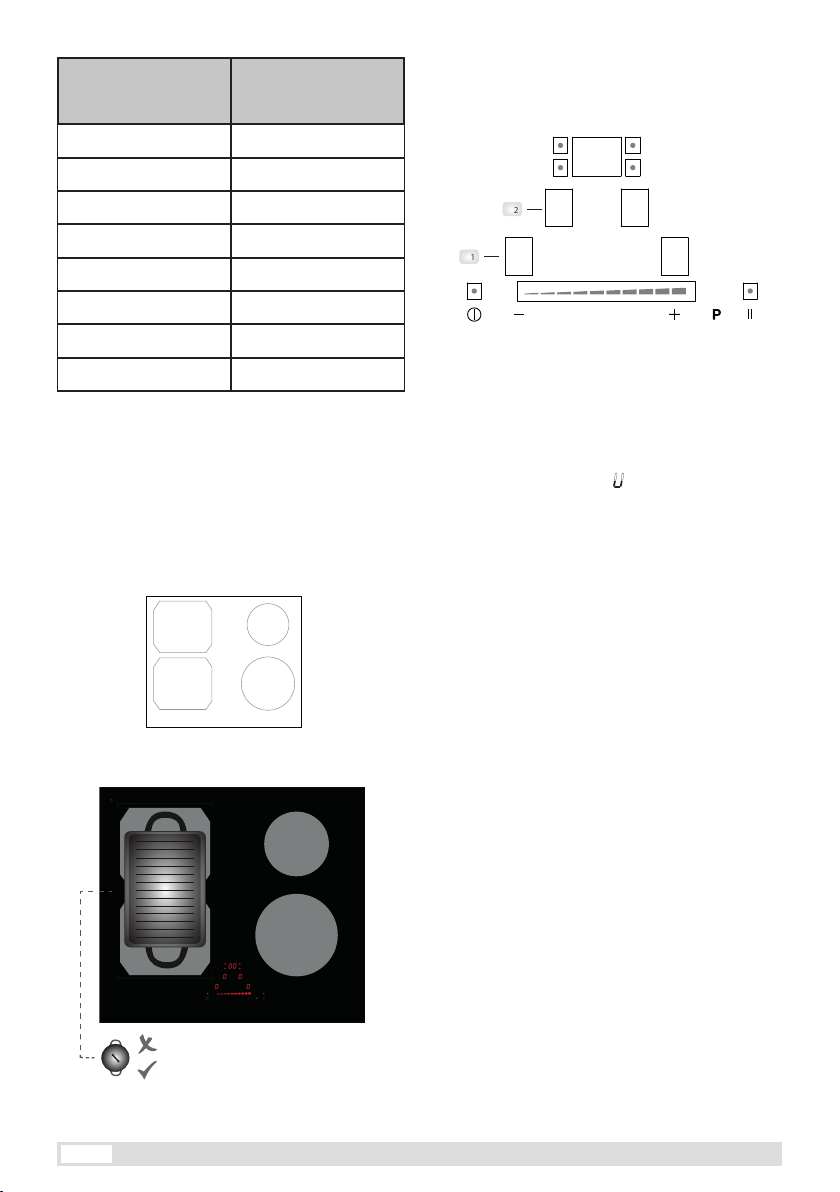
The use of flat-bottomed pots, with a diameter equal to
or slightly bigger than the heated area, is recommended.
(Fig.5). Do not use pots that have a rough base, in order
to prevent the hob thermal surface from being scratched.
This appliance is not intended for use by children or in-
firm people without supervision.
IMPORTANT
- Avoid the overflow of liquids by reducing the heat
supply when boiling or warming liquids.
- Do not leave any heating element switched on, if
there are no pots, or if the pots are empty.
- Once cooking is completed, turn the concerned
heating element off, by using the control shown be-
low.
- This appliance is not intended for use by people
(children included) with limited physical, sensorial or
mental abilities, or lacking of experience and knowl-
edge, unless they are supervised or well instructed
about the use of the appliance, by a person who is
responsible for their safety.
- Children should be supervised to assure that they
do not play with the appliance.
- If the hob surface is cracked, turn the appliance off
and disconnect it from the electric network , so as to
avoid the possibility of electric shock.
INSTALLATION INSTRUCTIONS
These installation instructions are intended for a spe-
cialized installer and are meant as guidelines for the
hob installation, adjustment and maintenance, in com-
pliance with any regulations and standards in force. If a
built-in oven or any other appliance generating heat is to
be mounted directly under the vitro-ceramic hob, IT IS
NECESSARY THAT SUCH AN APPLIANCE (the oven)
AND THE VITRO-CERAMIC HOB ARE PROPERLY IN-
SULATED. Failure to comply with this precaution might
result in the incorrect operation of the TOUCH CON-
TROL system.
• Positioning:
This household appliance has been designed for built –in
installation onto a worktop, as shown in the figure (Fig.
1- Cut dimensions). Use sealing material along the whole
perimeter (Fig.2). This operation is necessary in order
to prevent any liquid from entering inside the hob, being
that the flatness of the top, the glass and their coupling
cannot be assured. Gently push the appliance into the
built-in hole (Fig.4). If, after installation, the lower part
of the appliance is accessible from the lower part of the
cabinet, it will be necessary to mount a spacing panel at
the distances given (Fig.3).
• Electric connections (Fig.9):
• The installation of this appliance and the connection
to the electrical network should be entrusted only to
an electrician perfectly to the fact of the normative
regulations and which respects them scrupulously.
• Protection against the parts under tension must be
ensured after the building-in.
• The data of connection necessary are on the stickers
place on the hob casing near the connection box.
• The connection to the main must be made using an
earthed plug or via an omnipolar circuit breaking device
with a contact opening of at least 3 mm.
• The electrical circuit must be separated from the network
by adapted devices, for example: circuit breakers, fuses
or contactors.
• If the appliance is not tted with an accessible plug,
disconnecting means must be incorporated in the
xed installation, in accordance with the installation
regulations.
• The inlet hose must be positioned so that it does not
touch any of the hot parts of the hob or even.
Caution!
This appliance has only to be connected to a network
230 V~ 50/60 Hz.
Connect always the earth wire.
Respect the connection diagram.
The connection box is located underneath at the
back of the hob casing. To open the cover use a
medium screwdriver. Place it in the slits and open
the cover.
Caution!
Be careful that the cables are correctly engaged and
tightenet.
We cannot be held responsible for any incident
resulting from incorrect connection or which could
arise from the use of an appliance which has not
been earthed or has been equipped with a faulty
earth connection.
USE AND MAINTENANCE
• Maintenance (Fig.8):
Remove any food residue and grease drops from the
cooking surface, by using the special scraper provided
on request.
Clean the heated area in the best way possible, using
suitable products and a paper towel, then rinse with wa-
ter and wipe away with a clean cloth.
Through the use of the special scraper (optional),
promptly remove any pieces of aluminum foil and plastic
material, which might have accidentally melted, or sugar
or food remains, and/or remains of sugary foods, from
the heated surface. In this way, any possible damage to
the surface is prevented.
The use of abrasive sponges or irritating chemical clean-
ers, such as sprays for ovens or cleaning agents is not
allowed under any circumstance.

9
• Use:
Use the touch control system in the corresponding posi-
tion according to individual cooking needs. Keep in mind
that the higher the number, the more heat is produced.
The command oer a convenient handling as selections
are performed by touching directly on the display:
- the acitive selection is displayed with high intensity;
- avaible selections are displayed with a low intensity;
- unavaible selections are not lighted.
• Function (Fig.7):
A_Power on Key
B_Power level-and Timer setting range with
BbBar graph (B1)
C_Booster key
D_Pause key with LED (D1)
E_Cooking zone selection and power level
disdisplay
F_Timer select key and timer display with LED
asassign to cooking zone (F1 - F2- F3 - F4)
• Switching the cooking top ON/OFF:
The Touch Control may be switched on by pressing the
ON/OFF key [A key], then the displays [E area] shows
a static 0. If a cooking zone is still hot, the display
alternates between 0 and H, and the display blinks.
The hob remains activated for 20 sec. , if there is no
selection of cooking zone or timer during this time (20
sec.), automatically the command resets into the stand-
by mode and the hob will emit a signal beep.
If the Child Lock function is activated at switching on, all
cooking zones display will show L
By pressing ON/OFF [A key] the hob can be switched
o at any time. This is also applicable when the Touch
Control has been locked.
• Switching the cooking area ON/OFF:
The user can select a cooking zone, pressing the cooking
zone select [E area], and the respective display light will
show 0. A cooking level is switched on and then adjusted
by pressing on the slider eld [B area].
By moving the nger on the slider eld to the right
(increasing the heat) or left (decrease the heat) or by
direct selection of the required cooking level on the slider
the desired cooking level can be adjusted.
0 0
00
00
A single cooking zone may be switched o by selecting
and setting cooking level to 0; ten seconds later the
display cooking zone [E area] will go o.
In case of cooking zone is still hot there will be a warning
letter Hdisplayed, in alternation with 0.
After switching o the display is o and only if a cooking
zone is still hot a static H is displayed as a warning.
Immediately switching o all cooking zones is always
possible by using the ON/OFF [A key].
During the stand-by mode H appears on all still hot
cooking zones; the other cooking zones displays remains
o.
• Pot detection:
This hob has the pot detection function, that enables to
comunicate at the user that the pot is not in the selected
cooking zone.
To activate this function the user have to select a cooking
zone [E area], and a cooking level value greater 0 [B
area].
In case of no cookware has been identied by the hob,
a “missing pot” gure is showed on the cooking zone
display [E area]. Unlike, if a pot is placed, the display of
the cooking zone will show 0.
• Boost function:
The Booster is an additional cooking level, oers a higher
powel level for a limited time (5 minutes). This function
allows the user to heat the pot very quickly, for example
to save time during boiling water.
To activate the Booster the user have to select the
desired cooking zone [E area], and then press Booster
function [C key].
To deactivate this function the user have to change the
power level [B area].
• Heat up automatic:
Heat-up automatic is a feature which enables heating
up a cold pot with full heating power and returning
automatically to the desireed cooking level. The time
during the cooking zone is heated with full power is
depending on the selected cooking level.
To activate this function the user have to select a cooking
zone [E area], and then hold continuous cooking level on
the slider [B area] for at least 3 sec.
After activation, the symbol Ais displayed immediately
and appears alternating with the cooking level value.
Below is indicated the Heat up automatic time for every
power level:
Cooking level Heat-up Automatic
time (sec)
1 48
2 144

10
Cooking level Heat-up Automatic
time (sec)
3 230
4 312
5 408
6 120
7 168
8 216
9 not avaible
P not avaible
•Bridge function:
Bridging of 2 cooking zones is the connection of 2 single
cooking zones, so they can be controlled and will behave
as one large cooking zone. This enables using cookware
which has a larger bottom surface than a single cooking
zone. In this hob the user can connect the rst and the
second cooking zone. (See the gure below)
If the user connect these two cooking zones, he/she
should follow these indications for the pot size:
If bridge function is activated the Boost mode is not
possible.
1
23
4
≤ Ø 190 mm
≥ Ø 230 mm
To activate and disable this function, the user have to
select simultaneously both cooking elements [E1-E2
area].
(See the gure below)
Now, one display will show and another one .
•Warming function:
This function is used to keep cooked food warm. The
warming level is between 0 and 1. To activate the
warming level you have to select the zone [E area], and
choose the power between 0 and 1 with the slider [B
area]. The display will show:
To deactivate this function you have to change the power
cooking level of that cooking zone.
In order to assure the food quality and for microbiological
reasons the warm keeping time shall be as short
as possible. The time limit for this function is two hours.
The touch control switches automatically for this reason
in stand-by mode after this time.
•Residual heat:
If the temperature of the cooking zone is still high (over
65°) after it has been switched o, the relative display
will indicate the Hsymbol (residual heat). The symbol will
only switch o when the burn risk is no longer present.
•Child Lock:
The keys could be locked to suppress unintended
actions, by childrens or to cleaning the hob.
The switching o using ON/OFF key is also possible in
locked state.
To activate this function the user have to press the
E1 display [E1area] and the Booster key [C area]
simultaneously, then release and press E1 display [E1
area] again. This procedure must take place within
10 sec., otherwise the input will not be valid. If the
operations is ok, all displays show Lfor locked (against
unintentional activation). If a cooking zone is still hot
Land His displayed alternately as a warning.
The hob remains in a lock state until its release, even
if the user turned it o, or disconnect the power supply.
To deactivate the lock function, the hob must be
switching on. The user have to press the E1 display
[E1area] and the Booster key [C area] simultaneously,
followed by pressing only E1 display [E1area] again. If all
steps were performed in the correct order and within 10
sec. the locking is cancelled, and the hob is in stand-by
mode. Otherwise, only the ON/OFF key can be pressed
for switching o and the procedure must be repeated.
The hob is switched on again by pressing the ON/OFF
key and 0is displayed, now the user can start cooking.
0 0
00
00
E1
E2
U
U
To deactivate this function the user can change the
cooking level.

11
•Timer:
The timer is avaible in two options:
• Stand alone timer
• Cooking zone timers
One timer is available for each cooking zone, and one for
stand alone timer. The timers can be used parallel. The
maximum time value can be set to 99 min. Value less
than 1 min. is indicated in seconds.
The Stand alone timer has the behavior of an egg timer.
To active this function, ensure that no cooking zone has
been selected, then press Timer select key [F area], now
the user can set timer value on the slider [B area].
To deactivate this function, the user can set timer value to
0or press the ON/OFF key [A area] twice.
The Cooking zone Timers can be used to switch o a
cooking zone automatically after the set time has
run out. To activate this function, the user can select
the corresponding cooking zone, using E1 - E2 - E3 - E4
key [E area]; after that set a power level (greater than 0),
and then press the Timer select key [F area], after that
the user can set timer value on the slider [B area]. In case
the timer is set and no cooking zone is activated within 10
sec., the displays [E area] are switched o.
To deactivate this function, the user can set time value
to 0 or switch o corresponding cooking zone (select the
cooking zone, using E area, and move the slider, B area
to 0). If a timer runs out the alarm mode starts. The alarm
can be stopped by any key operation.
•Pause function:
During active pause function no power will be emitted
and cooking process is interrupted.
When at least one cooking zone is active, the heating
elements may be switched o by pressing the Pause key
[D area] for at least 1 sec, and in the display will show
this symbol: I I.
The programmed timers (also the stand alone timer) are
stopped and not continued during the pause. Automatic
Heat-up and Booster functions are also switched o on
all cooking zones during pause activation. Unlike the
Residual heat and Operating time limitation continue and
are not stopped.
This function may be activated also if cooking zone
specic errors occur, unlike if a general error occurs
during the Pause the hob switches o.
The Pause mode can continue for max. 10 minutes, after
which the hob turns o automatically.
In this 10 minutes (max time) the coooktop may be
switched o at any time by the user with the ON/OFF
key [A area].
To deactivate the Pause mode press the Pause key [D
area], thereafter any other key (not the same again) has
to be actuated for 10 sec. This recovers the conditions
before the pause mode.
The led of the Pause mode [D1 area] is illuminated when
the pause function is active, and blinking in two cases:
during the waiting time for a second key be activated for
ending the pause; and with recall function is possible
after switching on again.
•Recall function:
By using the recall function the settings can be recovered
quickly when the hob was switched o using the ON/OFF
key [A area] accidentaly.
The restorable informations are:
• Cooking levels of all cooking zones
• Minutes and seconds of active cooking zone
related timers
• Heat-Up Automatic and Booster functions
• Child-lock
• Bridged zones
•Operation Time Limitation [Automatic Switch Off]:
The Operation Time Limitation is an additional safety
feature to turn OFF cooking zone after certain time with
no operation to the corresponding cooking zone by the
user. The time after which the cooking zone is turned
OFF is mentioned in the table below. Each user operation
related to the cooking zone will reset this time limit.
Cooking
level
Max. Operation time
(h)
Warming level 2
1 6
2 6
3 5
4 5
5 4
6 1.5
7 1.5
8 1.5
9 1.5
P 5 min.

12
Information for household electric hobs
In acc. with regulation (EU) No. 66/2014
Model name/ identier Eico 60 Fusion IF
Type of induction hob built-in
Number of cooking zones and/or areas 4
Heating technology
Induction cooking zones and cooking areas, radiant cooking zones.
1. = Induction
2. = Induction
3. = Induction
4. = Induction
For circular cooking zones:diameter of useful surface area/mm cooking zone
For non-circular cooking zones or areas: lenght and width of useful surface area
per electric cooking zone or area
1. = Octa
2. = Octa
3. = Ø 160
4. = Ø 200
Energy consumption per cooking zone or area calculated per Kg (ECelectric cooking) 1. = 189,7
2. = 189,7
3. = 179
4. = 193,3
Energy consumption for the hob calculated per kg (ECelectric cooking) 187,9
1
23
4
Energy Saving Advice
For hobs
• As far as possible, always prepare the food in pots and pans with lids to avoid unnecessary heat consump-
tion.
• Choose a small pot for small quantities. A small pot uses less energy than a larger, underlled pot.
• Cook with as little water as possible.
• Lower the heat level as soon as possible after boiling or browning.
• Use a pressure cooker to reduce the cooking time.
Eico 60 Fusion IF
mm
Wh/Kg
Wh/Kg

13
DISPOSAL OF OLD ELECTRICAL APPLIANCES
The European Directive 2002/96/EC on
Waste Electrical and Electronic Equipment
(WEEE), requires that old household
electrical appliances must not be disposed
of in the normal unsorted municipal waste
stream. Old appliances must be collected
separately in order to optimise the recovery and recycling
of the materials they contain and reduce the impact on
human health and the environment.
The crossed-out dustbin symbol on the product reminds
you of your obligation regarding separated waste
collection. Consumers should contact their local public
service or their local dealer for more information on the
correct disposal of exhausted household appliances.
THE MANUFACTURER DECLINES ALL
RESPONSIBILITY FOR EVENTUAL
DAMAGES CAUSED BY BREAKING THE
ABOVE WARNINGS. THE WARRANTY IS
NOT VALID IN THE CASE OF DAMAGE
CAUSED BY FAILURE TO COMPLY WITH
THE ABOVE-MENTIONED WARNINGS.
ERROR CODE:
GENERAL TOUCH CONTROL ERROR
Error code Description Remedy
/ H
ER03
Permanent use of keys;
Touch Control switched off after
10 sec.
Water or cooking utensils on the
glass;
Clean the surface
ER20 Internal error in touch control Replace touch control
ER21 Over temperature Let cooktop cool down
Check heat partitioning for TC
ER22 Internal error in touch control Replace touch control
ER31 Variant detection error Download correct conguration
ER36 Internal error in touch control Replace touch control
ER40 Power supply voltage too low on
secondary side
Check connected components for
overload
Replace touch control
ER47 LIN communication error Check LIN cabling

14
EA Communication error
Check cabling between touch control
and power board
Replace touch control
Replace power board
U400 Overvoltage due to wrong connection Turn o power supply voltage and
connect cooktop properly
COOKING ZONE SPECIFIC ERRORS
Error code Description Remedy
E2 Over temperature of cooking zone Allow cooking zone to cool down
E3 Inapplicable pot Use suitable pot
E4 Cooking zone does not exist,
conguration data is incompatible Download correct conguration
E5, E6 Error on lter board/generator Replace lter board/generator
E7 Unknown failure (master is not able
to assign the failure code)
Contact technical support
E8 Fan defective Replace fan
E9 Temperature sensor defective Replace temperature sensor

15

16
Induktiolevy käyttöohjeet FI
YLEISIÄ TIETOJA
Lue huolellisesti tämä käytön ja huollon käsikirja, jossa
annetaan tärkeitä tietoja asennuksen, käytön ja huollon
turvallisuudesta. Säilytä käsikirja tulevaa tarvetta varten.
Kaikki asennustoimenpiteet (sähköliitännät) saa suorittaa
vain ammattitaitoinen henkilöstö ja on noudatettava
voimassa olevia standardeja ja määräyksiä.
TURVALLISUUSVAROITUS
Käytä tasapohjaisia ja halkaisijaltaan yhtä suuria tai
hieman lämpiävää aluetta suurempia keittoastioita.
(Kuva 5). Älä käytä karkeapohjaisia keittoastioita, jotta
keittotason pinta ei naarmuunnu. Laite ei sovellu lapsien
tai vammaisten käyttöön ilman valvontaa.
TÄRKEÄÄ
- Vältä nesteiden ylivuotoa vähentämällä lämpöä,
kun keitetään tai lämmitetään nesteitä.
- Älä jätä mitään kuumennuselementtiä päälle, jos
sen päällä ei ole keittoastioita tai astiat ovat tyhjiä.
- Kun keittäminen päättyy, kytke kuumennuselementti
pois päältä käyttämällä osoitettua säädintä.
- Laitetta ei ole tarkoitettu käytettäväksi henkilöille
(lapset mukaan lukien), joiden fyysinen, henkinen tai
aistitoimintojen suorituskyky on rajoittunut tai joiden
kokemus tai tiedot ovat puutteellisia, ellei heitä valvo
tai opasta laitteen käyttöön heidän turvallisuudesta
vastuussa oleva henkilö.
- Lapsia on valvottava, jotta varmistetaan se, etteivät
he leiki laitteella.
- Jos keittotason pinta on säröytynyt, sammuta
laite ja kytke se irti sähköverkosta, jotta vältetään
sähköiskujen mahdollisuus.
ASENNUSOHJEET
Nämä asennusohjeet on tarkoitettu ammattitaitoiselle
asentajalle suuntaa antaviksi ohjeiksi keittotason
asennukseen, säätöön sekä huoltoon ja on noudatettava
voimassa olevia määräyksiä ja standardeja. Jos kiinteä
uuni tai muu lämpöä tuottava laite on asennettava suoraan
lasikeraamisen keittotason alle, ON VÄLTTÄMÄTÖNTÄ,
ETTÄ KYSEINEN LAITE (uuni) JA LASIKERAAMINEN
KEITTOTASO ERISTETÄÄN
KUNNOLLA. Mikäli tätä varotoimea ei noudateta,
saattaa aiheutua KOSKETUSSÄÄDINJÄRJESTELMÄN
häiriöitä.
•Sijoittaminen:
Tämä kodinkone on suunniteltu asennettavaksi kiinteäs-
ti työtasoon kuvan mukaisesti (Kuva 1- Leikkausmitat).
Käytä tiivistemateriaalia koko äärireunalla (Kuva 2).
Toimenpide on välttämätön, jotta estetään mahdollisen
nesteen valuminen keittotason sisälle, koska ei voida
varmistaa tason, lasin sekä niiden liitännän tiiviyttä.
Työnnä laite varovasti kalusteen aukkoon (Kuva 4). Jos
asennuksen jälkeen laitteen alapuoli on saavuttavissa
kaapin alapuolelta, on asennettava välipaneeli annetuille
etäisyyksille (Kuva 3).
•Sähköliitännät (Kuva 9):
• Laitteen asennus ja sähköverkkoon liittäminen
on annettava tehtäväksi vain ammattitaitoiselle
sähköasentajalle, joka tuntee kaikki määräykset ja
noudattaa niitä huolellisesti.
• Jännitteenalaisten osien suojaus on varmistettava
kiinteän asennuksen jälkeen.
• Tarvittavat liitäntätiedot löytyvät tarroista, jotka ovat
keittotason kotelossa liitäntärasian lähellä.
• Verkkoliitäntä on tehtävä käyttämällä maadoitettua
pistoketta tai moninapaista suojalaukaisinta, jonka
avoimien koskettimien välinen etäisyys on vähintään 3
mm.
• Sähköpiiri on erotettava sähköverkosta asianmukaisilla
laitteilla kuten esimerkiksi: suojalaukaisimet, sulakkeet
tai kontaktorit.
• Jos laitteessa ei ole saavutettavissa olevaa pistotulppaa,
irtikytkemismahdollisuus on taattava kiinteässä
asennuksessa asennusmääräysten mukaisesti.
• Tuloletku on sijoitettava niin, ettei se kosketa mitään
keittotason tai työtason kuumia osia.
Huomio!
Tämän laitteen saa kytkeä ainoastaan 230 V~ 50/60
Hz -verkkoon.
Kytke aina maadoitusjohdin. Noudata
kytkentäkaaviota.
Liitäntärasia sijaitsee keittotason kotelon takaosan
alla. Avaa suojus keskikokoisella ruuvitaltalla. Aseta
se rakoihin ja avaa suojus.
Huomio!
Ole tarkka, että johdot kytketään oikein ja kiristetään
kunnolla.
Emmeolevastuussamahdollisistaonnettomuuksista,
jotka aiheutuvat virheellisestä kytkennästä tai jotka
saattaisivat tapahtua käytettäessä maadoittamatonta
tai virheellisesti maadoitettua laitetta.
KÄYTTÖ JA HUOLTO
•Huolto (Kuva 8):
Poista kaikki ruokajäämät ja rasvapisarat keittotasol-
ta käyttämällä erityistä kaavinta, joka toimitetaan
pyynnöstä.
Puhdista kuumennusalue mahdollisimman hyvin käyt-
tämällä sopivia tuotteita ja talouspaperia sekä huuhtele
lopuksi vedellä ja pyyhi puhtaalla rievulla.
Erityisellä kaapimella (lisävaruste) poista kuumalta pinn-
alta välittömästi mahdolliset alumiinifolion tai muovimate-
riaalin palaset, jotka voisivat sulaa. Toimi samoin sokerin,
ruokajäämien ja/tai sokeria sisältävien ruokien kanssa.
Tällä tavalla ehkäistään pinnan vahingoittumista.
Hankaavien sienten tai voimakkaiden kemikaalien kuten
uunisuihkeiden tai puhdistusaineiden käyttö ei ole kos-
kaan sallittua.

17
•Käyttö:
Käytä kosketussäädinjärjestelmää vastaavassa asen-
nossa yksittäisten keittotarpeiden mukaan. Pidä mieles-
sä, että korkeampi numero tarkoittaa enemmän lämpöä.
Komentoalue tarjoaa kätevän käsittelymahdollisuuden,
koska valinnat tehdään suoraan näytöltä:
-aktiivinen valinta näkyy voimakkaana,
-saatavilla olevat valinnat näkyvät himmeämpinä,
-valinnat, jotka eivät ole käytettävissä, eivät pala.
•Toiminto (Kuva 7):
A_Päällä/pois näppäin (ON/OFF)
B_Tehotason ja ajastimen asetusalue pylväskaavion
kanssa (B1)
C_Tehostinnäppäin
D_Taukonäppäin ja merkkivalo (D1)
E_Keittoalueen valinta ja tehotason näyttö
F_Ajastimen valintanäppäin ja ajastinnäyttö sekä merk-
kivalo keittoalueelle (F1 - F2- F3 - F4)
• Keittotason kytkeminen PÄÄLLE/POIS:
Kytke kosketussäädin päälle painamalla ON/OFF-
näppäintä [A-näppäin], sitten näytön [E-alue] näyttää
staattisena . Jos keittoalue on edelleen kuuma, näytöllä
vuorottelee sekä H ja näyttö vilkkuu.
Keittotaso pysyy aktivoituna 20 sek., jos ei tehdä
keittoalueen tai ajastimen valintaa kyseisessä ajassa (20
sek.), komento resetoituu automaattisesti valmiustilaan
ja keittotaso antaa äänimerkin.
Jos lapsilukko on aktivoitu päälle kytkettäessä, kaikilla
keittoalueilla näkyy L
Keittotaso voidaan sammuttaa aina painamalla ON/
OFF [A-näppäin]. Tämä on voimassa myös, kun
kosketussäädin on lukittu.
• Keittoalueen kytkeminen PÄÄLLE/POIS:
Käyttäjä voi valita keittoalueen painamalla keittoalueen
valintaa [E-alue] ja vastaavan näytön valossa näkyy .
Keittotaso kytketään päälle ja sitten sitä säädetään
painamalla liukusäädintä [B-alue].
Haluttu keittotaso voidaan säätää liikuttamalla sormea
liukusäätimellä oikealle (lisätään lämpöä) tai vasemmalle
(vähennetään lämpöä) tai valitsemalla suoraan halutun
keittotason.
0 0
00
00
Kytke yksi keittoalue pois valitsemalla se ja asettamalla
keittotasoksi ; 10 sekunnin kuluttua kyseisen keittoalueen
[E-alue] näyttö sammuu.
Jos keittoalue on edelleen kuuma, näkyy vuorotellen
varoituskirjain H ja merkintä .
Pois kytkennän jälkeen näyttö on sammutettu ja vain jos
keittoalue on vielä kuuma, näkyy staattinen H
varoituksena.
Kaikki keittoalueet voidaan aina kytkeä pois nopeasti
painamalla ON/OFF [A-näppäin].
Valmiustilan aikana H näkyy kaikilla edelleen kuumilla
keittoalueilla, muiden alueiden näytöt ovat pois.
• Kattilan tunnistus:
Keittotasossa on kattilan tunnistusjärjestelmä, joka
sallii ilmaista käyttäjälle, että kattila ei ole valitulla
keittoalueella.
Aktivoi tämä toiminto valitsemalla keittoalue [E-alue] ja
keittotason arvo, joka on suurempi kuin [B-alue].
Mikäli ei tunnisteta kattilaa keittotasolla, näytetään
”kattila puuttuu” kuva keittoalueen näytöllä [E-alue].
Sen sijaan jos kattila on paikalla, keittoalueen näytöllä
näkyy 0.
• Tehostintoiminto:
Tehostin on lisäkeittotaso, jolloin tehotaso on korkeampi
rajoitetun ajan (5 minuuttia). Tämän toiminnon avulla
käyttäjä voi lämmittää kattilan erittäin nopeasti ja säästää
aikaa esim. vettä keitettäessä.
Aktivoi tehostin valitsemalla haluttu keittoalue [E-alue] ja
paina sitten tehostintoimintoa [C-näppäin].
Kytke toiminto pois muuttamalla tehotasoa [B-alue].
• Lämmitysautomatiikka:
Lämmitysautomatiikka on toiminto, jolla voidaan
lämmittää kylmä kattila täydellä kuumennusteholla
palaten haluttuun keittotasoon automaattisesti. Aika,
jonka kuluessa keittoaluetta lämmitetään täydellä
teholla, riippuu valitusta keittotasosta.
Aktivoi tämä toiminto valitsemalla keittoalue [E-alue]
ja sitten paina keittotasoa liukusäätimellä [B-alue]
vähintään 3 sek.
Aktivoinnin jälkeen näytetään välittömästi symboli A
vuorotellen keittotason arvon kanssa.
Alla osoitetaan lämmitysautomatiikan aika kullakin
tehotasolla:
Keittotaso Lämmitysautomatii-
kan aika (sek.)
1 48
2 144
3 230
4 312
5 408
0
0
0

18
Cooking level Heat-up Automatic
time (sec)
6 120
7 168
8 216
9 ei saatavilla
P ei saatavilla
• Siltatoiminto:
Silloittamalla 2 keittoaluetta luodaan yhteys 2 yksittäisen
keittoalueen välille niin, että niitä voidaan säätää ja
ne toimivat kuten yksi suuri keittoalue. Näin voidaan
käyttää astioita, joiden pohja on suurempi kuin
yksittäinen keittoalue. Tässä keittotasossa voit yhdistää
ensimmäisen ja toisen keittoalueen. (Katso alla olevaa
kuvaa)
Jos yhdistät nämä kaksi keittoaluetta, on noudatettava
seuraavia astiakokoja:
Jos siltatoiminto on päällä, tehostinta ei voi käyttää.
1
23
4
≤ Ø 190 mm
≥ Ø 230 mm
Aktivoi ja kytke pois tämä toiminto valitsemalla
samanaikaisesti molemmat keittoelementit [E1-E2-alue]
(Katso alla olevaa kuvaa)
Nyt yhdellä näytöllä näkyy ja toisella .
• Lämmitystoiminto:
Toimintoa käytetään ruuan pitämiseksi lämpimänä.
Lämmitystaso on välillä 0 - 1. Aktivoi lämmitystaso
valitsemalla alue [E-alue] ja tehotaso välillä 0 - 1
liukusäätimellä [B-alue]. Näytöllä näkyy :
Kytke toiminto pois muuttamalla tehokeittotasoa
kyseiselle keittoalueelle.
Jotta varmistetaan ruuan laatu ja mikrobiologisista syistä,
lämmitysajat on pidettävä niin lyhyinä kuin mahdollista.
Tämän toiminnon aikaraja on kaksi tuntia. Kyseisen ajan
kuluttua kosketussäädin kytkeytyy automaattisesti pois
valmiustilaan.
• Jälkilämpö:
Jos keittoalueen lämpötila on edelleen korkea (yli 65°)
sen pois kytkemisen jälkeen, vastaavalla näytöllä näkyy
H symboli (jälkilämpö). Symboli sammuu vasta, kun
palovammavaara poistuu.
• Lapsilukko:
Näppäimet voidaan lukkia, jotta niitä ei käytetä
vahingossa keittotasoa puhdistettaessa tai lasten
toimesta.
Sammuttaminen ON/OFF-näppäimellä on mahdollista
myös lukitussa tilassa.
Aktivoi toiminto painamalla E1-näyttöä [E1-alue] sekä
tehostinnäppäintä [C-alue] samanaikaisesti ja vapauta
sitten sekä paina E1-näyttöä [E1-alue] uudelleen.
Menettely on suoritettava 10 sekunnissa, koska muutoin
syöttö ei ole kelvollinen. Jos toimenpide onnistui, kaikissa
näytöissä näkyy L (vahingonomainen aktivointi estetty).
Jos keittoalue on vielä kuuma, näkyy L ja H vuorotellen
varoituksena.
Keittotaso pysyy lukitussa tilassa sen vapautukseen
asti, vaikka se sammutetaan tai kytketään irti
virransyötöstä. Lukitustoiminnon pois kytkemiseksi
lieden on oltava päällä. Paina E1-näyttöä [E1-alue]
sekä tehostinnäppäintä [C-alue] samanaikaisesti, ja
paina sitten uudelleen vain E1-näyttöä [E1-alue]. Jos
kaikki vaiheet on tehty oikein 10 sekunnissa, lukitus
peruutetaan ja keittotaso siirtyy valmiustilaan. Muutoin
voidaan painaa vain ON/OFF-näppäintä sammutusta
varten ja menetelmä on toistettava. Keittotaso kytketään
uudelleen päälle painamalla ON/OFF ja näytetään 0,
nyt käyttäjä voi aloittaa keittämisen.
0 0
00
00
E1
E2
U
U
Kytke toiminto pois muuttamalla tehotasoa.

19
• Ajastin:
On kaksi eri ajastinvaihtoehtoa:
• Itsenäinen ajastin
• Keittoalueen ajastimet
Kullekin keittoalueelle on käytettävissä yksi ajastin ja
lisäksi on saatavilla yksi itsenäinen ajastin. Ajastimia
voidaan käyttää rinnakkain. Asetettava maksiaika on 99
min. ja alle 1 min. aika osoitetaan sekunneissa.
Itsenäinen ajastin toimii kuten munakello. Aktivoi
toiminto varmistaen, ettei yhtään keittoaluetta ole valittu,
ja paina sitten ajastimen valintanäppäintä [F-alue], ja voit
asettaa ajastimen arvon liukusäätimellä [B-alue].
Kytke toiminto pois asettamalla ajastimen arvoksi tai
painamalla ON/OFF-näppäintä [A-alue] kahdesti.
Keittoalueen ajastimilla voidaan kytkeä pois
automaattisesti keittoalue, kun asetettu aika on kulunut.
Aktivoi toiminto valitsemalla
vastaava keittoalue käyttämällä E1 - E2 - E3 - E4
näppäintä [E-alue], tämän jälkeen aseta tehotaso (yli 0)
ja paina sitten ajastimen valintanäppäintä [F-alue]. Sitten
voit asettaa ajastimen arvon liukusäätimellä [B-alue].
Mikäli ajastin asetetaan eikä mitään keittoaluetta
aktivoida 10 sekunnin kuluessa, näytöt [E-alue]
sammutetaan.
Toiminnon pois kytkemiseksi aseta ajaksi 0tai sammuta
vastaava keittoalue (valitse keittoalue E-alueella ja siirrä
liukusäädin B-alueella asentoon 0). Jos ajastimen aika
loppuu, käynnistyy hälytystila. Hälytys voidaan lopettaa
millä tahansa näppäimellä.
• Taukotoiminto:
Aktiivisen taukotoiminnon aikana ei toimiteta tehoa ja
kypsennystoiminto keskeytetään.
Kun jokin keittoalue on aktiivinen, kuumennuselementit
voi sammuttaa painamalla taukonäppäintä [D-alue]
vähintään 1 sek. ja näytöllä näkyy seuraava symboli: II .
Ohjelmoidut ajastimet (myös itsenäinen ajastin)
pysäytetään eivätkä ne jatka toimintaansa tauon aikana.
Lämmitysautomatiikka ja tehostintoiminto kytketään
myös pois kaikilta keittoalueilta tauon aktivoinnin aikana.
Sen sijaan jälkilämpö: ja käyttöajan rajoitus jatkuu eikä
niitä keskeytetä.
Kyseinen toiminto voidaan aktivoida myös, jos tapahtuu
keittoaluekohtainen virhe, mutta jos tapahtuu yleinen
virhe taukotilan aikana, keittotaso kytkeytyy pois päältä.
Taukotila voi jatkua enintään 10 minuuttia, ja sitten
keittotaso sammuu automaattisesti.
Näiden 10 minuutin (maks.aika) kuluessa keittotaso
voidaan sammuttaa aina ON/OFF-näppäimellä [A-alue].
Kytke pois taukotila painamalla taukonäppäintä [D-alue]
ja sitten mitä tahansa muuta näppäintä (ei samaa
uudelleen) vähintään 10 sek. Näin palautat taukoa
edeltävät olosuhteet.
Taukotilan merkkivalo [D1-alue] palaa, kun taukotila
on aktiivinen, ja se vilkkuu kahdessa tapauksessa:
odotettaessa toisen näppäimen aktivointia sekä
palautustoiminnon ollessa mahdollinen päälle
kytkettäessä.
• Palautustoiminto:
Toimintoa käyttämällä voidaan palauttaa asetukset
nopeasti, kun keittotaso sammutettiin käyttämällä ON/
OFF-näppäintä [A-alue] vahingossa.
Palautettavissa olevat tiedot:
• aikkien keittoalueiden keittotasot
• Aktiiviseen keittoalueeseen liittyvien ajastimien
minuutit ja sekunnit
• Lämmitysautomatiikka: ja
• Tehostintoiminnot Lapsilukko
• Silloitetut alueet
• Käyttöajan rajoitus [Automaattinen sammutus]:
Käyttöajan rajoitus on lisäturvaominaisuus, joka
kytkee keittoalueen POIS tietyn ajan kuluttua, kun
käyttäjä ei suorita mitään toimenpiteitä kyseisellä
keittoalueella. Aika, jonka kuluttua keittoalue kytketään
POIS, ilmoitetaan alla olevassa taulukossa. Jokainen
käyttäjän toimenpide kyseisellä keittoalueella resetoi
aikarajoituksen.
Keitto-taso Käytön maksimiaika
(h)
Varoitustaso 2
1 6
2 6
3 5
4 5
5 4
6 1.5
7 1.5
8 1.5
9 1.5
P 5 min.

20
Tietoja kodin sähköisistä keittotasoista
asetuksen (EU) N:o 66/2014 mukaisesti
Mallin nimi/ tunniste Eico 60 Fusion IF
Keittotason tyyppi kiinteä
Keittoalueiden ja/tai vyöhykkeiden määrä 4
Kuumennustekniikka
Induktiokeittoalueet ja keittovyöhykkeet, säteilevät keittoalueet.
1. = Induktio
2. = Induktio
3. = Induktio
4. = Induktio
Pyöreät keittoalueet: keittoalueen hyötypinta-alan halkaisija/mm Muut kuin
pyöreät keittoalueet tai vyöhykkeet: sähköisen keittoalueen tai vyöhykkeen
hyötypinta-alan pituus ja leveys
1. = Octa
2. = Octa
3. = Ø 160
4. = Ø 200
Kunkin keittoalueen tai vyöhykkeen energiankulutus per kg (ECelectric cooking) 1. = 189,7
2. = 189,7
3. = 179
4. = 193,3
Kunkin keittotason energiankulutus, laskettu per kg (ECelectric cooking) 187,9
1
23
4
Eico 60 Fusion IF
Energiansäästöneuvoja
Keittotasoille
• Tarpeettoman lämmönkulutuksen välttämiseksi valmista ruoka aina kannellisessa keittoastiassa, mikäli
mahdollista.
• Valitse pieni kattila pienille annosmäärille. Pieni kattila kuluttaa vähemmän energiaa kuin suuri kattila.
• Keitä mahdollisimman vähän vettä.
• Pienennä lämpötasoa heti, kun se on mahdollista kiehumisen tai ruskistamisen jälkeen.
• Lyhennä keittoaikaa painekattilaa käyttämällä.
mm
Wh/Kg
Wh/Kg
Table of contents
Languages:
Other Eico Cooktop manuals
Popular Cooktop manuals by other brands

Whirlpool
Whirlpool GJM3040 Use & care guide

Volkswagen Zubehör
Volkswagen Zubehör 9620009563 Installation and operating manual

Kleenmaid
Kleenmaid CH311XFF Instructions for use

IKEA
IKEA BRANNPUNKT manual

Frigidaire
Frigidaire FGEC3645PS Dimension and installation guidelines

Cuisinart
Cuisinart ICT-60 user manual