Elari NanoPods 2 User manual

USER MANUAL
Wireless Headphones
Model: NPS-2
EN | RU
2
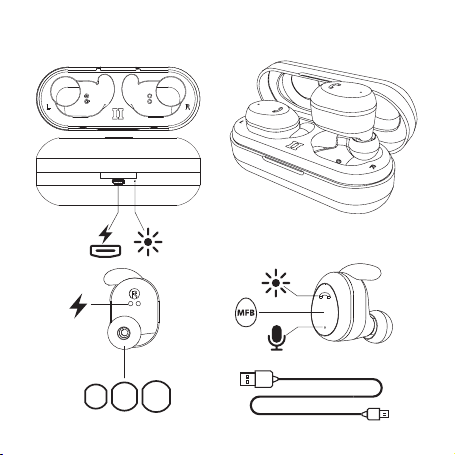
Components and Controls
2
S M L

3
Thank you for choosing ELARI NanoPods 2.
Before operating the device, carefully read this manual and keep it
for future reference.
To take full advantage of the device and to extend its service life, it
is recommended to read the complete User Manual, available for
download: www.elari.net/support, www.help.elari.net.
The exterior and software of your device may dier from the
pictures in this manual as all illustrations are based on prototypes.
The company shall not be made liable for any damage caused as the
result of any misuse of the device.
In order to ensure the continuous improvement of our devices, we
reserve the right to implement any changes to the design, software,
and technical specications of the device, without any prior notice
to the user. Please see all up-to-date information at www.elari.net.

4
Technical Specications
Bluetooth v 5.0 +EDR+BLE+Dual mode
Bluetooth Prole A2DP, HFP, HSP, AVRCP, SPP
Supported Audio Codecs AAC, SBC
Bluetooth range from Device Up to 10 m
Frequency Range 20 Hz~20 kHz
Impedance 16Ω (@ 1 kHz)
Sensitivity (S.P.L) 90±3 dB (@ 1 kHz)
Earphone Driver Size Ø10 mm
Microphone Input Sensitivity -42 dB (±3 dB)
Battery Capacity of the
Earphones
Li-Ion 50 mAh, 3.7 V
Battery Capacity of the Case Li-Ion 250 mAh, 3.7 V

5
Playback/Talk Time Up to 4.5 hrs
Standby time Up to 80 hrs
Charging Time ~2 hrs
Weight of the Earphone 6.3 g
Weight (Earphones + Case) 42.5 g
First time use
Remove the protective lm from the device.
Before the rst use, charge the case and earphones via a USB cable for
at least 30 minutes. During this procedure, it is not recommended to
remove the earphones from the case.
Charging the Case
• Plug the case with the earphones inside to the power source using
the included micro USB cable*. The charging case LED indicator will
blink red while charging. When the case is fully charged, LED indicator
will stop blinking and switch to steady red light if plugged to the
power source.
* Power adapter is not included. We recommend to use the power
adapter with following specications: 5V, 0.5A max (e.g. ELARI

6
PowerPort). Using alternative power source (e.g. PC) instead of the
power adapter can lower the charging speed due to lower amperage.
• A fully charged earphone case can provide 4 cycles of a full charge to
the earphones if the power source is disconnected.
Charging the earphones
Check L/R markings on each earphone and plug them into the case
according to the markings. Charging will begin automatically.
Earphones’ indicators ash red while charging, charging case LED
indicator ashes steady white. If the LED indicators don’t light up
when earphones are placed in the charging case, plug the charging
case using the included micro-USB cable to the power source.
The charging case will start charging itself and the earphones
simultaneously. Charging case’s LED indicator will ash red. When
earphones are fully charged, their LED indicators will switch to white
for 1 minute and then turn o.
Turning on and pairing the earphones
Earphones automatically turn on when removed from the charging
case.
If the charging case is discharged, the earphones will have to be
turned on manually. Press and hold the multifunctional button on
both earphones for 3 seconds until you hear the voice notication

7
“Power On”in both earphones.
When turned on, earphones automatically switch into the
synchronization mode to sync themselves between each other. You
will hear «NanoPods connected» in each earphone after successful
sync, «Right channel» in the right earphone and «Left channel» in
the left earphone. After that, you will hear the «NanoPods pairing»
notication in the right earphone and the earphones will switching
into pairing with external Bluetooth device mode.
After successful syncing and connecting to an external Bluetooth
device, ELARI NanoPods 2 earphones work using TWS (True Wireless
Stereo) technology. The right earphone acts as a master device that
receives the signal from the source and then sends it to the left
earphone.
If the left earphone «ELARI NanoPods 2-L» is turned on separately,
it will enter the synchronization state awaiting the right earphone
connection for 30 seconds. If the right earphone is not found, it will
connect to the paired external Bluetooth device on itself.
WARNING: for the stereo sound to work the earphones should rstly
be synchronized between themselves by removing them from the
case. The successful synchronization will be indicated by «NanoPods
connected» sound notication in both earphones. After that, the
earphones will be ready to be connected to an external Bluetooth
device (smartphone, tablet, laptop, etc.).

8
Connecting the earphones to the external
Bluetooth device
1. Open the Bluetooth settings on your device and search for
Bluetooth devices.
2. Choose «ELARI NanoPods 2» from the list of found Bluetooth
devices.
You will hear «Pairing successful» in the right earphone upon
successful connection.
In order to force the earphones to switch to the Bluetooth pairing
mode, remove the earphones from the case, make sure that the
earphones are o, press and hold multifunctional button on
each earphone for 5 seconds until you hear «NanoPods pairing»
notication and LED indicator starts blinking white and red. Follow
steps 1-2 afterwards.
You can use each earphone as the separate mono sound device. In
order to do so, connect «ELARI NanoPods 2-L» or «ELARI NanoPods
2» to the external Bluetooth device separately (without pairing step
beforehand).
NOTE:
ELARI NanoPods 2 remember the previously connected devices. After
turning on, the earphones automatically establish connection to the
previously connected devices given that they have Bluetooth turned

9
on and the earphones are in range of the Bluetooth signal.
Upon pairing the earphones to the Android/iOS devices the battery
charge level indicator will be displayed in the status bar next to the
Bluetooth connection indicator. If both (left and right) earphones are
connected, the charge level of the right earphone will be displayed.
If the earphones run out of charge during call, the call will be
redirected to the smartphone.
Turning the earphones o
Place the earphones into the charging case* or press and hold the
multifunctional button on any earphone for 3 seconds.The earphones
will turn o and you will hear «Goodbye» in the both earphones.
*If the charging case is out of charge, the earphones should be turned
o manually.
Automatic shutdown
In order to save charge, the earphones will be automatically turned
o:
• If the earphone is not connected to another earphone or smartphone
for more than 3 minutes (for the right earphone) or more than 5
minutes (for the left earphone) and the multifunctional button is not
pressed.
• If the battery charge level is low.

10
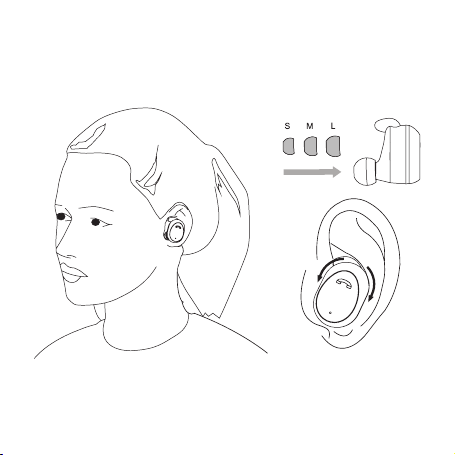
Changing and installing ear tips
To ensure comfortable usage and best sound it is necessary to
appropriately choose the ear tip size. Try all the included ear tips and
choose the most suitable size.
To make sure that your choice is correct try to say something loudly
when wearing the earphones. Your voice should sound mued in
both ears.
1. Holding the earphone, gently pull on the edge of the installed ear
tip and remove it from the earphone.
IMPORTANT: when installing, don’t pull the ear tip with excessive
force. It can break.
2. Install the ear tip on the locking groove with is located on the
bottom side of the earphone.
3. Repeat the procedure for the second earphone.
IMPORTANT: in order to avoid damage to your ear canal do not use
the earphones without ear tips.
11
Wearing the earphones
Install the appropriately sized ear tips to the earphones. Put ELARI
NanoPods 2 in, turning them left and right so that the earphones will
be comfortable placed in the ear canal.
WARNING: To avoid hearing impairment use the earphones set to the
medium comfortable volume level. Before putting the earphones on
turn the device’s volume down and the slowly increase it to reach the
comfortable volume level.

12
Music:
Playing music/pausing*
* Playing/pausing is done
on the player that is set as
default in the device’s OS
if another application is
not playing anything (e.g.
YouTube). Turning the player
on in the background should
be allowed in the device’s OS
Shortly press the multifunctional
button (hereinafter – MFB) on any
earphone.
Phone calls:
Answering/ending the call Shortly press the MFB on any
earphone.
Declining the incoming call Press and hold the MFB on any
earphone until you hear the
sound cue.
Earphone’s functioning and multifunctional
buttons

13
Redialing the last number Press and hold the MFB for
1 second. This will not work
during active phone call or when
establishing connection.
Extra:
Activating voice assistant**
**This function is not
available when in phone call
mode.
To use a voice assistant (Siri
for iOS/ Google Assistant for
Android), shortly press MFB two
times on any earphone.
Changing the voice
messages language
Hold the MFB for 5 seconds on
the right earphone while it is
turned o to enter the pairing
mode. Earphone’s LED indicator
should ash white and red. Then
double press the MFB.
Checking the battery charge
level of the earphones
Battery charge level will be
displayed on the upper part of
the screen of your mobile device.

14
LED earphone indicators
When charging in case
Steady red light Earphones’ battery is charging
Light turned o Earphones’battery is fully
charged
When using the earphones
Blinking red (once in 5
seconds) in conjunction
with «Low Battery» sound
notication
Low battery charge level
Blinking white and red Earphones are in pairing mode
Blinking white (once in 5
seconds)
Earphones are connected to an
external Bluetooth device

15
LED charging case indicator will turn on every time you open the case
and when the case is connected to the power source.
Potential Failures and Troubleshooting
Are you encountering any diculties while connecting or using the
earphones?
1. Make sure your earphones are charged. Charge earphones before
using them.
2. Make sure that the earphones and an external Bluetooth device
are within 10 m of each other. The range may vary depending on the
LED charging case indicator
Blinking red light Case is connected to the power
source, charging case’s battery
is charging
Steady red light Case is connected to the power
source, charging case’s battery is
fully charged
Steady white light Case is disconnected from the
power source, earphones are
charging from the case

16
Failure Troubleshooting
Earphones don’t
turn on
Check the earphones’charge level. In order
to charge the earphones, place them into
the charging case.
environment. Obstacles and electromagnetic interferences can aect
performance.
3. Increase the sound level on your mobile device.
4. Place the earphones in the charging case, reboot the mobile device,
pair and connect the earphones following the steps listed in this user
manual.

17
Earphones are
not synchronized/
Sound can’t be
heard from one
earphone
Follow the outlined procedure:
1. Remove ELARI NanoPods 2 from the list
of the Bluetooth device on your device.
Turn o Bluetooth on your device.
2. Place the earphones in the charging
case, reboot your device.
3. Remove the earphones from the case.
Wait for the «NanoPods connected. Right
channel, Left channel, NanoPods pairing»
sound notications.
4. Turn the Bluetooth on your device
afterwards and choose «ELARI NanoPods 2»
from the list of discovered Bluetooth
devices. Wait for the «Pairing successful»
sound notication in the right earphone.

18
Earphones do not
connect to the
device
1. Make sure that the device has Bluetooth
turned on.
2. On the device:
• Turn the Bluetooth o and on;
• Remove ELARI NanoPods 2 from the list of
the Bluetooth devices. Repeat the pairing
procedure.
3. Move the device away from the potential
sources of interference and close to the
earphones.
4. Put the earphones into case, reboot
the device and repeat the pairing and
connecting procedure following the steps
listed in this user manual.

19
Earphones’ battery
canot be charged
1. Make sure that earphones are correctly
placed inside the charging case.
2. Make sure that the charging contacts on
the earphones and the case are clean from
dirt and touch each other.
3. Make sure that the charging case’s
battery is charged. Charge it if needed.
4. In case of exposal to low or high
temperatures, please wait until the
temperature of the devices reaches
room temperature and try to charge the
earphones again.
Charging case’s
cannot be charged
1. Make sure that the charging cable is
securely and rmly connected to the
charging port (on the both ends).
2. Make sure that charging cable is in
working condition.
3. Make sure that the charging device
is in working condition and meets the
recommended technical characteristics.
4. Make sure that the power supply is
working.

20
No sound 1. Using the device’s screen, make sure
that the device plays a music track/outputs
sound and it is not paused.
2. Make sure the earphones are charged.
Charge them if needed.
3. Turn the playback volume up on the
device.
4. Make sure that the earphones are
connected to your device.
5. Move the device away from the potential
sources of interference and close to the
earphones.
6. Try to play another audio le.
7. Pair to another device.
Poor sound quality 1. Make sure that the earphones are
correctly placed in ears.
2. Try to choose another audio le
3. Pair to another device.
4. Move the device away from the potential
sources of interference and close to the
earphones.
5. Clean the ear tips and the earphones (for
directions head to «Care tips»).
This manual suits for next models
1
Table of contents
Languages:
Other Elari Wireless Headphones manuals


