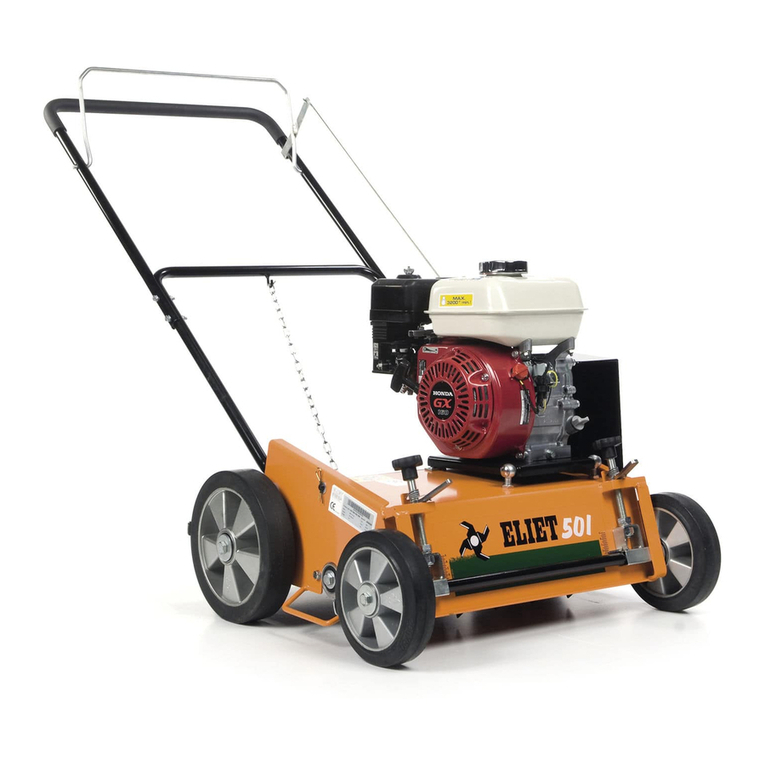
Eliet E750 User manual

MANUAL
E750

• When irregularities occur, always switch offthe
engine and check the knives for defects.
1.2 Symbols
used
3
The listbelow lists all symbols used on the machine.
~
Always
read the manual attent;vcly.
• Always wea< safety goggles
(i)
Always wear
ear
mumen
e
-Always wear working gloves
Keep your hands away from the
rotating knife
• When maintaining the machine always switch
off
the
engine and remove the
spark
plug cable.
ELIE'I'
Scarifier type 750

4
2.
General provisions and functions
Eliel scarifier is a machine which removes moss
and
other plants from your lawn.
It
consists
of
the following parts:
• Frame
• Knives and drive
• Adjustment
• Push shackle with control handle
In the sections below you will find a description
of
the different parts.
2.1 Frame
The frame carries all parts. The wheels are mounted
at
the side
of
the frame. The engine is mounted on the
frame and the knives are covered
by
the fran1e.
2.2
Knives
and
drive
The engine is mounted
on
the frame. A V-belt
transmission drives the cutter spindle. The engine can
be
an
electrical engine as well as a combustion engine.
The engine will always revolve
at
a maximum speed
so no speed regulation is foreseen.
The cutter spindle which is mounted under the frame,
can consist
of
fixed knives, individual knives or
double-cut knives.
2.3 The adjustment
The depth can be adjusted at the front side
of
the
scarifier. The wheels are moved upwards
or
downwards with the heigth adjustment foreseen.
.
-,
•,
."f
.-.-.t.~
..
/
2.4 The push shackle
and
controlhandle.
The push shackle, fixed
at
the back
of
the scarifier, has
on top a handle to control the drive. When pulled, the
V-belt is tightened. When released, the cutter spindle
stops.
I~LIJrl'
Scarifier type 750

5
3.
Technical specifications
Working
width
75 em
fixed knives
25
knives - 3 mm tl1ick
types
of
knives surfaced with stellite
by
welding
individual knives 46 knives -2.5
rom
thick
types
of
knives surfaced with stelliteby welding
fixed withnylon hinge point
distance between knives
25
rnm
wheels rubber tires
on
aluroium rims with industrial ball
bearings
depth
adjustment
stepless quick-lock system
depth
blocking with automatic blocking
belt
tension vertical
push
shackle floating
weigth 0 79
kg
engine options B & S
Vanguard-
9 HP
Honda
GX
270-
9 HP
Kubota GH 250
max
speed 3200
rpm
I~LIE'I'
Scarifier type 750

6
4. Moving the machine
To be able to use
the
scarifier, the knives have to be situated deeper
than
the
wheels (see chapter 5B).
To
move the
machine, following steps have to
be
followed :
1.
Switch
off
the engine.
2.
Push
the
push
shackle downwards so
that
the front wheels
are
lifted 10
em
from
the ground.
3. Move the scarifier.
4.
Put
the scarifier down
on
the
lawn
.
5. Start the scarifier.
&Attention: Not following the above-mentioned instructions can damage knives and subsoil.
5. Put the scarifier into use
5.1 First use
Scarifiers with a combustion engine are always delivered without oil
or
petrol. Fill
it
up with good engine oil
of
the
type SAE 20-40 Fill also
the
petrol
tank
with unleaded petrol (see engine manual).
/f\
Att 0. N k
· ·
LW
en
on
: ever smo e
when filling up the petrol
tank
.
5.2 Adjustment for operation
Before the scarifier
can
operate
the
correct depth
of
the knives has to be adjusted.
The
way to adjust depends
on
the
type
of
scarifier :
eAlways wear working gloves
1.
Switch
off
the engine.
2. Remove
the
spark
plug
cable from
the
engine (see
engine manual).
3. Place the machine
on
a flat surface (concrete,
asphalt,...)
e
4.
Rotate
the
V-belt manually till the tops
of
the
knives reach their lowest point.
It
is possible that
the front wheels will
be
lifted.
5. The distance from the front wheels to
the
ground
determines the depth
of
knives for operation
6. Pull the handle
of
the
blocking system so
that
the
starlike button
can
be turned.
7.
Tum
the starlike button to move
the
wheels
upwards
or
downwards :
tum
left : draw in the kniv
es
or
work less deep.
turn right : push
out
the knives
or
work deeper.
Humid
period
s:
adjust the depth
of
the knives
at
5
mm.
Dry
periods : adjust the depth
of
the knives
at
2
mm.
8. Release the
handle
of
the blocking system so that
the
starlike button is secured.
9.
Put
the spark
plug
cable back
in
place.
When
the
starlike button comes too close to the frame
and
the frame upfront nearly touches the ground (1 to
2 em),
the
back wheels have to
be
heightened.
(It
will
be
harder
to
push
the
machine forward).
1.
Loosen the bolt
and
the concerning nut.
2. Position the wheel one hole upwards
and
secure
it
with
the bolt
and
the concerning
nut
.
3. Move the front wheels downwards by turning the
starlike button to
the
left.
4. Release the
handle
of
the blocking system so that
the starlike button is secured.
5.
ELIE
'I'Scarifier type 750

7
5.3 Starting the machine.
Before using the machine, always follow
the
steps below.
Place the machine on the grass.
(i)
1.
Start the engine (do not pull the control handle). See engine manual.
2. Push the push shackle downwards.
3. Pull the handle towards you and let the knives go to full speed.
4. Slowly lower the front wheels so that the knives cut
in
the grass.
5. Slowly push the scarifier forward.
6.
Using the scarifier.
Using the scarifier is
just
like using a lawn mower.
One
walks through the lawn
in
one direction. When neccessary,
one can walk through the lawn for a second time but
then
in
cross-direction.
During operation
it
can
be necessary to adjust the depth again. Follow the instructions described
in
chapter 5.
& Always
make
sure
that
the
knives
do
not
hit
stones
or
hardened
subsoil.
This
can
seriously
damage
your
knives.
A\AJ
. .
~
ways
wear
protective clothes
and
ear
protection.
7.
Stopping and storing the machine.
7.1
Stopping
After finishing the
job
the scarifier has to be switched off. Therefore, follow the instructions below :
1.
Push
the
push shackle downwards so
that
the
5.
Tum
the knives
in
so that the scarifier can be
knives -while rotating -come out
of
the
grass. moved on
hard
ground without the knives touching
2. Push the scarifier a little bit further away so that no the bottom. (see chapter 5).
moss remains on the knives. 6. Note down the operating hours.
3. Release the handle while the knives are still above 7. Compare the operating hours with the maintenance
the grass. table
and
do the necessary maintenance work.
4. Let the knives come to a standstill.
7.2 Storing
Before storing, following steps have to be taken :
1.
Do the necessary maintenance work, including cleaning.
2. For a winter stop all petrol has to be removed from
the
tank
and
the engine.
3. Let the engine run till
it
stops by lack
of
petrol.
4. Place
the
engine horizontally.
ELU'I' Scarifier type 750

8
8.
Maintenance
The rules
of
true workmanship are always to be observed during maintenance. Whenever something is unclear, consult
your dealer or constructor.
8.1 Maintenance table
action
after
the
first
10
hours
engine
oil level engine
checking
rJ
changing
air
filter
cleaning
lubricating
V-belt
knives
general check-up
cleaning
8.2
Procedures
1.
ENGINE:
The maintenance
of
Ute
engine
is
described in detail in
the engine manual.
2.
OIL
LEVEL
OF
THE
ENGINE :
Checking : As described in the engine manual, the oil
level has
to
be checked.
If
necessary the suitable oil
of
the type SAE 20-40 has
to
be added.
Changing : The engine oil has
to
be changed after the
first
10
hours and after 25 hours. Follow the
instructions
in
the engine manual. Use oil
of
the type
SAE 20-40.
3.
AIR
FILTER:
Cleaning : After
25
hours
of
operation the air filter
has to be cleaned. The procedure to be followed is
described in the engine manual.
4.
LUBRICATION:
After every operation the parts have to be lubricated.
Clean the scarifier before lubrication. Following parts
are to be lubricated :
• wheels
• control cable
• adjusting screws
after
operation
after
10 hours
after
25 hours
rJ
rJ
rJ
rJ
fj
rJ
fj
fj
fj
rJ
rJ
• bearings
of
the cutter spindle with penetrating
oil
5.
V-BELT:
After some time the tension on the V-belt can lessen.
Depending on the type
of
scarifier, following
procedures have to be followed :
1.
Switch offthe engine and remove the spark plug
cable from the engine.
2. Dismount the cover(39)
by
loosening the bolts (38).
3. Loosen bolt (24) so that the cable (59) is loosened.
4. Push the V-belt tensioner against the V-belt.
5. Tighten the cable (59).
6. Secure the cable with the bolt (24).
7. Remount the cover.
8. Refix the spark plug cable.
For changing the V-belt following procedure has
to
be
followed:
1. Switch offthe engine and remove the spark plug
cable from the engine.
2. Dismount the cover hood
by
loosening the bolts.
3.
Remove the V-belt from the pulley.
4. Mount the new V-belt.
5. Remount the cover.
6. Refix the spark plug cable.
ELIE'l' Scarifier type 750

9
6.
KNIVES:
The knives have to be checked on their effectiveness.
When replacement is necessary, following procedures
have to be followed :
flXetl knives :
1. Switch offthe engine and remove the spark plug
cable from the engine.
2. Loosen the cutter spindle from the frame by
loosening the bolts
of
the bearings.
3. Dismount the bearing
at
the side where there is no
V-pulley.
4. Remove the knives together with their distance
sleeve one by one from the spindle.
5. Mount new knives
in
the same way. Make sure that
the cutting edge points forward.
6. Remount the bearing
on
the shaft.
7. Mount the whole
on
the frame.
8. Refix the spark plug cable.
Individual knives :
Here you have the possibility to replace knives
separately.
It
is advisable to replace all knives
at
once.
Follow therefore the procedure below :
1.
Place the scarifier
on
its side, with the air filter
upwards.
2. Loosen the knives one
by
one by loosening the bolt
(60) and replace the knives.
3. Put the scarifier back
on
its wheels.
Double-cutknives :
Follow the same procedures as for fixed knives.
7.
GENERAL
CHECK-UP
After 10 hours
of
operation the scarifier has to be
checked for possible wear and defects. Check every
connection
and
hinge
point
Make sure that everything
is functioning perfectly.
8.
CLEANING:
Each time the scarifier has been used,
it
has to be
cleaned. Remove all dirt and remains
of
moss from the
engine and fran1e. Use therefore a hard brush. Avoid
as much as possible the use
of
water on the scarifier
ELIE'I'
Scarifier type 750

10
9.
Guarantee conditions
The Certificate
of
Guarantee consists
of
two
parts
:
The
Customer
Guarantee
Certificate
The
Manufacturer
Guarantee
Certificate
The
'Cu~1omer
Guarantee
Certificate'
is
strictly
personal
and
is to be held
in
the customer's possession. With this
certificate the manufacturer N.
V.
ELIET grants a
-one
year
guarantee
if
the machine is employed for
private
use.
-six months
guarantee
if
the machine is used professionally
or
leased.
The guarantee period starts with the date
on
which the machine is purchased. Guarantee claims are invalid
if
the
required guarantee procedure is not strictly followed.
The 'Manufacturer Guarantee Certificate' is to be sent to the below address.
On
signing this certificate the customer
confirms having received
and
understood the user's manual. The user is to follow the instructions included
in
the
manual. Non-observance
of
the instructions may cause unsafe situations. Each use exceeding the user manual requires
the manufacturer's written consent.
This guarantee however does not cover damage to parts that are subject to normal wear, i.e. : knives, belt, bearings,
closing piece, chain, chain wheels.
Each dismounting, alteration
or
addition
of
non-Eliet part renders the guarantee null and void. This also applies to the
damage due to non-observance
of
the use
and
maintenance rules included
in
the user's manual.
The manufacturer N.
V.
Eliet reserves the right to decide whether
or
not the customer has met the guarantee conditions
(be it a one year
or
a six months guarantee).
If
N.
V.
Eliet rejects the guarantee claim definitely,
it
will not pay any damages for repairs
or
compensate any costs
resulting from such repairs.
If
parts are replaced under guarantee, these new parts are covered during the original guarantee period (starting on
date
of
purchase).
Guarantee
procedure
-The complete certificate
of
guarantee (two parts) is to be filled out correctly
and
truthfully
on
the day
of
delivery.
-Both certificates are to be stamped by the dealer
and
to be signed by both the dealer
and
the customer
-The 'Manufacturer Certificate
of
Guarantee' is to be sent to the address mentioned
on
the certificate immediately
after delivery.
-In case
of
malfunction during the guarantee period the customer is to take the certificate
of
guarantee and his/her
machine to the dealer for inspection.
-The dealer
will
then send a guarantee claim
on
behalf
of
the customer to the manufacturer. (A copy
of
the certificate
of
guarantee is to be enclosed with the letter).
-The dealer is to dismount the defective part
and
send
it
to the below address.
-N.V Eliet
will
approve or reject the guarantee claim.
EUE1' Scarifier type 750

12
10.Table of maintenance
Date boures Total boures remarkes
EUE1' Scarifier type 750

EC-Declaration Of Conformity -
E750
Machine:
Type:
Model number:
SCAR
IF
YER
ELIET
E750
MA
009
010
207
MA
009
020
207
MA
009
030
207
The previously mentioned machine
has
been designed and manufactured to comply with the
following European
CE
regulations :
EN
13684
: Garden equipement -Pedestri
an
controlled lawn aerators and scarifiers -
Safety
ELIET
mfg.
cy.
hereby declares
that
after performing a hazard analysis, it
is
fully aware of
the potential hazards and risks associated with the machine.
In
this knowledge, the neces-
sary steps have been taken in line with Machine Directive 2006/42/EC in order to ensure
absolute operator safety for the operator, when the machine
is
used correctly.
The
value of the measured sound power level and the guaranteed sound power level were
obtained according the procedures set forward
in
the directive 2000/14/EG annex
111/B
clause
49
and directive
EN
13684.
Measured sound power level
LwA
:
94
dB(A)
Guaranteed A-weighted sound power level :
95
dB(A)
Date:
01/01/2011
Frederic
LIETAER
Managing Director
ELIET
EUROPE
NV
Date of birth: 02/01/1975
ELIET
EUROPE
NV
Diesveldstraat 2
BE- 8553 Otegem Belgium
Ph.
+32
56
77
70
88-
Fax
+32
56
77
5213

Eliet750.
xls
ELIET: GAZONVERLUCHTER 750 20-10-98
MACH.TYPE:
GV ELIET 750 REF.Nr.:40.052
Nr.
AANT.
PLAN
Nr./ART.Nr.
BENAMING
PRIJS
BTW
EXL.
500 I
40
.050 MONTAGEPLAN
AS
LOSS
EN
MESS
EN
0
501
I
40
.
051
MONTAGEPLAN AS DUBBELE CUT MESSEN 0
502 I
40
.049 MONTAGEPLAN
AS
VASTE MESSEN 0
0
I 2 6KT. TEGENMOER 0
2 2 1.323 OOGBOUT 0
3 2 1.322 LAGERBUS OOGBOUT 0
4 9 ZELFBORGENDE MOER 0
5
16
SLUITRING 0
6*
I
10
.
180
MOTORPLAAT-HONDA+BR&ST 0
6** I
10
084 MOTORPLAAT KUBOTA 0
7 I
MOTOR
0
8 4 6KT.TAPBOUT 0
9 I 1.803 REGELSTUK V-RIEM 0
10
2 STELSCHROEF 0
II
I 1.683 V-RIEMSCHIJF MOTOR 0
12
I SPIE AS
MOTOR
0
13
I
10
.174 DUWBEUGEL 0
14
I 1.
321
SUPPORT 0
15
5
6KTTAPBOUT
0
16
25
SLUITRING 0
17
2
BORGVEER
0
18
2 1.330 BUSJE EXCENTRIEK 0
19
I
10
.176 EXCENTRIEK MOTORPLAAT 0
20 I
10
.
173
DUWBEUGEL BOVEN 0
21
1
10
.
175
KOPPELINGSHENDEL 0
22 20 ZELFBORGENDE
MOER
0
23* I 1.680 REGELSTANG 0
23** 1 1682 REGELSTANG-HONDAMOTOR 0
24 I 1.325 ASJE RIEMSPANNER 0
25
2 ZELFBORGENDE MOER 0
26 2 1.327 LAGERBUS EXCENTRIEK 0
27
4
6KTTAPBOUT
0
28
2 BETASPELD 0
29 4 SLUJTRING 0
30 4 ZELFBORGENDE MOER 0
31
2 1.028 DUIM WIELEN 0
32
10
LAGE BOLKOPSCHROEF MET BINNENZESKANT 0
..,..,
I
10
.
182
AFSCHERMKAP 0
.).)
34 I I 678 KOPPELSTUK AFSCHERMKAP 0
35
2 1.679 OPSPANSTUK KOPPELSTUK AFSCHERMING 0
36 2 WIEL 0
37 2 SLUJTRING 0
38 2 6KT. SCHROEFBOUT 0
39 2 V-RIEM 0
Page
I

Eliet750.
xls
40 I
10
.
181
AFSCHERMKAP AANDRIJVING 0
41
2
6KTTAPBOUT
0
42 2 SLUITRING 0
43 2
WLEL
0
44 2 1.329 KLEM AS WIELEN 0
45 2 1.328 VEER 0
46 2 1.035 REGELSCHROEF 0
47 4 ZELFBORGENDE MOER 0
48 2 1.685 SUPPORT HOOGTEREGEUNG 0
49 I SPIE AS MESSEN 0
50 I 1.681 V-RIEMSCIDJF MESSENAS 0
51
I ZELFKLEVER ELIET 750 0
52 I 25.014 GESTEL 0
53
I 1.675
AS
WIELEN 0
54
1 ZELFKLEVER INSTRUKTIES 0
55
1 ZELFKLEVER MOTORSTOP 0
56 4
6KTTAPBOUT
0
0
0
0
Page2

/ 7 (
38
~..
~zl
·
---
---
....._---
---
---l
---------~-
------
·
ll
------
-l
I
---
1
I..._
i
___
GAZONVERLUCHTER
ELIET--750
ELIET
ZJEVEGEWSTRAAT
136
B-8553
OTEGEil
TEL:
056/77
70
88
P-40.052

ELIET
750:MONTAGEPLAN VASTE
MESSEN
10-09-911
MACH.TYPE /GV.ELIET750 REF.N
r.:P-40.049
Nr. AANT. PLAN Nr./ART.Nr.
BENAMING
PRIJS
BlW
EXL.
I I 6KT TAPBOUT MIO X 20 I 0
2 I SLUITIRNG 0
10
,5 X 0 40 X 3
3 I 1.022 KLEMRING 0
4 I 1.674 AS 0
5 .
24
1.015 TUSSENRINGEN 0
6
25
1.016 MESSEN 0
7 I 1.021 KLEMR.ING 0
8 I 1.023 MOER
9 2 1.082 AFSCHERMING I 0
10
2 FLENSKUSSEN 0
ELIET
750
:
AS
V
ASTE
MESSEN
ZWEVEGEMSTRAAT
136
B-8553
OTEGEM
TEL:
056/77
70
88
ELIET
P-40.049

ELIET
750
:
AS
LOSSE
MESSEN
ELIET
ZWEVEGEMSTRAAT
136
D-0553
OTEGEM
TEL:
056
77 70
88
P-40.050
ELIET
750
:
AS
DOUBEL
CUT
MESSEN
ELIET
ZWEVEGEMSTRAAT
136
D-0553
OTEGEM
TEL:
056
77
70
88
P-40.051

Elict7SO.xls
ELIET:MONTAGEPLAN
AS LOSSE MESSEN 20-10-9H
MACH.
TYPE
GV.ELIET
750 REF.N
r.:
P-40.050
Nr.
AANT.
PLAN
Nr./ART.Nr
BENAMING
PRIJS
BnV
EXL
I I
6KT
TAPBOUT
MIO X 20 0
2 I SLUITRING 0 10,5 X 0 40 X 3 0
3 2 FLENSKUSSEN 0
4 48
6KT
T
APBOUT
M8
X 20 0
5 I 1.022 KLEMRING ST 0
6 48 1033
TUSSENRING
MESSEN 0
7 48 1.030 LOS MES 0
8 48
6KTMOERM8
0
9 24 1.017
TUSSENRING
0
10
23 1.019
TUSSENRING
0
II
48 1.029
MESHOUDER
0
12
I 1.674 AS 0
13
I 1.021
KLEMRfNG
0
14
I 1.023
6KTMOER
0
15
2 1.082
AFSCHERMING
0
Elict750.xls
ELIET:MONTAGEPLAN
DUBBEL
CUT
MESSEN 20-I0-9H
l\fACH.TYPE :GV.ELIET 750
REF.N
r.:P-40.051
Nr.
AANT.
PLAN
Nr./ART.Nr.
BENAMING
PRIJS
BnV
EXL
I I 6 KT
TAPBOUT
MIO X 20 0
2 I SLUITRING
ERT
ALON0 10,5 X 0 40
X3
0
3 2 FLENSKUSSEN 0
4 I I 022 KLEMRING 0
5 I 1.674 AS 0
6 45 I 332 MESSEN 0
7 44 1.019
TUSSENRING
0
8 I 1.017
TUSSENRING
0
9 I I
021
KLEMRING 0
10
2 1.082 AFSCHERMING 0
I I I 1.023 ZESK. MOER 0

ELIET
750
:
AS
V
ASTE
MESS
EN
ZWEVEGEMSTRAAT
136
B-8553
OTEGEM
TEL:
056/77
70
88
ELIET
P-40.049

ELIET
750
:
AS
DOUBEL
CUT
MESSEN
ELIET
ZWEVEGEMSTRAAT
136
B-5553
OTEGE1!
TEL:
056/77
70
88
P-40.051

ELIET
750
:
AS
LOSSE
MESSEN
ELIET
ZWEVEGEMSTRAAT
136
B-8553
OTEGEM
TEL:
056/77
70
88
P-40.050
Table of contents
Other Eliet Lawn And Garden Equipment manuals
Popular Lawn And Garden Equipment manuals by other brands

Texas
Texas mini tex 200 instruction manual

Best Barns
Best Barns the Elm R Assembly Book

Conrad
Conrad Garden watch operating instructions

Yardistry
Yardistry YM11909 Installation and operating instructions

FITT
FITT YOYO Use and maintenance manual

Land Pride
Land Pride Skid Steer Quick Hitch SH35 parts manual