Elinz DCDUAL User manual
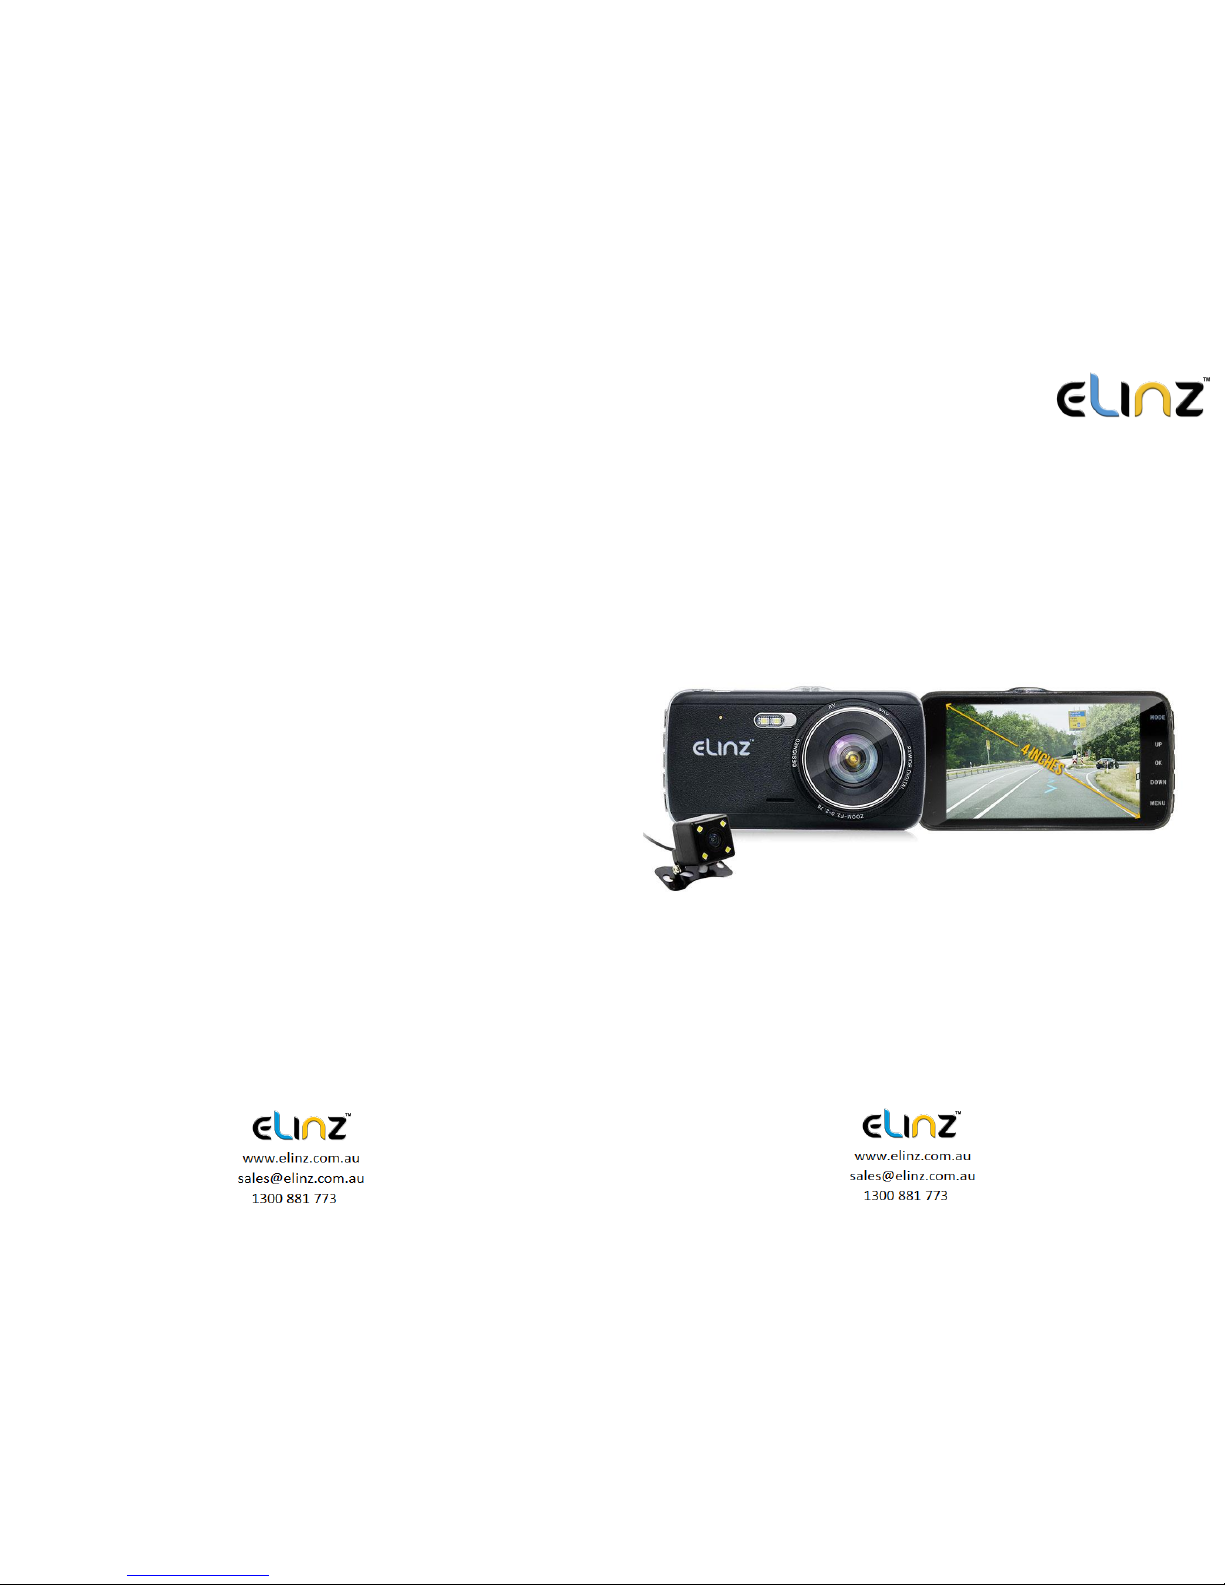
DCDUAL
USER MANUAL
This product uses a high performance chip, provides the high
definition video, dynamic images seamless. Support FHD1296P real
full HD video. Please read this manual carefully before using. We
hope that our products can meet your needs and provide a long-term
service to you.
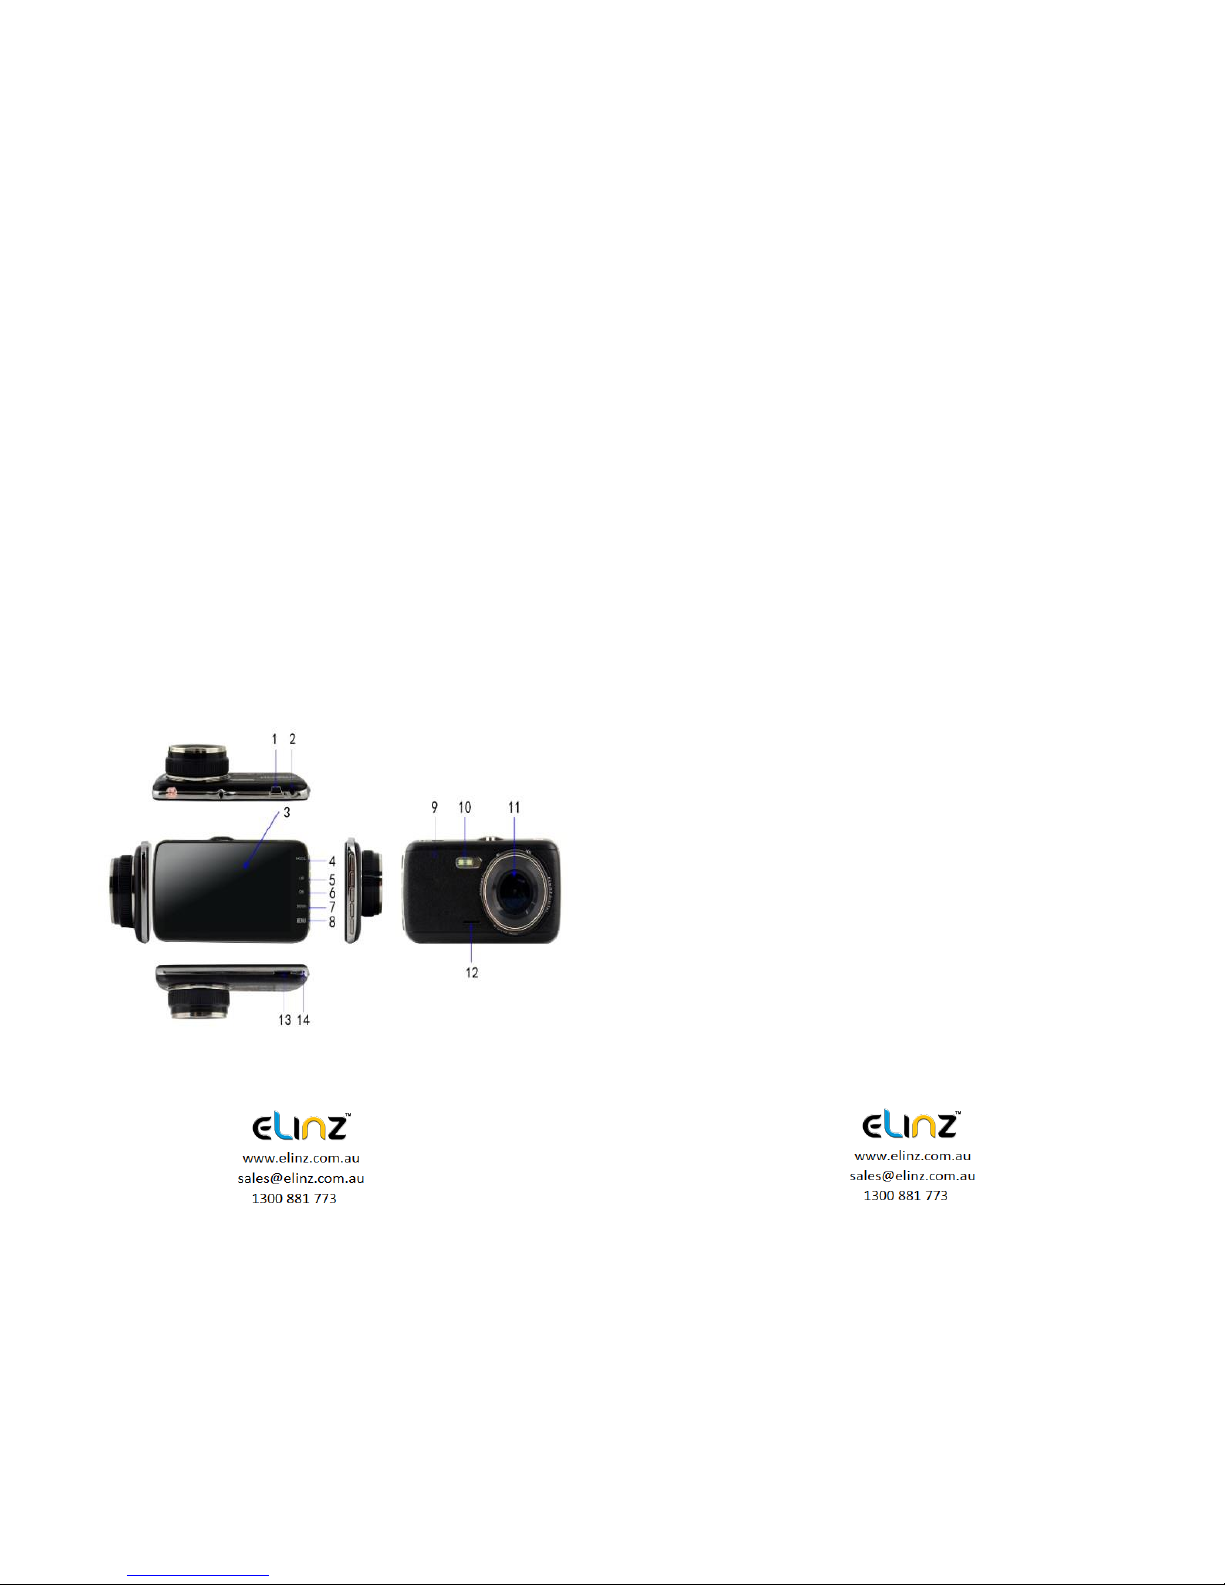
1. The appearance and keys function
description
1. USB interface 8. Menu key
2. Rear camera interface 9. Reset hole
3. 4.0 Inch display 10. White light lamp
4. Mode key 11. Front camera
5. UP key 12. Speakers
6. OK / Power key 13. TF card slot
7. Down turn key 14. Microphone
1. Power key
Function 1:Switch function
1. In the off state, press the power /OK button and hold for 3
seconds for the machine to start working automatically.
2. In the off state, press the power / OK button and hold for 3
seconds, the unit automatically shuts down and keep video files
and user settings switch.

2. MODE key
Function 1:Mode key
Press OK to pause the video recording, short press the Mode key,
the camera photograph/playback/video can be switched with each
other. In camera mode, press OK to take photo. In playback mode,
short press Menu to delete or protect the file, press UP and Down to
select the video/ photo for playback, short press OK to playback
video. In video mode, press OK to start recording.
Function 2:Emergency locking function
When recording, if you want to protect the current video from
being covered, short press mode key to start emergency locking
function, then on the top of the screen, will appear a lock file icon
which indicates that the current video is saved as a special file that
cannot be recycled or covered by another video.
3. Up Key
Function 1:Page Up
Press to use the scroll function in the menu settings and playback
modes.
Function 2:Camera switching function
When the reversing camera is connected to the dash cam, dual
cameras display will automatically show on the screen. Under
recording mode, short press 【Up】 button to switch between 4
types of display mode: Front camera only, Rear camera only,
Picture in picture, split screen display
Function 3:Zoom In
Under camera mode, short press the Up button for the lens to
zoom in.
Function 4:Rewind
In recovery mode, press the up key to rewind
4. OK key
Function 1:Enable / Disable recording function
In the video mode, press the Ok key to start recording and short
press the Ok key again to stop recording.
Function 2:Take photo
In camera mode, press the Ok key once to take a picture
Function 3:File playback

In the file explorer mode, press the Ok key to play video
Function 4:Confirm
Press OK to pause the video recording, press the Menu key to
enter the menu mode, press the up/down keys to navigate, press
the Ok key to determine
5. Down key
Function 1:Page down function
In the menu settings and playback mode for the next page function
Function 2:Close Recording
In the video mode, press [Down] key to turn off the audio recording
function, the screen above the microphone icon becomes ban,
indicating it had closed the audio recording function. Press again
to turn on the audio recording. The audio recording icon will be
displayed.
Function 3:Fast forward
In Playback mode, press [Down] key to fast forward
6. MENU key
Function 1:Video menu
Press OK to pause the video recording, press the [Menu key] to
enter the main menu function setting table. Press the [up/down]
key to select the option to be set. Press [Enter] to confirm. After
setting, press the Menu key until you exit the menu setup function.
(Menu setting methods are the same as in the video mode,
camera mode and playback mode)
Function 2:Open Led light
Long Press [Menu key] to turn on Led light, long-press [Menu key]
to turn off Led light again
2.
Installation Guide
1. Turn off your vehicle engine.
2. Insert the TF card into the recorder slot.
[Note] Please use the high-speed TF card (Class10 above),
capacity of not less than 8G. TF card can support up to 32GB.
3. The recorder is fixed to the front windshield of the car.
4. The car charger into the car cigarette lighter.

5. Extension cable charging the recorder's USB connector and car
charger is connected.
[Note] Reduces charging extension cord wiring can be laid along
the edge of the windshield.
6. The rear camera is installed in the rear of the vehicle. Pay
attention to the direction of installation. Wiring can be laid along
the vehicle roof. After the installation is complete you will plug into
the recorder rear camera interface.
7. Adjust the lens position to ensure that the lens levels with the
ground.
8. Start the engine and check if the machine has been installed
correctly.
[Note] When the machine is properly installed, the system
indicator lights will work; the machine starts to enter the recording
state and the recording indicator light flashes. Remember to check
if the display screen is normal. If not, please contact us.
Installation of wiring diagram suggested below.
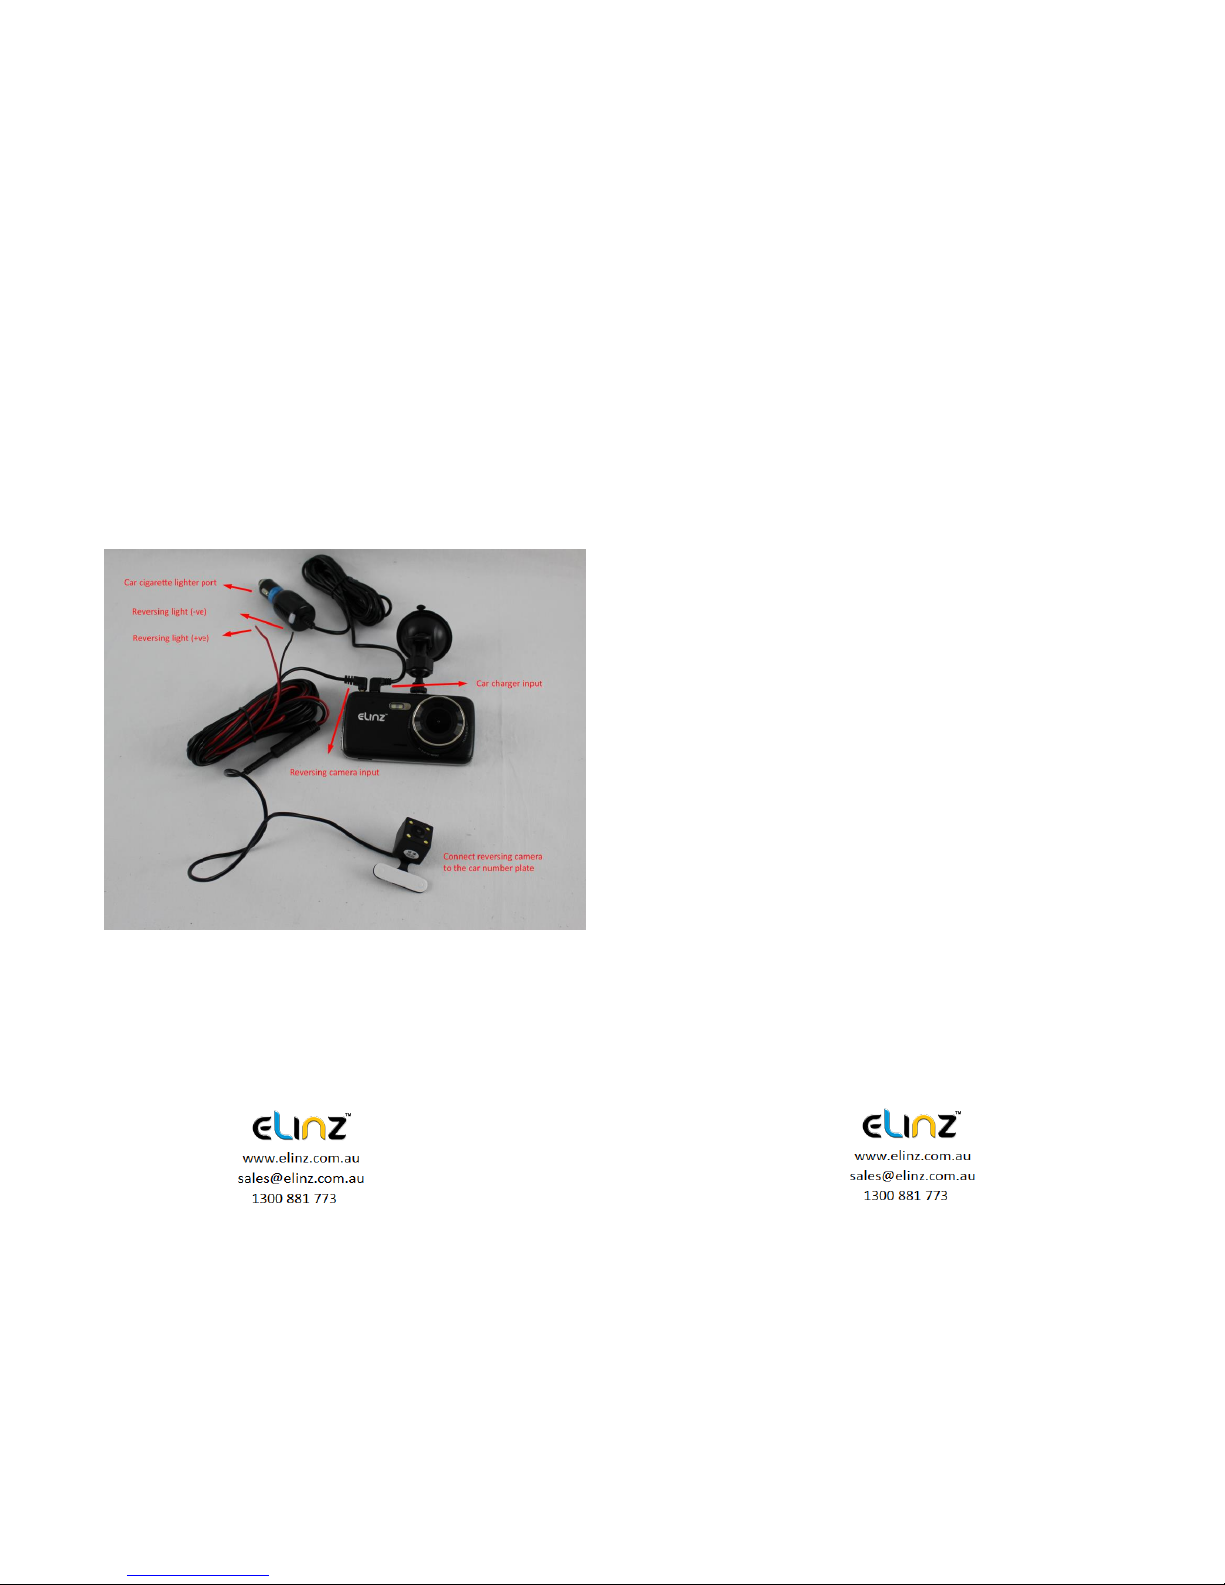
Reversing camera installation
1. Connect the reversing camera to the car number plate and
adjust the angle of the lens.
2. Connect the red wire to the positive of the reversing light (the
reversing image will show on the screen automatically when the
car is on reverse).
3. Connect the black wire to the negative of the reversing light.
4. Connect the video cable to the “Reversing camera input” of the
dash cam (this will feed the video image from the camera to the
dash cam, and also provide power to the camera when the car
is on forward gear).
5. In the reverse image state, use the [Up] / [Down] keys to
adjust the position of the reference line. After that, the
adjustment will be saved.
3. Features
1. Use automatic recording function
Start the car engine. The recorder automatically starts to open the
recording function, the charge indicator lights and video light is
blinking. After switching off the engine, the recorder automatically
saves the contents of the recorded video and shut down.
Recorded video segment is stored in the TF card. When the
memory is full, the recorder will overwrite the earlier recorded
image.
Note:
a. Recording time cycle can be selected in the menu settings
ranges from 1 minute / 3 minutes / 5 minutes / OFF four cycles.

b. Front, rear camera and video camera are recorded separately
to the "MOVIE" and "PHOTO" folder.
2. Use manual recording functions
Press the [OK] key, the recorder automatically starts. Video
recording indicator lights up and blinks. To shut down the power
button press [OK] for 3 seconds, the recorder will automatically
save the record again and shut down.
3. Take photo function
Press OK to pause the video recording, short press the [Mode]
button to enter the camera mode. The upper left corner of the
display is converted to a camera. Press [OK] to take pictures. To
switch back to recording mode, press the [Mode] key twice.
4. Motion detection function
Press OK to pause the video recording, press [MENU] key to enter
menu selection mode to turn on motion detection. When the lens
senses a moving object, the state of the machine will change into
camera and when the lens does not detect any moving objects for
5 seconds, the system will stop recording. To exit the motion
detection mode, long press on the turn button for 3 seconds to exit
the motion detection mode.
5. G-sensor function
The unit features an impact sensor (G-sensor). If a serious vehicle
collision, the recorder will lock the first 10 seconds, and 20
seconds after the accident occurred and save it as a special image,
the monitor will display a lock icon in the lower left. Locked images
will not be overwritten.
【prompt】
a. Lock the video file name at the beginning of ZW, general log
files beginning with AW.
b. G sensor can be turned on under Menu [G-sensor], you can
select the desired G sensor sensitivity High, Medium, Low or Off,
according to the actual need. The higher the sensitivity, the more
videos will be locked and will not be erased during loop recording,
therefore, we suggest you to select Medium sensitivity.
Alternatively, Press Mode while the video is recording to lock the
files.
6. A key lock function
The machine has a key lock feature that will retain an image
without being locked loop overwritten. In the video mode, short
press down, the recorder will lock the first 10 seconds, and 20
seconds after the accident occurred and save it as a special
image.

7. Date and time settings
Press OK to pause the video recording, short press [Menu] key to
enter the system setup menu, press the down arrow key [Up] /
[Down] keys to move the cursor to set the date options. Press
[Enter] to enter the menu settings.
[Note]
In order to efficiently record the date and time of the traffic
accidents forensics before using the machine, please set the
correct date and time.
8. A mute button function
In working condition, short press the [Down] key, the screen
changes to prohibit the bottom left of the microphone icon,
indicating that video recording has been turned off. The recorder
only records the image without a sound. Short press the [Down]
button below the microphone and the screen changes to the
record icon to indicate resume recording.
[Note] settings are saved automatically, without having to re-boot
after the mute function.
9. U-disk mode
The recorder is connected via a data line computer USB port. The
screen displays the disk, camera, and charging. The three
selectable modes. Press up key [Up] / [Down] keys to select the
Disk option. Then press [Enter] to enter the U disk mode.
10. Shooting File Playback
In Boot state, short press [MODE] key to switch to playback mode.
Press the [Up] / [Down] keys to find the file you want to play back
and press [Enter] to play. To exit playback mode, short press
[MODE] key.
11. Parking Monitor
When you open the parking monitoring in the off state, if the car
has a slight vibration, the recorder will automatically start
recording for 20 sec and shut down.
[Note] This feature requires hardware support.
12. WDR (Wide Dynamic Range)
Adopt internationally advanced double (long & short) exposure
techniques, reformat video images to be optimal. Images is commonly
overexposed in the strong sunshine, and hardly to be taken in the dim
light conditions, WDR capability gets the issue resolved. Turn this
function on/off under menu settings.

13. Exposure
Now, the dash cam comes standard set to a +0.0 exposure, which is
essentially baseline. This level of exposure will account for every day
lighting scenarios, bright days, darker days, etc. The exposure and
aperture both determine how much light is being allowed into the lens of
the camera. So on a regular, mild day, the standard factory setting will
do just fine.
The only time you want to adjust your exposure is when there is too little
light, or too much light in any given location. If it is dark outside, and your
footage is coming out too dark, you can simply ramp up the exposure,
and your camera will maximize the amount of light it absorbs. This trick
will ensure that your night vision comes out clearer. Exposure can be
adjusted under menu settings.
14. Screen saver
The screen will turn off by itself after 3mins, 5mins or 10mins if this is
turned on, but the dash cam is still recording at the background. If you
do not want the screen to turn off by itself, please select OFF.
15. Rear camera mirroring
Enable rear camera video recording, turn on/off under menu settings.
4. Product Specifications
Display
4.0 Inch High Resolution Screen
Front camera
Sensor AR0330 + 650NM lens, NTK96655
Chipset
Rear camera
Analog CVBS input, VGA resolution
Visual angle
170 degrees
Minimum
illumination
1Lux
Video mode
Loop video / motion detection
Video format
MOV
Video coding
mode
H.264
Video resolution
2304 x 1296p,1920 x 1280, 1080 x 720, 848 x
480, 640 x 480 (30 frames / sec)
Camera resolution
4032 x 3648, 3024 x 2736, 3264 x 2448, 2592 x
1944
Video output
N/A
Seamless video
yes
Boot automatic
recording
supported
Gravity induction
When car crash, it will emergency save videos,
not to be deleted
Manual lock
Video, short press mode key, to lock the current
file, not deleted
Languages
English, Chinese, western, Portuguese,
German, Italian, simplified, traditional, Russian,
Japanese
Video
segmentation
time
3 minutes /5 minutes /10 minutes
Sound recording
Built in microphone, recording can be selected to
close / open
Version number
Display product model, software version and
update time
Night Vision
2 white light lamps
Memory card
TF Card
Memory card
capacity
8GB--32GB
USB interface
USB2.0 Mini5Pin
Operating system
Windows 2000, XP Windows, Windows 7, etc.
Battery
3.7V 200mAh high rate polymer battery
Power waste
Double recorded video MAH 500-700
Power Supply
Vehicle mounted power 5V/1.5A
Storage
temperature
-10 C ~ 70 C
Operating
temperature
-10 C ~ 60 C

Instructions to use:
•For best result in using Dash Camera, we definitely recommend to
keep it plug-in into the car cigarette charger. This will allow you to
use or record for a longer period of time. Dash Camera uses a lot
of battery due to G Sensor system of the camera.
•To watch recorded video clips, please remove SD card from Dash
Camera and connect it to your computer or laptop. This will allow
you to watch all videos recorded.
•Please peel off the protective film on the screen before use.
• If you would like to use parking monitor function, please purchase
compatible hard wire kit from our store.
Common troubleshooting:
• Dash cam is not recording properly, please check:
1. Format the sd card and try again.
2. Change to another sd card and try again.
3. Reset to factory settings under menu.
If you have further questions or clarifications feel free to
contacts us at 1300 881 773 or send us an email
[email protected]om.au
Table of contents
Other Elinz Dashcam manuals


