ELM EcoPro2 User manual

P
r
o
f
e
ss
i
on
a
l
Disc
R
e
p
a
i
r
M
ac
h
i
n
e
O
p
e
r
a
ti
on
M
a
nu
a
l
Revision # v8.2.2022

Thank you for purchasing the EcoPro2.Please take a few minutes to read through this
manual to become familiar with your new machine and achieve the best results.
WE WOULD LIKE TO PREFACE THIS MANUAL WITH: It is important to
use your ECO Pro2 on a regular basis to prevent the compound lines from
drying. Try and run at least 2 discs through per week.
I
m
p
o
rta
n
t
S
a
f
e
g
u
ar
d
s
Please read through this entire manual and retain it for future reference. To
prevent personal injury or equipment damage, the following precautions
should be observed:
•
Always ground thisunit. A surge protected power bar is recommended.
•
Use only the AC adapter provided with the EcoPro2.
•
Keep the AC inlet and adapter dry.DO NOT USE if wet.
•
Do not use the Power cable if it is bundled or tangled. Never use the power cable if it
is damaged. It can over heat and a fire may result.
•
Do not alter, bend, or stretch the power cable forcibly, or unplug by pulling on the cord.
•
Keep the power plug clean. If the power plug is dirty, clean it with a dry cloth after unplugging
the unit.
•
Do not use thisequipment during a thunderstorm. Turn the machine off completelyuntil the
storm has passed.
•
WARNING: Do not turn thisunit OFFduring operation, unless there is an emergency.
•
If smoke or a strange odor should occur, please turn OFFthe MainPower Switch. Immediately
contact a servicetechnician for assistance. If thisprocedure is not followed, fire or electrical
shock may result.
•
Useonly the specified consumable materials. The use of substitute consumables may damage
the machine and voidthe warranty.
•
Do not disassembleor modify thisunit unless instructed to do so by a trained technician.
•
Never per form repair work yourself. It is dangerous and not recommended.
•
Do not use thisunit in an area where there is flammable or explosive gas.
2
Revision # v8.2.2022

T
a
b
l
e
of
C
on
t
e
n
t
s
Important Safeguards
2
Setup Instructions
4
Contents of Package
5
Description of Parts
6
Setting up the EcoPro
Attaching the Bottle Holder
Preparing the Water and Polish Bottles
7
7
7-8
Using the KEY CARD
Installing the KEY CARD
Removing the KEY CARD
9
9
9
Starting the EcoPro
10
Operating the
Pumps
Water Pump
Compound Pump
11
11-12
12
Installing the Pads
13
Repairing Discs
Choosing Disc Repair Mode
Stopping the Repair
14
14
15
Increasing the Repair Time
16
Cleaning the Pads
16
Add Water message
17
Change Key Card message
17
Cleaning your ECO Pro2
18-19
Checklist
(can be removed and placed by machine)
20
21
LCD Display Summary Table
22
Error Codes
Alert List
Troubleshooting
Warranty & Service
23
3
Revision # v8.2.2022
26
27

Set up
I
n
s
tr
u
c
ti
on
s
Choose
a
proper
p
l
ace
for
i
n
s
t
a
ll
a
t
i
on
Before you unpack and setup your EcoPro2, please ensure you have a flat, level surface on which to
unpack, situate and operate the machine. There is the possibility that water may leak from the machine if
installed incorrectly, so keep any water sensitive material away from unit operational area.
Use a correct power receptacle for the unit’s electric capacity.
EcoPro2 Electric Capacity: 100-240V AC,50/60Hz,120W (Max)
E
n
v
i
r
on
m
e
n
t
a
l
c
on
d
i
t
i
on
s
Do not use the EcoPro2 in areas exposed to:
•
•
•
•
•
Direct sunlight
Excessive humidity
Dust
Vibrations
Corrosive or flammable gas
S
p
ec
i
f
i
ca
t
i
on
s
U
n
p
ac
k
i
n
g
G
u
i
d
e
The unit weighs 13 lbs (6kg), so please use caution when unpacking.
Carefully lift the unit out of the box and set on a flat, stable location.
If unit is accidently dropped, contact ELM USA. Do not attempt to use the machine until you check
with ELM USA Service Department.
Technical Support.
,03257$17.HHSWKHVKLSSLQJFDUWRQDQGSDFNLQJPDWHULDOLQFDVHWKHPDFKLQHQHHGVWREHVKLSSHG
)RUVHUYLFLQJ PLEASE NOTE THERE IS A $65 FEE FOR A REPLACEMENT BOX AND INSERTS
4
Operation ambient
Temperature range
40 to 95 degrees F.
Operation ambient
Humidity range
15 to 85% (Non-condensing)
Power supply
(50/60Hz)
100 V AC to 240 VAC,120W
Dimensions
(W *D *H inches)
8*10 (13)*11.5
(With bottles)
Revision # v8.2.2022

Contents
o
f
P
ac
k
a
g
e
Power Cable
(4 pieces)
5
KEY CARD (located in
key card slot of machine)
Pads
Compound Bottle
Water Bottle
AC Adaptor and
Bottle Holder
EcoPro2 Machine
Revision # v8.2.2022

D
e
s
cr
i
p
ti
on
and
function
o
f
each
p
ar
t
Front of
Machine
Lid
Opens automatically when Main
Power switch is turned on.
Water Supply Tube
Compound Supply Tube
Compound Bottle Cap
Attaches the Compound
Bottle
Back of
Machine
Water Bottle Cap
Attaches the Water Bottle
AC Inlet
Connect the cable of AC
Adapter
6
Polish Basin
Pad Holders
Place Pads properly.
Platen Table
Disc placed label side
down.
Splash Cover
Inside lid
Compound Nozzles
Water Nozzles
Main Power Switch
Operation Panel
LCD indicates status of the machine,
Push buttons operate the machine
KEYCARD slot for time card.
Revision # v8.2.2022

Setting
up
the
ECO
P
R
O2
Attach the Bottle Holder
1. Loosen and set aside the bottle holder thumbscrew from the back of the machine.
Bottle Holder
Thumb Screw
2
.
Hook up the Bottle Holder to the back of the Unit by inserting the hooks of the Bottle Holder
into The slits in the back and then slide the holder to the left to lock it in place.
3. Secure the Bottle Holder by re-installing and tightening the Bottle Holder Thumb Screw.
Prepare the Water and Compound Bottles
4. Pour 350 ml of water into the Water Bottle. Attach the Water Bottle Cap, tighten the lid, and push the
Water Supply Tube into the bottle.
IMPORTANT:
The Water Supply Tube
should reach the bottom
of the bottle.
350ml
7
Revision # v8.2.2022

Prepare the
Water
and
Compound
B
o
tt
l
e
s
c
on
t
’
d
.
Shake the Compound Bottle
5. Uncap the Compound Bottle and attach the bottle to the Compound Bottle Cap.
BE CERTAIN TO REMOVE THE BLACK CAP AT THE END OF THE COMPOUND LINE.
5.
This position is correct.
This position is INCORRECT.
The
compound pump will not prime
properly with the tube in this position.
6. Attach the Compound Bottle and the Water Bottle to the Bottle Holder as shown
.
8
Revision # v8.2.2022

7
Using
the KEY
C
A
R
D
I
n
s
t
a
lli
n
g
the KEY CARD
Caution! Be sure the Unit is turned OFF before inserting / removing the KEY CARD.
1. Insert the KEY CARD so that the label side faces to the right
(
when viewing from the front of the machine).
The KEY CARD should be inserted
With arrow pointing down.
Be sure the KEY CARD is fully inserted into
The KEY CARD slot by pushing it down and
forward to lock it in place.
WARNING: A l w a y s t u r n o f f t h e
m a c h i n e w h e n t a k i n g o u t t h e K EY
C A R D
Removing
the KEY CARD
:
1. Pull the tab forward to release the card.
9
Revision # v8.2.2022

Starting
the Eco
P
ro2
1. Connect the Power Cable to the AC Adaptor securely.
2. Connect the cable of the AC Adaptor to the AC Inlet at the backside of the Main Unit.
3. Plug the power plug into a grounded outlet or power bar.
4. Turn ON the Main Power Switch.
The LCD displays “Starting”, the Hatch opens automatically, and then the LCD displays “CD/DVD” and the
Remaining time of the KEY CARD.
If the LCD displays “No KEY CARD” message, turn OFF the Main Power Switch, insert the KEY CARD to
the KEY CARD Slot properly, and then turn ON the Main Power Switch again.
IMPORTANT: Before repairing disc, the water and polish tubing must be filled with water
and polish compound. Failure to do so may cause damage to the disc and pads! See next
page for instructions.
10
Revision # v8.2.2022

11
1. Find a small container or use a piece of paper towel to catch water and compound from the nozzles
during the priming process.
Operating the Water Pump
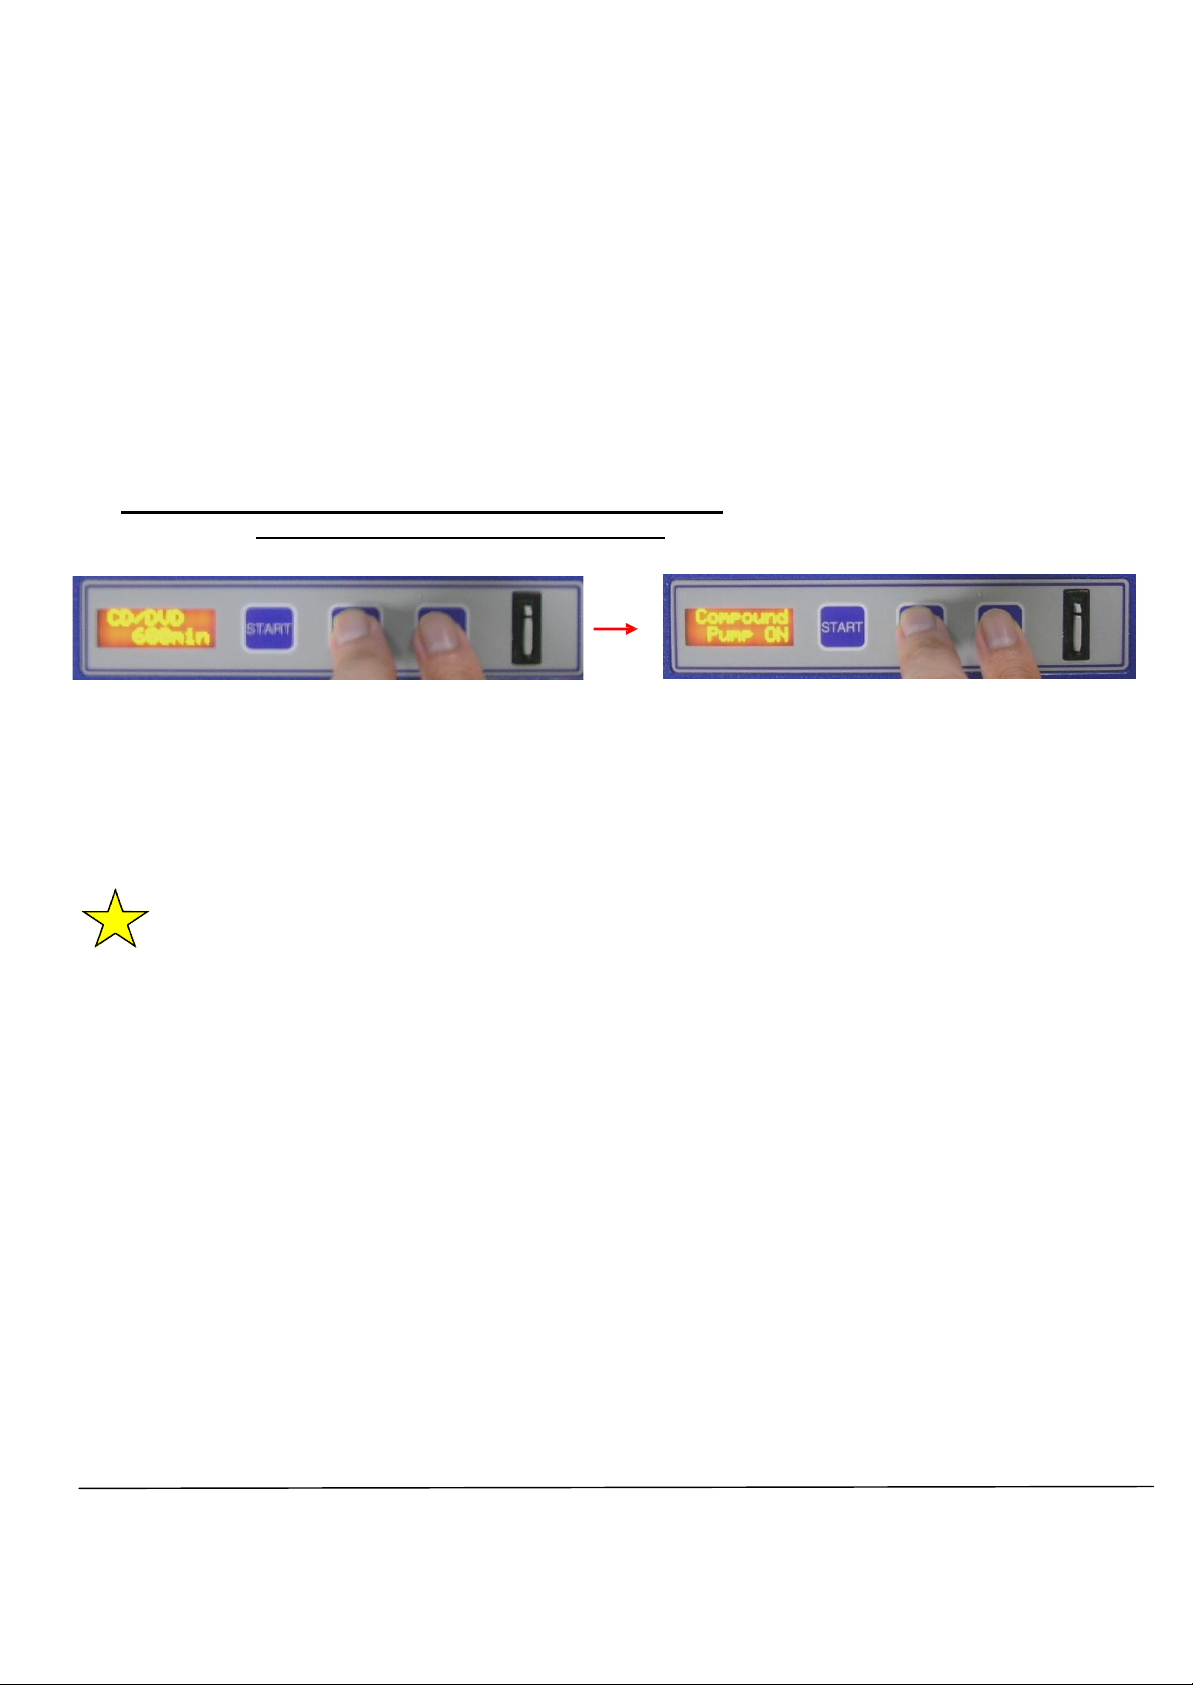
2. Press and hold “START” button, and then press “FUNC” button. The LCD displays “Water Pump ON”,
and the Water Pump begins running.
NOTE: You will hear a rhythmic clunking sound each time the water pump operates. This is normal.
It may take several minutes for water to come out of the nozzles. If you do not see water after that time,
gently squeeze the sides of the water bottle to push water into the tubing and clear the air.
If the water still does not come out, press Stop. Remove the lid from the water bottle and use a can of
compressed air to blow some air through the tubing until you feel air coming out of the nozzles.
Repeat step 2.
Operating the Compound and Water Pumps
Operating the Compound and Water Pumps Operating the Compound and Water Pumps
Operating the Compound and Water Pumps
Water nozzles
Polish nozzles
NOTE: The Polish nozzles have a
built-in valve so they seal when not in
use. Do not remove these nozzles.
Revision # v8.2.2022
Before you prime the pumps, remove the black water nozzle caps and set them aside. They are for
shipping purposes. Do not discard. Keep them for future use.
O
p
e
r
a
t
i
n
g
the
Water Pump
C
on
t
’
d.
The water will not come out in a steady stream, but a few drops should come out each time the pump
engages.
3. Press any button on the Operation Panel to stop the pump after confirming that water is coming from
Both Water Nozzles. The display on the LCD returns to “CD/DVD” or “BD” with the remaining time of the
KEYCARD.
O
p
e
r
a
t
i
n
g
the
Compound Pu
m
p
1. Press and hold “STOP” button, and then press “FUNC” button. The LCD displays “Compound
Pump ON”, and the Platen Table begins rotating clockwise to run the Compound Pump.
It may take several minutes for the compound to fill the lines and drip out of the nozzles.
2. Press any button on the Operation Panel to stop the Platen Table after confirming that compound
Comes out from both Compound Nozzles. The display on the LCD returns to “CD/DVD” or “BD” with the
remaining time of the KEYCARD.
IMPORTANT: Occationally you may need to run these tests to confirm that
water and compound are coming out from each nozzle before using the
machine. This is only if the machine has sat unused for long periods of time.
12
Revision # v8.2.2022
I
n
s
ta
lli
n
g
the
P
a
d
s
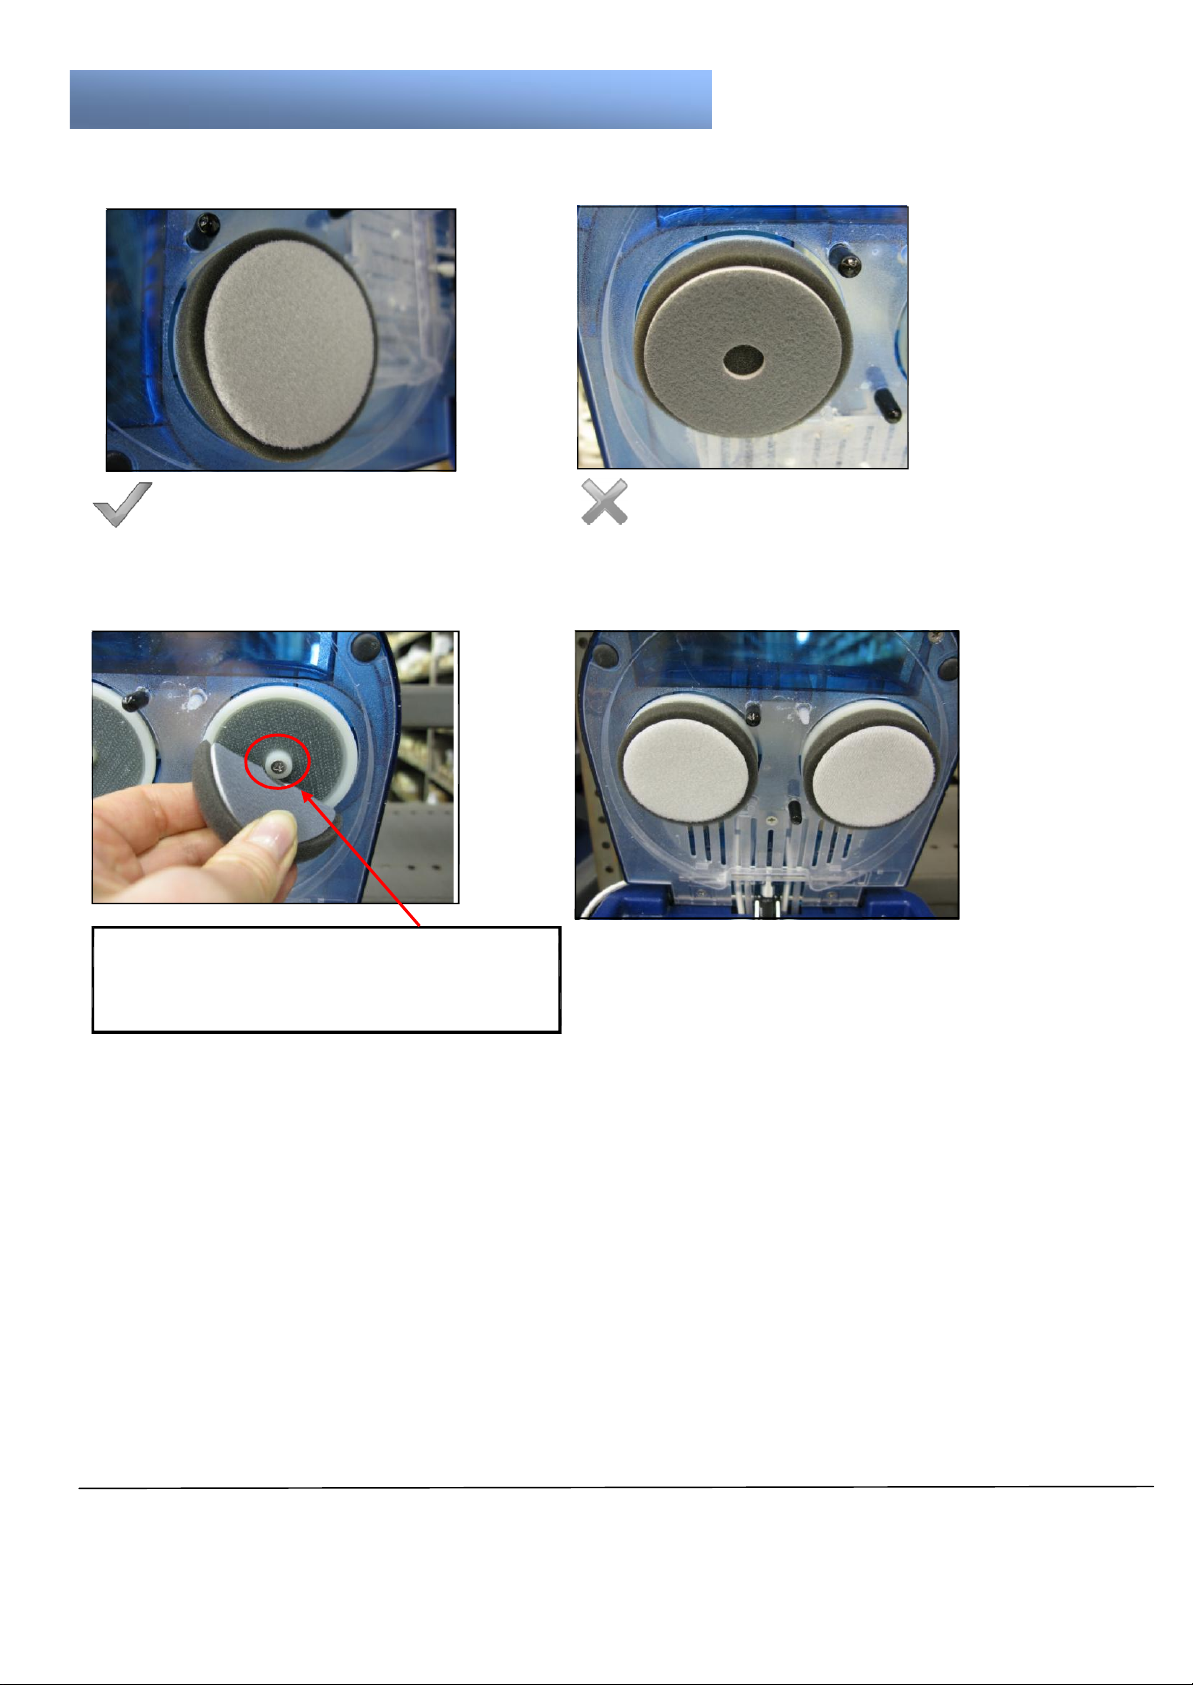
The pads have a polishing side, and a Velcro side that attaches to the pad holder.
Pad installed INCORRECTLY
Pad installed CORRECTLY
1. Place each pad to be sure it is centered within each pad holder.
Bend the Pads lightly with fingertips, and fit
the hole in the middle of the pad over the
center pin of the Pad Holder
2. Press the center of the Pad lightly after placing it into the Pad Holder to attach the Velcro.
If the pads have been used before, make sure they are clean and dry before reusing them.
See How to Clean the Pads on page 16.
NOTE : If the pads are not dry , the final disc
finish
will be hazy.
Helpful
Hint :
Buy another
set of pads for
quicker
change overs.
This way you have a clean. set of pads
ready
to be used.
13
Revision # v8.2.2022
R
e
p
a
i
r
i
n
g
D
i
s
c
s
1. Place a disc on the white Platen Table, with the label side down.
IMPORTANT : Place the disc so that the
side to be repaired faces upwards.
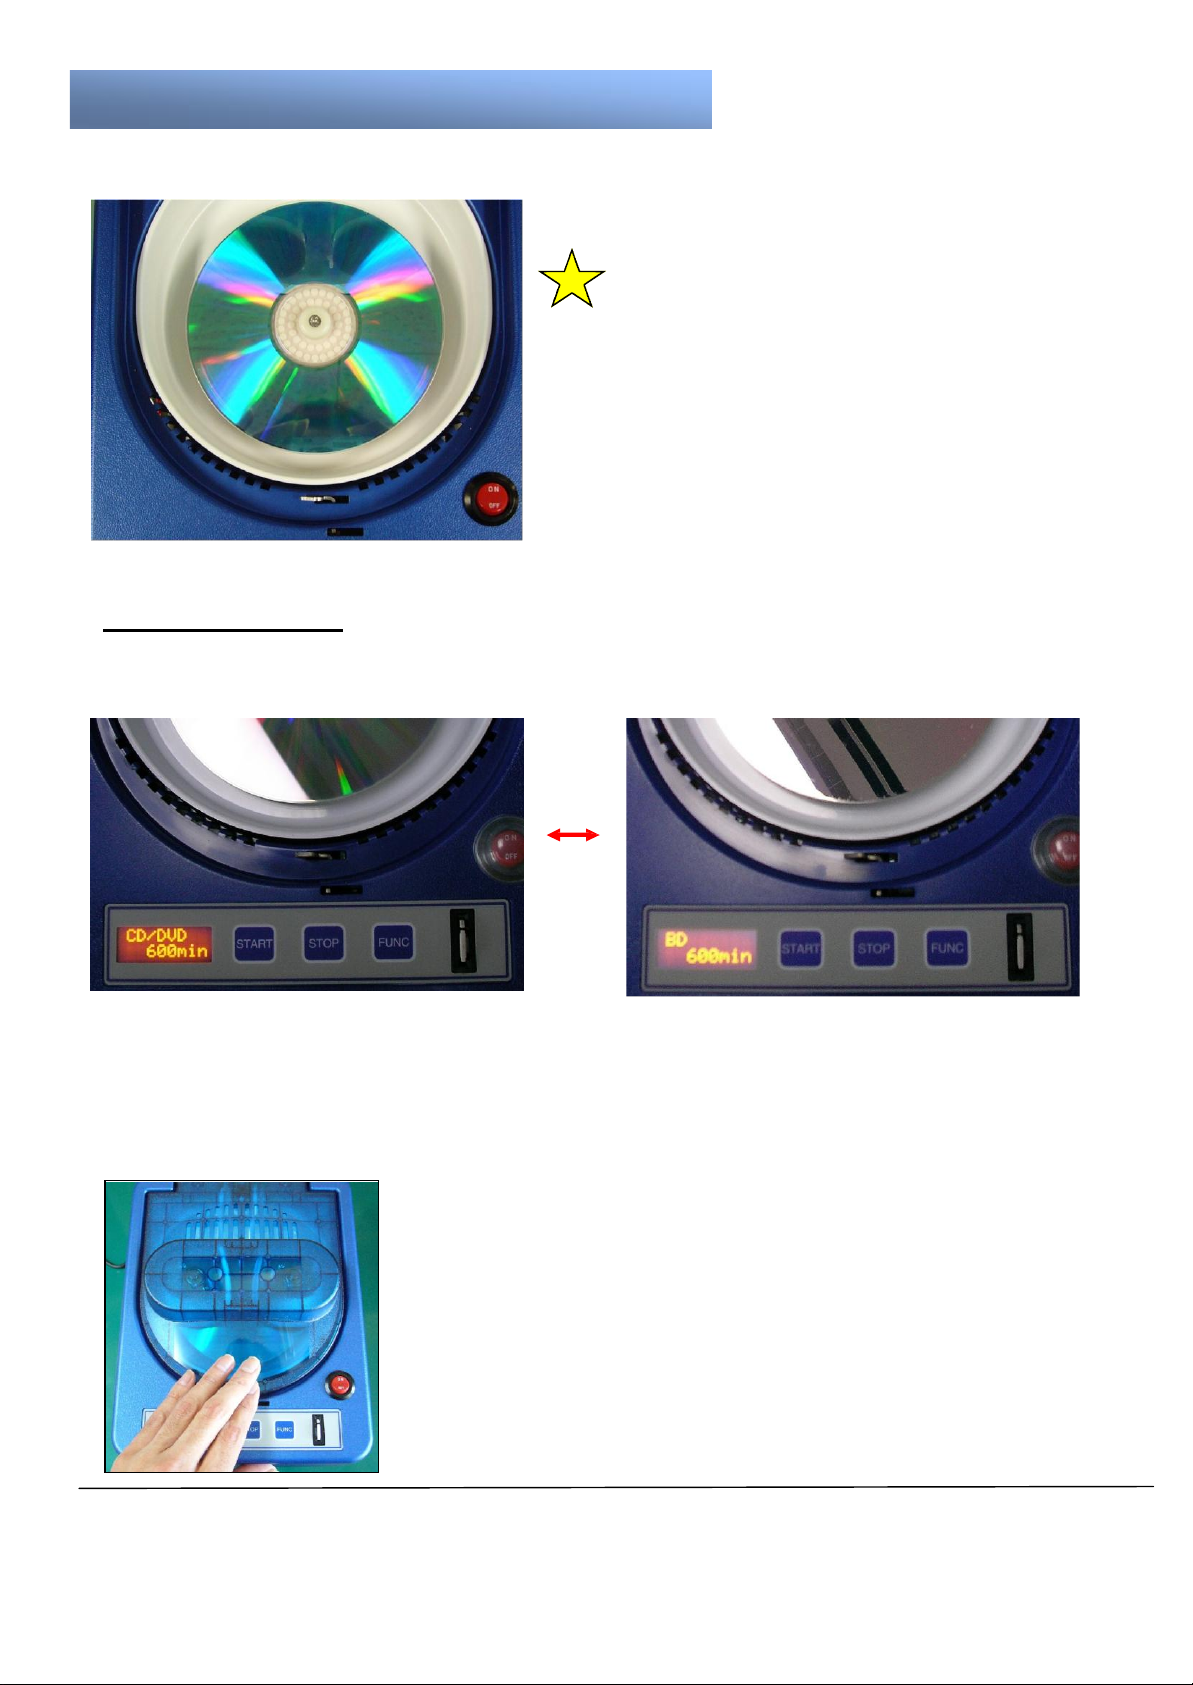
2. Select the Disc mode depending on the kind of the disc to repair.
Pressing “FUNC” button changes “CD/DVD” mode and “BD” mode alternately. BD refers to Blu-ray discs.
When the machine is in standby , the LCD displays “CD/DVD” on the first line with “CD/DVD” mode, and
“BD” with “BD” mode. The remaining time of the KEY CARD is displayed on the second line.
[“CD/DVD” mode]
[“BD” mode]
Select “CD/DVD” mode for repairing CDs and DVDs, or “BD” mode for repairing BD (Blu-ray Discs)
and Hard-Coat Discs.
3.
C
l
o
s
e
the lid; the
d
i
s
c
r
e
p
a
i
r
process
will
b
e
g
i
n
a
u
t
o
m
a
t
i
c
a
ll
y
.
Caution! Closing the Lid without a disc on the
Platen Table may cause pad damage.
14
Revision # v8.2.2022
R
e
p
a
i
r
i
n
g
Disc
C
on
t
’
d.
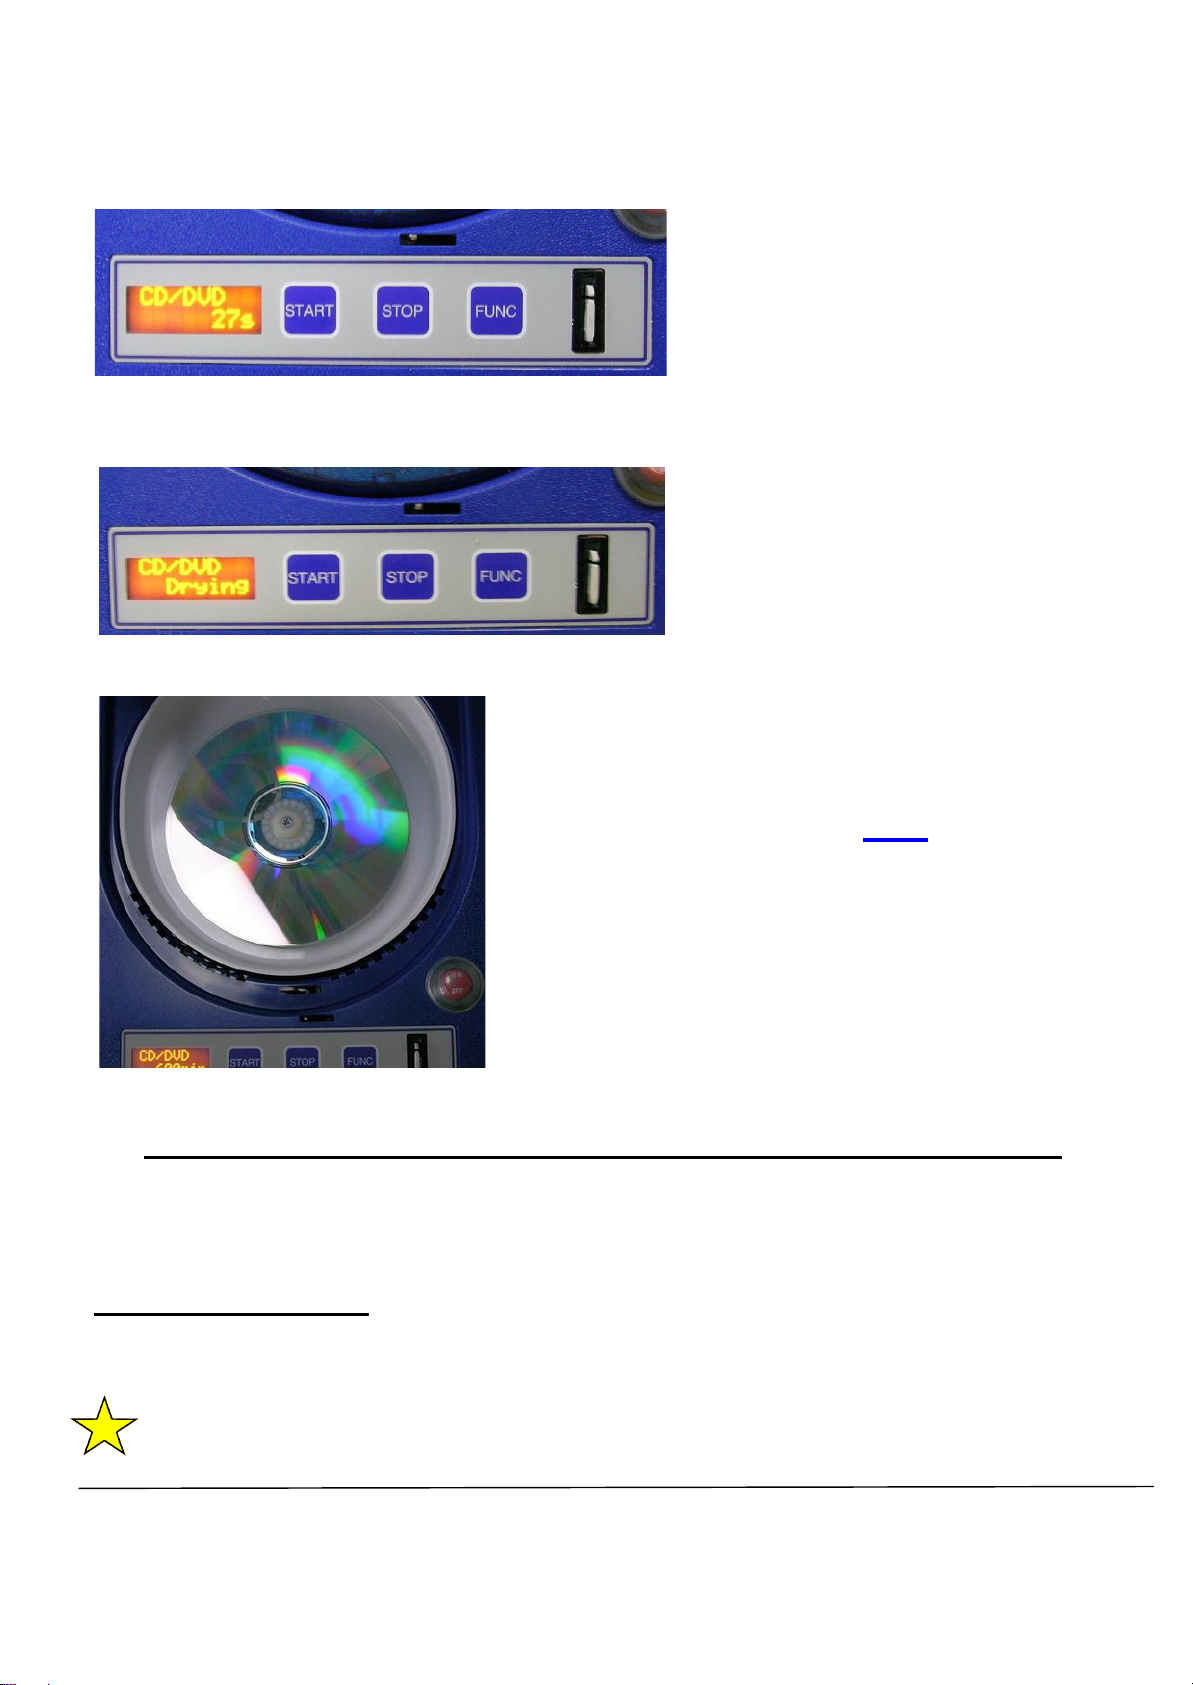
4. The LCD display shows the remaining time during the repair process.
5. The LCD displays “Drying” on the second line and the characters blink when the disc drying process
begins.
6. After finishing the disc drying process, the Lid opens automatically, and then the Platen Table stops.
Caution! Take out the disc only after the
Platen Table has stopped completely.
If there is compound residue left on the disc, wipe it gently with a soft cloth.
All Blu-ray discs will need to be wiped after repair to remove compound residue.
S
t
o
pp
i
n
g
the
R
e
p
a
i
r
S
e
ss
i
on
Pressing the “STOP” button during the disc repair terminates the process.
The lid will open and the Platen will stop spinning.
IMPORTANT: Do not use the Main Power Switch to stop the repair. If switch is turned
Off mid-repair, it could corrupt the KEY CARD.
15
Revision # v8.2.2022

I
n
c
r
ea
s
i
n
g
the Disc
R
e
p
a
i
r
T
i
m
e
(for more
heavily
scratched
d
i
s
c
s
)
Pressing “START” button during the disc repair extends the repair time. Each "press" of the start
button doubles the repair time.
The first time you press the START button, the repair time increases by 30 seconds.
The second time you press the START button, the repair time increases by an
additional 1 minutes.
(Before extending repair
time)
(After pressing START
Button once)
(After pressing START
Button twice)
C
l
ea
n
i
n
g
the
P
a
d
s
The LCD will display a “Clean Pads” message after every 20-minutes of disc repairs.
Exchange the pads for a clean dry pair and press any button on the Operation Panel to clear the
message.
Rinse used pads with warm water.
Squeeze the pads several times to help remove any polish.
Once no more polish comes out of the pads, squeeze the pads again to remove extra water. At this point,
you can either re-install them on the machine, or let them air dry overnight.
Each set of pads is good for 400 minutes of disc repair.
16
Revision # v8.2.2022
It is imperative the pads are cleaned when this message appears, otherwise you risk damage
to the discs you are repairing.

“Add
Water”
M
e
ss
a
g
e
The LCD displays the “Add Water” message every time the Water Pump in the Main Unit runs 2000 times.
Add water to the Water Bottle, and then press any button on the Operation Panel to clear the
alert indication.
“Change
KEY CARD”
M
e
ss
a
g
e
The LCD displays “Change KEY CARD” message when the KEY CARD has no remaining time for d
repair.
isc
Turn OFF the Main Power Switch, exchange the KEY CARD (see page 9 for removal tips)
Add water to the Water Bottle, and exchange the Compound Bottle.
Purchase new kits from ELM USA (see Consumables on page 24)
WARNING! Only use pads and compound manufactured and supplied
by ELM. Using generic compound and pads can damage your machine
and will void your warranty.
17
Revision # v8.2.2022

Cleaning Your ECO PRO2
Keeping your ECO Pro2 clean is an essential maintenance ritual to keep your machine running
flawlessly for many years.
The ECO Pro2 should be cleaned when you notice there is an accumulation of residual cleaning
materials left in the cleaning tray and platen table area.
Depending on how often you use your ECO Pro2, cleaning may be needed daily, weekly or even
monthly if there is minimal use.
1.
Hold onto the platen table assembly and lift it straight up to remove it from the machine.
2.
Take the polish tray out of the machine and wipe it with a damp cloth. You may also wash it in the sink,
If needed.
3. Spray the whole inside of the machine with glass cleaner including the lid. Avoid spraying the front
panel and Key Card area. Wipe front panel with a damp cloth if needed. be certain the platen table is
removed before using the glass cleaner.
18
Revision # v8.2.2022

4.
Wipeout the machine with a soft cloth to remove any polish build up.
5.Spray the platen table assembly with warm water and scrub with a toothbrush to clean it.
6.
Put the polish tray back in the machine.
7. When you put the platen table assembly back into the machine, align the groove in the base with
the pin on the motor spindle.
IMPORTANT: Once the platen table
Assembly is in the machine, rotate the platen
gently until you feel it drops lightly, then push
Down firmly in the middle to make sure it is
securely connected to the motor.
19
Revision # v8.2.2022
IMPORTANT: IT IS IMERATIVE YOU USE
ONLY WATER TO CLEAN THE PLATEN
TABLE. DO NOT USE ANY TYPE OF
CLEANING AGENT OR YOU RISK
DAMAGING THE PLATEN TABLE RUBBER.

C
h
ec
k
li
s
t
for the Eco
Pro2
B
e
f
o
re
a Disc
R
e
p
a
i
r
S
e
ss
i
on
:
1.
P
r
i
m
e
compound
and water pumps; make
s
u
r
e
compound and water are coming out of the nozzles.
Compound pump—hold Stop and press Function Button.
Water pump—hold Start then press Function Button.
2.Install a clean, dry set of pads.
After
a Disc
R
e
p
a
i
r
S
e
ss
i
on
:
1.
If needed, clean the machine.
Spray inside with gentle cleaner like Windex and wipe out
with soft cloth. Lift out disc Platen and clean polish tray.
2.Rinse the pads, wring them out and let them dry
overnight.
20
Revision # v8.2.2022
Remove this page and place by machine for easy reference.
3.Gently wipe the tips of the polish nozzle to remove and
compound build-up.
Table of contents
Other ELM Diagnostic Equipment manuals


