Emfit Quantified Sleep IP-9360 User manual

Quick guide
for model IP-9360 (Wi-Fi)
v2.0
10.9.2018
HEART CONTRACTIONS, BREATHING AND BODY MOVEMENT ANALYTICS IN SLEEP
1.
2.3.
5. 4.6. 7.
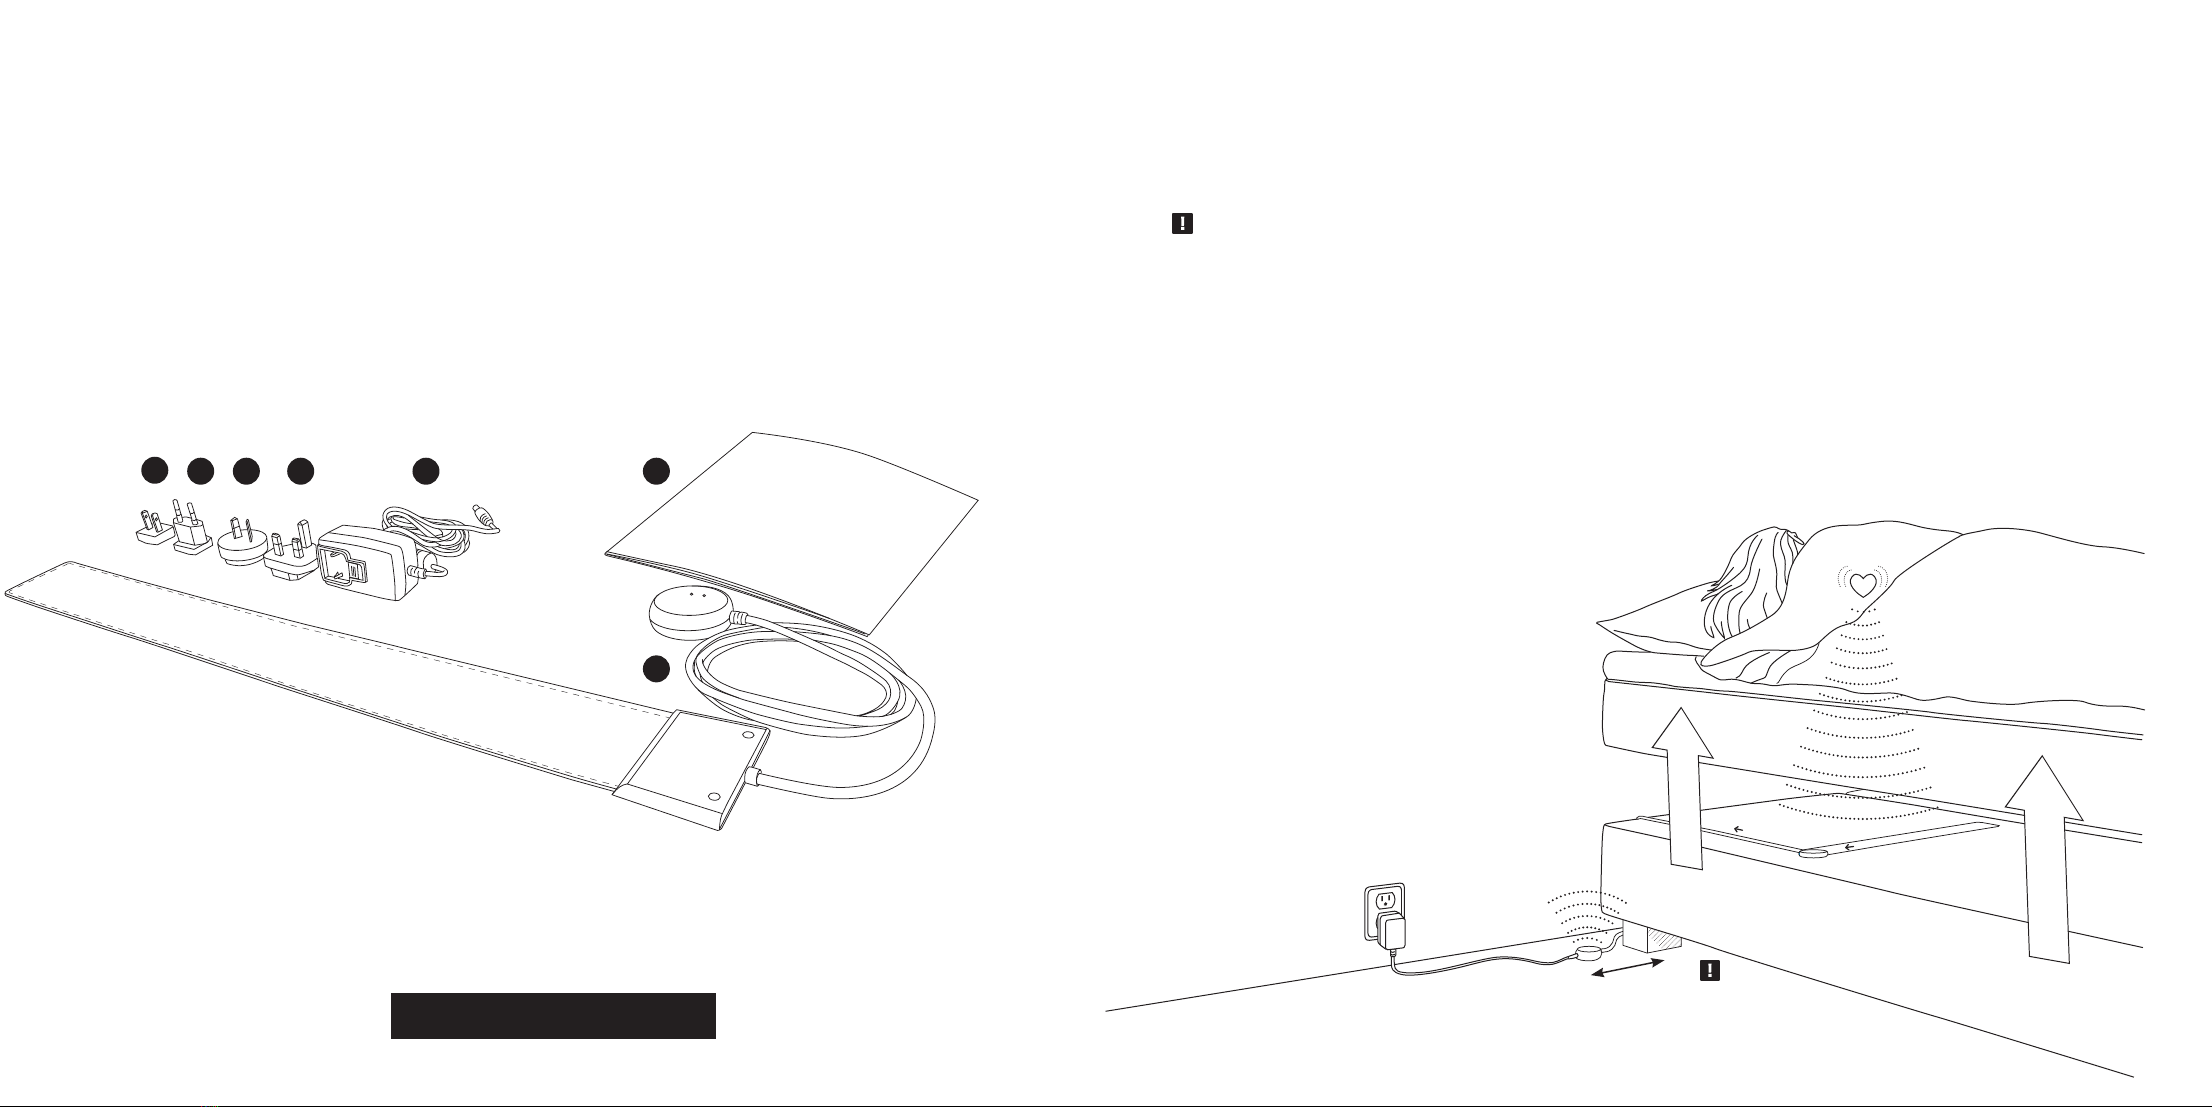
1. Electronic control unit with attached sensor
2. Power supply
3. Plug adapter for European countries
4. Plug adapter for United Kingdom
5. Plug adapter for United States of America
6. Plug adapter for Australia
7. Quick Guide
Package contents
Quick Guide
Please follow the steps of this guide for getting the device into use.
Overview
EMFIT QS needs to be connected to the Internet via
Wi-Fi network in order to operate.
Sensor
EMFIT QS
with Wi-Fi transceiver
Data signal
Keep electronic unit
minimum of 30 cm
distance away from body.
This Quick Guide contains information extracted from the instructions for use.
Please read the “Installation & operating instructions” for the full instructions for use,
including information on safety from:
https://qs.emfit.com/docs

1 2
カ チ ッ!
3
The device works most reliably when the
sensor is located directly below your heart.
Connect to electrical outlet
Select a suitable adapter from the four
alternatives.
Connect the correct adapter to the power supply
and ensure that it locks in its place.
Connect the power supply to electri-
cal outlet (110 - 230V AC) and con-
nect the power cord to Emfit QS.
Green and red lights start to flash
alternately and device makes beep
sounds.
Power cord
Install the sensor in your bed
Place the bed sensor beneath the mattress or
mattress topper across the bed under your chest
area.
1
… or you can place it
beneath the mattress.
You can place the EMFIT QS
beneath the mattress topper…
Note! If only the red led flashes you need
to restore the device into AP mode. Please
see the Installation & operating instructions;
chapter 10 on page 24.
Red
Green
Power cord Sensor cord

Placing the EMFIT QS in double bed
If you sleep with a partner in a double bed,
place the sensor on to your side of the bed
as far as possible from your partner. Make
sure the sensor is still under your chest
area.
You can bend the sensor over the corner
of your mattress. It will help to prevent
sensing your partner’s heart rate, especial-
ly when you leave the bed earlier than he/
she.
Notice these before attempting
to connect to Wi-Fi
or
Your Wi-Fi network
password
Home Wi-Fi
with Internet access
Mobile device as
Wi-Fi hotspot
NOTE! If you choose method B,
please notice that you will need an additional computing device during setup:
• Mobile device: to a create hotspot (Internet connection)
• Computing device (laptop, mobile phone or tablet): to set up your Emfit QS device to this hotspot
Your hotspot Wi-Fi
network password
To operate, EMFIT QS needs Internet connection. It can be either:
AB
Computing device
(computer or tablet
or smartphone
with browser)
NOTE! The electronics unit must be placed on
the floor and at minimum 30 cm distance away
from your body (electrical safety).
TO SET UP THE W-FI YOU NEED
(ONLY DURING SETUP):
Keep electronic unit
minimum of 30 cm
distance away from body.
Keep electronic unit
minimum of 30 cm
distance away from body.

Emt Ltd, Finland | Product: Emt QS | Model: IP-9360
Contains FCC ID: W70MRF24WG0MAMB
Contains transmitter module IC:
7693A-24WG0MAMB
Designed and manufactured in Finland.
SN: XXXXXX
PIN: XXXXX
PW: XXX-XXXX-XXX
http://192.168.1.3
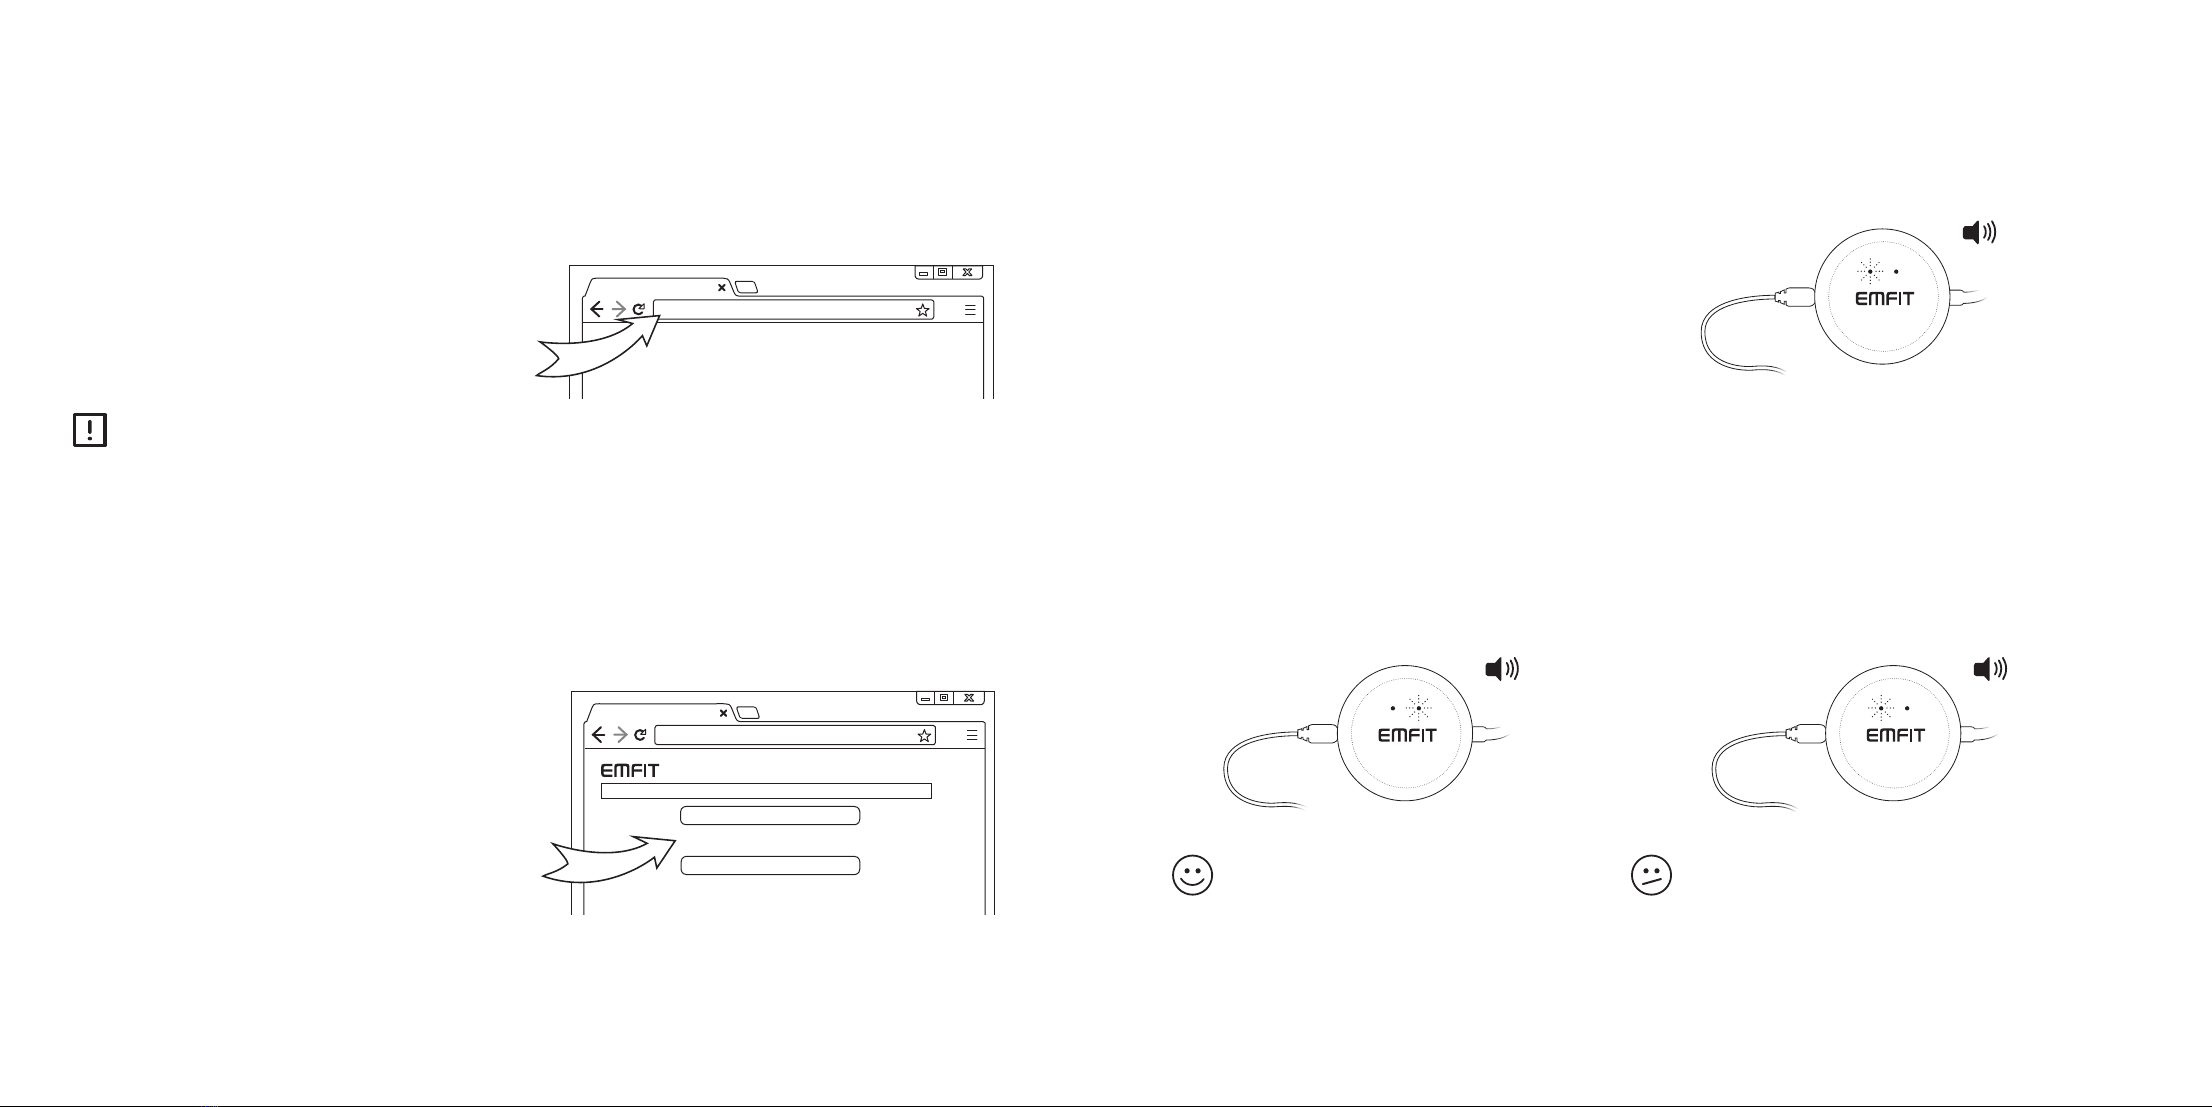
Note! If you are using Windows 10 operating system, we recommend
to use Google Chrome browser during Wi-Fi setup. According to our
experience setup may be dicult with other browsers.
Emfit QS supports 2.4 GHz Wi-Fi.
Wi-Fi channels 1 - 11 are supported.
If you do not know whether your home Wi-Fi is compatible,
go to Installation & Operating Instructions; chapter 14.
Available at: https://qs.emfit.com/docs
If your router has a WPS button (Wireless Protected Setup) see the Installation & operating
instructions chapter 8.1. (https://qs.emfit.com/docs)
The 5 GHz Wi-Fi is not supported.
Wi-Fi channels 12 , 13 and 14 are not supported. This concerns European customers especially.
With your computing device search for wireless
networks.
1
3
Steps:
Fill in the requested password
(PW: XXX-XXXX-XXX).
2Connect your computing device to the network:
Emfit_xxxxxx (where xxxxxx is the serial number
of your device).
Ignore possible “No internet connection”.
Connect to Wi-Fi
Note! The password must be filled in
with the hyphens.
Windows Mac OSX
Networks Turn Wi-Fi O
Emt_1234567
AppleWiFi
Testwork
Join Other Network…
Create Network…
Open Network Preferences…
Wi-Fi: On
Connections
Wi-Fi
ConnectedNetwork
Emt_1234567
Some-Guest-2.4GHz
2WIRE123
See “Connecting to Wi-Fi” -video
on our YouTube channel:
www.youtube.com/user/EmfitCorp
4
5
Open your computing device’s browser
(Mozilla, Safari, Chrome, Internet Explorer etc.).
Type in address/url bar:
http://192.168.1.3 and press enter.
Select your own Wi-Fi network from the list
and type its password.
If you cannot access above IP-address,
check that your computing device did not
disable itself from EMFIT QS and is perhaps
again connected to your own Wi-Fi.
Problem may also arise with desktop com-
puter when also LAN/ethernet cable is con-
nected. To solve possible problem, simply
remove LAN/ethernet cable temporarily.
8
http://192.168.1.3
http://192.168.1.3
Emt
“Your network”
Detected Wireless Networks
Other Network…
Connect to Wi-Fi …continued
6Press enter and EMFIT QS will now try to
connect to your Wi-Fi network. Connecting
can take up to few minutes. You hear short
“beep” sounds and see the red led flashing.
Successful connection
Device will emit high tone sounds. This
means that the password you typed is cor-
rect. In about 1-3 minutes red light will stop
flashing and green light will start flashing.
Red light remains flashing
Device will emit high tone sounds (password
you typed is correct). However red light will
keep flashing (in cycles of one, two or three
times) even aer three minutes.
You are done! Your device is now con-
nected and ready to track your sleep.
Sorry, you are not done yet! Router/mo-
dem may be blocking the Internet con-
nection. This occurs occasionally in a
corporate Wi-Fi network which may have
restrictions for IOT devices. You may need
to contact your IT support or Emfit sup-
port so that we will help you.
Only red light remains flashing.Green light will start flashing.
Red light starts flashing.

Unsuccessful connection
Device will emit low tone sounds. Red and
green lights flash alternately again. This
means device has returned to AP mode.
This can happen a few times, so please be
patient. This is common issue in Wi-Fi net-
works.
Please start again from step 1. Check that
your computing device has automatical-
ly returned connection to your home Wi-Fi.
You need to search again for available Wi-Fi
networks and reconnect to EMFIT QS.
With your next attempt(s) you probably can
skip step 3 as your laptop/tablet/smart-
phone remembers the EMFIT QS password.
Red and green lights are flashing alternately.
Device is again at AP mode.
Please don’t get confused if your browser
says “http://192.168.1.3 is not replying.” It is
because your computer probably switched
automatically to your home Wi-Fi and there
is no device in that address in Internet.
Check however again that you write your
own home Wi-Fi network password correct-
ly. Also, if aer few attempts still no success,
check that your router is not dual frequency
(2.4 GHz and 5 GHz) version or operating
at channels 12-13. For troubleshooting, see
chapter Troubleshooting in Installation & op-
erating instructions.
You may also get reply from some other de-
vice than EMFIT QS device. For example if
you have IP camera.
Connect to Wi-Fi …continued Register your device
Aer successful Wi-Fi connection, it is time to register your device.
Go to https://qs.emfit.com
and click “Register your device”.
Locate your serial and PIN
numbers on the back of the
device.
YOUR SERIAL NUMBER
YOUR PIN NUMBER
Insert serial number and PIN number of your device.
PASSWORD TO YOUR DEVICE (AP ACCESS POINT)
YOUR SERIAL NUMBER
YOUR PIN NUMBER
Click “next”.
1 2
3
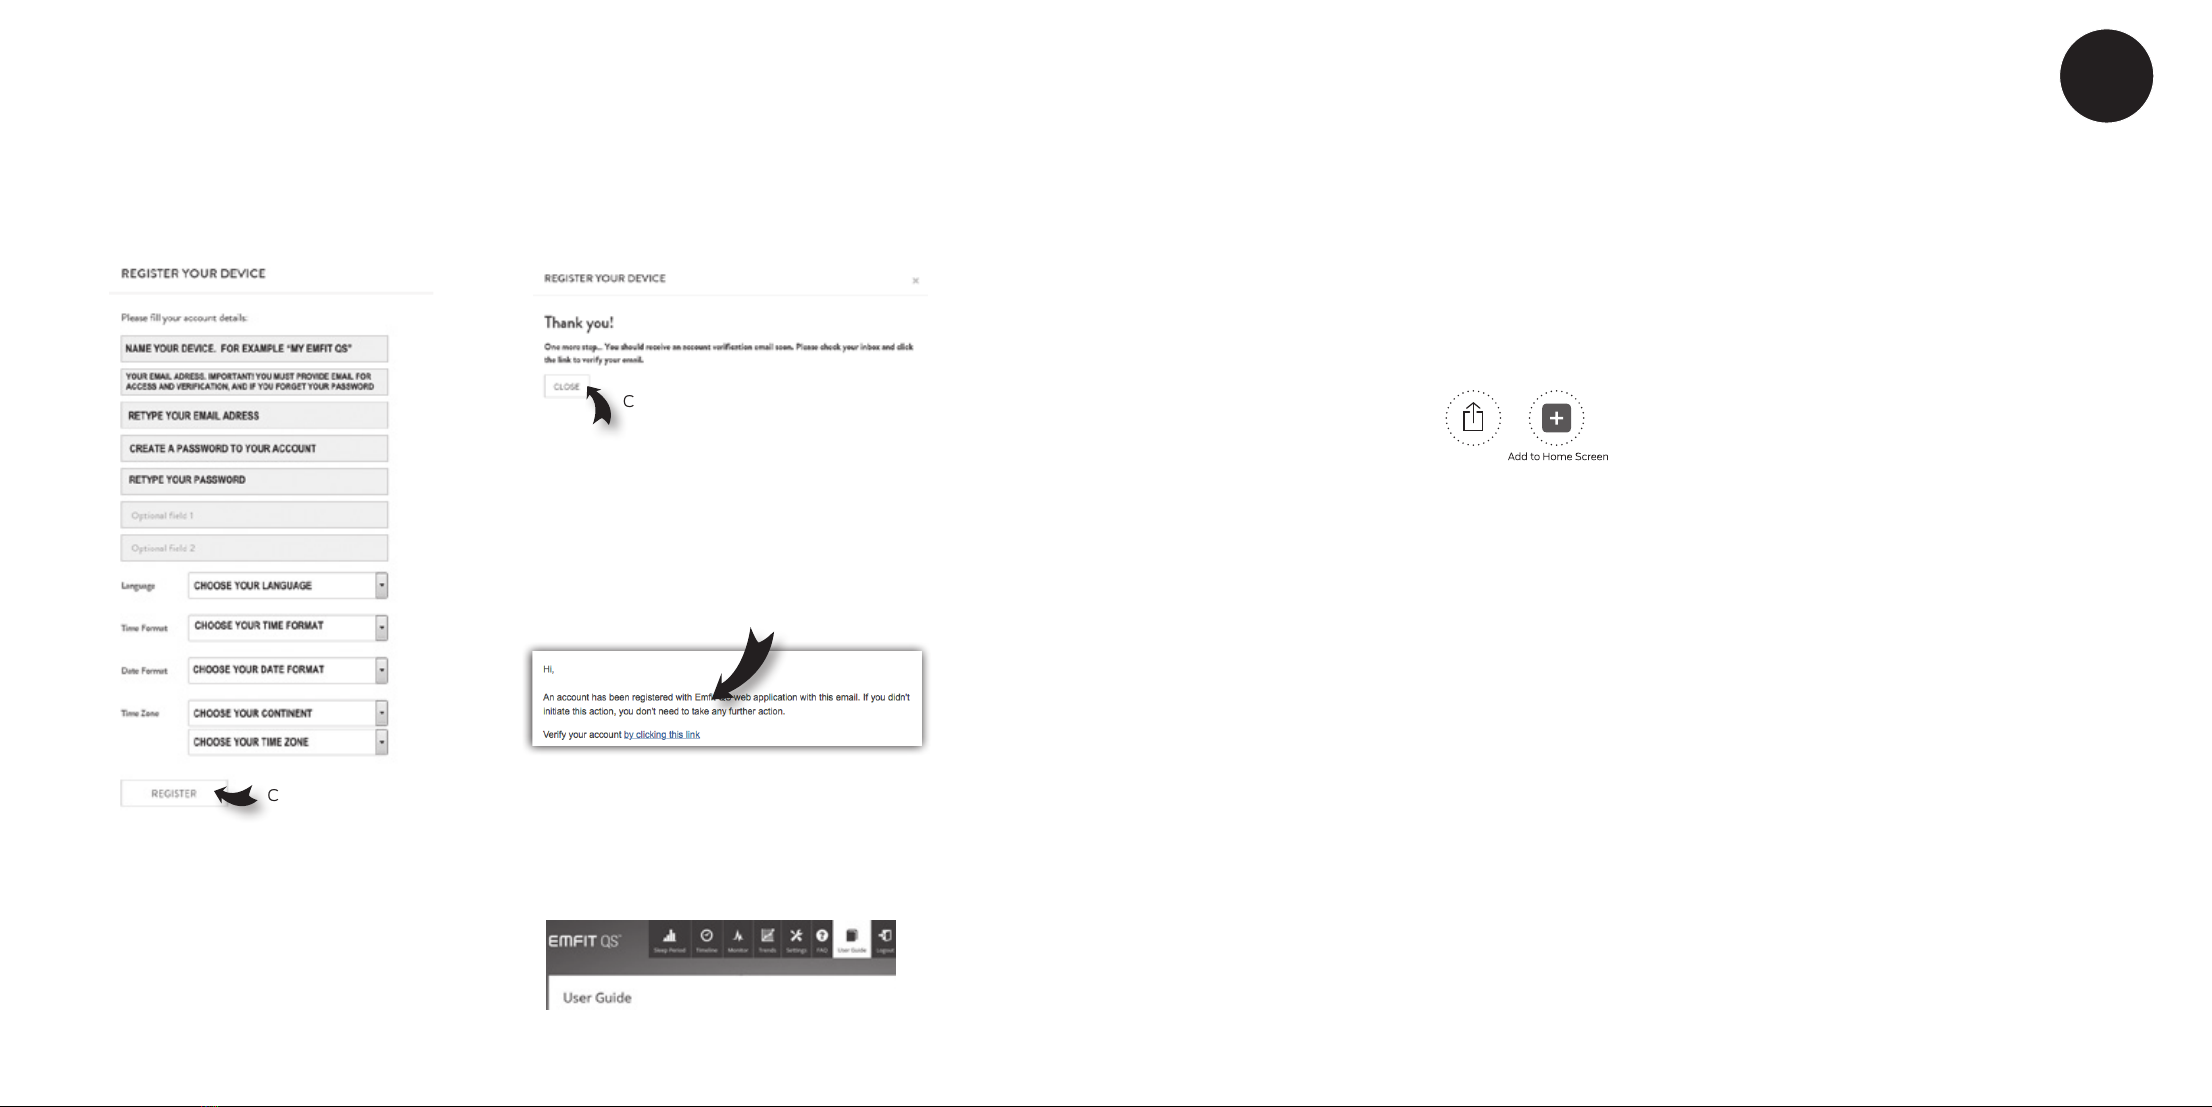
Fill/choose the details.
Click “register”.
4This will open.
Go and check your email for our verification email*.
Open it and click the link in it.
(If you do not receive the confirmation message
within a few minutes of signing up, please check
your Spam folder just in case the confirmation email
got delivered there instead of your inbox.)
* If you do not receive the email at all, you can go
directly to https://qs.emfit.com and log in (clicking
the verification link is not necessary).
Click “close”.
5
6
You will be directed to the Emfit QS web ap-
plication.
7
…continued
Register your device
iOS devices
To quickly access your sleep data it is useful to create a QS icon to your phone’s/
tablet’s homescreen.
Android devices
Useful
tip!
Add QS icon to your phone/tablet
homescreen
1) Open up Safari and go to
https://qs.emfit.com
2) At the bottom of the screen
you’ll see a square icon with an
arrow. Tap this icon and you’ll
have a few options. Choose
“Add to Home Screen”.
3) You’ll be asked to write a name for the homescreen
icon. Write EMFIT QS and save it. Now it will show up
on your homescreen and you can access directly to your
EMFIT QS data.
1)Launch Chrome for Android and open the website
https://qs.emfit.com
2) Tap the menu button and tap “Add to homescreen”.
You’ll be asked to write a name for the homescreen
icon. Write EMFIT QS and save it. Chrome will add it to
your home screen.
3) The icon will appear on your home screen and you can
drag it around and place it wherever you like. Chrome for
Android loads the website as a “web app” when you tap
the icon, so it will get its own entry in the app switcher
and won’t have any browser interface getting in the way.
www.emfit.com
Emfit, Corp.
P.O. Box 342394
Austin, TX 78734
United States
Phone: (512) 266-6950
qs@emfit.com
USA CHINA
Emfit Ltd
Konttisentie 8 B
40800 Vaajakoski
FINLAND
Phone: +358 20 778 0870
qs@emfit.com
EUROPEAN UNION
Please read the “Installation & operating instructions” for the full instructions for use, including
information on safety from: https://qs.emfit.com/docs
Instruction videos available on our YouTube channel:
www.youtube.com/user/EmfitCorp
Emfit warranty, its terms of condition and
technical support
The warranty of Emfit products is valid for 24
months from the purchase date. The warranty
covers structural, material and manufacturing
defects. The warranty does not cover normal
wear or defects caused by it. Emfit can demand
a purchase invoice, receipt or other verification for
deliveries to warranty services.
The warranty does not cover damages or prob-
lems caused by use of other additional devices,
such as routers. The warranty also does not cover
self-inflicted problems, such as careless use.
The warranty does not cover damages caused by
external matters (such as thunder or water leak-
age). The warranty does not cover any indirect
ramification damages such as person damages,
decrease of production, decrease of revenue, etc.
Emfit Ltd is not liable for such consequences in
any way.
Emfit Ltd has a right to exchange a defected
product to another equivalent product. The ex-
changed product becomes ownership of Emfit
Ltd. Exchanging a product does not elongate the
original warranty.
Actions in warranty repairs
The customer has to contact the vendor or Emfit
Ltd and agree upon sending the device to warran-
ty repair. Tell the serial number (found at the back
of the electronics device), purchase date, defect
description and your own contact information.
Aer this, you will receive instructions for sending
the device.
When the product is shipped, it has to be carefully
packed and the power source has to be shipped
with the device. Personal contact information,
including phone number and defect description,
must be included as well.
Actions when contacting technical support
Free of charge technical service is available from
9 am to 4 pm on business days (Finnish time,
GMT+2) at +358 20 778 0870. Questions for
technical support can also be sent to qs@emfit.
com. Be prepared to give technical support the
serial number of your device.
GENERAL NOTE: THE USE OF THE PRODUCT INCLUDING THE SOFTWARE AND DOCUMENTATION (THE “PRODUCT”) IS SUBJECT EMFIT LTD GRANTS A NON-EX-
CLUSIVE RIGHT TO USE THE PRODUCT. THE RECIPIENT SHALL NOT TRANSFER, COPY, MODIFY, TRANSLATE, REVERSE ENGINEER, CREATE DERIVATIVE WORKS;
DISASSEMBLE OR DECOMPILE THE PRODUCT OR OTHERWISE USE THE PRODUCT EXCEPT AS SPECIFICALLY AUTHORIZED. THE PRODUCT AND THIS DOCU-
MENT ARE PROVIDED ON AN “AS IS” BASIS ONLY AND MAY CONTAIN DEFICIENCIES OR INADEQUACIES. TO THE MAXIMUM EXTENT PERMITTED BY APPLICABLE
LAW, EMFIT LTD DISCLAIMS ALL WARRANTIES AND LIABILITIES. THE RECIPIENT UNDERTAKES FOR AN UNLIMITED PERIOD OF TIME TO OBSERVE SECRECY
REGARDING ANY INFORMATION AND DATA PROVIDED TO HIM IN THE CONTEXT OF THE DELIVERY OF THE PRODUCT. THIS GENERAL NOTE SHALL BE GOVERNED
AND CONSTRUED ACCORDING TO FINNISH LAW.
COPYRIGHT: TRANSMITTAL, REPRODUCTION, DISSEMINATION AND/OR EDITING OF THIS DOCUMENT AS WELL AS UTILIZATION OF ITS CONTENTS AND COM-
MUNICATION THEREOF TO OTHERS WITHOUT EXPRESS AUTHORIZATION ARE PROHIBITED. OFFENDERS WILL BE HELD LIABLE FOR PAYMENT OF DAMAGES. ALL
RIGHTS CREATED BY PATENT GRANT OR REGISTRATION OF A UTILITY MODEL OR DESIGN PATENT ARE RESERVED. EMFI, EMFIT, EMFIT QS, QS LOGO AND EMFIT
LOGO ARE REGISTERED TRADEMARKS OR TRADEMARKS OF EMFIT LTD. © EMFIT LTD 2004-2018. ALL RIGHTS RESERVED. PATENTED, PATENTS PENDING. ALL SPECIFI-
CATIONS ARE SUBJECT TO CHANGE WITHOUT PRIOR NOTICE. MOZILLA, SAFARI, CHROME, INTERNET EXPLORE, WINDOWS 10 ARE REGISTERED TRADEMARKS OF
MOZILLA FOUNDATION, APPLE INC., GOOGLE INC. AND MICROSOFT CORP. WITH WHOM EMFIT IS NOT AFFILIATED.
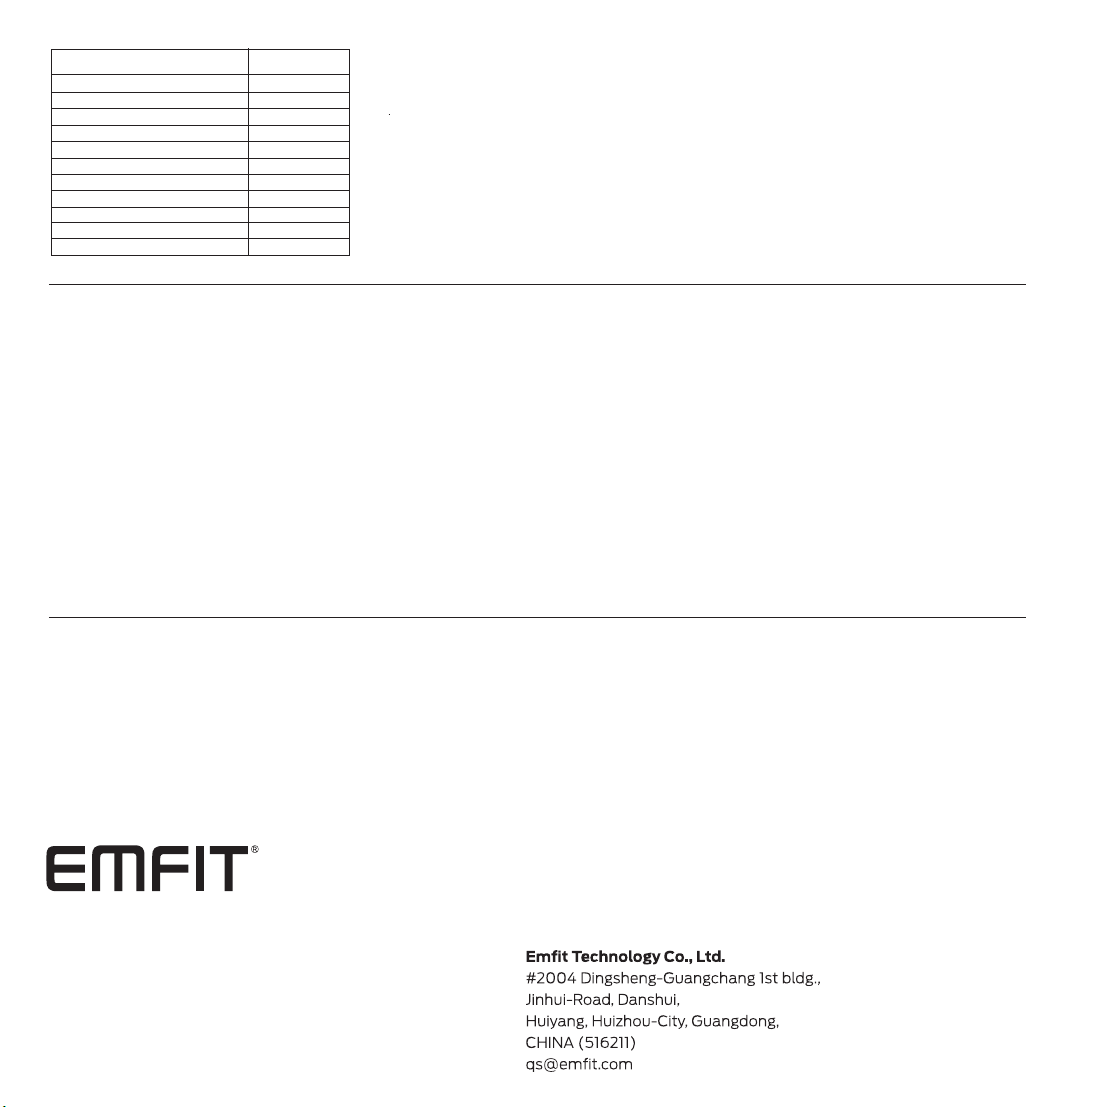
Release date Revision
v1.0
v.1.1
v.1.2
v.1.3
v.1.4
v1.5
v1.6
v1.7
v1.8
v1.9
v2.0
23.2.2017
4.5.2017
1.6.2017
10.8.2017
11.9.2017
4.10.2017
25.10.2017
22.1.2018
9.2.2018
20.4.2018
10.9.2018
Other manuals for Quantified Sleep IP-9360
1
Table of contents
Other Emfit Medical Equipment manuals


Popular Medical Equipment manuals by other brands


Getinge
Getinge Arjohuntleigh Nimbus 3 Professional Instructions for use

Mettler Electronics
Mettler Electronics Sonicator 730 Maintenance manual

Pressalit Care
Pressalit Care R1100 Mounting instruction

Denas MS
Denas MS DENAS-T operating manual

bort medical
bort medical ActiveColor quick guide

AccuVein
AccuVein AV400 user manual


