manuals.online logo
Brands
  1. Home
  2. •
  3. Brands
  4. •
  5. EMG
  6. •
  7. Other
  8. •
  9. EMG S/S/89 Service manual

EMG S/S/89 Service manual

© 2009 Copyright EMG INC. All Rights Reserved.
PO BOX 4394
SANTA ROSA, CA
95402 USA
P (707) 525-9941
F (707) 575-7046
EMGPICKUPS.COM
0230-0157A
INSTALLATION INFORMATION
EMG MODEL: S/S/89, 81-TW COMBINATION SYSTEM
Warranty
All EMG Pickups and accessories are warranted for a period of two years. This warranty does not cover failure due to improper installation, abuse or damage. If
upon examination the pickup is determined to be defective, a replacement will be made. Warranty replacement products are covered by this same warranty. This
warranty covers only those pickups and accessories sold by authorized EMG Dealers. This warranty is not transferable.
*Note: Magnet Type: A (Alnico) C (Ceramic)
**Note: Specifications shown are for the entire 3 pickup system
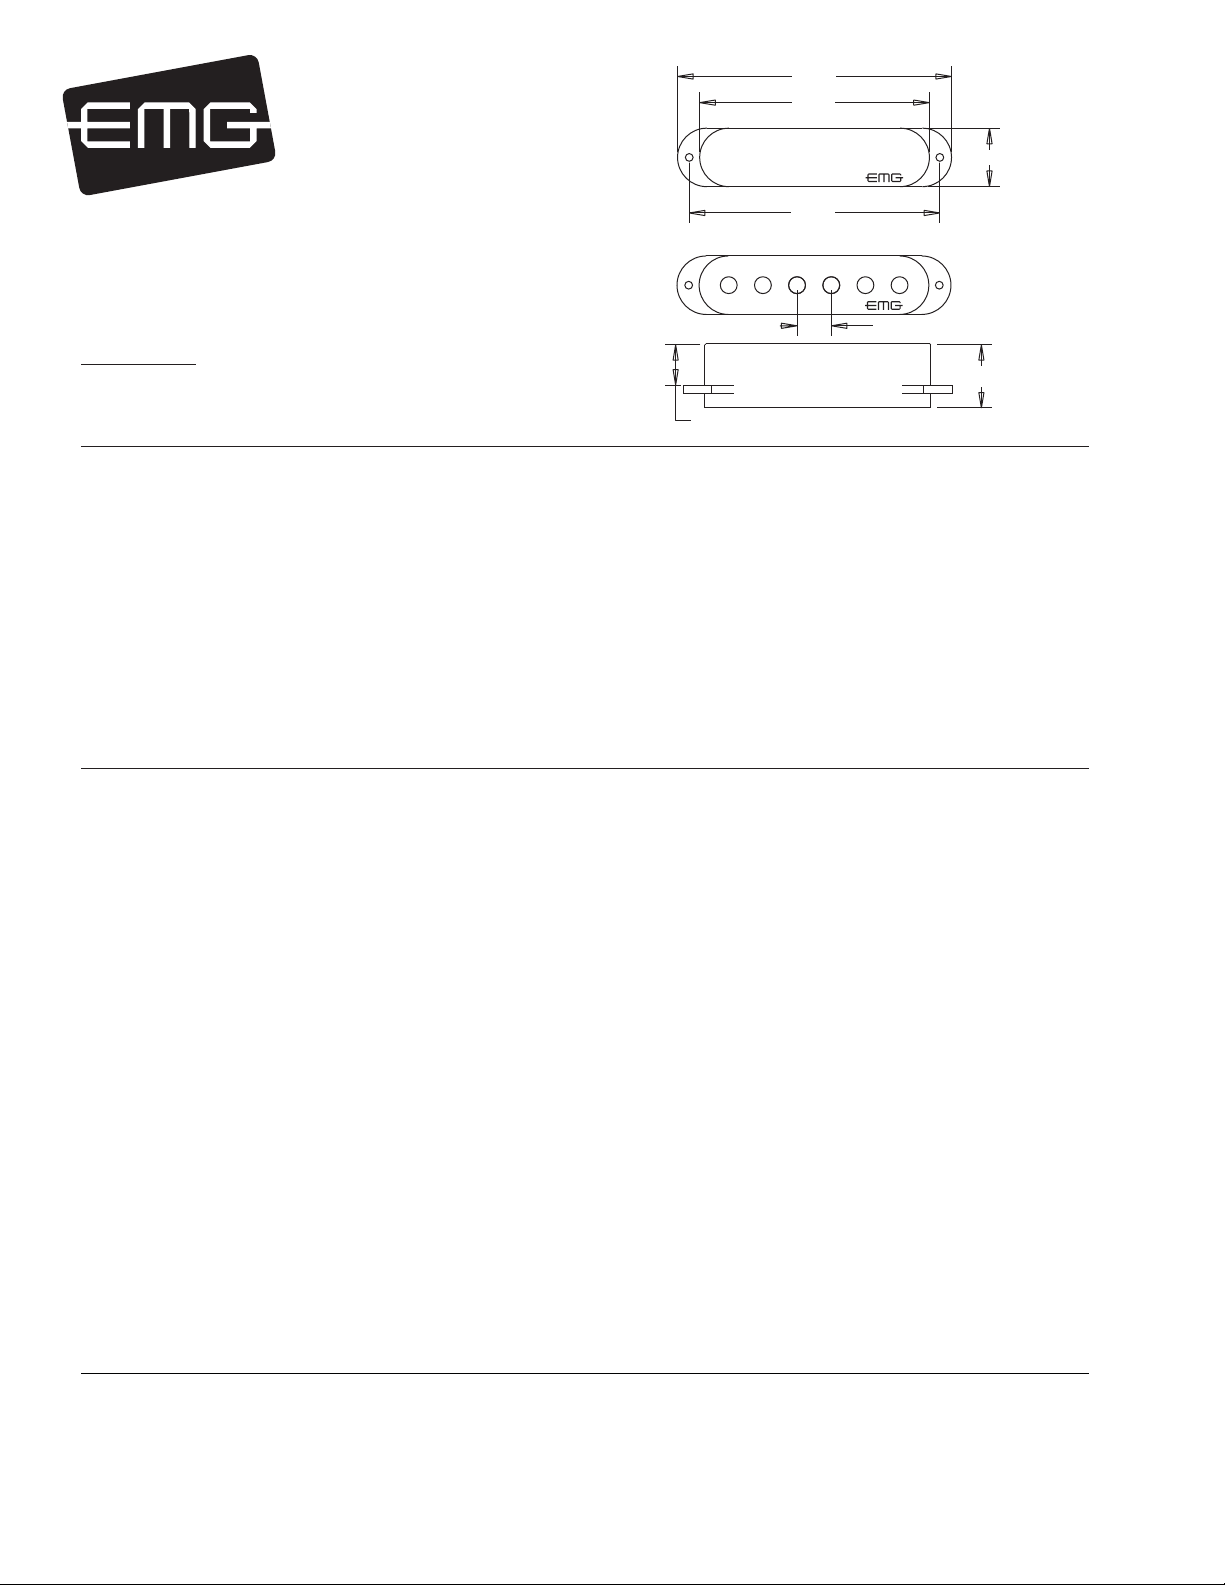
3.28
2.75
3.00
.70
6/32 MOUNTING SCREWS
.49
.77
.412 TYP
S, SA, SLV
SV, SAV
Installation notes:
All EMG Pickups are compatible with each other. The connector system is an easy method of installation, avoiding the need to solder.
Older systems may need to be soldered, while the newer systems can be easily connected and modified. If you have an older EMG
Pickup you can install the new system along with it.
EMG accessories like the VLPF, EXG, SPC or RPC Controls can be added to any EMG Pickup System without the need for an extra battery.
SPECIFICATIONS: MODEL:
S SA SV SAV SLV
Logo Color Silver Gold Gold Gold Gold
Magnet Type * C A A A A
Resonant Frequency (KHz) 4.05 3.70 2.41 4.41 3.33
Output Voltage (String) 1.00 1.00 1.00 1.00 1.00
Output Voltage (Strum) 3.00 3.00 3.00 3.00 3.00
Output Noise (60 Hz) -101 -101 -102 -101 -103
Output Impedance (Kohm) 10 10 10 10 10
Current @9V (Microamps)** 240 240 690 240 240
Battery Life (Hours)** 1000 1000 400 1000 1000
Maximum Supply (Volts DC) 27 27 27 27 27
IMPORTANT INSTALLATION NOTES:
1) Only one 9-Volt battery is required to power the pickups and any
accessories such as the SPC, RPC, EXG, AB, PA-2, and Pi-2.
Use an Alkaline or Lithium battery for longest life.
2) The Volume and Tone controls included with this EMG System are
25K Ohm. This value is required for the system to work correctly.
3) A stereo output jack (12B) is included with the EMG Pickups;
it grounds the black battery wire to turn on the pickups when
the plug is inserted into the jack. If you are replacing passive
pickups, make sure to use the jack included. If your guitar has a
long panel jack make sure it is a stereo type, a Switchcraft 152B
is recommended.
4) When installing EMG Active Pickups, DO NOT connect the bridge
ground wire. This wire is usually soldered to a volume or tone
control casing and goes to the bridge. This wire grounds the
strings and uses them and your body as a shield against hum and
buzz. It also creates a shock hazard.
EMG Pickups are shielded internally and DO NOT require string
grounding. This greatly reduces the possibility of reverse
polarity shock from microphones and other equipment.
5) EMG Active Pickups have very little magnetism compared to
passive pickups. We recommend you adjust the pickups as
close to the strings as possible. Sustain and string movement
will not be inhibited by close adjustment. Models EMG-SV and
EMG-SAV feature magnetic pole pieces which can inhibit
intonation and string movement.
6) If your installation is different from the diagrams in these
instructions or you need additional diagrams visit our website:
emgpickups.com for a complete listing of available diagrams.
S/S/89 COMBINATION SYSTEM INSTRUCTIONS Page 2
General Notes:
Every attempt has been made to make this a solderless installation.
There are some instances where this is not possible;
1) If your instrument uses the long panel output jack and you had
passive pickups you will need a new stereo output jack, the
Switchcraft 152B is recommended. Soldering to the new jack will be
required, see the Power Tips Data sheet at http://www.emgpickups.com
2) Some instruments may already have a battery holder installed and in that
case soldering may be required, see page 4.
Installing EMG Combination Systems is very easy and is accomplished in a
few steps. The controls included have a 10 mm bushing height so they can
be used either on a pickguard, or body mount. The cable lengths are
designed for a pickguard, so you should make sure they are long enough if
you are mounting the system into a body. Longer cable lengths may be
required. If a cable is too long, any extra cable length should be kept
under the pickup
Installation Instructions:
EMG-S/S/89 Combination Systems
Step One:
Mount the pickups and the controls onto the Pickguard,
or into the guitar body.
1
2
3
TONE CONTROL
MIDDLE PICKUP
TONE CONTROL
NECK PICKUP
PUSH-PULL SWITCH
VOLUME CONTROL
(MASTER)
EMG-S5
5 POSITION SWITCH
EMG-89 or 81-TW
Step Two:
Plug the pickup cable onto
the Push-Pull Pot using either
Diagram #1 or Diagram #2 below.
Diagram #1
HUMBUCKING ON: DOWN POSITION
SINGLE COIL ON: UP POSITION
Diagram #2
SINGLE-COIL ON: DOWN POSITION
HUMBUCKING ON: UP POSITION FLIP CONNECTORS 1 AND 2
AS SHOWN
WIRE ORDER:
WHITE
GREEN
BLUE
YELLOW
ORANGE
SHIELD
WIRE ORDER:
GREEN
WHITE
YELLOW
BLUE
ORANGE
SHIELD
1
2
3
1
2
3
CHOOSE EITHER DIAGRAM #1 OR
DIAGRAM #2 FOR THE WIRE ORDER
EMG-89 or 81-TW
Step Four:
Plug the Single-Coil pickup cables onto the NEK and MID
inputs of the switch as shown. The pots and the 89/
81-TW cable have been omitted for clarity.
TONE INPUT
MID
P/U
NEK
P/U
BLK
WHT
OUTPUT
SLV
TIP
RING
BAT-
BAT+
V+
GRN
RED
RED
BLK
WHT
BLK
WHT
BLK
BRG
BLK
WHT
RED
EMG-S5
NEK
MID
B161rC
NECK PICKUP
MIDDLE PICKUP
EMG-89 or 81-TW PICKUP
POTS AND 89 PICKUP CABLE
OMITTED FOR CLARITY
S/S/89 COMBINATION SYSTEM INSTRUCTIONS Page 3
SHUNT ON (H5)
PICKUP OUTPUT (H4)
TO (BRG) INPUT
ON PC BOARD
TONE INPUT
MID
P/U
NEK
P/U
BLK
WHT
OUTPUT
SLV
TIP
RING
BAT-
BAT+
V+
GRN
RED
RED
BLK
WHT
BLK
WHT
BLK
BRG
BLK
WHT
RED
EMG-S5
NEK
MID
B161rC
INPUT FOR EMG-89 or 81-TW PICKUP
AS THE BRIDGE (BRG) PICKUP
Step Three:
Plug a coax cable from the Push-Pull Pot (H4)
to the Bridge (BRG) input on the selection
switch. Plug the RED wire from the
pickup cable to the PC Board as well.
See the diagram below.
COAX CABLE FROM THE PUSH-PULL POT TO
THE (BRG) PICKUP INPUT ON THE SWITCH PC BOARD
1
2
3
If the instrument has a Battery Holder:
If your instrument has a 9 or 18-Volt battery holder you can still
use the EMG Connectors to supply power to the pickups.
Simply cut and strip the wires from the battery clip provided.
Twist the wires together and use the shrink tubing included
to cover the connections. Soldering the wires is the preferred.
Cover these connections with the
shrink tubing provided.
To PC Board
9/18 VOLT
BATTERY
HOLDER
TO EMG-S5 SWITCH
RING
TIP
SLEEVE
SSH COMBINATION SYSTEM INSTRUCTIONS Page 4
Step Six:
The Pickguard is now fully assembled. Next the pre-wired output jack
needs to be mounted in the Jack plate. Mount the Jack onto the plate
with the orientation as shown with the Tip spring pointing down.
Refer to the diagrams below and make sure the Jack is mounted tightly.
Step Seven:
Route the Output cable from the Jack cavity into the control cavity via the small hole.
If the hole is too small, Push the connectors through one at a time
Fasten the Jack plate onto the guitar and test to make sure the jack inserts and exits easily.
Mount the battery in the control compartment. Insulate the battery using
the foam insulator provided..
Step Five:
Plug the Volume and Tone control cables from the controls
to the switch. Two views are shown.
MIDDLE PICKUP
TONE CABLE
NECK PICKUP
TONE CABLE
PLUG A COAX CABLE FROM
THE H1 POSITION OF THE
PUSH-PULL POT TO THE OUTPUT
OF THE SWITCH PC BOARD
1
2
3
COAX CABLE SHOWN ON H1
OF THE PUSH-PULL POT
Battery Replacement:
Remove these 4 screws,
gently lift the pickguard’
remove and replace the battery.
RING
TIP
SLEEVE
Step Nine:
Plug the Battery clip cable onto the BAT- (BLACK) and the BAT+ (RED)
terminals of the PC Board. The extra terminal marked V+ is for powering
additional EMG Accessories (see page 6).
Step Ten:
This completes the installation. Plug the battery clip onto the battery.
We suggest you plug in the instrument, tap lightly on the pickups with
a small screwdriver to make sure the pickups are working correctly.
When the battery needs to be replaced (about 6 months to 1 year)
refer to the diagram at the right.
Step Eight:
Plug the Output cable from the Output Jack to
H2 of the Push-Pull Pot as shown.
Plug the green wire onto the Ring
terminal of the Switch PC Board.
TONE INPUT
MID
P/U
NEK
P/U
BLK
WHT
OUTPUT
SLV
TIP
RING
V+
GRN
RED
RED
BLK
WHT
BLK
WHT
BLK
BRG
BLK
WHT
RED
EMG-S5
NEK
MID
B161rC
BATTERY CLIP TO BAT- AND BAT+
TERMINALS ON THE PC BOARD
GREEN WIRE FROM OUTPUT JACK
TO THE RING PIN OF THE PC BOARD
TONE INPUT
MID
P/U
NEK
P/U
BLK
WHT
OUTPUT
SLV
TIP
BAT-
BAT+
V+
GRN
RED
RED
BLK
WHT
BLK
WHT
BLK
BRG
BLK
WHT
RED
EMG-S5
NEK
MID
B161rC
H2 OF PUSH-PULL POT
TO OUTPUT JACK
S/S/89 COMBINATION SYSTEM INSTRUCTIONS Page 5
ALTERNATE VIEW
- 9V +
GREEN WIRE TO THE RING
TERMINAL OF THE PC BOARD
TO OUTPUT JACK
1
2
3
H2 OF PUSH-PULL POT
TO OUTPUT JACK

This manual suits for next models

1

Other EMG Other manuals

EMG X Series Service manual

EMG

EMG X Series Service manual

EMG B122 Volume Control Service manual

EMG

EMG B122 Volume Control Service manual

EMG PJA SET Service manual

EMG

EMG PJA SET Service manual

EMG B157 Pickup Buss Service manual

EMG

EMG B157 Pickup Buss Service manual

EMG TB-HZ Service manual

EMG

EMG TB-HZ Service manual

EMG X Series Service manual

EMG

EMG X Series Service manual

EMG 45-TW-X Service manual

EMG

EMG 45-TW-X Service manual

EMG B125 ACTIVE BALANCE CONTROL User manual

EMG

EMG B125 ACTIVE BALANCE CONTROL User manual

EMG HB Service manual

EMG

EMG HB Service manual

EMG BQC CONTROL Service manual

EMG

EMG BQC CONTROL Service manual

EMG BTC CONTROL Service manual

EMG

EMG BTC CONTROL Service manual

EMG MMTW Dual Mode Service manual

EMG

EMG MMTW Dual Mode Service manual

EMG J Service manual

EMG

EMG J Service manual

EMG AB Service manual

EMG

EMG AB Service manual

EMG B234rB Service manual

EMG

EMG B234rB Service manual

EMG MARTY FRIEDMAN MF Series Service manual

EMG

EMG MARTY FRIEDMAN MF Series Service manual

EMG EMG-ZW Series Service manual

EMG

EMG EMG-ZW Series Service manual

EMG B124 Tone Control Service manual

EMG

EMG B124 Tone Control Service manual

EMG P-HZ Service manual

EMG

EMG P-HZ Service manual

EMG X Series Service manual

EMG

EMG X Series Service manual

EMG EMG-ACB BARREL Service manual

EMG

EMG EMG-ACB BARREL Service manual

EMG 81-TW-X Service manual

EMG

EMG 81-TW-X Service manual

EMG BTS SYSTEM Service manual

EMG

EMG BTS SYSTEM Service manual

EMG MMTW Service manual

EMG

EMG MMTW Service manual

Popular Other manuals by other brands

GTSYS DR-E-USB Quick reference guide

GTSYS

GTSYS DR-E-USB Quick reference guide

Vintage Air 55070-VCZ-A manual

Vintage Air

Vintage Air 55070-VCZ-A manual

Dwyer Instruments BDL-1 Specifications-installation and operating instructions

Dwyer Instruments

Dwyer Instruments BDL-1 Specifications-installation and operating instructions

Tiger CS7-200H owner's manual

Tiger

Tiger CS7-200H owner's manual

DiMarzio Model P manual

DiMarzio

DiMarzio Model P manual

Chamberlain LMHNTG manual

Chamberlain

Chamberlain LMHNTG manual

Strong SRT 8114 user manual

Strong

Strong SRT 8114 user manual

UCView RackMedia Xtreme installation manual

UCView

UCView RackMedia Xtreme installation manual

LAMBORGHINI VELA X 24 MB - SCHEMA manual

LAMBORGHINI

LAMBORGHINI VELA X 24 MB - SCHEMA manual

Logik L8DHW10 instruction manual

Logik

Logik L8DHW10 instruction manual

Meinberg IMS-M1000 manual

Meinberg

Meinberg IMS-M1000 manual

ASO Safety Solutions ELMON rail 39-726 operating manual

ASO Safety Solutions

ASO Safety Solutions ELMON rail 39-726 operating manual

Trinity BarrierGate Series Product Description Instructional Manual

Trinity

Trinity BarrierGate Series Product Description Instructional Manual

Victron energy Cyrix-ct 12/24V-120A manual

Victron energy

Victron energy Cyrix-ct 12/24V-120A manual

BlumSafe BlumSafe Installation and operating instruction manual

BlumSafe

BlumSafe BlumSafe Installation and operating instruction manual

THIEMAN TVLR 125 installation instructions

THIEMAN

THIEMAN TVLR 125 installation instructions

SPI Infrared Thermal Infrared Camera user manual

SPI Infrared

SPI Infrared Thermal Infrared Camera user manual

AudioBahn DUAL 6 - DIAGRAM manual

AudioBahn

AudioBahn DUAL 6 - DIAGRAM manual

manuals.online logo
manuals.online logoBrands
  • About & Mission
  • Contact us
  • Privacy Policy
  • Terms and Conditions

Copyright 2025 Manuals.Online. All Rights Reserved.