Tebco Transporter User manual
OWNER’S MANUAL
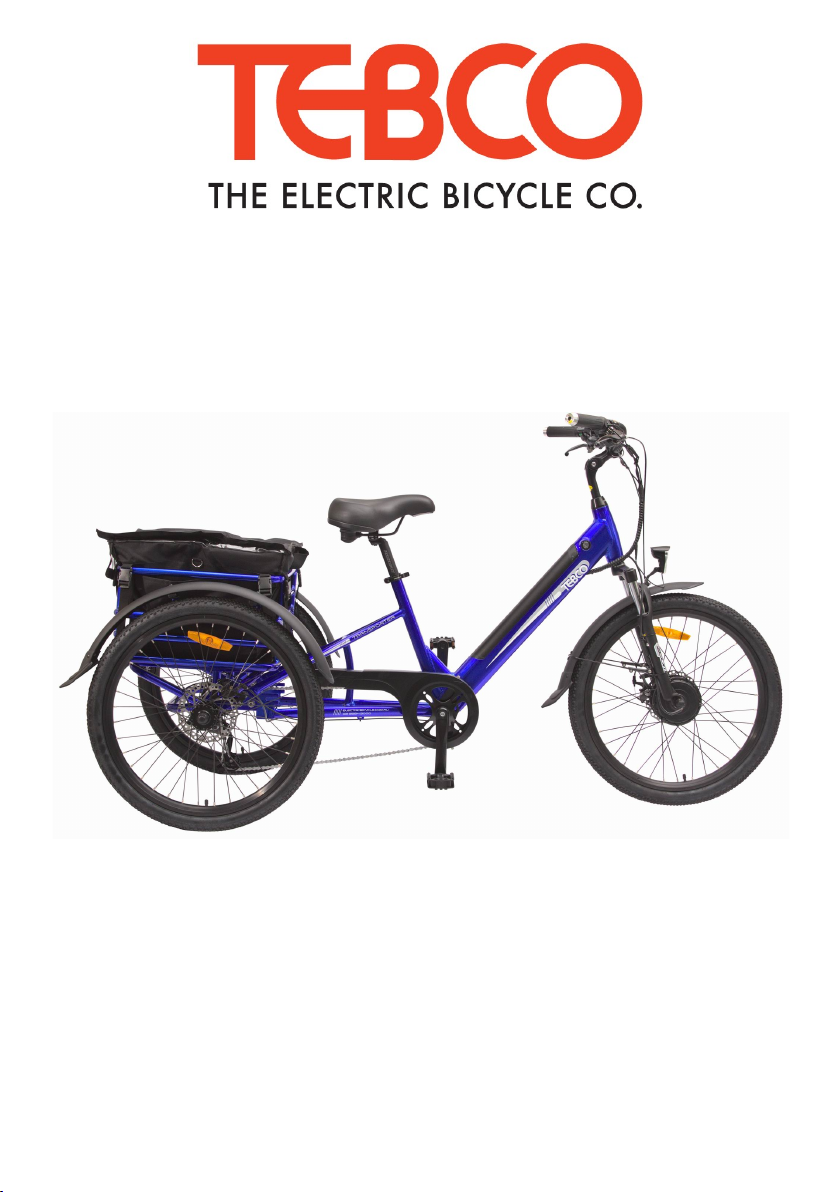
Transporter Tricycle
www.electricbicycle.com.au

ATTENTION
Congratulations on your purchase of the Transporter Tricycle.
Your Transporter is an ELECTRIC TRICYCLE.
It is fitted with an electric motor and is powered by a BATTERY
The BATTERY is the MOST IMPORTANT and indeed the
MOST EXPENSIVE component of you Transporter.
To prolong the life of your BATTERY it is
important to keep it in a CHARGED state.
NEVER allow your BATTERY to DISCHARGE and
REMAIN DISCHARGED as this will
greatly reduce the life of your BATTERY.
Every day you ride your Transporter bring it home
and FULLY RE-CHARGE.
If you do not ride your Transporter on a regular basis –
RE-CHARGE your BATTERY at least ONCE every month .
Failure to adhere to correct BATTERY management
shall void your Battery Warranty.

Introduction:
Thank you for you choosing your Transporter Electric Tricycle from The Electric Bicycle
Co. We have created a stylish and serviceable tricycle for your personal transport and
enjoyment. Prior to riding your new Transporter please thoroughly read and understand this
manual - it is provided for YOUR benefit. Should you not understand any parts of this manual
please consult your supplier.
Our company has designed and manufactured this Transporter to strict quality control
systems to IS09001 certification standard.
Our company's aim is to provide you with high quality, serviceable and affordable personal
electric transportation that will give you many years of enjoyable, trouble free service - whilst at
the same time helping to sustain our fragile environment by utilizing clean, green renewable
energy.
Attention:
Before you use this Transporter, please thoroughly read and understand this
Owner’s Manual.
After you understand the Owner’s Manual and operation of your tricycle, you can ride
it. Please don't lend your Transporter to others who are unfamiliar with its operation.
ALWAYS WEAR A GOOD QUALITY, PROPERLY FITTED and APPROVED
BICYCLE SAFETY HELMET!
ALWAYS ENSURE THAT POWER IS TURNED OFF WHEN YOU MOUNT OR
DISMOUNT THE TRICYCLE
Be familiar with and observe all local traffic rules of your city.
This Transporter is designed for single rider use. At no time should you ever carry a
pillion passenger.
When riding in wet or slippery conditions or on uneven surfaces please ride
cautiously.
This Owners Manual is designed for use only with Transporters supplied by The
Electric Bicycle Co.
Enjoy your ride!
A. J. (Tony) Morgan
The Electric Bicycle Co. P/L

Preface
“The Electric Bicycle Co” Transporter has set precedents in design and performance of
personal transportation.
The aesthetically designed body styling makes it appealing to look at whilst offering excellent
operating performance and manoeuvrability. There is no other Transporter in the world that
offers comparable comfort and safety.
Your exceptional insight has allowed you to select a fashionable product that is fun to ride
whilst also being environmentally friendly. Thank you for selecting our product and
congratulations for doing your part to preserve the environment.
To ensure proper usage and extended life of your fabulous Transporter please read this
Owners Manual carefully.
Main Functions and Characteristics
1. Highly efficiency / high torque brushless geared front hub motor.
2. Digital controller
3. Proportional twist grip throttle for smooth effortless acceleration and control.
4. Front and rear brakes and handlebar mounted brake levers with in-built brake locks.
5. 3 x 12V 12Ah Sealed Lead Acid OR 36V 10.4Ah Lithium Ion maintenance free batteries
offering stronger starting current and extended distance between re-charges.
6. Large easy to read LCD Speedometer / Battery Status Gauge / Trip Computer
7. Removable battery box making it convenient to charge both in tricycle and in house.

Operating Methods
Before operating:
1. Press to ‘Power ON’ Transporter – LCD Indicator Panel will activate.
2. If battery status gauge does not show at least half full – recharge before you attempt to
ride. (To extend battery life - re-charge batteries every time you get home.)
3. Check both brakes to see if they are both working effectively. Check ‘Honka Hoota’
operation.
4. Check the pressure of front and rear wheels. Pressure should be Min 40psi – Max 65psi
Riding Technique
1. Seat yourself comfortably on seat. If seat too high or too low - adjust to suit your comfort.
2. The ‘Transporter’ is fitted with 2 types of Power Activation:
(A) ‘Twist Grip Accelerator Assembly’ - Turn ‘twist grip throttle’ slowly towards you to
accelerate. The further you turn the ‘twist grip throttle’ the more you will accelerate
and the faster your speed.
(B) ‘Pedal Activation System’ – Simply start to pedal and power will automatically be
activated to motor.
3. To decelerate – release ‘twist grip throttle’ or ‘cease pedalling’ and controller will
automatically cut power to motor.
4. Slowly pull on both brake levers to ‘brake’ and slow the bicycle to a stop.
Power ‘Override Switches’
Your Transporter is equipped with 2 power ‘Override Switches’
1. These are small micro-switches situated within each brake lever.
2. By simply pulling either brake lever on slightly – power is cut to the motor.
3. These are safety switches, which can prevent your tricycle from accidentally ‘starting’
whilst you are stationary.
FULL EXPLANATION OF LED TRIP COMPUTER AND PAS
POWER MODE CONTROLLER LATER IN THIS MANUAL.

Battery charging:
1. The battery is the most important part of your Transporter. To ensure good performance -
proper usage and maintenance will maximise battery life.
2. Over-discharging of batteries should be avoided at all times. Batteries should always be
re-charged ready for riding. If not used for a period of 30 days, batteries should be re-
charged fully.
3. After usage and when tricycle is not in use always be sure to turn Power off via KPA
Remote Unit or key and remove key from switch.
4. If the ‘Battery Status Gauge’ drops to half way - this means that batteries need to be
immediately re-charged. Continuing to ride whilst battery ‘charge’ is low can cause severe
battery damage.
5. To use battery charger, first insert the plug into charging socket on side of battery box.
Next insert plug into 240V power supply. After the charger is connected properly, turn on
240V AC supply. To disconnect after charging, turn off 240V AC supply, remove plug from
240V socket then pull out plug from Tricycle or battery socket. REFER TO BATTERY
CHARGER OPERATING INSTRUCTIONS SUPPLIED WITH YOUR CHARGER
6. When charging the battery, charger status lamp will glow RED to indicate ‘charging’.
When lamp turns GREEN ‘charging’ is complete and charger can be turned OFF.
Charging duration depends on the level of discharge of the battery. Normal charging
duration is 4-5 hours from flat.
7. Battery performances can be greatly influenced by many factors - weight of rider, type of
terrain, prevailing climatic conditions, style of riding etc. Be observant of your battery
performance and never try to achieve more than your batteries are capable of delivering.
8. If battery needs to be taken out of the Tricycle for re-charging or tricycle transport - unlock
battery lock and slide battery assembly towards you to remove from tricycle. To replace
battery pack – reverse this operation.
Adjustment & Maintenance
1. As a general rule to ensure longevity and good performance of your Transporter, have it
regularly serviced by a qualified and experienced tricycle mechanic.
2. There is no specific maintenance required on your electrical components. Simply re-
charge your batteries after each ride to ensure longest possible life.
3. Adjustment of the height of saddle. Loosen quick release on seat tube and adjust saddle
to a suitable height. The raised height of the saddle cannot exceed the height marked with
minimum insertion mark on saddle stem.
4. Brakes and their adjustment are standard to the tricycle industry. Be sure to keep brakes
properly adjusted at all times.
5. Regular checking of spoke tension and wheel alignment can also ensure maximum
performance of your Tricycle.

Tyre Pressure:
1. It is most important for continued effective operation of your Transporter that you
maintain the correct tyre inflation.
2. Both front and rear tyres should be maintained at Min 40psi and Max 65psi inflation.
Safety Precautions:
1. Always make sure POWER is OFF when you mount or dismount your tricycle. Only turn
POWER ON once you are safely seated on your tricycle.
2. When starting the tricycle, the twist grip throttle should be turned slowly and evenly to
ensure smooth gentle acceleration.
3. Never try to RACE your tricycle or ride at high speeds for long periods of time.
4. Remember that the motor on your tricycle is designed to assist your pedalling and not
substitute for your pedalling, so in order to extend motor and battery life pedal to assist
your tricycle if speed drops below 10kmh when climbing hills.
6. In wet or rainy weather, the tricycle should be ridden slowly and with much greater care.
Main technical parameter
1 Dimensions – L 1900mm x H 1140mm x W 800mm
2 Wheelbase ~ 1250mm
3 Weight - 33kg
4 Carrying Capacity ~ 120kgs
5 Max Speed 26kmh
6 Maximum Range - 60km Pedal Assist Mode
7 Minimum Ground Clearance - 160mm
8 Lithium Battery - 1pc x 36v 10.4Ah
9 Motor ~ Brushless geared
10 Rated Continuous Output - 250W
11 Input of Charger - 240V
12 Output of Charger – 2A 36V DC
13 Charging Duration – 4 to 5 hours
Indicator Panel

Your new discovery comes fitted with a ‘State of the Art’ LCD Trip Computer with the following
functions:
• Trip Computer Display
• Handlebar Control Buttons
• Backlit Display
• Smart Battery Indicator
• Power Draw Indicator
• Pedestrian Function
• Front / Rear Light Control
Power ON / OFF
To switch ON the Discovery, hold the power button for 2 (two) seconds.
To switch OFF the Discovery, hold the power button again for 2 (two) seconds.
If the bike is stationary for more than 10 minutes, it will switch off automatically.
Top Level Menu
NOTE: The menus are disabled whilst the bike is not stationary.
Home Screen
At power on, the display shows current speed and the total distance the bike has
travelled. Use the ‘i‘ button to rotate through the various display functions below:
• Current Speed (km/h)
• Average Speed (km/h)
• Maximum Speed (km/h)
• Trip Distance (km)
• Total Distance (km)
• Trip Time (hours)

The battery charge status is displayed in the top right corner of the
display. When the battery is discharged, the battery frame will flash to
indicate the battery needs to be recharged immediately.
The power draw from the battery by the electric bicycle can be read
under the battery charge status indicator in real time.
If there are any faults with the electrical system, an error code will
be displayed at the bottom of the display. Consult TEBCO or your
retailer for assistance.
Pedestrian Function
The Discovery has an in built 6 km/h pedestrian function so that
the bike can be safely wheeled under power whilst walking beside
it. To activate, hold down the ‘-‘ button for as long as you wish to
walk the bicycle.
Headlights and Taillights
To switch ON the headlight and taillight, press the ‘headlight’
button. To switch OFF the headlight and taillight, press the
‘headlight’ button again.
NOTE: The display backlight will dim when the headlight and
taillight are illuminated.
PAS Setting
The pedal assist function sets the amount of assistance from the
motor when pedaling. This is adjusted with the ‘-‘ and ‘+’ buttons.
The default level is 0 (zero) - no output power. This can be
adjusted between 0 (zero) and 9 (nine) as desired by the user.
General Settings Menu
With the bicycle switched on, the general settings menu is accessed by holding both
the ‘+’ and ‘-‘ buttons for two seconds.
To exit the menu, hold the ‘i’ button for 2 (two) seconds. Any menu will timeout after
approximately 2 (two) minutes and return to the home screen.
tC - Trip Distance Clearance
To clear the trip distance, press the ‘+’ or ‘-‘ buttons until Y (yes) is displayed.
Press the ‘i’ button confirm and proceed to the next screen in the menu.
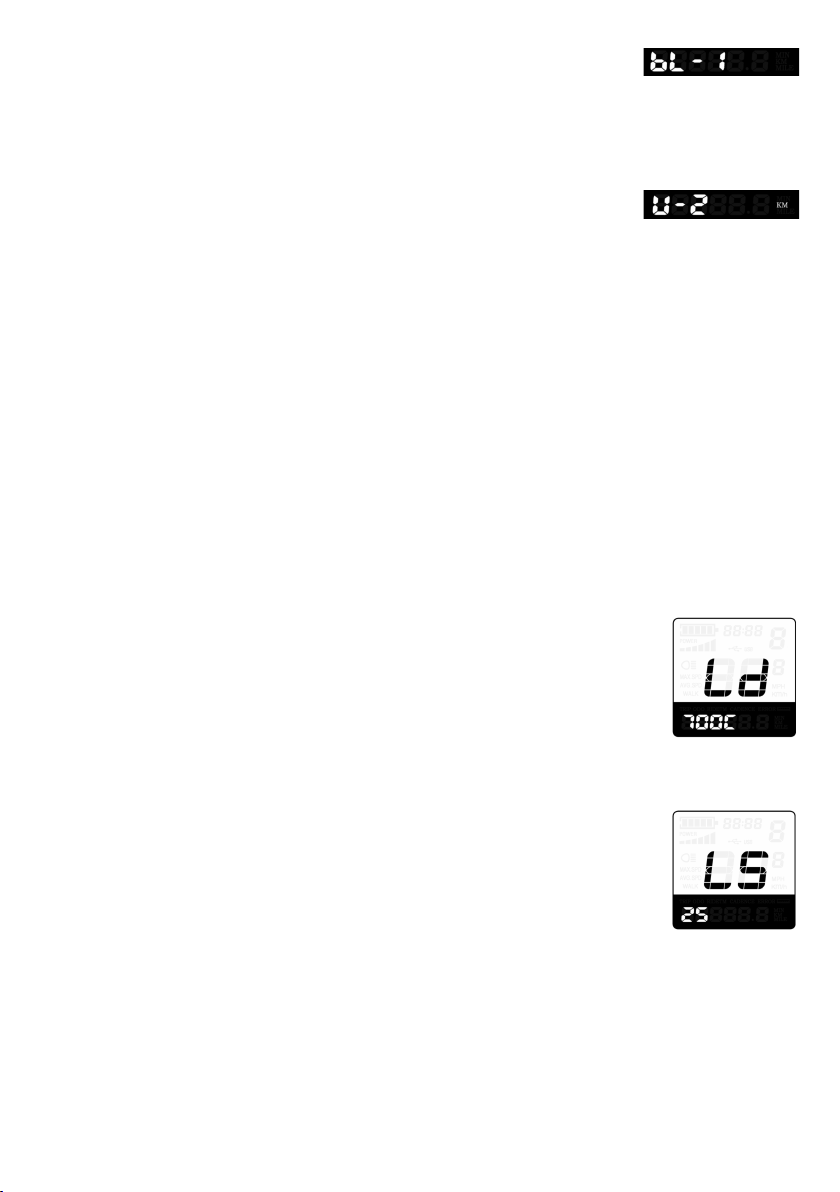
bL - Backlight Contrast
The backlight contrast setting can be adjusted between 1 (one) and 3 (three)
with the ‘+’ and ‘-‘ buttons. To store the setting, press the ‘i’ button and
proceed to the next screen in the menu.
U - Unit of Measurement
This allows the user to select between miles and kilometres.
The default value is 2 - kilometres. The value 1 represents miles. The units
are also shown on the display.
General Parameter Setting Menu
From the general settings menu, the general parameter settings menu can be
accessed by pressing the ‘-‘ and ‘i’ buttons for two seconds.
NOTE: This menu can only be accessed whilst already in the general settings menu.
To advance a screen in the menu, use the ‘+’ or ‘-‘ buttons whilst the black text is
flashing. To advance a screen in the menu use the ‘i’ button when the white text is
flashing.
To exit the menu, hold the ‘i’ button for 2 (two) seconds.
Ld - Wheel Diameter
The bicycle wheel diameter can be adjusted by pressing ‘i’
whilst ‘Ld’ is flashing on screen. The wheel diameter will
begin to flash, and can be adjusted with the ‘+’ and ‘-‘
buttons as desired. If the wheel diameter is already
flashing, it can be adjusted immediately with the ‘+’ and ‘-‘
buttons.
LS - Speed Limit
The maximum speed of the electrical system (only) of
the bicycle can be adjusted by pressing ‘i’ whilst ‘LS’ is
flashing on screen. The speed limit setting will being to
flash, and can be adjusted with the ‘+’ and ‘-‘ buttons as
desired. If the speed limit setting is already flashing, it can
be adjusted immediately with the ‘+’ and ‘-‘ buttons.
Other manuals for Transporter
1
This manual suits for next models
1
Table of contents
Other Tebco Bicycle manuals


