Encision AEM e-Edge Series User manual

AEM® Disposable Scissors Insert
Instructions For Use/Care
00555-013 Rev. S 2015/04 1 of 2
EN
ENCISION recommends placing this document in the Instructions for
Use/Care Section of your AEM Monitor Operator/Service Manual.
Device Description
Disposable Scissors Insert – For Single Use Only
The Scissors Inserts are designed for use with the ES8000 / ES8200
series AEM® Handle Assemblies. The 1/2” curved scissors will t
through “true 5mm” surgical trocars and operating scopes. The 3/4”
scissors and hook scissors will t through standard 5.5mm trocars.
Principle of Operation
The AEM Handle Assembly is sized to accept an insulating
Disposable Sheath (ES0150 series) that allows the surgeon to control
the amount of exposed electrosurgically active metal at the scissors.
The front and rear handles open and close the working tip (blade
insert) of the instrument.
Scissors Insert
Shielded Barrel Assembly
(Insert Inside)
Rotation Knob
Cord Connection
Handle
Trigger
NOTE
This product is rated to 9000 Vp-p. Limit electrosurgical generator
power setting to 80 Watts or lower (60 Watts for the Conmed
Aspen Excalibur spray mode). Higher settings may result in
spurious insulation failure alarms and/or insulation breakdown.
See Encision AEM Monitor Operation/Service Manual for list of
compatible electrosurgical generators.
See also Instructions for Use/Care for AEM Instruments,
Disposable Sheath and Disposable Scissors as applicable.
This product is supplied sterile and is not intended for use more
than one time. No attempt should be made to reprocess this
device.
Use with Monopolar Electrosurgery
AEM instruments, in conjunction with an AEM Monitor properly
connected to the electrosurgical generator (ESU), continuously
monitor and dynamically manage “stray energy” (insulation failure
and capacitive coupling) in zones 2 & 3, which are likely out of the
surgeon’s eld of view.
AEM shielding does not cover zone 1, which the surgeon should
keep in view during instrument activation. As in all applications,
“misapplied”electrosurgical energy remains the responsibility of the
attending surgeon.
(Note: Zone 1 equals approximately 1.6cm Tip to Shield)
(Note: Zone 3 equals area of Trocar Cannula)
Zone 1 Zone 2 Zone 3
Laparoscopic procedures should be performed only by surgeons
having adequate training and familiarity with laparoscopic
techniques and who are also knowledgeable about anatomy and
pathology as well as the complications, hazards, risks and benets of
the procedure.
Indications/Intended Use
These AEM instruments incorporate the use of AEM technology and
are intended for use in delivering monopolar electrosurgical energy
during laparoscopic procedures only.
AEM instruments are intended for use with the AEM Monitoring
System and electrosurgical generators having compatibility with the
AEM Monitor.
Scissors Inserts are intended for use on soft tissue only.
Contraindications
These instruments are not intended for use when laparoscopic
electrosurgical techniques are contraindicated.
Instructions For Use
Prior to Use
Thoroughly read these instructions and the instructions in the AEM
Monitor Operator/Service Manual.
The Disposable Scissors Insert is supplied sterile. Inspect the package
and product for damage prior to use.
AEM System Setup
See laminated Setup Sheet (00701) when using the ES9005 series
AEM Cord Adapter and (02678) when using the ES9015 Universal
Adapter.
WARNING
Laparoscopic surgery may result in gas embolism due to
insuation of gas into the abdomen.
Keep electrical connections dry while in use to prevent potential
conduction of HF current to the user.
Damaged external insulation AND incorrect setup of the AEM
Monitor may result in a risk of unintended patient burn, shock or
re hazard. Do not use product having damaged insulation.
CAUTION
Good operating room practice suggests that connections of
accessories to electrosurgical generators be made only while the
generator is OFF or on Standby.
Use these instruments only in conditions that assure adequate
visualization to minimize risk of misapplied electrosurgical
energy.
Keep ESU power setting as low as possible for the intended
purpose to minimize unintended burns.
Damaged internal insulation of the cord and/or instrument,
or loss of shield continuity, may cause ESU return pad alarms
triggered by the AEM Monitor’s Fault Indicators. For maximum
patient safety, discontinue use of the instrument if this occurs.
A singular AEM instrument must be the sole conductor of energy
to tissue. Do not conduct energy by touching an AEM instrument
to a second instrument contacting tissue. The second device will
not be protected from capacitive coupling and insulation failure.
Keep electrosurgical instruments away from the patient and
operative eld when not in use. Accidental activation can result in
unintended injury to the patient.
See electrosurgical generator manual and AEM Monitor
Operator/Service Manual for precautions concerning the general
application of electrosurgical equipment.
00555-013 Rev. S 2015/04 2 of 2
EN
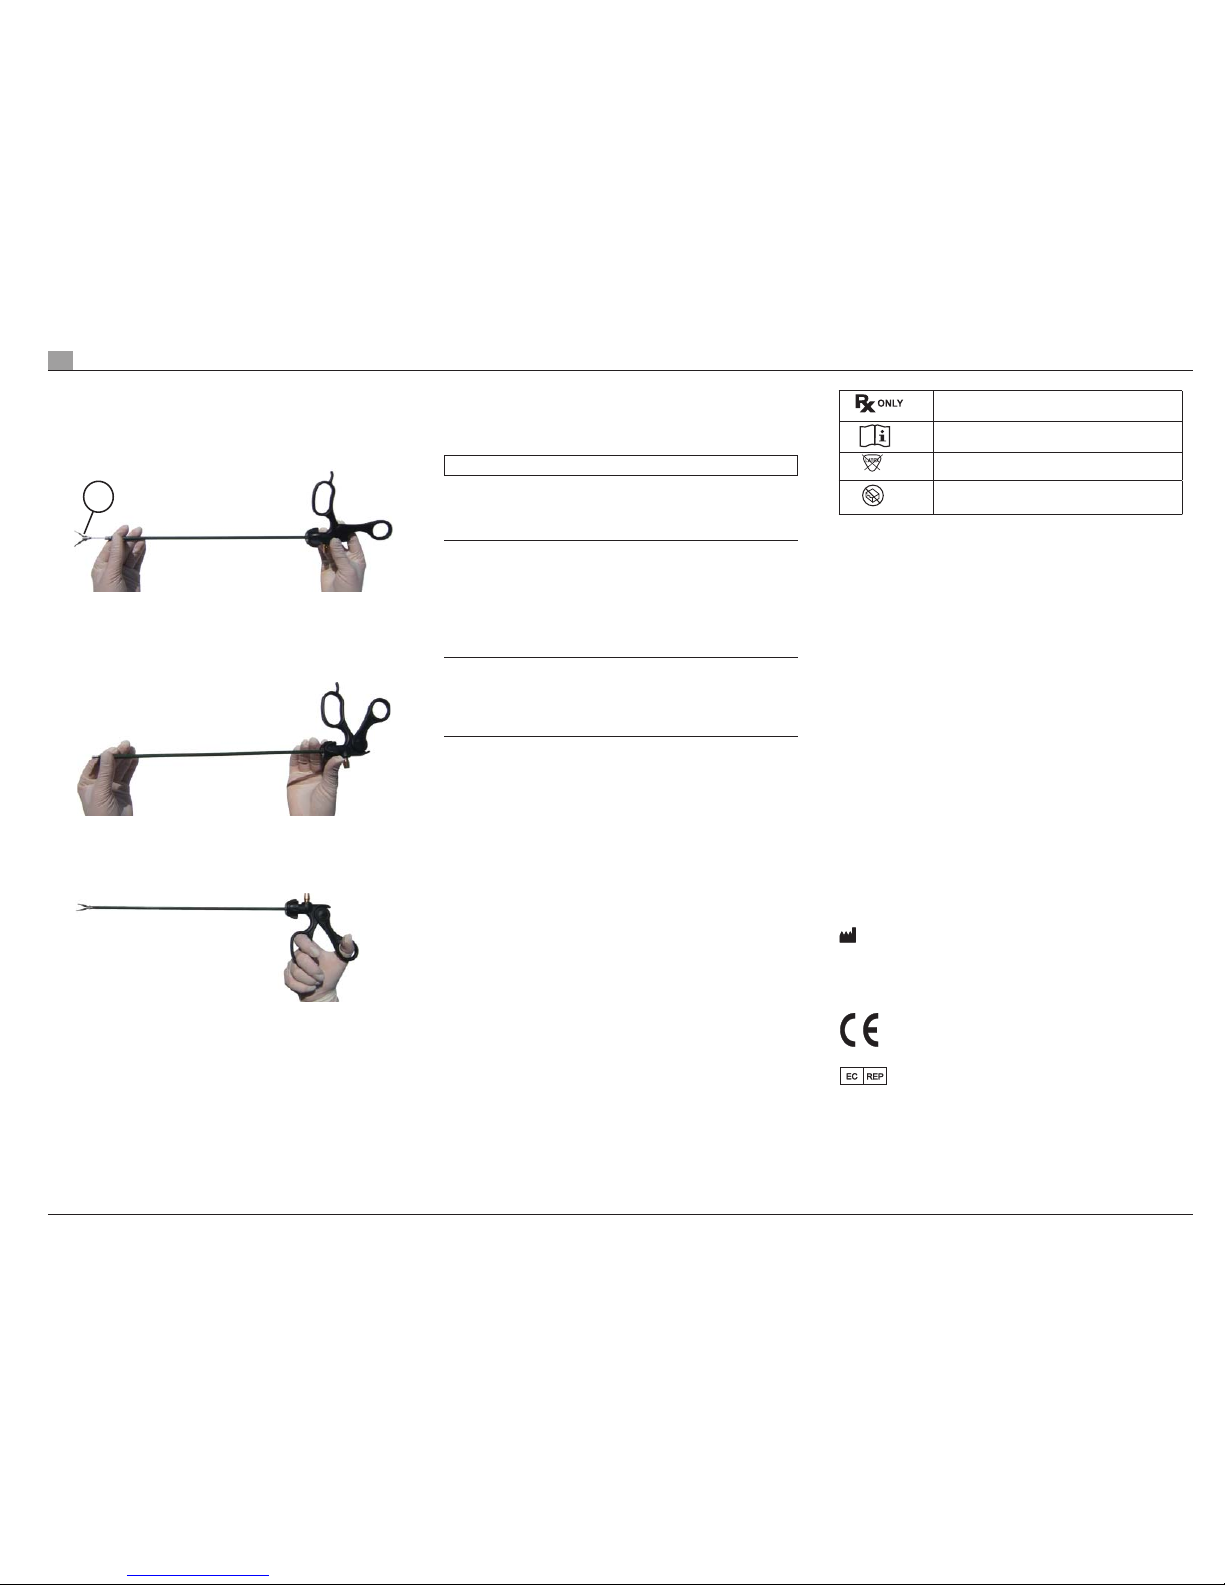
Assembly Instructions
Assemble the two (2) basic components.
1. Hold the instrument upside down as shown. Slide the insert (A)
into the handle shaft until the trigger catches and rotates slightly
upward.
A
DO NOT FORCE TRIGGER UP - IT WILL ROTATE
AUTOMATICALLY AS INSERT ENGAGES.
2. Rotate the insert tip clockwise to screw in the insert.
DO NOT USE OPEN BLADES TO TIGHTEN SCISSORS
3. Turn the rotation knob to adjust the positioning of the insert.
During Use
The working tip (blade insert) of the instrument should always be
closed when introducing or removing the instrument from the
cannula or Disposable Sheath.
Scissors Inserts are intended for use on soft tissue only. Use of
scissors on hard tissues or hard objects (such as staples) will cause
damage to the blades or hinges of the scissors.
Disassembly/Disposal
Disassemble in reverse order from assembly. No further disassembly
is recommended.
If using Disposable Sheath, see also Disposable Sheath IFU.
NOTE
Used instruments are considered medical waste. Dispose of in
accordance with local regulations.
End of Life Indicators
Discontinue use if any of the following are evident:
Binding or impaired mechanical function
Bent or damaged housing, rod or tip
Dulling of scissors
After one use of product.
Reprocessing
This product is intended for single use and shall not be reprocessed
or resterilized. Resterilization may compromise the integrity of the
device, which may result in malfunction.
Express Warranty
ENCISION hereby warrants to Buyer that products purchased
hereunder shall be free from defects in materials and workmanship
under normal use and service, as specied in this Instruction for Use/
Care, until the labeled USE BY date, or one (1) use, whichever occurs
rst.
Any evidence of repair, modication, or resterilization of this product
will void this warranty.
See AEM Monitor Operator/Service Manual for details of Limitations,
Disclaimer, and Exclusions.
Return of Used Product
If for any reason this product must be returned to ENCISION,
a returned goods authorization is required prior to shipping.
Appropriate return instructions may be obtained from ENCISION.
Product
ENCISION reserves the right to amend, modify or to change any
product, to introduce new products, to withdraw products and
otherwise vary product specications at any time without notice.
ENCISION® and AEM® are registered trademarks of ENCISION Inc.
Federal (USA) law restricts this device to sale
by or on the order of a physician.
Consult Instructions for Use
Not Made with Natural Rubber Latex
Do not use if the product sterilization barrier
or its packaging is compromised.
Made in USA
Manufactured by
ENCISION Inc.
6797 Winchester Circle
Boulder, CO 80301 USA
Ph: 303-444-2600 Fax: 303-444-2693
0197
Authorized Representative
(according to MDD93/42/EEC)
MDSS GmbH
Schigraben 41
30175 Hannover, Germany
Printed in USA
© Copyright 2010 Encision Inc.
Other Encision Medical Equipment manuals


Popular Medical Equipment manuals by other brands

mectron
mectron COMPACT PIEZO LED installation manual

Sterisil
Sterisil AC+ System Installation and maintenance manual

novocure
novocure TFT9200 user manual

EyeQue
EyeQue Insight Pro product manual

FujiFilm
FujiFilm SonoSite S Series User guide supplement

Graham Field
Graham Field Hausted VIC429 operating manual


