Enerpac ECCE32 User manual

1
L4318 Rev. E 07/20 EN
1.0 SAFETY
1.1 Introduction
Read all instructions carefully. Follow all recommended
safety precautions to avoid personal injury as well
as damage to the product and/or damage to other
property. Enerpac cannot be responsible for any
damage or injury from unsafe use, lack of maintenance
or incorrect operation. Do not remove warning labels,
tags, or decals. In the event any questions or concerns
arise, contact Enerpac or a local Enerpac distributor for
clarification.
If you have never been trained on high-pressure hydraulic
tool safety, consult your distributor or service center for
information about an Enerpac hydraulic safety course.
This manual follows a system of safety alert symbols,
signal words and safety messages to warn the user of
specific hazards. Failure to comply with these warnings
could result in death or serious personal injury, as well
as damage to the equipment or other property.
The Safety Alert Symbol appears throughout
this manual. It is used to alert you to
potential physical injury hazards. Pay close
attention to Safety Alert Symbols and obey
all safety messages that follow this symbol to avoid the
possibility of death or serious personal injury.
Safety Alert Symbols are used in conjunction with certain
Signal Words that call attention to safety messages or
property damage messages and designate a degree or
level of hazard seriousness. The Signal Words used in
this manual are DANGER, WARNING, CAUTION and
NOTICE.
NOTICE:
DANGER
Indicates a hazardous situation that,
if not avoided, will result in death or
serious personal injury
NOTICE:
WARNING Indicates a hazardous situation that,
if not avoided, could result in death
or serious personal injury.
NOTICE:
CAUTION
Indicates a hazardous situation that,
if not avoided, could result in minor
or moderate personal injury.
NOTICE
Indicates information considered
important, but not hazard related
(e.g. messages relating to property
damage). Please note that the Safety
Alert symbol will not be used with this
signal word.
1.2 Hydraulic Cutter Safety Precautions
NOTICE:
WARNING Failure to observe and comply with the
following precautions and instructions may result in
death or serious personal injury. Property damage
could also occur.
• Read and completely understand the safety
precautions and instructions in this manual. Always
follow all safety precautions and instructions,
including those that are contained within the
procedures of this manual.
• Read this manual before operating the cutter, or
before performing any adjustments, inspections,
maintenance or repairs.
• Follow all instructions and heed all precautions
stated in this manual.
POWERFUL SOLUTIONS. GLOBAL FORCE.
Instruction Sheet
Chain Cutter
Model ECCE32
INDEX
1.0 SAFETY .............................1
2.0 PRODUCT DATA ......................6
3.0 CONFORMANCE TO NATIONAL AND
INTERNATIONAL STANDARDS ...........7
4.0 DESCRIPTION ........................7
5.0 RECEIVING INSTRUCTIONS .............7
6.0 SET-UP .............................8
7.0 POWER REQUIREMENTS ...............8
8.0 MAJOR FEATURES AND COMPONENTS ..8
9.0 CUTTER OPERATION .................10
10.0 MAINTENANCE .....................13
11.0 CLEANING THE PISTON AREA .........20
12.0 STORAGE .........................20
13.0 TROUBLESHOOTING ................20

2
• Do not allow use of the cutter by persons that are
tired, or under the influence of drugs, alcohol or
medication.
• Do not allow children to operate the cutter or to assist
with its use. Keep children out of the work area.
• Place the tool horizontally on a substantial work
surface. The work surface must have a rated weight
capacity that exceeds the weight of the cutter and of
the material being cut.
• Fragments and splinters may be ejected from the
cutter during normal use. Chain links being cut could
become projectiles. Stay clear of the cutting head
and surrounding area during operation. Always wear
face and eye protection.
• As needed, remove any foreign objects from
the cutting head that could damage the cutter
and/or injure the operator. Before removing
any foreign objects, always stop the cutter and
disconnect it from AC power supply.
• Avoid touching the cutter’s metal surfaces during
operation and after the cutter has been in use. Be
aware of the risk of burns if the cutter becomes hot.
• Do not use the cutter for activities other than those
it was approved and designed to perform. Refer to
Section 9.1 of this manual for additional information
regarding foreseen use.
• Use the cutter’s built-in handle when lifting or
moving the cutter. Use the cutter lifting eyebolt and
appropriately rated lifting equipment if it is necessary
to lift or suspend the tool by mechanical means.
• Do not exceed equipment ratings. Never attempt to
cut an item that exceeds the maximum allowable
parameters for your cutter model. For additional
information, refer to Section 2.1 of this manual.
Overloading may cause equipment failure and
possible personal injury.
• Do not use the cutter in explosive atmospheres
(for example, in the presence of flammable liquids,
gasses or powders).
• Do not use the cutter on live electric lines, on
pressure vessels or ducts, or on vessels containing
corrosive and/or toxic substances.
• If the cutter malfunctions, stop use immediately.
Check for misaligned or jammed moving parts,
broken components and any other condition that
could make the tool operate incorrectly. Place the
cutter back into operation only after the fault has
been identified and the identified repairs and/or
adjustments have been performed.
• Ensure that any repairs are performed only by
trained, qualified and authorized sta using original
equipment replacement parts. For repair service,
contact the Enerpac authorized service center in
your area.
• Keep this manual for future reference in a place that
is accessible to all persons operating or servicing the
cutter.
• Always perform a visual inspection of the cutter
before placing it into operation. If any problems are
found, do not use the tool. Make repairs before using
the cutter.
• Do not use the cutter if it is leaking oil. Do not use the
cutter if damaged, altered or in need of repair.
• Do not remove or disable cutter safety devices.
Before using the cutter, make sure that all the safety
devices (guards, etc.) are in place and in good
condition.
• Do not remove the guards installed on the cutter or
on any accessories. Replace any guards immediately
if they develop faults or become damaged.
• Do not alter the calibration of the safety devices,
such as maximum pressure valves (if equipped).
• Allow only authorized, trained, and experienced
personnel to operate the cutter and supervise its use.
• Ensure that all users are trained and qualified to
operate the cutter. Operators must be aware of
all applicable occupational safety laws and must
operate the cutter in accordance with all such laws.
• Keep the work area clean and well illuminated.
• When operating the cutter, do not wear loose
clothing or jewelry that could get caught up in the
cutter during operation. Tie up long hair.
• Always wear and use appropriate personal protective
equipment (PPE) such as non-skid safety shoes,
hard-hat, hearing protection and face and eye
protection. Use of these and other PPE items (used
as appropriate for conditions) will reduce the chance
of personal injuries. The use of these items may also
be required by local regulations or laws.
• Consult your employer concerning specific safety
requirements and the safety equipment required for
use in your country or region.
• Be certain that cutter safety guard is closed before
starting the cutter.
• Always stop the cutter before opening the safety
guard. Never open the safety guard during operation.
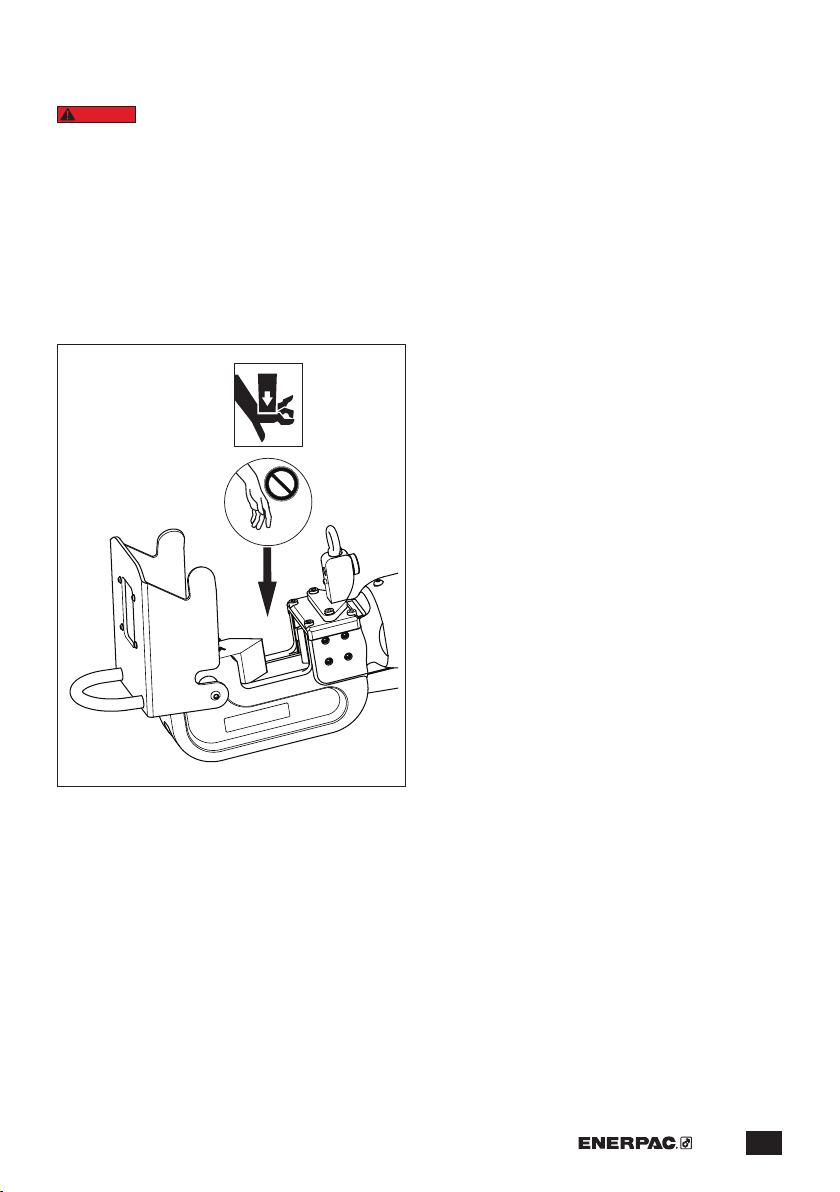
• Before reaching inside the cutting area for any
reason, always stop the cutter and disconnect it from
the AC power supply.
• Keep others clear of the work area while the tool is
in use. Be sure that all personnel not operating the
cutter remain at a safe distance when the cutter is
in operation.
• Stop the cutter if people and/or animals enter the
work area.
• Ensure that the operator is alert, observant of the
task being performed and that the work is being
done with care.

3
• Do not expose the tool to heat sources in excess of
158°F [70°C] as this could cause irreversible damage
to cable insulation and other electrical components,
possibly leading to a fire. If tool becomes overheated,
allow tool to cool or remove heat source.
• The tool is designed for noncontinuous use. Allow
suciently long pauses to allow the oil to cool.
Consult Enerpac if prolonged and/or uninterrupted
use is required.
• Do not service or clean the tool, or replace blades
or guards, while the tool is operating and/or if tool is
connected to AC power supply.
• Keep electric tools out of the reach of children. Do
not allow inexperienced users or users who have not
read the instructions to operate them. Electric tools
are dangerous in the hands of non-expert users.
• In accordance with the standards indicated and
followed by the manufacturer, the equipment
components that also perform a safety function
(insulators, guards, etc.) must not be repaired, but
must instead be replaced with original spare parts.
1.4 Additional AC Electric Tool Safety Instructions
NOTICE:
WARNING
Failure to observe and comply with the
following precautions and instructions could result
in death or serious personal injury.
1.4.1 Use and Care
• Store the tool indoors. Keep in a secured area to
prevent use by unauthorized personnel.
• Do not clean the tool with a water spray or the like.
• Do not operate the tool with a damaged cord or
plug, or after the tool malfunctions or is dropped or
damaged in any manner.
• Return the tool to the nearest Enerpac authorized
service center for examination, repair, or electrical or
mechanical adjustment.
1.4.2 Disconnecting Power
• Be sure that tool motor is o before removing plug
from electrical outlet.
• Do not unplug the tool by pulling on the cord. To
unplug, grasp the plug, not the cord.
• Remove plug from electrical outlet when the tool is
not in use and before servicing or cleaning the tool.
DANGER High voltage is present inside the tool
even when tool motor is o. Before servicing the
tool, be sure that the tool power cord is disconnected
from the electrical outlet or other electrical power
source.
• Use only original equipment Enerpac parts. Enerpac
parts are designed to fit properly and to withstand
high loads. Non-Enerpac parts may break or cause
the product to malfunction.
• Keep cutting tools clean and replace blades when
they become dull. Suitably maintained cutting tools
with sharp edges are less likely to jam and are easier
to control.
CAUTION
Failure to observe and comply with the
following precautions and instructions could result
in minor or moderate personal injury. Property
damage could also occur.
• To help ensure proper operation and best
performance, use only Enerpac HF hydraulic oil. Use
of any other oil may result in unsafe operation and/or
damage to tool. The Enerpac product warranty may
also be invalidated.
• Keep hydraulic equipment away from flames and
heat. Excessive heat will soften packings and seals,
resulting in fluid leaks. Heat also weakens hose
materials and packings.
• Protect all hydraulic equipment from weld spatter.
1.3 Safety Precautions - AC Powered Electric Tools
NOTICE:
WARNING Failure to observe and comply with the
following precautions and instructions could result
in death or serious personal injury. Property damage
could also occur.
• Always be certain that tool is stopped and
disconnected from AC power supply before
performing any tool cleaning, maintenance or repair
procedures.
• Be certain that the tool is disconnected from the AC
power supply before reaching inside the cutting head
to clear jams, or for any other reason.
• Do not leave the tool unattended in the workplace
when connected to AC power supply. Take all
reasonable precautions to avoid unauthorized use.
• Take precautions so that the tool is not switched on
accidentally. Be certain not to press the trigger when
picking up the tool or when positioning it.
• If it is not possible to unplug the tool power cord from
the AC power outlet, the power must be turned o
and locked out at the AC power supply.
• Always disconnect the tool from AC power before
transporting it. If electric tools are transported while
the operator’s finger is on the trigger and AC power
is connected, accidents can occur.
• Do not use the tool if it cannot be switched on and o
using the trigger. Any tool that cannot be controlled
with the trigger is dangerous and must be repaired.
• Remove all wrenches and adjustment tools (if
present) before switching on the tool. A wrench or
adjustment tool attached to a rotating element of an
electric tool can cause personal injury.
• Make sure the cooling vents are unobstructed and
that the cooling surfaces are clean in order to avoid
dangerous overheating.

4
1.4.3 Grounding Instructions
DANGER
Risk of electric shock! Connect the tool
only to a properly grounded outlet.
The tool is double insulated and equipped with a
polarized power plug.
The plug must be plugged into a polarized electrical
outlet that is properly installed and wired in accordance
with all local codes and ordinances.
• If the cord and/or plug are damaged, do not connect
the tool to a live electrical outlet. Repair or replace
the damaged items and be sure the polarized plug
is correctly wired before reconnecting the tool to
the outlet. Consult a qualified electrician if wiring
procedures are not completely understood or if there
is any doubt as to whether the tool is properly wired.
• Do not modify the plug provided with the tool.
If the plug will not fit in the outlet, have a proper
outlet installed by a qualified electrician. A qualified
electrician should be consulted if there is any doubt
as to whether an outlet box is properly wired.
• All 230V tool models: The tool is for use on a single-
phase circuit, which has a nominal rating of more
than 120 volts and is factory equipped with a specific
electric cord and plug.
• If the tool must be used with a dierent type of
electric socket, the plug should be changed by
a qualified electrician. After the plug is changed,
the tool should comply with all local codes and
ordinances.
1.4.4 Use of Extension Cords
It is important to use the proper size extension cord with
the tool power cord when use of an extension cord is
necessary.
A qualified electrician should be consulted to help
specify and select the proper size extension cord.
DANGER
Risk of electric shock! Connect the tool
only to a properly wired outlet.
If an extension cord is used:
1) The marked electrical rating of the extension cord
should be at least as great as the electrical rating of the
tool.
2) The extension cord should have a polarized plug
at one end and a polarized receptacle at the other. It
should be wired for single phase power.
3) A long extension cord should be arranged so that it
will not drape over any working area where it can be
tripped over, snagged, or pulled on unintentionally.
If the tool is to be operated outdoors and an extension
cord is needed, use only an outdoor-use extension cord.
An outdoor-use extension cord will be clearly marked
with the sux letter “W” and the statement “Suitable for
Use with Outdoor Appliances.”
1.4.5 Additional Precautions
NOTICE:
WARNING Do not use electric powered tools in an
explosive atmosphere. Sparks and electrical arcing
could ignite combustible vapors or airborne dust.
NOTICE
To prevent damage to the tool electric motor,
check power specifications on tool data plate. Use of
incorrect outlet will damage the motor.
1.5 Safety Symbols (located on cutter)
WARNING
Failure to observe and comply with the
safety symbols axed to the cutter housing could
result in death or serious personal injury.
WARNING
Make sure the safety symbols (decals,
labels, etc.) are securely axed to the tool and that
they are legible. If not, obtain replacements from
Enerpac. Refer to tool repair parts sheet for locations
and part numbers. Failure to maintain safety symbols
on tool could result in death or serious personal
injury.
The following safety symbols are axed to the cutter
housing:
Crush hazard: Keep hands, fingers and other
body parts away from the cutting head during
operation.
Projectile hazard: Objects may be ejected
from the cutter during operation. Stay clear of
cutting area. Wear eye and face protection.
PPE Alert: Wear personal
protective equipment
(PPE) when using or
servicing equipment.
Instruction Manual Alert: Read the
instruction manual before using or servicing
equipment.

5
1.6 Crush Hazard
DANGER
Cutter will start immediately when
connected to AC power supply and on-o trigger is
depressed.
DO NOT place hands, fingers or other parts of your
body inside the cutting head unless cutter is
disconnected from AC power supply. Death or
serious personal injury will result if cutter is started
while persons are working inside the cutting head.
• Never reach into the cutting head while cutter is in
operation.
• Before reaching inside the cutting head for any
reason, always stop the cutter and disconnect it from
AC power supply.

6
Product specifications are subject to change without notice.
2.0 PRODUCT DATA
2.1 Cutter Maximum Capacities
Material to be Cut Chain Type
Chain Maximum
Diameter Hardness
in mm Rockwell C
Metal Chain
Grade 70 1.25 32 46
Grade 80 1.0 25 46
Grade 100 0.75 19 46
NOTICE
Chain to be cut must not exceed any of the stated maximum limits shown in this table. Cutter may stall
during operation if one or more of the maximum limits is exceeded. Chain links that are nearly as large, or larger
than the blade must be cut in two passes. Refer to Sections 9.6 and 9.7 for additional information.
2.2 General Specifications
Cutter
Model No.
Max. Cutting
Force Weight
Max. Hydraulic
Operating
Pressure
Ambient
Operating Temp
Hyd.
Pump
Tons kN lb Kg psi bar °F °C Type
ECCE32B 52.9 471 106 48 8702 600 -40
to
+ 122
-40
to
+ 50
Internal
AC
Electric
ECCE32E 52.9 471 106 48 8702 600
2.3 Power and Noise Level Specifications
Cutter
Model No. Volts Hz Watts Amps Insulation
Class
Noise Level (typical)
No Load
LWA
†
No Load
Operator
LpAB
ECCE32B 120 60 1300 11.0 II 101 90
ECCE32E 230 50 1400 6.8 II 101 90
Notes:
†Per CEI EN 60745-1 and CEI EN 60745-2-8 [dB]. B Per CEI EN 60745-1 and EN ISO 5349.
2.4 External Dimensions
Dimension in mm
C
A
B
A 27.5 700
B 7.5 192
C 12.6 321

7
123567
9
8
10
11
12
13
14
4
Figure 1, Features and Components
Key:
1. Safety Guard
2. Piston and Moving Blade
3. Lifting Eyebolt
4. Safety Guard Latch
5. Trigger On-O Switch
6. Oil Reservoir
7. Grip/Handle
8. AC Power Cord
9. Electric Motor
10. Directional Lever
11. Hydraulic Cylinder
12. Cutting Head
13. Fixed Blade
14. Storage Case
3.0 CONFORMANCE TO NATIONAL AND
INTERNATIONAL STANDARDS
Enerpac declares that this product has been
tested and conforms to applicable standards
and is compatible with all CE requirements.
A copy of an EU Declaration of Conformity is
enclosed with each shipment of this product.
4.0 DESCRIPTION
The Enerpac model ECCE32 is a fixed-head hydraulic
cutter designed to cut metal chains.
The cutter contains two blades, one fixed and one
moving. The moving blade is actuated by a hydraulic
cylinder.
Hydraulic force is provided by an AC powered electric
motor and an internal hydraulic pump. The pump
provides oil flow to the hydraulic cylinder, which
advances the cylinder piston and moving blade.
A hydraulic reservoir with built-in rubber diaphragm
provides a constant supply of oil to the pump, regardless
of tool orientation or the amount of piston extension.
A trigger style on-o switch, mounted on the cutter grip,
starts and stops the electric motor. The trigger must
remain pressed during the cutting process.
See Figure 1 for a description of cutter major features and
components. Refer to Sections 2.1 through 2.4 of this
manual for maximum cutting capacities, specifications
and dimensions.
5.0 RECEIVING INSTRUCTIONS
Visually inspect all components for shipping damage.
Shipping damage is not covered by warranty. If shipping
damage is found, notify carrier at once. The carrier is
responsible for all repair and replacement costs resulting
from damage in shipment.

8
8.0 MAJOR FEATURES AND COMPONENTS
8.1 Cutter Safety Guard
When fully closed and latched, the safety guard helps
prevent hand contact with the moving piston and blade.
See Figure 2.
12 3
Figure 2, Safety Guard with Inspection Window
Key:
1. Safety Guard
2. Inspection Window
3. Latch
The safety guard is manufactured from steel and
contains a clear polycarbonate inspection window. Two
screws secure the guard to the cutting head.
NOTICE:
WARNING
Failure to observe and comply with the
following precautions and instructions could result
in serious personal injury.
• Always close the safety guard before beginning the
cutting process. Cutting head must be shielded by
guard during cutter operation.
• Never operate cutter with safety guard open.
• Never open guard and reach into the cutting head
while cutter is operating. Guard must remain closed
until cutter is stopped.
• Before reaching inside the cutting head to clear
jams or for any other reason, always disconnect
cutter from AC power supply.
• Always reinstall safety guard after performing any
adjustments, maintenance or repairs. Never operate
the cutter with safety guard removed.
• Be certain that safety guard is in good condition
and secured by both screws. Replace guard if worn,
damaged or missing. Tighten or replace screws if
loose.
• Verify that safety guard latch operates properly and
is in good condition. Repair safety guard latch if
worn, corroded or damaged.
• Replace inspection window if it is damaged or if it
becomes scratched or dicult to see through.
6.0 SET-UP
6.1 Delivery and Handling
The cutter and various related items are housed inside a
plastic storage case. The cutter should be stored in this
case when not in use.
Place the cutter on a substantial and stable work
surface. The work surface must be of sucient capacity
to support the weight of the cutter plus the additional
weight of the chain to be cut. Refer to Section 2.2 for
cutter weight.
6.2 Before Start-up
• Be sure that the shipment includes all components
and that there is no obvious damage.
• Read the following sections of this manual to become
familiar with cutter features and safety devices.
• Verify that the AC power supply is of the correct
specifications and capacity to power the cutter. Refer
to Section 7.0 of this manual for additional information.
NOTICE
Be sure that cutter piston is advanced as far
as possible before removing oil reservoir cap in the
next step. Oil leakage and improper operation may
result if this instruction is not followed.
• Advance the piston as far as possible, disconnect AC
power cord and check the cutter hydraulic oil level.
Add oil if oil level is low. Refer to Section 10.5.2 for
detailed instructions.
• Before first use, remove air from the cutter hydraulic
system. Refer to procedure in Section 9.3.
7.0 POWER REQUIREMENTS
The cutter is available in two versions, each with dierent
electrical power requirements:
Model ECCE32B is designed for 120VAC, single-phase,
60 Hz power. This version contains a USA style NEMA
6-15 power plug.
Model ECCE32E is designed for 230VAC, single-phase
50 Hz power. This version contains a European style
“Schuko” power plug.
Before connecting electric power to tool, be certain that
the power supply is the proper voltage and Hz for the
cutter version that you are using. Refer to the cutter data
plate.
Also refer to Sections 1.3 and 1.4 of this manual for
important electrical safety information and precautions.
NOTICE:
WARNING
Failure to follow the electrical safety
precautions contained in Sections 1.3 and 1.4 of this
manual could result in electric shock. Death or
serious personal injury could occur.

9
8.2 Opening and Closing the Safety Guard
The safety guard contains a U-shaped handle at the
hinged end. Use this handle to open and close the guard.
A spring-loaded latch pin secures the guard when it is in
the fully closed position. See Figures 3 and 4.
To open the safety guard:
1. Be sure that the cutter is o.
2. Pull the latch pin knob in the direction shown.
3. Open the safety guard.
3
2
1
Figure 3, Opening the Safety Guard
To close the safety guard:
1. Be sure that the cutter is o.
2. Move the safety guard to the fully closed position. Be
certain that it is secured by the latch pin.
Figure 4, Closing the Safety Guard
1
8.3 Directional Lever
The directional lever is located on the left side of the
tool. The lever position determines the piston direction
of travel when the cutter is operated. See Figure 5.
• Position 1: Piston advances and moving blade slides
forward.
• Position 2: Piston retracts and moving blade slides
rearward.
1
2
Key:
1. Advance
2. Retract
Figure 5, Directional Lever Positions
8.4 Trigger On-O Switch
NOTICE:
WARNING
To prevent serious personal injury, be
certain that hands, fingers and other body parts are
away from the cutting area before depressing the
cutter trigger.
A trigger mounted in the cutter grip controls cutter
operation. Pressing the trigger automatically starts the
cutter electric motor. See Figure 6.
• With the directional lever in position 1, press and hold
the trigger to advance the piston and slide the moving
blade forward. See Figure 7.
• With the directional lever in position 2, press and hold
the trigger to retract the piston and slide the moving
blade rearward. See Figure 8.
• Release the trigger at any time to stop the piston and
moving blade. Be advised that there may be a brief
delay until the piston comes to a complete stop.
• The piston will stop moving when it has reached
either its minimum or maximum extension. To prevent
possible damage to the cutter, do not continue to
press the trigger after the cylinder is fully retracted or
extended.
Key:
1. Handle
2. Safety Guard
3. Latch Pin Knob
Key:
1. Latch Pin

10
9.0 CUTTER OPERATION
9.1 Foreseen Use and Residual Risks
NOTICE:
WARNING
Failure to observe and comply with the
instructions and precautions contained in the
following paragraphs could result in death or serious
personal injury.
1. The cutter must be used only to cut metal chains.
Material parameters must not exceed the allowable
values shown in Section 2.1 of this manual.
2. The cutter may be used only if powered by an electrical
system compliant with legislation and current law
(suitably connected to a grounded electrical system
and protected from current surges and short circuits).
3. Operators must observe the instructions in this
manual in order to minimize the risk of accidents. In
particular, operators must pay attention when working
in conditions that could cause:
• Possible burns from overheated metal parts.
• Injury due to incorrect positioning or inadequate lifting
or moving.
• Injury caused by splinters discharged from the
workpiece.
NOTICE:
WARNING
People remaining in the vicinity of the
cutter while it is working are subject to the risk of
flying debris (dangerous objects, etc. ). Serious
personal injury could result.
4. Mechanical vibrations transmitted to the hands and
arms can pose a risk to the health and safety of
workers. The user and/or employer is responsible for
assessing the risk generated by mechanical vibrations
from the cutter, and minimizing the possibility of injury.
5. Incorrect use:
• The cutter must not be used for purposes other than
indicated in this manual.
• The cutter must not be used in areas subject to the
risk of explosion.
Figure 6, Trigger On-O Switch
Figure 7, Advance Piston
Figure 8, Retract Piston
NOTICE:
WARNING
The cutter safety guard is shown in the
open position in Figures 7 and 8 for illustration
purposes only. Never operate the cutter with the
safety guard open or removed.

11
9.2 Operating Precautions
NOTICE:
WARNING
Failure to observe the following
precautions and instructions could result in death or
serious personal injury.
• Keep fingers, hands and other body parts clear of
the cutting head. Do not reach into the cutting area
during cutter operation.
• Do not attempt to reposition the chain being cut
while the cutter is in operation. If repositioning is
required, stop the cutter.
• After cutting is complete, chain segments may fall.
Keep body parts and equipment away from area
under and beside the cutter.
• Dangerous projectiles could occur at any
time during cutting. Always wear face and eye
protection. Keep persons away from cutting area.
• Cutter surfaces can become very hot. To prevent
burns, avoid contact with cutter components and
wear appropriate personal protective equipment.
• Refer to additional safety precautions in
Section 1.0 of this manual before using the cutter
or performing any maintenance or repair activities.
9.3 Trapped Air Removal
Before placing a new cutter into operation, cycle the
piston several times without load to remove any trapped
air in the hydraulic circuit.
Air is completely purged when the piston advances and
retracts smoothly in both directions, from fully advanced
to fully retracted.
This procedure should be performed after the oil in the
cutter is changed, and after any maintenance or repair
activity in which the oil is drained and replaced.
9.4 Locating and Positioning the Cutter
• Before inserting the chain inside the cutting head, be
certain that the cutter is placed on a solid and stable
work surface of sucient weight rating capacity. Refer
to Section 2.2 for cutter weight.
• Position the cutter as needed using the handle/grip
mounted at the top of the cutter.
• If it is necessary to move or transport the cutter, use
only the supplied lifting eyebolt. See Figure 9. Use
appropriately rated lifting equipment.
NOTICE:
WARNING
Because the cutter components are very
heavy, there is a risk of cuts, crushing or broken bones. To
avoid accidents, use care when working with the cutter.
Serious personal injury may result if the cutter is not
properly supported and handled in an appropriate way.
Figure 9, Cutter Lifting Location
9.5 Using the Correct Fixed Blade
The cutter comes supplied with a short fixed blade and
a long fixed blade. The diameter of the chain to be cut
determines the blade to be used. See Section 10.6.2 for
instructions on how to replace the fixed blade. Always
make sure the proper blade is installed before you begin
cutting.
• A long fixed blade will have an “A” stamped into the
top of it. The “A” fixed blade is used for cutting chains
with a diameter of 0.94 inch [24 mm] or less.
• A short fixed blade will have a “B” stamped into the
top of it. The “B” fixed blade is used for cutting chains
with a diameter greater than 0.94 inch [24 mm].
Refer to fixed blade replacement instructions in
Section 10.6.2 if it is necessary to change the fixed
blade.

12
Figure 10, Fixed Blade Stamping (1)
1
9.6 Positioning Chain Inside the Cutting Head
Be sure that the piston and moving blade are located
in the fully retracted “home” position before placing the
chain inside the cutting head. See Figure 8.
Place the chain between the cutter blades so that it is
positioned perpendicular to the piston axis (as close as
possible to the center of the blade), as shown in Figure
11. Be sure that the chain is not stacked or “bunched
up.” During cutting, the blades must cut through only
one link at a time. Following these recommendations
will result in the best quality cut while placing the least
amount of load on the cutter.
90°
90°
Figure 11, Positioning Chain Inside Cutting Head
NOTICE
Be certain that the parameters of the chain to
be cut do not exceed maximum allowable limits. Refer to
Section 2.1 of this manual for additional information.
Failure to observe this instruction may result in poor
cutting performance and/or damage to the cutter.
9.7 Cutting Procedure (typical)
1. Make sure the correct fixed blade is installed for
the diameter of the chain being cut. See Using the
Correct Fixed Blade in Section 9.5.
2. Connect the cutter to the electrical outlet.
3. Be sure that the piston is in the “home” (fully retracted)
position. See Figure 8.
4. Be sure that the directional lever is in the advance
position (position 1). See Figure 5.
5. Open the cutter safety guard. See Opening and
Closing the Safety Guard in Section 8.2.
6. Place the chain to be cut between the fixed and
moving blades. Refer to instructions in Section 9.6 for
additional information.
NOTICE
Cutting near the center of the blade will help
prolong blade life. If the chain link reaches the top or
bottom of the blade, or extends beyond the top of the
blade, the cutting process will need to be performed
twice.
Cut one side of the chain link by following the process
described in steps 7 through 12 of this procedure. After
the first cut has been made, flip the chain over and
repeat steps 7 through 12 to cut the other side of the
link.
7. Close the cutter safety guard. See Opening and
Closing the Safety Guard in Section 8.2.
8. Be certain that hands, fingers or other body parts are
not inside the cutting head.
9. Press and hold the trigger to start the motor and begin
cutting. The piston and moving blade will advance.
10. When the cut is completed, release the trigger and
allow the piston to come to a complete stop.
11. Move the directional lever to the retract position
(position 2). See Figure 5.
12. Press and hold the trigger until the piston fully
retracts to the “home” position and then release the
trigger.
Figure 12, Chain Being Cut (typical)

13
NOTICE:
WARNING
The cutter must sometimes be
operated in order to complete a maintenance or
repair procedure being performed, or to prepare it
for a procedure that is about to be performed.
However, to prevent start-up while persons are
working on the cutter, always disconnect the cutter
from the AC power supply before beginning any
procedure steps that require use of tools and/or
physical contact with the cutter. Failure to observe
this precaution may result in death or serious
personal injury.
NOTICE:
WARNING Ensure that cutter safety guard has
been correctly reinstalled before placing the cutter
back into service after maintenance procedures are
completed. Failure to reinstall this guard could result
in serious personal injury.
Table 1 - Periodic Maintenance Chart
Time Interval Maintenance Operation Method To be performed by:
Every 8 hours of
operation:
Check the cutter for loose,
damaged or worn parts.
Check for oil leaks. Tighten,
replace or repair as required.
Visual Operator
Clean the cutter exterior. Refer to instructions in
Section 10.3.
Operator
Clean the cutter piston. Refer to instructions in
Section 11.0.
Operator
Check the tightening torque
of screws and bolts. Replace
any missing screws or bolts.
Use torque wrench. Refer to
repair parts sheet for complete
torque specifications.
Operator
Every 1600 hours
of operation:
Change the hydraulic oil. Refer to instructions in
Sections 10.5.1 - 10.5.3.
Service Center
As required: Replace fixed blade. Refer to instructions in
Section 10.6.2.
Operator
Replace moving blade. Refer to instructions in
Section 10.6.3.
Operator
10.0 MAINTENANCE
10.1 Preparation for Maintenance
All cutter maintenance procedures must be performed
under the following conditions:
• Material must be removed from the cutting head.
• The cutter must be disconnected from the AC power
supply.
• The cutter must be given time to cool to prevent burns.
• Procedures must be performed in a suitable work
environment in accordance with all current safety
regulations and/or laws in your country or region.
• The cutter must be cleaned thoroughly before
maintenance procedures are performed.
• Suitable personal protective equipment (PPE) must be
used and/or worn while performing any work.
10.2 Periodic Maintenance Chart
Refer to the Periodic Maintenance Chart (Table 1) for a
list of various routine checks and procedures.
10.3 Cleaning
• Clean the cutter using a dry cloth or compressed air.
For plastic surfaces, use a cloth slightly dampened
with water.
NOTICE:
CAUTION
To prevent possible injury, always wear
safety glasses or face mask when using compressed
air.
• Be sure there are no traces of oil, grease or corrosive
substances on the tool, especially on the grips.
• Use a damp cloth and soapy water to clean plastic
components.
• Do not use gasoline or thinner to clean the tool.
10.4 Fasteners
Periodically check all screws, nuts and other fasteners
for proper tightness. Tighten any loose fasteners.
Replace any worn or damaged fasteners. This should
be performed periodically or every day in the event of
frequent or prolonged cutter operation.
NOTICE
Failure to check and tighten fasteners as
required may result in serious damage to the cutter.
10.5 Cutter Hydraulic System
The cutter contains a small hydraulic pump and an oil
reservoir with a rubber diaphragm. The oil level must be
periodically checked and additional oil must be added if
the oil level is low. In addition, the oil must be completely
changed at the specified interval. Refer to the Periodic
Maintenance Chart (Table 1).

14
NOTICE
A small amount of hydraulic oil may leak from
the drain/fill hole when cap is loosened in the next step.
Be prepared to catch this oil in a pan or with a clean rag.
Dispose of spilled oil in accordance with all applicable
laws and regulations.
5. Slowly loosen the oil reservoir cap while watching for
oil flow:
• If oil starts flowing from the oil drain/fill hole as the
cap is loosened, the reservoir is full. Tighten the
cap immediately. To avoid excessive oil spillage, do
not continue loosening the cap if oil flow occurs.
Skip steps 6 through 8 and go on to step 9.
• If no oil flow occurs when the cap is loosened,
fully loosen and remove the cap. Then, check oil
level and add oil (if needed) as described in steps
6 through 8.
6. Check the oil level in the drain/fill hole. Oil level will be
up to the top of the hole when reservoir is full.
7. If oil level is low, loosen the vent screw to provide
venting. Then, slowly add new Enerpac HF oil through
the oil drain/fill hole, until the oil level is up to the top
of the hole.
8. Remove any residue or metal particles from the oil
reservoir cap (it is magnetic).
9. Install and securely tighten the oil reservoir cap.
10. Tighten the vent screw (if loosened).
11. Using a clean rag, wipe the cutter housing, grip and
motor so that these surfaces are free of oil residue.
12. Connect cutter to AC power supply. Cycle the
piston several times to test for proper operation
before placing the cutter back into service.
10.5.1 Hydraulic System Maintenance Precautions
NOTICE:
WARNING
Always disconnect cutter from AC power supply
before performing hydraulic system maintenance.
Failure to observe this precaution could result in
accidental start-up while maintenance procedures
are being performed. Serious personal injury and
damage to cutter may result.
Wait for cutter to cool before performing hydraulic
system maintenance. Hot oil can cause burns.
Be sure that oil reservoir cap is securely tightened
after checking oil level or changing the oil. Leaking
oil can cause short circuits, fire and explosions.
Additional Precautions:
• Do not check oil level or change the oil in dusty areas.
• Be sure that all tools (wrench, screwdriver, etc.) used
to perform maintenance procedures are clean.
• When adding oil and performing oil changes, take every
precaution to prevent impurities from contaminating
the oil or entering the cutter. Impurities can cause
permanent damage to the hydraulic components.
• The hydraulic reservoir contains a rubber diaphragm
that slightly pressurizes the oil. Some oil spillage may
occur when checking the oil level or when changing
the oil. Wear and/or use appropriate personal
protective equipment (PPE) to prevent exposure to
hydraulic oil.
• Use only new Enerpac HF hydraulic oil poured from a
clean container. Use of other oil brands and/or used
oil may damage the cutter and may void the Enerpac
product warranty.
10.5.2 Checking Oil Level and Adding Oil
NOTICE
The reservoir contains a flexible rubber
diaphragm that slightly pressurizes the oil. To help
prevent excessive oil leakage when the reservoir cap is
removed, be certain that the piston is fully extended
before loosening the cap.
Refer to Figures 13A through 13D during the following
steps:
1. Operate the cutter and advance the piston until it is
fully extended.
2. Disconnect the cutter from the AC power supply to
prevent accidental motor start-up during the following
steps.
3. Place the cutter in the horizontal position, on a stable
and level work surface, with the oil reservoir cap
facing upwards. Place a pan or suitable container
under the cutter to catch any spilled oil.
4. To prevent contamination, remove any built-up dust
and dirt from the oil reservoir cap and surrounding
area.

15
Figure 13, Hydraulic System Maintenance
Figure 13C, Oil Reservoir Cap - Loosen (1) and
Tighten (2)
2
1
Figure 13B, Vent Screw - Loosen (1) and Tighten (2)
2
1
1
Figure 13D, Adding Oil to Reservoir Fill Hole (1)
1
2
3
4
5
Figure 13E, Diaphragm Cover (1), Diaphragm (2),
Extension (3), Diaphragm Opening (4) and
Oil Reservoir (5)
Figure 13A, Vent Screw (1), Diaphragm Cover (2)
and Oil Reservoir Cap (3)
3
12

16
10.5.3 Changing the Oil
NOTICE
The oil change procedure is very detailed and
will take a considerable amount of time. It should only
be performed by a trained technician at an Enerpac
authorized service center. Failure to properly perform
the procedure may result in incomplete filling of the
cutter oil reservoir, which could lead to cavitation, air
entrainment, reduced performance and pump damage.
Change the oil in the cutter hydraulic reservoir as
described in the following steps. Refer to Figures 13A
through 13E and Figure 14:
1. Before beginning this procedure, purchase a new
ECCE32 seal kit from your Enerpac authorized
service center or distributor. Some of the seals in this
kit will be used later in this procedure. Refer to the
cutter repair parts sheet for a description of seal kit
items.
2. Fill a clean oil dispenser with new Enerpac HF oil. Put
the dispenser aside for later use.
3. Operate the cutter and extend the piston all the way
forward.
4. Disconnect the cutter from the AC power supply to
prevent accidental motor start-up during the following
steps.
5. Place the cutter in the horizontal position, on a stable
and level work surface, with the oil reservoir cap and
diaphragm cover pointing upwards. Place a pan or
suitable container under the cutter to catch any
spilled oil.
6. To prevent contamination, remove any built-up dust
and dirt from the oil reservoir cap, diaphragm cover
and surrounding area.
NOTICE
A small amount of hydraulic oil leakage may
occur when the diaphragm cover and reservoir cap are
removed in the next step. Be prepared to catch this oil in
a pan or with a clean rag. Dispose of spilled oil in
accordance with all applicable laws and regulations.
7. Remove the oil reservoir cap and, using an adjustable
face spanner wrench, loosen and remove the
diaphragm cover.
8. Remove the diaphragm from the diaphragm opening.
9. Completely drain all old oil from the cutter, turning
it upside down and using a suitable oil extraction
system (used oil extraction pump) if necessary, so
that no oil remains in the cutter hydraulic reservoir.
NOTICE
Dispose of all used oil in accordance with all
applicable regulations and laws.
10. After all oil is evacuated, remove the three screws
for the stando bracket and remove the stando
bracket from the bottom of the cutter. See Figure 14.
11. Remove the directional control valve by removing
the four screws retaining it.
1
2
Figure 14, Stando Bracket (1) and Directional
Control Valve Screws (2)
12. Position the cutter with the control valve oil holes
pointing straight down, and allow the remaining oil
to drain for 30 to 60 minutes. Toward the end of this
time, the end of the cylinder opposite the oil holes
can be elevated slightly to aid in the draining.
13. Reinstall the directional control valve, using the
new O-Ring seals from the ECCE32 seal kit (refer to
step 1 of this procedure).
14. Install the stando bracket using the three screws.
Torque to 18 ft-lbs [25 Nm].
NOTICE
Use only new Enerpac HF oil in the following
step. Use of other oils may damage the cutter and may
invalidate the Enerpac product warranty.
15. Using the oil dispenser prepared in step 1, slowly
add new Enerpac HF oil through the oil drain/fill hole
and diaphragm opening until oil level is up to the top
of the drain/fill hole.
16. Install and securely tighten the oil reservoir cap.
NOTICE:
WARNING
To avoid serious personal injury, stay clear of cutting
head and blades during the following procedures.
Wear rubber gloves to prevent contact with oil. Wear
eye and face protection to avoid injury due to
splashing oil.
NOTICE
During the following steps, refer to Figure 5 for
directional lever positions.
17. Connect the cutter to the AC power supply.
18. Move the directional lever to position 2 (retract).
19. Cover the diaphragm opening with a rubber-gloved
hand to help prevent oil splashing.
20. Prime the pump by pressing and releasing the
trigger in short bursts. During this process, check
the oil level in the diaphragm opening and add oil
(as needed) to keep the reservoir filled. Failure to
keep reservoir full may result in cavitation and
pump failure. Pump is primed when piston starts
extending.

17
32. Install and securely tighten the oil reservoir cap.
33. Tighten the vent screw (if loosened).
34. Using a clean rag, wipe the cutter housing, grip and
motor so that surfaces are free of oil residue.
35. Connect the cutter to the AC power supply. Cycle
the piston several times to test for proper operation
before placing the cutter back into service.
10.6 Cutter Blade Replacement
NOTICE:
WARNING
• Always disconnect cutter from AC power supply
before beginning blade replacement procedures.
Failure to observe this precaution could result in
accidental start-up during blade replacement.
Serious personal injury could result.
• Use extreme caution when removing and installing
blades. Blades may be sharp even when worn. To
avoid hand injury, wear appropriate personal
protective equipment (PPE) and avoid contact with
blade cutting edges.
10.6.1 Blade Wear
The use of worn blades decreases the eectiveness of
the cutter and can also side load the cylinder, resulting
in possible damage to the tool. Motor overheating can
also occur.
Replace blades immediately if they are worn and/or
damaged or if there has been a noticeable decrease in
cutting performance.
NOTICE
Blades are not sharpenable and must be
replaced when worn. To help ensure optimum cutting
performance, replace both the fixed blade and the
moving blade at the same time.
NOTICE
During priming, the oil may become entrained
with air and may develop a foamy appearance. This is
normal.
21. Continue pressing and releasing the trigger in
short bursts as the piston retracts all the way back.
During this process, continue adding oil to keep the
reservoir full.
22. Move the directional lever to the position 1
(advance).
23. Press and release the trigger in short bursts as
the piston extends all the way forward. During this
process, continue adding oil to keep the reservoir
full.
24. Loosen the vent screw.
25. Slowly install the diaphragm in the diaphragm
opening. This should result in some oil leakage
from the vent screw, as well as from around the
diaphragm.
26. Tighten the vent screw.
27. Install and securely tighten the diaphragm cover.
NOTICE:
WARNING
To avoid serious personal injury, stay clear of cutting
head and blades during the following procedures.
28. Start the cutter and cycle the piston through several
advance and return strokes. Ensure that the piston
is fully advanced when done.
29. Disconnect the cutter from the AC power supply.
30. Be sure cutter is positioned so that the oil reservoir
cap is facing upwards. Do not operate cutter for
several hours (preferably overnight) to allow any
remaining air to separate from the oil.
31. Loosen and remove the oil reservoir cap. Recheck
the oil level in the oil drain/fill hole. If oil level has
dropped, loosen vent screw and add additional
Enerpac HF oil until the oil level is up to the top of
the hole.

18
Figure 15, Fixed Blade Replacement
12
3
Key:
1. Safety Guard
2. Fixed Blade
3. Fixed Blade Screw
10.6.2 Blade Replacement - Fixed Blade
Replace the fixed blade as described in the following
steps. Refer to Figure 15, items 1 through 3.
1. Be sure that the cutter piston is fully retracted. If not,
start the cutter and cycle the piston until it is fully
retracted.
2. Disconnect cutter from AC power supply to prevent
accidental motor start-up during the following steps.
3. Place the cutter horizontally on a stable work surface.
4. Close the cutter safety guard to gain access to the
fixed blade screw hole.
5. Remove the fixed blade screw.
6. Open the cutter safety guard.
7. Remove the worn fixed blade and replace it with the
new fixed blade.
8. Close the cutter safety guard to gain access to the
fixed blade screw hole.
9. Secure the new fixed blade using the new fixed blade
screw included with the new fixed blade. Torque to
102 ft-lb [138 Nm].
10. Test cutter for proper operation before placing it
back into service.

19
1. Be sure that the cutter piston is fully retracted. If not,
start the cutter and fully retract the piston.
2. Disconnect cutter from AC power supply to prevent
accidental motor start-up during the following steps.
3. Place the cutter horizontally on a stable work surface
with the handle facing upwards.
4. Open the cutter safety guard.
5. Remove the two screws for the lifting eye bracket and
remove the lifting eye bracket.
6. Remove the four screws for the top plate and remove
the top plate.
10.6.3 Blade Replacement - Moving Blade
Replace the moving blade as described in the following
steps. Refer to Figure 16, items 1 through 6.
Figure 16, Moving Blade Replacement
1
3
3
2
4
5
6
Key:
1. Lifting Eye Bracket Screws
2. Lifting Eye Bracket
3. Top Plate Screws
4. Top Plate
5. Retention Pin
6. Moving Blade
7. Remove the retention pin using a pair of pliers.
8. Remove the moving blade from the piston.
9. Install the new moving blade onto the piston and
install the retention pin.
10. Install the top plate, top plate screws, lifting eye
bracket and lifting eye bracket screws. Torque
screws to 18 ft-lbs [25 Nm].
11. Close the cutter safety guard.
12. Test cutter for proper operation before placing it
back into service.

20
13.0 TROUBLESHOOTING
Refer to the Cutter Troubleshooting Charts (Tables 2
and 3) for lists of common cutter symptoms, possible
causes and solutions.
For repair service, contact an Enerpac authorized service
center. Inspection and repairs should be performed
only by an Enerpac authorized service center or other
qualified hydraulic tool service facility.
11.0 CLEANING THE PISTON AREA
NOTICE:
WARNING
Always disconnect cutter from AC
power supply before cleaning the piston head area.
Failure to observe this precaution could result in
accidental start-up during cleaning procedures.
Serious personal injury could result.
• Keep the piston area clean to ensure that the piston
operates smoothly.
• Remove any built-up dirt or debris from the cutting
head, the piston and moving blade.
12.0 STORAGE
12.1 Storage Guidelines
If the cutter will be stored for an extended period of time:
• Disconnect cutter from AC power supply.
• Thoroughly clean the cutter. Remove any loose
dust or dirt. Dry the cutter after completing cleaning
procedures.
• Lubricate the cutter metal surfaces using a clean oil-
moistened rag to provide added corrosion protection
during storage.
• Store the cutter in its plastic storage case, in a clean
and dry location, accessible only to authorized
personnel.
12.2 Return to Use (after storage)
Before using the cutter after an extended period of
storage or inactivity, perform the following steps:
• Check the hydraulic oil level and add oil if low. Refer
to instructions in Section 10.5.2.
• Check for oil leaks. Make repairs as required.
• Remove any traces of oil (if present) from the
handle/grip and other parts that can be gripped.
• Remove any oil from cutter metal surfaces.
• Check that the electrical power cord and plug are
undamaged and in good condition.
• Verify that the cutter housing (including the electric
motor) is undamaged.
• Check for any missing, worn or improperly installed
parts.
• Check that all screws, nuts, bolts and other fasteners
are tight. Replace, repair or tighten components as
needed.
• Connect cutter to AC power supply. Cycle the piston
several times to test for proper operation before
placing the cutter back into service.
Table of contents
Other Enerpac Cutter manuals

Enerpac
Enerpac EBC20B User manual

Enerpac
Enerpac EWCE55 User manual

Enerpac
Enerpac EBE22 User manual

Enerpac
Enerpac ECSE300 User manual

Enerpac
Enerpac EWCH90 User manual

Enerpac
Enerpac EWCH180 User manual

Enerpac
Enerpac EBH30 User manual

Enerpac
Enerpac EBE26 User manual

Enerpac
Enerpac NC-1319 User manual

Enerpac
Enerpac EFBE5017 User manual
Popular Cutter manuals by other brands

Panasonic
Panasonic EY3552 - 18V METAL SAW operating instructions

H.K. Porter
H.K. Porter 8690 Series Service manual

Current Tools
Current Tools 754 Operating, Maintenance, Safety and Parts Manual

Makita
Makita XEC01 Series instruction manual

Makita
Makita DCS553 instruction manual

REMS
REMS Nano operating instructions