enware TWYFORD Series User manual

I00328_Nov 19
Installation and Maintenance Instructions
TWYFORD
RIMLESS BACK TO WALL TOILET PAN
Call 1300 369 273
www.enware.com.au
Enware Australia Pty Limited
9 Endeavour Rd Caringbah NSW 2229 Australia
Ph: 02 8536 4000 info@enware.com.au
Toilet seat to be ordered separately
contents
Toilet Pan
Fixing kit

2 Call 1300 369 273 www.enware.com.au
Installation shall be in accordance with the AS/NZS3500 series of Standards, the Plumbing
Code of Australia (PCA), and the manufacturer’s instructions.
Installations not complying with AS/NZS 3500, the PCA or the manufacturer’s instructions
may void the product and performance warranty provisions.
Enware Australia advises:1. Due to ongoing Research and Development, specifications may
change without notice; 2. Component specifications may change on some export models.
All measurements are in millimetres.
Inlet Connection Flush pipe connection on pan
approximately 53 - 55mm diameter
40mm European Kee Seal required
Outlet Connection DN100 DWV PVC Pan Collar
technical data
installation
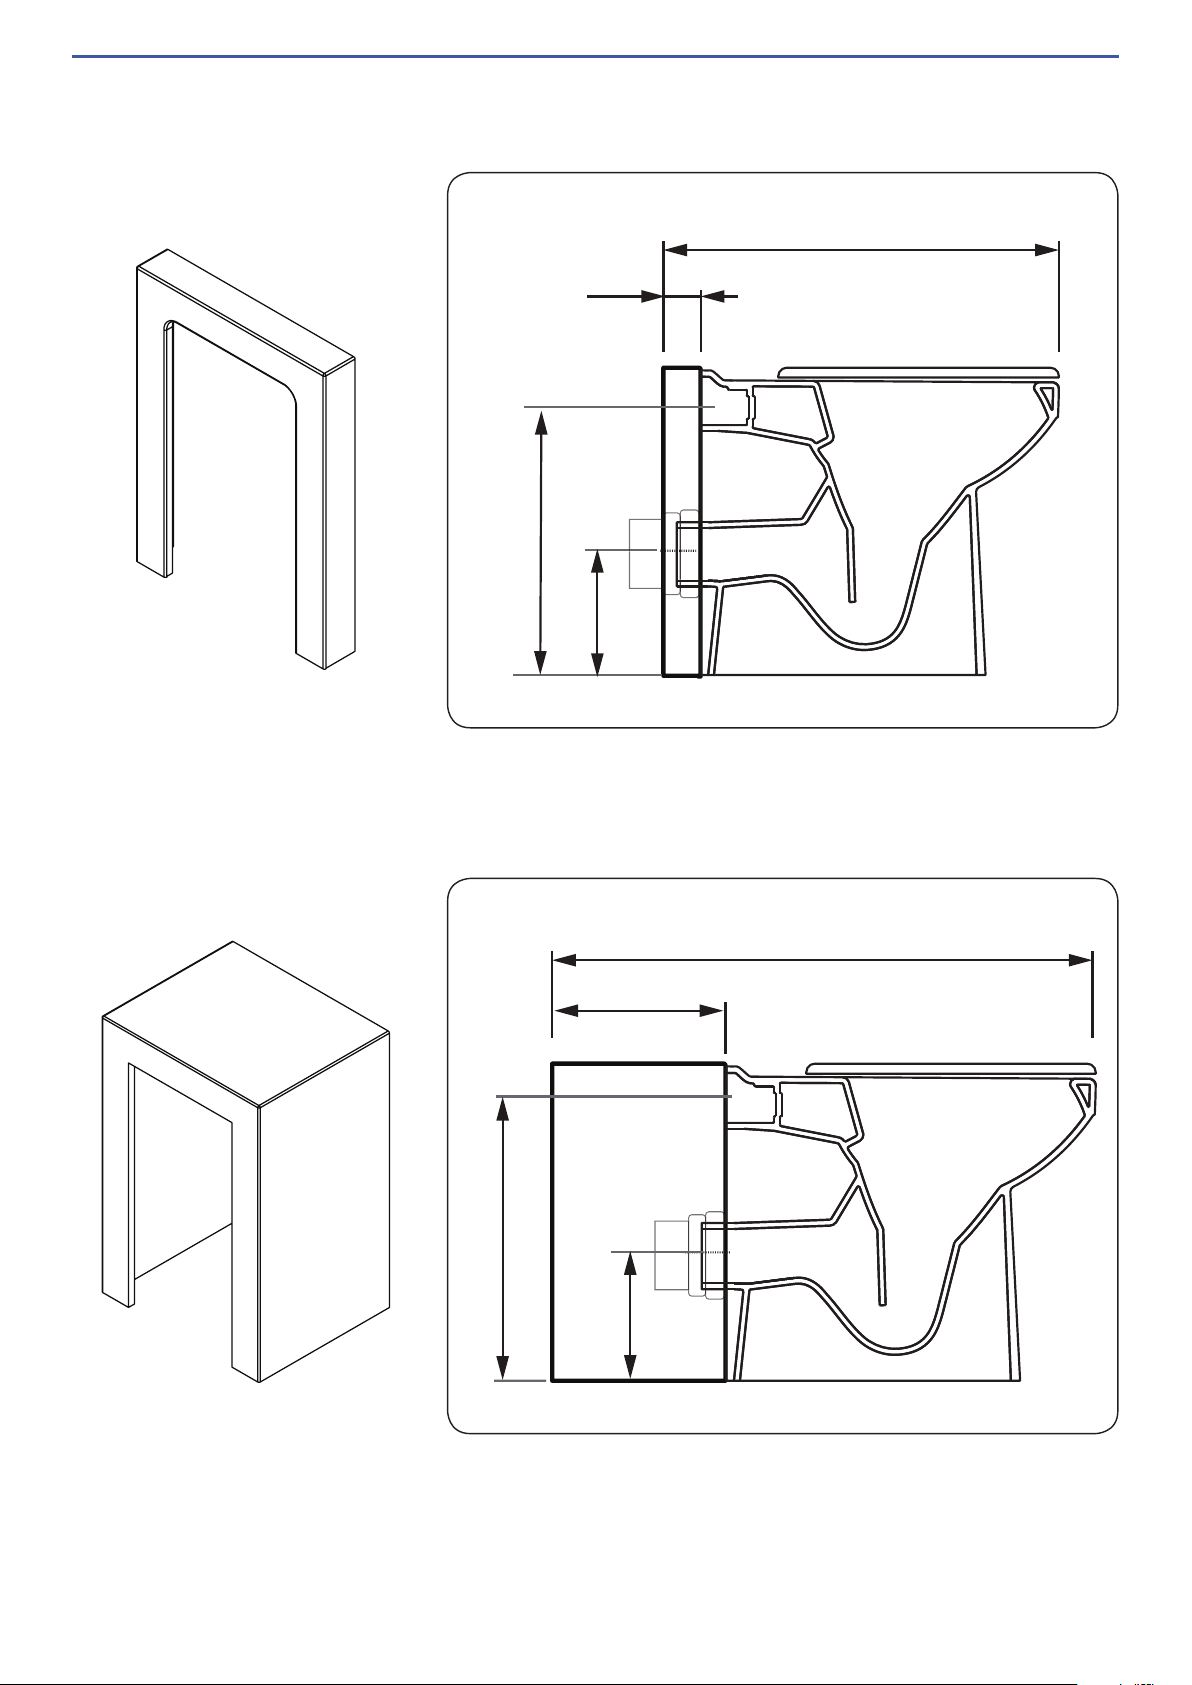
Detemine set out for the toilet pan.
The Twyford Rimless WC “P” trap has an
extended spigot outlet that requires the pan
collar connection to be within a wall cavity,
service duct or Pan Infill. Please take note of the
set out dimensions before plumbing the waste
connection.

www.enware.com.au Call 1300 369 273 3
360
40
102
40mm Kee Seal*
185 5
+
-
365
405 510
102
Pan collar inside
wall or pan infill
460
355
535
40
185 5
420
102
40mm Kee Seal*
+
-
Pan collar inside
wall or pan infill
Twyford Avalon Model TWY-AV1968WH
Twyford Sola Model TWY-SA1968WH
* Flush pipe connection
on pan approximately
53 - 55mm diameter.
40mm European Kee
Seal required
* Flush pipe connection
on pan approximately
53 - 55mm diameter.
40mm European Kee
Seal required

4 Call 1300 369 273 www.enware.com.au
185 5
+
-
365
562
52
Pan Infill TWY-INF52WH (Optional) with Twyford Sola Model TWY-SA1968WH
185 5
420
+
-
800
265
Pan Infill TWY-INF265WH (Optional) with Twyford Avalon Model TWY-AV1968WH

www.enware.com.au Call 1300 369 273 5
Floor Mounting
Determine floor fixing requirements.
Floor fixing kit (including brackets and screws) is
supplied. Ensure the pan bracket screws can be
fixed onto floor material with adequate structural
integrity and strength.
Mark out the drill holes for fixing brackets. Pre-drill
holes and install fixing brackets, then fix the toilet pan
in place. Hand tighten the pan fixing screws, but do
not over-tighten. (Over-tightening screws will cause
the ceramic to crack.)
Install white screw cover caps (supplied).
Caulking
Connect flush pipe and waste to the pan, and visually inspect the pan for any leaks.
Level the pan, and ensure the floor surface is clean and dry - free of dust, moisture and
grease.
Apply silicone sealant to the bottom contact surface of the pan and around the perimeter
of the foot of the pan to create a thorough seal between the pan and floor.
For pan infills, apply silicone sealant to all contact surfaces to the pan, to the wall, and to
the floor. Ensure no gap is left that can let any moisture to get through inside.

6 Call 1300 369 273 www.enware.com.au
cleaning
• WC units have a glazed surface. Glazed surfaces are easy to keep clean and are resistant
against most chemicals.
• Clean bowl regularly.
• Clean external surfaces regularly with a dry, soft cloth. Alternatively clean with hot water
and soap, using soft cloth or a sponge, and wipe dry with a cloth.
• Cleaning utensils, which contain abrasive agents, such as steelwool and green scouring
pads, must not be used. Strong abrasive materials can scratch the glaze and devoid it of
its original qualities.
• Strong acids such as hydrochloric acid or sulphuric acid, strong alkaline such as caustic
soda, and cleaning powders or pastes must not be used.
• Running WC units should be repaired immediately.

www.enware.com.au Call 1300 369 273 7
product warranty for Australia Effective 1 September 2014
Enware Australia Pty Limited (ACN 003 988 314)
(“we” or “us”) warrants that this product (also referred
to as “our goods”) will be free from all defects in
materials and workmanship for 12 months* from the
date of purchase. Our liability under this warranty
is limited at our option to the repair or replacement
of the defective product or part, the cost of repair
of the defective product or part or the supply of an
equivalent product or part, in each case if we are
satisfied the loss or damage was due to a defect in
the materials or workmanship of the product or part.
All products must be installed in accordance with the
manufacturer’s instructions, the Plumbing Code of
Australia (PCA), and AS/NZS3500 including any other
applicable regulatory requirements.
exceptions
This warranty does not apply in respect of any
damage or loss due to or arising from:
a) Failure by you or any other person to follow
any instructions for use (including instructions
and directions relating to the handling, storage,
installation, fitting, connection, adjustment or repair of
the product) published or provided by us;
b) Failure by you or any other person responsible for
the fitting, installation or other work on the product to
follow or conform to applicable laws, standards and
codes (including the AS/NZ 3500 set of Standards,
all applicable State and Territory Plumbing Codes,
the Plumbing Code of Australia and directions and
requirements of local and other statutory authorities);
or
c) Any act or circumstance beyond our control
including faulty installation or connection, accident,
abnormal use, acts of God, damage to buildings,
other structures or infrastructure and loss or damage
during product transit or transportation.
making a claim
To make a claim under this warranty you must
notify us in writing within 7 days of any alleged defect
in the product coming to your attention, provide us
with proof of your purchase of the product and have
completed the Online Product Service and Warranty
Form available on website:
www.enware.com.au/product-service-enquiry
All notifications and accompanying forms must be
sent to us marked for the attention of the Enware
Australia Pty Limited, 9 Endeavour Road, Caringbah
NSW 2229. We can also be contacted by telephone
Your costs in making a claim under this warranty,
including all freight, collection and delivery costs, are
to be borne and paid by you. We also reserve the
right at our cost to inspect any alleged defect in the
product wherever it is located or installed or on our
premises.
* Vitreous China Pans - 10 Years warranted against material and
manufacturing defects | Toilet Seats - 1 Year warranted against
material and manufacturing defects | Accessories & Spare Parts -
1 Year warranted against material and manufacturing defects
For more information on warranty, see www.enware.com.au/
warranty
other conditions
Except as provided or referred to in this document,
we accept no other or further liability for any
damages or loss (including indirect, consequential
or economic loss) and whether arising in contract,
tort or otherwise. Any benefits available to you under
this warranty are in addition to any non-excludable
rights or remedies you may have under applicable
legislation, including as a “consumer” under the
Australian Consumer Law. To that extent you need to
be aware that: our goods come with guarantees that
cannot be excluded under the Australian Consumer
Law. You are entitled to a replacement or refund for
a major failure and for compensation for any other
reasonably foreseeable loss or damage. You are also
entitled to have the goods repaired or replaced if the
goods fail to be of acceptable quality and the failure
does not amount to a major failure.

This manual suits for next models
2
Table of contents
Other enware Toilet manuals
Popular Toilet manuals by other brands

American Standard
American Standard Cygnet Hygiene Rim Over-height Round 1810107 installation manual

Woodbridge
Woodbridge B0980S Installation and care guide

YitaHome
YitaHome BFTLPT-0000 user manual

Foremost
Foremost BTS-1005E-W OPERATING MANUAL, INSTALLATION STEPS

LUXE BIDET
LUXE BIDET Neo 110 manual

TRELINO
TRELINO Origin instruction manual

Toto
Toto Aquia CT418F quick start guide

Sanela
Sanela SLP 49S Instructions for use

Signature Hardware
Signature Hardware CONTEMPORARY EASY CLEAN TOILET SEAT 447330 manual

FV
FV E122 installation instructions

Helvex
Helvex WC-OPTION-AT2 installation guide

ITT Industries
ITT Industries JABSCO 37275 Series quick start guide