Inserting Your Memory Card
When you insert the card, you see a message
indicating that you have inserted a memory card.
The printer reads and counts the images on
your card.
NOTE: The printer recognizes the first 999 files
only. If your photos aren’t recognized, see your
Printer Basics book for troubleshooting
information.
CompactFlash®
or MicrodriveTM
(left)
Memory Stick®
(middle)
SDTM (Secure Digital)
or MMC (MultiMediaCard)
(middle)
SmartMediaTM
(right)
xD Picture CardTM
(right)
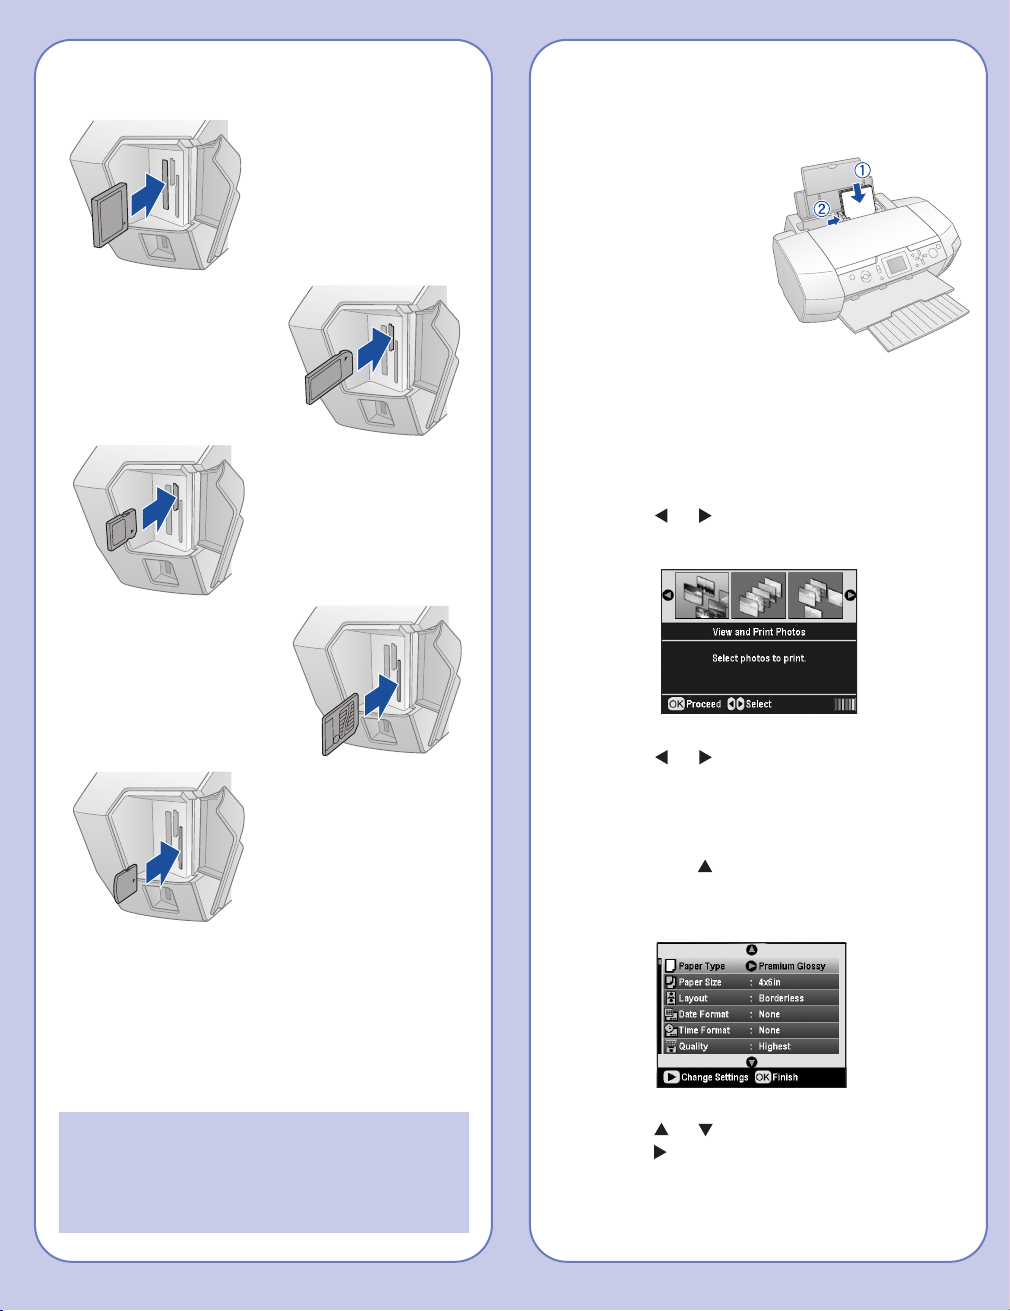
Loading 4 x 6 "Photo Paper
1Place the paper against the
right side of the feeder.
2Slide the left edge
guide against the
paper.
Printing a 4 x 6 "Photo
1Press the Memory Card button to choose
Memory Card mode.
2Press or to highlight View and Print
Photos, then press OK.
3Press or to scroll through your photos.
(Press and hold one of the buttons to scroll
quickly.)
4When the photo you want is shown on the
LCD, press to select one copy.
5Press the Print Settings button.
6Press or to highlight Paper Type, then
press .
8Press or to highlight one of these
options, then press :
• Quality: Choose Standard, Higher, or
Highest
• Filter: Choose Off, Black & White, or
Sepia
• Brightness: Choose Standard, Brighter,
Brightest, Darker, or Darkest
• Contrast: Choose Standard, Higher, or
Highest
• Sharpness: Choose Standard, Sharper,
Sharpest, Softer, or Softest
• Saturation: Choose Standard, Higher,
Highest, Lower, or Lowest
9Adjust any settings as necessary, then press
OK.
Paper Type Setting
Paper Paper Type
setting
Plain paper Plain Paper
Epson Premium Bright White Paper
Epson Photo Quality Ink Jet Paper
Epson Premium Glossy Photo Paper Premium Glossy
Epson Ultra Premium Glossy Ultra Premium
Photo Paper
Epson Premium Semigloss Semigloss
Photo Paper
Epson Semigloss Scrapbook
Photo Paper
Epson Premium Luster Photo Paper Premium Luster
Epson Glossy Photo Greeting Card Photo Paper
Epson Photo Paper
Epson Glossy Photo Paper
Epson Matte Paper Heavyweight Matte
PremierArtTM Matte Scrapbook
Photo Paper
7Press or to highlight the correct paper
type setting (see “Paper Type Setting” to the
right), then press OK.
8Press or to highlight Paper Size, then
press .
9Choose 4x6in, then press OK.
10 Press OK, then check your settings and press
the green Start button to print your photo.
Customizing Your Prints
You can select layouts, adjust image quality
manually or automatically, and add the date or time
to your prints.
1Press the Memory Card button to choose
Memory Card mode.
2Press or to highlight View and Print
Photos, Print All Photos, Print Range of
Photos, or Print by Date, then press OK.
3Choose your photos if necessary, then press
Print Settings.
4Press or to highlight Layout, then
press .
5Choose one of the layouts then press OK.
6Press or to highlight Date Format or
Time Format then press .
7Press or to highlight a format setting,
then press OK.
Senna_QRG_CPD20397.qxd 7/20/05 2:18 PM Page 2


