ERHS Eswa DC-3 User manual

DC-3 Instructions
Thank you for purchasing a new Eswa DC-3 thermostat.
The DC-3 is a programmable thermostat for the control of Underfloor Heating or Ceiling Heating.
It is programmable for up to 3 periods a day (On&Off) for Monday-Friday and Saturday & Sunday
separately. It has an internal air sensor for room air temperature control and can be used with a
compatible floor sensor to allow control of, or limit to the floor temperature.
These instructions will guide you through the initial set up and use of your new thermostat.
Operation:
1. Power button – Press to turn the thermostat on & off. When off the heating will not work.
2. Time Setting – Press to set minute, hour and day of the week.
3. Menu – Press to select Manual mode (indicated by a hand icon) or Programme mode
(indicated by a clock icon). When in manual mode you may press the ˄ / ˅ keys to alter the set
temperature. The thermostat will hold this temperature until you change it.
4. ˄ / ˅ keys may be used while in Programme mode to temporarily override the programme. The
hand and clock icons will show and the thermostat will revert to the programme at the next
period.
5. Child lock: Press ˄ & ˅ together and hold for more than 5 seconds to lock/unlock the
thermostat.

I nstallation:
Installation should only be undertaken by a competent person. Ensure that the power is turned off at
the MCB before undertaking any work.
1. Turn off the power at the mains.
2. Connect the Power supply, Load and external sensor (if applicable) in the correct terminals:
1 & 4: Load N&L (No polarity)
2: 240V in N
3: 240V in L
5: Earth (if required)
6&7: Sensor NTC 10k
3. Fix the mounting frame to the box with relevant accessory screws, being careful not to
overtighten the screws, or the thermostat body may come away from the mounting frame. If
this happens back off the screws and carefully reinsert the body into the frame.
4. Slide the front face onto the lugs on the front of the metal mounting frame.
5. Turn on the power at the mains and set up the thermostat.
6. Check that the correct sensor mode is selected in the configuration menu as below.
Configuration Menu:
To enter the configuration please turn the thermostat off by pressing the power button.
With “OFF” showing on the display, press and hold the menu button for approximately 5 seconds.
To alter the setting on the parameter use the arrow keys, to switch to the next parameter press the
“menu” button.
When you have finished altering the settings press the power button to save your changes and exit the
configuration menu.
No. Function Press ˄ / ˅ to alter Default
1 Calibration -9oC to 9oC 0oC
2 Dead Zone 1 oC to 5oC 1oC
3 Lock 0: All buttons locked
1: All buttons locked except the
Power Button
1
4 Sensor Selection In – Internal Room Air Control
OU – Remote Sensor Control
All – Both Internal and Remote
All
5 Minimum Temperature Setting 5oC to 15 oC 5oC
6 Maximum Temperature Setting 15oC to 45oC 35oC
7 Display Mode 00: Display room and set
temperatures
01: Display set temperature only
0
8 Backlight 0: Backlight off after button press
1: Backlight dims after button press
1
9 High Temperature Protection Setting 25 oC - 70 oC 45 oC
A Anti Freeze Range 2 oC - 10 oC 5 oC
B Anti Freeze Protection Setting 0: Off 1: ON 0
C ECO Mode 0: Off 1: ON 0
D ECO Temperature set range 5 oC to 30oC 16 oC
Programme Setting:
The thermostat comes with a default factory installed programme:
Display Weekday (Mon-Fri) Saturday Sunday
Time Set Temp oC Time Set Temp oC Time Set Temp oC
Period 1 06:00 22 06:00 22 06:00 22
Period 2 08:00 16 08:00 16 08:00 16
Period 3 12:00 22 12:00 22 12:00 22
Period 4 14:00 16 14:00 16 14:00 16
Period 5 18:00 22 18:00 22 18:00 22
Period 6 22:00 16 22:00 16 22:00 16
If you wish to change the default programme you may go into the programme setting function menu
and change any or all of the periods to suit your own needs.
With the power button “On” press and hold the menu button for 5+seconds. The display will
change to show the first programmable period.
Change the value by using the up and down arrows, move to the next value with a short press
of the menu button.
When you have finished programming you may exit with a short press of the power button.
If while in programming mode you don't press a button for 3+seconds the thermostat will revert to
normal operation. It may therefore be useful to use the blank copy below to make a record of your
personal routine before starting to programme the thermostat.
Display Weekday (Mon-Fri) Saturday Sunday
Time Set Temp oC Time Set Temp oC Time Set Temp oC
Period 1
Period 2
Period 3
Period 4
Period 5
Period 6
Wi-Fi Operation:
If you have purchased a DC-3W this section covers Wi-Fi operation.
Please make sure that your phone/tablet and router are in range of your thermostat with a good signal
strength on a 2.5GHz signal or the connection may not work correctly.
•Download “Tuya Smart” or “Smart Life” from your App Store
•Once downloaded open the App and register a free account following the on-screen
instructions. Once you have successfully registered log in to your account and connect you
device to the thermostat.
There are 2 modes for connecting your phone and thermostat. AP mode and EZ. EZ mode is
recommended.
EZ Mode connection:
First Ensure your thermostat is in EZ connection mode, Wi-Fi signal indicator flashing rapidly
0.5seconds per flash. If this needs resetting
press and hold the “Power” button for +5
seconds.
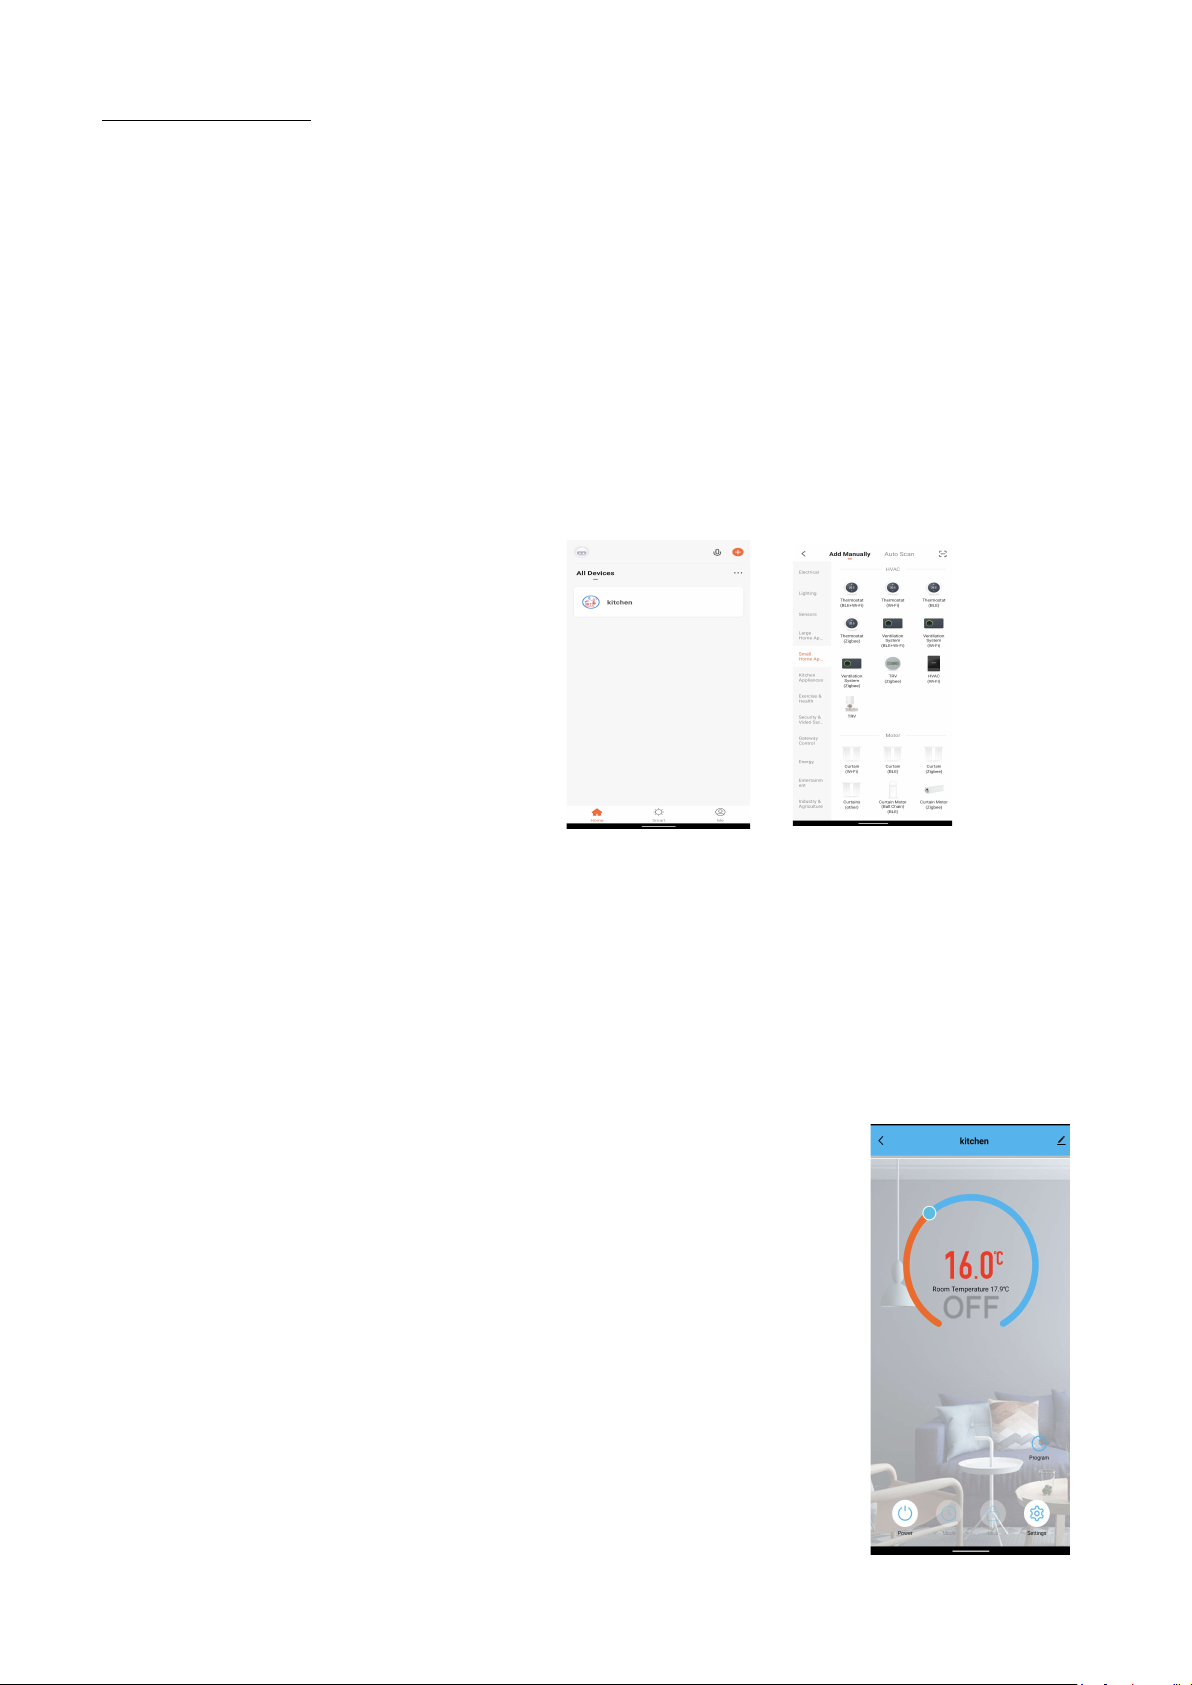
•Go to the “Add Device” (+) button in
the top right of your screen (Figure 1)
•Go to the “Small Home Appliances”
section on the left hand side menu &
select HVAC – Thermostat (Wi-Fi)
(Figure 2).
•Follow the instructions on your device
to connect to the thermostat. This should
take 15-30 seconds.
AP Mode connection:
First Ensure your thermostat is in AP connection mode, Wi-Fi signal indicator flashing slowly, once
per second. Select AP Mode connection at the top right of the app screen on your device and follow
the prompts on the screen.
Wi-Fi Use:
The thermostat name is displayed at the top and may be changed by using the
edit (pen) button.
The room temperature and set temperature are shown in the middle of the
screen. To alter the set point of the DC-3W move the blue dot around the circle
as you do so the set temperature will change and the status of the thermostat
will change to “Heat on”.
Power – appears at the bottom left, when it is blue the DC-3W is Off when it is
red the DC-3W is On.
Mode – allows selection of Manual, Eco (permanently set to 16oC unless
changed in the manual configuration) or Programme modes.
Lock – Locks/Unlocks the touch button controls.
Setting – Allows adjustment of the temperature compensation, frost protection
and factory data reset.
Programme – Above settings is the programme icon, this allows for
programming times and temperatures as per the manual instructions when in
“Programme” mode.
Figure 1 Figure 2

Technical Data:
Dimensions:
Face: 86 x 86 x14mm
Rear terminal box: 50 x 50 x 35mm
Installation hole depth Minimum:45mm recommended
Sensor: NTC 10 KΩ
Accuracy: +/-1 oC
Power Consumption: <1.5W
Timing Error: <1%
Power Supply: 95 - 240V AC, 50 - 60Hz
Max load: 16A
Shell Material: PC + ABS(Flame retardant)
Ambient Temperature: 0 - 45oC, 5 - 95%RH
Storage Temperature: -5 – 55oC
Troubleshooting:
Err displayed – Remote sensor not connected, check/connect the remote sensor or select internal
sensor only in the configuration menu.
No display on the thermostat – Check the connections and voltage to the thermostat.
Room temperature displayed is different than the actual room temperature, use the temperature
compensation in the configuration menu to adjust the displayed temperature.
If after reading the instructions you require any further support please contact us at [email protected]
Electric Radiant Heating Systems Ltd
70 Woolmer Way, Bordon, Hants., GU35 9QF; T: 01420 476 049; Company number:10899902
Table of contents
Other ERHS Thermostat manuals


