ermengineering PAF-301 User guide

Use and maintenance manual
Automatic conveyor belts punching machine
Model: PAF-301
____________________________________________________________________________________________________________________
www.ermengineering.com info@ermengineering ✆(+34)937632525
P a g . 1
(Original) Use and maintenance manual
Type: Automatic conveyor belts punching machine
Model: PAF-301
IMPORTANT
Carefully read this User Manual and follow the instructions and warnings before operating the
machine.
Any modification or change may cause the loss of warranty and manufacturer liability.
This Manual should always be stored the machine and visible for operators and maintenance
technicians for any future reference. The Manual is part of the machine.

Use and maintenance manual
Automatic conveyor belts punching machine
Model: PAF-301
____________________________________________________________________________________________________________________
P a g . 2
Index:
Page
-CE Declaration of conformity:................................................................................................................................................3
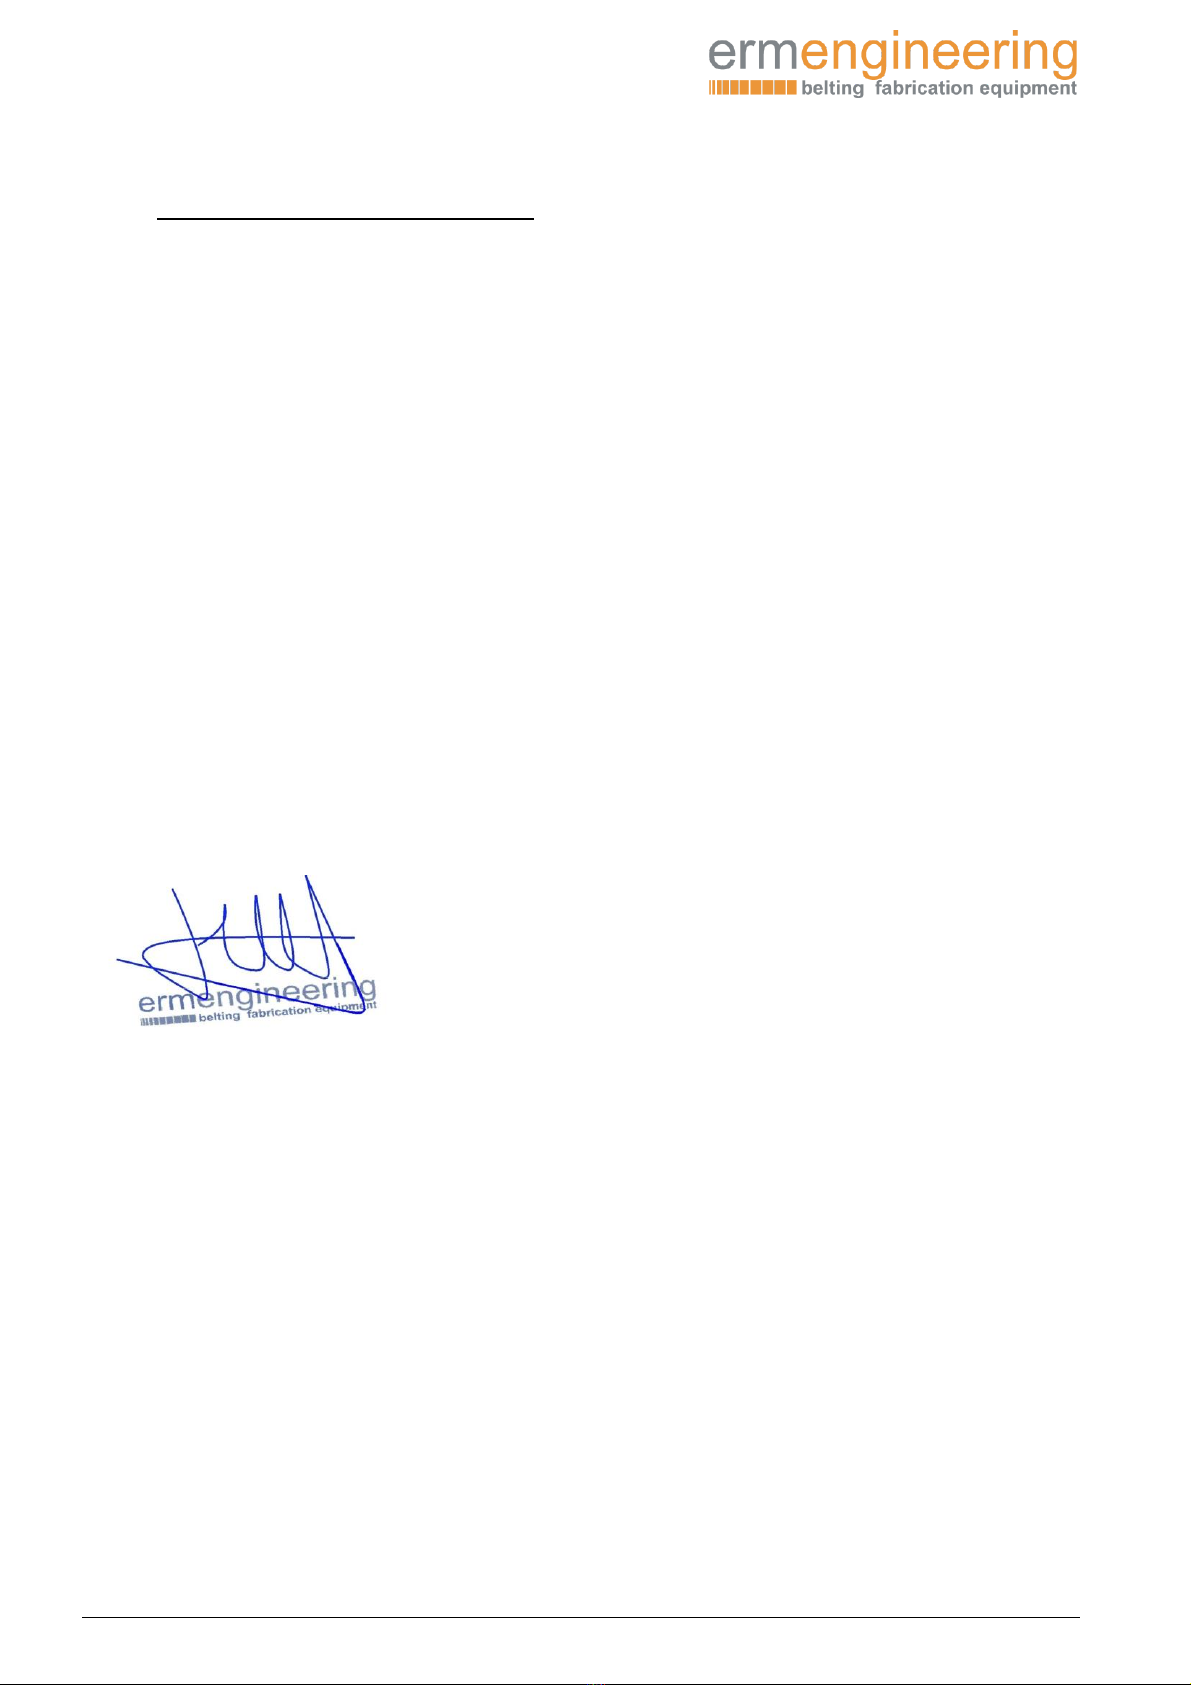
-Transport and unloading the machine:..............................................................................................................................4
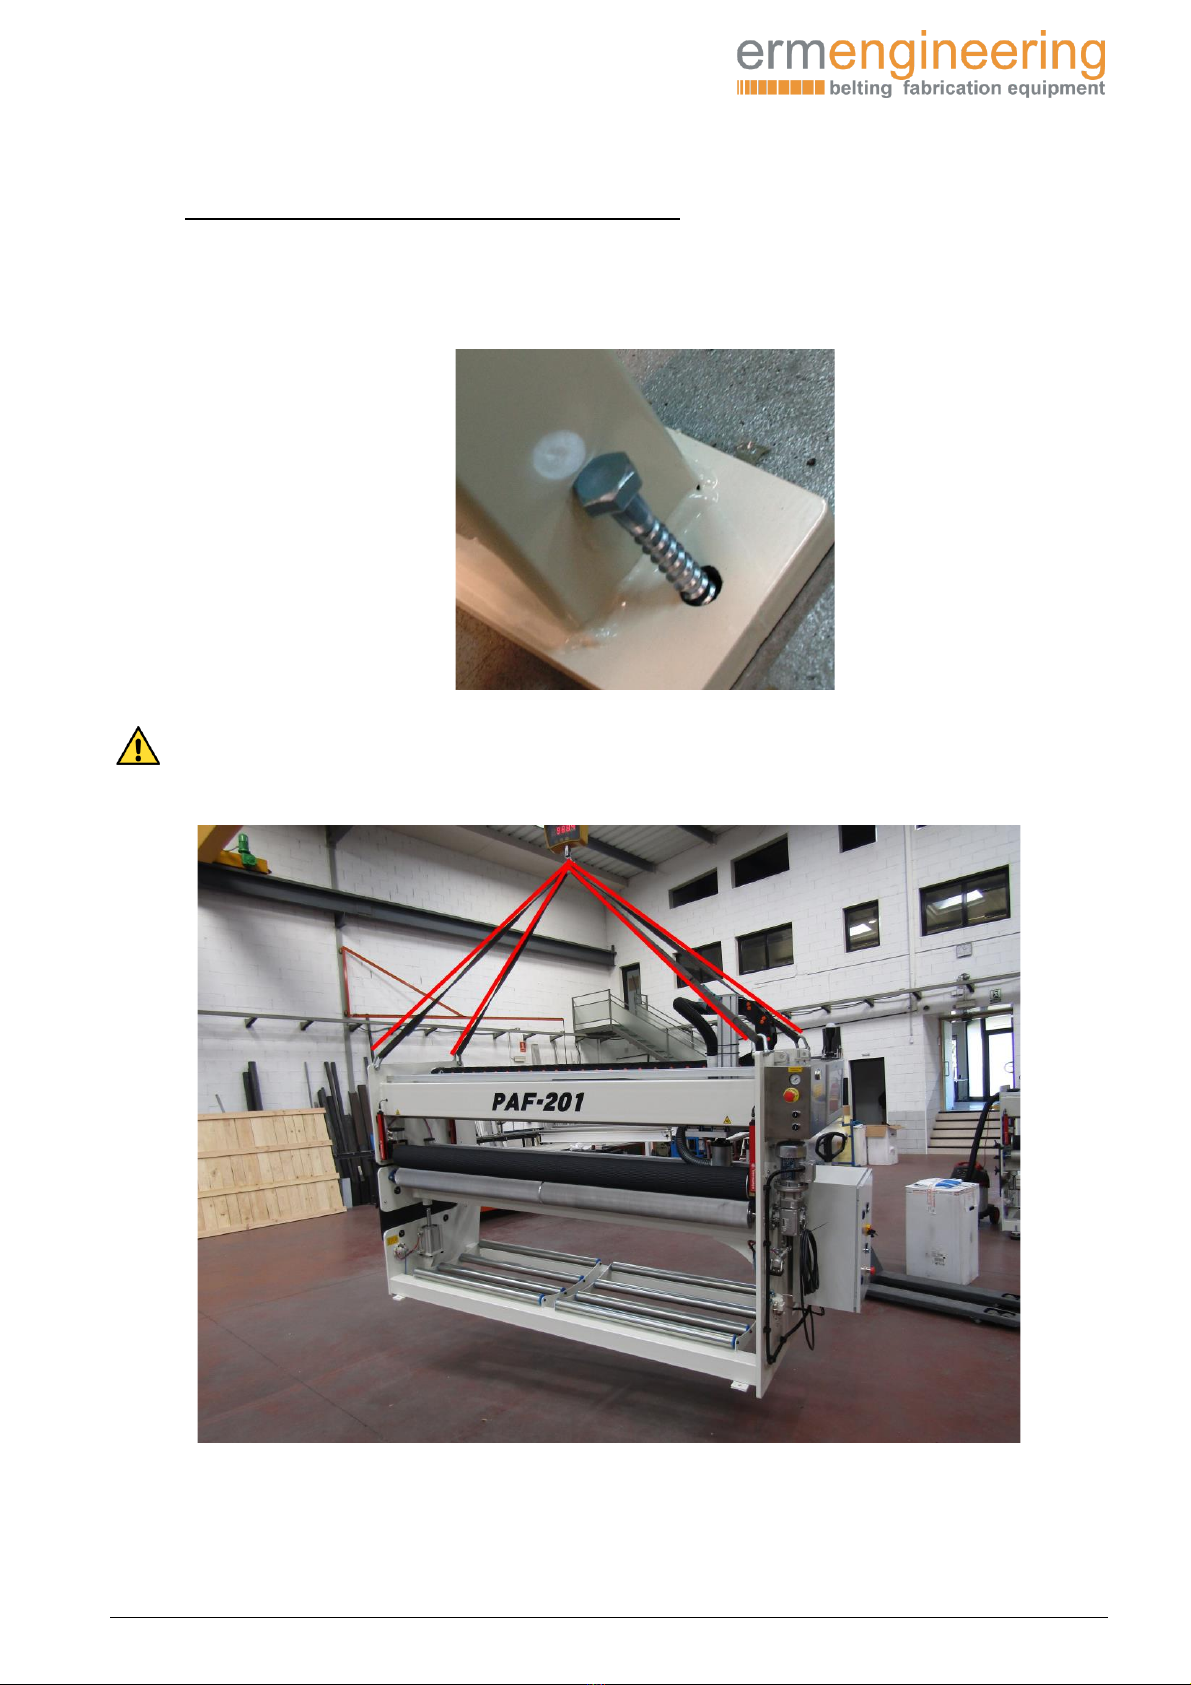
-Dimensions and weights:.........................................................................................................................................................5
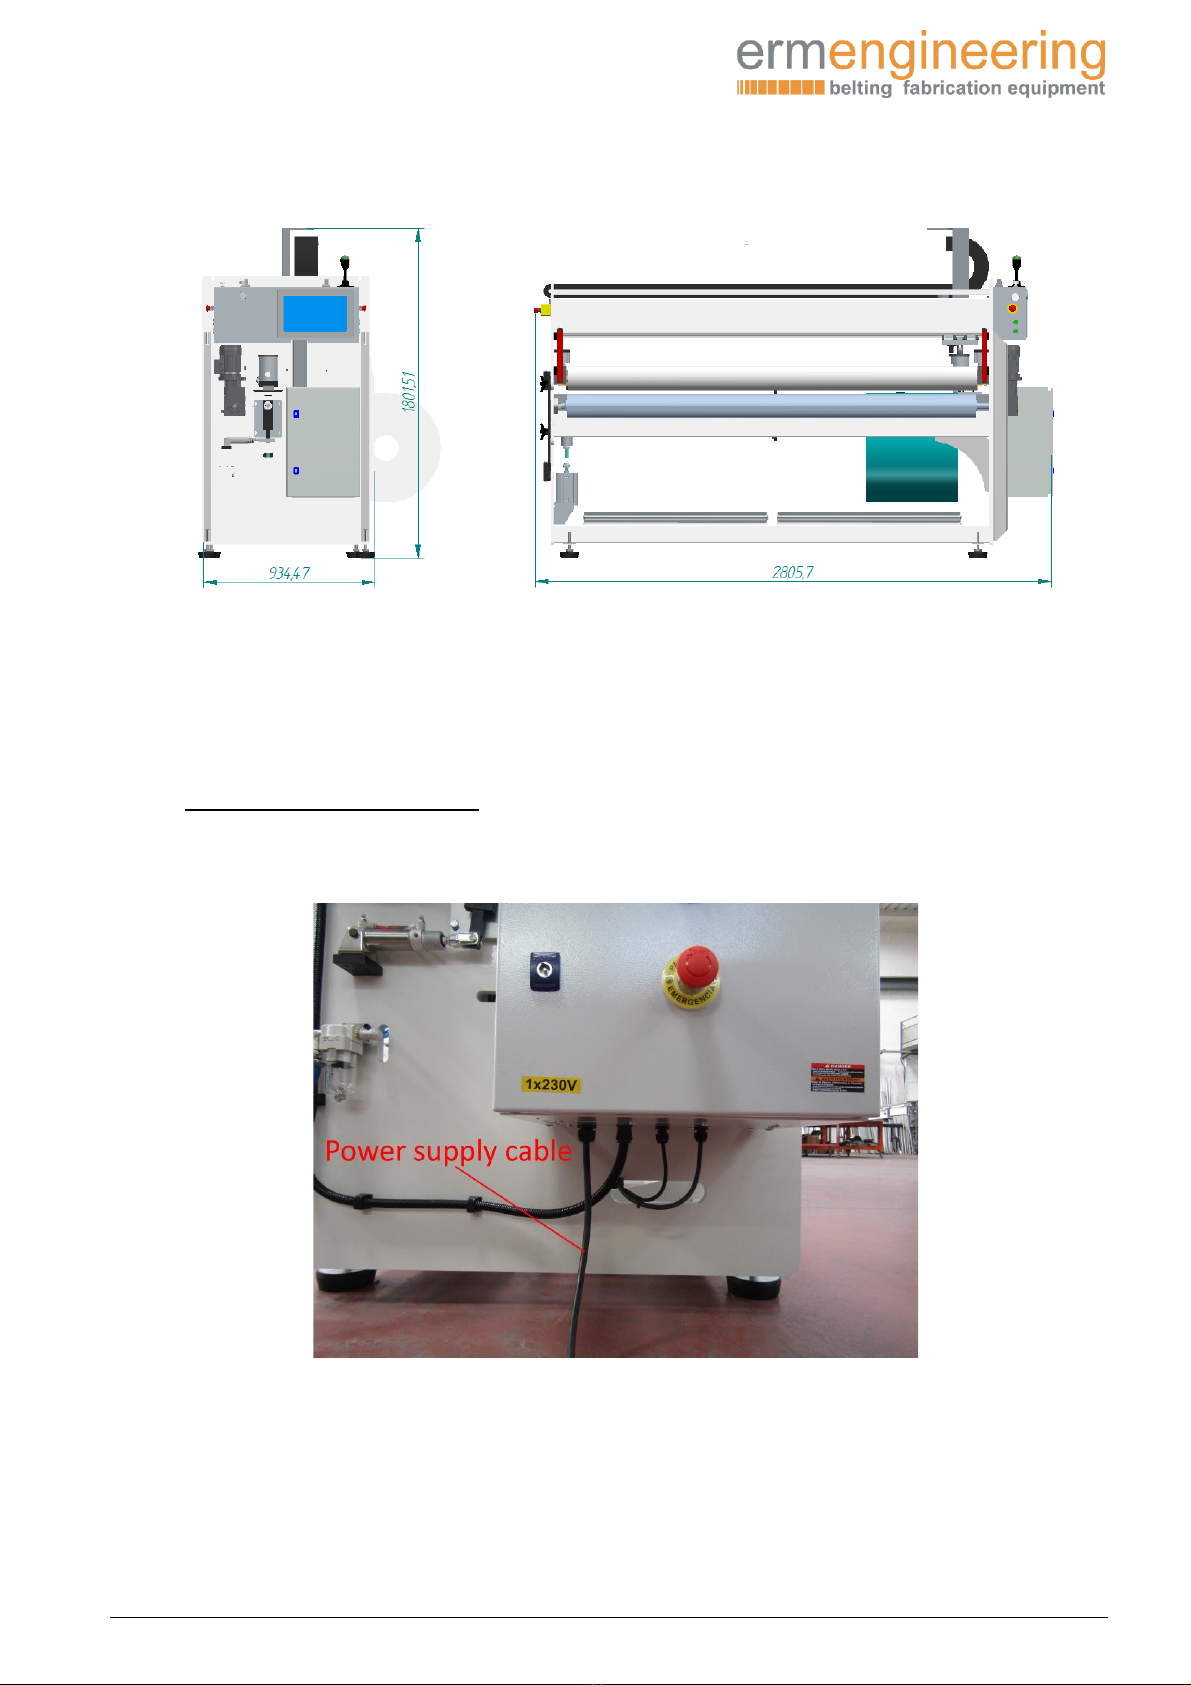
-Set-up and connection: .............................................................................................................................................................6
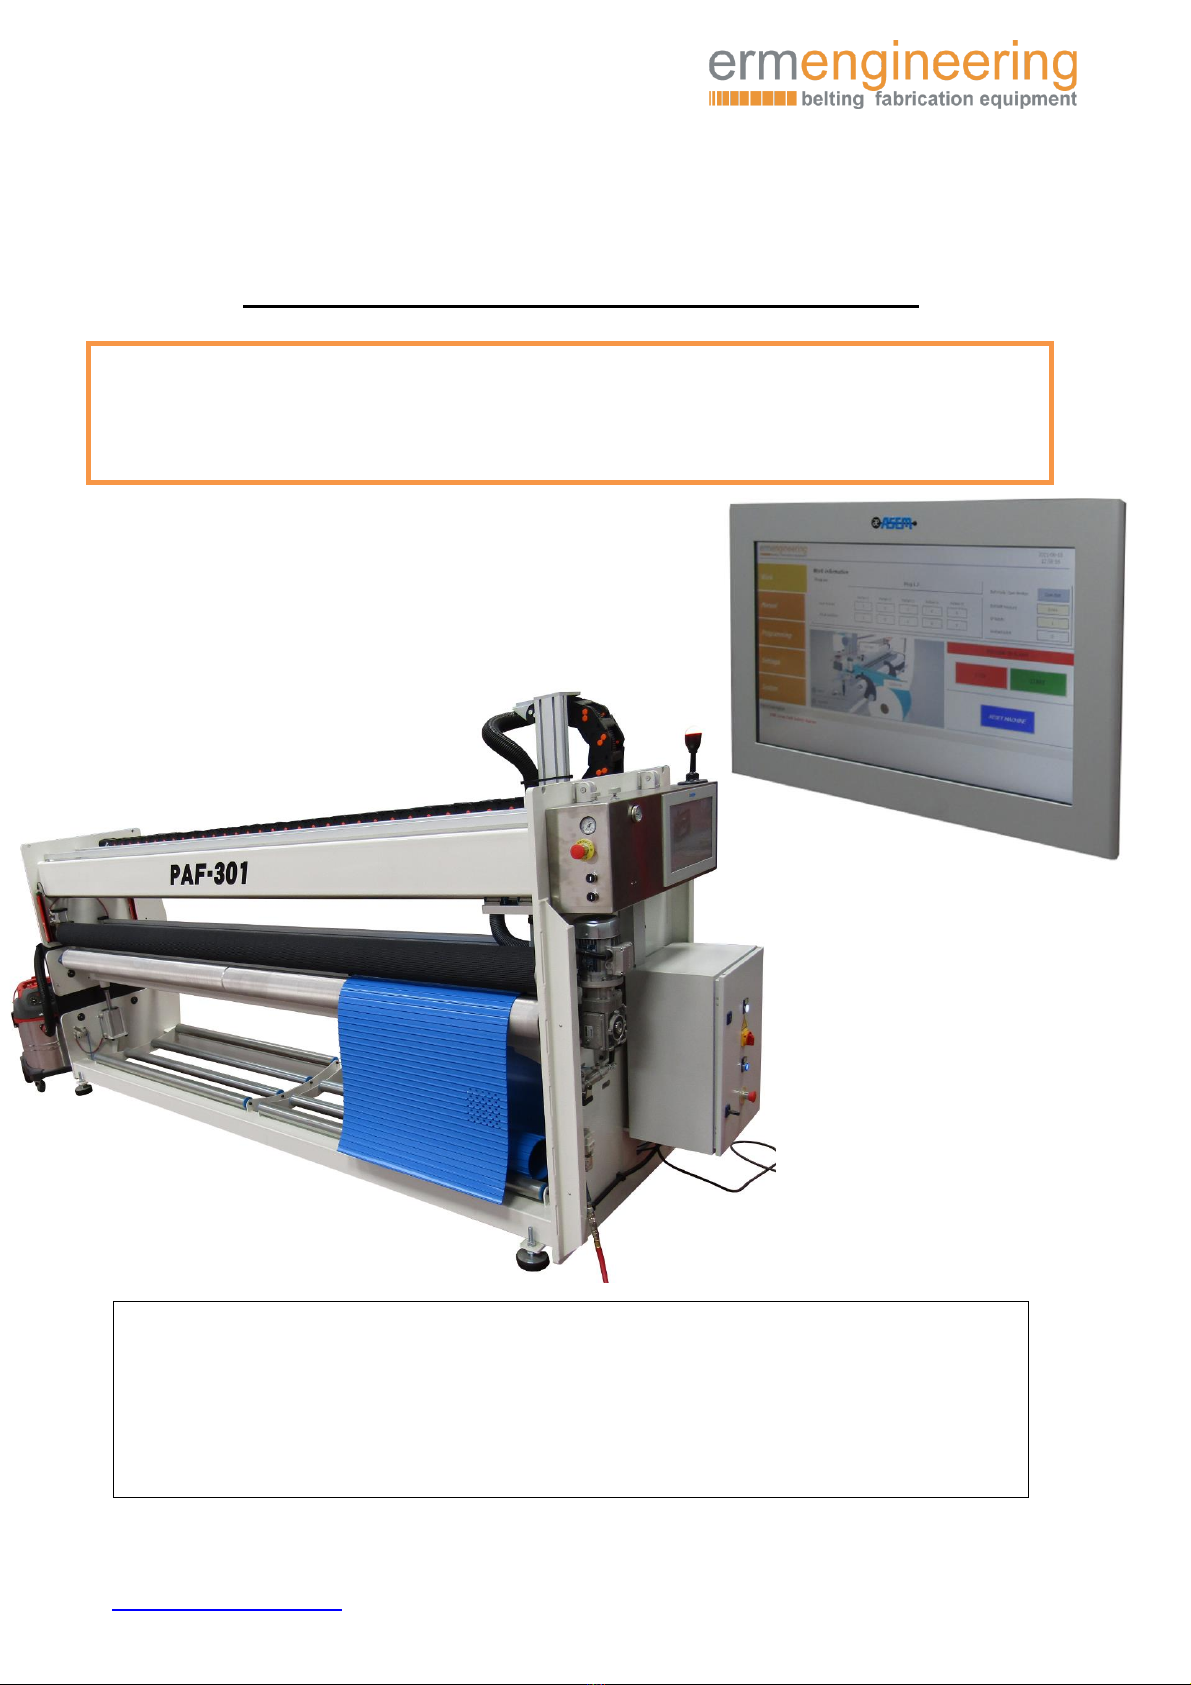
-Description: ..................................................................................................................................................................................8
-Technical features:.....................................................................................................................................................................8
-Instructions for Use: ..................................................................................................................................................................8
Preparation................................................................................................................................................................................................................ 9
Safety systems and messages: ...........................................................................................................................................................................12
Functions of the main MENU.............................................................................................................................................................................13
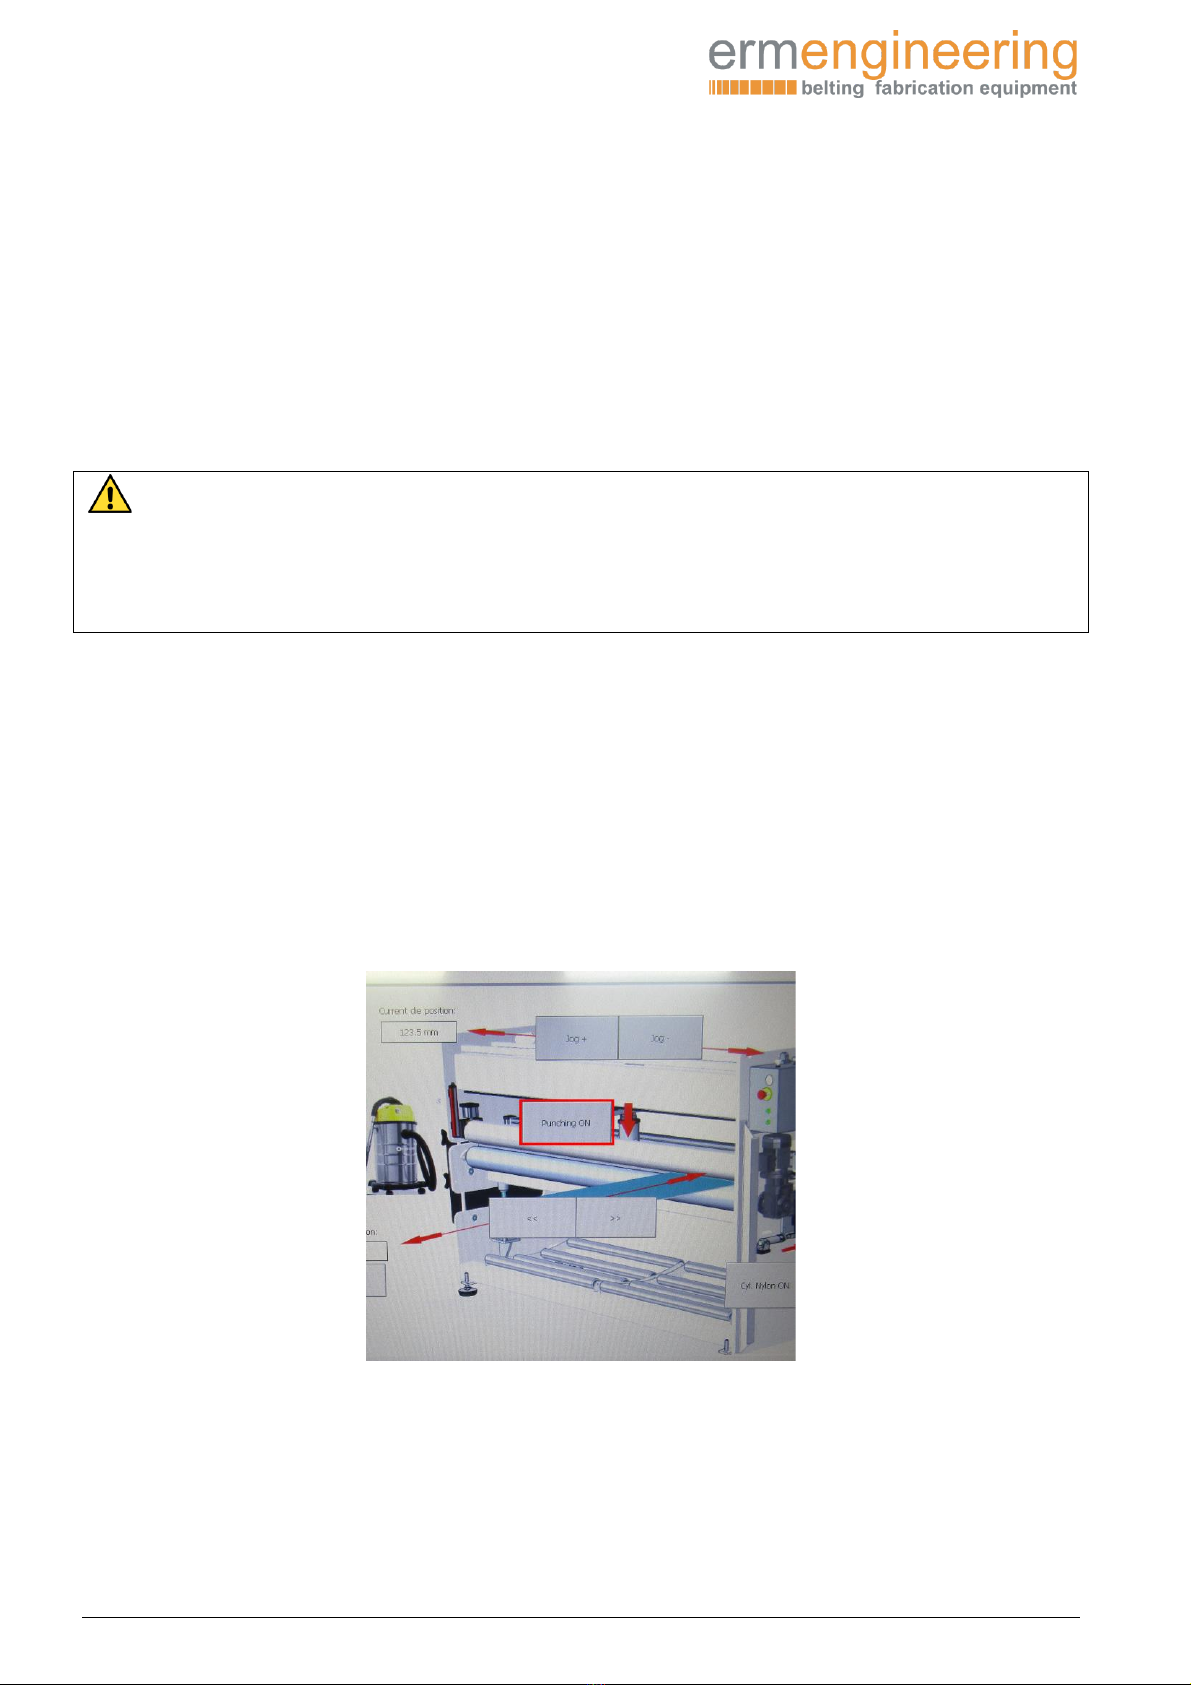
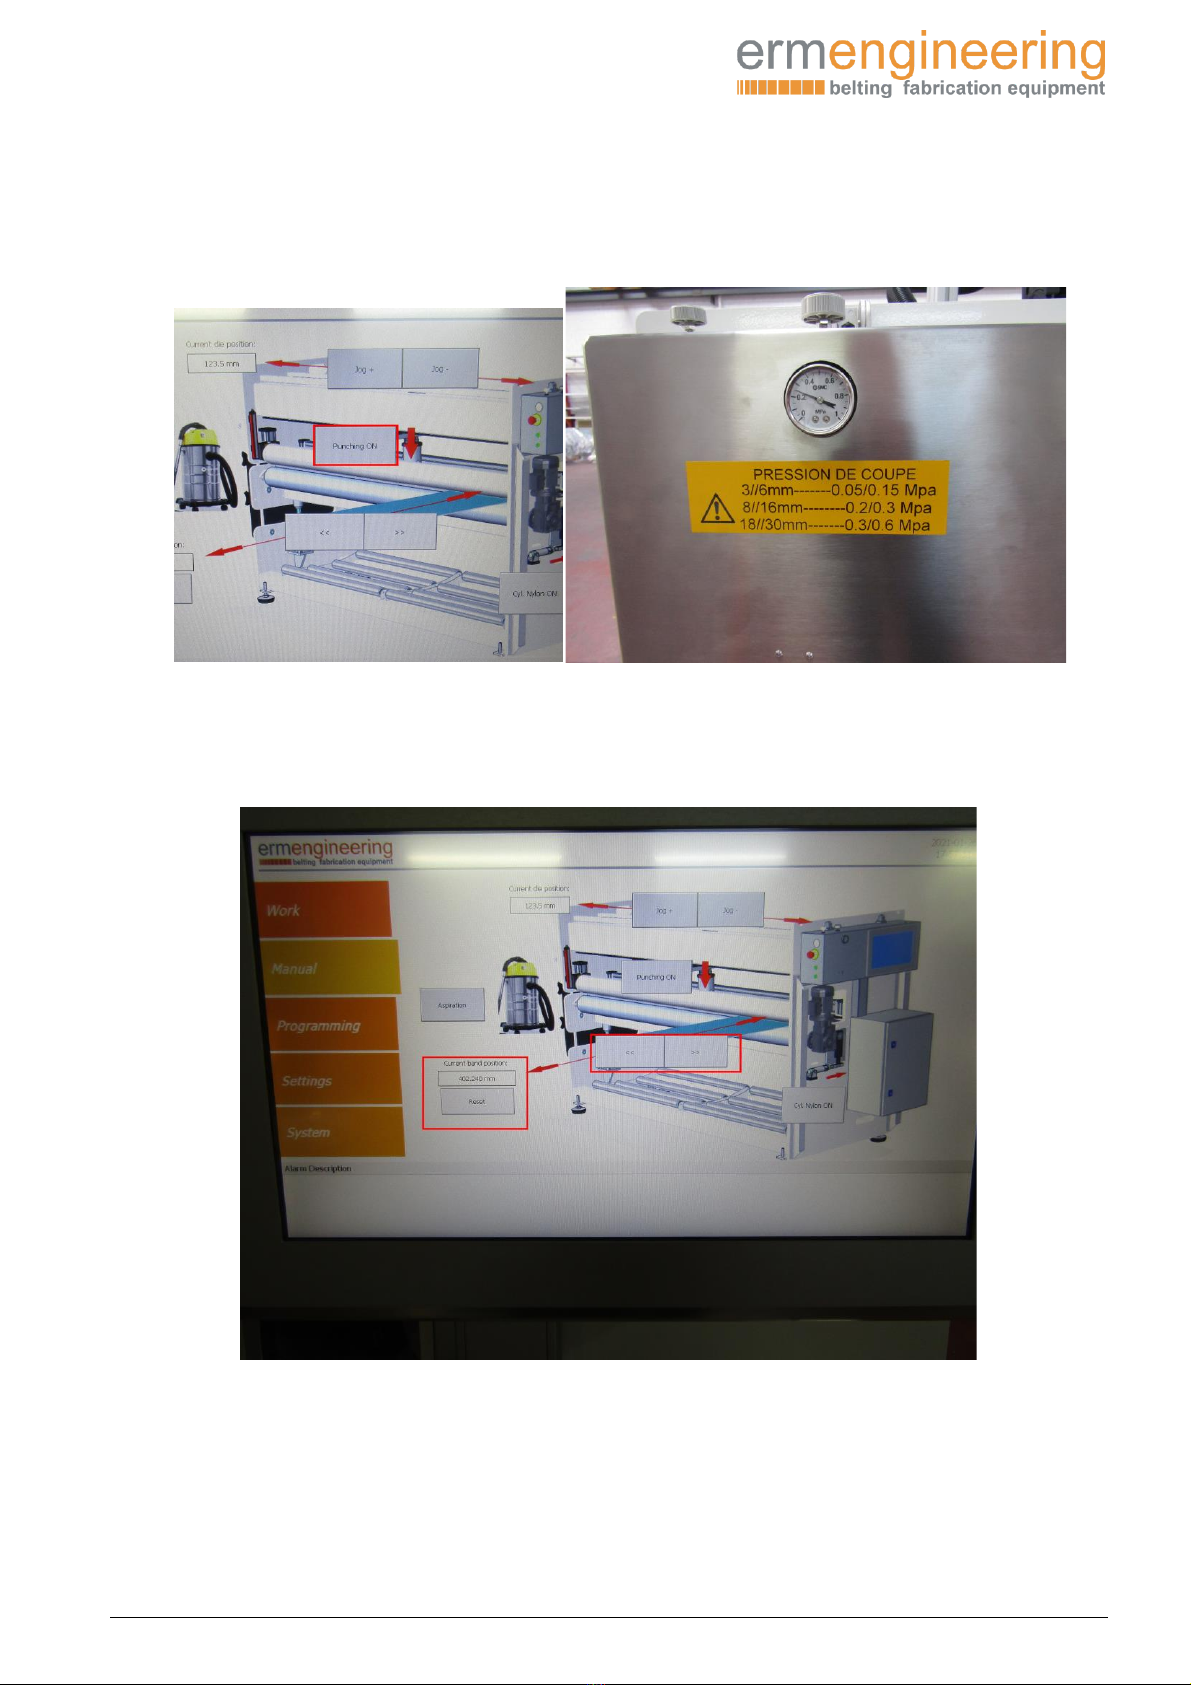
Work: ..........................................................................................................................................................................................................................13
Manual. ......................................................................................................................................................................................................................15
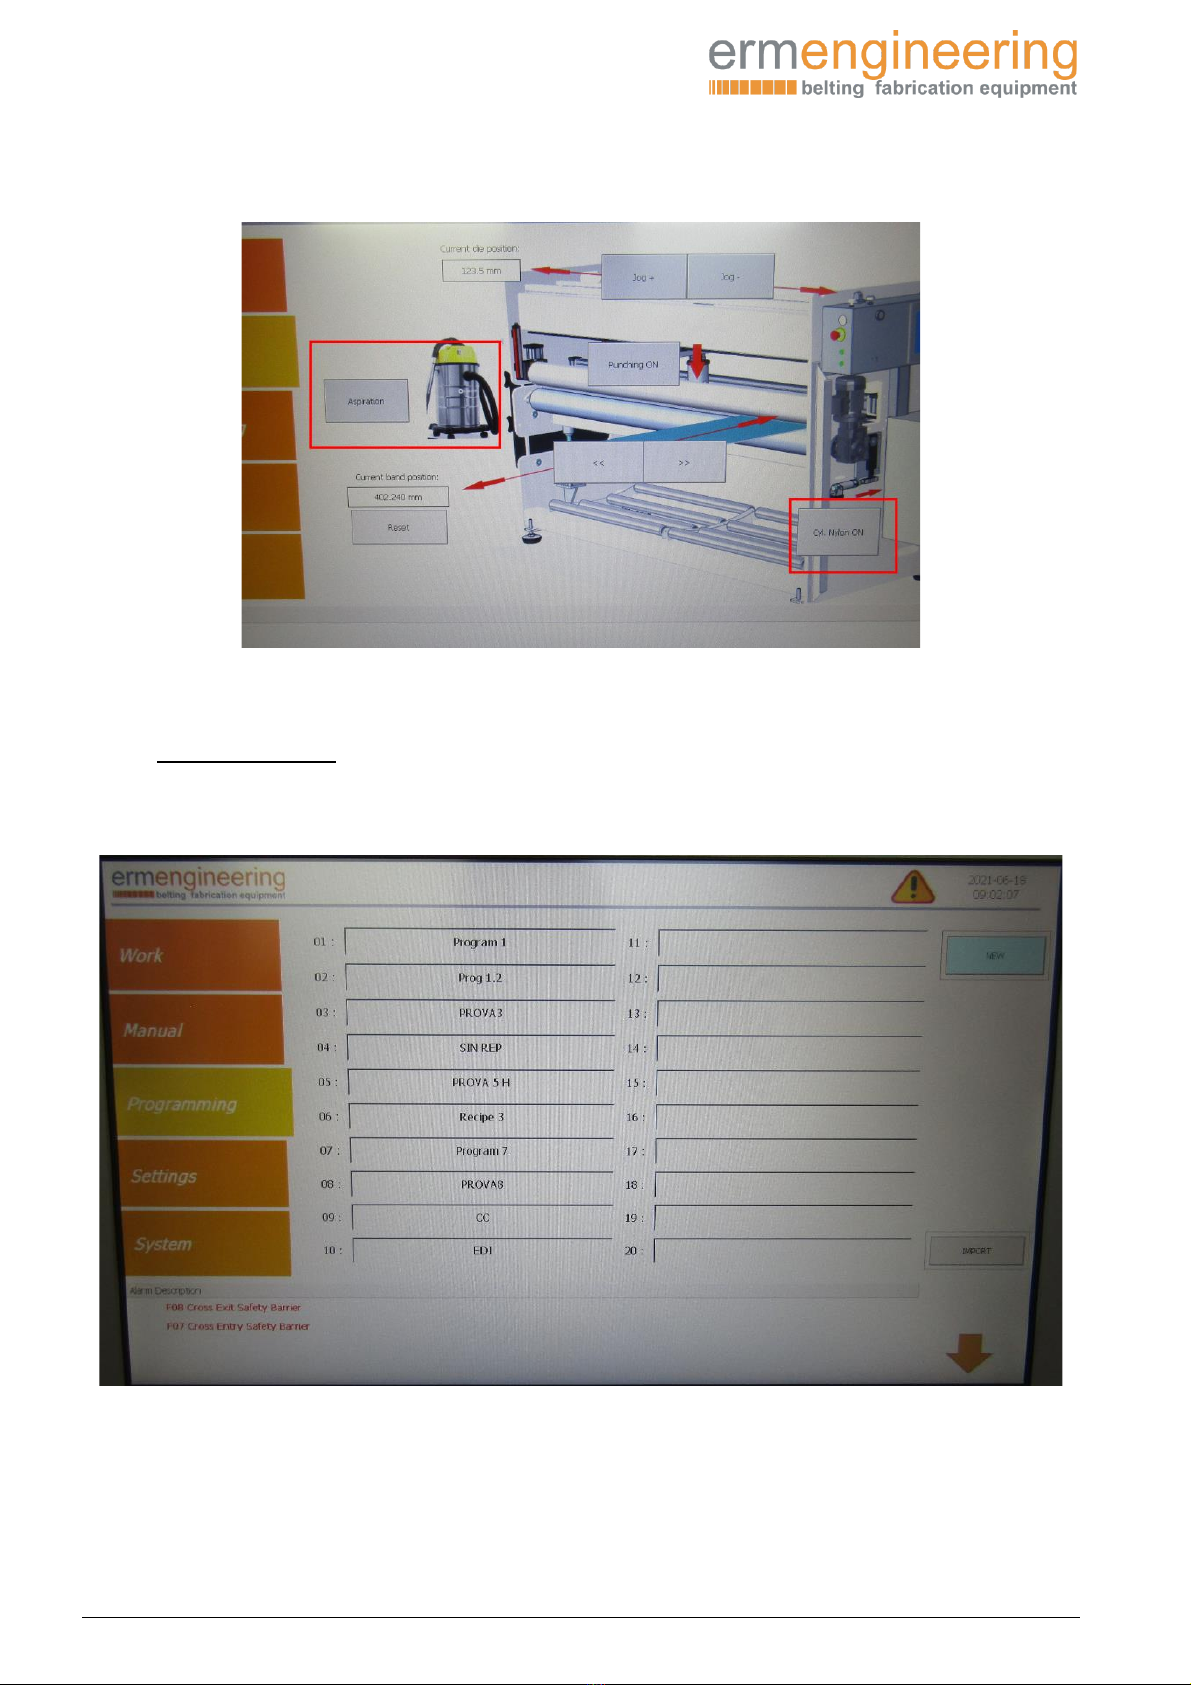
-Programming ............................................................................................................................................................................ 17
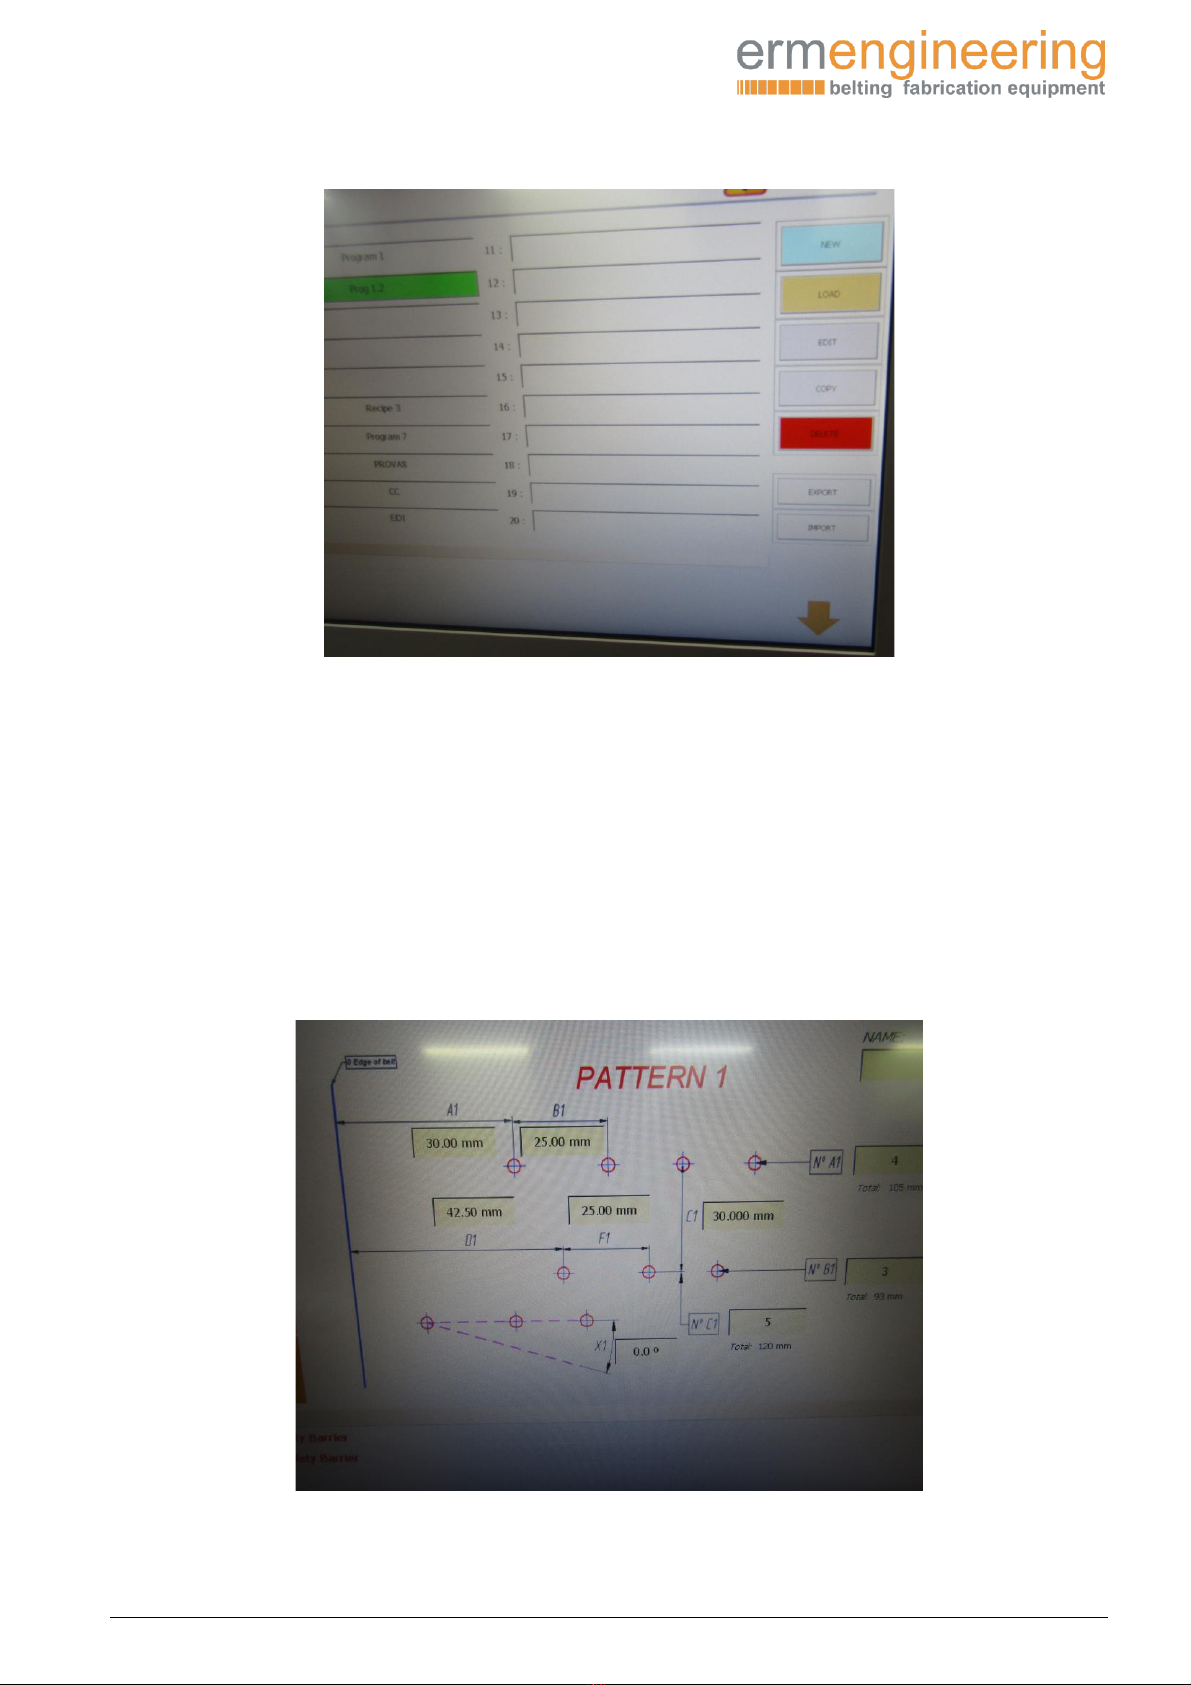
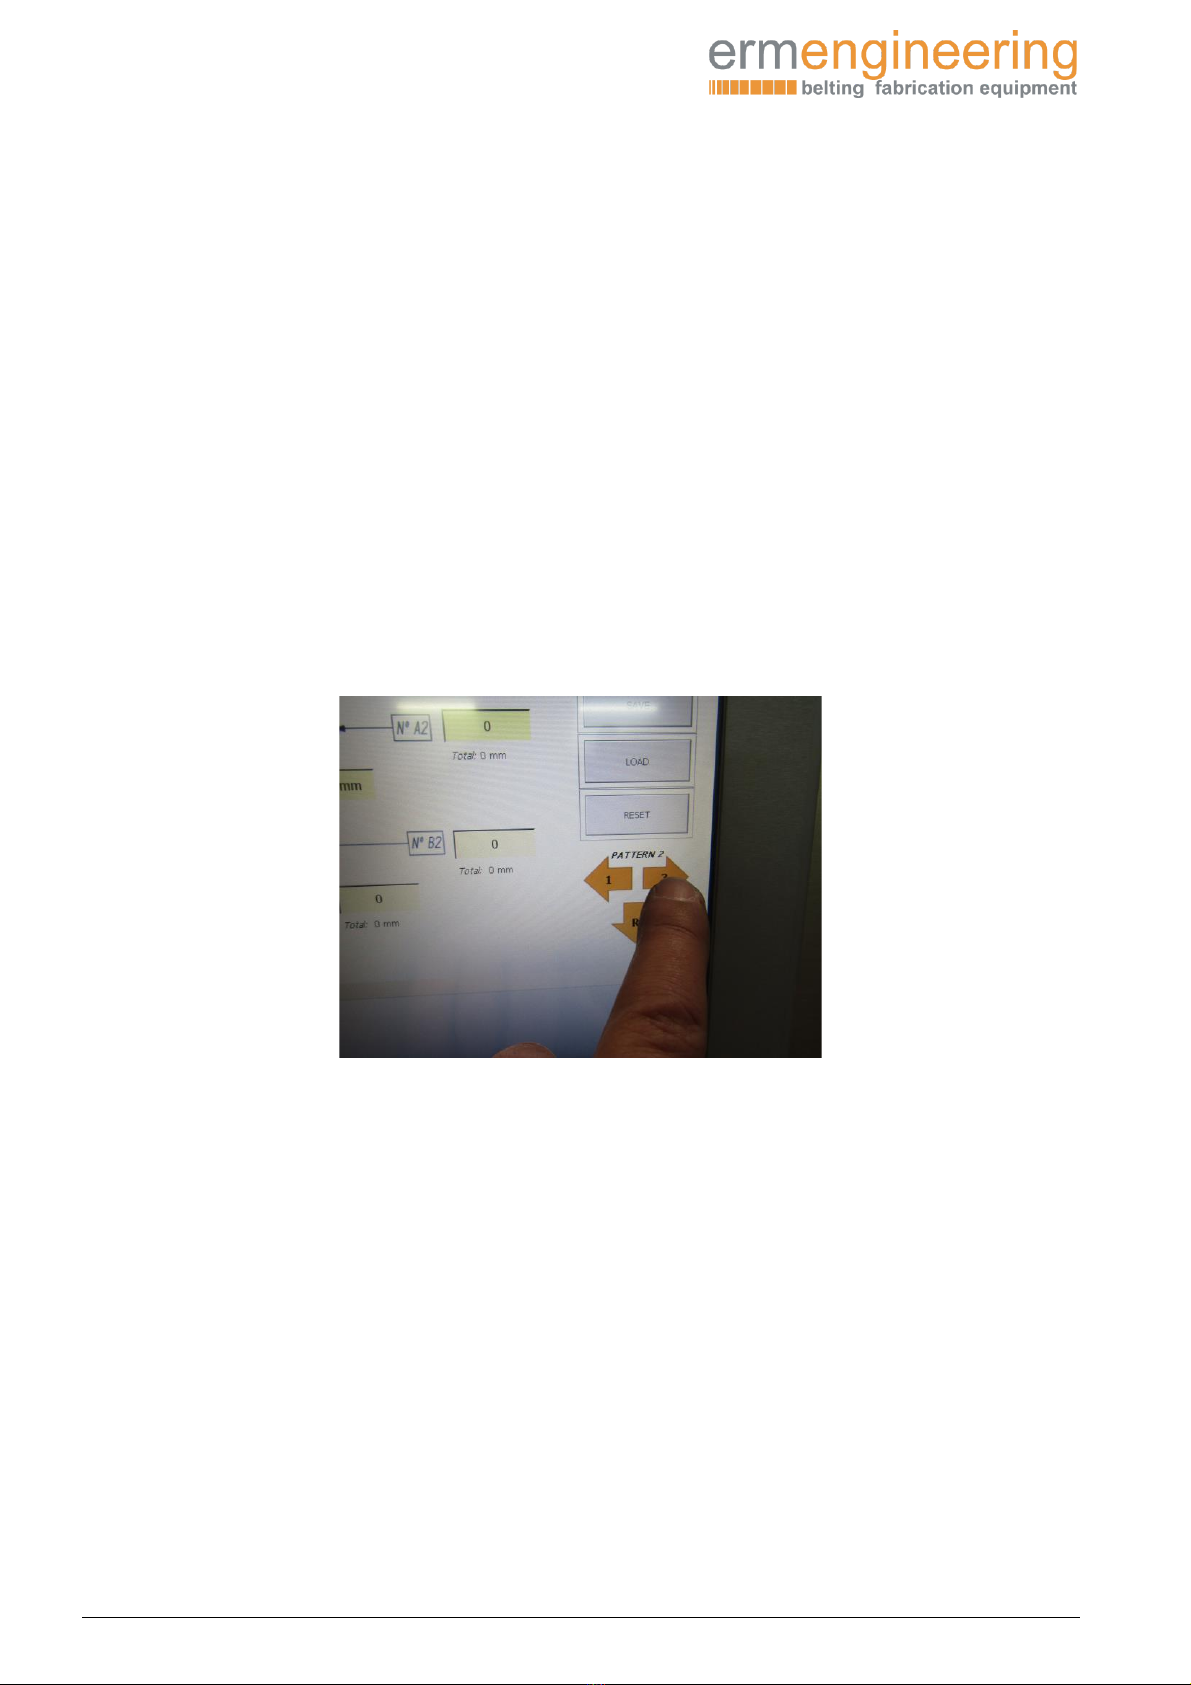
New..............................................................................................................................................................................................................................18
Memories:..................................................................................................................................................................................................................23
-Settings:....................................................................................................................................................................................... 25
-Endless belt option.................................................................................................................................................................. 26
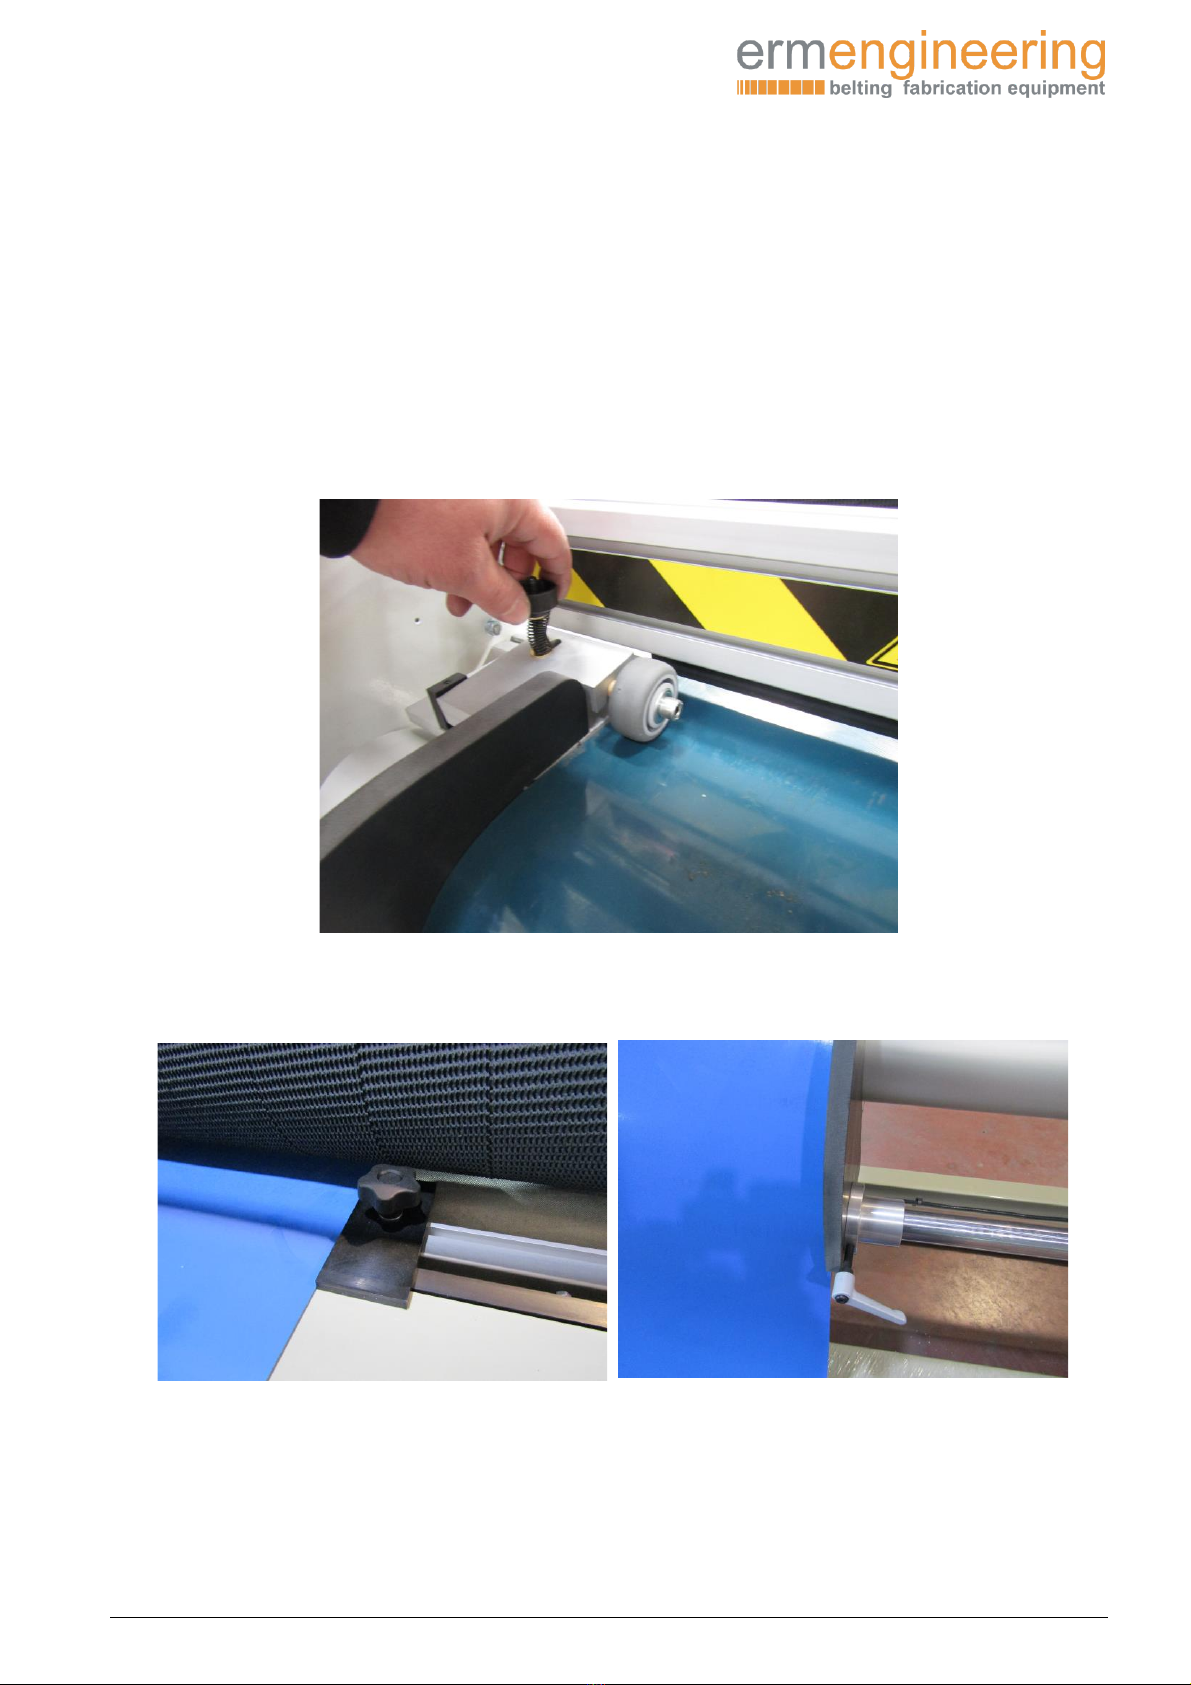
-Die change .................................................................................................................................................................................. 30
-Electrical drawings: ................................................................................................................................................................ 32
-Spare parts:................................................................................................................................................................................ 56

Use and maintenance manual
Automatic conveyor belts punching machine
Model: PAF-301
____________________________________________________________________________________________________________________
P a g . 3
-CE Declaration of conformity:
WE DECLARE, under our responsibility, that the machine:
- Type: Automatic conveyor belts punching machine
- Brand: ERM Engineering
- Model: PAF-301
- Serial No.: xxxxxx
- Manufacturer date: 2021
Inspired by the directives of the Official Journal of the European Communities:
2006/42/CE Machinery Directive
2014/35/UE Low Voltage Directive
2014/30/UE Electromagnetic Compatibility Directive
Complies with the design and construction specifications of the European Standards on General
Machine Safety:
EN 349 –EN 614-1 –EN 614-2 –EN 1005-1 –EN 1005-2 –EN 1005-3 –EN 1005-4 –EN
14118 - EN 12100–EN 13850 –EN 13857 –EN 14118 - EN 14120 –EN 60204-1 –EN
11161 –EN 61310-1 - EN 13849-1 –EN 13849-2 –EN 60204-1
General Manager: Eduardo Ramos Martínez
Arenys de Munt (Barcelona)-SPAIN
Date: 2021/08

Use and maintenance manual
Automatic conveyor belts punching machine
Model: PAF-301
____________________________________________________________________________________________________________________
P a g . 4
-Transport and unloading the machine:
Given the fragility of some components of the machine, it needs a wooden crate with reinforced
platform for attachment to the base by bolts in the holes of the rubber feet.
IMPORTANT:
Raise the machine using slings attached to the 4 points of the frame.
When the machine is hanging, we will place the four rubber feet and after going down to the
ground the machine is hanging level the machine.

Use and maintenance manual
Automatic conveyor belts punching machine
Model: PAF-301
____________________________________________________________________________________________________________________
P a g . 5
In case of maritime transport, the linear guides and the driving spindle located in the upper
section of the cutting head need to be lubricated and totally covered with a plastic sheet.
We will place the four rubber feet and level the machine.
-Dimensions and weights:
•Total weight: 1.286 kg
•Dimensions: 3790x960x1760mm

Use and maintenance manual
Automatic conveyor belts punching machine
Model: PAF-301
____________________________________________________________________________________________________________________
P a g . 6
-Set-up and connection:
Connect the power cord of the control panel to 230 v single phase.
Compressed air supply with a pipe, inner diameter 8 mm minimum, connected to the input jack.

Use and maintenance manual
Automatic conveyor belts punching machine
Model: PAF-301
____________________________________________________________________________________________________________________
P a g . 7
REMARK:
Please take into account that the air consumption of this punching machine is 180
liters/minute.
REMARK:
If you hear a small air leak from the precision pressure regulator, is normal.
REMARK:
We recommend that the two air and power supplies are hung from the top, to prevent
operators tripping or falling.
We will connect the power cord of the vacuum cleaner to the back frame socket.

Use and maintenance manual
Automatic conveyor belts punching machine
Model: PAF-301
____________________________________________________________________________________________________________________
P a g . 8
-Description:
Pneumatic punching machine with powered head to cut holes in conveyor belts, with step-by-
step powered balls spindle and positioning control –Pressure and punching time control.
Interchangeable cutting heads for different cut diameters, with the possibility to program
diverse movement steps.
Motorized rollers for the belt´s movement.
This punching machine has been specially designed for cutting thermoplastic materials with
interior tissue.
-Technical features:
Dimensions
3790x960x1760mm (l x w x h)
Weight
1.286 kg
Max. thickness
8 mm
Voltage
1 x 230
Power
3.7 kW
Max. pressure
6 bar
Conveyor width
3020 mm
Feed speed
1 meter/minute
-Instructions for Use:
WARNING:
THIS DEVICE INVOLVES THE RISK OF HANDS AND ARMS BEING TRAPPED DUR TO THE
MOVEMENT OF THE CUTTING HEAD.
CAUTION SHOULD ALSO BE EXERCISED BETWEEN THE CUTTING HEAD AND THE
SUPPORT PLATE TO AVOID THE RISK OF CUTS.
Once the machine has been connected to the power network and provided with air, we can start
the machine with the general switch of the control panel.

Use and maintenance manual
Automatic conveyor belts punching machine
Model: PAF-301
____________________________________________________________________________________________________________________
P a g . 9
Then, press the blue SYSTEM RESET button.
If not reset, we will see that the emergency stops are unlocked, and we will read the alarm
messages shown on the screen.
Wait few seconds to load the program and touch in the screen center to choose main menu.
The option WORK will appear immediately with the last program that was loaded.
Preparation

Use and maintenance manual
Automatic conveyor belts punching machine
Model: PAF-301
____________________________________________________________________________________________________________________
P a g . 10
To start a job, introduce the end of the belt to be punched on the right side of the machine,
passing the belt below the hold-down bar.
REMARK:
DO NOT MOVE the left guide position, “0” point of step motor is aligned with this
reference.
Ensure that the belt is properly placed on the wheel of the measurement encoder,
completely tangential to the left guide of the table up to the drive rollers. You can adjust the
height wheel pressure depending on the belt thickness.
Once the initial end has been introduced, adjust the two right guides to prevent the material
from suffering any displacement.
Lower the pressure role with the black button of frontal panel to get it fixed, allowing belt
progress in automated mode.

Use and maintenance manual
Automatic conveyor belts punching machine
Model: PAF-301
____________________________________________________________________________________________________________________
P a g . 11
If we want to adjust the top roller pressure, you can do it with pressure regulator (see picture).
If we have a starting reference, we will operate in MANUAL mode to advance or rewind the belt
to the desired extent; then execute an ENCODER RESET to put the gauge to “0”.

Use and maintenance manual
Automatic conveyor belts punching machine
Model: PAF-301
____________________________________________________________________________________________________________________
P a g . 12
Push blue button RESET MACHINE to reference servomotor in 0 point.
Now, the machine is ready to operate and everything is positioned.
Assemble the desired punching head (see page 25)
We shall verify that the regulator pressure is between 0.05 and 0.8 Mpa, depending on the cut
diameter set-up and the belt thickness.
Safety systems and messages:
This punching machine is equipped with the following safety systems:
1- Emergency Stop
This system allows performing a stop at any moment with the three buttons located on the
upper and frontal panel of the power panel and back of frame. We must unlock the button and
then press RESET BUTTON of control panel and RESET MACHINE on screen to reposition the
cutting head to its initial position.
2- Spindle Drive Not Positioned
This device prevents the cutting head from cutting if it is not positioned in its 0 starting point.
Press on RESET MACHINE on the screen in Operation Mode to reposition the cutting head to its
starting point.
3- Cross Entry Safety barrier // Cross Exit Safety barrier
This device detects that one or two barriers are crossed.
Automatically deactivates.

Use and maintenance manual
Automatic conveyor belts punching machine
Model: PAF-301
____________________________________________________________________________________________________________________
P a g . 13
4- Cylinder Detector
This device does prevent the movement of the cutting head because it detects that the cutting
cylinder is not raised. This can be due to lack of air or a detector error.
To deactivate the device, supply the machine with air or replace the detector.
Functions of the main MENU.
To program the punching machine, we need to know the different functions of the screen MENU:
Work:
Pressing on “WORK”, the machine will show us the latest job loaded of the main memory used.
This Job Menu will be always used to operate the machine in automated mode.
Manual:
Pressing on “Manual”, the screen will show us the scheme of the machines with the elements that
can be activated with the buttons shown.
Programming:
Pressing on a selected memory, will appear:
NEW//LOAD//EDIT//COPY//DELETE//EXPORT//IMPORT.
Pressing on “New”, the screen will show us the possible geometries for punching, we can enter to
pinpoint the dimensions and later save them in the memory or load them for a job.
Settings:
Pressing on “Configuration”, the screen will show us the time and measurement parameters of
some commands which we can change.
System:
Pressing on “System”, we can select the language, time, date or units (METRIC or INCHES).
Work:
Once a memory or a NEW file has been loaded, the Job Screen will appear.

Use and maintenance manual
Automatic conveyor belts punching machine
Model: PAF-301
____________________________________________________________________________________________________________________
P a g . 14
The “Program name” field will show us the name of the loaded memory; the field will be white if
it is a new file not saved in the memory.
Below we will have information about the finished rows of each pattern and each batch or
repetition.
In the central picture we will have information about the position of the head and the length of
the band traveled.
In the upper right corner, we can choice if it is an open or endless belt, in the case OPEN you can
program the END BELT measure (the belt advances after finishing the batch or distance between
batches in the case of having more than one).

Use and maintenance manual
Automatic conveyor belts punching machine
Model: PAF-301
____________________________________________________________________________________________________________________
P a g . 15
REMARK:
It is always recommendable to press the RESET MACHINE before starting any job to put
the gauges to “0” and position the mechanisms.
Once the machine has been reset, press START to start the job.
We can stop the cycle at any moment pressing on STOP and re-initiating again with START.
This allows us stopping or pausing the cycle without losing the positioning memory of the
drives,
WARNING:
IF THE EMERGENCY BUTTON IS PRESSED DURING OPERATIONS IN START MODE, THE
POSITIONING VALUES WILL BE LOST AND WE HAVE TO RESTART THE WORK PRESSING
ON RESET.
During the punching process, if the safety barriers are crossed. In this way, we can restart
the process keeping the values pressing START.
On the screen we can see how far the belt has progressed, the position of the cutting head and
the number of rows and patterns punched.
Manual.
In the Manual Mode, we can execute a punching test to adjust the pressure or the cutting time.
To this purpose, we will feed the machine with a sample of the same material and press on the
Punching ON.

Use and maintenance manual
Automatic conveyor belts punching machine
Model: PAF-301
____________________________________________________________________________________________________________________
P a g . 16
The cylinder will operate with the gauge pressure and the punching time set in the configuration
in SETTINGS screen.
In this Manual Mode, we can also position the belt at a precise measure with the pushbuttons of
the feed drive.
When we move the belt, we can see the measurement, putting it at “0” and pressing on RESET
ENCODER.
We can also activate or deactivate the suction motor and the table displacement motor.

Use and maintenance manual
Automatic conveyor belts punching machine
Model: PAF-301
____________________________________________________________________________________________________________________
P a g . 17
-Programming
In the programming menu the list of memories will appear on screen.
In this section we have three options
1º Select one of the memories that will be marked in green.

Use and maintenance manual
Automatic conveyor belts punching machine
Model: PAF-301
____________________________________________________________________________________________________________________
P a g . 18
Afterwards choose the options on the right side of the screen such as: NEW // LOAD 77 EDIT //
COPY // DELETE // IMPORT // EXPORT
2º IMPORT –import from a memory from a USB.
3º NEW –edit a new program.
New
When we select a new file, the drawing with geometries will appear:
Enter the values in millimeters, pressing on each of them.

Use and maintenance manual
Automatic conveyor belts punching machine
Model: PAF-301
____________________________________________________________________________________________________________________
P a g . 19
A1 distance from the belt edge to the first hole
B1 distance between holes
NA1number of holes in each row
D1 distance from the belt edge to the first hole
F1 distance between holes
NB1 number of holes in each row
NOTE:
if the holes are aligned, we must introduce the same values in: D1-F1-NB1
C1 distance between rows
NC1number of rows
X angle (between -45º and 45º)
all values can be entered in hundredths of a millimeter if required.
If we want to program different geometries across the width, we will press the arrows to the
right to introduce new transversal patterns (maximum 5 patterns)
When we program another cross pattern, we must always program the values A2 and D2 from
the edge of the belt.

Use and maintenance manual
Automatic conveyor belts punching machine
Model: PAF-301
____________________________________________________________________________________________________________________
P a g . 20
You can also have a measure of displacement between patterns P2, always with respect to the
first row of the first pattern.
NOTE:
These 4 remaining patterns to be programmed are independent of each other, so they can
be interspersed with each other.
The number of rows, number of batches, and other measurements must be entered in
each pattern separately.
Advertence:
If we want to delete data from the program, we must press RESET in each of the patterns,
Table of contents
Other ermengineering Industrial Equipment manuals

ermengineering
ermengineering VG-22 User manual

ermengineering
ermengineering APTM-600 User manual

ermengineering
ermengineering SK-270 User manual

ermengineering
ermengineering AFP-200 User manual

ermengineering
ermengineering SKR-350 User manual

ermengineering
ermengineering LRWG-10 User manual

ermengineering
ermengineering PAF-201 User manual

ermengineering
ermengineering LRBW-150 User manual

ermengineering
ermengineering LRW-130 User manual