ESCO Technologies ETS-LINDGREN 2303 User manual

2303
Positioner
User Manual
PN: 1723281
January, 2021
Rev A
ets-lindgren.com

ETS-Lindgren Inc. reserves the right to make changes to any products herein to improve functioning or
design. Although the information in this document has been carefully reviewed and is believed to be
reliable, ETS-Lindgren does not assume any liability arising out of the application or use of any product or
circuit described herein; nor does it convey any license under its patent rights nor the rights of others. All
trademarks are the property of their respective owners.
© Copyright 2021 by ETS-Lindgren Inc. All Rights Reserved. No part of this document may be copied by
any means without written permission from ETS-Lindgren Inc.
Trademarks used in this document: The ETS-Lindgren logo is a registered trademark of ETS-Lindgren, Inc.
Revision Record
MANUAL, 2303 | Part # 1723281 Rev A
Revision Description Date
AInitial Release January, 2021

3
TABLE OF CONTENTS
NOTES, CAUTIONS, WARNINGS . . . . . . . . . . . . . . . . . . . . . . . 4
SAFETY INFORMATION . . . . . . . . . . . . . . . . . . . . . . . . . . . 5
INTRODUCTION. . . . . . . . . . . . . . . . . . . . . . . . . . . . . . . 6
Standard Configuration . . . . . . . . . . . . . . . . . . . . . . . . . . . . . . . . .6
Model 2303 Positioner Assembly . . . . . . . . . . . . . . . . . . . . . . . . . . .6
EMCenter Modular RF Platform. . . . . . . . . . . . . . . . . . . . . . . . . . . .6
Optional Items . . . . . . . . . . . . . . . . . . . . . . . . . . . . . . . . . . . . .6
ETS-Lindgren Product Information Bulletin . . . . . . . . . . . . . . . . . . . . . . . .6
MAINTENANCE . . . . . . . . . . . . . . . . . . . . . . . . . . . . . . . 7
Routine Maintenance . . . . . . . . . . . . . . . . . . . . . . . . . . . . . . . .7
6-Month Service . . . . . . . . . . . . . . . . . . . . . . . . . . . . . . . . . . .7
12-Month Service . . . . . . . . . . . . . . . . . . . . . . . . . . . . . . . . . . .7
Replacement Parts . . . . . . . . . . . . . . . . . . . . . . . . . . . . . . . . . . .7
Service Procedures . . . . . . . . . . . . . . . . . . . . . . . . . . . . . . . . . . .7
Safety Precautions. . . . . . . . . . . . . . . . . . . . . . . . . . . . . . . . . . . .7
SPECIFICATIONS . . . . . . . . . . . . . . . . . . . . . . . . . . . . . . 8
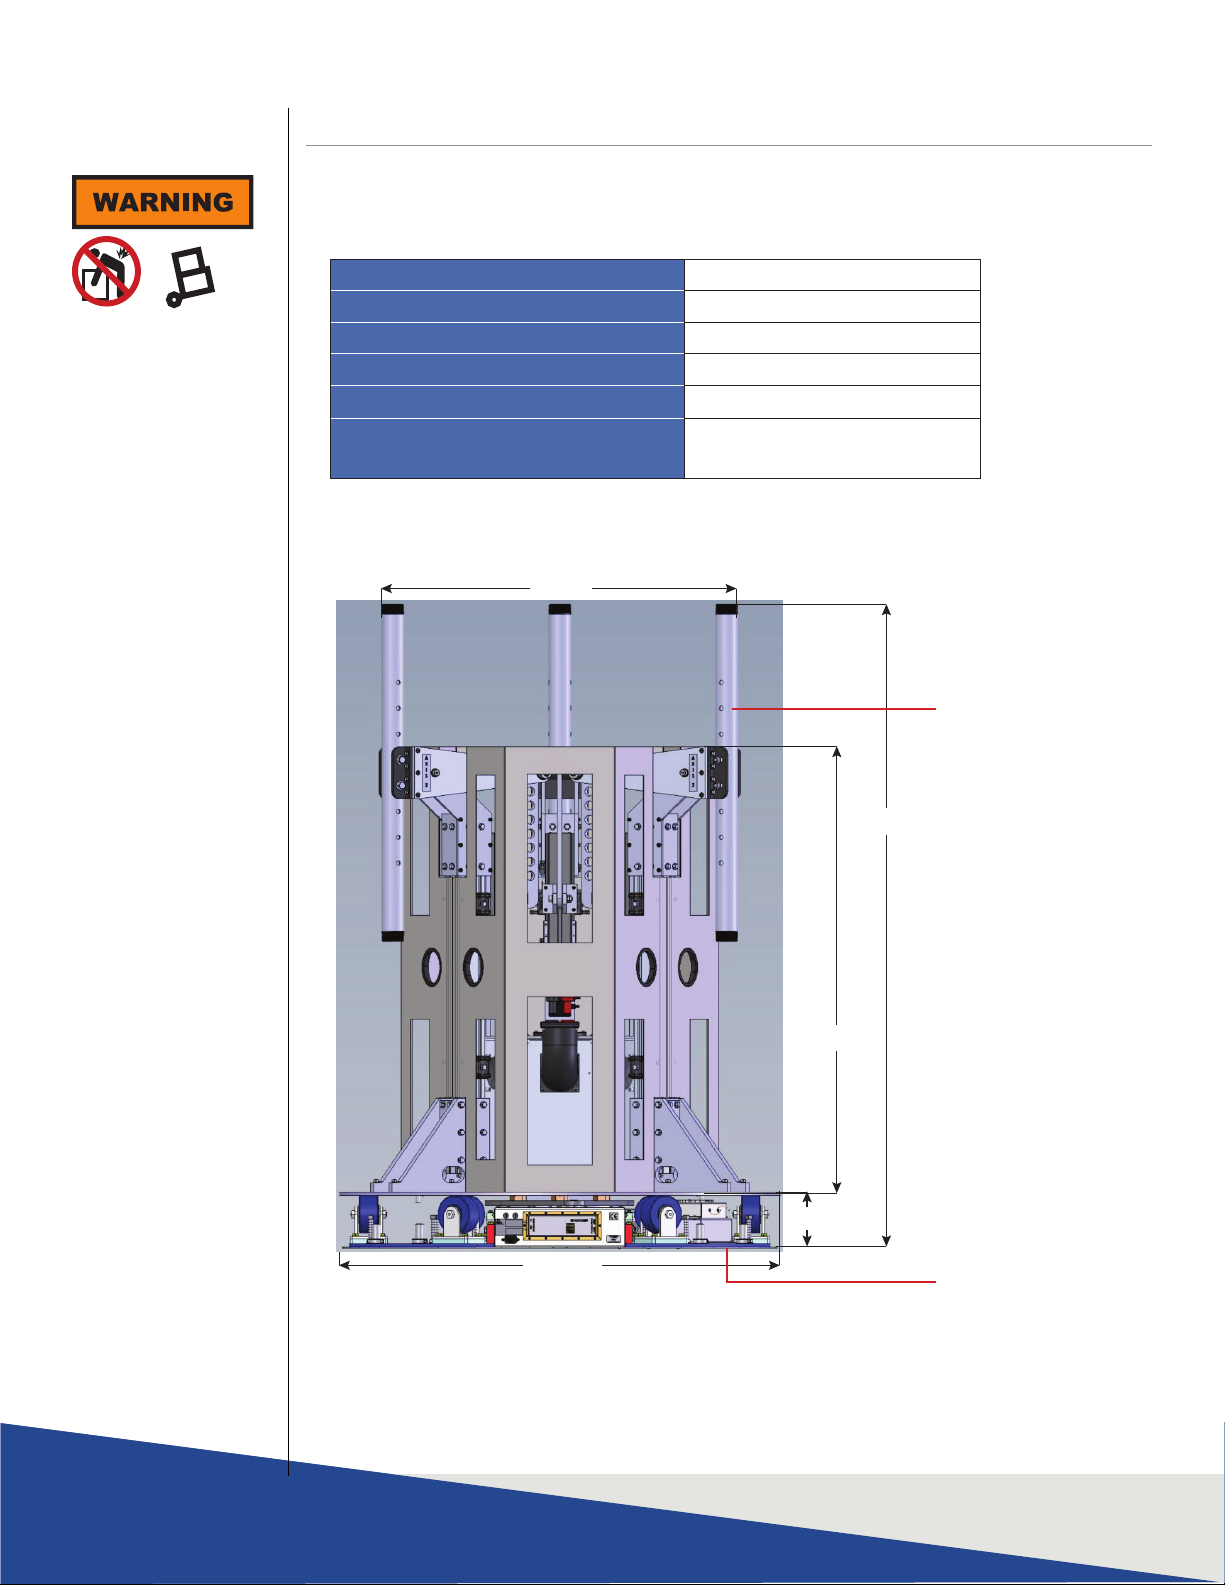
Physical Specifications. . . . . . . . . . . . . . . . . . . . . . . . . . . . . . . . . .8
Electrical Specifications . . . . . . . . . . . . . . . . . . . . . . . . . . . . . . . . .9
INSTALLATION . . . . . . . . . . . . . . . . . . . . . . . . . . . . . . 10
Pre-Installation Tasks . . . . . . . . . . . . . . . . . . . . . . . . . . . . . . . . . 10
ELECTRICAL INSTALLATION . . . . . . . . . . . . . . . . . . . . . . . . 12
Elevation Axes Input / Output Connections . . . . . . . . . . . . . . . . . . . . . . . 12
Trigger . . . . . . . . . . . . . . . . . . . . . . . . . . . . . . . . . . . . . . 12
Fiber Optic. . . . . . . . . . . . . . . . . . . . . . . . . . . . . . . . . . . . . 12
Turntable Electrical Installation . . . . . . . . . . . . . . . . . . . . . . . . . . . . 13
OPERATION . . . . . . . . . . . . . . . . . . . . . . . . . . . . . . . 14
2303 Positioner Command Set . . . . . . . . . . . . . . . . . . . . . . . . . . . . . 14
General Command Structure . . . . . . . . . . . . . . . . . . . . . . . . . . . . 14
System Commands . . . . . . . . . . . . . . . . . . . . . . . . . . . . . . . . 16
Control Commands . . . . . . . . . . . . . . . . . . . . . . . . . . . . . . . . 18
Error Codes . . . . . . . . . . . . . . . . . . . . . . . . . . . . . . . . . . . . 23
NETWORK CONFIGURATION . . . . . . . . . . . . . . . . . . . . . . . 24
Network Factory Configuration. . . . . . . . . . . . . . . . . . . . . . . . . . . . . 24
Changing the Positioner IP Address . . . . . . . . . . . . . . . . . . . . . . . . . . 24
Reset to Factory Default . . . . . . . . . . . . . . . . . . . . . . . . . . . . . . . . 25
Computer Network Configuration . . . . . . . . . . . . . . . . . . . . . . . . . . . 26
Background Information. . . . . . . . . . . . . . . . . . . . . . . . . . . . . . . . 27
Multiple Devices in a LAN . . . . . . . . . . . . . . . . . . . . . . . . . . . . . . . 31

4
Note: Denotes helpful information intended to provide tips for better
use of the product.
CAUTION: Denotes a hazard. Failure to follow instructions could
result in minor personal injury and/or property damage. Included
text gives proper procedures.
WARNING: Denotes a hazard. Failure to follow instructions could
result in SEVERE personal injury and/or property damage. Included
text gives proper procedures.
NOTES, CAUTIONS, WARNINGS

5
See the ETS-Lindgren Product Information Bulletin for safety, regulatory, and other
product marking information.
Refer to Manual: When product is marked with this symbol, see the instruction
manual for additional information. Manuals are available for download at
ets-lindgren.com, or contact ETS-Lindgren Technical Support.
High Voltage: Indicates presence of hazardous voltage. Unsafe practice could
result in severe personal injury or death.
Protective Earth Ground (Safety Ground): Indicates protective earth terminal.
You should provide uninterruptible safety earth ground from the main power
source to the product input wiring terminals, power cord, or supplied power cord
set.
Before power is applied to this instrument, ground it properly through the
protective conductor of the AC power cable to a power source provided with
the protective earth contact. Any interruption of the protective (grounding)
conductor, inside or outside the instrument, or disconnection of the protective
earth terminal could result in personal injury.
Heavy Object: Unassisted lifting can cause injury. Mechanical assistance is
required.
Stay clear of moving components during operation of equipment.
Moving and/or falling equipment can cause serious injury.
Keep hands clear: Moving parts can crush and cut.
Pinch Points: Keep hands clear during operation.
Moving Gears: Do not stick hand in or near machine during operation.
Only qualified personnel should operate (or service) this equipment.
Invisible Laser Radiation: Do not stare into beam or view directly with optical
instruments.
Before servicing: Contact ETS-Lindgren. Servicing (or modifying) the unit by
yourself may void your warranty. If you attempt to service the unit by yourself,
disconnect all electrical power before starting. There are voltages at many points
in the instrument which could, if contacted, cause personal injury. Only trained
service personnel should perform adjustments and/or service procedures upon
this instrument. Capacitors inside this instrument may still be charged even
when instrument is disconnected from its power source.
WARRANTY
SAFETY INFORMATION

6
EMCenter Modular RF Platform
• The EMCenter manual (PN 399342) can be found at ets-lindgren.com.
Optional Items
• EMQuest EMQ-100 Antenna Measurement Software (Standard Version)
• EMQuest EMQ-100 Lite Antenna Pattern Measurement Software
ETS-Lindgren Product Information Bulletin
See the ETS-Lindgren Product Information Bulletin included with your
shipment for the following:
• Safety, regulatory, and other product marking information
• Steps to receive your shipment
• Steps to return a component for service
• ETS-Lindgren calibration service
• ETS-Lindgren contact information
Before performing any
maintenance, read
the safety information
in the ETS-Lindgren
Product Information
Bulletin included with
your shipment.
WARRANTY
Only qualified
personnel should
operate (or service)
this equipment.
If you have any
questions concerning
maintenance, contact
ETS-Lindgren Technical
Support. Warranty may
be voided if housing is
opened.
Note:
See the ETS-Lindgren
Product Information
Bulletin for safety,
regulatory, and other
product marking
information.
INTRODUCTION
ETS-Lindgren’s 2303 Positioner is designed to perform automated 3-dimensional
pattern measurements. The positioner includes vertical support columns that will
accommodate equipment under test (EUT) up to 25 kg (55 lb).
The positioner is equipped with four motors (one Azimuth, three elevation),
208/230 VAC 50 or 60 Hz single phase. An IEC receptacle is the standard power
input. The IEC rocker switch illuminates red when in the ON position. Current draw
is fused at 6.3 A maximum. The motor drive, in conjunction with the provided
command set, controls the movement of the unit. 10 M (32.8 ft) fiber-optic cable
provided.
Standard Configuration
Model 2303 Positioner Assembly
• Single-phase electric drive (208/230 VAC 50/60 Hz)
• Variable-speed drive
• 708043 Ethernet to Fiber Converter
• 705347-10 10.0 M (32.8 ft) Fiber-Optic Cable (2)
Note:
ETS-Lindgren may
substitute a similar
part or new part
number with the same
functionality for another
part/part number.
Contact ETS-Lindgren
for questions about part
numbers and ordering
parts.

7
.
MAINTENANCE
Routine maintenance should be conducted prior to each use of the turntable.
For assistance, contact ETS-Lindgren Technical Support.
Routine Maintenance
• Check for excessive rotation. Attempt to rotate the turntable top by hand.
Excessive rotation may indicate a loose drive component.
• Listen for excessive noise. Listen for excessive or unusual noise during
turntable operation.
• Check cables for wear. Ensure they are clear of potential damage from
moving parts.
• Ensure bearing and pinion have adequate lubrication.
6-Month Service
• Lubricate the casters. Lubricate the casters with good quality bearing
grease.
12-Month Service
• Lubricate the main bearing race. Lubricate the main bearing race with
a grease gun containing good quality bearing grease. The grease fittings are
located inside the race, 90 degrees apart, beneath the top. Three discharges
from the grease gun in each fitting are adequate.
• Lubricate the chain and sprocket of the chain drive. Apply good quality
grease to the chain and sprocket.
Replacement Parts
Following are the part numbers for ordering replacement parts for the 2303
Positioner.
Part Description Part Number
Laser 1723184
Fiber-Optic Cable 705347-10
Service Procedures
For the steps to return a system or system component to ETS-Lindgren for
service, see the Product Information Bulletin included with your shipment
Safety Precautions
Removing top panel will expose AC power.
Do not use damaged or crimped AC power cords.
Disconnect the power
before proceeding
with recommended
maintenance. Do not
perform maintenance
while the positioner is
operating.
Note:
Contact ETS-Lindgren
Technical Support
for assistance with
replacement parts.
High Voltage:
Unsafe practice could
result in severe personal
injury or death.
Damaged or crimped
AC cords:
Using damaged or
crimped AC cords may
damage the equipment
and/or cause physical
injury.

8
SPECIFICATIONS
Physical Specifications
Height without Base Station Mounts: 135.89 cm (53.5 in)
Max Height with Base Station Mounts: 195.63 cm (77.02 in)
Width at Base Station Mounts: 96.55 cm (38.01 in)
Turntable Diameter: 119.71 cm (47.13 in)
Overall Weight: 163.29 kg (360.0 lb)
Maximum Load Capacity: 74.85 kg (165 lb) max total
(24.95 kg (55 lb) per elevation axis)
Heavy Object:
Unassisted lifting can
cause injury. Mechanical
assistance is required.
38.01”
Ø47.13”
77.02”
53.50”
6.99”
Base Station Mounts
Turntable

9
Electrical Specifications
Phase: Single
Voltage: 208/230 VAC, 50/60 Hz
Amperage: 10 A
High Voltage:
Unsafe practice could
result in severe personal
injury or death.
33.66”
29.38”
Ø47.13”
Top View

10
WARRANTY
The 2303 includes:
• Variable speed turntable
• Lossy foam absorber covering
• Vertical columns with tilt positioners
• Laser for aligning system
• Control 3-Axis Box
• Terminal Enclosure
INSTALLATION
Pre-Installation Tasks
Pre-planning is essential for successful installation. Discuss requirements with your sales representative
and request dimensional drawings prior to construction of your site.
Read this manual completely before starting installation. This equipment should
be installed and operated only by qualified personnel. Before installing any
components, follow the safety information in the ETS-Lindgren Product Information
Bulletin included with your shipment.
Do not attempt to service unless qualified to do so.
Do not modify this unit without consulting with ETS-Lindgren directly. Regularly
inspect all equipment for loose fasteners and wear. Conduct scheduled
maintenance in accordance with the factory recommendations provided.
High Voltage: Unsafe practice could result in severe personal injury or death.
Ensure power is off and base is secured before proceeding with installation.
Damaged or crimped AC cords: Using damaged or crimped AC cords may damage
the equipment and/or cause physical injury.

11
Positioner Installation
Proper installation of the 2303 Positioner unit directly affects performance of the positioning system as
well as the accuracy of the test results.
1. Uncrate all parts. Check all parts for any shipping damage. Ensure a clear area is available to
assemble the positioner unit safely.
Do not discard packing material until the Turntable is fully assembled and correct
operation is verified.
Customer provides RF, power, and control cabling to the top of the unit and to the
EUT.
2. The center of rotation for the unit must intersect the line through the bore sight of the
measurement antenna. Use the included laser to verify alignment.
3. Place the unit so the positioner connections are easily accessible and located closest to available
feed through panels and power supply connections. Ensure the Model 2303 is connected to a
power outlet that supplies 208/230VAC 50/60Hz. Use the power cord provided with the Model 2303
to make this connection to the system.
US shipments will include a NEMA type 6-15P electrical plug power cord.
International shipments will include a Schuko type electrical plug power cord.
The IEC power inlet assembly includes a filter and an illuminated power switch.
4. Connect the positioner to the included Ethernet-to-
fiber optic converter using the included dual fiber
optic cable with type ST connections. The converter
connects to the host computer via the included
0.9 m (3.0 ft) Cat5 Ethernet cable. Ensure the fiber
converter TX line is connected to the positioner RX
input connector, and the fiber converter RX line is
connected to the positioner TX output connector.
5. Loosen M6 bolts on the placeholder pipe.
6. Remove the two larger ones.
7. Take out the pipe.
8. Place the laser or antenna in place of the pipe.
9. The upper axis is limited to ±15°.
10. The turntable is limited to ±180°.
11. Leveling bolts can be adjusted in order to level unit.
Once the positioner is in place, check that it is level.
Verify that all screws, nuts, and collars are tightened.
M6 Bolts

12
Elevation Axes Input / Output Connections
Trigger
The positioner is equipped with a TTL-compatible output. This output is
capable of driving a 50 ohm load that can be used to trigger a measurement
sweep on a network analyzer (or other measurement device equipped with a
TTL-compatible external trigger input option).
Reset
Pressing Reset for more than 6 seconds resets the device IP address and mask
to factory default, 192.168.0.100, 255.255.255.0. Used in case the IP address of
the device is unknown.
Fiber Optic
The positioner is equipped with a fiber-optic inlet and a fiber-optic outlet.
Connect the positioner to the included Ethernet-to-fiber optic converter using
the included dual fiber optic cable with type ST connections. The converter
connects to the host computer via the included 0.9 m (3.0 ft) Cat5 Ethernet
cable. Ensure the fiber converter TX line is connected to the positioner RX
input connector, and the fiber converter RX line is connected to the positioner
TX output connector.
ELECTRICAL INSTALLATION
The Model 2303 Positioner is designed to operate using 208/230 VAC single phase
50/60 Hz power. The motor drive will not operate on a lower voltage, such as 110
VAC. The power inlet assembly has an integral 10 A fuse. Normal current draw for
the drive is less than 6 A. The branch circuit supplying power to the motor drive
must be protected from excess current according to local electrical codes.
Ensure the distance from the mains power source is appropriate for the wire
gauge used and that the wire gauge is adequate for the motor load.
Prior to servicing the turntable, remove the power connection. Trigger, Reset, Fiber
Optic connections are found on the Control 3-Axis box (PN 1725357).
High Voltage:
Unsafe practice could
result in severe personal
injury or death.
Make sure power is off
and secured before
proceeding.
Before assembling,
installing, or connecting
any components, follow
the safety information
in the ETS-Lindgren
Product Information
Bulletin included with
your shipment.
Electrical installation
must be performed by
a qualified electrician,
and in accordance
with local and national
electrical standards.
Using undersized wire
gauge will result in a
higher than expected
voltage drop in the
power conductors,
reduced starting
torque, and potentially
premature motor
failure.
Control 3-Axis Box
RX
TX

13
Turntable Electrical Installation
The 2303 Turntable is configured to operate using 208/230 VAC, single phase,
50/60 Hz service. This voltage level is recommended for operation to reduce the
surge currents necessary to power an electric motor.
1. The branch circuit supplying power to the motor base should be protected
from excess current according to local electrical codes. An integral circuit
breaker is mounted on the control box. The circuit breaker is specifically
designed for the inductive load presented by the electric motor.
2. Make sure the conductor size is adequate for the motor load and the
distance from the mains source. Improperly sized conductors will lead to
a high voltage drop in the power conductors and cause reduced starting
torque and premature motor failure.
Following is the conductor color code:
Brown: AC high
Blue: AC neutral
Green/Yellow: Protective earth/safety ground
Connect the fiber optic control cable and install the power connection
according to local electrical code. See the controller manual for information on
connecting the fiber optic cable. After the fiber optic cable is installed, secure it
with a wire tie to one of the leveling screws.
To feed the fiber optic connectors through a waveguide in the chamber, cables
are included to connect from the feedthroughs on the penetration panel to the
controller and motor base.
Electrical installation
must be performed by
a qualified electrician,
and in accordance
with local and national
electrical standards.
High Voltage:
Unsafe practice could
result in severe personal
injury or death.
Do not, at any time,
place hands or feet in
the vicinity of the drive
pinion on the turntable.
Stay clear of all moving
components.

14
OPERATION
Read this manual completely before operating. Before and during operation, follow
the safety information in the ETS-Lindgren Product Information Bulletin included
with your shipment.
Ensure the current travel limit settings will not cause damage to existing cables.
Do not operate the 2303 Positioner in a stalled condition. Doing so can cause
damage to the drive unit and will void the warranty. Ensure the positioner will
continue to rotate under load at all speeds.
2303 Positioner Command Set
General Command Structure
Most of the following commands use this general structure:
[SUBSET:]AXIS<n[-m]>:COMMAND <argument_n>[,<argument_m>]
Where:
[ ] Indicates optional.
< > Indicates required.
COMMAND The backwards compatible Model 2090 Multi Device Controller
command.
When used by itself, controls the first device in a multi axis system, and,
when arguments are required, supports only a single argument.
The command prefix
in optional brackets
[ ]
Required to access a specific axis or multiple axes at a time.
SUBSET The particular command grouping subset (e.g. configure, control, etc.).
AXIS<n[-m]> Selects the desired axis or axes to control.
A single index specifies a single axis (e.g. AXIS1 or AXIS2) with a
single argument, while a range (e.g. AXIS1-2) specifies a range of
axes with a corresponding range of arguments.
Note that some commands only support single axis control.
<argument_n> The single argument required for a single axis command.
[,<argument_m>] Represents the additional arguments required for an optional multi axis
command
(e.g. SUBSET:AXIS1-2:COMMAND 1,2).

15
Azimuth
Axis
Elevation Axis 1
Elevation Axis 2
Elevation Axis 3

16
System Commands
Device Identification Query
Command: *IDN?
Description: Identification query. Determines the nature of device located at a given address on the
network. The string returned ("ETS-Lindgren Inc.,2303 Precision Positioner,<Module
Name>,PCA120518 FW N.NN”) identifies this device as a 2303 Precision Positioner. The
<Module Name> parameter is a place holder to identify a specific module. The N.NN
parameter is a place holder for the firmware version identification.
Query: *IDN?
Returns: ETS-Lindgren Inc.,2303 Precision Positioner,<Module Name>,PCA120518 FW n.nn
Example: *IDN?
ETS-Lindgren Inc.,2303 Precision Positioner,Comm,PCA120518 FW 4.14
Module IP Address
Command: MOD:IP <nnn.nnn.nnn.nnn>
Description: The device default IP address and subnet mask is 192.168.0.100, 255.255.255.0. The
default address and subnet mask are assigned to the device by ETS-Lindgren and do
not change even if your computer reboots.The IP address can be changed using the
MOD:IP command. The new address will not change even if your computer reboots.
The port number is 1206.
Query: MOD:IP?
Returns: nnn.nnn.nnn.nnn
Example: MOD:IP 192.168.0.55
Module Name
Command: MOD:NAME <Module Name>
Description: The <Module Name> parameter in the *IDN? query response is a place holder to
identify a specific device in a network. If you have more than one device you might
want to identify them with different module names. For instance, “EMC LAB1” and
“EMC CHAMBER”.
Query: MOD:NAME?
Example: MOD:NAME EMC LAB1

17
Module Subnet Mask
Command: MOD:NETMASK <nnn.nnn.nnn.nnn>
Description: The device default IP address and subnet mask is 192.168.0.100, 255.255.255.0.
This address and mask are assigned to the device by ETS-Lindgren and does not
change even if your computer reboots. The subnet mask can be changed using
the MOD:NETMASK command. The new subnet mask will not change even if your
computer reboots.
Query: MOD:NETMASK?
Returns: nnn.nnn.nnn.nnn
Example: MOD:NETMASK 255.255.0.0

18
Control Commands
Acceleration in Milliseconds
Command: A <nnnn>
Description: Acceleration setting for variable speed devices. The number nnnn represents the time
in milliseconds for the positioner to reach max speed. For high inertial loads, a longer
acceleration time might be required.
Query: A?
Returns: The time in milliseconds for the positioner to reach max speed.
Example: AXIS1:A 1000
Acceleration in Seconds
Command: ACC nn.n
Description: Acceleration setting for variable speed devices. The number N.N represents the time
in seconds for the positioner to reach max speed. For high inertial loads, a longer
acceleration time might be required.
Query: ACC?
Returns: The time in seconds for the positioner to reach max speed.
Example: AXIS2:ACC .5
Command Complete Query
Command: *OPC
Description: Informs if a seek of home command have been completed. Please see home
command for an example of how to use the *OPC query.
Query: *OPC? Returns: 1 if a seek of home command have been completed, 0 otherwise.
Example: AXIS3:*OPC?
Error Query
Command: ERR?
Description: Queries the axis error register. The error register is cleared on read.
Query: ERR?
Returns: An error code (See list at the end of command set.)
Example: AXIS3:ERR?

19
Homing Procedure
Command: HOME
Description: The device has a mechanical home sensor. Every time the positioner is turned on, a
home procedure must be performed so the current position is known by the firmware.
To home the positioner, send the following commands:
HOME
*OPC?
Keep querying the positioner by sending the *OPC? until it returns 1.
*OPC? Will return 0 if the turntable is still being homed.
*OPC? will return 1 if the home procedure is done.
After *OPC returns 1, send the queryHOME?to confirm that the positioner found the
mechanical home sensor.
HOME? returns 0 if the home procedure was not successful; result of a faulty sensor.
Query: HOME?
Returns: 1 if the AXIS1 has been homed, 0 otherwise
Example: AXIS1:HOME
Lower Limit
Command: LL nnn.n
Description: Sets the lower/counterclockwise limit of the device. The specified value nnn.n must be
less than the upper/clockwise limit.
Query: LL?
Returns: Lower or counterclockwise limit of the device in degrees.
Example: AXIS1-2:LL 0,-10
Motion Direction
Command: DIR?
Description: Queries the motion direction for the device.
Query: DIR?
Returns: <direction> Value indicating the current motion of the queried device.
+1 Device is moving up/clockwise.
0 Device is stopped.
-1 Device is moving down/counterclockwise
Example: AXIS1-2:DIR? Response: 0,+1
Move Clockwise
Command: CW
Description: Instructs the positioner to move in the clockwise direction. In non-continuous mode
this movement is limited by the clockwise (upper) limit.
Example: AXIS1-2:CW

20
Move Counterclockwise
Command: CCW
Description: Instructs the positioner to move in the counterclockwise direction. This movement is
limited by the counterclockwise (lower) limit.
Example: AXIS2:CCW
Scan
Command: SCAN
Description: Instructs the positioner to begin scanning between preset lower and upper limits.
Example: AXIS1:SCAN
Seek Negative
Command: SKN <nnn.n>
Description: Instructs the device to begin seeking the specified target value in the negative (down/
counterclockwise) direction only. This command primarily supports continuous
rotation mode. It allows forcing seeking a position from a particular direction. Thus, a
SKN from 180.0 to 181.0 will rotate counterclockwise to reach the target value. In non-
continuous rotation mode if the target is up/clockwise from the current position, no
motion occurs. The target must be located between the current upper/clockwise and
lower/counterclockwise limits.
Example: AXIS1:SKN 30
Seek Position
Command: SK nnn.n
Description: Instructs the device to begin seeking for a target position. In continuous rotation
mode, the device will seek the target value by the shortest possible path. Thus, a seek
from 350.0 to 10.0 will rotate clockwise, not direction.
Example: AXIS1-2:SK 90,30
Seek Positive
Command: SKP <nnn.n>
Description: Instructs the device to begin seeking the specified target value in the position (up/
clockwise) direction only. This command is provided primarily to support continuous
rotation mode. It allows forcing seeking a position from a particular direction. Thus,
a SKP from 181.0 to 180.0 will rotate clockwise to reach the target value. In non-
continuous rotation mode if the target is down/ counterclockwise from the current
position, no motion occurs. The target must be located between the current upper/
clockwise and lower/counterclockwise limits.
Example: AXIS2:SKP 90
This manual suits for next models
1
Table of contents
Other ESCO Technologies Valve Positioner manuals
Popular Valve Positioner manuals by other brands

Omron
Omron H8PS Operation manual

Spirax Sarco
Spirax Sarco CVS10M Installation and maintenance instructions

Metso
Metso NE Series Installation maintenance and operating instructions

Festo
Festo CMSX C-U-F1 Series Translation of the original instructions

Siemens
Siemens SITRANS VP100 manual

PI
PI P-63 Series user manual