Esco Yellow Jackit 10450 User manual

ESCO Equipment Supply Company 2
Instruction Manual
Please read this instruction manual carefully before use.
IMPORTANT
PLEASE READ THESE INSTRUCTIONS CAREFULLY. NOTE THE SAFETY INSTRUCTIONS N
WARNINGS. USE THE PRODUCT CORRECTLY AND WITH CARE FOR THE PURPOSE FOR WHICH
IT IS INTENDED. FAILURE TO DO SO MAY CAUSE DAMAGE TO PROPERTY AND/OR PERSONAL
INJURY. PLEASE KEEP THIS INSTRUCTION MANUAL SAFE FOR FUTURE USE.
1. SAFETY INSTRUCTIONS AND WARNINGS
1.1 Use a qualified person to maintain the jack in good condition. Keep it clean for best and safest
performance.
1.2 The maximum load is 12/20tons. DO NOT exceed this rated capacity.
1.3 Use this jack for lifting purpose only. DO NOT use it for any other purpose it is not designed to
perform.
1.4 Keep children and unauthorized persons away from the work area.
1.5 Remove ill fitting clothing. Remove ties, watches, rings and other loose jewelry, and contain long hair.
1.6 Wear ANSI approved safety goggles when operating the jack.
1.7 Keep proper balance and footing, do not overreach and wear nonslip footwear.
1.8 Only use this jack on a surface that is stable, level, dry and not slippery, and capable of sustaining the
load.
Keep the surface clean, tidy and free from unrelated materials and ensure that there is adequate
lighting.
1.9 When lifting a vehicle, apply the emergency brake and block all wheels.
1.10 Immediately after lifting, support the load with appropriate supporting equipments such as jack stands
of adequate capacity! DO NOT work under a load which is supported only by a jack.
1.11 Before lowering load ensure that there are no obstructions underneath and that all persons are
standing clear.
1.12 DO NOT attempt to move the load while on the jack. The jack must only be used in a static position
for lifting and lowering loads. Ensure that the load remains stable at all times.
1.13 DO NOT use the jack if damaged, any suspect parts are noted or it has been subjected to a shock
load.
1.14 DO NOT operate the jack when you are tired or under the influence of alcohol, drugs or any
intoxicating medication.
1.15 DO NOT allow untrained persons to operate the jack.
1.16 DO NOT make any modifications to the jack.

ESCO Equipment Supply Company 3
1.17 DO NOT use brake fluid or any other improper fluid and avoid mixing different types of oil when
adding hydraulic oil. Only a good quality hydraulic jack oil can be used.
1.18 DO NOT expose the jack to rain or any other kind of bad weather.
1.19 If the jack need repairing and/or there are any parts that need to be replaced, have it repaired by
authorized technicians and only use the replacement parts supplied by the manufacturer.
1.20 WARNING: the warnings, cautions and instructions discussed in this instruction manual cannot cover
all possible conditions and situations that may occur. It must be understood by the operator that
common sense and caution are factors which cannot be built into this product, but must be supplied
by the operator.
2. SPECIFICATIONS
Capacity Min Height Ram
Travel Screw
Adj. Max
Height Air Pressure Air Inlet Fitting
20 Ton 10.3”
262mm 6.3”
160mm 3.3”
84mm 19.92”
506mm 0.75-0.85MPa 1/4" NPT
3. OPERATING INSTRUCTIONS
WARNING
Ensure that you read, understand and apply the safety instructions and warnings before use.
Ensure that you have familiarized yourself thoroughly with the product and the hazards associated
with its improper use.
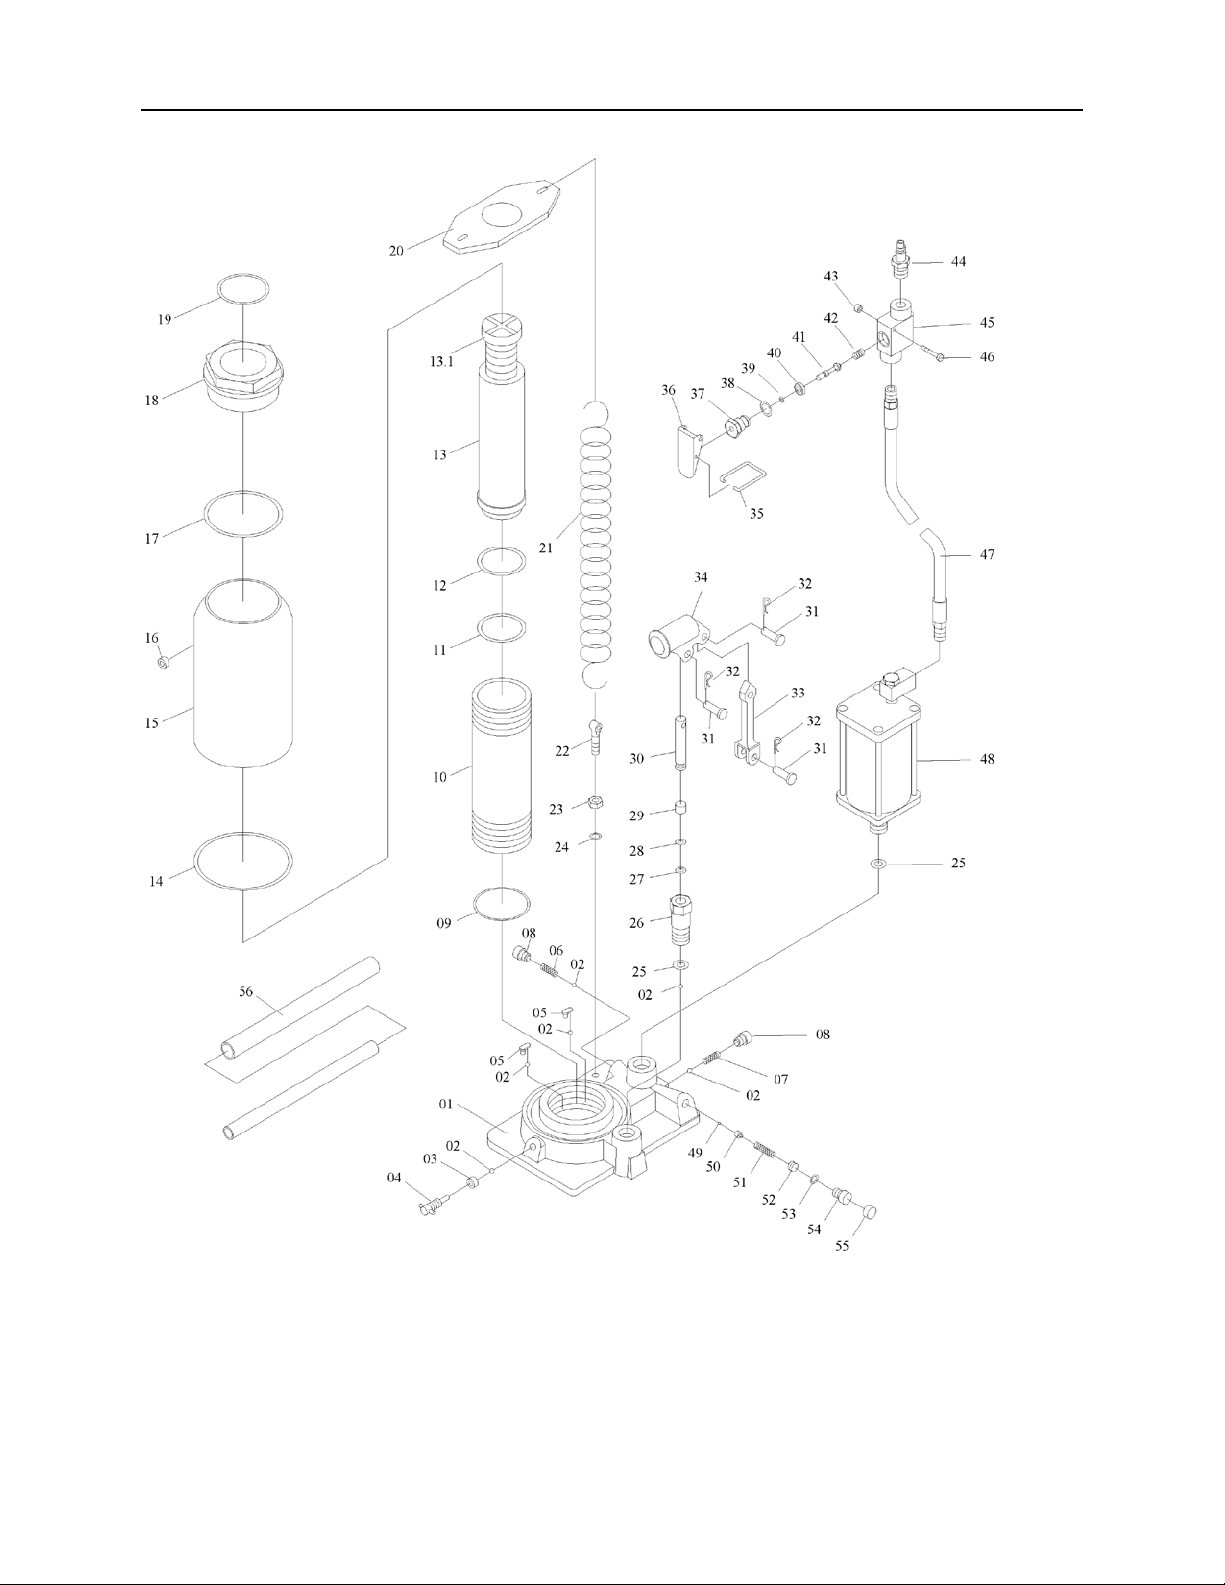
3.1 Before first use of this product, pour a teaspoon of good quality air tool lubricant into the hose quick
coupler-male(44) of the air quick coupler-female, then connect it to air source and turn on the air valve
and work for 3 seconds to evenly distribute lubricant.
3.2 Use the slotted end of the handle(56) to turn the release valve(04) clockwise until it is firmly closed.
3.3 Apply the emergency brake and use wheel chocks to block all wheels to prevent any movement of
the vehicle being lifted.
3.4 Place the jack into position and adjust the extension screw(13.1) as needed.
NOTE: Check in your vehicle owner's manual for the location of recommended lift point.
3.5 Connect the air quick coupler-male into the shop air supply hose quick coupler-female, then turn on
the air valve.
3.6 Raise the load to desired height, turn off the air valve and immediately USE JACK STANDS with
adequate capacity to support the load.
3.7 When air source is not available, insert the big end of the handle into the handle bracket(34), pump it
manually to raise the load to desired height. Then immediately transfer the load to appropriate support
devices such as jack stands.
WARNING! Be sure all tools and personnel are clear before lowering load.
3.8 When work is done, raise load enough to carefully remove the jack stands. Then SLOWLY and

ESCO Equipment Supply Company 4
CAREFULLY lower the load by turning the release valve counterclockwise (use the slotted end of the
handle) in extremely small increments, then lower the extension screw by turning it clockwise as
needed and remove the jack.
WARNING! Dangerous dynamic shock loads are created by quick opening and closing the release
valve when the load is being lowered. The resulting overload may cause hydraulic
system failure which could cause severe personal injury and/or property damage.
4. MAINTENANCE
4.1 Clean the outside of the jack with dry, clean and soft cloth and periodically lubricate the joints, extension screw and
all moving parts with a light oil as needed.
4.2 When not in use, store the jack in a dry location with ram(13) and extension screw(13.1) fully lowered.
4.3 Purge the hydraulic system to eliminate any air in the system if jack efficiency drops or jack doesn’t work: A. If
manual operation performs poorly, use the slotted end of the handle to turn the release valve 1-1/2 turns
counterclockwise and remove the oil filler plug (16) by gently pulling, insert the handle into the handle bracket
and pump it 10 to 15 times, then replace the filler plug. B. If air operation performs poorly, connect the air inlet
fitting to air source, use the slotted end of the handle to turn the release valve 1-1/2 turns counterclockwise and
remove the oil filler plug (16) by gently pulling, turn on the air valve to let the pump work for one minute, then
replace the filler plug.
4.4 Check the hydraulic oil: place the jack in an upright position, completely lower the ram and remove the filler plug,
if it is not adequate, fill with high quality hydraulic jack oil to the lower rim of the fill hole, purge away air from the
hydraulic system as described in 4.3, top off with more hydraulic oil, then replace the filler plug.
4.5 For best performance and longest life, replace the complete jack oil at least once per year: With the ram fully
lowered, remove the oil filler plug, lay the jack on its side and drain the oil into a suitable container, then fill with
high quality hydraulic jack oil as described in 4.4, reinstall the filler plug.
NOTE: Dispose of hydraulic oil in accordance with local regulations.
4.6 It is recommended that an annual inspection be done by qualified technicians.

ESCO Equipment Supply Company 5
5.TROUBLESHOOTING
Symptom Possible Causes Corrective Action
Jack will not lift load Release valve not tightly closed
Overload condition
Air supply inadequate
Air trapped in system
Close release valve firmly
Remedy overload condition
Ensure adequate air supply
Purge away air from system
Jack will lift, but will not
maintain pressure Release valve not tightly closed
Overload condition
Hydraulic unit malfunction
Close release valve firmly
Remedy overload condition
Contact your dealer
Will not lower after
unloading Reservoir overfilled
Linkages binding Drain oil to proper level
Clean and lubricate moving parts
Poor lift performance Hydraulic oil level low
Air trapped in system Add oil to proper level
Purge away air from system
Will not lift to max height Hydraulic oil level low Add oil to proper level

ESCO Equipment Supply Company 6
Parts Breakdown Sheet
NO.
DESCRIPTION
QTY
NO.
DESCRIPTION
QTY
NO.
DESCRIPTION
QTY
01
BASE
1 21
SPRING
2 41
THROTTLE
1
02 BALL 6 22 EYE BOLT 2 42 SPRING 1
03 SEAL 1 23 NUT 2 43 NUT 1
04 RELEASE VALVE 1 24 LOCK WASHER 2 44 QUICK COUPLER-MALE 1
05 BALL CUP 2 25 WASHER 1 45 VALVE BODY 1
06
SPRING
1 26
PUMP CYLINDER
1 46
SCREW
1
07
SPRING
1 27
O-RING
1 47
AIR HOSE
1
08
SCREW
2 28
NYLON RING
1 48
AIR MOTOR
1
09
NYLON RING
1 29
BACK UP RING
1 49
BALL
1
10
CYLINDER
1 30
PISTON
1 50
BALL CUP
1
11
O-RING
1 31
PIN
3 51
SPRING
1
12 CUP SEAL 1 32 R-PIN 3 52 SCREW 1
13 RAM 1 33 CONNECTOR 1 53 O-RING 1
14 PACKING 1 34 HANDLE NRACKET 1 54 SCREW 1
15 RESERVOIR 1 35 LOCK LEVER 1 55 PLASTIC CUP 1
16 FILLER PLUG 1 36 LEVER 1 56 HANDLE 2
17
NYLON RING
1 37
NUT
1
18
TOP NUT
1 38
O-RING
1
19
O-RING
1 39
O-RING
1
20
SPRING PLATE
1 40
PACKING
1

ESCO Equipment Supply Company 7
Table of contents
Other Esco Jack manuals

Esco
Esco 90520 User manual

Esco
Esco 10807 User manual

Esco
Esco Pro Series User manual

Esco
Esco 10771 User manual

Esco
Esco 10497 User manual

Esco
Esco YELLOW JACKIT 10812 Technical manual

Esco
Esco 10897 User manual

Esco
Esco YAK 22/11 User manual

Esco
Esco CYCLONE X Series User manual

Esco
Esco 70131 Parts list manual