Motomaster 009-1534-6 User manual

HYDRAULIC
ATV AND LAWN MOWER JACK
INSTRUCTION
MANUAL
model no. 009-1534-6
IMPORTANT:
Please read this manual carefully before operating this jack and
save it for reference.
300 LB (136 KG) Maximum Weight

INTRODUCTION
2
IF ANY PARTS ARE MISSING OR DAMAGED, OR IF YOU HAVE ANY
QUESTIONS, PLEASE CALL OUR TOLL-FREE HELPLINE AT
1-888-942-6686
model no. 009-1534-6 I contact us 1-888-942-6686

TABLE OF CONTENTS
3
TABLE OF CONTENTS
Safety
Specifications
Important safety information
Assembly
Bleeding
Lifting
Cleaning, maintenance, and lubrication
Troubleshooting
Lowering
Maintenance
Exploded view
Operation
4
4
4
6
12
Key parts diagram 11
12
12
13
14
14
15
16
Parts list 17
Environmental concerns 18
Warranty 18
SAVE THESE INSTRUCTIONS
This manual contains important safety and operating instructions. Read all instructions and follow
them while using this product.

SAFETY
4
IMPORTANT SAFETY INFORMATION
SPECIFICATIONS
Rated Capacity Maximum Lift Height
300 lb (136 kg) 23 13 / 16" (60.5 cm)
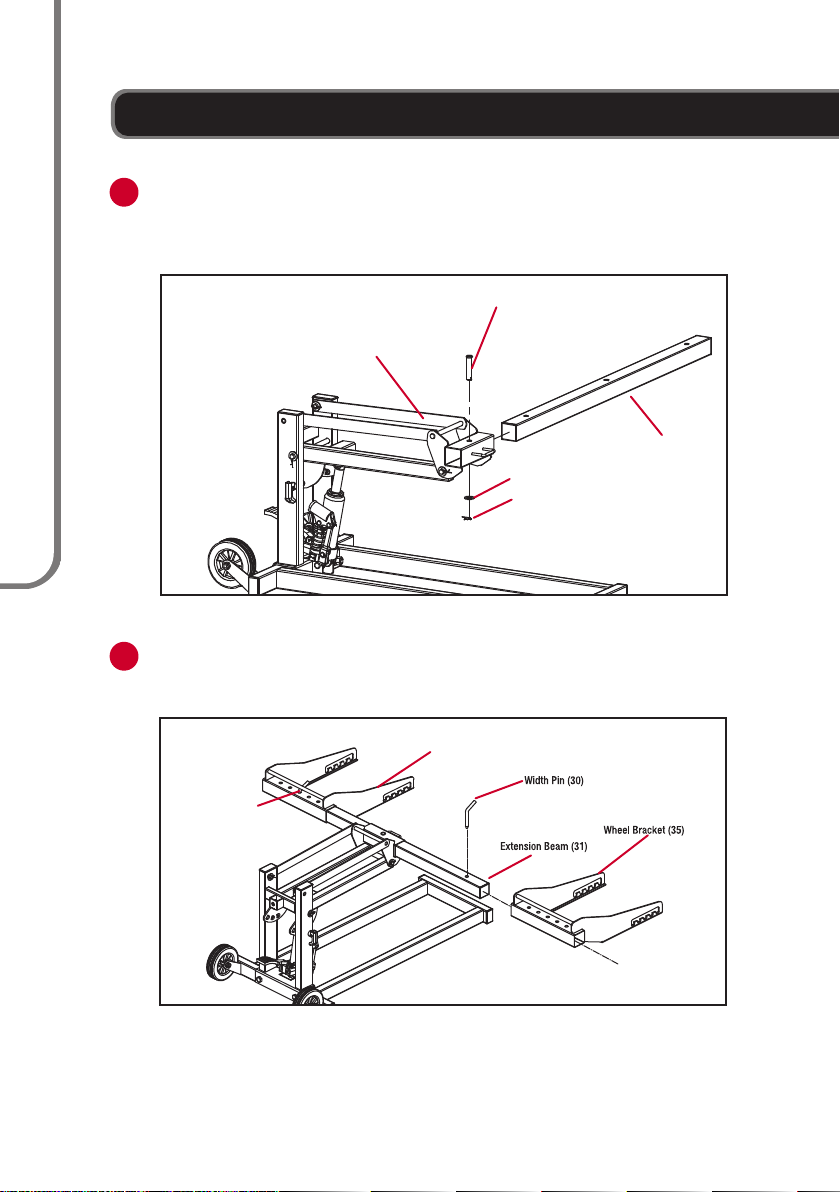
Axle Width
36 – 50 1/2" (91.4 – 128.3 cm)
Assembly Precautions
Failure to heed these warnings may result in personal injury and/or property damage.
• Assemble only according to these instructions. Improper assembly can create
hazards.
• Wear ANSI-approved safety goggles and heavy-duty work gloves during assembly.
• Keep assembly area clean and well lit.
Use Precautions
• Study, understand, and follow all instructions before operating this device.
• Do not exceed rated capacity.
• Use only on hard, level surfaces.
• Load wheels equally.
• Lift only on areas of the vehicle as specified by the vehicle manufacturer.
• Immediately after lifting load, ensure jack mechanical load holding means is engaged.
• Do not move while loaded.
• Secure load with appropriate restraint device.
• Do not adjust safety valve.
• Wear ANSI-approved safety goggles and heavy-duty work gloves during use.
• Keep clear of load while lifting and lowering.
• Lower load slowly.
• Do not use for aircraft purposes.
• Inspect before every use; do not use if parts loose or damaged.
• Keep your work area clean and well lit. Cluttered work areas invite accidents.
• Do not allow anyone on the vehicle while using the jack. Keep bystanders a safe
distance away from the vehicle and jack.
• Stay alert. Watch what you are doing, and use common sense when operating a jack.
Do not use a jack while tired or under the influence of drugs, alcohol, or medication. A
moment of inattention while operating jacks may result in serious personal injury.
model no. 009-1534-6 I contact us 1-888-942-6686

SAFETY
5
• Store idle jacks out of reach of children and other untrained persons. Jacks are
dangerous in the hands of untrained users.
• Jack service must be performed only by qualified repair personnel. Service or
maintenance performed by unqualified personnel could result in a risk of injury.
• When servicing a jack, use only identical replacement parts. Follow instructions in the
“Maintenance and Servicing” section of this manual. Use of unauthorized parts or
failure to follow maintenance instructions may create a risk of injury.
• Before use, read manufacturer's instruction manual for the vehicle you will lift.
• Do not support both ends of the vehicle at the same time.
• Before lowering the jack, remove all tools and equipment from under the vehicle.
• The warnings, precautions, and instructions discussed in this manual cannot cover all
possible conditions and situations that may occur. The operator must understand that
common sense and caution are factors which cannot be built into this product but
must be supplied by the operator.
SAVE THESE INSTRUCTIONS.
Failure to heed these markings may result in personal
injury and/or property damage.

ASSEMBLY
1
2
WARNING!
Read the ENTIRE IMPORTANT SAFETY INFORMATION section at the beginning of this manual
including all text under subheadings therein before set up or use of this product.
6
model no. 009-1534-6 I contact us 1-888-942-6686
Put Shaft (11) and Lift Arm Assembly (23) shown in Fig. a.
Connect the pins on the Shaft (11) through the holes on Upper Lift Arm (27)
shown in Fig.b.
Slide Lift Arm Pin (18) through Shaft (11) and Lift Arm Assembly (23) shown
in Fig. c & d.
Fig. a Fig. b Fig. c Fig. d
ASSEMBLY INSTRUCTIONS
Place Lift Arm / Shaft Assembly flat on a horizontal surface.
Move the two Safety Lock Levers (14) to the unlocked position as shown in Fib. b.
Raise the Lift Arm portion of the assembly to the position shown in Fig. c.
Prepare Lift Arm / Shaft Assembly
Lift Arm / Shaft
Assembly
Lift Arm
Safety Lock
Lever (14)
Safety Lock
Lever (14)
Lift Arm
Assembly (23)
Upper Lift Arm
Lift Arm Pin (18)
Shaft (11)
Fig. a Fig. b Fig. c
(27)

7
ASSEMBLY
3
4
Fig. a
Install Ram
Upper Ram
Pin (22)
Lower Ram
Pin (7)
Ram (19)
R- Clip (6)
Safety Lock Lever (14)
Fig. b Fig. c
Lift Arm/Shaft
Aeembly
Base (1) Bolt (10)
Lock
Washer (9)
Washer (17)
Nut (8)
Position the Ram in Lift Arm I Shaft Assembly as shown.
Press the pump piston rod to the proper position with the foot pedal and install it as
shown in the figure.
Slide Lower Ram Pin (7) through the shaft bracket and the clevis base of the Ram (19).
Slide Upper Ram Pin (22) through the bracket on the Lift Arm and the top of the Ram (19).
Place Washer (17) over the end of each Pin.
Secure each Pin with an R-Clip (6).
Move the two Safety Lock Levers (14) to locked position as shown in Fig.c.
Place the Lift Arm I Shaft Assembly onto the wheeled end of the Base (1 )
as shown and align the bolt holes.
Secure the Lift Arm I Shaft Assembly to the Base using two Bolts (10), Washer (17)
Lock Washers (9), and Nuts (8).
Connect Lift Arm / Shaft Assembly to Base
Washer (17)

5
6
ASSEMBLY
Extension Beam Pin (32)
Extension Beam (31)
Washer (17)
R-Clip (6)
Insert Extension Beam (31) through the bracket on the Upper Lift Arm (27).
Insert Extension Beam Pin (32) through centre of bracket.
Hold Washer (17) over end of Extension Beam Pin and secure it with R-Clip (6).
Attach Extension Beam
Install Wheel Brackets
Slide one Wheel Bracket (35) over each end of the Extension Beam (31).
Insert Width Pins (30) to secure them in place.
Width Pin (30)
Wheel Bracket (35)
Upper Lift Arm (27)
8
model no. 009-1534-6 I contact us 1-888-942-6686

ASSEMBLY
9
7
8
Remove the R-Clip (6) and Washer (33) from one end of each Wheel Bracket
Rod (34).
Insert one Wheel Bracket Rod through the slots on each Wheel Bracket (35).
Replace the Washer over the end of each Wheel Bracket Rod and
use an R-Clip to secure the end of each Rod in place.
Insert the Foot Pedal (21) into its holder on the Ram (19).
Secure the Foot Pedal in place using the Lock Washer (36) and Foot Pedal
Bolt (20) through the side of its holder.
Attach Wheel Bracket Rods
Install Foot Pedal
Foot Pedal Bolt (20)
Foot Pedal (21)
Ram (19) Lock Washer (36)
Wheel Bracket (35)
Wheel Bracket Rod (34)
Washer (33)
R-Clip (6)

ASSEMBLY
10
9Insert the Handle (25) into the bracket on the Lift Arm I Shaft Assembly and
align the holes.
Secure in place using the Handle Bolt (12) and Lock Washer (9).
Install Handle
Handle (25)
Lock Washer (9)
Handle Bolt (12)
model no. 009-1534-6 I contact us 1-888-942-6686

11
KEY PARTS DIAGRAM
KEY PARTS DIAGRAM
Fluid Fill Hole
Release Pedal
Safety Lock Levers in
LOCKED position.
Safety Lock Levers in
UNLOCKED position.
Safety Lock Lever
Foot Pedal
Handle Width Pin
Wheel Bracket
Width Pin
Fluid Fill Plug
Ram

OPERATION
12
BLEEDING
LIFTING
WARNING!
Read the entire Important Safety Information section at the beginning of this document including
all text under subheadings therein before set up or use of this product.
model no. 009-1534-6 I contact us 1-888-942-6686
IMPORTANT! During shipment or after refilling the oil, air may become trapped in the
hydraulic system, causing poor lifting performance. The air must be removed before
starting operation of the jack.
• Have an assistant hold the Release Pedal down.
• Pump the Foot Pedal (21) quickly several times.
• Test the jack several times for proper operation before attempting to lift a load. If the
jack still does not appear to be working properly after bleeding, do not use the jack until
it has been repaired by a qualified service technician.
• Determine the wheel width of the ATV/mower, and adjust the Wheel Bracket
supports to match that width. Lock them in place using the Width Pins.
WARNING! Adjust them so that they are equal distance from the centre of the
jack, or else the jack will be unstable and might tip.
• Examine the bottom of each ATV/mower wheel that is touching the floor. Adjust
the depth of both Wheel Brackets to be slightly larger than that distance.
• Press the Release Pedal to lower the jack. Once the jack is fully lowered,
release the Release Pedal.
• Use the ATV/mower's steering to straighten its wheels. Use wheel chocks (sold
separately) to block the wheels on the opposite side of the mower/ATV.

13
OPERATION
WARNING!
Set jack and vehicle on a flat, level, hard, ground surface safely away from oncoming traffic.
Turn off vehicle's engine. Also place the vehicle's transmission in “PARK” (if automatic) or in its
lowest gear (if manual). Set the vehicle's emergency brake. Then, block the wheels that are not
being lifted.
• Press the fronts of the Wheel Brackets straight against the fronts of the
ATV/mower's wheels. Push the Wheel Brackets under the wheels until both
wheels rest in the centre of the Wheel Bracket.
• Place the two Safety Lock Levers in the closed, locked position to enable the
locking mechanism. Refer to Key Parts Diagram on page 11.
• Hold the Handle and pump the Foot Pedal. Use smooth, full strokes for best results.
• Raise the vehicle to the desired height. As the load is lifted, the locking mechanism will
automatically engage to lock the Lift Arm in one of three positions.
• Make sure the Lift Arm is locked in one of the three available positions before
working on the ATV/mower.
LOWERING
• Remove all tools, parts, etc. from under the vehicle.
• Pump the Foot Pedal slightly to remove weight from the locking mechanism.
• Place the two Safety Lock Levers in the horizontal, unlocked position to disen gage the
locking mechanism. Refer to Key Parts Diagram on page 11.
• Keep clear while pressing the Release Pedal to lower the ATV/mower.
• Once the jack is completely lowered, remove it from under the ATV/mower.
• When not in use, store jack in a safe, dry location out of reach of children.

MAINTENANCE
14
WARNING!
TO PREVENT SERIOUS INJURY FROM ACCIDENTAL OPERATION: Do not use damaged equipment.
If abnormal noise or vibration occurs, have the problem corrected before further use.
Procedures not specifically explained in this manual must be performed
only by a qualified technician.
CLEANING, MAINTENANCE, AND LUBRICATION
• BEFORE EACH USE, inspect the general condition of the jack. Check for:
a. Broken, cracked, or bent parts.
b. Loose or missing parts.
c. Any other condition that may affect its safe operation.
If a problem occurs, have the problem corrected before further use. Do not use
damaged equipment.
• Before each use, thoroughly test the jack for proper operation prior to its actual
use. If the jack appears not to be working properly, follow Bleeding instructions
on page 12.
• Check for proper hydraulic oil level in the ram. The oil level has a direct impact
on the performance of the jack, causing it to malfunction when the oil level is
not correct.
• Change the hydraulic fluid at least once per year:
a. With the jack fully lowered and upright, remove the fluid fill plug on the side of
the ram housing.
b. Check the fluid fill hole (where the fluid fill plug was removed) and if
necessary, refill with a high quality hydraulic fluid (not included) until the fluid
just begins to run out of the fluid fill hole.
c. Then reinstall the fluid fill plug.
d. Clean with a clean cloth with a detergent or mild solvent.
e. Test the jack several times for proper operation before attempting to lift a
load. If the jack still does not appear to be working properly after bleeding, do
not use the jack until it has been repaired by a qualified service technician.
model no. 009-1534-6 I contact us 1-888-942-6686

15
TROUBLESHOOTING
TO PREVENT SERIOUS INJURY: Use caution when troubleshooting a malfunctioning jack.
Stay well clear of the supported load. Completely resolve all problems before use.
If the solutions presented in the Troubleshooting guide do not solve the problem, have a
qualified technician inspect and repair the jack before use. After the jack is repaired: Test
it carefully without a load by raising it and lowering it fully, checking for proper operation,
BEFORE RETURNING THE JACK TO OPERATION.
POSSIBLE SYMPTOMS PROBABLE SOLUTION
(Make certain that the jack is not supporting
a load while attempting a solution.)
Jack will
not lift at
its weight
capacity
Lift Arm
lowers
under
load
Pump
stroke
feels
spongy
Lift Arm
will not
lift all the
way
Pedal
moves up
when jack
is under
load
Fluid
leaking
from fill
plug
X X Check that Release Pedal is not stuck and raises
completely.
X X X
X X X
Ram may be low on fluid. Check the fluid level and
refill if needed.
Ram may require bleeding - see page 12.
XUnit may have too much hydraulic fluid inside.
Check fluid level and adjust if needed.
Valves may be blocked and may not close fully.
To flush the valves, with assistance:
1. Lower the Lift Arm and release the Release Pedal.
2. Manually lift the Lift Arm several inches.
3. Press the Release Pedal and force the Lift Arm
down quickly.
WARNING!
DO NOT USE A DAMAGED OR MALFUNCTIONING JACK!
MAINTENANCE

16
1
2
2
4
5
6
7
13
13
14
16
15
17
17
17
17
17
23
25
26
27
29
35 6
6
6
6
19
28
34
34
33
32
31
30
30
29
20
21
36
35
24
6
6
22
18
9
9
8
10
10
11
12
3
EXPLODED VIEW
model no. 009-1534-6 I contact us 1-888-942-6686

17
PARTS LIST
NOTE:
Some parts are listed and shown for illustration purposes only, and are not available
individually as replacement parts.
No. Description Qty.
1 Base 1
2 Base End Cap 4
3 Bolt M10 2
4 Nut M10 2
5 Wheel 2
6 R-Clip 13
7 Lower Ram Pin Ø12 1
8 Nut M12 2
9 Lock Washer Ø12 3
10 Bolt M12 2
11 Shaft 1
12 Handle Bolt M12 1
13 Pin 2
14 Safety Lock Lever 2
15 Spring 2
16 Lock Pin 2
17 Washer Ø12 11
18 Lift Arm Pin Ø12 1
19 Ram 1
20 Foot Pedal Bolt M8 1
21 Foot Pedal 1
22 Upper Ram Pin Ø12 1
23 Lift Arm Assembly 1
24 Shaft End Cap 2
25 Handle 1
26 Handle Grip 2
27 Upper Lift Arm 1
28 Upper Lift Arm Pin Ø12 1
29 Extension Beam End Cap 2
30 Width Pin 2
31 Extension Beam 1
32 Extension Beam Pin Ø12 1
33 Washer Ø14 4
34 Wheel Bracket Rod Ø14 2
35 Wheel Bracket 2
36 Lock Washer Ø8 1
No. Description Qty.

ENVIRONMENTAL CONCERNSWARRANTY
18
ENVIRONMENTAL CONCERNS
Made in China
Imported by Motomaster Canada Toronto, Canada M4S 2B8.
even in a sealed container,
towards
model no. 009-1534-6 I contact us 1-888-942-6686
This Motomaster product carries a one (1) year warranty against defects in workmanship
and materials. At its discretion, Motomaster Canada agrees to have any defective part(s)
repaired or replaced free of charge, within the stated warranty period, when returned by
the original purchaser with proof of purchase. This product is not guaranteed against wear
or breakage due to misuse and/or abuse.

GUIDE
D’UTILISATION
Nº de modèle : 009-1534-6
IMPORTANT :
Veuillez lire attentivement ce guide d’utilisation avant d’utiliser
cet article et le conserver aux fins de consultation ultérieure.
CRIC DE VTT ET DE
TRACTEUR DE JARDIN
HYDRAULIQUE
Poids maximum 300 lb (136 kg)

S'IL YA DES PIÈCES MANQUANTES OU ENDOMMAGÉES, OU SI VOUS
AVEZ LA MOINDRE QUESTION, VEUILLEZ COMMUNIQUER AVEC LE
SERVICE D'ASSISTANCE TÉLÉPHONIQUE SANS FRAIS AU
1 888 942-6686.
2
AVERTISSEMENT! Avant d’utiliser l’article, veuillez lire attentivement et bien
comprendre ce guide d’utilisation. Ce guide contient des consignes de sécurité
importantes ainsi que des consignes relatives à l’utilisation et à l’entretien du produit.
Conservez ce guide d’utilisation pour toute consultation ultérieure. Si vous remettez cet
article à un tiers, ce guide d’utilisation doit l’accompagner.
Nº de modèle : 009-1534-6 I Communiquez avec nous au 1 888 942-6686
GARANTIE
Table of contents
Languages:
Other Motomaster Jack manuals