ESI Juli@ XTe User manual

High Quality 24-bit 192kHz 4x4 reference
audio interface with swappable I/O socket
User’s Guide

ESI - Copyright © 2012
Revision 1, July 2012
www.esi-audio.com

ESI Juli@ XTe
3
INDEX
1. Introduction..................................................................................................................................4
Key Features.................................................................................................................................4
2. Description of Juli@ XTe............................................................................................................5
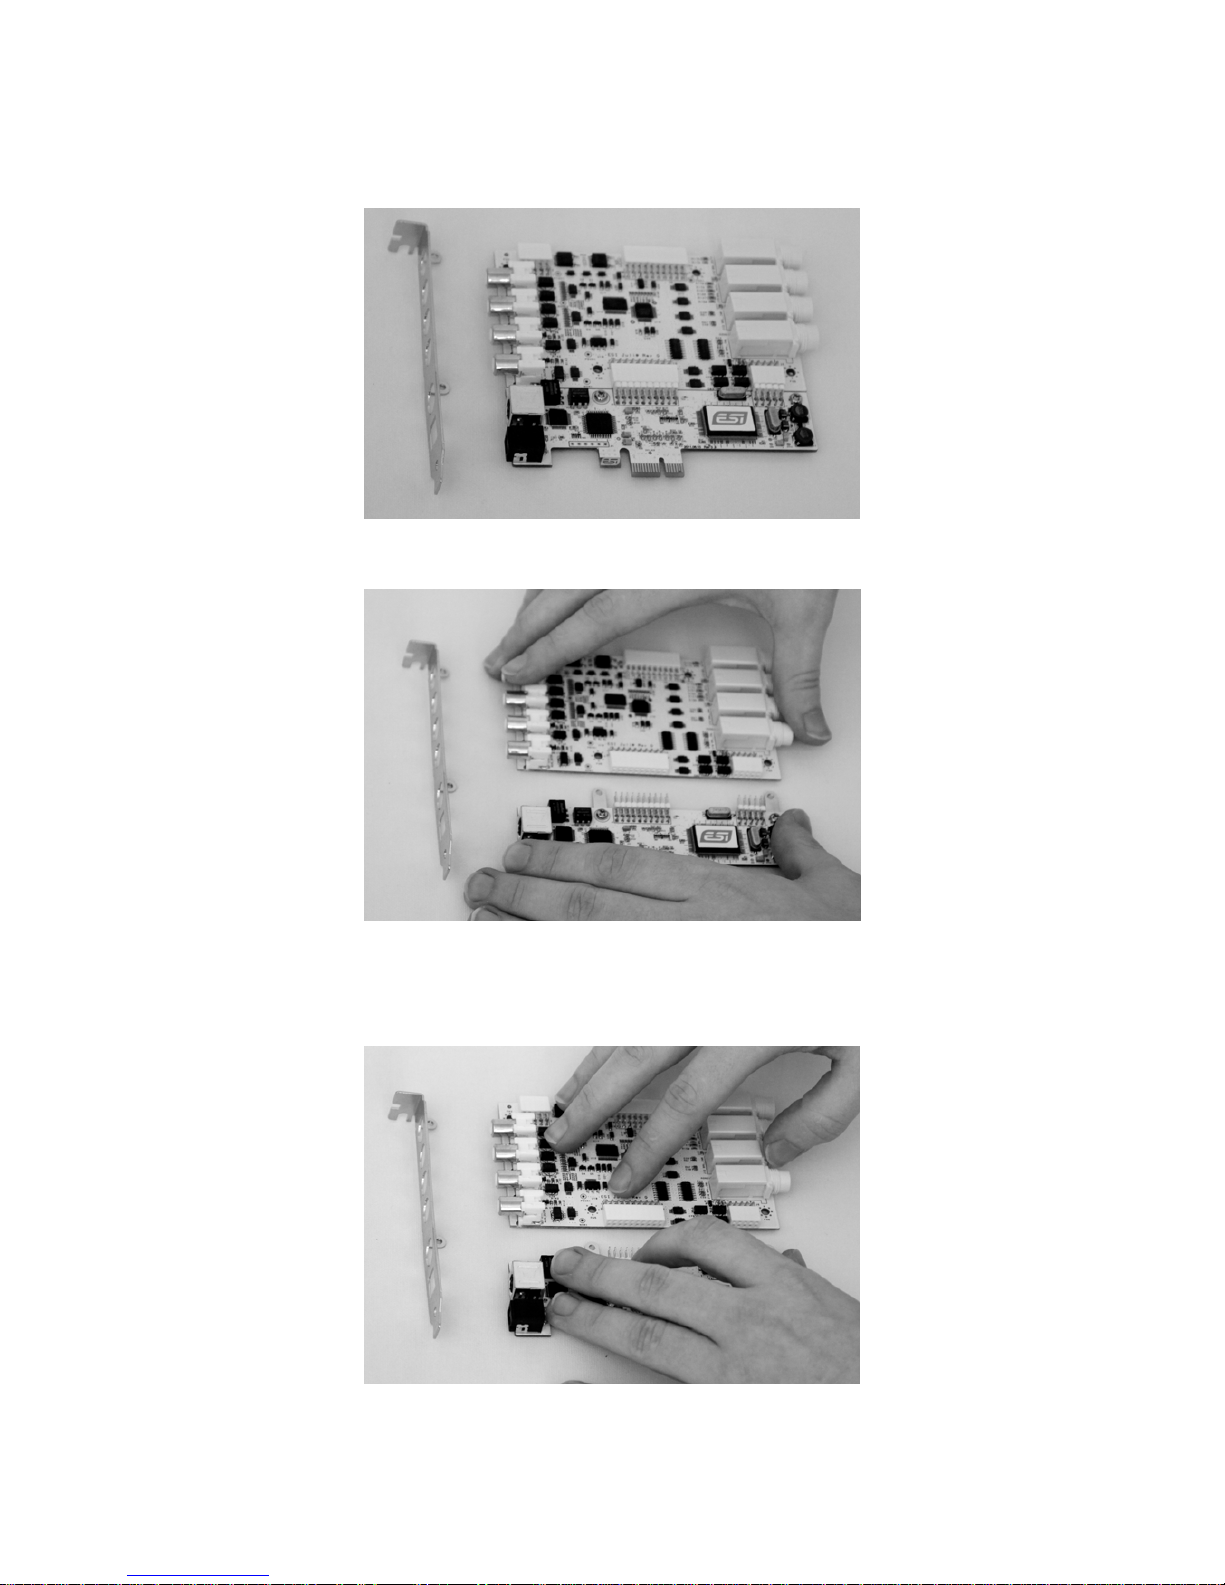
How to swap the Connectors?......................................................................................................7
3. Hardware Installation ...............................................................................................................11
System Recommendation...........................................................................................................11
Minimum System Requirement..................................................................................................11
Preparation for Hardware Installation........................................................................................ 11
PCIe Card Installation................................................................................................................12
4. Driver Software Installation .....................................................................................................14
Windows XP...............................................................................................................................14
Windows Vista & 7....................................................................................................................15
Mac OS X...................................................................................................................................17
5. Juli@ XTe Console.....................................................................................................................18
Pull down Menu .........................................................................................................................18
Input Panel..................................................................................................................................19
Output Panel...............................................................................................................................20
Sample Rate and Clock ..............................................................................................................21
DirectWIRE................................................................................................................................22
What is DirectWIRE? .............................................................................................................. 22
DirectWIRE Panel ...................................................................................................................22
DirectWIRE Examples.............................................................................................................23
6. Setting in Applications...............................................................................................................25
Windows Multimedia Setup.......................................................................................................25
Mac OS X Audio MIDI Setup....................................................................................................25
Cubase LE 6 ...............................................................................................................................25
Installation................................................................................................................................25
Initial Setup..............................................................................................................................26
7. Specifications..............................................................................................................................27
8. General Information..................................................................................................................28
Trademarks.................................................................................................................................28
The FCC and CE Regulation Warning....................................................................................... 28
Correspondence..........................................................................................................................28
Disclaimer ..................................................................................................................................28

ESI Juli@ XTe
4
1. Introduction
Congratulations on your purchase of Juli@ XTe by ESI – High Quality 24-bit 192kHz 4x4
reference audio/MIDI interface with swappable I/O socket.
Juli@ XTe is the perfect reference audio interface for home studio recording applications.
This audio card provides support for 24-bit 192kHz on 2 analog input and 2 analog output channels
with a special swappable I/O socket. You can choose between –10 dBV RCA type unbalanced I/O
and +4 dBu quarter inch TRS balanced I/O – depending on your requirement. Others features are
S/PDIF input clock detection, auto sync and individual real time monitoring support for analog and
digital input signals. Juli@ XTe provides 24bit 192kHz coaxial digital I/O and a 24-bit 96 kHz
optical output, 16 channel MIDI I/O and an EWDM driver with DirectWIRE 3.0 functionality.
Key Features
- 2 analog input channels, 2 analog output channels
- 24-bit/192kHz AD converter with 114dB(a) dynamic range
- 24-bit/192kHz DA converter with 112dB(a) dynamic range
- swappable socket (unbalanced RCA with -10dBv or balanced TRS with +4dBu )
- coaxial S/PDIF digital input
- synchronisation to digital S/PDIF input signals
- optical S/PDIF digital output with automatic shutter (max.96kHz specified)
- coaxial S/PDIF digital output (max 192kHz)
- 1 MIDI input (16 channels) / 1 MIDI output (16 channels)
- support for DirectWIRE 3.0
- 4 inputs and 4 outputs can be used with 24bit/192kHz simultaneously (incl. MIDI I/O) - full
duplex
- independent monitoring control for analog and digital input signals and playback
- EWDM driver: MME, DirectSound and ASIO 2.0 support
- Windows XP / Vista / 7 compatible (32-bit and 64-bit)
- compatible with Mac OS X
- Cubase LE from Steinberg included

ESI Juli@ XTe
5
2. Description of Juli@ XTe
Here is a short description of Juli@ XTe’s connectors.
1. 2. Analog Inputs 1/2 (top) and Analog Outputs 1/2 (bottom)
These are analog Line inputs and outputs. Depending on the your requirements, you can select
between balanced (+4dBu nominal TRS) and unbalanced (-10dBV nominal RCA) connectors (both
cannot be used simultaneously).
3. Breakout cable connection
This port allows you to connect Juli@ XTe’s breakout cable.
4. S/PDIF Optical Output
This port allows you to transfer Juli@ XTe’s audio data digitally without loss, directly to devices
like a DAT, MD, CD-recorder with digital input. The optical output sends out signals from output
channel 3/4 (‘Juli@ XTe 3/4’) from your audio applications. The maximum sample rate for the
optical output is 96kHz.

ESI Juli@ XTe
6
5. Juli@ XTe breakout cable
The Juli@ XTe PCIe card comes with a special breakout cable.
This cable provides 24bit/192kHz coaxial inputs and outputs and 16 MIDI I/O channels. The
coaxial I/O port sends and receives the signals from channel 3/4 (‘Juli@ XTe 3/4’) from your audio
applications. These coaxial connectors fully support up to 192 kHz.

ESI Juli@ XTe
7
How to swap the Connectors?
The following example shows you how to change from RCA I/O to TRS I/O connectors. Usually
you change the setup of the card once before you install it and before you start to use it (both I/O
connector types cannot be used simultaneously).
1. First, follow the order of the pictures below to remove the 4 screws carefully.
(Pic 1) (Pic 2)
(Pic 3) (Pic 4)

ESI Juli@ XTe
8
2. Detach the metal bracket from the card.
3. Hold the edges of the card and carefully separate the PCIe card like shown on this picture.
OO
Caution: Don’t touch the chipsets on the card like shown on the following picture. Otherwise
the card could be damaged.
XX

ESI Juli@ XTe
9
4. Turn the TRS connector parts toward to the bracket.
Hold the edges of the card and carefully combine PCIe card like shown on the pictures below.

ESI Juli@ XTe
10
5. Put the metal bracket to the card.
6. Tighten screws again (in opposite order).

ESI Juli@ XTe
11
3. Hardware Installation
System Recommendation
Juli@ XTe is not simply a standard digital audio interface card, but a high-resolution device capable
of advanced processing of audio content. Even though Juli@ XTe is built to have low-CPU
resource dependability, system specifications play a key part in the Juli@ XTe’s performance.
Systems with more advanced components are generally recommended.
Minimum System Requirement
- Intel CPU or equivalent and compatible AMD CPU
- 512 MB RAM
- Direct X 8.1 or higher
- one available PCIe x1 (or higher) slot
- DVD-ROM drive (for Cubase LE 6 installation)
- internet connection (for Cubase LE 6 activation)
- recent version of Microsoft Windows XP (SP2 or higher) or Windows Vista/7 (32-bit & 64-bit) or
-Mac OS X (10.6 or higher)
- the latest chipset and mainboard utility drivers and system updates must be installed
Preparation for Hardware Installation
The Juli@ XTe PCIe card and other components in the computer can be damaged easily by
electrical shock. You should use an anti-static device that can discharge the static electricity of your
body to avoid potential static damage to the cards. If you do not feel capable of installing a PCIe
card into your computer please contact a computer specialist.
Turn off the computer power and remove the power cable from your computer power supply.
Disconnecting the Power Cord
Refer to your computer user’s manual and remove the computer cover. Make sure that you have an
available PCIe slot on your motherboard to install the Juli@ XTe.
Removing the computer cover

ESI Juli@ XTe
12
To avoid possible static shock damage to the computer parts, discharge it by touching the computer
case or something grounded. We recommend you use an anti-static device such as an anti-static
wristband.
When holding the Juli@ XTe card, touch only the guide or the edge of card. Do not grab the card
by the board or connector.
PCIe Card Installation
Find an empty PCIe slot on the motherboard. If you are unsure, please check the manual of your
mainboard or computer to identify the PCIe slot, or consult a computer specialist. There are
different types of PCIe slot, Juli@ XTe will work both in a shorter PCIe x1 and in any longer higher
level PCIe slot, however not in old standard PCI slots.
Typical PC Motherboard Slot Configuration
If a faceplate or cover is behind the PCIe slot, you can remove it by removing the screw holding it
in place or by prying it off with a screwdriver.
Removing the slot faceplate
Insert the Juli@ XTe card into the PCIe slot, firmly pushing the card into the slot until it is seated
securely. Replace the screw, and tighten.

ESI Juli@ XTe
13
Juli@ XTe Installed in a PCIe x1 slot, next to two standard PCI slots
Once finished, close the computer case.

ESI Juli@ XTe
14
4. Driver Software Installation
Before installing the drivers of Juli@ XTe, we recommend to check on the download section of
www.esi-audio.com for updated drivers.
Windows XP
Turn on your computer. Windows will automatically detect a new device installation and the Found
New Hardware Wizard window will appear as seen on the following picture on the left.
Select No, not this time and click Next. On the following dialog select Install from a list or a
specific location (Advanced) and click Next. The dialog below will appear.
Make sure to select Search for the best driver in these locations and below that only select Include
this location in the search. Via Browse, you can select the folder that contains the driver data. If you
install from the original CD, select your CD-/DVD-drive and the \Windows XP folder. Otherwise
select the folder that contains the unzipped driver data from our website. Once done, click Next.

ESI Juli@ XTe
15
Windows will now prompt you to confirm the Windows Logo testing in the Hardware Installation
dialog with Continue Anway before the driver installation proceeds. After some time, the
installation of the ESI Juli@ XTe Controller device will be completed and you need to click Finish.
Once this is done, the Found New Hardware Wizard will automatically appear again. Please follow
the exact steps one more time, this time to install the ESI Juli@ XTe Audio device. After that is
finally confirmed on the last dialog via Finish, the Juli@ XTe driver software has been completely
installed. To confirm this, please check if the ESI icon is displayed in the taskbar notification area
as shown below.
If yes, the driver installation has been completed successfully. Note that on some systems the
computer has to be rebooted (Windows will display a message in that case) before everything is
completed.
Windows Vista & 7
Turn on your computer. Windows will automatically detect a new device installation and the Found
New Hardware window will appear as seen on the following picture.
Select Locate and install driver software (recommended). Insert the driver CD only if you are
installing the original driver from the CD. If you are installing an updated driver from our website,
proceed by clicking on I don’t have the disc. Show me other options. on the following dialog.

ESI Juli@ XTe
16
If the following window on the left will appears, click on Browse my computer for driver software
(advanced) in order to show Windows where the driver files are located. The dialog on the right
will appear.
Via Browse, you can select the folder that contains the driver data. If you install from the original
CD, select your CD-/DVD-drive and the \Windows Vista-7 folder. Otherwise select the folder that
contains the unzipped driver data from our website. Once done, click Next.

ESI Juli@ XTe
17
Windows will now prompt you to confirm the installation in the Windows Security dialog with
Install before the driver installation proceeds. After some time, the installation of the ESI Juli@ XTe
Controller driver will be completed and you need to click Close.
To confirm the completion of the installation, please check if the ESI icon is displayed in the
taskbar notification area as shown below.
If yes, the driver installation has been completed successfully.
Mac OS X
To install Juli@ XTe under Mac OS X, insert the CD into your system and navigate in Finder to the
Mac OS X folder on the CD. Alternatively you can download the latest version of the driver from
our website. You will find a file called Juli@-Mac-vx_yy.dmg (where x_yy stands for the driver
version number). Double click on this file and a new window with the installer opens.
Now double click on the Juli@ XTe driver installer and follow the instructions on screen. Once the
installation is completed it is recommended to reboot your system.
Via Utilities -> Audio MIDI Setup you can check if the driver has been installed correctly.

ESI Juli@ XTe
18
5. Juli@ XTe Console
This chapter describes the Juli@ XTe Control Panel. To open the panel double
click on the ESI icon in the task notification area (or by double clicking on the
icon in the Applications folder when using Mac OS X). The following dialog will appear:
Pull down Menu
The Juli@ XTe console includes a pull down menu bar that contains the configuration menus for
Juli@ XTe.
1. File - Exit
File – Exit will close the Juli@ XTe Console window but it will not shut down the Console. You
can always launch the Console by clicking ‘ESI’ icon on the system tray.

ESI Juli@ XTe
19
2. Config – Mouse Wheel
Controls the increment at which the volume is adjusted when using a mouse wheel. The adjustment
step is from 1 to 8.
3. Config – Latency
Adjust the latency (also often referred as buffer size) of the Juli@ XTe. A faster latency is achieved
by selecting smaller sample size which is ideal for software synthesizer and precise timing
recording. However, the latency is also limited by your system performance. For recording, you
would typically select a sample size between 64 ~ 512. Sample sizes of 48, 1024 and 2048 are used
in special circumstances of which 48 is reserved for very fast and reliable ASIO driver working
environments. The factory default setting is 256.
4. Config – Factory Default
It resets the Console to default settings.
5. Config - Always On Top
This enables to place the Console on top of every open window, which makes it easy to work with
Juli@ XTe and other music software simultaneously.
6. Config - Link
Links the L-R faders for stereo operation. Un-select the button, if you need to control the left and
right levels independently.
7. DirectWire
(explained later in detail)
Input Panel

ESI Juli@ XTe
20
Analog Input 1/2
This is where you can adjust the input monitoring level for the analog input 1/2. When you active
‘MON’ button of 1/2, the input monitoring level fader appears (displayed on the right picture). Now
the analog input signal is routed to output 1,2 and you can monitor (listen to) the analog input signal
in real-time. The monitoring level can be set using the mouse, mouse wheel, or cursor keys.
S/PDIF Input
This is where you can adjust the input monitoring level of the S/PDIF input. When you active the
‘MON’ button of S/PDIF, the input monitoring level fader appears (displayed on the right picture).
The S/PDIF input signal is then routed to output 1,2 and you can monitor the S/PDIF input signal in
real-time. The monitoring level can be set using the mouse, mouse wheel, or cursor keys.
MON
When you activate this button, input monitoring (for monitoring via the analog output 1,2) level
fader will appear for this channel.
MUTE
Select this button to mute each signal source.
Output Panel
Analog Output 1/2
This is where you can control the output signal. The level can be set using the mouse, mouse wheel,
or cursor keys.
S/PDIF Out
This is where you can adjust output-monitoring level of the S/PDIF out/playback signal. When you
active ‘MON’ button of S/PDIF Out, the S/PDIF output level fader will appear (displayed on the
next picture). Now the S/PDIF out/playback signal will be routed to the analog output 1/2 and you
Table of contents
Other ESI Accessories manuals

ESI
ESI Dr. DAC nano User manual

ESI
ESI Maya 44 USB User manual

ESI
ESI WaMi Box User manual

ESI
ESI Waveterminal 192M User manual

ESI
ESI GIGAPORT HD User manual

ESI
ESI FlexCharge3 FCH3-DSK-BLK Parts list manual

ESI
ESI AUDIOTRAK Prodigy 7.1 HiFi User manual

ESI
ESI MAYA44 USB User manual

ESI
ESI MIDIMATE ( ) User manual

ESI
ESI U22 XT User manual
Popular Accessories manuals by other brands

brennenstuhl
brennenstuhl Premium-Line Comfort Switch Plus operating instructions

Dometic
Dometic A&E 8500 Series installation manual

Philips
Philips PR3110 user manual

COQON
COQON ZigBee LUXSENB1 manual

Vega
Vega VEGACAP 64 operating instructions

Agilent Technologies
Agilent Technologies 1141A User's guide and service guide