Estate EST-MTB29 User manual
INSTRUCTION MANUAL
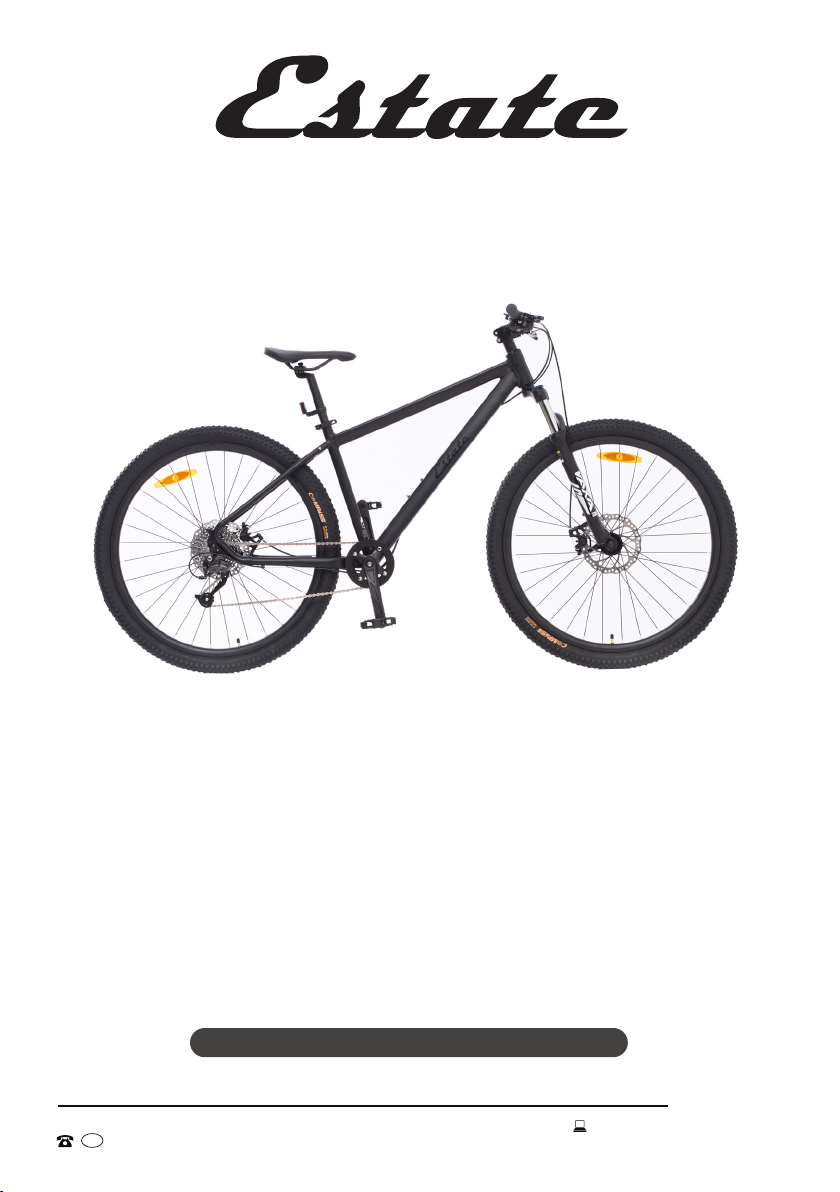
29 " (74 cm) Mountain Bike
(Large or Medium)
Model Number EST-MTB29 / EST-MTB29M
po.org
MODEL: EST-MTB29 PRODUCT CODE: 704513 | MODEL: EST-MTB29M PRODUCT CODE: 704512 10/2021
AFTER SALES SUPPORT info@tem
AUS 1300 112 534

2po.org
MODEL: EST-MTB29 PRODUCT CODE: 704513 | MODEL: EST-MTB29M PRODUCT CODE: 704512 10/2021
AFTER SALES SUPPORT info@tem
AUS 1300 112 534
Welcome
Congratulations on choosing to buy an ESTATE product.
All products brought to you by ESTATE are manufactured to the highest
standards of performance and safety and, as part of our philosophy of
customer service and satisfaction, are backed by our comprehensive
1Year Warranty.
We hope you will enjoy using your purchase for many years to come.

3
po.org
MODEL: EST-MTB29 PRODUCT CODE: 704513 | MODEL: EST-MTB29M PRODUCT CODE: 704512 10/2021
AFTER SALES SUPPORT info@tem
AUS 1300 112 534
02 Welcome
04 Warranty Details
05 General Safety Instructions
08 Product Overview
09 Getting Started
10 Assembly
15 Instructions
16 Other Useful Information
19 Repair and Refurbished Goods or Parts Notice
Contents

4po.org
MODEL: EST-MTB29 PRODUCT CODE: 704513 | MODEL: EST-MTB29M PRODUCT CODE: 704512 10/2021
AFTER SALES SUPPORT info@tem
AUS 1300 112 534
The product is guaranteed to be free from defects in workmanship and
parts for a period of 12 months from the date of purchase. Defects that
occur within this warranty period, under normal use and care, will be
repaired, replaced or refunded at our discretion. The benefits conferred by
this warranty are in addition to all rights and remedies in respect of the
product that the consumer has under the Competition and Consumer Act
2010 and similar state and territory laws.
Our goods come with guarantees that cannot be excluded under the
Australian Consumer Law. You are entitled to a replacement or refund for
a major failure and to compensation for any other reasonably foreseeable
loss or damage. You are also entitled to have the goods repaired or
replaced if the goods fail to be of acceptable quality and the failure does
not amount to a major failure.
Warranty Details
REGISTER YOUR PURCHASE AT www.aldi.com.au/en/about-aldi/product-registration/ TO KEEP UP-TO-DATE WITH IMPORTANT PRODUCT INFORMATION
YEAR WARRANTY
1
29 " (74 cm) Mountain Bike (Large or Medium)

5
po.org
MODEL: EST-MTB29 PRODUCT CODE: 704513 | MODEL: EST-MTB29M PRODUCT CODE: 704512 10/2021
AFTER SALES SUPPORT info@tem
AUS 1300 112 534
General Safety Instructions
NOTE: Throughout the instructions, this product may be referred to as mountain
bike, bicycle or simply as bike.
Road Safety
WARNING: Read and follow all safety warnings before riding!
• Traffic laws: Some state and local traffic laws may require that your bicycle be
equipped with a warning device, such as a horn or bell and a light, if the bicycle is
to be ridden after dark. When you are riding on the road, make sure that you are
always visible to other vehicles. Please respect the road rules in all circumstances.
• On and off-road operation: Avoid the following hazards: drain grates, potholes,
ruts, soft road edges, gravel and leaves, especially when they are wet.
• Protective equipment: Like any other moving products, cycling can be a
hazardous activity and it is possible to get into dangerous situations. Always
wear proper protective equipment, such as an Australian standards-approved
helmet, elbow pads, knee pads, long sleeve shirt, gloves, long pants.
• Always wear fully enclosed shoes: Make sure your shoe laces or buckles are
done up properly before riding. You must not ride barefoot or in sandals.
• Wet weather warning: Slow down your speed when riding in rainy and snowy
conditions and in slippery areas. Increase your braking distance to ensure safety.
Use the rear brake lever FIRST, then the front brake lever.
• Night-time operation: We do NOT recommend riding your bike at night. If you
have an emergency that makes it necessary to ride at right, have proper lights
and reflectors. Do NOT ride at night without a headlight, taillight, a white front
reflector, a red rear reflector and yellow wheel reflectors. Cyclists should wear a
reflective vest at night outside urban areas.
• Safe riding advice: Failure to follow the above warnings could result in injury
from a fall or accident and permanently and irreversibly damage the bike. If you
fall, make sure you carefully inspect your bike before riding again.
IMPORTANT SAFETY INSTRUCTIONS
READ CAREFULLY AND KEEP FOR FUTURE REFERENCE
Read this manual thoroughly before riding the mountain bike, even if you are familiar
with this type of product. The safety precautions enclosed herein reduce the risk of
injury and product damage. Keep the manual in a safe place for future reference,
along with the completed warranty card, your purchase receipt and packaging carton.
If applicable, pass these instructions on to the next owner of the mountain bike.
Always follow basic safety precautions and accident prevention measures when
riding a bike, including the following:

6po.org
MODEL: EST-MTB29 PRODUCT CODE: 704513 | MODEL: EST-MTB29M PRODUCT CODE: 704512 10/2021
AFTER SALES SUPPORT info@tem
AUS 1300 112 534
General Safety Instructions (Cont.)
• Usage restrictions: This mountain bike is not intended for use by persons
(including children) with reduced physical, sensory or mental capabilities, or
lack of experience and knowledge, unless they have been given supervision or
instruction concerning the use of the appliance by a person responsible for their
safety.
• Children: This mountain bike may be used by children aged 14 years or older.
Children younger than 14 years should not play with the bike. Cleaning and
maintenance should not be performed by children without adult supervision.
Do not let children inflate tyres.
Bike Essentials
• Always double-check your bike before riding it: tighten the handlebars and
stem, check the saddle, wheels and brakes, etc.
– Steering: Make certain that the stem is inserted into the head tube to at least
the minimum insertion line. Check the clamp nut and stem bolt to make sure
they are tightened securely.
– Seat: Check for tightness of the seat clamp and seat post clamp and that the
minimum insertion line is inside the frame. See that the seat is at the proper
height for the intended rider. Perform each check list below after all assembly
instructions and any necessary adjustments have been completed.
WARNING: Failure to perform these checks could result in serious injury to
yourself and others.
– General inspection: See that all reflectors have been properly installed.
Replace any missing or damaged reflectors. Check all fasteners and tighten if
necessary.
• Height adjustment: Adjust the seat height and handlebar height appropriately:
the rider must be able to straddle the bicycle with at least 2.5 cm clearance
above the horizontal bar when standing. Please refer to the assembly sections for
details.
• Tyre pressure: The tyre pressure range of this mountain bike is 40 psi, which is
marked on the tyre. Please ensure that the tyre pressure is in this range to avoid
accidents (1 psi = 6.895 kPa).
• Check the tyre pressure: Check your tyre pressure before each ride by squeezing
the tyre between your thumb and fingers. It should feel very firm, but not hard.
When you sit on your bicycle, the tyre sidewalls should not compress very much
under your body weight. Use a hand or foot pump to inflate your tyres. NEVER
inflate your tyres with an air compressor at a petrol station.

7
po.org
MODEL: EST-MTB29 PRODUCT CODE: 704513 | MODEL: EST-MTB29M PRODUCT CODE: 704512 10/2021
AFTER SALES SUPPORT info@tem
AUS 1300 112 534
General Safety Instructions (Cont.)
• Kickstand: There is no kickstand included. If you add a kickstand, keep in mind
that it can only support the bicycle, NOT the rider.
• Recommended torque requirements in Newton metres (N·m) for the
following:
(A) Front axle nuts: 15–25 N·m
(B) Back axle nuts: 20–30 N·m
(C) Handlebar clamp nut/bolt: 8–12 N·m
(D) Handlebar stem expander bolt: 35–45 N·m
(E) Seat pillar clamp nut/bolt: 18–22 N·m
(F) Brake cable anchor bolt: 1.5–4 N·m
(G) Brake mounting bolt: 8–12 N·m
(H) Seat clamp nuts: 18–22 N·m
(I) Crank attachment systems: 40–60 N·m
(J) Pedal: 35–40 N·m
• Maximum rider weight: 100 kg
• Maintenance: We strongly recommend you establish and respect a periodic
maintenance schedule, which will be determined by the frequency and length of
your rides, style of riding and the terrain on which you most often ride.
• We strongly recommend that significant mechanical repairs are carried out
by a skilled bicycle mechanic.
• WARNING: Replace worn parts! As with all mechanical components,
the bicycle is subjected to wear and high stresses. Different materials and
components may react to wear or stress fatigue in different ways. If the design
life of a component has been exceeded, it may suddenly fail, possibly causing
injuries to the rider. Any form of crack, scratch or change of colouring in highly
stressed areas indicates that the life of the component has been reached and it
should be replaced.
8po.org
MODEL: EST-MTB29 PRODUCT CODE: 704513 | MODEL: EST-MTB29M PRODUCT CODE: 704512 10/2021
AFTER SALES SUPPORT info@tem
AUS 1300 112 534
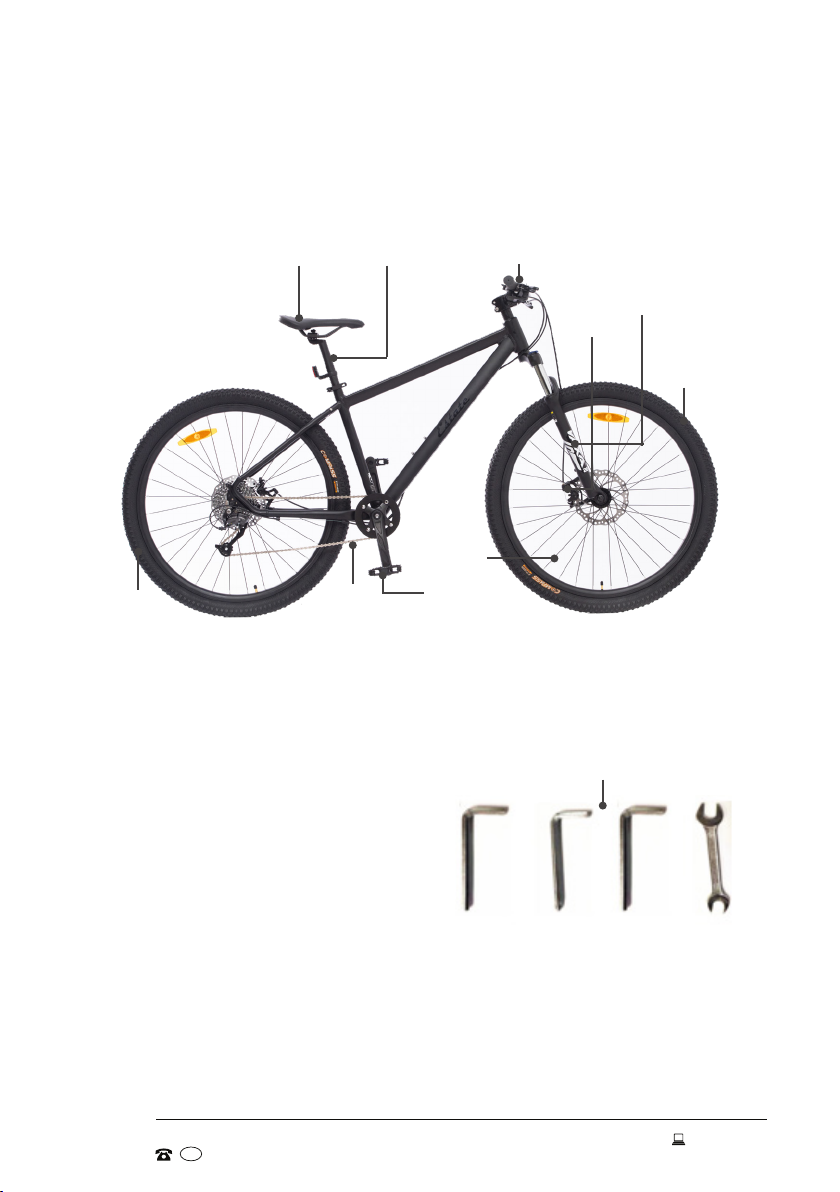
Product Overview
Other inclusions
M4 Allen key
M5 Allen key and screwdriver
M6 Allen key
M13/M15 wrench
Documentation (not pictured)
Instruction manual
Installation guide
Warranty certificate
NOTE: Due to continued product improvement, images and illustrations in this manual
may vary slightly from the product purchased. All images in this manual are for reference
purposes only. Parts are not necessarily pictured to scale.
Tools
M4 M5 M6 M13/15
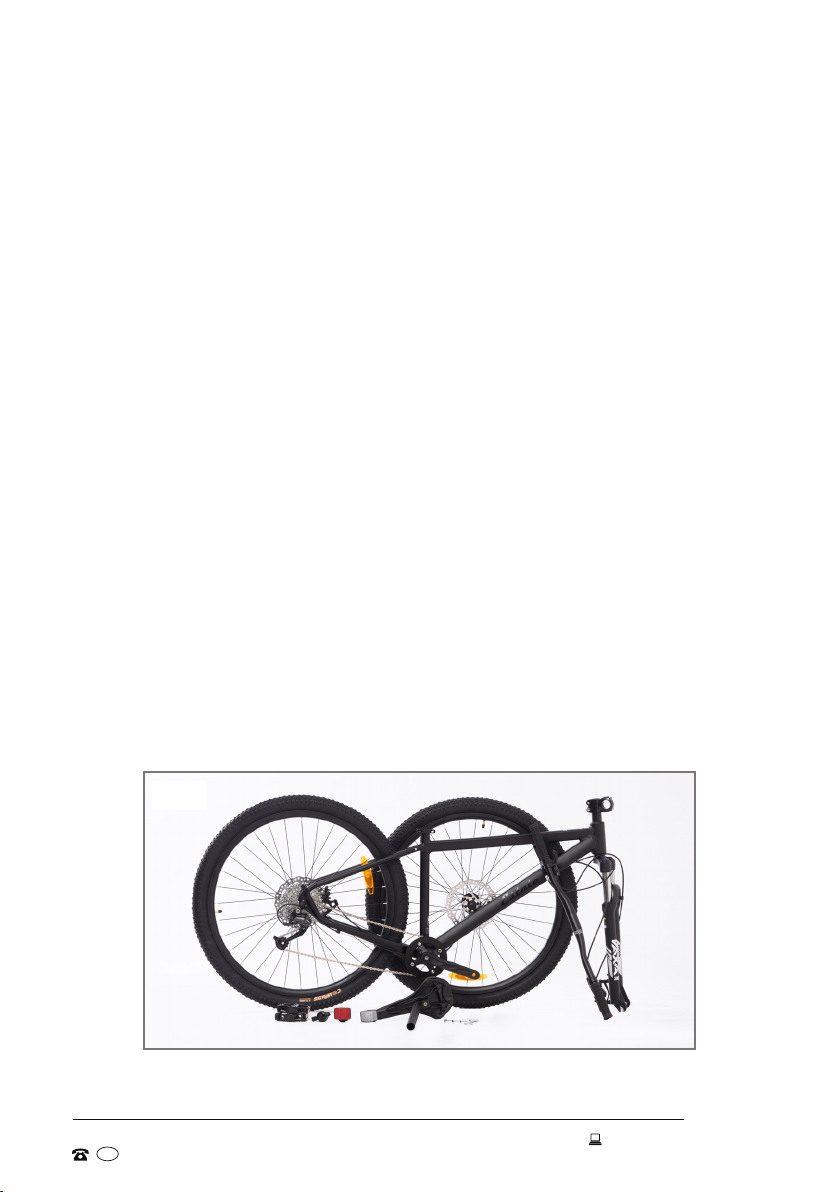
Scope of Delivery
29" mountain bike (large & medium)
Saddle Seat post
Chain
Handlebar with grips
Front
tyre
Fork
Spokes
Front
brake
Rear
tyre
Pedal
9
po.org
MODEL: EST-MTB29 PRODUCT CODE: 704513 | MODEL: EST-MTB29M PRODUCT CODE: 704512 10/2021
AFTER SALES SUPPORT info@tem
AUS 1300 112 534
Getting Started
Before First Use
• Unpack the bicycle, making sure to remove all parts from the packaging
carton—check before you discard the carton. Remove all protective packing
materials. The carton staples may be sharp, take care that you do not hurt
yourself when reaching into the carton to remove parts.
• Packaging materials: Keep the original packaging materials in a safe place.
It will help prevent any damage if the product needs to be transported in the
future, and you can use it to store the bike when it is not in use. In the event
that the carton is to be disposed of, please recycle it where possible.
• CAUTION: Unwrap all parts carefully! If you are using a retractable utility knife
or scissors when unwrapping the parts, take care that you do not scratch the
metal parts of the bike or pierce the tyres. Remove the plastic covers from the
front wheel nuts, base of the fork and stem pillar.
Plastic wrapping can be a suffocation hazard for babies and young children, so
ensure all packaging and protective materials are out of children's reach and
disposed of safely.
• Read all instructions in this manual and make sure you understand all
warnings. To familiarise yourself with all the parts of the bicycle, please refer
to the Product Overview and the remaining sections in this manual. Also pay
attention to the safety instructions on the previous pages.
• Assembly requirements: The comes partially assembled (Fig. 1) and requires
full assembly by a professional bicycle mechanic or competent person, following
the instructions provided. The tools required for assembly (Allen keys and
wrench) are supplied.
Fig. 1
10 po.org
MODEL: EST-MTB29 PRODUCT CODE: 704513 | MODEL: EST-MTB29M PRODUCT CODE: 704512 10/2021
AFTER SALES SUPPORT info@tem
AUS 1300 112 534
Assembly
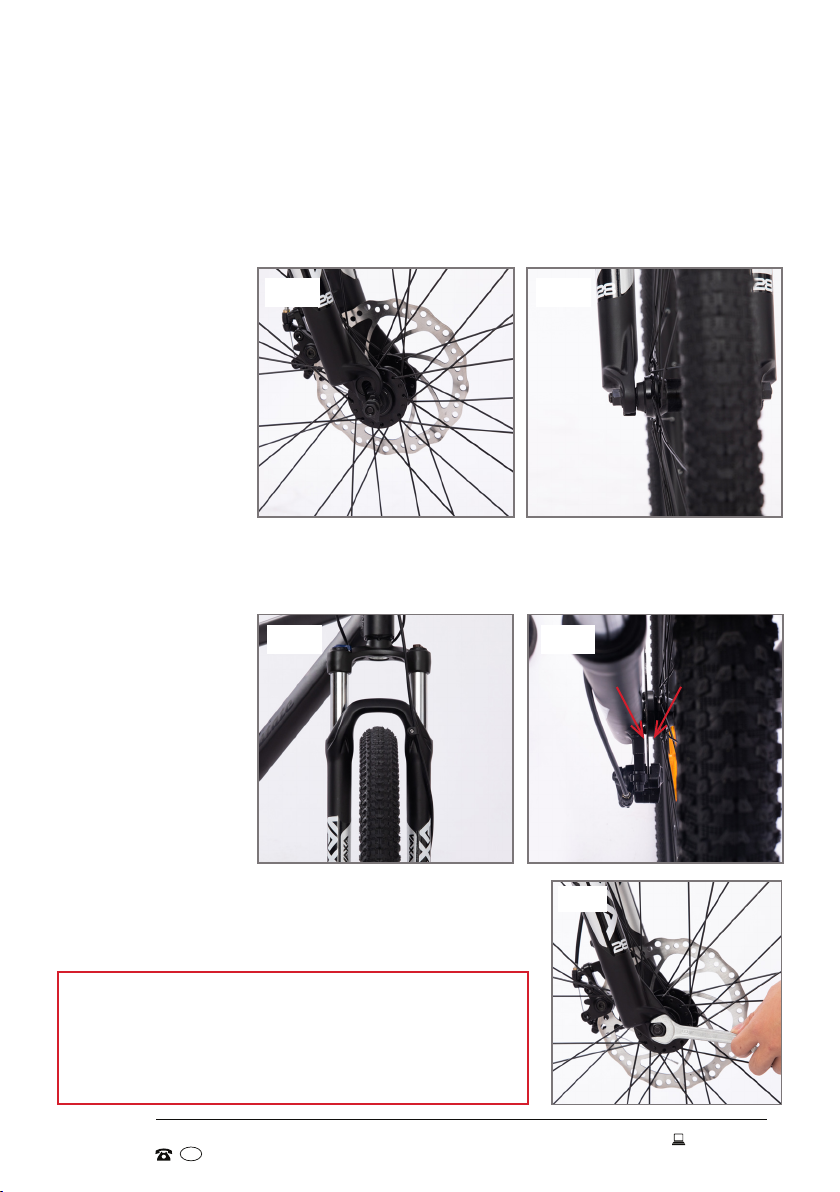
Step 1: Assembling the Front Wheel
1. Turn the fork until the fork plate points to the front of the bicycle (Fig. 2).
2. Insert the wheel into the fork.
3. Install an axle nut to each side of the axle (Fig. 3).
Fig. 2
4. Tighten the axle nuts by hand. Make sure there is an equal distance between
each fork tube and the wheel. Make sure the disc is in the middle of the disc
brake pads (Fig. 4 + 5).
Fig. 3
Fig. 4
Fig. 6
5. Then tighten the axle nuts securely using the M15
wrench (Fig. 6).
CAUTION!
After long time use of the bicycle, the braking
efficiency weakens and the brake pads/discs need
to be replaced by a skilled bicycle mechanic.
Fig. 5

11
po.org
MODEL: EST-MTB29 PRODUCT CODE: 704513 | MODEL: EST-MTB29M PRODUCT CODE: 704512 10/2021
AFTER SALES SUPPORT info@tem
AUS 1300 112 534
Assembly (Cont.)
Step 2: Assembling the Stem and Handlebar
WARNING!
For safe operation, the clamp bolts must be
tightened securely. If you can move the handle-
bar forward or backward, the bolts are not tight
enough. Take care not to overtighten and damage
the handlebar stem pillar bolt, which could cause
injury to the rider.
1. Loosen the screws on the stem and remove the stem cover (Fig. 7).
2. Fit the handlebar to the stem, ensuring it is centred. Replace the stem cover and
partially tighten the screws. Check the handlebar is in the correct position and
once satisfied, fully tighten the screws (Fig. 8).
Fig. 7 Fig. 8
Fig. 9
Fig. 10
3. The steering stem is supplied assembled, but if
you wish to make any adjustments, loosen the
screws as shown and after the stem is in the
correct position, tighten the screws again (Fig. 9).
Gear shifter on the handlebar
The bike is equipped with a SHIMANO 9
speed system and the shifter is at the right
side of the handlebar (Fig. 10).
Pull lever B to get a bigger tooth ratio (pedal
heavier); push lever A to get smaller tooth
ratio (pedal lighter).
12 po.org
MODEL: EST-MTB29 PRODUCT CODE: 704513 | MODEL: EST-MTB29M PRODUCT CODE: 704512 10/2021
AFTER SALES SUPPORT info@tem
AUS 1300 112 534
Assembly (Cont.)
Step 3: Installing the Saddle
The saddle is preassembled to the seat post (Fig. 11).
1. Loosen the seat clamp, then insert the seat post into the bicycle frame, making
sure that the minimum insertion mark on the seat post is completely inserted
into the frame and not visible.
2. Tighten the quick release seat post binder bolt securely at the desired height.
Turning the tension adjustment nut clockwise while keeping the cam lever from
rotating increases clamping force. Turning it anticlockwise while keeping the
cam lever from rotating reduces clamping force. Less than half a turn of the
tension adjustment nut can make the difference between safe clamping force
and unsafe clamping force.
3. Adjust the seat angle so that the top of the seat is parallel to the ground and
comfortable for the rider.
4. Once satisfied with the seat height and angle, adjust the screw tension by hand
and then close the clamp.
IMPORTANT!
• Pay special attention to the insertion warning mark.
• Test the seat to pedal distance by having the rider sit on the seat. When the
rider's leg is slightly bent, the ball of the foot should rest on the pedal when it
is in its lowest position and the feet of a seated rider can reach the ground. If
it does not, adjust the seat height as necessary.
• Check for tightness by attempting to twist the seat. If the seat is loose, be
sure to tighten the clamp nut and binder bolt nut securely.
Fig. 11

13
po.org
MODEL: EST-MTB29 PRODUCT CODE: 704513 | MODEL: EST-MTB29M PRODUCT CODE: 704512 10/2021
AFTER SALES SUPPORT info@tem
AUS 1300 112 534
Assembly (Cont.)
Step 4: Installing the Pedals
WARNING!
• For safe operation, the pedal spindle must be securely tightened against the
crank arm.
• Always replace damaged pedals, and always wear fully enclosed shoes or
sneakers when riding a bicycle.
1. Look for the letters “R” or “L” stamped on the pedal spindle.
2. To install the pedals, proceed as illustrated below (Fig. 12):
– Thread the pedal marked “R” into the crank arm on the chain side of the bike.
Turn the pedal spindle in a clockwise direction. Securely tighten the pedal
spindle with an M15 wrench.
– Thread the pedal marked “L” into the crank arm on the left side of the bike.
Turn the pedal spindle in an anticlockwise direction. Securely tighten the
pedal spindle with an M15 wrench.
Torque requirements: 20–26 N·m.
NOTE: Both pedals should be tightened towards the front of the bicycle. Start
each pedal spindle by hand to avoid stripping the threads.
Fig. 12

14 po.org
MODEL: EST-MTB29 PRODUCT CODE: 704513 | MODEL: EST-MTB29M PRODUCT CODE: 704512 10/2021
AFTER SALES SUPPORT info@tem
AUS 1300 112 534
Assembly (Cont.)
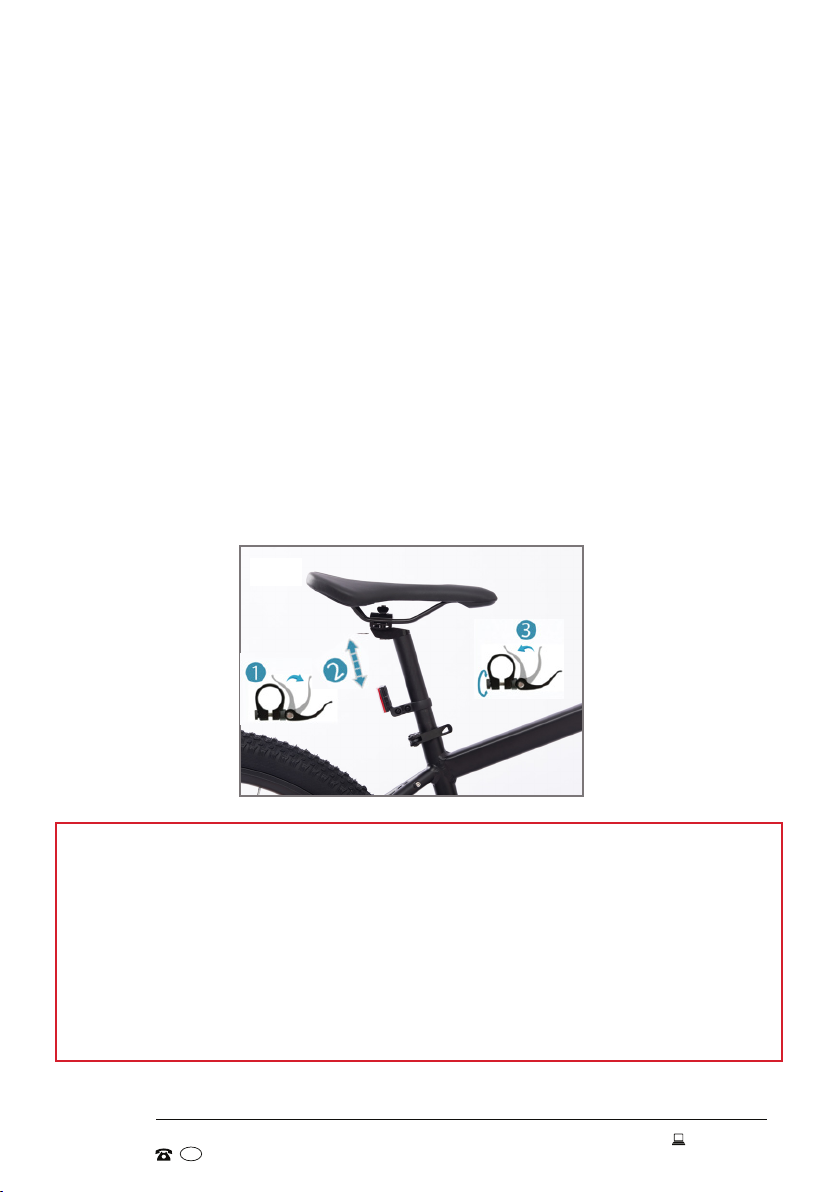
Step 5: Installing the Reflectors and Bell
CAUTION!
• Be sure the reflector is in the same longitudinal plane as the bicycle
(horizontal to the ground). If the reflector is aimed up or down, oncoming
headlights may not reflect properly in the reflector. If the reflector is not
horizontal to the ground, loosen the clamp screw and readjust the angle.
• It is important to check and adjust the position of the reflectors as you
assemble your bike. The reflectors must always be vertical (perpendicular to
the ground) and pointed toward the front and rear of the bike.
1. Remove the clamp screw from the reflector (or bell) bracket.
2. Push open the bracket “loop” and slide it onto the handlebar. (If there is a sizing
insert included with the bracket, please be sure it is inside the clamp loop before
mounting.)
3. Position the bell bracket (Fig. 13) or the reflector bracket (Fig. 14) at a certain
position on the handlebar and tighten the clamp screws securely.
Fig. 13 Fig. 14
Rear reflector (red)
1. Put the seat post mounted rear reflector in the
correct position by loosening the screws of the
rear reflector bracket (Fig. 15).
2. Make sure the rear reflector is vertical to the
ground and points straight back.
3. Make sure there is a minimum clearance of
7.5 cm between the top of the seat and the top of
the red rear reflector.
Fig. 15

15
po.org
MODEL: EST-MTB29 PRODUCT CODE: 704513 | MODEL: EST-MTB29M PRODUCT CODE: 704512 10/2021
AFTER SALES SUPPORT info@tem
AUS 1300 112 534
Instructions
Getting Ready to Ride
Wear appropriate clothing
To protect yourself from injury, always wear appropriate clothing and equipment
when riding a bike: an Australian standards-approved helmet, elbow pads, knee
pads, long sleeve shirt, gloves, long pants. Always wear fully enclosed shoes.
Make sure your shoe laces or buckles are done up properly before riding. You must
not ride barefoot or in sandals.
Check the bike before every use
– Tighten the handlebars and stem—the stem must be inserted into the head
tube to at least the minimum insertion line and the clamp nut and stem bolt
tightened securely.
– Check the saddle—the minimum insertion line must be inside the frame, the
seat clamp securely tightened and the seat at the proper height.
– Check the tyres—they must be inflated by hand to the appropriate pressure:
40 psi (1 psi = 6.895 kPa). The tyres should feel very firm, but not hard when
squeezed between your thumb and fingers.
– Check the brakes—test them before you ride. Replace the brake pad when any
part of the brake pad wear groove is not visible.
– Check the chain—ensure it is correctly routed. Clean and relubricate the chain
when required. Check for "chain stretch" after extensive cycling
WARNING: Failure to perform these checks could result in serious injury to
yourself and others.
Follow the road rules
Make sure your bike is equipped with the appropriate warning devices (horn, bell,
light) required by your state and local traffic laws
When you are riding on the road, make sure that you are always visible to other
vehicles. Please respect the road rules in all circumstances.
Avoid the following hazards: drain grates, potholes, ruts, soft road edges, gravel
and leaves, especially when they are wet.
WARNING: Failure to follow these warnings could result in a fall or accident and
permanently and irreversibly damage the condition of the bike.
Enjoy your ride!

16 po.org
MODEL: EST-MTB29 PRODUCT CODE: 704513 | MODEL: EST-MTB29M PRODUCT CODE: 704512 10/2021
AFTER SALES SUPPORT info@tem
AUS 1300 112 534
Other Useful Information
Cleaning and care
WARNING!
Clean the bicycle properly and maintain it in good working condition. The
warranty will not apply in case of corrosion due to lack of maintenance.
• After every ride, wash your bike with soapy water—liquid dish soap is
recommended for its ability to remove grease without damaging the bike. Avoid
using high-pressure washers. Always dry your bike with a soft cloth in order to
avoid rust and corrosion. While carefully drying your entire bike, you will also be
able to inspect all the different parts and detect any potential problems.
• Lubrication is an important part of maintenance of bicycles. The front axle,
middle axle, flywheel, front fork shock absorber pivot and other components
should be scrubbed with an appropriate lubricating oil every six months.
• Check the chain tension after every ride. The correct chain tension is 8036 N.
The bike has a freewheel, so you can check the chain tension by spinning the
pedals backwards. The chain needs to be as tight as possible without creating
friction that will waste energy and wear the chain and cogs prematurely.
Professional bike mechanics are required to carry out the following steps:
• To adjust the rear wheel's position, loosen one side and push the rim between
the chain stays to one side to move the loose end of the axle a short distance
back or forward. Retighten the nut. Loosen the other side and ease the rim in
the other direction so the rear wheel is once again straight in the frame.
• Test again and repeat the process, moving the rear wheel a short distance
forward or back until the tension is in the target zone. You need to test by
spinning the pedals because neither cogwheel will be a perfect circle so the
chain tension will vary as the cranks spin. Once the chain tension is acceptable,
tighten both nuts fully.
• During the whole process please pay attention to cables, do not damage or
loosen any cables.

17
po.org
MODEL: EST-MTB29 PRODUCT CODE: 704513 | MODEL: EST-MTB29M PRODUCT CODE: 704512 10/2021
AFTER SALES SUPPORT info@tem
AUS 1300 112 534
Other Useful Information (Cont.)
Storage
When it is not in use, store the bicycle in a cool, dry place, protected from dust and
high humidity, and out of reach of children.
For prolonged storage we recommend using the original carton for the bike.
Service and repair
WARNING: Replace worn parts! As with all mechanical components, the bicycle
is subjected to wear and high stresses. Different materials and components may
react to wear or stress fatigue in different ways. If the design life of a component
has been exceeded, it may suddenly fail, possibly causing injuries to the rider. Any
form of crack, scratch or change of colouring in highly stressed areas indicates
that the life of the component has been reached and it should be replaced.
WARNING: Replace wheel rims and brake pads!
Danger of wheel failure due to rim and brake pad wear!
Replace the wheel when any part of the rim wear groove is not visible.
Replace the brake pad when any part of the brake pad wear groove is not visible.
Replacement of disc brakes
Check the brakes on your bike regularly. When they need replacing, please take
the bike to a competent bicycle mechanic for replacement.
Spare parts
Our after sales support centre stocks the following spare parts for the bicycle:
Bell Brake lever
Chain Chainwheel set
Derailleur Fork (29")
Freewheel Front hub
Pedal PU leather saddle
Reflectors (F/R wheel, F white, R red) Seat post
Shifter (Shimano) Steel ball bearing headset
Steel sealed ball bearings Stem
Tyre and tube
To purchase a part or book a service, please contact the centre on 1300 112 534

18 po.org
MODEL: EST-MTB29 PRODUCT CODE: 704513 | MODEL: EST-MTB29M PRODUCT CODE: 704512 10/2021
AFTER SALES SUPPORT info@tem
AUS 1300 112 534
Other Useful Information (Cont.)
Compliance
This appliance has been fully tested and meets all requirements as set out by
standard AS 1927.
Technical specifications
Mountain bike
specifications
Large bike Medium bike
Model number EST-MTB29 EST-MTB29M
Maximum rider weight 100 kg 100 kg
Product weight (net) 16 kg 16 kg
Product dimensions
(assembled)
188 x 72 x 100 cm 188 x 72 x 100 cm
Frame Lightweight alloy frame
48 cm MTB
Lightweight alloy frame
43.5 cm MTB
Tyres 29 " x 2.25 " 29 " x 2.25 "
Freewheel Steel cassette
11-36 T, 9 S
Steel cassette
11-36 T, 9 S
Derailleur Shimano right side 9 S Shimano right side 9 S
Chain ½ ” x 3/32 ” 112 L 9 S ½ ” x 3/32 ” 112 L 9 S
Fork Zoom 100 mm travel
lockable suspension
Zoom 100 mm travel
lockable suspension

19
po.org
MODEL: EST-MTB29 PRODUCT CODE: 704513 | MODEL: EST-MTB29M PRODUCT CODE: 704512 10/2021
AFTER SALES SUPPORT info@tem
AUS 1300 112 534
Repair and Refurbished
Goods or Parts Notice
YEAR WARRANTY
1
Unfortunately, from time to time, faulty products are manufactured which need to
be returned to the supplier for repair.
Please be aware that if your product is capable of retaining user-generated data
(such as files stored on a computer hard drive, telephone numbers stored on
a mobile telephone, songs stored on a portable media player, games saved on
a games console or files stored on a USB memory stick) during the process of
repair, some or all of your stored data may be lost. We recommend you save this
data elsewhere prior to sending the product for repair.
You should also be aware that rather than repairing goods, we may replace them with
refurbished goods of the same type or use refurbished parts in the repair process.
Please be assured though, refurbished parts or replacements are only used where
they meet ALDI’s stringent quality specifications.
If at any time you feel your repair is being handled unsatisfactorily, you may
escalate your complaint. Please telephone us on 1300 112 534 or write to us at:
Tempo (Aust) Pty Ltd ABN 70 106 100 252
PO BOX 132, Frenchs Forest NSW 1640, Australia
Email: [email protected]g
Tempo Help Desk: 1300 112 534 (Aust)
(Operating Hours: Mon–Sat 09:00 am to 06:00 pm AEST)
29 " (74 cm) Mountain Bike (Large or Medium)
po.org
MODEL: EST-MTB29 PRODUCT CODE: 704513 | MODEL: EST-MTB29M PRODUCT CODE: 704512 10/2021
AFTER SALES SUPPORT info@tem
AUS 1300 112 534
Warranty returns
Should you for any reason need to return this product for
a warranty claim, make sure to include all accessories with
the product.
Product does not work?
If you encounter problems with this product, or if it fails to
perform to your expectations, make sure to contact our
After Sales Support Centre on 1300 112 534 for advice.
For an electronic copy of this manual, please contact our after sales support centre.
Instruction Manual Revision Index
Version No Issue Date Description
V1.0 21 June 2021 Original (2021) release
V1.1 05 July 2021 Minor changes on pg 8 and 12
Please read the manual
It will help you get the
best out of your product.
Still have questions?
Call after sales support
1300 112 534
Or visit www.tempo.org
This manual suits for next models
1
Table of contents
Other Estate Bicycle manuals

Estate
Estate EST-MTB24G User manual

Estate
Estate EST-EMTB275 User manual

Estate
Estate City ESTC27U1 2023 User manual

Estate
Estate EST-EMTB275 User manual

Estate
Estate EST-EFLDBIKE User manual

Estate
Estate EST-EFLDBIKE1 User manual

Estate
Estate City ESTC27M1 2023 User manual

Estate
Estate FOLD EST-EFLDBIKE User manual

Estate
Estate City ESTC27M User manual

Estate
Estate City ESTC27U User manual


