Estate City ESTC27U1 2023 User manual

INSTRUCTION MANUAL
Electric Bicycle (Unisex)
Model Number ESTC27U1
AUS
AFTER SALES SUPPORT
1300 112 534
tempo.org/support
MODEL: ESTC27U1 PRODUCT CODE: 712191 04/2023

2
Welcome
Congratulations on choosing to buy an ESTATE product.
All products brought to you by ESTATE are manufactured to the highest
standards of performance and safety and, as part of our philosophy of
customer service and satisfaction, are backed by our comprehensive
1Year Warranty.
We hope you will enjoy using your purchase for many years to come.
2AUS
AFTER SALES SUPPORT
1300 112 534
tempo.org/support
MODEL: ESTC27U1 PRODUCT CODE: 712191 04/2023

3
02 Welcome
04 Warranty Details
05 General Safety Instructions
08 Product Overview
09 Getting Started
10 Assembly
16 Battery Charging
18 Instructions
24 FAQs and Troubleshooting Guide
25 Other Useful Information
31 Repair and Refurbished Goods or Parts Notice
Contents
3
AUS
AFTER SALES SUPPORT
1300 112 534
tempo.org/support
MODEL: ESTC27U1 PRODUCT CODE: 712191 04/2023

4
The product is guaranteed to be free from defects in workmanship and
parts for a period of 12 months from the date of purchase. Defects that
occur within this warranty period, under normal use and care, will be
repaired, replaced or refunded at our discretion. The benefits conferred by
this warranty are in addition to all rights and remedies in respect of the
product that the consumer has under the Competition and Consumer Act
2010 and similar state and territory laws.
Our goods come with guarantees that cannot be excluded under the
Australian Consumer Law. You are entitled to a replacement or refund for
a major failure and to compensation for any other reasonably foreseeable
loss or damage. You are also entitled to have the goods repaired or
replaced if the goods fail to be of acceptable quality and the failure does
not amount to a major failure.
Warranty Details
REGISTER YOUR PURCHASE AT www.aldi.com.au/en/about-aldi/product-registration/ TO KEEP UP-TO-DATE WITH IMPORTANT PRODUCT INFORMATION
YEAR WARRANTY
1
4AUS
AFTER SALES SUPPORT
1300 112 534
tempo.org/support
MODEL: ESTC27U1 PRODUCT CODE: 712191 04/2023
Electric Bicycle (Unisex)

5
General Safety Instructions
WARNING: Read and follow all safety warnings before riding!
• Local traffic laws: Some state and local traffic laws may require that your
bicycle be equipped with a warning device, such as a horn or bell and a light,
if the bicycle is to be ridden after dark. When you are riding on the road, make
sure that you are always visible to other vehicles. Please respect the road rules
in all circumstances.
• Protective equipment: Always wear proper protective equipment, such as an
Australian standards-approved helmet, elbow pads, knee pads, long sleeve
shirt, gloves, long pants.
• Wet weather warning: Slow down your speed when riding in rainy and snowy
conditions and in slippery areas. Increase your braking distance to ensure
safety. Use the rear brake lever FIRST, then the front brake lever.
• Kickstand: The kickstand is designed to support the bicycle only, NOT the rider.
• Always double-check your bike before riding it (tighten the handlebars and
stem, check the saddle, wheels and brakes, etc.). We strongly recommend
that significant mechanical repairs are carried out by a skilled bicycle
mechanic.
• Height adjustment: Adjust the seat height and handlebar height appropriately:
the rider must must be able to straddle the bicycle with at least 2.5cm clearance
above the horizontal bar when standing. Please refer to the assembly section for
details.
• Check the tyre pressure: The tyre pressure range of this E-bike is 345–550 kPa
(50–80 psi), which is marked on the tyre. Please ensure that the tyre pressure is
within this range to avoid accidents (1psi = 6.895 kPa).
• Children below 14 years old should not play with the product.
DO NOT LET CHILDREN INFLATE TYRES.Charging, cleaning and
maintenance should not be performed by children without adult supervision.
IMPORTANT SAFETY INSTRUCTIONS
READ CAREFULLY AND KEEP FOR FUTURE REFERENCE
Read this manual thoroughly before first use, even if you are familiar with this type
of product. The safety precautions enclosed herein reduce the risk of injury and
product damage. Keep the manual in a safe place for future reference, along with
the completed warranty card, purchase receipt and carton. If applicable, pass these
instructions on to the next owner of the e-bike.
Always follow basic safety precautions and accident prevention measures
when riding a bike (or e-bike), including the following:
5
AUS
AFTER SALES SUPPORT
1300 112 534
tempo.org/support
MODEL: ESTC27U1 PRODUCT CODE: 712191 04/2023

6
General Safety Instructions (Cont.)
• Recommended torque requirements in Newton metres (N·m) for the following:
(A) Front axle nuts: 15-25 N·m
(B) Back axle nuts: 20-30 N·m
(C) Handlebar clamp nut/bolt: 8-12 N·m
(D) Handlebar stem expander bolt: 30 N·m
(E) Seat pillar clamp: quick release
(F) Brake cable anchor bolt: 1.5-4 N·m
(G) Brake mounting bolt: 8-12 N·m
(H) Seat clamp nuts: 12 N·m
(I) Crank attachment systems: 40-60 N·m
(J) Pedal: 35-40 N·m
• Maximum rider weight: 100 kg (including rear carrier 15 kg loading; excluding
the bicycle weight)
• This bike is intended to be used on urban roads. It is not intended for use on
unpaved ground or for off-road use. Failure to follow these warnings could result
in a fall or accident and permanently and irreversibly damage the condition of
your power-assisted bicycle.
• Night-time operation: We do NOT recommend riding your bike at night. If you
have an emergency that makes it necessary to ride at right, have proper lights
and reflectors. Do NOT ride at night without a headlight, taillight, a white front
reflector, a red rear reflector and yellow wheel reflectors.
• On and off-road operation: Avoid the following hazards: drain grates, potholes,
ruts, soft road edges, gravel and leaves, especially when they are wet.
• Maintenance schedule: We strongly recommend to establish and respect a
periodic maintenance schedule, which will be determined by the frequency and
length of your rides, your style of riding, as well as the terrain on which you most
often ride.
• E-bike maintenance: Before maintenance or cleaning, make sure the e-bike is
disconnected from the charger.
WARNING: Never leave the battery charging without supervision!
• Before first use: The battery is 60% pre-charged. As it is a smart lithium
battery, no special action needs to be taken when first charging. We provide a
dedicated smart charger with a charge protection function.
• Appropriate environment: Do not use the e-bike (battery) in the rain, in a
waterlogged area or in temperatures outside the appropriate temperature range
from -10°C to 50°C. The best temperature range is between 0°C and 40°C, too
cold or too hot temperatures will affect the battery efficiency and life.
6AUS
AFTER SALES SUPPORT
1300 112 534
tempo.org/support
MODEL: ESTC27U1 PRODUCT CODE: 712191 04/2023

7
General Safety Instructions (Cont.)
• Charging the battery: Only charge the battery in a well-ventilated area. Do not
expose the battery to heat or charge it in direct sunlight or in the rain.
• Do not disassemble or modify the battery. Do not connect the (+) and (-)
connections of the battery with a metal object. Do not expose the battery to
liquids. Do not short-circuit the positive (+) and negative (-) battery terminals.
• Disconnect after use: Do not leave the battery charger plugged into the
power outlet while not in use.
• Infrequent use: In the event of non-use, infrequent use or storage, please
recharge the battery at least every month to ensure that it will work properly, and
keep it in a dry and cool environment. Prolonged storage of an empty battery
may damage the battery.
• Do not let the battery run out of power completely, otherwise it will damage
the battery. The best charge-discharge is 20%–80%.
• Battery storage: Do not store or leave the battery near fire. Do not immerse it in
water or acidic liquids. Do not allow it to get wet.
• Battery replacement: If the battery needs to be replaced, please contact our
after sales support centre to purchase a spare battery.
• Battery removal and disposal: The battery must be removed and discarded
before disposal of the bike. Please ensure that the battery is disconnected from
the charger and power supply before removing it from the bike. Dispose of the
battery safely and responsibly after the service life of the product.
WARNING: Handle the battery charger with care!
• Only use the charger supplied with this e-bike to charge the battery.
Do not charge the battery with any other (or universal) charger, doing so will void
the warranty. Do not use this charger to charge any other appliance.
• Indoor charging only: The charger must only be used indoors.
• Power cord: Never pull the external flexible cord of the battery charger to
disconnect the charger. The external flexible cord of the battery charger cannot
be replaced. If the cord is damaged, the charger shall be scrapped.
7
AUS
AFTER SALES SUPPORT
1300 112 534
tempo.org/support
MODEL: ESTC27U1 PRODUCT CODE: 712191 04/2023
8
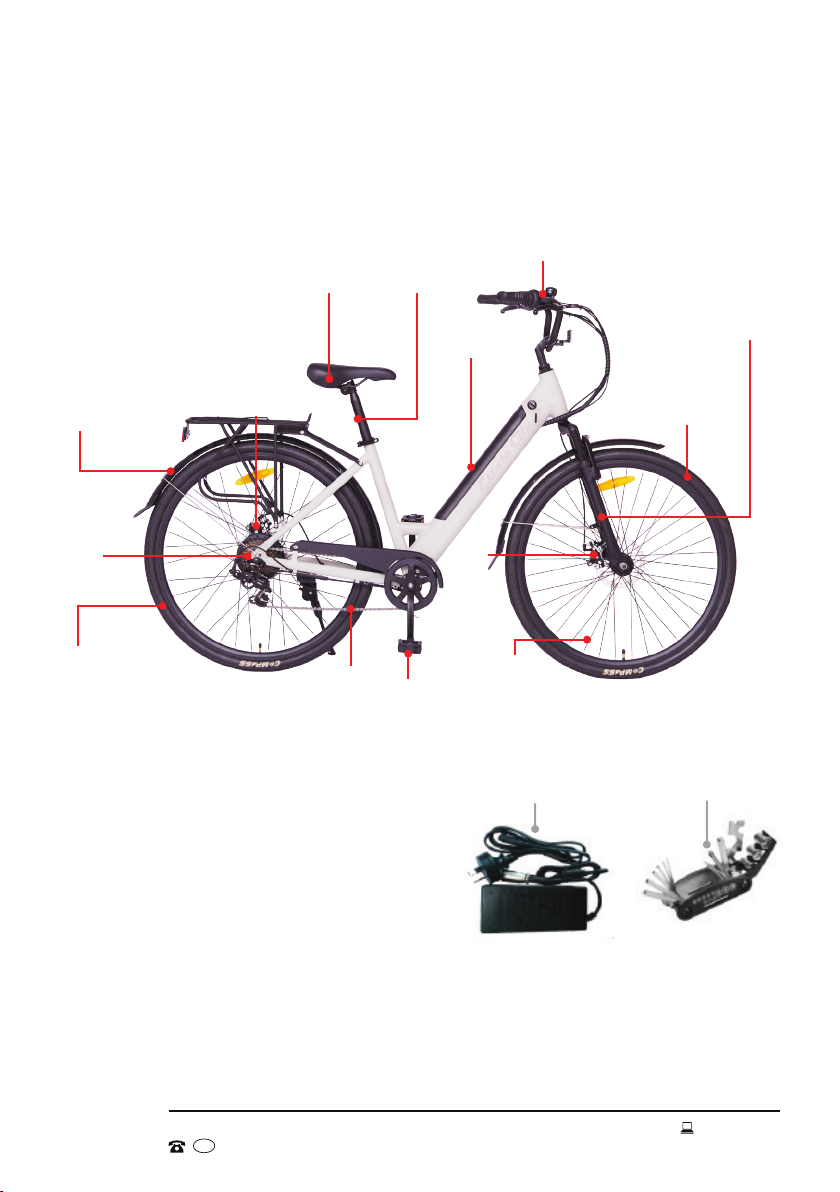
Product Overview
B Other inclusions
Battery charger
Multipurpose tool
C Documentation (not pictured)
Instruction manual
Quick Start Guide
Warranty certificate
Battery
charger
Multipurpose
tool
NOTE: Due to continued product improvement, images and illustrations in this manual
may vary slightly from the product purchased. All images in this manual are for reference
purposes only. Parts are not necessarily pictured to scale. The colour(s) of the bike may
differ from those pictured.
8AUS
AFTER SALES SUPPORT
1300 112 534
tempo.org/support
MODEL: ESTC27U1 PRODUCT CODE: 712191 04/2023
Scope of delivery
AElectric bicycle (unisex)
Saddle Seat post
Fender/
mudguard
Chain
Handlebar with grips
and display
Front
tyre
Rear brake
Fork
Battery
Spokes
Front
brake
Rear
tyre
Motor
Pedal

9
Getting Started
Before first use
• Unpack the e-bike, making sure to remove all parts from the packaging carton.
The carton staples may be sharp, take care that you do not hurt yourself when
reaching into the carton to remove parts.
• Packaging materials: Keep the original packaging materials in a safe place.
It will help prevent any damage if the product needs to be transported in the
future, and you can use it to store the e-bike when it is not in use. In the event
that the carton is to be disposed of, please recycle it where possible.
• Unwrap all parts carefully. If you are using a retractable utility knife or scissors
when unwrapping the parts, take care that you do not scratch the metal parts
of the bike or pierce the tyres. Remove the plastic covers from the front wheel
nuts, base of the fork and stem pillar.
Plastic wrapping can be a suffocation hazard for babies and young children, so
ensure all packaging and protective materials are out of children's reach and
disposed of safely.
Key removal: The e-bike comes with two keys which are attached to the brake
cables. Please ensure you remove the keys and keep them in a safe place, a key
is required for locking the battery in place and unlocking it.
• Assembly requirements: The e-bike comes partially assembled (as pictured)
and requires full assembly by a professional
bicycle mechanic or competent person. The
stem needs to be assembled with an M6 Allen
wrench (35-45 N·m) and the pedals with an
M15 Allen wrench (35-40 N·m). Other torque
requirements for the different part assemblies
are listed on page 6.
A multipurpose tool with other tools required
for assembly is supplied.
• Inspect the cord and plug of the battery charger for damage or wear before
each use. Do not use the charger if it is not working or if its cord is damaged. In
case of damage, please contact our after sales support centre.
• Read all instructions in this manual and make sure you understand all
warnings. To familiarise yourself with all the parts and operating principles of the
e-bike, please refer to the Product Overview and the remaining sections in this
manual. Also pay attention to the safety instructions on the previous pages.
9
AUS
AFTER SALES SUPPORT
1300 112 534
tempo.org/support
MODEL: ESTC27U1 PRODUCT CODE: 712191 04/2023
10
Assembly
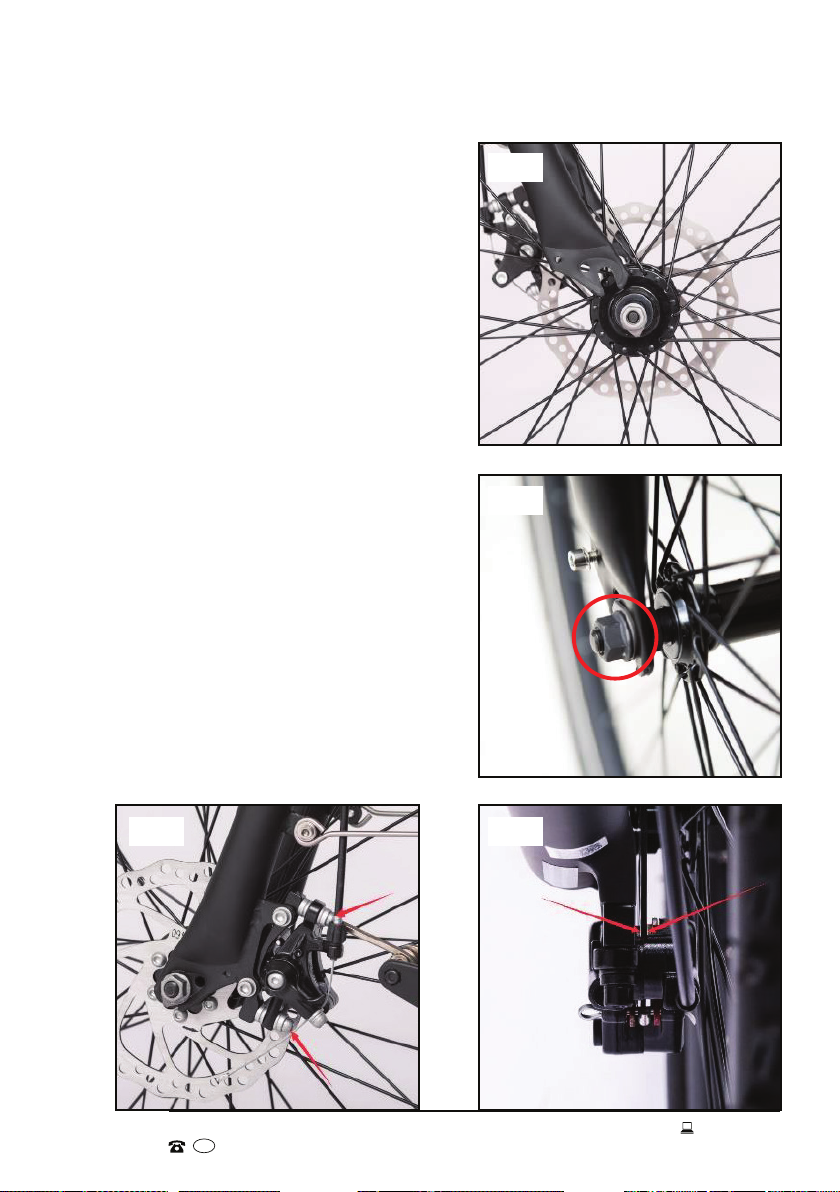
Step 1: front wheel assembly
1. Turn the fork until the fork plate points to
the front of the bicycle.
2. If the brake cable is closed, undo it, then
insert the wheel into the fork (Fig. 1).
3. Install an axle nut to each side of the axle
(Fig. 2).
4. Ensure the brake disc is in the middle
of the brake caliper (Fig. 3). It is very
important that this is positioned correctly,
in order for the front brake to work
properly.
5. If the caliper touches the brake disc when
the wheel moves (see note), slightly loosen
the screws holding the caliper to the frame
of the bike, using the M5 allen key
(Fig. 4). Very gently shift the caliper by
hand until it is centered around the disc
(see previous step). Hold the caliper in
place as you tighten the screws. Double
check that the caliper screws have been
correctly tightened before riding.
NOTE: The front disc brake has been
pre-adjusted; only make alterations to the
caliper's position when the disc brake pad
touches the rotor.
Fig. 1
Fig. 2
Fig. 3Fig. 4
10 AUS
AFTER SALES SUPPORT
1300 112 534
tempo.org/support
MODEL: ESTC27U1 PRODUCT CODE: 712191 04/2023

11
Assembly (Cont.)
Step 2: front fender (mudguard) assembly
1. Attach the fender hanger on the fork crown, using a tool to tighten the screw
from the front (washer against the bike part) (Fig. 7).
2. Adjust the fender position to ensure there is an equal distance between each
fork tube. Tighten the screws at each fork tube (Fig. 8).
NOTE: If the fender is touching the tyre, please loosen the bolt slightly.
6. Tighten the axle nuts by hand. Make sure there is an equal distance between
each fork tube and the wheel (Fig. 5). Then use a wrench and securely tighten
the axle nuts (Fig. 6).
As per the Australian/New Zealand standard, the left brake lever controls the rear
brake and the right brake lever controls the front brake. To achieve the maximum
amount of stopping power, please use both brakes.
Fig. 5 Fig. 6
Fig. 7 Fig. 8
11
AUS
AFTER SALES SUPPORT
1300 112 534
tempo.org/support
MODEL: ESTC27U1 PRODUCT CODE: 712191 04/2023
12
Assembly (Cont.)
WARNING!
Make sure you do not overtighten the stem pillar bolt, which could damage the
handlebar stem pillar assembly and result in possible injury to the rider.
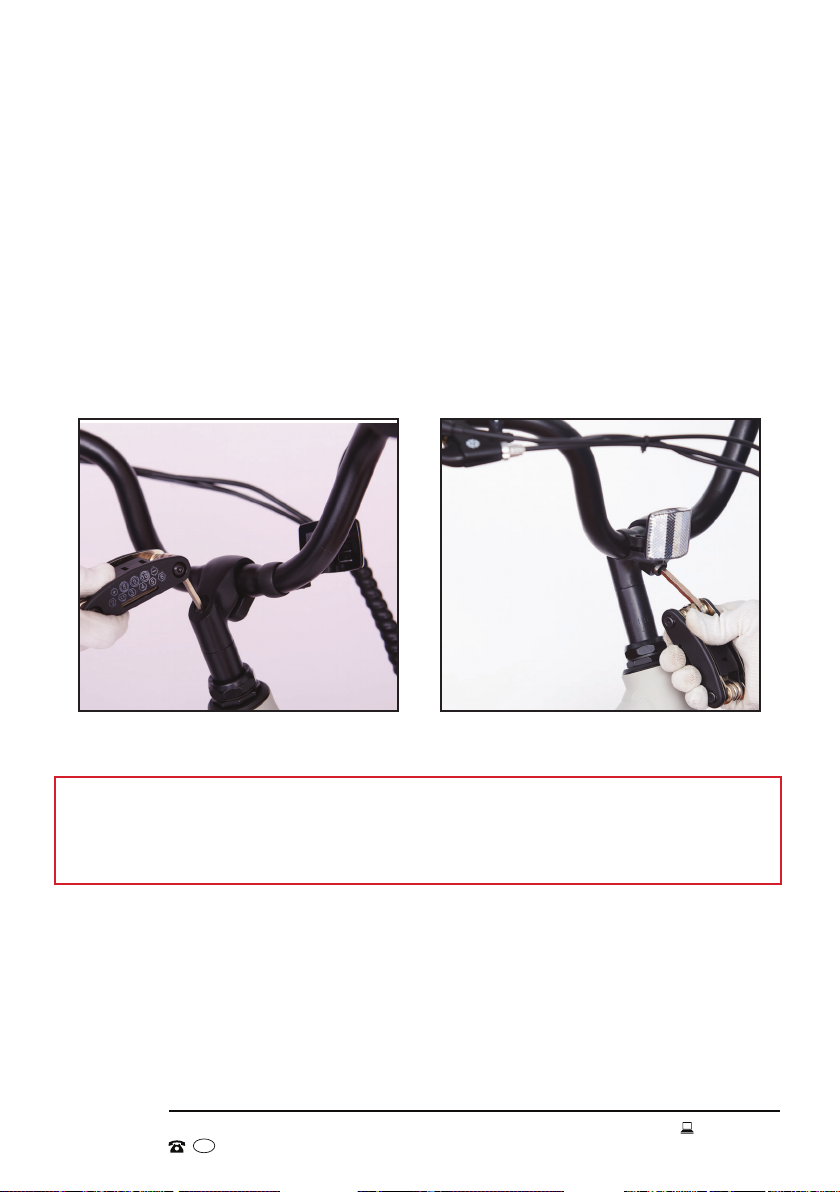
Step 3: stem and handlebar assembly
1. Insert the stem pillar into the fork tube up to the minimum insertion line indicated
on the stem pillar.
2. Face the handlebar stem forward, directly in line with the front wheel. Then tighten
both stem pillar bolts to a torque requirement of or 17–19 N·m (12–15 ft.lb.)
(Fig. 9).
3. The handlebar is semi-assembled on the stem. Loosen the clamp bolts, adjust the
handlebar position, then tighten the clamp bolts to 17–19 N·m (15 ft.lb.) (Fig. 10).
WARNING: If you can move it forward or backward, the clamp bolts are not tight
enough.
Fig. 9 Fig. 10
12 AUS
AFTER SALES SUPPORT
1300 112 534
tempo.org/support
MODEL: ESTC27U1 PRODUCT CODE: 712191 04/2023
13
Assembly (Cont.)
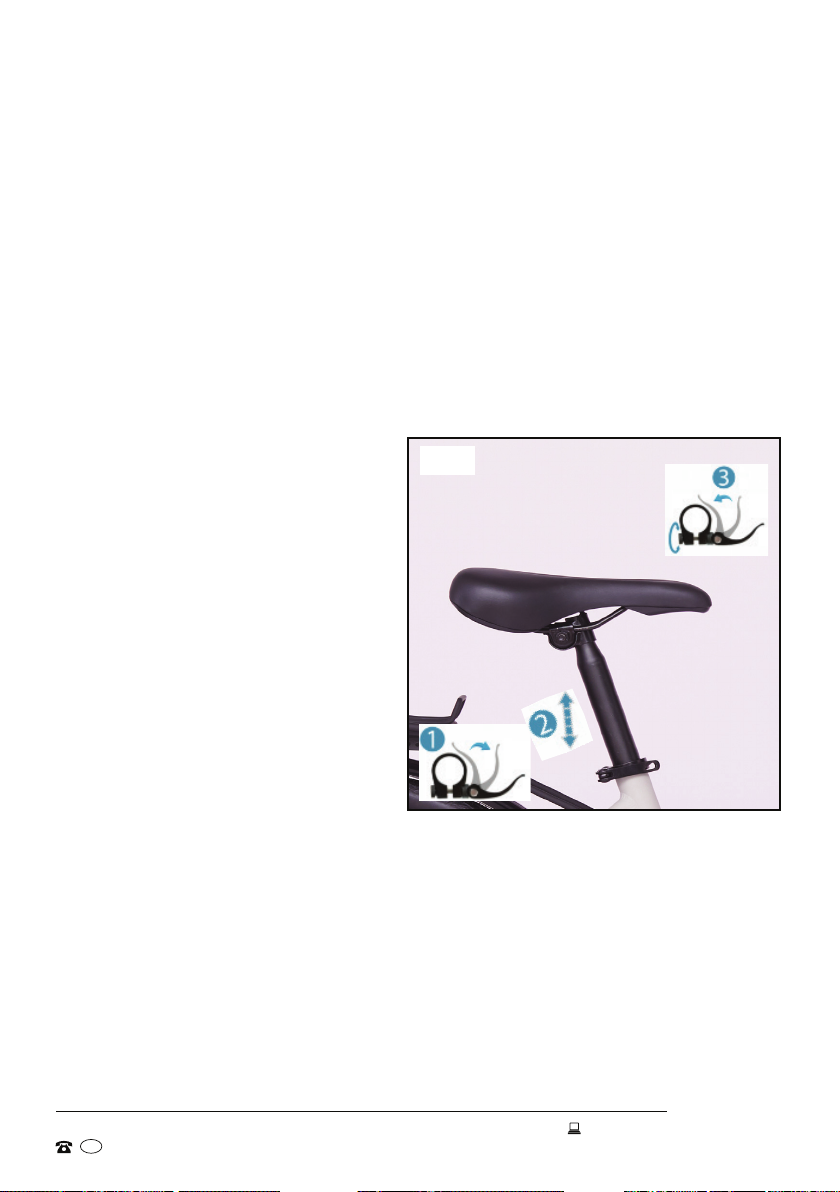
Step 4: saddle assembly
The saddle is pre-assembled to the seat post.
1. Loosen the seat clamp, then insert the seat post into the bicycle frame, making
sure that the minimum insertion mark on the seat post is completely inserted
into the frame and not visible.
2. Tighten the quick release (QR) seat post binder bolt securely at the desired
height. Turning the tension adjustment nut clockwise while keeping the cam
lever from rotating increases the clamping force. Turning it anticlockwise while
keeping the cam lever from rotating reduces the clamping force (Fig. 11). Less
than half a turn of the tension adjustment nut can make the difference between
safe clamping force and unsafe clamping force.
3. Adjust the seat angle so that the
top of the seat is parallel to the
ground or comfortable to the rider.
4. Close the seat clamp.
NOTE: Test the seat to pedal
distance by having the rider sit on
the seat. When the rider’s leg is
slightly bent, the ball of the foot
should rest on the pedal when it is
in its lowest position. If it does not,
adjust the seat height as necessary.
Check for tightness by attempting
to twist the seat. If the seat is loose,
be sure to tighten the clamp nut and
binder bolt nut securely.
Fig. 11
13
AUS
AFTER SALES SUPPORT
1300 112 534
tempo.org/support
MODEL: ESTC27U1 PRODUCT CODE: 712191 04/2023

14
Assembly (Cont.)
Step 5: pedal assembly
1. Look for the letters “R” or “L” stamped on the pedal spindle.
2. Thread the pedal marked “R” into the crank arm on the chain side of the bike.
Turn the pedal spindle in a clockwise direction. Securely tighten the pedal spindle
(Fig. 12).
3. Thread the pedal marked “L” into the crank arm on the left side of the bike.
Turn the pedal spindle in an anticlockwise direction. Securely tighten the pedal
spindle.
Torque requirements: 35-40 N·m (25-30 ft.lb.).
NOTE: Both pedals should be tightened towards the front of the bicycle.
Start each pedal spindle by hand to avoid stripping the threads.
WARNING!
• For safe operation, the pedal spindle must be securely tightened against the
crank arm.
• Always replace damaged pedals, and always wear shoes or sneakers when
riding a bicycle.
Fig. 12
14 AUS
AFTER SALES SUPPORT
1300 112 534
tempo.org/support
MODEL: ESTC27U1 PRODUCT CODE: 712191 04/2023

15
Assembly (Cont.)
Step 6: reflector assembly
Front reflector (white) and bell
1. Remove the clamp screw from the reflector
(or bell) bracket (Fig. 13).
2. Push open the bracket 'loop' and slide it
onto the handlebar. (If there is a sizing insert
included with the bracket, make sure it is
inside the clamp loop before mounting.)
3. Put the reflector (or bell) bracket on an
appropriate position on the handlebar
(Fig. 14).
4. Tighten the clamp screw securely.
CAUTION: Be sure the reflector is in the same
longitudinal plane as the bicycle (horizontal
to the ground). If the reflector is aimed up or
down, oncoming headlights may not reflect
properly in the reflector. If the reflector is not
horizontal to the ground, loosen the clamp
screw and readjust the angle.
Fig. 12Fig. 13
Fig. 14
15
AUS
AFTER SALES SUPPORT
1300 112 534
tempo.org/support
MODEL: ESTC27U1 PRODUCT CODE: 712191 04/2023

16
Battery Charging
Battery
The e-bike comes with a removable lithium battery installed on the down tube of
the bike. Also supplied is a key (and a duplicate), attached to the brake cables,
which you should have removed earlier in the assembly process. The key is
required for locking the battery in place or unlocking it for removal of the battery.
1. You can charge the battery while it is attached to or removed from the e-bike.
CAUTION: If you want to charge the battery while it is attached to the bike,
make sure the bike is switched off.
2. To remove the battery, turn the key to the “UNLOCK” position and the battery
will be ejected (Fig. 15).
3. To attach the battery, place it in its space on the down tube and press firmly until
it clicks securely in place. Then turn the key to the “LOCK” position to lock the
battery. (When the key is in this position, you can pull it out.)
4. To show the battery status, press the button on the battery. The LED light will
illuminate to show the battery status (Fig. 16):
Blue: Approximately 75%–100% battery charge
Green: Approximately 25%–75% battery charge
Red: Approximately 0%–25% battery charge
Red flashing: Empty battery, charge immediately
Fig. 15 Fig. 16
16 AUS
AFTER SALES SUPPORT
1300 112 534
tempo.org/support
MODEL: ESTC27U1 PRODUCT CODE: 712191 04/2023

17
Charger
The e-bike comes with a smart charger for easy charging.
1. Insert the AC plug into an appropriate electrical outlet.
2. Open the battery cover and insert the DC connector into the battery (Fig. 17).
3. When the battery is charging, the charging light illuminates red (Fig. 19).
4. When the battery is about 80% charged, the charging light turns green. At this
stage, please charge it for about one more hour, then it will be fully (100%)
charged and the charger will automatically stop charging (Fig. 19).
A full charge (from 0% charge to 100%) takes approximately 6 hours.
Battery Charging (Cont.)
WARNING!
• Only use the charger supplied with this e-bike to charge the battery.
Do not charge the battery with any other (or universal) charger, doing so will
void the warranty. Do not use this charger to charge any other appliance.
• Do not leave the battery charging unsupervised.
Fig. 17
Fig. 18
17
AUS
AFTER SALES SUPPORT
1300 112 534
tempo.org/support
MODEL: ESTC27U1 PRODUCT CODE: 712191 04/2023

18
Instructions
The e-bike's control panel, located on the left side of the handlebar, lets you turn
on the bike for electric power, select riding modes and check the battery status.
Fig. 19 Battery
status
Pedal assis-
tance level
PLUS / increase
MINUS / decrease
POWER
Bluetooth indicator
USB indicator
6km/h EV mode
indicator
USB port
Battery status
Shows the battery status from full to empty.
The last LED will flash when the battery needs to be charged.
Pedal assistance level
Shows the pedal assistance level from 1 to 5.
1 (low)..................1 LED light .............. up to 10 km/h
2 (medium low)....2 LED lights............. up to 13 km/h
3 (medium) ..........3 LED lights............. up to 17 km/h
4 (medium high) ..3 LED lights............. up to 21 km/h
5 (high).................5 LED lights............. up to 25 km/h
BT indicator
Shows that a device is connected wirelessly via Bluetooth technology when
using the Zippo Cycling app. When no device is connected, it will flash slowly.
USB charging indicator
Shows when the USB port is used for charging.
CAUTION: When this LED flashes while a device is connected for charging,
disconnect the device immediately to avoid overloading, otherwise you may risk
damaging the display or USB device.
NOTE: Please also refer to the relevant information on the opposite page.
6km/h EV mode
Shows when 6 km/h EV mode is in use.
18 AUS
AFTER SALES SUPPORT
1300 112 534
tempo.org/support
MODEL: ESTC27U1 PRODUCT CODE: 712191 04/2023

19
Operation
Turning on/off
• Long-press the POWER [ ] button to turn on the e-bike (display). The display
will show the approximate battery status and pedal assistance modes. When the
LED is switched on, the integrated USB port will be powered.
• Long-press the POWER [ ] button to turn off the e-bike (display). It will turn off
automatically if there is no operation for 10 minutes since switching on.
Electric-assisted mode (pedal assistance)
Power assistance is triggered when you pedal forward and it stops when you stop
pedalling. In other words, power assistance happens as long as you pedal. You do
not need to pedal hard, just apply a light force to the pedals continuously to maintain
the current flow. When you apply one of the brakes, power assistance will stop
automatically, allowing the e-bike to slow down and stop. Power assistance will turn
itself off when the e-bike has reached the maximum speed of 25 km/h.
You must turn on the battery to use the e-bike in electric-assisted mode. Once the
e-bike is powered on, you can use the PLUS / MINUS [ / ] buttons to change
the pedal assistance level from the five levels available. The indicators will change
with the level selected.
• Short-press the PLUS [ ] button to shift up.
• Short-press the MINUS [ ] button to shift down.
Using 6km/h EV mode
Once the e-bike is powered on, you can switch to 6 km/h EV mode to gain initial
speed before riding the e-bike, or for assistance when pushing (walking along with)
the bike.
• Press and hold the PLUS [ ] button to enter 6 km/h EV mode. The e-bike will
start with a speed of 6 km/h.
• Release the PLUS [ ] button to exit 6 km/h EV mode.
USB charging
The display must be turned OFF when inserting a USB cable. Otherwise the display
may turn off automatically to prevent a power surge. Depending on the type of USB
cable you are using, the charging current may be limited to below 140 mA, in which
case the USB indicator will not illuminate on the display; it will still charge, but not
indicate that it is charging. If the charging current is higher than 300 mA, the display
will turn off automatically.
NOTE: The USB port has a maximum output current of 300 mA. We therefore
recommend you only use it for emergency charging of your device.
Instructions (Cont.)
19
AUS
AFTER SALES SUPPORT
1300 112 534
tempo.org/support
MODEL: ESTC27U1 PRODUCT CODE: 712191 04/2023

20
Instructions (Cont.)
Zippo Cycling app
Installing the app
You can install an app on your mobile device that lets you connect to your e-bike
via Bluetooth®wireless technology.
• To download and install the app for an iPhone, go to the Apple App Store and
search for the Zippo Cycling app.
• To download and install the app for an Android phone, go to the Google Play
Store and search for the Zippo Cycling app.
NOTE: This app is supported by Android operating system 7.0 and above
only. As there are many different brands and devices on the market using an
Android operating system, the connection time may vary. If you experience a
delay when trying to connect, please exit and try again.
NOTE: The Bluetooth®word mark and logos are registered trademarks owned by
Bluetooth SIG, Inc., and any use of such marks by Hands (IP) Holdings Pty Ltd
is under licence. Other trademarks and trade names are those of their respective
owners.
WARNING!
• With regard to mobile phone use, e-bike riders have to follow the same rules
as motorists.
• Do not use the app while riding the e-bike, only use it to check riding speed,
distance travelled, battery power, etc.
• Your mobile phone must be in a cradle (not supplied), fixed to the bike for
hands-free use.
Pedal speed changing
The e-bike is equipped with a Shimano 7-speed system
with the shifter located at the right side of the handlebar.
• Turn the shifter to get a different tooth ratio in order to
change the pedal speed (Fig. 20).
Fig. 20
20 AUS
AFTER SALES SUPPORT
1300 112 534
tempo.org/support
MODEL: ESTC27U1 PRODUCT CODE: 712191 04/2023
This manual suits for next models
1
Table of contents
Other Estate Bicycle manuals

Estate
Estate City ESTC27U User manual

Estate
Estate EST-EMTB275 User manual

Estate
Estate EST-MTB29 User manual

Estate
Estate EST-EFLDBIKE User manual

Estate
Estate EST-MTB24G User manual

Estate
Estate City ESTC27M1 2023 User manual

Estate
Estate FOLD EST-EFLDBIKE User manual

Estate
Estate EST-EMTB275 User manual

Estate
Estate City ESTC27M User manual

Estate
Estate EST-EFLDBIKE1 User manual


