ESTeem 195H User manual

ESTeem User’s Manual
Models 195M-195H-195C
Manual Revision 2.3
October 2017
ESTeem Industrial Wireless Solutions

Electronic Systems Technology, Inc.
Dba ESTeem Wireless Modems
Building B1
415 N. Quay Street
Kennewick, WA 99336
Phone: 509-735-9092
Fax: 509-783-5475
E-mail: m[email protected]
Web Site: www.esteem.com
Copyright© 2017 by Electronic Systems Technology, Inc.
All rights reserved. Printed in the United States of America. No part of this publication may be reproduced, stored
in a retrieval system, or transmitted, in any form or by any means, electronic, mechanical, photocopying, recording,
or otherwise, without the prior written permission of Electronic Systems Technology.
Author:
Date:
Name:
Eric P. Marske
Title:
Product Support Manager
Approved by:
Date:
Name:
Mike Eller
Title:
President

PRODUCT WARRANTY
ESTeem Industrial Wireless Solutions Specifications subject to change without notice
415 North Quay Street •Kennewick, WA 99336 www.esteem.com
Phone (509) 735-9092 •Fax (509) 783-5475 Revised: 10 Oct 2017
Electronic Systems Technology, Inc. dba ESTeem Wireless Modems, (hereinafter ESTeem) expressly warrants its products as free
of manufacturing defects for a period of one year from the date of sale to first user/customer. THERE ARE NO OTHER
WARRANTIES, EXPRESS OR IMPLIED AND THERE IS EXPRESSLY EXCLUDED ALL WARRANTIES OF MERCHANTABILITY
OR FITNESS FOR A PARTICULAR PURPOSE. NO OTHERWARRANTY GIVEN BY ANY EMPLOYEE, AGENT, DISTRIBUTOR
OR OTHER PERSON WITH RESPECT TO THE PRODUCT SHALL BE BINDING ON ESTEEM.
LIMITATION OF LIABILITY:
ESTeem's liability shall be limited to refunding of purchase price, repair or replacement of product. IN NO EVENT SHALL ESTEEM
HAVE LIABILITY FOR CONSEQUENTIAL, INCIDENTAL, SPECIAL OR EXEMPLARY DAMAGES CAUSED DIRECTLY OR
INDIRECTLY BY THE PRODUCT, INCLUDING BUT NOT LIMITED TO ANY INTERRUPTION OF SERVICES, LOSS OF
BUSINESS OR ANTICIPATORY PROFITS. IN NO EVENT SHALL ESTEEM BE LIABLE FOR ANY DAMAGES WHATSOEVER
IN EXCESS OF THE PURCHASE PRICE OF THE PRODUCT.
In the event that a unit or part requires replacement or factory servicing, the following conditions apply:
a) Customer must obtain from ESTeem an authorized RMA (Return Materials Authorization) Number before shipment of
product or parts to ESTeem for any reason;
b) If the whole unit is shipped, it must be in its original carton and shipping components, or a carton and shipping
components supplied by ESTeem, or it parts only are shipped, they must be packaged and cushioned so as to prevent
damage in transit and shipped freight prepaid;
PRODUCT WILL BE CONSIDERED OUT OF WARRANTY IF:
a) If the product is damaged due to improper or abnormal use, abuse, mishandling, accident or improper maintenance or
failure to follow operating instruction;
b) If the product is defective as a result of sand, dirt, or water damage;
c) If any factory-sealed enclosure has been opened or shows evidence of an attempt to be opened;
d) If defects or damage are caused by the use of unauthorized parts or unauthorized service;
e) If the product has had its serial numbers altered or removed.
Warranty repair form must be accompanied by proof of user's purchase of unit. Product must be shipped to the manufacturer at the
following address:
ESTeem Wireless Modems
415 North Quay Street
Kennewick, Washington USA 99336
ADDITIONAL SERVICE:
If ESTeem releases an improvement update to firmware internal to the ESTeem unit during the 90-day period after the unit was
purchased by the first user/customer, ESTeem will update the applicable unit with the revised version at no charge other than for
UPS handling and shipping to and from your location to the ESTeem factory. Return of any such item must be accompanied with
proof of purchase.

TABLEOFCONTENTS
Revised: 15 Feb 2017 Page 1 ESTeem Models 195CMH
CHAPTER 1 – Introduction
BeforeYouBegin1‐1
Model195C/M/HOverview1‐1
SerialApplications ‐‐‐‐‐‐‐‐‐‐‐‐‐‐‐‐‐‐‐‐‐‐‐‐‐‐‐‐‐‐‐‐‐‐‐‐‐‐‐‐‐‐‐‐‐ 1‐1
EthernetApplications ‐‐‐‐‐‐‐‐‐‐‐‐‐‐‐‐‐‐‐‐‐‐‐‐‐‐‐‐‐‐‐‐‐‐‐‐‐‐‐‐‐‐‐‐‐ 1‐2
SensorApplications ‐‐‐‐‐‐‐‐‐‐‐‐‐‐‐‐‐‐‐‐‐‐‐‐‐‐‐‐‐‐‐‐‐‐‐‐‐‐‐‐‐‐‐‐‐ 1‐2
LegacyModel192Applications ‐‐‐‐‐‐‐‐‐‐‐‐‐‐‐‐‐‐‐‐‐‐‐‐‐‐‐‐‐‐‐‐‐‐‐‐‐‐‐‐‐‐‐‐‐ 1‐2
CHAPTER2–StartingOut
ThreeConfigurationPhases2‐1
Model195C/M/HHardwareConfiguration2‐2
SoftwareConfiguration2‐3
Model195C/M/HFrontPanel2‐4
CHAPTER3–ExampleApplications
ModesofOperationDescriptionandExamples 3‐1
TransparentPointtoPoint ‐‐‐‐‐‐‐‐‐‐‐‐‐‐‐‐‐‐‐‐‐‐‐‐‐‐‐‐‐‐‐‐‐‐‐‐‐‐‐‐‐‐‐‐‐ 3‐1
TransparentMultipoint ‐‐‐‐‐‐‐‐‐‐‐‐‐‐‐‐‐‐‐‐‐‐‐‐‐‐‐‐‐‐‐‐‐‐‐‐‐‐‐‐‐‐‐‐‐ 3‐3
PLCEmulations ‐‐‐‐‐‐‐‐‐‐‐‐‐‐‐‐‐‐‐‐‐‐‐‐‐‐‐‐‐‐‐‐‐‐‐‐‐‐‐‐‐‐‐‐‐ 3‐4
ProgrammingExamples3‐5
UsingModel195C/M/HConfigurationUtility ‐‐‐‐‐‐‐‐‐‐‐‐‐‐‐‐‐‐‐‐‐‐‐‐‐‐‐‐‐‐‐‐‐‐‐‐‐‐‐‐‐‐‐‐‐ 3‐5
Example1–TransparentPointtoPoint ‐‐‐‐‐‐‐‐‐‐‐‐‐‐‐‐‐‐‐‐‐‐‐‐‐‐‐‐‐‐‐‐‐‐‐‐‐‐‐‐‐‐‐‐‐ 3‐6
Example2–TransparentPointtoPointwithRepeater ‐‐‐‐‐‐‐‐‐‐‐‐‐‐‐‐‐‐‐‐‐‐‐‐‐‐‐‐‐‐‐‐‐‐‐‐‐‐‐‐‐‐‐‐‐ 3‐7
Example3–TransparentMultipoint ‐‐‐‐‐‐‐‐‐‐‐‐‐‐‐‐‐‐‐‐‐‐‐‐‐‐‐‐‐‐‐‐‐‐‐‐‐‐‐‐‐‐‐‐‐ 3‐8
Example4–PLCEmulationMode ‐‐‐‐‐‐‐‐‐‐‐‐‐‐‐‐‐‐‐‐‐‐‐‐‐‐‐‐‐‐‐‐‐‐‐‐‐‐‐‐‐‐‐‐‐ 3‐9
CHAPTER4–RepeatingFeatures
ConfiguringRouteandAppendTables ‐‐‐‐‐‐‐‐‐‐‐‐‐‐‐‐‐‐‐‐‐‐‐‐‐‐‐‐‐‐‐‐‐‐‐‐‐‐‐‐‐‐‐‐‐ 4‐1
ReadingRouteandAppendTables ‐‐‐‐‐‐‐‐‐‐‐‐‐‐‐‐‐‐‐‐‐‐‐‐‐‐‐‐‐‐‐‐‐‐‐‐‐‐‐‐‐‐‐‐‐ 4‐3
ClearingRouteandAppendTables ‐‐‐‐‐‐‐‐‐‐‐‐‐‐‐‐‐‐‐‐‐‐‐‐‐‐‐‐‐‐‐‐‐‐‐‐‐‐‐‐‐‐‐‐‐ 4‐3
CHAPTER5–EthernetApplications
ProgrammingThroughEthernetPort ‐‐‐‐‐‐‐‐‐‐‐‐‐‐‐‐‐‐‐‐‐‐‐‐‐‐‐‐‐‐‐‐‐‐‐‐‐‐‐‐‐‐‐‐‐ 5‐1
EthernetBridgeMode ‐‐‐‐‐‐‐‐‐‐‐‐‐‐‐‐‐‐‐‐‐‐‐‐‐‐‐‐‐‐‐‐‐‐‐‐‐‐‐‐‐‐‐‐‐ 5‐2
IPAddressRoutingConfiguration ‐‐‐‐‐‐‐‐‐‐‐‐‐‐‐‐‐‐‐‐‐‐‐‐‐‐‐‐‐‐‐‐‐‐‐‐‐‐‐‐‐‐‐‐‐ 5‐3
UsingEthernetPortasSDI ‐‐‐‐‐‐‐‐‐‐‐‐‐‐‐‐‐‐‐‐‐‐‐‐‐‐‐‐‐‐‐‐‐‐‐‐‐‐‐‐‐‐‐‐‐ 5‐7

TABLEOFCONTENTS
Revised: 15 Feb 2017 Page 2 ESTeem Models 195CMH
CHAPTER6–UtilitiesandFeatures
Model195C/M/HConfigurationUtility6‐1
ConfigurationTab ‐‐‐‐‐‐‐‐‐‐‐‐‐‐‐‐‐‐‐‐‐‐‐‐‐‐‐‐‐‐‐‐‐‐‐‐‐‐‐‐‐‐‐‐‐ 6‐1
ReadModemConfiguration ‐‐‐‐‐‐‐‐‐‐‐‐‐‐‐‐‐‐‐‐‐‐‐‐‐‐‐‐‐‐‐‐‐‐‐‐‐‐‐‐‐‐‐‐‐ 6‐3
WriteModemConfiguration ‐‐‐‐‐‐‐‐‐‐‐‐‐‐‐‐‐‐‐‐‐‐‐‐‐‐‐‐‐‐‐‐‐‐‐‐‐‐‐‐‐‐‐‐‐ 6‐4
ResetModem ‐‐‐‐‐‐‐‐‐‐‐‐‐‐‐‐‐‐‐‐‐‐‐‐‐‐‐‐‐‐‐‐‐‐‐‐‐‐‐‐‐‐‐‐‐ 6‐4
FactoryDefaults ‐‐‐‐‐‐‐‐‐‐‐‐‐‐‐‐‐‐‐‐‐‐‐‐‐‐‐‐‐‐‐‐‐‐‐‐‐‐‐‐‐‐‐‐‐ 6‐4
ModbusMonitoring6‐4
ReadingReceiveSignalStrength(RSSI) ‐‐‐‐‐‐‐‐‐‐‐‐‐‐‐‐‐‐‐‐‐‐‐‐‐‐‐‐‐‐‐‐‐‐‐‐‐‐‐‐‐‐‐‐‐ 6‐4
ModbusTCPTables ‐‐‐‐‐‐‐‐‐‐‐‐‐‐‐‐‐‐‐‐‐‐‐‐‐‐‐‐‐‐‐‐‐‐‐‐‐‐‐‐‐‐‐‐‐ 6‐4
SaveandLoadConfigurationFile6‐5
UpdateFirmware6‐7
ProgrammingConsole6‐7
Diagnostics6‐7
SpectrumAnalyzer6‐8
MURSFrequencyApplications6‐8
CHAPTER7–AntennaSetup
CoaxCables7‐1
Weatherproofing ‐‐‐‐‐‐‐‐‐‐‐‐‐‐‐‐‐‐‐‐‐‐‐‐‐‐‐‐‐‐‐‐‐‐‐‐‐‐‐‐‐‐‐‐‐ 7‐2
Grounding ‐‐‐‐‐‐‐‐‐‐‐‐‐‐‐‐‐‐‐‐‐‐‐‐‐‐‐‐‐‐‐‐‐‐‐‐‐‐‐‐‐‐‐‐‐ 7‐2
SWRTesting ‐‐‐‐‐‐‐‐‐‐‐‐‐‐‐‐‐‐‐‐‐‐‐‐‐‐‐‐‐‐‐‐‐‐‐‐‐‐‐‐‐‐‐‐‐ 7‐2
ExampleAntennaConfigurations7‐3
Model195CCabinetMount ‐‐‐‐‐‐‐‐‐‐‐‐‐‐‐‐‐‐‐‐‐‐‐‐‐‐‐‐‐‐‐‐‐‐‐‐‐‐‐‐‐‐‐‐‐ 7‐3
Model195CPoleMount ‐‐‐‐‐‐‐‐‐‐‐‐‐‐‐‐‐‐‐‐‐‐‐‐‐‐‐‐‐‐‐‐‐‐‐‐‐‐‐‐‐‐‐‐‐ 7‐4
Model195MCabinetMount ‐‐‐‐‐‐‐‐‐‐‐‐‐‐‐‐‐‐‐‐‐‐‐‐‐‐‐‐‐‐‐‐‐‐‐‐‐‐‐‐‐‐‐‐‐ 7‐5
Model195MPoleMount ‐‐‐‐‐‐‐‐‐‐‐‐‐‐‐‐‐‐‐‐‐‐‐‐‐‐‐‐‐‐‐‐‐‐‐‐‐‐‐‐‐‐‐‐‐ 7‐6
APPENDIXA–SoftwareCommands
APPENDIXB–InterfacePorts
Model195C/M/HFrontPanelDiagram ‐‐‐‐‐‐‐‐‐‐‐‐‐‐‐‐‐‐‐‐‐‐‐‐‐‐‐‐‐‐‐‐‐‐‐‐‐‐‐‐‐‐‐‐‐ B‐1
EthernetPort ‐‐‐‐‐‐‐‐‐‐‐‐‐‐‐‐‐‐‐‐‐‐‐‐‐‐‐‐‐‐‐‐‐‐‐‐‐‐‐‐‐‐‐‐‐ B‐2
RS‐232Ports ‐‐‐‐‐‐‐‐‐‐‐‐‐‐‐‐‐‐‐‐‐‐‐‐‐‐‐‐‐‐‐‐‐‐‐‐‐‐‐‐‐‐‐‐‐ B‐2
RS‐485andRS‐422Ports ‐‐‐‐‐‐‐‐‐‐‐‐‐‐‐‐‐‐‐‐‐‐‐‐‐‐‐‐‐‐‐‐‐‐‐‐‐‐‐‐‐‐‐‐‐ B‐3
4/20mASensors ‐‐‐‐‐‐‐‐‐‐‐‐‐‐‐‐‐‐‐‐‐‐‐‐‐‐‐‐‐‐‐‐‐‐‐‐‐‐‐‐‐‐‐‐‐ B‐3
APPENDIXC–Model192Integration
APPENDIXD–FCC/DOCInformation
APPENDIXE–Security
Enable256‐bitAESEncryption ‐‐‐‐‐‐‐‐‐‐‐‐‐‐‐‐‐‐‐‐‐‐‐‐‐‐‐‐‐‐‐‐‐‐‐‐‐‐‐‐‐‐‐‐‐ E‐1

TABLEOFCONTENTS
Revised: 15 Feb 2017 Page 3 ESTeem Models 195CMH
APPENDIXF–195CSpecifications
APPENDIXG–195MSpecifications
APPENDIXH–195HSpecifications

CHAPTER1
INTRODUCTION
Revised: 15 Feb 2017 1-1 ESTeem Models 195MHC
BeforeYouBegin
ThankyouandcongratulationsonyourpurchaseoftheESTeemModel195M(150‐
174MHz),195H(217‐220MHz)or195C(450‐470MHz)WirelessRadioModem!
Thismanualwaswrittentohelpboththefirsttimeandadvanceduserofthe
195M/H/Ctoconfigurethewirelessmodemforyourapplication.
TheESTeem195M/H/CwirelessmodemsareprogrammedthroughtheirEthernet
interfaceforbothserialandEthernetapplications.Tokeepthemanualusably
short,manyoftheapplicationdescriptionsandprogrammingdetailsassumethe
userhasagoodworkingknowledgeofthefollowingnetworkconcepts:
GeneralEthernetnetworkingandtheconfigurationofLANtopologies
CommonEthernetterminologyandacronyms
TCP/IPnetworkprotocolstructureandhowtoconfigureTCP/IPnetworks
andsubnets
HowtoidentifyandsettheTCP/IPaddressonyourcomputer
Haveadministratorprivilegestothecomputerandnetworkyouare
configuring
YoumustbefamiliarwithusingwebbrowsersoftwaresuchasInternetExplorer,ChromeorFirefox
Ifyouareunfamiliarwithanyoftheabovenetworkingconcepts,youmayneedtocontactyournetworkadministratorfor
assistance.
Model195M/H/COverview
TheESTeemModel195M/H/Carewirelessmodemtransceiversthatcan
beusedtobuildmanytypesofWirelessLocalAreaNetworks(WLAN).The
ESTeem195M/H/Cserieshavemultipleserial(RS‐232,RS‐422andRS‐485),
Ethernetand4/20mAsensorinterfaces.TheModel195M/H/Ccanbe
configuredformultiplemodesofoperationdependingupontheneedsof
thewirelessandwirednetwork.Thefollowinginterfaceconfigurationsare
providedasanoverviewofthebasicnetworktypes,asallpossiblenetwork
configurationscannotbelisted.Forfurtherhelpinselectingthecorrect
networktype,pleaserefertoChapter3ofthisUser’sManualorcall
CustomerSupportat509‐735‐9092.
SerialApplications
AModel195M/H/Ccanbeconfiguredforpoint‐to‐point,multipointorPLC
emulationsthroughsoftwareconfigurationchanges.Thefollowingare
briefdescriptionsoftheSerialDeviceInterface(SDI)configurationmodes.
Fordetaileddescriptionsandsuggestedapplicationsforeachmode,please
refertoChapter3.
RS‐232–TheESTeem195M/H/Chastwo(2)RS‐232dataports.OneRS‐232port(Port4)isavailableforusewhentheESTeem
195M/H/Cisremotepolemounted(Figure2),butonlysupportsthebasicthreewire(Transmit,ReceiveandGround)connection
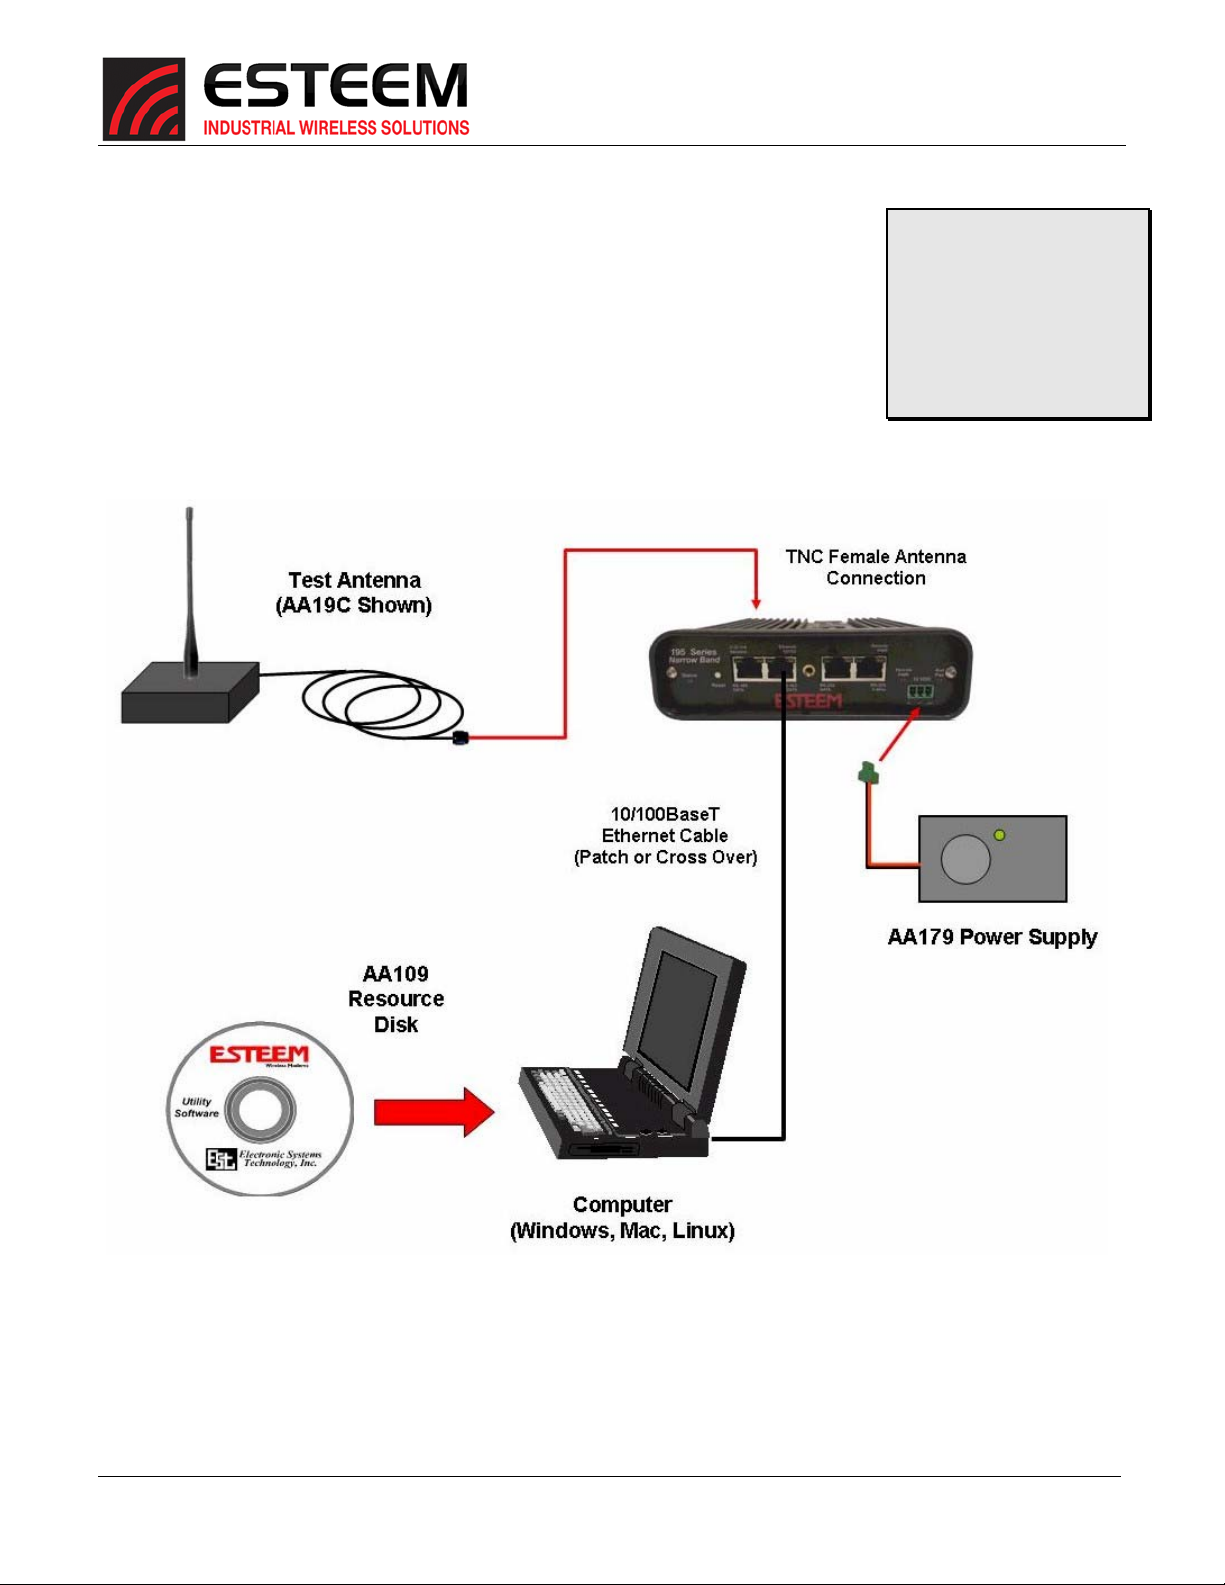
Figure1:ESTeemModel195M/H/CSeries
ThroughoutthisUser’sManualare
“TechnicalTips”inboxeslikethisthathave
beenaddedtohelpanswerthemost
commonlyaskedquestions.
Figure2–PoleMountConfiguration

CHAPTER1
INTRODUCTION
Revised: 15 Feb 2017 1-2 ESTeem Models 195MHC
withoutanyhandshaking.ThesecondRS‐232port(Port3)hasfullhardwarehandshakingthroughtherequesttosend(RTS)and
cleartosend(CTS)lines.BothRS‐232portsaresoftwareconfigurablefrom2,400to115,000bps.
RS‐422–TheESTeem195M/H/ChasasingleRS‐422dataport(Port2).TheRS‐422dataportissharedonthefrontpanelwiththe
10/100MbpsEthernetinterface.TheRS‐422interfaceistypicallyusedforlongdistancesto4,000feetatbaudsratesoftware
configurablefrom2,400to115,000bps.
RS‐485–TheESTeemshaveasingle,two‐wireRS‐485dataport(Port1).TheRS‐485dataportissharedonthefrontpanelwith
the4/20mAsensors.TheRS‐485interfaceistypicallyusedforlongdistancesto4,000feetatbaudratessoftwareconfigurable
from2,400to115,000bps.
EthernetApplications
TheESTeem195M/H/Chasa10/100MbpsEthernetinterface(Port2)thatisusedasbothadataportandtheprimary
programmingport.WhentheEthernetportisusedasadataporttherearetwomodesofoperation.Theprimaryusewillbeas
aslowspeed(12.5Kbps)EthernetbridgetoremotelocationstogatherdatafromremoteEthernetdevices.Thesecondarymode
ofoperationistoconfiguretheEthernetportasaTCPorUDPSocketandwritecustomsoftwareapplicationstoaccessthedata
port.EachofthesemodesofoperationaredescribedindetailinChapter5.
SensorApplications
TheESTeem195Cand195Mhavefour(4)4/20mAsensorinputs.Thesensorinputscanbereadoutofthe195M/H/Cthough
theirModbusTCPaddress,asoftwarecommandortheModel195M/H/Cconfigurationutility.Forcompletedetailsonthe
configurationandoperationofthesensorinput,pleaserefertoAppendixB–InterfacePorts.
Legacy‐Model192Applications
TheESTeem195CcanbeintegratedwithourlegacyESTeemModel192CorModel192CHP,whilethe195Mcanbeintegrated
withModels192Mor192MHPnetworks.Theprocedureforintegratingthenew195Cor195MinanexistingModel192network
canbefoundinAppendixCofthisUser’sManual.
TobeginsetupofyourwirelessEthernetnetwork,continuetoChapter2‐StaringOutofthisUser’sManual.

CHAPTER2
STARTINGOUT
Revised: 15 Feb 2017 2-1 ESTeem Models 195MHC
Overview
TherearethreemainphasestopreparetheESTeem195M,195Hor195Cforoperationinawirelessnetwork:
Phase1‐DeterminethecorrectmodeofoperationfortheESTeeminthewirelessnetwork.TheESTeem195M/H/Chave
multiplemodesofoperationanddeterminingthecorrectmodeofoperationisthefirststep.Chapter3ofthisUser’sManual
detailsthemodesofoperationandapplicationswhereeachwouldbeused.
Phase2‐ProgramtheESTeemforoperationinthewirelessnetwork.OncethecorrectmodeofoperationfortheESTeemhas
beendetermined,the195M/H/Cwillbeprogrammedforthewirelessnetwork.TosimplifytheprogrammingoftheModel
195M/H/C,ESTeemhascreatedasoftwareutilitycalledtheESTeem195NarrowBandConfigurationToolwhichisusedto
configurethewirelessmodemforuseinthenetwork.TheconfigurationutilitycanbeinstalledfromtheESTeemResourceDisk
orfromtheESTeemwebsite(www.esteem.com).SeeSoftwareConfigurationsectionbeloworChapter6(Utilitiesand
Features)ofthisUser’sManualwillguideyouintheinstallationofthesoftwareanddetailedoperatingguide.
Phase3‐InstalltheESTeemhardwareandtestcommunication.AftertheESTeemModel195M/H/C’sprogramming,installthe
hardwareineachremotelocation.Chapter7ofthisUser’sManualdescribestheantennaspecifications,mountingoptionsand
theconfigurationofthepolemountinghardwarefortheESTeem.Forinstructionsusingthelinkdiagnostictoolfortestingand
troubleshootingthewirelesslink,refertoChapter6(UtilitiesandFeatures).
Thefollowingbasichardwarelayouts,configurationsandsoftwareinstallationswillallowyoutoproceedwiththeprogramming
andtestingofthewirelessnetwork.
Model195M/H/CHardwareLayout
Tobegintheconfiguration,unpacktheESTeemModel195M/H/Cshippingboxesandlocatetheitemsbelowforinitial
configuration.Takeafewminutestoinventoryyourequipmentbeforeyouproceed.Reportanymissingordamageditemsto
CustomerSupport(509‐735‐9092)assoonaspossible.EachnodeinyourESTeemModel195M/H/C’snetworkmayhave
differenthardwarecomponentsbaseduponthefinalinstallationlocation(i.e.Outdoor,Indoor,Point‐to‐pointorMulti‐Point).
Antennatypes,cablelengths,powersuppliesmaybedifferent,butthefollowingitemswillberequiredforbasicsetup:
Model195M/H/C
AA109ResourceDisk
Antenna
(AA191CDisplayed)
EthernetCable
PowerSupply
(AA179Displayed)
Note:Youraccessorymodelnumbersmayvaryfromtheabove,butyouwillneedtolocateeachofaboveitemstocontinue
configuration.

CHAPTER2
STARTINGOUT
Revised: 15 Feb 2017 2-2 ESTeem Models 195MHC
Model195M/H/CHardwareConfiguration
ThefollowingstepsshouldbecompletedtobeginconfigurationoftheESTeemModel
195M/H/C:
1. ConnecttheantennacabletotheTNCconnectionontheESTeemModel195M/H/C(Figure
1).
2. ConnectthepowersupplyandEthernetcabletotheESTeem.CompletetheSoftware
ConfigurationbelowandproceedtoChapter3tobeginprogramming.
TechnicalTips:
1.ConfiguretheModel
195M/H/Cpriortomounting.
2.Attachantennatothe
Model195M/H/Cbefore
poweringup.
Figure1–BasicConfigurationDiagram

CHAPTER2
STARTINGOUT
Revised: 15 Feb 2017 2-3 ESTeem Models 195MHC
SoftwareConfiguration
TheESTeemNarrowbandConfigurationUtility(acomponentoftheESTeemDiscoverySuite)willalloweasyaccesstothe
configuration,monitoringanddiagnosticsfortheESTeemModel195M,195Hand195C.
Installation
TheDiscoverySuitecanbedownloadedfromtheESTeemwebsite
(http://www.esteem.com)orisavailableontheSoftwareResourcemediathatwas
shippedwiththeradios.
1. TheDiscoveryUtilityisaJava™basedapplicationcompatiblewithanycomputer
operatingsystem(Window,Linux,etc).Theapplicationrequirestwo(2)additional
supportfilestooperate:
Java–Downloadablefromhttp://www.java.com.Theversionrequiredwillbebaseduponyouroperatingsystem.
Note:TheinstallationandupdatesfromJavamaytryandinstalladditionalwebbrowsertoolbars.Unchecktheoptional
installationiftheyarenotdesired.
WinPcap–Downloadablefromhttp://www.winpcap.org/.Theversionrequiredwillbebaseduponyouroperatingsystem.
2. Onceboththeaboveprogramshavebeeninstalled,savetheESTeem.exefiletoanylocationonyourcomputersuchas
theDesktop.DoubleclicktheESTeem.exeprogramandFigure2willbedisplayed.
3. ConnecttheESTeem195M/H/CmodemtoyourcomputereitherdirectlytotheEthernetcardorthroughaSwitchusinga
CAT‐5eEthernetcable.TheEthernetportsupportsAuto‐Negotiation,soeitherapatchcableorcrossovercablewillwork.
PresstheDiscoverESTModemsbutton.ThisdiscoveryutilityandimbeddedESTeemNarrowbandConfigurationUtilitywill
beusedthroughouttheremainderoftheUser’sManual.
4. TheESTeem195M/H/Cwillbedisplayed(Figure3).IftheESTeemisnotonthesameIPsubnetasthecomputer,double
clickontheIP,NetmaskorGatewayandmakethenecessarychanges.PresstheApplyChangesbuttonwhencomplete.
TechnicalTip:Ifyourcomputeris
configuredforDHCPandnot
attachedtothenetwork,youwill
needtoassignastaticIPaddressto
programthe195M/H/C.
Figure2:ESTeemDiscoveryUtility
Figure3:DiscoveryFoundRadio

CHAPTER2
STARTINGOUT
Revised: 15 Feb 2017 2-4 ESTeem Models 195MHC
5. IfchangesweremadetotheIPaddress,youwillneedtopresstheDiscoverESTModemsbuttonagaintoshowthechanges.
Right‐mouseclickontheHorizonandselectConfigureRadiobuttontobeginprogramming.
Model195M/H/CFrontPanelLayout
ThesingleStatusLEDhasmultiplecolorsrepresentingthefollowing:
Off–NoActivity
Blue–Model195M/H/Chasestablishedawirelesslink
Red–Model195M/H/CistransmittinganRFpacket
Green–WirelessmodemisreceivinganRFsignalfromanother195M/H/C.
Amber–WirelessmodemisreceivinganRFsignalfromasourceotherthana195M/H/C.ThiscouldbeRFnoiseoranother
radiotransmitteronthefrequencyofthe195M/H/C.
Figure4:OpeningRadioConfigurationSoftware
Figure5:FrontPanel

CHAPTER 3
EXAMPLE APPLICATIONS
Revised: 10 Oct 2017 3-1 ESTeem Models 195MHC
Modes of Operation
The ESTeem Model 195M, 195H and 195C can be configured for multiple serial and Ethernet applications. Determining the
correct mode of operation for the ESTeem is the first step in creating a reliable wireless network. This chapter will explain each
mode of operation, provide example applications and detailed programming information for each mode. Please review the
following modes of operations. If you do not see an example of your application, please contact ESTeem support at 509-735-
9092 for help in selecting your mode of operation.
Transparent Point to Point Application
The most commonly used mode of operation with the ESTeem Model 195M/H/C is the transparent mode. The transparent
mode will pass serial or Ethernet data between two (or more) wireless modems as if they were connected by a cable. Point to
point operation is when two serial or Ethernet devices are transferring information between either other, directly or through a
repeater (Figures 1 and 2). The type of serial data interface (RS-232, RS-422, RS-485 or Ethernet) on either end of the wireless
link is configurable and can be independent on each side. For example, the Main Office in Figure 1 can be configured for RS-
232 operation, while the serial port at the remote site can be configured for RS-485.
Example Applications
•Point to point serial interfaces (RS-232, RS-422 or RS-485)
•Point to point wireless Ethernet communication devices
•Remote Supervisory Control and Data Acquisition (SCADA) networks
Applications Where Transparent Mode Not Used
•Multiple Remote Locations
•PLC Emulation Networks (see PLC Emulation below)
•Connections to large Ethernet traffic networks such as large office buildings or plant networks
Figure 1: Point to Point Example

CHAPTER 3
EXAMPLE APPLICATIONS
Revised: 10 Oct 2017 3-2 ESTeem Models 195MHC
Figure 2: Point to Point with Repeater

CHAPTER 3
EXAMPLE APPLICATIONS
Revised: 10 Oct 2017 3-3 ESTeem Models 195MHC
Transparent Multipoint Application
The ESTeem 195M, 195H and 195C can be configured multipoint transparent operation (Figure 3). Similar to point to point
applications, the 195M/H/C can support multiple serial data interfaces (RS-232, RS-422, RS-485 or Ethernet) on either end of
the wireless link. These wireless links are independent of each other and configurable.
Example Applications
•Point to multipoint serial networks (RS-232, RS-422 or RS-485)
•Point to multipoint wireless Ethernet communication devices
Applications Where Transparent Mode Not Used
•PLC Emulation Networks (see PLC Emulation below)
•Simple network connections (see transparent point to point)
Figure 3: Point to Multipoint Transparent Example

CHAPTER 3
EXAMPLE APPLICATIONS
Revised: 10 Oct 2017 3-4 ESTeem Models 195MHC
PLC Emulation Applications
The ESTeem 195M, 195H and 195C can support PLC based networks in both point to point and multipoint applications. The PLC
emulation driver allows the ESTeem to identify the destination address in the PLC message block and change the ESTeem
destination address to match. This PLC emulation allows the ESTeem 195M/H/C to support multiple repeaters in a network
(Figure 4). If repeaters are used with PLC emulation, the route and append table will also need configured (see Chapter 4 for
complete details).
PLC Protocols Supported
•Rockwell Automation/Allen-Bradley DF1 Full-Duplex
•Rockwell Automation/Allen-Bradley DF1 Half-Duplex
•Rockwell Automation/Allen-Bradley DF1 Radio Modem
•Modbus RTU/ASCII
•ModbusTCP
•Opto-22
•DNP-3
Figure 4: Multipoint PLC Emulation Example
Remote Site
& Repeater Repeater
Remote Site
Remote Site
NOTE:
Repeater may be stand-
alone or attached to a
network or device.
Note:
Antenna’s shown are for
illustration purposes. There
are many antenna options
available depending on your
application.
Modem addresses are the
last octet of the IP address
for the 195C/M/H
Master PLC
RS-232 Data
Remote PLC
RS-232 Data
RS-232 Data
To Antenna
To Antenna
Model 195C/M/H Address 180
Model 195C/M/H Address 181
Model 195C/M/H Address 182
Model 195C/M/H
Address 183
Model 195C/M/H Address 184
Model 195C/M/H Address 185

CHAPTER 3
EXAMPLE APPLICATIONS
Revised: 10 Oct 2017 3-5 ESTeem Models 195MHC
Programming Examples
Once the mode of operation for the ESTeem has been determined, you
are now ready to program the Model 195C, 195M or 195H for use.
ESTeem has created a simplified programming utility call the 195
Narrow Band Configuration Tool. This configuration utility is a
component of the Discovery Suite and will be used in all the following
programming examples.
Finding ESTeem 195M/H/C with Discovery
Each of the example applications will use the 195 Narrowband Configuration Utility to
program the ESTeem 195M/H/C. The modem can also be programmed by changing
individual software commands any serial interface (RS-232, RS-422 or RS-485) or
Telnet to the Ethernet port. Please refer to Appendix-A (Software Commands) for a
complete list of software commands and instructions on configuration.
1. Verify the basic hardware configuration from Chapter 2 and open the 195
Narrowband Configuration Utility (Figure 5). Press the Discover EST Modems button to continue.
2. The ESTeem 195M/H/C will be displayed (Figure 5). If the ESTeem 195M/H/C is not on the same IP subnet as the computer,
double click on the IP address and Netmask to make the necessary changes. Press the Apply Changes button when
complete.
3. If changes were made to the IP address you will need to press the Discover EST Modems button again to show the changes.
Right-mouse click on the ESTeem 195M/H/C and select Configure Radio button to begin programming.
Technical Tip: The 195 Narrowband Configuration
Tool communicates with the 195M/H/C through the
Ethernet interface. If Ethernet or RS-422 (Shared
ports with the Ethernet programming port) are the
data interface for the wireless link, configure the
195M/H/C as shown below first. Once configured
and reset change to the correct data cable.
Technical Tip: If your computer is
configured for DHCP and not
attached to the network, you will
need to assign a static IP address to
program the 195M/H/C.
Figure 5: ESTeem Discovery Utility
Figure 6: Opening Radio Configuration Software

CHAPTER 3
EXAMPLE APPLICATIONS
Revised: 10 Oct 2017 3-6 ESTeem Models 195MHC
Point to Point Transparent Example 1 (Figure 1)
(2) ESTeem Model 195C
Transparent RS-232 Wireless Link
RS-232 Data Rate (19,200 bps, No Parity, 8 data bits, 1 stop bit)
465.500 MHz Operating Frequency
Main Office Address –172.16.10.180
Remote Site Address –172.16.10.181
The 195 Series Narrow Band Configuration Tool provides a graphical interface to the software commands for the ESTeem
195M/H/C. The Configuration tab is the default when the Configure Radio (Figure 6) button is pressed in the Discovery Program.
All the basic configuration parameters can be entered in this window (Figure 7). Most basic information such as the current
frequency of operation, address and port configuration will be read from the 195M/H/C and displayed.
Main Office Configuration
1. The current address will be set to the last octet of
the IP address. The Main Office address will be set to
180. This should be entered from the discovery utility
but verify and continue.
2. Set the operating frequency to 456.500 MHz.
3. Set the destination address to the last octet in
Remote Site address (181).
4. Set the data interface to the RS-232 DATA port (Port
3).
5. Set the operating mode to Transparent.
Once all the above software commands are adjusted to
their correct parameters, press the Write Config button
to send the changes to the 195C, 195M or 195H. The
modem will reset and be ready for operation on the
selected serial port.
Remote Site Configuration
1. Set remote site address to 181.
2. Set the operating frequency to 456.500 MHz.
3. Set the destination address to the last octet in Main
Office address (180).
4. Set the data interface to the RS-232 DATA port (Port
3).
5. Set the operating mode to Transparent.
Once all the above software commands are adjusted to their correct parameters, press the Write Config button to send the
changes to the 195C, 195M or 195H. The modem will reset and be ready for operation on the selected serial port.
Technical Tip: The unit address of the ESTeem 195C,
195M or 195H is the last octet of the IP address. This
single address is used when configuring the destination
and routing. Example –Main Address IP =
172.16.10.180. Unit address = 180.
Figure 7: Model 195M/H/C Main Site Configuration
Figure 8: Point to Point Remote Site Configuration

CHAPTER 3
EXAMPLE APPLICATIONS
Revised: 10 Oct 2017 3-7 ESTeem Models 195MHC
Point to Point Transparent Example 2 (Figure 2)
(3) ESTeem Model 195C
Transparent RS-232 Wireless Link
RS-232 Data Rate (19,200 bps, No Parity, 8 data bits, 1 stop bit)
465.500 MHz Operating Frequency
Main Office Address –172.16.10.180
Remote Site Address –172.16.10.181
Repeater Site Address –172.16.10.200
The addition of a repeater to a point to point link is as simple as including the repeater address in the destination (Figure 9).
The following are configuration page examples for each site in the network.
Main Office Configuration
1. The current address will be set to the
last octet of the IP address. The Main
Office address will be set to 180. This
should be entered from the discovery
utility but verify and continue.
2. Set the operating frequency to 456.500
MHz.
3. Set the destination to the Remote Site
address including the repeater (200,181).
The 195M/H/C RF link will follow the exact
path as written in this field. For example,
the data will first be sent to address 200
and then repeated to address (181).
4. Set the data interface to the RS-232
DATA port (Port 3).
5. Set the operating mode to Transparent.
Once all the above software commands
are adjusted to their correct parameters,
press the Write Config button to send the
changes to the 195C, 195M or 195H. The
modem will reset and be ready for
operation on the selected serial port.
Complete the configuration for the remote site and repeater as shown in Figures 10 and 11.
Technical Tip: The unit address of the ESTeem 195C,
195M or 195H is the last octet of the IP address. This
single address is used when configuring the destination
and routing. Example –Main Address IP =
172.16.10.180. Unit address = 180.
Figure 9: Point to Point with Repeater Main Site Configuration
Figure 10: Remote Site Configuration
Figure 11: Repeater Site Configuration

CHAPTER 3
EXAMPLE APPLICATIONS
Revised: 10 Oct 2017 3-8 ESTeem Models 195MHC
Multipoint Transparent Example 1 (Figure 3)
(4) ESTeem Model 195C
Transparent RS-485 Wireless Link
(19,200 bps, No Parity, 8 data bits, 1 stop bit)
465.500 MHz Operating Frequency
Manufacturing Facility Address –172.16.10.180
Remote Site Addresses –172.16.10.183-172.16.10.186
The following are examples of the configuration pages need for point to multipoint
operation. The only difference from a point to point application is that a special global
Destination Address (Address = 255) is used. Checking the “Global” button on the
Destination will all remote locations receive the data simultaneously and pass through
the configured serial data interface.
Manufacturing Facility Configuration
1. The current address will be set to the
last octet of the IP address. The Main
Office address will be set to 180. This
should be entered from the discovery
utility but verify and continue.
2. Set the operating frequency to
456.500 MHz.
3. Click the Global check box (Figure 12)
and the Destination address will be set to
255
4. Set the data interface to the RS-485
DATA port (Port 1).
5. Set the operating mode to
Transparent.
Once all the above software commands
are adjusted to their correct parameters,
press the Write Config button to send
the changes to the 195C, 195M or 195H.
The modem will reset and be ready for
operation on the selected serial port.
The configuration for the remote sites in the network
will be very similar with only the address being
different for each wireless modem. Complete the
configuration for the remote sites as shown in Figure
13.
Technical Tip: The unit address of the ESTeem 195C,
195M or 195H is the last octet of the IP address. This
single address is used when configuring the destination
and routing. Example –Main Address IP =
172.16.10.180. Unit address = 180.
Technical Tip: To send to
multiple remote locations at
once use a global Setconnect
address of 255.
Figure 12: Multipoint Example Manufacturing Facility Configuration
Figure 13: Remote Site Configuration
This manual suits for next models
2
Table of contents
Other ESTeem Modem manuals

ESTeem
ESTeem 195Eg User manual

ESTeem
ESTeem 85 User manual

ESTeem
ESTeem 210C User manual

ESTeem
ESTeem Edge 900 User manual

ESTeem
ESTeem Horizon 2.4 User manual

ESTeem
ESTeem 195Ed User manual

ESTeem
ESTeem 195Eg User manual

ESTeem
ESTeem 195Eg User manual

ESTeem
ESTeem MODEL 192E User manual

ESTeem
ESTeem 210C User manual
Popular Modem manuals by other brands

Radyne
Radyne OM20 Installation and operation manual

Topcom
Topcom Xplorer 874A Quick user guide

Trust
Trust 56K V92 External Modem user manual

Patton electronics
Patton electronics NetLink 1095 user manual

Midco
Midco ARRIS DG3450 Self-install guide

Atlantis Land
Atlantis Land WEB RUNNER 56K V.90/V.92 installation guide