ETNA A1026VW User manual

700003219100
Handleiding
Manual
Notice d’utilisation
Anleitung
A1026VW
A1027VW
A1029VW

Nederlands . . . . . . . . . . . . . . . . . . . . . . . . . . . . . . . . . . . . . . . . . . . . . . . . . . . . . . . . . . . . . . 1 - 9
English. . . . . . . . . . . . . . . . . . . . . . . . . . . . . . . . . . . . . . . . . . . . . . . . . . . . . . . . . . . . . . . . 10 - 19
Français. . . . . . . . . . . . . . . . . . . . . . . . . . . . . . . . . . . . . . . . . . . . . . . . . . . . . . . . . . . . . . . 20 - 29
Deutsch . . . . . . . . . . . . . . . . . . . . . . . . . . . . . . . . . . . . . . . . . . . . . . . . . . . . . . . . . . . . . . . 30 - 39
54
12
4
5
2
1
6
7
4
3
5
12
25143
6 7
5
6
4
3
1
2
51234
7
A1026VW A1027VW
A1029VW

Sudder brander
Simmer burner
Brûleur auxiliair
Hilfsbrenner
Normaal brander
Semi- rapid burner
Brûleur semi- rapide
Normalbrenner
Sterk brander
Rapid burner
Brûleur rapide
Starkbrenner
Wokbrander
Wok burner
Brûleur pour le wok
Wokbrenner
Belasting totaal
Total heat input
Capacité total
Belastung total
G25 - 25 mbar G20 - 20 mbar
I2H I2E I2E+ I2ELL
0,80 mm 1,0 kW
1,02 mm 1,75 kW
G25 - 20 mbar
I2ELL
0,77 mm 1,0 kW
1,01 mm 1,75 kW
1,29 mm 3,0 kW
0,85 mm 1,0 kW
1,07 mm 1,75 kW
1,38 mm 3,0 kW
0,65 (inner)
1,26 (outer)
mm
0,37 (inner)
0,90 (outer)
mm
0,37 (inner)
0,90 (outer)
mm
0,63 (inner)
1,21 (outer)
mm
0,71 (inner)
1,33 (outer)
mm
3,5 kW 3,5 kW 3,5 kW
1,32 mm 3,0 kW
A1026VW 8,0 kW 8,0 kW8,0 kW
576 g/h576 g/h
799 g/h799 g/h
799 g/h799 g/h
8,0 kW8,0 kW
A1027VW 11,0 kW 11,0 kW11,0 kW
A1029VW 11,0 kW 11,0 kW11,0 kW
11,0 kW11,0 kW
11,0 kW11,0 kW
Sudder brander
Simmer burner
Brûleur auxiliair
Hilfsbrenner
Normaal brander
Semi- rapid burner
Brûleur semi- rapide
Normalbrenner
Sterk brander
Rapid burner
Brûleur rapide
Starkbrenner
Wokbrander
Wok burner
Brûleur pour le wok
Wokbrenner
Belasting totaal
Total heat input
Capacité total
Belastung total
Verbruik
Consumption
Consommation
Verbrauch
G30 - 50 mbar
I 3B/P I 3+
1,0 kW 0,46 mm 1,0 kW
G30 - 29 mbar
I 3B/P I 3+
0,50 mm
0,66 mm 1,75 kW 0,58 mm 1,75 kW
0,87 mm 3,0 kW 0,79 mm 3,0 kW
3,5 kW 3,5 kW
A1026VW
A1027VW
A1029VW
A1026VW
A1027VW
A1029VW
Spuitstuk diameter en belastingen gemeten op bovenwaarde
Injector diameter and heat input measured on gross C.V.
Diamètre injecteur et capacité mesuré à P.C.S.
Düsendurchmesser und Belastung gemessen auf Ho

INHOUD1
Introductie
Als u deze gebruiksaanwijzing doorleest, bent
u snel op de hoogte van alle mogelijkheden
die dit toestel u biedt. U vindt informatie
voor uw veiligheid en over het onderhoud
van het toestel. Verder vindt u milieutips en
aanwijzingen om energie te besparen.
Bewaar deze handleiding. Een eventueel
volgende gebruiker van dit toestel kan daar zijn
voordeel mee doen.
Veel kookplezier!
Inhoud
Toestelinformatie. . . . . . . . . . . . . . . . . . . . . 1
Veiligheid . . . . . . . . . . . . . . . . . . . . . . . . . . . 2
Vóór het eerste gebruik . . . . . . . . . . . . . . . . 2
Waarop u moet letten . . . . . . . . . . . . . . . . . 3
Bediening . . . . . . . . . . . . . . . . . . . . . . . . . . . 3
Ontsteking . . . . . . . . . . . . . . . . . . . . . . . . . . . 3
Toepassing . . . . . . . . . . . . . . . . . . . . . . . . . . 4
Pannen. . . . . . . . . . . . . . . . . . . . . . . . . . . . . . 4
Onderhoud. . . . . . . . . . . . . . . . . . . . . . . . . . . 4
Reinigen. . . . . . . . . . . . . . . . . . . . . . . . . . . . . 4
Installatie . . . . . . . . . . . . . . . . . . . . . . . . . . . 5
Algemeen. . . . . . . . . . . . . . . . . . . . . . . . . . . . 5
Inbouwmaten . . . . . . . . . . . . . . . . . . . . . . . . 6
Inbouwen. . . . . . . . . . . . . . . . . . . . . . . . . . . . 7
Technische gegevens . . . . . . . . . . . . . . . . . 8
Afvoeren verpakking en toestel. . . . . . . . . 9
Toestelinformatie
1 – bedieningsknop voor normaalbrander 1
2 – bedieningsknop voor normaalbrander 2
3 – bedieningsknop voor sterkbrander 3
4 – bedieningsknop voor sudderbrander 4
5 – bedieningsknop voor wokbrander 5
6 – pandrager
7 – hardglazen vangschaal
Knopaanduiding:
0 uitstand
volstand
kleinstand

2VEILIGHEID
Vóór het eerste gebruik
Lees voor gebruik eerst de separate
veiligheidsvoorschriften.

3
Waar u op moet letten
Direct schoonmaken
Overgekookte voedselresten direct
verwijderen, met name van rode kool,
appelmoes en rabarber. Wanneer ze lang
op email of roestvrijstaal inwerken kan dit
tot verkleuring leiden.
Inbranden email
De pandrager wordt door de kookbrander
zeer sterk verhit, waardoor na verloop
van tijd het email op de dragerpunt kan
inbranden. Dit is niet te voorkomen en valt
dan ook niet onder de garantie.
Branderdoppen
Controleer regelmatig of de branderdoppen
juist op de branderringen liggen; onjuiste
positionering kan slechte ontsteking,
ongunstige verbranding of beschadiging
van de doppen tot gevolg hebben.
Ontsteking
De bedieningsknop van de betreffende
kookbrander ingedrukt linksom draaien en met
een lucifer de brander ontsteken. De vlam is
traploos in te stellen, van groot naar klein.
Elektrische vonkontsteking
Druk de gewenste bedieningsknop in en
draai deze linksom naar de volstand. Houd
de bedieningsknop ingedrukt totdat de
brander ontsteekt.
Thermokoppel beveiliging
Dit toestel is voorzien van een
thermokoppel. Dit is een thermo-elektrisch
beveiligingssysteem. Het zorgt ervoor dat de
gaskraan gesloten wordt als de vlam dooft.
Draai de bedieningsknop linksom naar
de volstand en druk deze vervolgens in.
Zodra de knop wordt ingedrukt gaat de
vonkontsteking werken. Houdt nadat de
brander is ontstoken de knop nog
5 seconden ingedrukt.
VEILIGHEID/BEDIENING
Branderdop
Branderring
Bougie
Thermokoppel
Branderhuis
Spuitstuk

4TOEPASSING/ONDERHOUD
Pannen
De aanbevolen panbodemdiameters zijn:
sterkbrander. . . . . . . . . . . . . . . minimaal 24 cm.
normaalbrander . . . . . . . . . . . . minimaal 20 cm.
sudderbrander . . . . . . . . . . . . . minimaal 12 cm.
wokbrander. . . . . . . . . . . minimaal 24 - 26 cm.
Fout:
Er ontsnapt veel
warmte langs de pan.
Goed:
De warmte wordt
gelijkmatig over de
panbodem verdeeld.
Tip
Kook met een deksel op de pan en u bespaart
tot 50% energie.
Schone pannen nemen beter warmte op.
Reinigen
Dagelijks
Reinig de glasplaat steeds na gebruik.
U kunt hiervoor bijvoorbeeld een sopje van
een afwasmiddel gebruiken. Gebruik niet te
veel vocht, omdat dit de brander binnen kan
dringen.
Verwijder overgekookte voedselresten
nadat de glasplaat afgekoeld is.
Wekelijks
Speciale onderhoudsmiddelen voor kerami-
sche kookplaten, zoals ATAG Shine*, geven de
glasplaat een beschermende laag. Behandel
de glasplaat ook met deze middelen nadat u
hardnekkige vlekken hebt verwijderd.
Hardnekkige vlekken
Aangekoekte vlekken, metaal- en kalkvlekken
op de glasplaat kunt u verwijderen met
speciale schoonmaakmiddelen zoals ATAG
Shine*. Verwijder hardnekkige vlekken met een
glasschraper.
Let op:
Hete branderdoppen nooit onderdompelen in
koud water. Door de sterke afkoeling kan het
email beschadigd raken.
Overgekookte voedselresten
Gesmolten suiker kunt u verwijderen met een
glasschraper. Verwijder deze verontreinigingen
terwijl de glasplaat nog heet is. Dergelijke
verontreinigingen kunnen bij het afkoelen
blijvende schade aan de glasplaat veroorzaken.
Speciale onderhoudsmiddelen voor
keramische kookplaten (bijv. ATAG Shine*)
vormen een anti-statisch laagje op de
kookplaat, waardoor deze minder makkelijk
stof aantrekt.
* Schoonmaakmiddelen uit het ATAG
Shine assortiment zijn te verkrijgen via de
website www.hps.nl. Hier vind u ook diverse
schoonmaak en gebruikerstips.

5 INSTALLATIE
Algemeen
Dit toestel mag alleen door een erkend gas-
technisch installateur aangesloten worden.
Let op:
Dit toestel wordt niet aangesloten op
een rookgas-afvoerkanaal. Zorg dus voor
voldoende ventilatie.
Elektrische aansluiting
230 V - 50 Hz.
Dit toestel voldoet aan de voorschriften van de
richtlijn 89/336/EEG inzake elektromagnetische
compatibiliteit.
De elektrische aansluiting moet voldoen aan
de nationale en lokale voorschriften. Voor
Nederland is dit onder andere NEN 1010.
Stopcontact en stekker moeten te allen tijde
bereikbaar blijven.
Wilt u een vaste aansluiting maken, zorg er
dan voor dat er een omnipolaire schakelaar
met een contactafstand van minimaal 3 mm
in de toevoerleiding wordt aangebracht.
Gasaansluiting G1/2” (ISO 7/1-RC 1/2)
De gasaansluiting moet voldoen aan de
nationale en lokale voorschriften. Voor
Nederland zijn dit onder andere de GAVO-
voorschriften (NEN 1078).
Deze bepalen onder andere dat:
– uitsluitend goedgekeurde materialen
gebruikt mogen worden.
– achter een inbouwoven en onder de
kookplaat slechts een volledig metalen
slang gebruikt mag worden.
Let op:
De gassoort en het land waarvoor het
toestel is ingericht staan vermeld op het
gegevensplaatje.
Wij adviseren de kookplaat aan te sluiten
met een vaste leiding. Aansluiting door
middel van een speciaal daarvoor bestemde
metalen veiligheidsslang is ook toegestaan.
In alle gevallen moet er voor het toestel
een aansluitkraan geplaatst worden op een
makkelijk bereikbare plaats, bijvoorbeeld in
het naastgelegen keukenkastje.
Let op:
Een metalen veiligheidsslang mag niet worden
geknikt en niet in aanraking komen met
bewegende delen van het keukenmeubel.
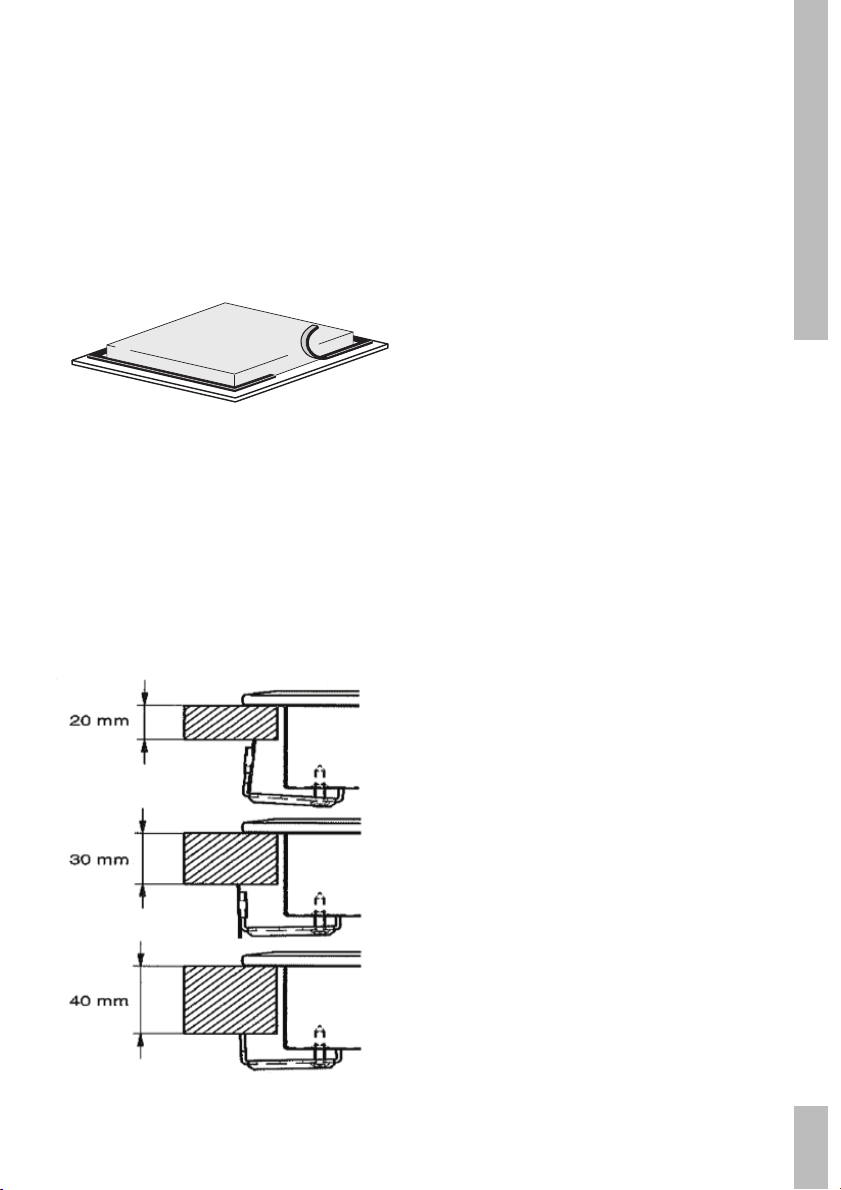
Alvorens het toestel in gebruik te nemen de
aansluitingen met zeepsop controleren op
gasdichtheid.
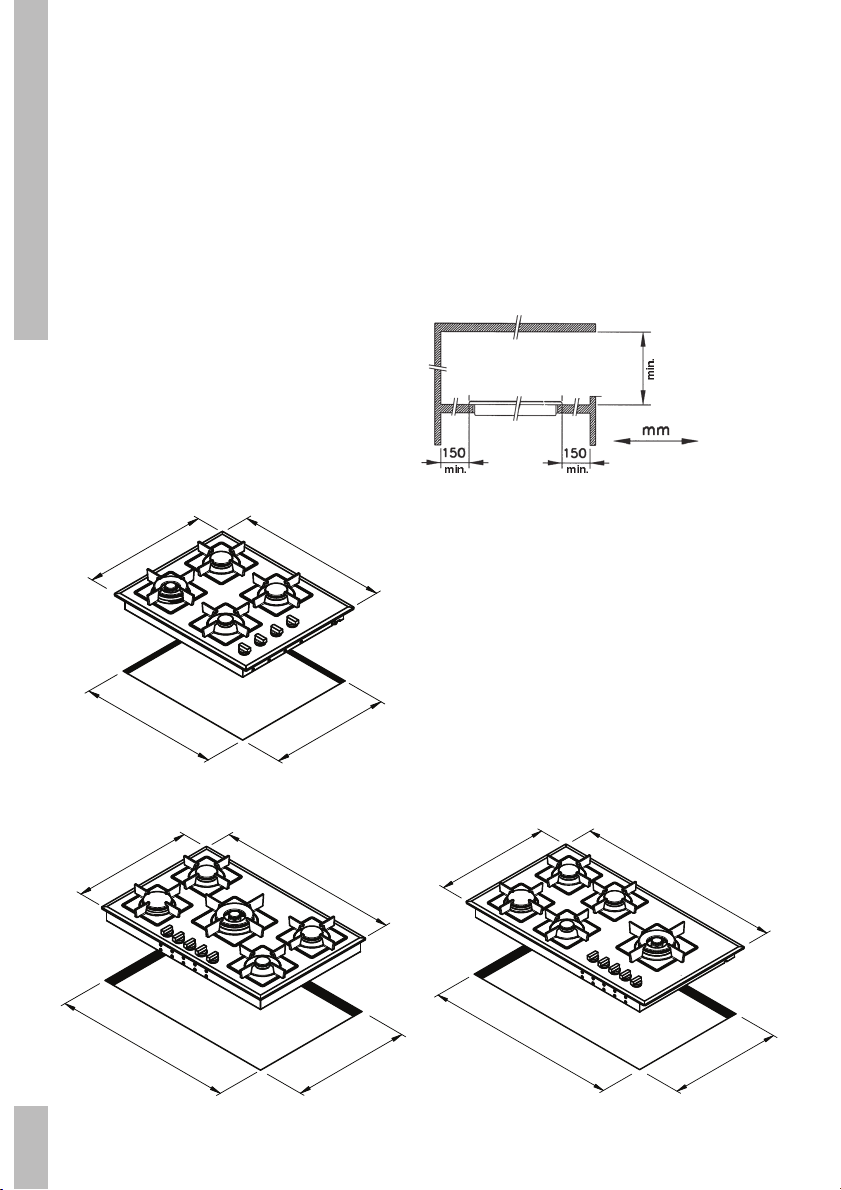
Plaats een kookplaat niet naast een hoge
kast of wand van brandbaar materiaal.
(Indien niet anders mogelijk, houd dan
een minimale afstand van 150 mm tussen
buitenkant kookplaat en deze wand. Houd
een afstand van minimaal 750mm aan
tussen kookplaat en afzuigkap, indien de
kookplaat een wokbrander heeft.

Inbouwmaten
Zaag de uitsparing in het aanrechtblad. Doe dit
zeer nauwkeurig (zie maattekening). Zaag ook
eventueel aanwezige tussenschotten uit. Zorg
ervoor dat u voldoende ruimte vrij laat aan de
zij- en achterkant. Houd onder de kookplaat een
ruimte met een hoogte van minimaal 15 mm vrij.
Let op:
De afstand tussen de kookplaat en de
achterwand moet minimaal 40 mm bedragen.
6INSTALLATIE
560
480
510
620
750
490
510
770
840
490
510
909
A1026VW
A1027VW A1029VW
650 / 750 *
benodigde vrije ruimte
* 650 mm voor kookplaat zonder wokbrander
750 mm voor kookplaat met wokbrander

7 INSTALLATIE
Inbouwen
1. Maak een uitsparing in de zijwand van de
keukenkast voor het doorvoeren van de
gasleiding.
2.
Plak het afdichtband aan de onderkant van
de kookplaat.
3.
Laat de kookplaat in de uitsparing zakken.
4.
Zet de kookplaat vast.
5.
Maak de gasaansluiting. Controleer de
aansluitingen met zeepsop op gasdichtheid
(zie “gasaansluiting”).
6.
Maak de elektrische aansluiting
(zie “elektrische aansluiting”).
7.
Controleer de werking van het toestel.
Het inbouwen in combinatie met een inbouw-
oven staat beschreven in het installatie-
voorschrift van de oven.
Pas op:
De onderkant van de inbouwkookplaat
wordt heet. Let erop, dat u geen brandbare
of kunststof voorwerpen in de eventueel
onder het toestel aanwezige lade legt!
vastzetten voor- en achterzijde

Technische gegevens (zie ook tabel op omslag)
8TECHNISCHE GEGEVENS
Kookplaattype A1026VW A1027VW A1029VW
Elektrisch aansluiting:
AC 230 V-50Hz-0,6 VA
Vonkonsteking
Thermokoppel
Gasaansluiting:
G1/2” (ISO 7/1 - RC 1/2)
Afmeting toestel:
620x510x48 lxbxh (mm)
770x510x48 lxbxh (mm)
909x510x48 lxbxh (mm)
Afmeting nis:
560x480 bxd (mm)
750x490 bxd (mm)
840x490 bxd (mm)

Afvoeren verpakking en toestel
De verpakking van het toestel is recyclebaar.
Gebruikt zijn:
– karton;
– poly-ethyleenfolie (PE);
– CFK-vrij polystyreen (PS-hard schuim).
Deze materialen op verantwoorde wijze en
conform de overheidsbepalingen afvoeren.
De overheid kan u ook informatie verschaffen
over het op verantwoorde wijze afvoeren van
afgedankte huishoudelijke apparaten.
9 AFVOEREN VERPAKKING EN TEOSTEL

10
54
12
4
5
2
1
6
7
4
3
5
12
25143
6 7
5
6
4
3
1
2
51234
7
A1026VW
A1027VW
A1029VW

11 TABLE OF CONTENTS
Introduction
When you have read these instructions for use,
you will quickly be aware of all the facilities
the appliance can offer you. You can read
about safety and how you should take care
of the appliance. In addition you will find
environmental tips and instructions that can
help to save energy.
Keep the instructions for use and the
installation instructions so any later users
of this appliance could benefit from it.
Enjoy your cooking!
Table of contents
Appliance information. . . . . . . . . . . . . . . . 11
Safety. . . . . . . . . . . . . . . . . . . . . . . . . . . . . . 12
Before using the appliance. . . . . . . . . . . . 12
Things to watch for . . . . . . . . . . . . . . . . . . 13
Operating the appliance . . . . . . . . . . . . . . 13
Lighting the burners . . . . . . . . . . . . . . . . . . 13
Use . . . . . . . . . . . . . . . . . . . . . . . . . . . . . . . . 14
Saucepans. . . . . . . . . . . . . . . . . . . . . . . . . . 14
Maintenance. . . . . . . . . . . . . . . . . . . . . . . . 14
Cleaning the appliance . . . . . . . . . . . . . . . 14
Installation . . . . . . . . . . . . . . . . . . . . . . . . . 15
General . . . . . . . . . . . . . . . . . . . . . . . . . . . . 15
Building in dimensions. . . . . . . . . . . . . . . . 16
Building in . . . . . . . . . . . . . . . . . . . . . . . . . . 17
Technical specifications . . . . . . . . . . . . . 18
Disposal of packaging and appliance . . 19
Appliance information
1 – control knob for semi-rapid burner 1
2 – control knob for semi-rapid burner 2
3 – control knob for rapid burner 3
4 – control knob for simmer burner 4
5 – control knob for wok burner 5
6 – saucepan supports
7 – safety glass drip tray
Control knob symbols:
0 off
high
low

12
Before using the appliance
Lees voor gebruik eerst de separate
veiligheidsvoorschriften.
SAFETY

13
Things to watch for
Clean immediately
Any spillage should be removed
immediately, particularly red cabbage,
apple sauce and rhubarb. These can leave
permanent spots on the enamel or on
stainless steel.
Burning in of the enamel
The burners cause the saucepan supports
to get extremely hot. Over time the enamel
on the support points can burn in. This
cannot be prevented and is not covered by
the guarantee.
Burner caps
Check regularly to ensure that the caps of
the burners are properly in position on the
burner depressions; improper positioning
can make it difficult to light the burners,
give rise to an irregular gas flame, or
damage the burner caps.
Lighting the burners
While keeping the knob of the burner held in,
turn the knob to the left and light the burner
with a match. The gas flame can now be
smoothly adjusted from high to low.
Electrical spark switch
Press the desired control knob and turn it
to the left to the maximum setting. Keep
the control knob depressed until the burner
ignites.
Thermocouple protection
This appliance is fitted with a thermocouple.
This is a thermoelectric protection system. It
ensures that the gas tap is closed if the flame
goes out.
Press the desired control knob and turn
it to the left to the maximum setting. Hold
the control knob pressed in for 5 seconds.
Press the ignition until the burner ignites.
SAFETY/OPERATING
Burner cap
Burner ring
Spark plug
Thermocouple
Burner casing
Injector

14 USE/MAINTENANCE
Saucepans
The recommended saucepan diameters are:
rapid burner . . . . . . . . . . . . . . . minimum 24 cm.
semi-rapid burner . . . . . . . . . . minimum 20 cm.
simmer burner . . . . . . . . . . . . . minimum 12 cm.
wok burner . . . . . . . . . . . minimum 24 - 26 cm.
Wrong:
A great deal of heat is
lost along the sides of
the saucepan.
Right:
The heat is evenly
distributed over the
base of the saucepan.
Tip:
Cooking with a lid on the pan saves up to 50%
on energy.
Clean saucepans absorb heat more efficiently.
Cleaning the appliance
Daily
For daily cleaning of your gas hob, it is best
to use a mild cleaning agent. Do not use too
much liquid, since this could get into the
burner.
Remains of food that has boiled over are to
be removed after the glass top has cooled
down.
Weekly
Special maintenance products for ceramic
hobs, such as ATAG Shine* give the ceramic
hob a protective layer. Treat the hob with these
products also when obstinate stains have been
removed.
Stubborn stains
You can remove burnt-on stains, metal and
lime scale stains from the ceramic hob with
such special cleaning materials as ATAG
Shine*.
Remove stubborn stains with a glass scraper.
Please note:
Do not drop hot burner caps in cold water.
Because of the strong cooling they might get
damaged.
Boiled-over food residues
Remove boiled-over food residues with a glass
scraper. Molten plastic and sugar can also be
removed with a glass scraper.
Do not first allow the hob to cool completely.
Special maintenance products for ceramic
hobs (e.g. ATAG Shine*) form an antistatic
layer on the hob so that it attracts dust less
readily.
* Cleaning agents under the name ATAG Shine
can be obtained via the website at www.hps.nl,
where you will also find various cleaning and
operating tips.

15
General
The fitting of the appliance should only be
carried out by a registered Corgi gas fitter.
Please note:
This appliance is not connected to a flue duct.
Take care to ensure that there is sufficient
ventilation.
Electrical connection
230 V - 50 Hz.
This appliance complies the regulations
concerning electromagnetic compatibility in
directive 89/336/EEC.
The electrical connection must comply with
national and local regulations.
Wall socket and plug must be accessible at
all times.
If you want to make a fixed connection,
ensure that a multi-pole switch with a
distance between contacts of 3 mm is
installed in the supply cable.
Gas connection RC 1/2” (ISO 7/1-RC 1/2)
The gas connection must comply with
national and local regulations.
Amongst other things these regulations
instruct that:
– only approved materials are to be used;
– only a completely metal hose may be used
behind a built-in oven and beneath the hob.
Please note:
The type of gas and the country for which the
appliance has been designed are indicated on
the data badge.
We recommend that the hob be connected
by means of a fixed pipe. Connection using
a specially designed safety hose is also
permitted. In all cases the connection tap for
the appliance must be positioned such that
it is easily accessible, in an adjacent kitchen
cupboard, for example.
Please note:
A metal safety hose must not get kinks in it or
get trapped and must not come into contact with
moving parts of the kitchen furniture.
Before using the appliance for the first time
check the connections using water and
washing-up liquid to ensure that there are no
gas leaks.
Do not install a hob next to a high cupboard or
wall made of flammable material. (If there is
no alternative, ensure that there is a minimal
distance of 150 mm between the outer edge
of the hob and the wall in question. If there is
a wokburner, ensure that there is a minimum
distance of 750 mm between the hob and
overhead extractor fan.
INSTALLATION

16 INSTALLATION
Building in dimensions
Saw the opening in the worktop. This should
be done very accurately (see illustrations
below). Also saw out any partitions that may be
present. Ensure that there is sufficient space
allowed at the sides and at the back. Ensure
that there is a clear space with a height of at
least 15 mm below the hob.
Please note:
The distance between the hob and the rear
wall must be at least 40 mm.
560
480
510
620
750
490
510
770
840
490
510
909
A1026VW
A1027VW A1029VW
650 / 750 *
clearance required
* 650 mm for hob without wokburner
750 mm for hob with wokbrander

17
Building-in
1. Make a hole in the side of the kitchen
cabinet to enable the gas pipe to be passed
through.
2. Stick the strips of sealant to the underside of
the hob.
3.
Place the appliance in the cut-out.
4.
Secure the appliance in position.
5.
Make the gas connection. Check the gas
connections with a soap/water mixture
(see “Gas Connection”).
6.
Put the plug in the socket
(see “Electrical Connection”).
7. Test to check the appliance is operational.
The building in of the hob in combination with
a built-in oven is described in the installation
guide for the oven.
Attention!
The underside of this built-in hob becomes
hot. Take care that you do not place any
flammable or plastic objects in any drawer
under the appliance.
INSTALLATION
securing the front and rear
This manual suits for next models
2
Table of contents
Languages:
Other ETNA Hob manuals

ETNA
ETNA KI259ZT Operating and maintenance manual

ETNA
ETNA T110VRVSA User manual

ETNA
ETNA KI129 Series User manual

ETNA
ETNA A026VWRVS User manual

ETNA
ETNA KI560K Series User manual

ETNA
ETNA KI160ZT User manual

ETNA
ETNA KIV254KWIT User manual

ETNA
ETNA T007VB Series User manual

ETNA
ETNA A123VWRVS User manual

ETNA
ETNA A500A User manual
Popular Hob manuals by other brands

Smeg
Smeg SIM61B Guide to installation and use

Atag
Atag HIDD8471E/A01 Instructions for usage and installation

Beko
Beko Hll74700UF user manual

IKEA
IKEA SMAKLIG BEJUBLAD Assembly instructions

Aspes
Aspes AIFZ5600 Instruction & installation manual

Electrolux
Electrolux EHS 6651 P Installation and operating instructions