Etzinger etzMAX-plus User manual
Simplicity is the
soul of Efficiency
Austin Freeman
etzMAX
QUICK START GUIDE

Grinders
etzMAX-m/plus
etzMAX-light
etzMAX-filter
Accessories
etzFLEX
Single Dose Device
Espressokit
Filterkit
ETZINGER AG
Wirtschaftspark 44
FL-9492 Eschen
Phone: +423 375 8383
www.etzinger-ag.com
QUICK START GUIDE
The etzMAX is an ON-DEMAND Espresso-or Filter Grinder
for commercial use.
Time-and weight-based models are available in different versions,
depending on preferences and use:
Espresso Grinders:
etzMAX-lightT / lightW –time-based / weight-based
etzMAX-mT / mW –time-based / weight-based
etzMAX-plusT –time-based w/ integrated cooling system
etzMAX-plusW –weight-based w/ integrated cooling system
Filter Grinders:
etzMAX-filterLT / filterLW –time-based / weight-based
etzMAX-filterT –time-based w/ integrated cooling system
etzMAX-filter –weight-based w/ integrated cooling system
THANK YOU for
NOTE: Check out the label on top of the grinder to ensure you have received
the grinder ordered.
ATTENTION: FIRMWARE-Updates will be published on our Website. It is
NEITHER necessary NOR recommended to update your etzMAX without any
Updates having been published on our Website.
INSTALLING BEAN HOPPER
Fig. 1
NOTE: Hopper should be cleaned daily as coffee oil residues can have a negative
effect on the taste of your coffee. Once empty and removed (acc. to our
instructions), hopper and lid may be washed in warm soapy water. Rinse and dry
thoroughly.
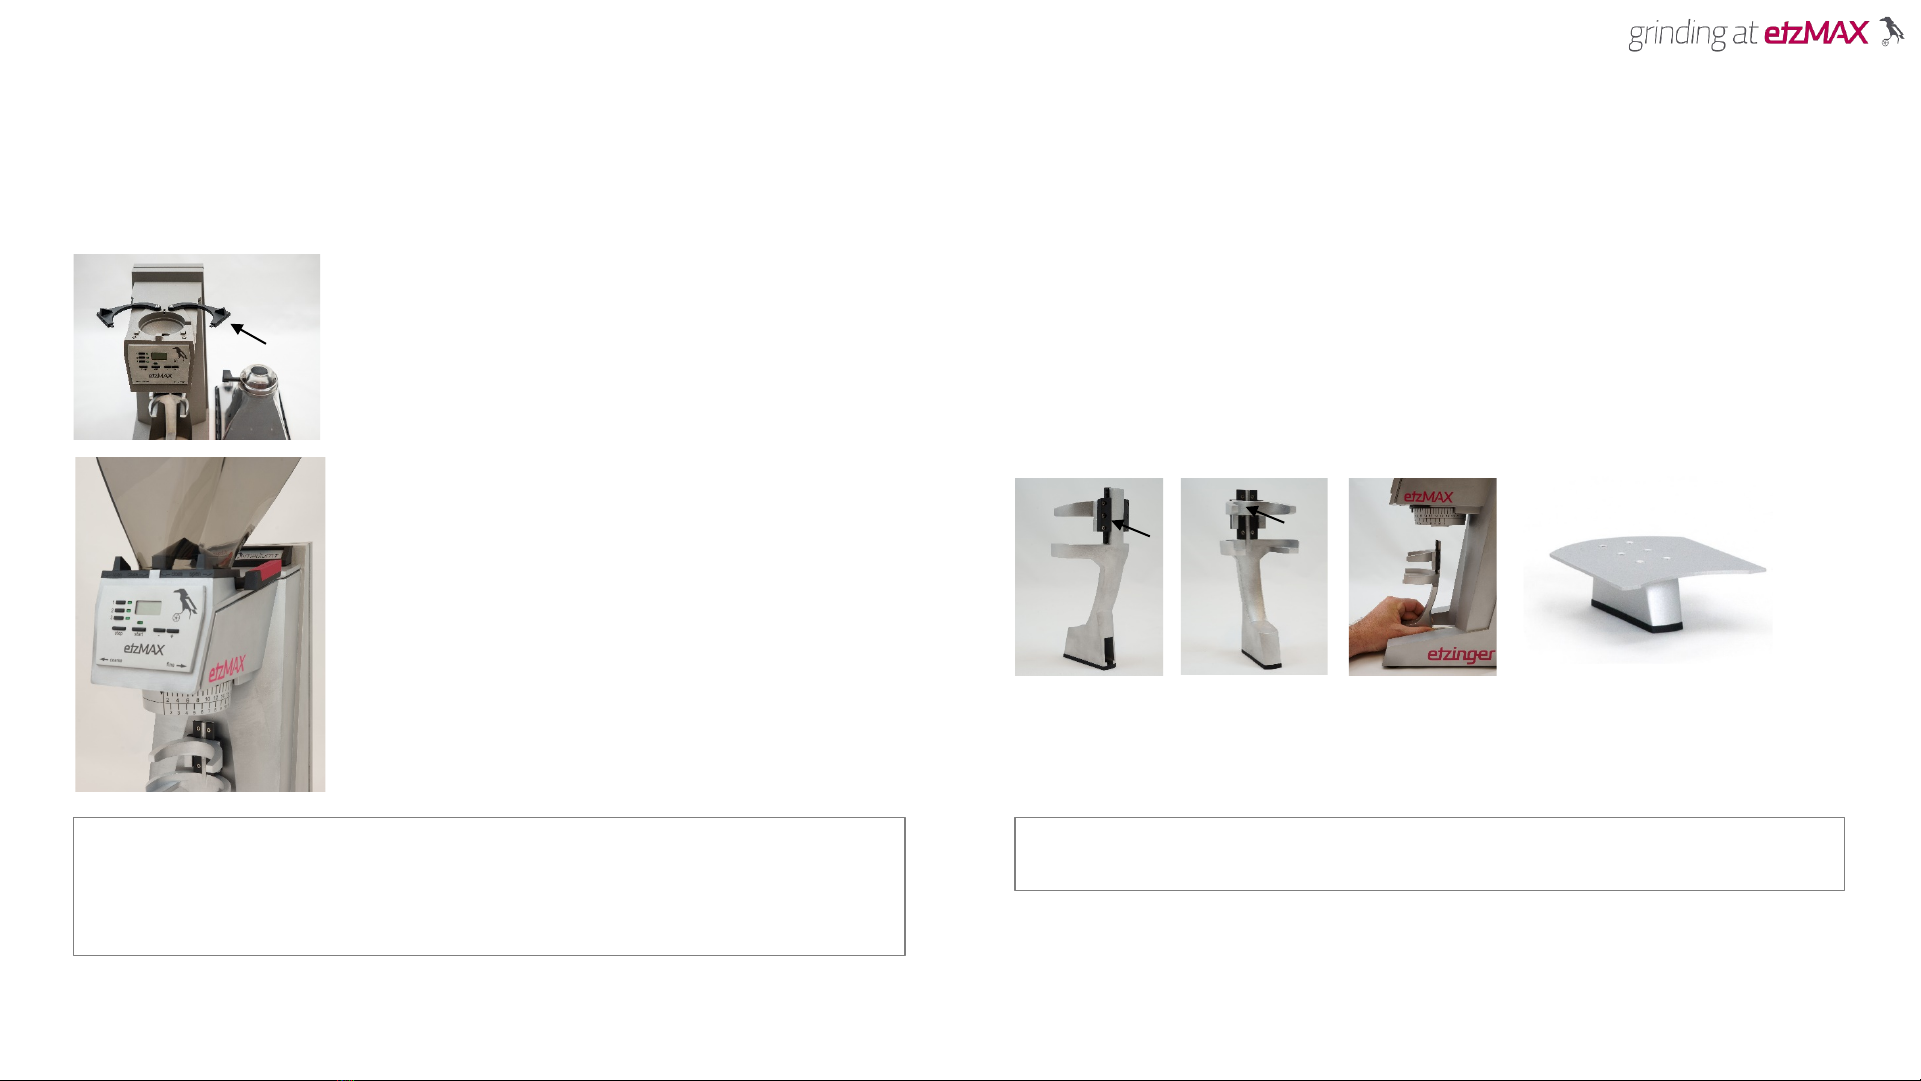
PORTAFILTER HOLDER (Espresso) / PLATFORM (Filter)
Carefully unpack grinder and verify delivery contents according to attached list.
Clean all loose parts with a soft damp cloth and allow to dry completely before use.
GETTING STARTED
Fig. 2
ATTENTION (W-versions only): Be careful not to bend the center hook by applying
too much force thus damaging the loadcell.
Fig. 6
Push both locking levers rearwards
(arrow direction OPEN, Fig. 1).
Position hopper (bean-blocker handle to the right) at
intended opening.
Close locking levers and rotate bean-blocker by 180°
into OPEN-position (Fig. 2).
Fill in the beans and close lid.
Fig. 5
Fig. 3 Fig. 4
Use your index finger to press against the rear part part of the upper holding arm
(Fig. 3) while sliding the arm in position with your thumb –up/down (Fig. 4).
Once adjusted, insert the portafilter holder / platform (Fig. 6) onto the center hook
(Fig. 5) and slide it rearwards as far as it will go.
REMOVING BEAN HOPPER
Close bean-blocker handle by turning it to the front. Open locking levers. Lift off
hopper and place it on its lid.
Grinder Motor will not turn on with hopper removed!

Recommended Settings
(final Setting depending on roast/cone, use
higher Settings for lighter roasts):
Ristretto Macro 4-8 Micro 1
Espresso Macro 6-10 Micro 1
Longhi Macro 8-12 Micro 1
Filter Macro 4-12 Micro 1
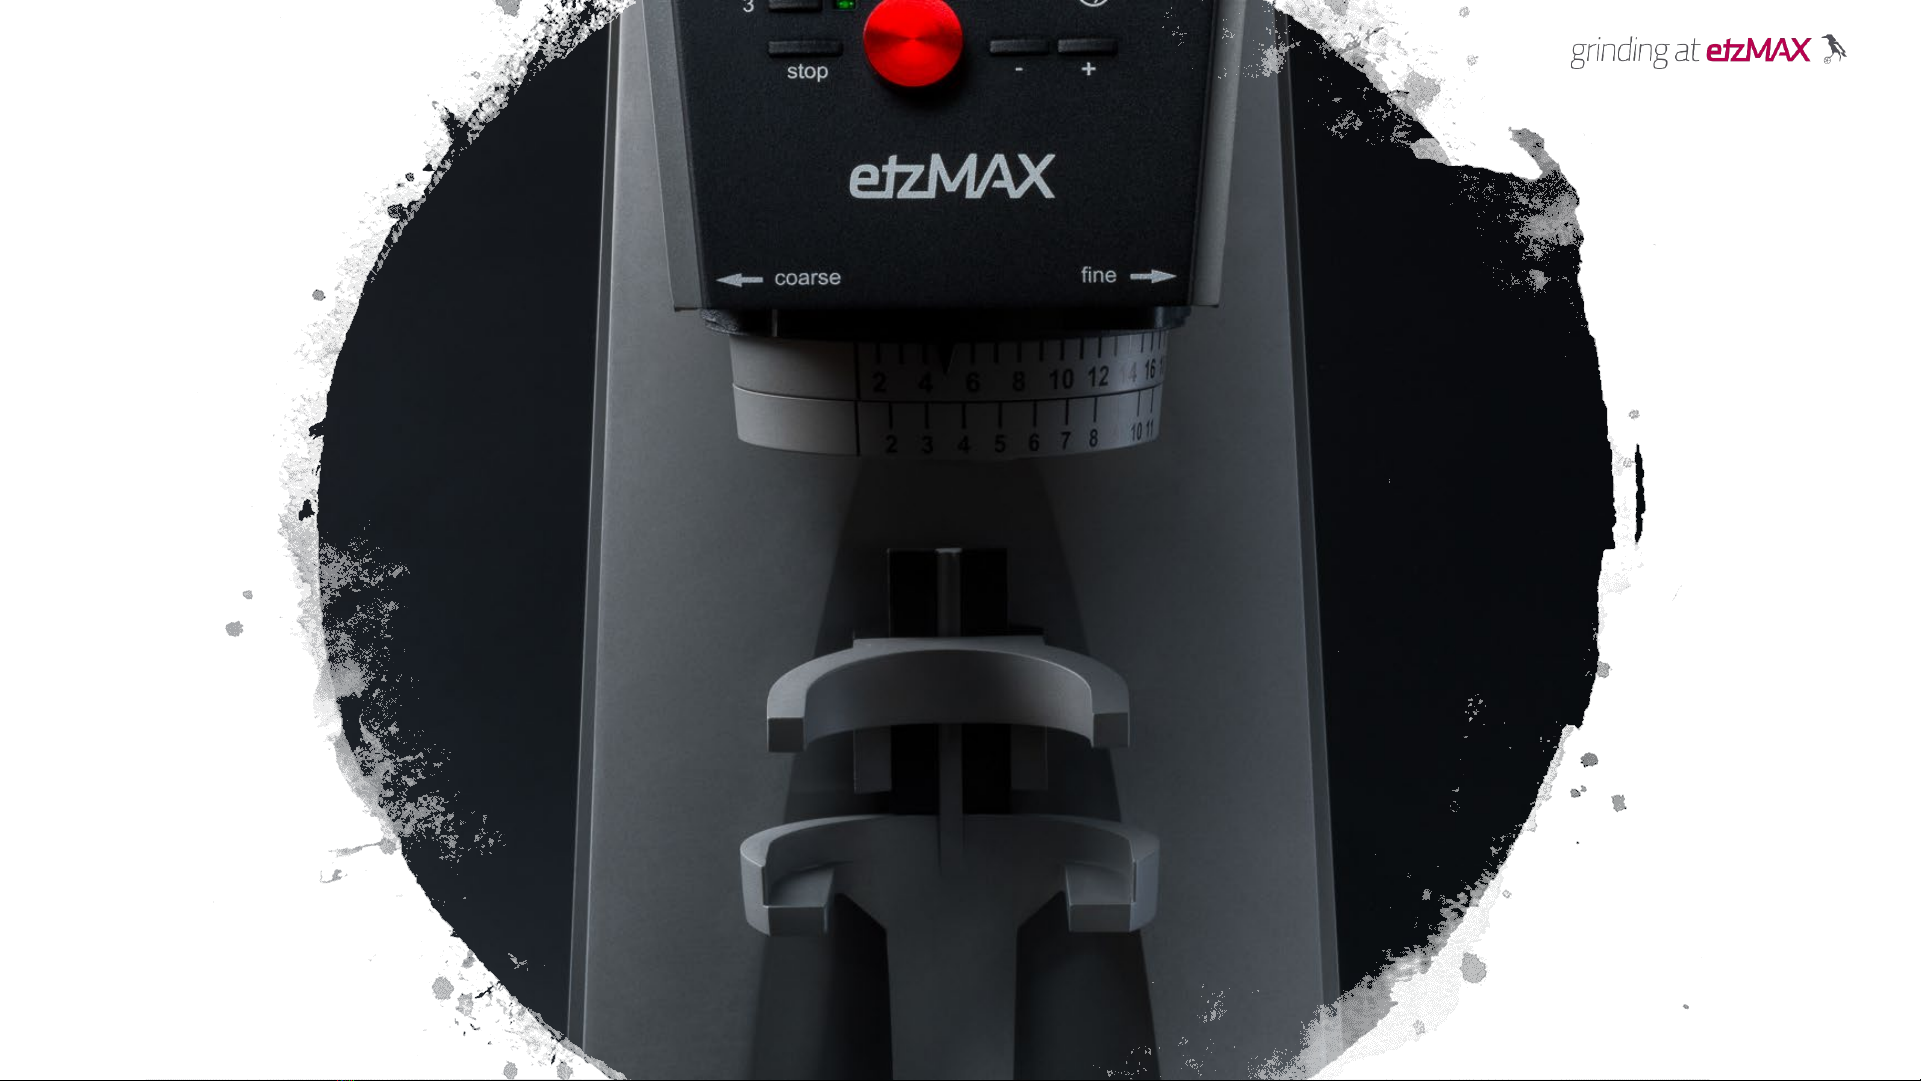
ADJUSTMENT
Fig. 7
CONE BURRS
LIGHT-Cone: All-purpose Espresso Cone
etzMAX-light/m/plus (installed), Espressokit (Delivery Content)
HIGH-Cone: Fast Espresso Cone, optimized for medium roasts
etzMAX-m/plus (Delivery Content), Espressokit (Delivery Content)
FILTER-Cone: Optimized for Filter (less fines)
etzMAX-filterL and etzMAX-filter (installed), Filterkit (Delivery Content)
NOTE: In case of blockades or uneven grinding or if you want to grind finer,
switch from HIGH-to LIGHT-cone.
Fig. 8
The Adjustment (Fig. 7) consists of a stepped macro adjust and a stepless micro adjust.
NOTE: At standstill, it is not possible to adjust more than 1 step on the macro or 5
steps on the micro ring (when going finer).
NOTE: Not following our recommendations (cleaning, use of oily roasts, ..) and/or not
adhering to the recommended settings (too fine, too coarse –beyond 16) may result
in clogging and/or defects to the Adjustment.
To move from coarse to fine turn the macro-
(top) ring to the right (Direction FINE),
with the grinder running.
To move from fine to coarse, turn the macro ring to the left (Direction COARSE). The
pointer (Fig. 7) indicates your macro-setting. The micro adjust (bottom ring) ranges
from coarse (11) to fine (1) steplessly and allows for even more precise grind settings
(Click 1 on macro ring serves as reference point for the micro ring).

Default Setting
Espressomühlen: 1 = 14g 2 = 18g 3 = 22g
Filtermühlen:1 = 20g 2 = 30g 3 = 40g
PROGRAMMING of time-based versions (T)
The etzMAX User Interface is equipped with three programmable buttons labeled 1, 2
and 3. These buttons adjust the grind time in seconds but not the grind setting
(Coarse/Fine).
Default Setting
Espresso Grinders: 1 = 4.3 sec 2 = 5.6 sec 3 = 7.0 sec
Filter Grinders: 1 = 4.5 sec 2 = 6.7 sec 3 = 8.9 sec
Fig. 9
NOTE: Install Grinder on an even, stable and vibration-free surface. Be aware, that
the weight-based etzMAX is optimized to be used with Portafilters (max. 2kg).
Other receptacles (lighter / heavier) may have an impact on accuracy and cause
malfunctions and/or error codes.
The weighing system is self-regulating. Accuracy improves with the number of
grinding operations within the same parameters (same roast, same setting). After
change of roast or setting, it takes a couple of grinding operations for the system to
adjust accordingly.
To change the setting, proceed as follows:
1. Select a Preset button (1, 2, 3)
2. Press + or –to program the time (in seconds)
3. Once the desired time setting in seconds is reached, press and hold the selected
button for 3 seconds. The display will flash to confirm the setting.
Repeat steps 1-3 to program the other buttons.
TIME-BASED-GRINDING (T-versions)
Press the desired Preset-button (1, 2, 3). Display will show the programmed grind time in
seconds. Press START. While grinding, the display is counting the seconds and comes to a
halt when the custom time is reached. The motor will stop, and display will reset to the
programmed time.
The etzMAX will go into SLEEP MODE after 4 hours of non-use.
To reactivate grinder, press any button on the User Interface.
For grinding in manual mode, press and hold START button until you reach the desired
quantity of ground coffee. Release START button, and the grinder will stop with the display
showing the total number of seconds run. To return to automatic mode, press STOP.
To change the setting, proceed as follows:
1. Select a Preset button (1, 2, 3)
2. Press + or –to program the weight (in grams)
3. Once the desired weight setting in grams is reached, press and hold the selected
button for 3 seconds. The display will flash to confirm the setting and you will hear a
confirmation sound. Repeat steps 1-3 to program the other buttons.
PROGRAMMING of weight-based versions (W)
The etzMAX User Interface is equipped with three programmable buttons labeled 1, 2
and 3 (Fig. 9). These buttons adjust the grind weight in grams but not the grind setting
(Coarse/Fine).
NOTE: Should the etzMAX be in time-based mode (Fig. 12) when being operated for
the very first time, switch to weight-based mode by pressing STOP and 1 for at least
5 seconds.

Fig. 10
GRINDING weight-based versions (W)
All W-versions may be operated in time-or weight-based as well as in SCALE-
only-mode!
Fig. 11 Fig. 12
Time-based Mode Scale-only-mode
Weight-based Mode
NOTE: From Scale-only-mode, the system will always return to the mode
it was in before switching.
CHANGE of MODE -Combinations:
Weight (gr) to Time(Sec) and back: STOP and 1 (at least 5 sec)
Weight (gr) or Time (Sec) to Scale-only and back: STOP (at least 5 sec)
Weight-based GRINDING
WEIGHT-BASED: Press the desired Preset-
button (1, 2, 3). Display will show the
programmed weight in grams. Press START.
While grinding, the display is showing the
corresponding grams and comes to a halt
when the custom weight is reached. The
motor will stop, and the display will reset to
the programmed weight.
The etzMAX will go into SLEEP MODE after 4 hours of non-use. To reactivate the
grinder, press any button on the User Interface.
SCALE ONLY
For using the scale independently from grinding, press STOP for at least 5
seconds. While in SCALE-mode, all LEDs stay illuminated and the Display
shows 0.0 (Fig. 11). To return to weight-based-grinding, press STOP for 5
seconds.
Time-based GRINDING (W-version)
To switch to time-based mode, simultaneously press STOP and 1 for 5
seconds. The display will now show the time in seconds, while a vertical
line on its left side indicates that you are in time-mode (Fig. 12). To return
to WEIGHT-based grinding, press STOP and 1 for 5 seconds.
To pause the grinding during operation, press START-button. By repeatedly
pushing START-button, the target weight may be reached in small steps of 0.1-
0.2g. For grinding in manual mode (or Purging), press and hold START until you
reach the desired weight. Release the START button. To return to automatic
mode, press STOP.
CLEANING the etzMAX
Cleaning Schedule: For commercial use, we recommend cleaning on a daily basis
or after grinding 1000-1500g of coffee.
Fig. 13 Fig. 14 Fig. 15
Fig. 16
NOTE: To remove remaining coffee powder (stuck in between the sealings),
occasionally (after cleaning) turn macro ring to finest setting (Click 1) with the
empty grinder running and back to your settings.
Rotate bean-blocker handle from OPEN to the front. Insert portafilter / place cup and
clear grinding chamber by grinding until empty (8.5g). Remove portafilter.
Disconnect from power supply.
Push both locking levers backwards as far as they will go. Lift off hopper (ensure lid is
closed) and place aside (Fig. 1). Close both locking levers. To remove portafilter
holder, pull it off the hook. Mark down settings!
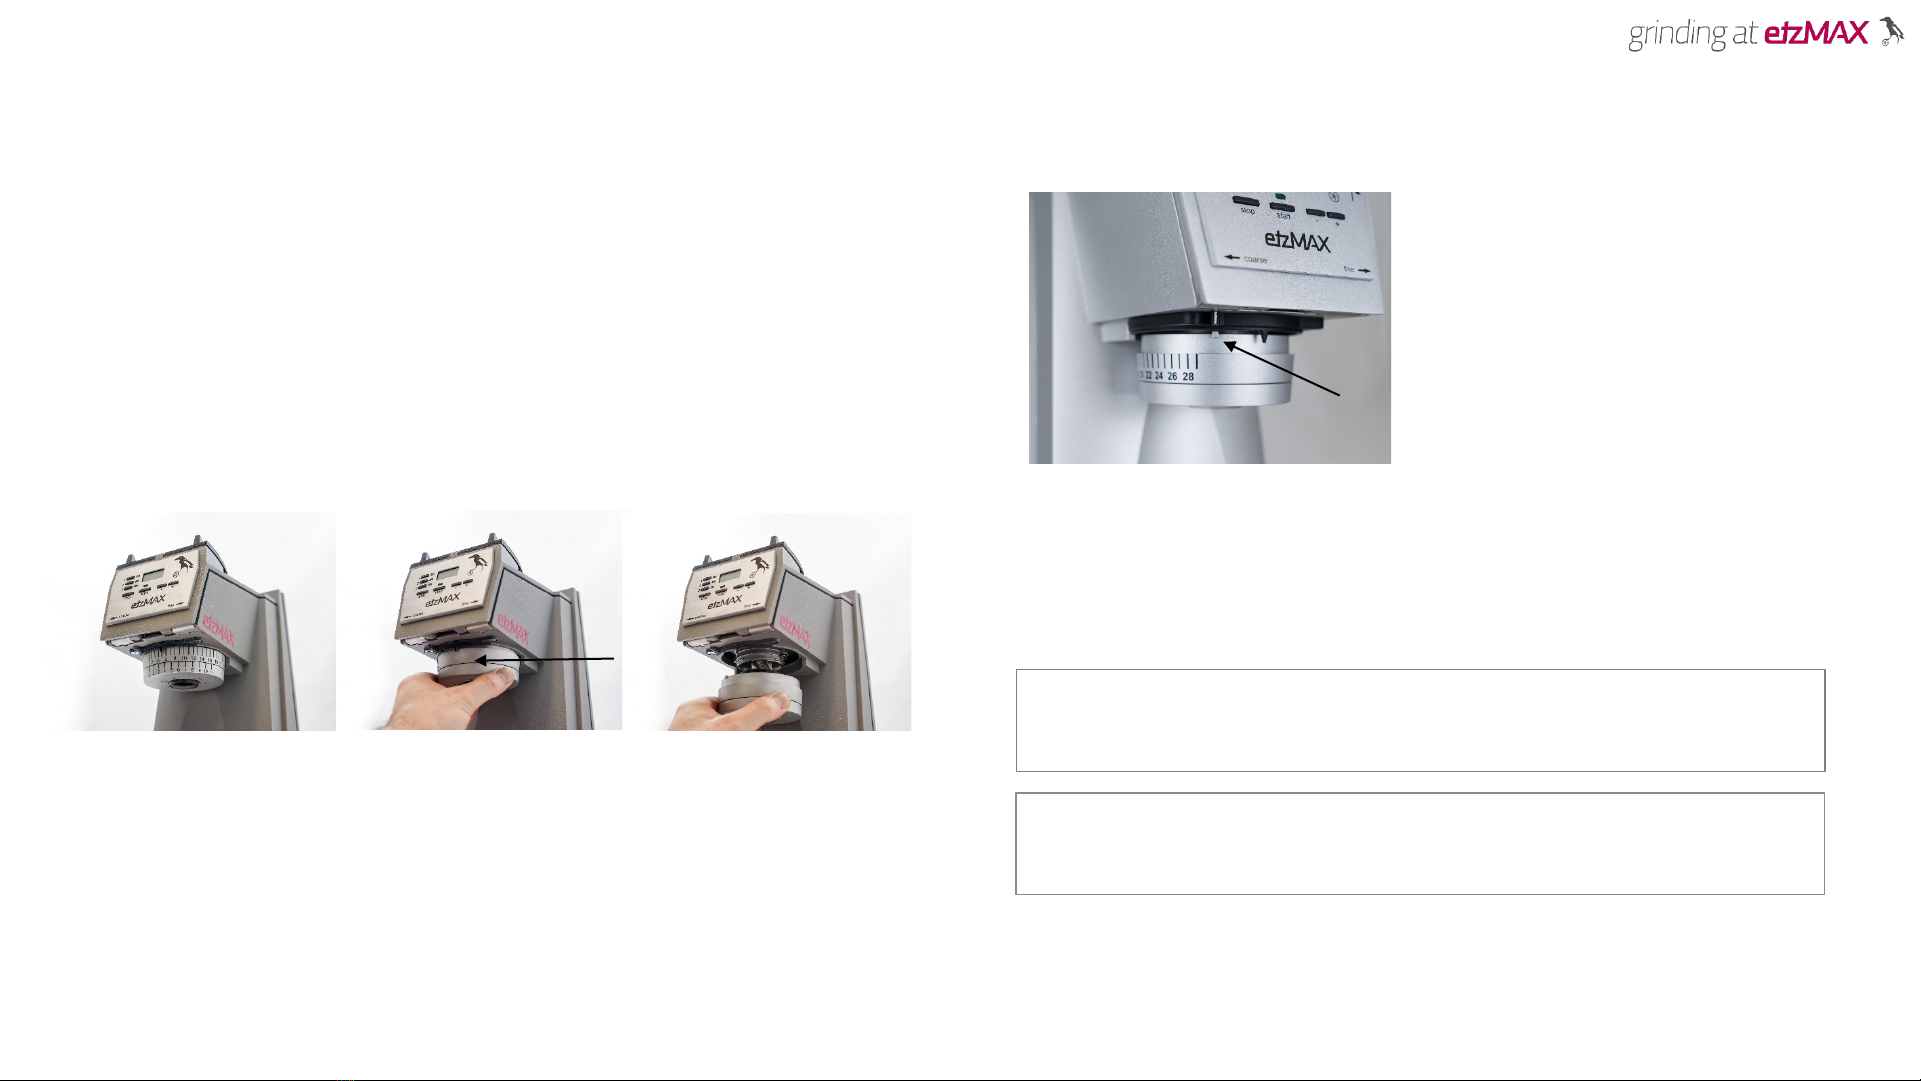
Remove adjustment by turning the macro-ring counterclockwise (Fig. 14) until you
feel no more resistance. Slowly pull it downwards and out (Fig. 15).
Open locking levers (Fig. 1), place back hopper and close locking levers (Fig. 2).
Carefully rotate bean-blocker handle all the way to the back to OPEN position
(Fig. 2). Connect to power supply.
To clean grinding chamber, insert bottlebrush from above through the hopper
opening. Use small brush to clean the coneholder. If removing coneholder for
cleaning, ensure it`s perfectly snapped in when reassembling.
Reassemble adjustment in reverse order
(reposition at 8 o`clock, see marking
before mounting, Fig. 16). Once
snapped in properly, turn and return to
your previous settings. Insert portafilter
holder / platform onto center hook
(Fig. 5).
NOTE: To clean the grinder or in case of clogging, IT IS NOT NECESSARY to open
the top cover lid. The lid only needs to be opened to replace etzJET (grinding
mechanism) or User Interface.

THANK YOU for
PLEASE NOTE SAFETY INSTRUCTIONS
NOTE: The Main Switch (ON/OFF = Circuit Breaker) is located at the bottom of the
grinder. When not in use, it is NOT necessary/recommended to turn off the grinder,
as –after 4 hours of non-use -it will go into SLEEP MODE automatically. Press any
button to reactive the grinder!
The etzMAX has been designed for grinding ON-DEMAND (not bulk). Our cones are
optimized for grinding quantities from 7 to 22g (Espresso) or 40g (Filter)
at settings between 3 and 8.
(Finer/coarser settings may cause blockades or damage to the Adjustment)
DO NOT grind light/hard beans at setting 1!
(HIGH-cone: to grind finer, switch from HIGH-to LIGHT-cone)
Clean your etzMAX regularly, especially before/after longer periods of non-use!
(Stiffened coffee powder may cause clogging/jamming)
OPERATION CYCLE
Maximum permissible operating cycle LIGHT/M: 1-1.5 double espresso à 16g/min
Maximum permissible operating cycle PLUS: 2 double espresso à 18g/min
(depending on roast/setting -also see Risk of Motor-Overheating)
Maximum permissible running time: 30 seconds followed by a 5 min cool-off-break
RISK of (Motor-) Overheating
The motor is equipped with a heat detector turning it off automatically when reaching
75°C and back on at 65°C.
For more information, consult our Operating Manual (Download from Website:
etzinger-ag.com), read our FAQs, watch our Video Tutorials and/or contact us via Email:
support@etzinger-ag.com.
Please read the information below very carefully. It contains important safety information for this
grinder. Please keep these instructions for future reference.
Use only with AC current and the correct voltage. See the label on the base of the grinder to
determine the correct voltage.
Only use the grinder for its intended purpose, the grinding of roasted whole coffee beans.
Clean the grinder housing with a dry or slightly damp cloth. Do not immerse the grinder, any
parts, plug or cord in water or any other liquid.
Do not touch the grinder with damp or wet hands and never operate it when barefoot.
Keep the grinder and its cord out of reach of children aged less than 8 years as well as pets.
Do never operate the grinder with a damaged cord or plug. Regularly inspect your grinder.
If the supply cord is damaged, it must be replaced by the manufacturer, its service agent or
similarly qualified persons in order to avoid a hazard.
Do not leave your grinder unattended during grinding.
This grinder can be used by children aged from 8 years and above and persons with reduced
physical, sensory or mental capabilities or lack of experience and knowledge if they have been
given supervision or instruction concerning use of the grinder in a safe way and understand
the
hazards involved.
Cleaning and user maintenance shall not be made by children without supervision by a
qualified person. Maintenance and repair work to be carried out by manufacturer, its service
agent or qualified persons only.
Always unplug the grinder from the electrical supply before assembling, disassembling,
repairing or cleaning. To unplug grasp plug and remove from outlet. Never pull on the cord.
DISCLAIMER OF LIABILITY
ETZINGER Engineering & AG will not accept any liability for damage, injury or warranty if the grinder
is used other than for its intended purpose, the grinding of roasted whole coffee beans, or is
improperly operated or repaired.
For more information contact us via Email: support@etzinger-ag.com
This manual suits for next models
13
Table of contents
Other Etzinger Coffee Grinder manuals


