EUCOL U2836 User manual

I
O
OP
PE
ER
RA
AT
TI
IO
ON
N
M
MA
AN
NU
UA
AL
L
U2836 Precision LCR meter
C
C
Ch
h
ha
a
an
n
ng
g
gz
z
zh
h
ho
o
ou
u
u
E
E
Eu
u
uc
c
co
o
ol
l
l
E
E
El
l
le
e
ec
c
ct
t
tr
r
ro
o
on
n
ni
i
ic
c
c
C
C
Co
o
o.
.
.
,
,
,
L
L
Lt
t
td
d
d.
.
.
A
A
Ad
d
dd
d
d:
:
:No.1, Ziyang Road, Tianning District, Changzhou, Jiangsu
T
T
Te
e
el
l
l:
:
:(
(
(0
0
05
5
51
1
19
9
9)
)
)8
8
85
5
55
5
50
0
05
5
51
1
19
9
99
9
9
F
F
Fa
a
ax
x
x:
:
:(
(
(0
0
05
5
51
1
19
9
9)
)
)8
8
85
5
55
5
50
0
05
5
51
1
16
6
69
9
9
E
E
E-
-
-m
m
ma
a
ai
i
il
l
l:
:
:
S
S
Sa
a
al
l
le
e
es
s
s@
@
@e
e
eu
u
uc
c
co
o
ol
l
l.
.
.c
c
co
o
om
m
m.
.
.c
c
cn
n
n
W
W
We
e
eb
b
bs
s
si
i
it
t
te
e
e:
:
:
h
h
ht
t
tt
t
tp
p
p:
:
:/
/
//
/
/
w
w
ww
w
ww
w
w.
.
.e
e
eu
u
uc
c
co
o
ol
l
l.
.
.c
c
co
o
om
m
m.
.
.c
c
cn
n
n

U2836 Operation Manual Contents
II
Contents
Chapter 1Out of Box Audit..........................................................................................................1
1.1To Inspect the package .................................................................................................1
1.2Power connection .........................................................................................................1
1.3Fuse ..............................................................................................................................1
1.4Environment.................................................................................................................2
1.5Use of Test Fixture .......................................................................................................2
1.6Warm-up.......................................................................................................................2
1.7Other features...............................................................................................................3
Chapter 2Introduction..................................................................................................................4
2.1Introduction to front panel ...........................................................................................4
2.2Introduction to rear panel .............................................................................................6
2.3Introduction to display zone.........................................................................................7
2.4Main menu keys and corresponding displayed pages ..................................................8
2.4.1[MEAS DISP] ......................................................................................................8
2.4.2[MEAS SETUP]...................................................................................................8
2.4.3[SYSTEM] ...........................................................................................................8
2.5Basic Operation............................................................................................................8
2.6Start the instrument ......................................................................................................9
Chapter 3Introduction to [MEAS DISP] ..........................................................................10
3.1<MEAS DISPLAY> ...............................................................................................10
3.1.1Test function.......................................................................................................11
3.1.2Test range ...........................................................................................................12
3.1.3Test frequency ....................................................................................................12
3.1.4Test level ............................................................................................................13
3.1.5Test speed ...........................................................................................................13
3.1.6Output Impedance ..............................................................................................14
3.1.7Tools...................................................................................................................14
3.2<BIN DISP>...............................................................................................................15
3.2.1Comparator function ..........................................................................................15
3.2.2BIN.....................................................................................................................16
3.2.3HIGH/LOW........................................................................................................16
3.2.4COUNT..............................................................................................................16
3.2.5AUX ...................................................................................................................16
3.2.6OUT ...................................................................................................................16
3.3<MEAS SETUP>.......................................................................................................17
3.3.1Trigger mode ......................................................................................................18
3.3.2Average ..............................................................................................................18
3.3.3Monitor function ................................................................................................19
3.3.4Delay time ..........................................................................................................20
3.3.5Output impedance ..............................................................................................20
3.3.6Deviation test function .......................................................................................21
3.4<CORRECTION>......................................................................................................22

U2836 Operation Manual Contents
III
3.4.1OPEN .................................................................................................................22
3.4.2SHORT...............................................................................................................23
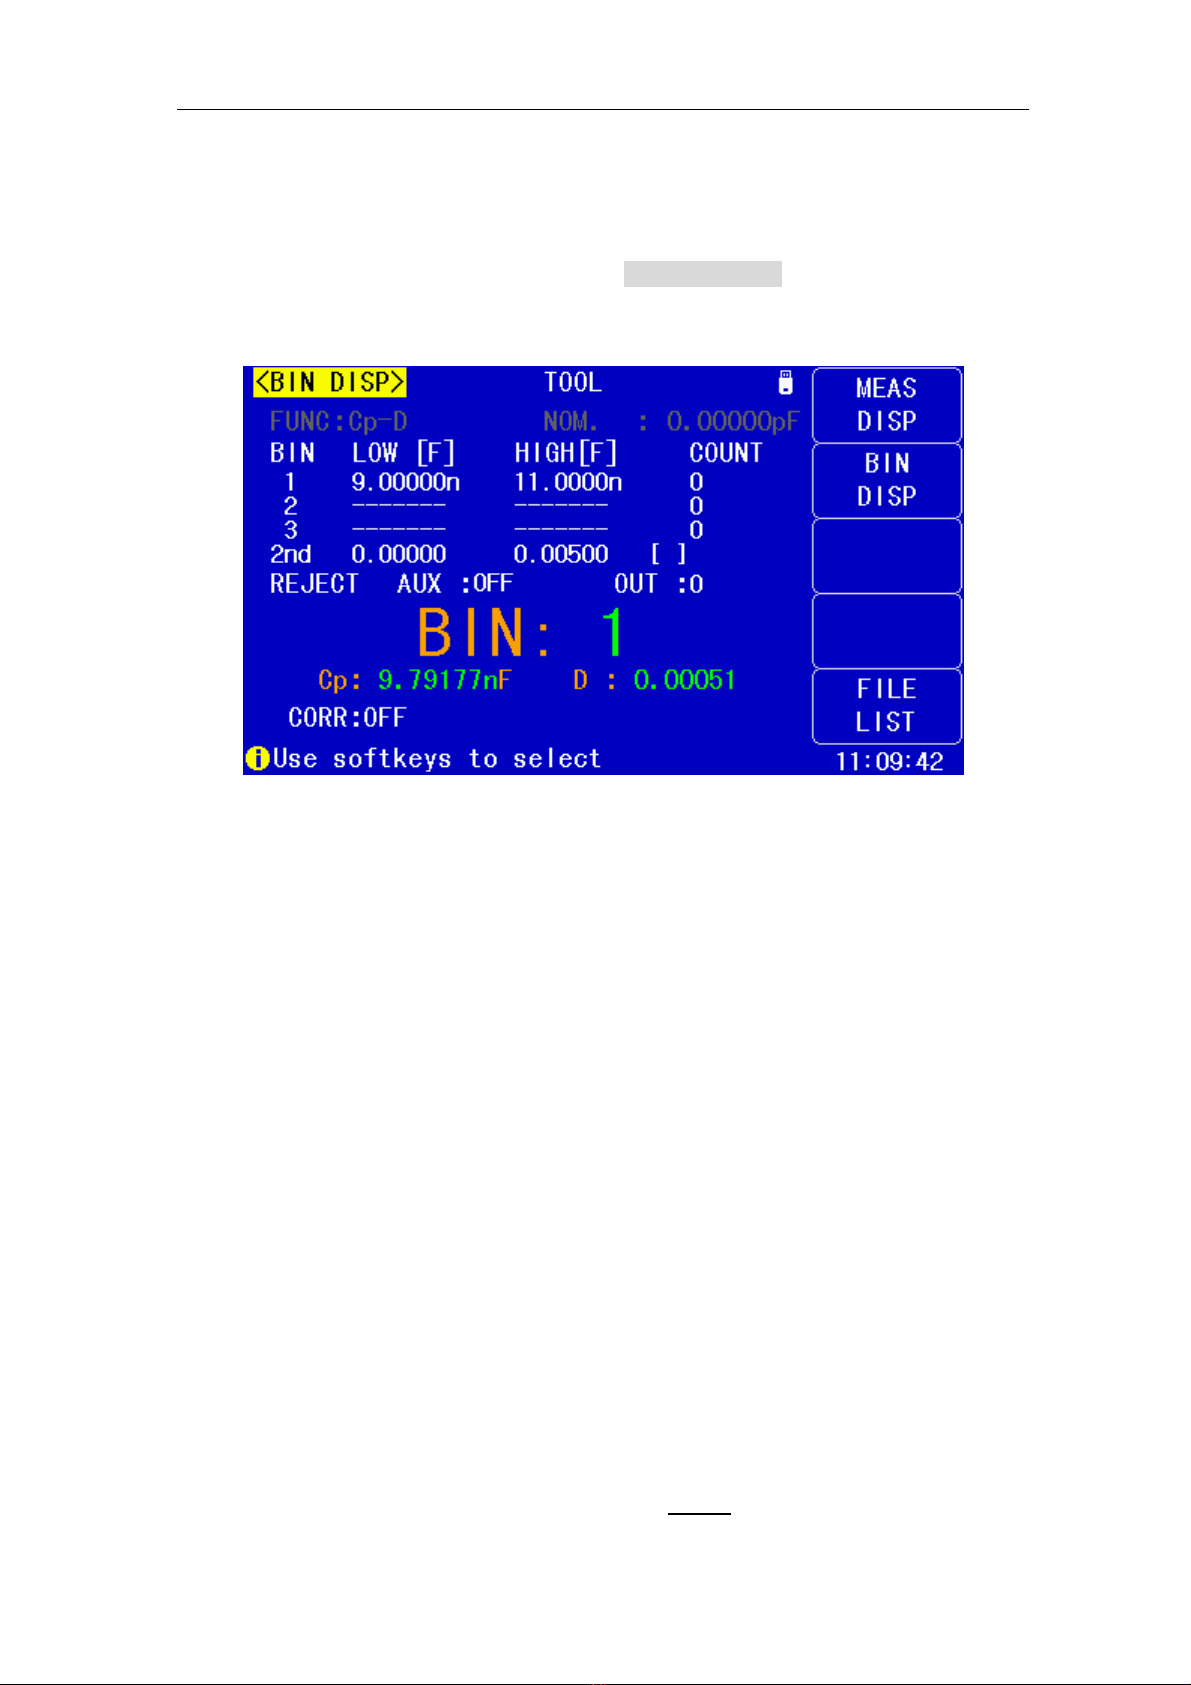
3.5<LIMIT TABLE>....................................................................................................24
3.5.1Swap parameter..................................................................................................25
3.5.2Limit modes of compare function ......................................................................26
3.5.3Set nominal value of tolerance mode .................................................................27
3.5.4Comparator function ON/OFF ...........................................................................27
3.5.5Auxiliary bin ON/OFF .......................................................................................27
3.5.6HIGH/LOW........................................................................................................28
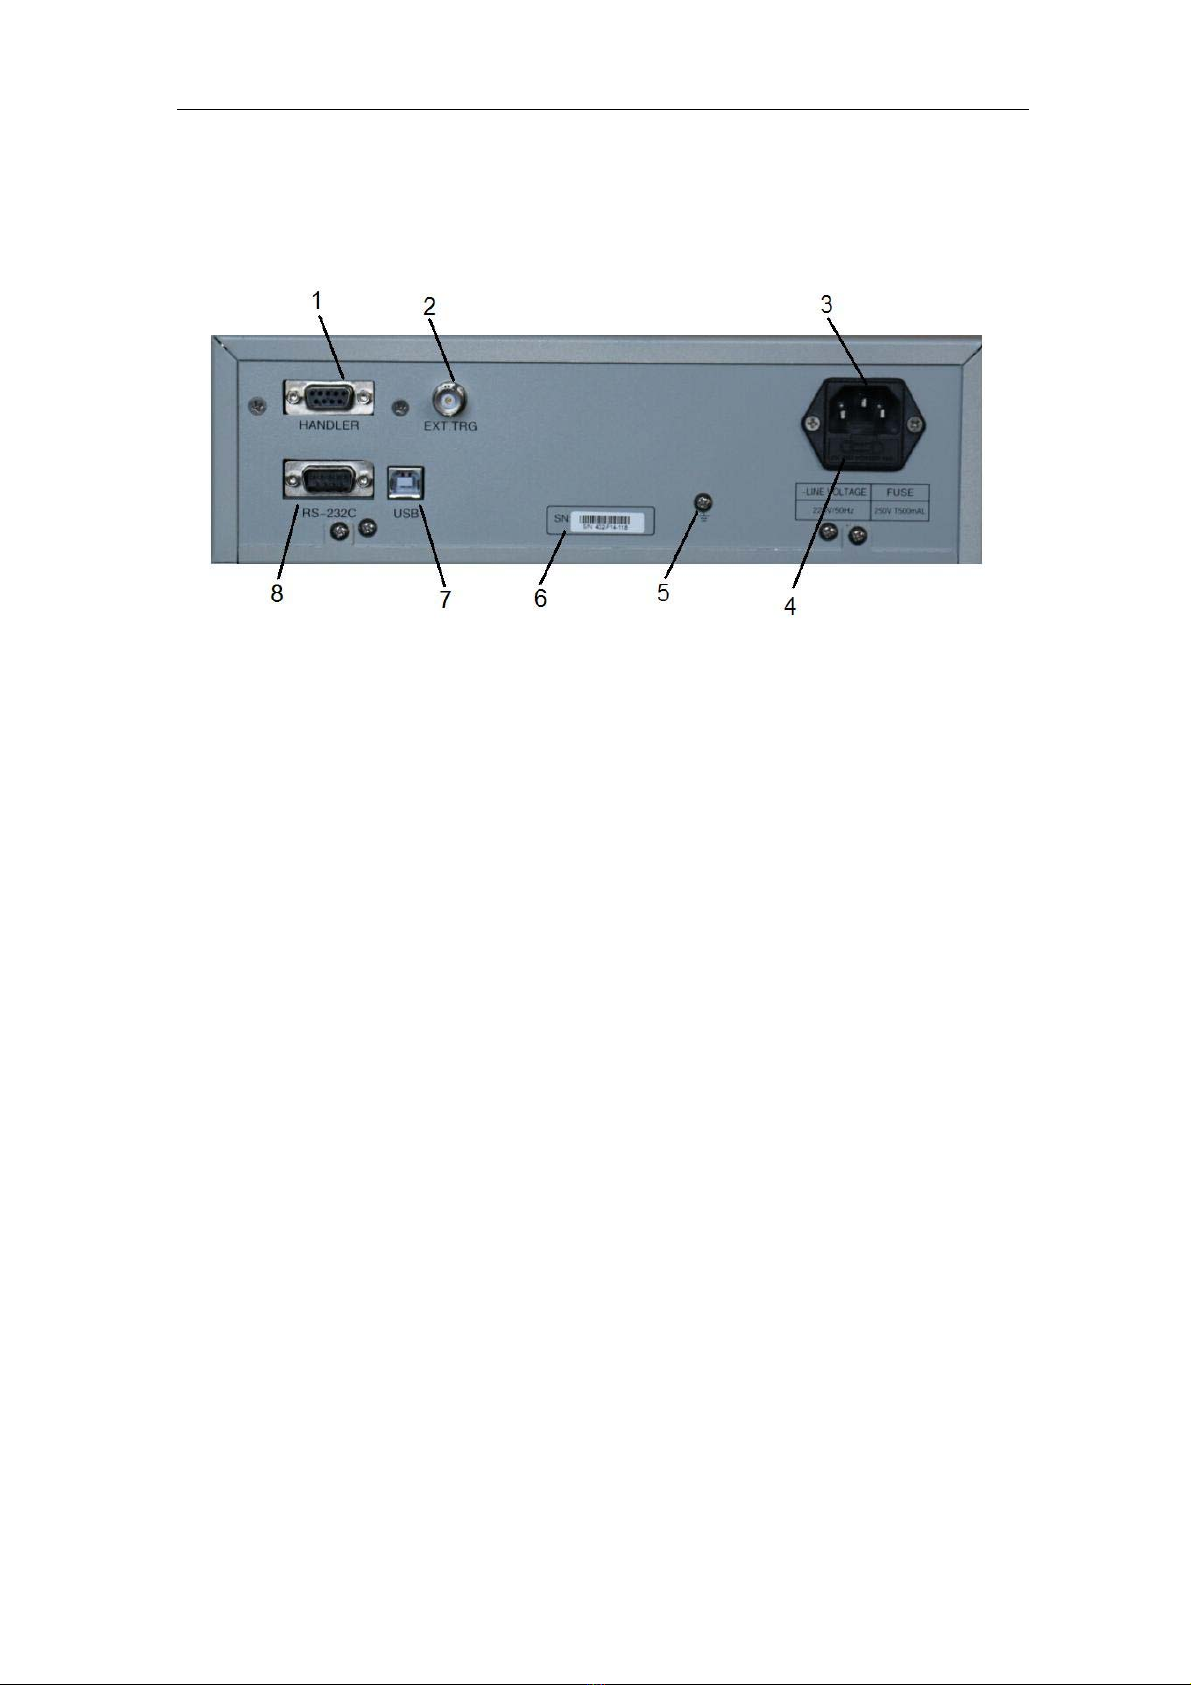
Chapter 4SYSTEM and FILE ................................................................................................30
4.1<SYSTEM> ...............................................................................................................30
4.1.1SKIN ..................................................................................................................30
4.1.2LANGUAGE......................................................................................................30
4.1.3PASS ALARM ...................................................................................................31
4.1.4FAIL ALARM ....................................................................................................31
4.1.5KEY SOUND.....................................................................................................31
4.1.6PASSWORD ......................................................................................................32
4.1.7SAVE TYPE.......................................................................................................32
4.1.8BUS MODE .......................................................................................................32
4.1.9BAUD RATE .....................................................................................................33
4.1.10DATA/TIME ......................................................................................................33
4.1.11SYSTEM INFORMATION................................................................................33
4.1.12FIRMWARE UPDATE ......................................................................................34
4.1.13SYSTEM TEST .................................................................................................34
4.2<FILE> ....................................................................................................................35
4.2.1Setup file for single-group component (*.EST) .................................................35
4.2.2U-disk manage performance ..............................................................................36
4.2.3Operation steps for file management..................................................................36
Chapter 5Execute LCR operation and some examples..............................................................38
5.1Correct connection of DUT........................................................................................38
5.2Eliminate the influence of stray impedance ...............................................................39
5.3Operation example for testing inductance with U2836..............................................41
Chapter 6Performance and Test .................................................................................................43
6.1Test function...............................................................................................................43
6.1.1Parameter and symbol...............................................................................43
6.1.2Test combination..........................................................................................43
6.1.3Mathematical operation.............................................................................43
6.1.4Equivalent mode ..........................................................................................43
6.1.5Range ...............................................................................................................43
6.1.6Trigger..............................................................................................................43
6.1.7Delay time ......................................................................................................44
6.1.8Connection modes of test terminals.....................................................44
6.1.9Test speed (Frequency>=10kHz)..........................................................44
6.1.10Average ...........................................................................................................44

U2836 Operation Manual Contents
IV
6.1.11Display digit...................................................................................................44
6.2Test signal ..................................................................................................................44
6.2.1Test signal frequency .................................................................................44
6.2.2Signal mode...................................................................................................44
6.2.3Test signal level............................................................................................45
6.2.4Output impedance.......................................................................................45
6.2.5Monitor for test signal level.....................................................................45
6.2.6Maximum measurement display range ...............................................45
6.3Measurement accuracy...............................................................................................45
6.3.1Accuracies of │Z│,│Y│, L, C, R, X, G, B........................................45
6.3.2Accuracy of D ................................................................................................46
6.3.3Accuracy of Q ................................................................................................46
6.3.4Accuracy of θ.................................................................................................46
6.3.5Accuracy of G ................................................................................................47
6.3.6Accuracy of Rp..............................................................................................47
6.3.7The accuracy of Rs......................................................................................47
6.3.8Accuracy factor.............................................................................................47
6.3.9Accuracy of DCR...........................................................................................50
6.4Safety requirement .....................................................................................................50
6.4.1Insulation resistance ..................................................................................50
6.4.2Insulation intensity .....................................................................................51
6.4.3Leakage current ...........................................................................................51
6.5Electromagnetic compatibility ...................................................................................51
6.6Performance test.........................................................................................................51
6.6.1Working condition........................................................................................51
6.6.2The used instruments and devices .......................................................52
6.6.3Function check..............................................................................................52
6.6.4Test signal level............................................................................................52
6.6.5Frequency.......................................................................................................53
6.6.6Measurement accuracy..............................................................................53
6.6.7Accuracy of C and D ...................................................................................53
6.6.8Accuracy of L.................................................................................................53
6.6.9Accuracy of Z ................................................................................................53
Announcement
The description of the manual may not cover all contents of the instrument, and
our company is subject to change and to improve the performance, function,
inner structure, appearance, accessory and package of the instrument without
notice. If there is puzzle caused by inconsistency of manual and instrument, then
you can contact with our company by the address on the cover.

U2836 Operation Manual Chapter 1 Out of Box Audit
1
Chapter 1 Out of Box Audit
When you receive the instrument, some inspections are necessary, and the
condition must be understood and available before installing the instrument.
1.1 To Inspect the package
Inspect the shipping container for damage after unpacking it. It is not
recommended to power on the instrument in the case of a damaged container.
If the contents in the container do not conform to the packing list, notify us or
your dealer.
1.2 Power connection
1) Power-supplying voltage range: 99~243Vac. Being related with the power
setup on the rear panel.
2) Power-supplying frequency range: 47~63Hz.
3) Power-supplying power range: less than 20VA.
4) Power supplying input phase line L, zero line N, ground lead E should be as
same as the power plug of the instrument.
5) After careful design, the instrument can reduce the clutter jamming caused
by AC power terminal input, however, it should be used under the
environment with low-noise. Please install power filter if being unavoidable.
———————————————————————————————————————
Warning: In order to prevent user and instrument from being hurt by
leakage, it is necessary for user to guarantee the ground line of supply
power being reliably grounded.
———————————————————————————————————————
1.3 Fuse
The instrument has installed fuse, so operators should use the installed fuse of
our company.
———————————————————————————————————————
Warning: Be sure that the location of fuse is consistent with
power-supplying voltage range before charging.
———————————————————————————————————————

U2836 Operation Manual Chapter 1 Out of Box Audit
2
1.4 Environment
1) Please do not operate the instrument in the place that is vibrative, dusty,
under direct sunlight or where there is corrosive air.
2) The normal working temperature is 0℃~40℃, relative humidity ≤75%, so
the instrument should be used under above condition to guarantee the
accuracy.
3) There is heat abstractor on the rear panel to avoid the inner temperature
rising. In order to keep good airiness, please don’t obstruct the left and right
airiness holes to make the instrument maintain the accuracy.
4) Although the instrument has been specially designed for reducing the noise
caused by ac power, a place with low noise is still recommended. If this
cannot be arranged, please make sure to use power filter for the instrument.
5) Please store the instrument in the place where temperature is between 5℃
and 40℃, humidity is less than 85%RH. If the instrument will not be put in
use for a time, please have it properly packed with its original box or a similar
box for storing.
6) The instrument, especially the test cable should be far from strong
electro-magnetic field, to avoid the jamming on measurement.
1.5 Use of Test Fixture
Please use the accessory test fixture or cable, the test fixture made by user or
from other company may cause the incorrect measurement result. The
test fixture or cable should be kept clean, as well as the pin of DUT, thus to
guarantee the good connection between DUT and fixture.
Connect the fixture or cable to four test terminals Hcur, Hpot, Lcur, Lpot on the
front panel. As for the DUT with shielding shell, connect shielding layer or ground
“”.
Note: When test fixture or cable has not being installed, the instrument will
display an unstable test result.
1.6 Warm-up
1) To guarantee the accurate measurement, the warm-up time is no less than
15min.
2) Please not turn on or off instrument frequently, in order to avoid the inner
data fluster.

U2836 Operation Manual Chapter 1 Out of Box Audit
3
1.7 Other features
1) Power: consumption power≤20VA.
2) Dimension (W*H*D): 280mm*88mm*320mm
3) Weight: About 3.5kg.

U2836 Operation Manual Chapter 2 Introduction
4
Chapter 2 Introduction
In this chapter, the basic operation features of U2836 are described. Please read
the content carefully before using U2836 instruments, thus you can learn the
operation of U2836.
2.1 Introduction to front panel
Figure 2-1 shows the front panel of U2836.
1) POWER
Power switch
2) Brand and model
Brand and model
3) USB HOST interface
Connect U flash disk so as to save or use a specified file.
4) [MEAS SETUP]
Press this key to enter into the setup page of measurement setup.
5) [SYSTEM]
Press this key to enter into the system setup page.
6) Ground terminal
The ground terminal is connected with the case of instrument, which can be
used to protect or shield the ground connection.
7) Test terminals (UNKNOWN)
4-teminal test pair are used to connect 4-terminal test fixture or cable to
measure DUT.
The 4 terminals are respectively as follows: Hcur, Hpot, Lpot and Lcur.
8) [ENTER]
This key is used to end the input of data, and confirm and save the data
displayed on the inputting line (the bottom line on LCD).

U2836 Operation Manual Chapter 2 Introduction
5
9) [TRIG]
When the trigger mode is set to MAN mode, press this key to trigger the
instrument.
10) [LOCK/LOCAL]
Press this key, the buzzer will beep, which means the function of current
panel is locked. Press it again, it will be off, which means discharging the lock
status. If the password function is ON, it means correct password is
necessary when discharging the key-lock, or the key cannot be unlocked.
11) [CLEAR]
Execute the calibration operation. Press this key to execute OPEN/SHORT
calibration.
12) [ESC]
ESCAPE key
13) [←]
BACKSPACE key is used delete the last numeric of the input value.
14) Numerical keys
These keys are used to input data to the instrument. The key consists of
numerical keys [0] to [9], decimal point [.] and [+/-] key.
15) FAIL indicator
LED indicator shows the test result has failed.
16) CURSOR
This key is used to move the cursor on the LCD displayed page. When the
cursor moves to a zone, the corresponding zone will be lightened.
17) PASS indicator
LED indicator shows the test result has passed.
18) [MEAS DISP]
Press this key to enter into the display page of measurement display.
19) Soft keys
Five soft keys are used to select parameters. The corresponding function of
each soft key has been displayed on its left (the right part of LCD). The
function definition varies with different pages.
20) LCD
480*272 colorful TFT LCD displays measurement results and conditions.

U2836 Operation Manual Chapter 2 Introduction
6
2.2 Introduction to rear panel
Figure 2-2 shows the rear panel of U2836.
1) HANDLER interface
Handler interface is used to realize the sorting output of test results.
2) External trigger interface
Handler interface is used to realize the sorting output of test results.
3) Power socket
Input AC power.
4) Fuse base
Being used to install power fuse, protect instrument.
———————————————————————————————————————
Warning: Be sure that the direction of fuse is accordant with
power-supply voltage range before charging.
———————————————————————————————————————
5) Ground terminal
The ground terminal is connected with instrument casing, being available for
protecting or shielding ground connection.
6) Serial number
Information about production date, instrument number and manufacturer
etc..
7) USB DEVICE interface
The tester can communicate with PC through the USB DEVICE interface.
8) RS232 interface
Series communication interface can realize the communication with PC.

U2836 Operation Manual Chapter 2 Introduction
7
2.3 Introduction to display zone
U2836 applies a 65k, 4.3-inch TFT display. The display screen is divided into the
following zones:
Figure 2-3 display zones
1) Display page name
Indicate the name of the currently displayed page.
2) Tools menu
When the cursor moved the area, the softkey area will display the
corresponding specific tools.
3) System icon zone
In this zone, display the system status:
U disk is connected
Romot control status.
±Keyboard locked.
§Data recording status.
4) Soft keys
The zone is used to display the function definition of soft key. The definition of
soft key can be different as the difference of cursor’s direction in the zone.
5) Time
Display the current time.
6) Test result/ condition display zone
In this zone, test result information and current condition are displayed.
7) Help
In this zone, information about system and user data input is displayed.

U2836 Operation Manual Chapter 2 Introduction
8
2.4 Main menu keys and corresponding displayed
pages
2.4.1 [MEAS DISP]
Press this key-[MEAS DISP] to enter into the LCR measurement display page,
the following soft keys will be displayed in the soft key zone.
<MEAS DISPLAY>
<BIN DISPLAY>
<FILE LIST>
2.4.2 [MEAS SETUP]
Press this key-[MEAS SETUP], the following soft keys will be displayed in the
soft key zone on the LCR measurement setup page.
<MEAS SETUP>
<LIMIT TABLE>
<FILE LIST>
2.4.3 [SYSTEM]
This key-[SYSTEM] is used to enter into the system setup page. The following
soft keys will be available:
<SYSTEM SETUP>
<SYSTEM INFO>
<FIRMWARE UPDATE>
<SYSTEM TEST>
<FILE LIST>
2.5 Basic Operation
Basic operation of U2836 is as follows:
Use menu keys ([MEAS DISP], [MEAS SETUP], [SYSTEM]) and soft keys to
select the desired page.
Use cursor keys ([←][→]) to move the cursor to the desired zone. When the
cursor moves to a specified zone, the zone will become reverse expression.
The soft key functions corresponding to the current zone of the cursor will be
displayed in the soft key zone. Users can select and use the desired key.
Numeric keys, [BACKSPACE] and [ENTER] are used to input data.
When a numeric key is pressed down, the usable unit soft key will be

U2836 Operation Manual Chapter 2 Introduction
9
displayed in the soft key zone. You can choose a unit soft key or press [ENTER]
to end data inputting. When [ENTER] is used to terminate data inputting, the
unit of data will be set to a default unit, such as Hz, V or A. For example, the
default unit for frequency is Hz.
2.6 Start the instrument
Plug in 3-line power plug.
Caution: Keep the power-supply voltage and frequency conform to above
specifications. Power input phase line L, zero line N, ground line E should be the
same as that of the instrument.
Press the power switch at the left corner on the front panel and then a boot screen
will appear which displays our company logo.
If the password protection function is on, users are required to input the
password and then press [ENTER] to enter into the page of main menu.
———————————————————————————————————————
Note: The instrument has a default password-123456. In your practical use,
you can change it and set your own one. Please see <SYSTEM> section for more
information.

U2836 Operation Manual Chapter 3 Introduction to [MEAS DISP]
10
Chapter 3 Introduction to [MEAS
DISP]
3.1 <MEAS DISPLAY>
Press [MEAS], the <MEAS DISPLAY> page will be displayed on screen as shown in
the following figure.
On this page, the test result is displayed. The measurement control parameters
can be set in this page:
Test function (FUNC)
Test frequency (FREQ)
Test level (LEVEL)
Test range ( RANGE)
Test speed (SPEED)
Output impedance(RSOU)
There are 6 zones in this page: FUN, FREQ, LEVEL, RANG, SPEED, RSOU. The
details will be discussed later.
The test result/ condition display zone shows the information about test condition.
These conditions can be set on <Meas Setup> page or <Correction> page.
Signal source voltage/ current monitor (Vm, Im)
Open, shortcorrection ON/OFF status (CORR)

U2836 Operation Manual Chapter 3 Introduction to [MEAS DISP]
11
3.1.1 Test function
In a measurement period, U2836 can test two parameters for an impedance
component. Parameters that can be tested are as follows:
Primary parameters
|Z| (Module of impedance)
L (Inductance)
C (Capacitance)
R (Resistance)
G (Conductance)
Secondary Parameters
D (Dissipation factor)
Q (Quality factor)
Rs (Equivalent Series Resistance ESR)
Rp (Equivalent Parallel Resistance)
X (Reactance)
B (Admittance)
θ(Phase Angle)
Test results of primary and secondary parameters are respectively displayed in
two lines in the form of upper-case characters. The primary parameter displays in
the upper line while the secondary parameter displays in the lower line.
Operation steps for setting test function:
1) Move the cursor to FUNC zone, the following soft keys will be displayed on the
screen.
Cp—D
Cp—Rp
Cs—D
Cs—Rs
More 1/3
2) Select and press a softkey to set test function. If the softkey you need is not
displayed on the page,press More to display the following softkeys.
Ls—Q
Ls—Rs
Lp—Q
Lp—Rp
More 2/3
3) Select and press a softkey to set test function. If the softkey you need is not
displayed on the page,press More to display the following softkeys.
R—X
Z—θr
Z—θ°
G—B
More 3/3

U2836 Operation Manual Chapter 3 Introduction to [MEAS DISP]
12
3.1.2 Test range
Measurement range should be selected in accordance with the impedance value
of the tested LCR component.
U2836 has 5 AC measurement ranges: 30Ω, 100Ω, 1kΩ, 10kΩand 100kΩ.
When the output impedance is selected as 30Ωand 50Ω, U2836 has 6 AC
measurement ranges: 10Ω, 30Ω, 100Ω, 1kΩ, 10kΩand 100kΩ.
Operation steps for setting test range:
1) Move the cursor to the range zone, the following soft keys will be displayed:
AUTO The soft key is used to set the range mode to AUTO.
HOLD The soft key is used to switch the AUTO mode to the HOLD mode.
When the range mode is set to HOLD, the range will be locked in the
current measurement range. The current measurement range will be
displayed in the range zone.
INCR+ The soft key is used to increase the range under HOLD mode.
DECR- The soft key is used to decrease the range under HOLD mode.
2) Use soft keys to set measurement range.
3.1.3 Test frequency
The measurement range of U2836 ranges from 50Hz to 200kHz, total 37
frequency points.
Operation steps for setting test frequency:
U2836 provides two methods to set measurement frequency. The first one is to
use soft keys and the other one is to input data by using numeric keys.
1) Move the cursor to the FREQ zone, the following soft keys will be displayed.
INCR++
This is a coarse adjustment soft key used to increase the frequency. Press
this key, the frequency will change as the following sequence: 50Hz,
100Hz, 1kHz, 10kHz, 100kHz, 200kHz.
INCR+
This is a fine adjustment soft key used to increase the frequency. Press
this key, the frequency will switch between the following ones:
50 Hz 100 Hz 1 kHz 10 kHz 100 kHz
60Hz 120 Hz 1.2 kHz 12 kHz 120 kHz
80 Hz 150 Hz 1.5 kHz 15 kHz 150 kHz
200 Hz 2 kHz 20 kHz 200 kHz
250 Hz 2.5 kHz 25 kHz
300 Hz 3 kHz 30 kHz
400 Hz 4 kHz 40 kHz
500 Hz 5 kHz 50 kHz
600 Hz 6 kHz 60 kHz

U2836 Operation Manual Chapter 3 Introduction to [MEAS DISP]
13
800 Hz 8 kHz 80 kHz
DECR-
This is a fine adjustment soft key used to decrease the frequency. The
selectable frequencies are the same as that of INCR+.
DECR--
This is a coarse adjustment soft key used to decrease the frequency. The
selectable frequencies are the same as that of INCR++.
2) Use soft keys or numeric keys to select or set frequency. When using numeric
keys to input the required frequency value, the soft key displays the available
frequency units (Hz and kHz). You can use unit soft key to input unit and data.
When using [ENTER] to input frequency, the default unit is Hz.
3.1.4 Test level
The measurement level of U2836 can be set from 10mV to 2.0V with the
resolution of 10mV.
Operation steps for setting test level:
U2836 provides two methods to set the level of test signal source. The first one is
to use soft keys, while the second one is to input data by numeric keys.
1) Move the cursor to LEVEL, the following soft keys will be displayed.
INCR+
This soft key is used to increase the level of test signal source.
DECR-
This soft key is used to decrease the level of test signal source.
2) Soft or numeric keys are used to select or set the test level. When numeric
keys are used to input the desired level, the available units (mV, V) will be
displayed in the soft key zone. Users can use these unit keys to input unit and
data.
3.1.5 Test speed
The test speed of U2836 is determined by the following factors:
Integration time (A/D conversion)
Average times (average test times per each test)
Measurement delay (from startup to the start of measurement)
Display time of test results
You can select test mode as FAST, MED or SLOW. Generally, the test result is more
stable and accurate in SLOW test mode.
Operation steps for setting test speed:
1) Move the cursor to SPEED, the following soft keys will be displayed:
FAST
MED
SLOW
2) Use above soft keys to set the test speed.

U2836 Operation Manual Chapter 3 Introduction to [MEAS DISP]
14
3.1.6 Output Impedance
The output impedance of U2836 can be set as 30Ω,30Ωand 100Ω.
Operation steps for setting output impedance:
3) Move the cursor to RSOU, the following soft keys will be displayed:
100Ω
50Ω
30Ω
4) Use above soft keys to set the output impedance.
3.1.7 Tools
The test result of U2836 is displayed as 6 floating-point digits. Decimal point lock
function can make U2836 output the test result in fixed way. Meanwhile this
function can change the displayed count of test result. This displayed result can
be selected to be shown in large character or small character.
Operation steps for tools
Set the display mode of decimal point in fixed mode according to the following
operation steps. Also the character size of test result can be set.
1) Move the cursor to TOOL zone, the following soft keys will be displayed:
D.P.FIX A
D.P. FIX B
DISP OFF ON
EASY
START SAVE CSV
2) Press D.P.FIX A to lock the decimal location of primary parameter TEST
result. When the decimal location is locked,“ ”▲is displayed. Press D.P.FIX A
once,the last digit will be deleted, and the displayed digit will be reduced by
one.
3) Press D.P.FIX B to lock the decimal location of secondary parameter TEST
result. When the decimal location is locked,“▲” is displayed. Press D.P.FIX B
once,the last digit will be deleted, and the displayed digit will be reduced by
one.
4) Press EASY to display the test results on easy operation page. On the easy
operation page, the numeric keys( 1 to 9) is response 9 measurement setup.
5) Press DISP OFF ON to close/open the display of the test results.
———————————————————————————————————————
NOTE: Under the following circumstance, the function of decimal lock will be
cancelled automatically to recover to floating decimal point status.
Test function is changed.
In deviation test, the deviation test mode (ΔABS, Δ%, OFF) is changed.
———————————————————————————————————————

U2836 Operation Manual Chapter 3 Introduction to [MEAS DISP]
15
3.2 <BIN DISP>
Press [MEAS DISP] firstly and then the BIN DISPLAY. soft key to enter into
<BIN DISPLAY> display page. On this page, bin NO. is displayed in upper-case
character while the test result, in lower-case character.
The following control parameters can be set on <BIN DISPLAY>.
Compare function ON/OFF (COMP OFF ON)
Count function ON/OFF (COUNTE OFF ON)
Counter reset(RESET COUNT)
The following test result/ condition can be displayed in this page but cannot be set
in this page. Users can set them on the <LIMIT TABLE > page.
Nominal value (NOM)
Bin limit value (HIGH/ LOW)
3.2.1 Comparator function
U2836 has an inserted compare function which can divide DUT to up to 4 bins
(from BIN1 to BIN3 and BIN OUT). Users can set 3 pairs of primary parameter
limit and one pair of secondary bin limit. If the primary parameter of DUT is within
the range of the bin limit but the secondary parameter is outside of the bin limit,
the DUT will be sorted into the auxiliary bin. When U2836 has installed an
HANDLER interface, the compare result will be output into the automatic test
system and further realizing auto-sorting test. These limits can only be set on the
<LIMIT TABLE > page. Users can set the compare function to ON or OFF in the
TOOL zone.
Operation steps for compare function and bin count function:
1) On <BIN DISP> page,move the cursor to TOOL, the following soft keys will

U2836 Operation Manual Chapter 3 Introduction to [MEAS DISP]
16
be displayed.
COUNT OFF ON
COMP OFF ON
RESET COUNT
2) Press the soft key COUNT OFF ON to set the bin counter as ON or OFF.
3) Press the soft key COMP OFF ON to set the compare function as ON or OFF.
4) Press the soft key RESET COUNT, “Info: Sure clear bin counter?” will be
displayed in the help zone. Then the following soft keys will be displayed.
YES
NO
5) Press the soft key YES to reset all bin counts to 0.
6) Press the soft key NO to cancel the reset operation.
3.2.2 BIN
This zone shows the bin number of the limit list.
3.2.3 HIGH/LOW
This zone shows the high and the low limits of the limit list.
3.2.4 COUNT
This zone shows the count value of the current bin.
3.2.5 AUX
This zone shows the count value of the auxiliary bin.
3.2.6 OUT
This zone shows the count value of the out bin.
Table of contents
Other EUCOL Measuring Instrument manuals