Eureka NEM100 Series User manual

www.eureka.com 1
Thank you for purchasing your new Eureka steam mop!
Important instructions
For easy assembly, please take a few moments to read
this owner’s guide.
If you have questions about your new steam mop,
please contact our customer service HELPLINE
at 1-800-282-2886.
We’re here to help!
Eureka stands by our
Clean Promise seal.
Owner’s Guide
NEM100 series
Steam mop; household type
www.eureka.com

2 Eureka Customer Service HELPLINE 1-800-282-2886
Contents
Important safeguards .............................................3
What comes in the carton .........................................4
Filling water tank .................................................5
..........................6
Light indicators for cleaning modes ...............................7
...............................................8
Cleaning in handheld mode .......................................9
Cleaning attachments........................................... 10
Steam mop maintenance........................................ 11
Problem solving ................................................ 12
The Eureka limited warranty..................................... 13
How to order replacement parts................................. 14
Where to find important steam mop information
Keep this information
Write the model, type and serial number here:
Date of purchase (keep your receipt) __________________
Model number and type ____________________________
Serial number _____________________________________
Find these numbers on a label on the middle back side of
the steam mop. Refer to these numbers when ordering
parts and accessories or if service is needed.
This Owner’s Guide provides important instructions to prolong
the life of your Eureka steam mop.
Registration: To register your product visit www.eureka.com and click on the ‘Register Your Product’
link in the top right corner.
Inspection: Carefully unpack and inspect your new Eureka steammop for shipping damage. Each unit is
tested and thoroughly inspected before shipping. For instructions regarding any shipping damage, call
Eureka Customer Service HELPLINE 1-800-282-2886 immediately.
!
Follow caution information wherever you see this symbol.

www.eureka.com 3
IMPORTANT SAFEGUARDS
When using an electrical appliance, basic precautions should always be followed, including the following:
READ ALL INSTRUCTIONS BEFORE USING THIS STEAM MOP
Warning: DANGER OF SCALDING. Steam coming out of the steam mop is very hot and may cause scalding. Please use caution
when using the steam mop.
WARNING
•
•
•
•
•
•
•
•
•
•
•
•
•
•
•
SAVE THESE INSTRUCTIONS
To reduce the risk of electric shock, this appliance has a polarized plug (one blade is wider than the other).
Prevent unintentional starting. Ensure the switch is in the
off-position before picking up or carrying the appliance.
Carrying the appliance with your finger on the switch or
energizing appliance that has the switch on invites
accidents.
Do not put any object into openings. Do not use with any
openings blocked; keep free of dust, lint, hair and anything
that may reduce steam flow.
Do not use outdoors.
Do not operate the steam mop if it has been damaged in
any way. If steam mop is not working as it should, has
been dropped, damaged, left outdoors, or dropped into
water, call the Eureka Customer Service HELPLINE at
1-800-282-2886.
Do not allow to be used as a toy. Close attention is
necessary when used by or near children.
Always turn off this appliance before connecting or
disconnecting the nozzle. Do not direct steam at people,
animals, or at electrical outlets.
Use only as described in this manual. Use only
manufacturer’s recommended attachments.
• Do not use on leather, wax-polished furniture, synthetic
fabrics, velvet, or other delicate, materials.
Do not unplug by pulling on cord. To unplug, grasp the
plug, not the cord.
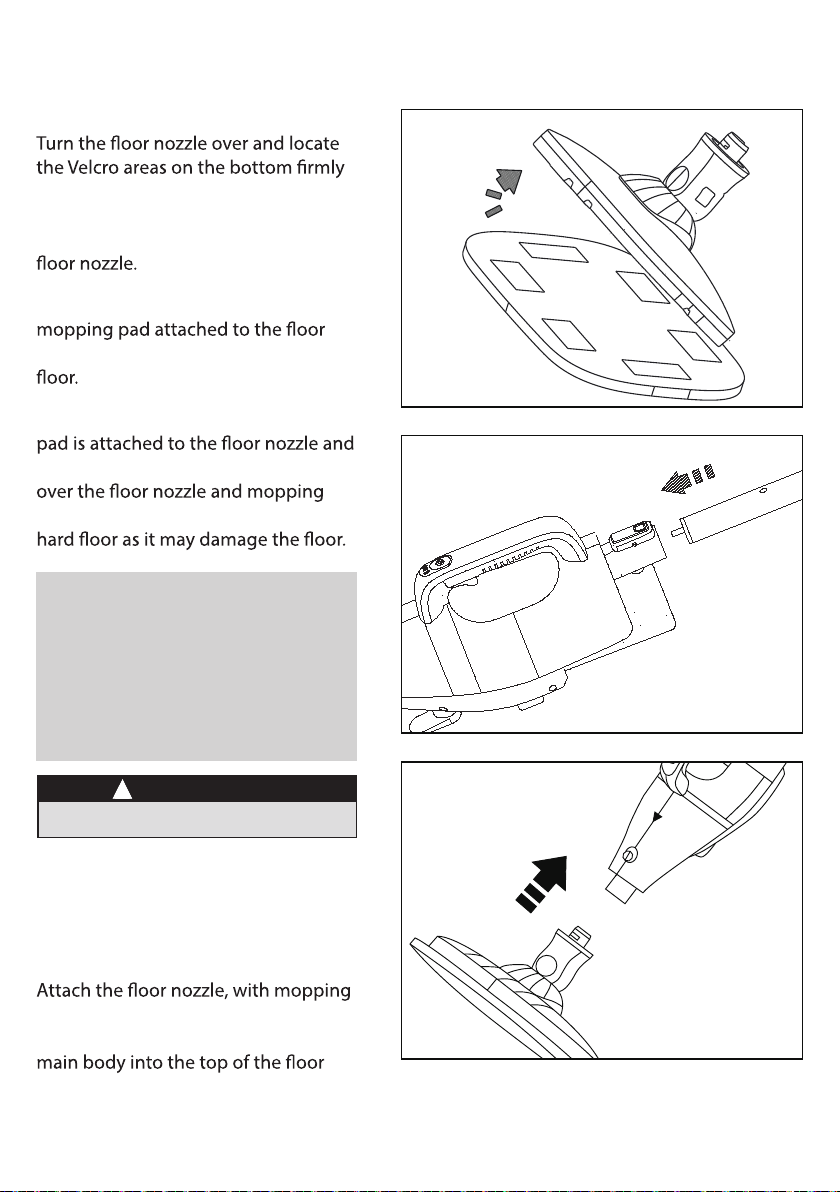
Use only on flat surfaces when mopping. Do not use on
walls, windows or counter tops in mopping floor mode.
Have servicing performed by a qualified repair person
using only identical replacement parts. This will ensure
that the safety of the product is maintained.
Do not modify or attempt to repair the appliance except as
indicated in the instructions for use and care.
Do not use or plug in with wet hands. Wear shoes or
slippers while operating.
Keep hair, loose clothing, fingers, and all parts of body
away from openings and moving parts.
Do not use on leather, wax polished furniture or floors,
synthetic fabrics, velvet or other delicate, steam sensitive
materials.
•
•
•
•
•
•
•
•
•
•
•
•
•
•
•
•
•
•
•
Do not mop over anything that is burning or smoking, such
as cigarettes, matches, or hot ashes.
Use extra care when cleaning stairs.
Do not use for space heating purposes
Do not use to pick up flammable or combustible liquids,
such as gasoline, or use in areas where they may be
present.
Store steam mop indoors in a cool, dry area.
The foot surfaces are liable to get hot during use.
To avoid electric shock and/or cleaner damage, do not
expose to weather elements.
Keep your work area well lit.
Do not incinerate this appliance even if it is severely
damaged. Contact local waste facility before discarding in
trash. Do not use cleaning solutions, chemicals, oils or
vinegar as this may block or damage the machine that may
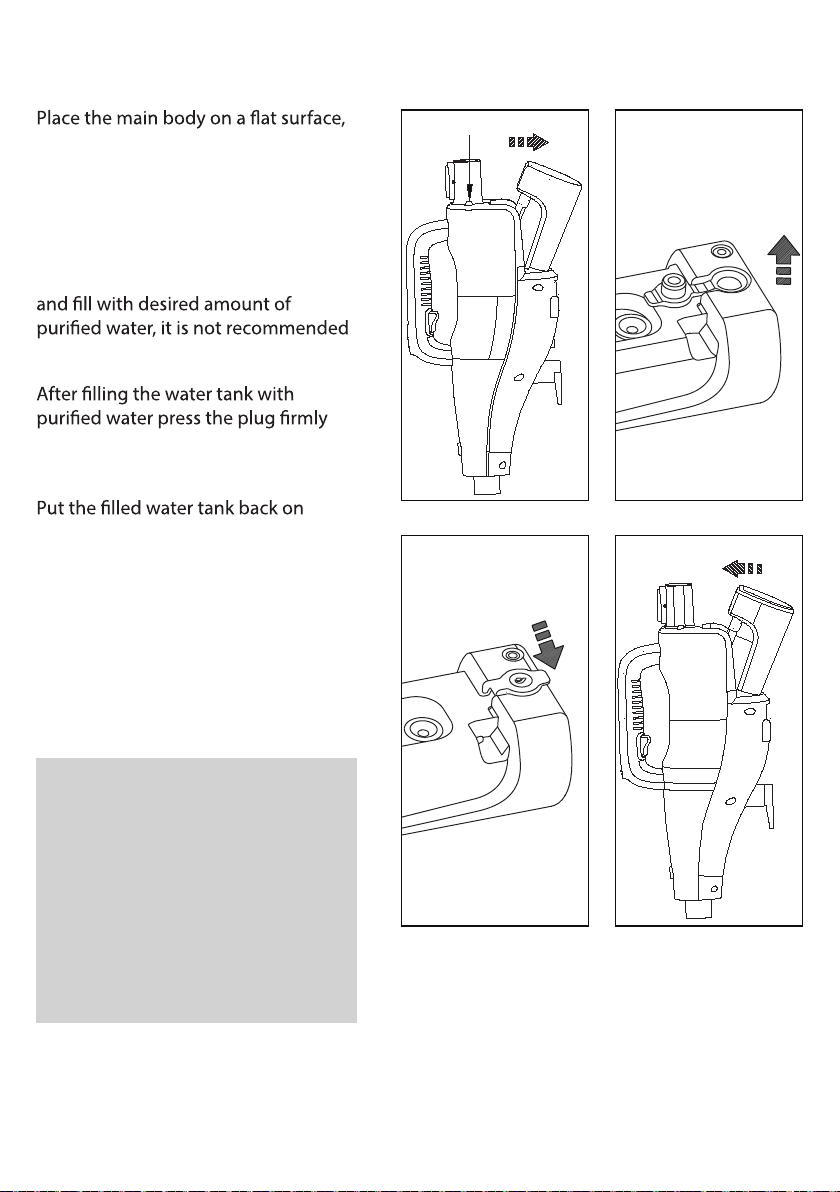
void the warranty. Always use purified or demineralized
water in the steam mop.
WARNING: This product can expose you to chemicals
including Di(2-ethylhexyl)phthalate (DEHP), which is
known to the State of California to cause cancer and to
cause birth defects or other reproductive harm. For more
information go to www.P65Warnings.ca.gov.
Not for Space Heating Purposes,Avoid Contact Hot
Surface.
It is forbidden to modify the use and function of the
product without authorization.
Please disconnect the power before cleaning the machine
or maintenance, otherwise accidents may occur.
If you do not use the machine for a long time, please
disconnect the main power.
For wading products, the water must be drained when the
product is not used for a long time or when the power is
cut off in low temperature weather.
Do not place the water container on the electrical product.
Water intruding into the product will weaken the electrical
insulation and cause electricity, fire, etc.
The power supply must conform to the specified voltage
range of the product.
It is forbidden to modify the power cord.
Do not immerse in water.

4 Eureka Customer Service HELPLINE 1-800-282-2886
What Comes in the Carton
OWNER’S
GUIDE
Important
safeguards
Steam Mop
Accessories may vary depending on which model was purchased.
Water Tank
Hose Assembly
Flat Wiper with
Fabric Cover
Scraper Tool Round Brush
Straight Nozzle
Slider Plate for Carpet
Mopping Pad

www.eureka.com 5
Filling water tank
press and hold the small silver release
button located on top of main body
with one hand and remove the water
tank with the other hand by pulling it
away from the machine. (Fig. 1)
Pull out plug of inlet on water tank
to use tap water. (Fig. 2)
back into the water tank ensuring it is
completely closed. (Fig. 3)
the main body by tilting tank back
and aligning the indentation on the
bottom of the water tank with the tab
on machine then pressing into place
until you hear a click. Please ensure
water tank is correctly installed prior
to use to avoid leaks and potential
damage to the machine. (Fig. 4)
12
3 4
Note: The water tank must have
water in it prior to use or it will cause
the boiler to dry burn which may
damage the machine.
Note: Only distilled or demineralized
water should go in the steam mop.
Do not use cleaning solutions,
chemicals, scented oils or vinegar in
the water tank as this may damage
the machine and void the warranty.
Click!

6 Eureka Customer Service HELPLINE 1-800-282-2886
Do not over wet the carpet
!
C A UTIO N
Assembling steam mop for floor cleaning
Attaching mop pad
press the Velcro side of the mopping
pad on ensuring it is properly aligned
and fully covering the bottom of the
(Fig. 1)
Hard floor cleaning: Only the
nozzle is needed for cleaning hard
Carpet cleaning: Ensure the mopping
that the sliding plate is then installed
pad. Do not use the sliding plate on
1
2
3
Note: Before cleaning area rugs
test a small area of the rug for
color fastness. Also please check
manufacturers cleaning instructions
before cleaning area rugs. Do not use
for on silk or delicate rugs or wall to
wall carpeting.
Assembling unit
Insert the metal end of the handle
assembly into the main body until you
hear a click. (Fig. 2)
pad properly attached, to the main
body by inserting the bottom of the
nozzle until it clicks into place. (Fig. 3)
Click!
Click!

www.eureka.com 7
Light indicators for cleaning modes
(both floor and handheld)
!
Always make sure machine is unplugged when not in use.
Only assemble/disassemble and refill water tank
when steam mop is unplugged.
MODE Button
Spray Trigger
PREHEATING MODE: After plugging
in, the machine will automatically
indicating that the machine is in
PREHEATING MODE.
STANDBY MODE: About 15 seconds
after entering PREHEATING MODE, the
red light will turn steady indicating
that the machine is in STANDBY
MODE.
HIGH-FLOW MODE: When the
machine is in STANDBY MODE press
the MODE button once and the
blue light on the far right will turn
on indicating that the machine is in
HIGH-FLOW MODE.
LOW-FLOW MODE: When the
machine is in HIGH-FLOW MODE press
the MODE button once and the blue
the blue light in the middle will light
up indicating that the machine is in
LOW-FLOW MODE.
wall.
Note: Steam mop turns on and
goes into PREHEATING MODE when
plugged in.

8 Eureka Customer Service HELPLINE 1-800-282-2886
Cleaning your floors
Never operate the steam mop without
attached or hose/adapter in place.
!
C A UTION
Note: The water tank must have water in it
prior to use or it will cause the boiler to dry
burn which may damage the machine.
pad and handle are allproperly attached and
installed to the main body before use.
Before you clean thoroughly sweep and or
The Eureka steam mop is designed to clean hard
not use an unsealed wood or unglazed ceramic
glossiness due to the heat and steam action. For
best results test in an inconspicuous area and
manufacturer.
1. Plug power cord into outlet.
2. To start generating steam, press MODE button
once to go into HIGH-FLOW MODE and once
more to go into LOW-FLOW MODE depending
on the desired amount of steam. (Fig. 1)
Note: Put into STANDBY MODE at any time
by pressing the MODE button indicated by
the light turning to a solid red.
3. Use multiple back and forth, slow, even stokes
the same area a few times using continuous
steam for best results.
Do not leave the mop over one spot
for an extended period of time to
!
C A UTION
Floor nozzle could be very hot, do not step on
!
C A UTION
4.
5. Wait at least 2-3 minutes for the steam mop
to cool down before disassembling and
removing mopping pad and any attachments.
Use caution when disassembling as trapped
steam may escape.
Note: Always remove mopping pad from
mop with wet pad attached. Allowing the
period of time when machine is not in use
1
MODE Button
Spray Trigger

www.eureka.com 9
Cleaning in handheld mode
Let the unit cool down for a few minutes
before removing or installing tools or hose
as the end of the machine will be hot.
!
C A UTIO N
Do not direct steam at people animals or at
electrical outlets.
!
C A UTIO N
Note: Special accessory attachments should
not be connected directly to the tip of the
handheld unit or hose. They should be
attached to the straight nozzle for use.
The Eureka steam mop handheld mode is designed
to clean surfaces that can withstand high heat
and moisture. Do not use on unsealed wood
surfaces (such as antiques), unglazed ceramic tile,
painted surfaces or surfaces that have been treated
with wax, oils, varnishes or shellac. It is always
recommended to test an isolated, inconspicuous
area of the surface to be cleaned and refer to the
care instructions from the surface manufacturer.
Please refer to the“Light indicators for
cleaning mode (both floor and handheld)”
section on page 7.
Note: When using in handheldmode, you
must hold down the spray trigger to release
steam otherwise steam will not come out.
(Fig. 1)
Hose assembly with straight nozzle
Align the openend of the hose assembly with the
opening at the bottom of the main body until you
hear a Click to make sure it is installedproperly.
If you don’t hear a click please rotate the hose
connector until you hear it click into place. (Fig. 2)
Insert tip of the end of the hose with the opening
on the straight nozzle attachment and push down
hose. Then rotate the straight nozzle until the tab
is locked inplace. (Fig. 3)
Install the specialty cleaning accessories by
aligning the opening of the accessory with the tip
of the straight nozzle and push in then rotate the
accessory until the tab is locked in place. (Fig. 4)
23
4
Click!
Click!
1
MODE Button
Spray Trigger

10 Eureka Customer Service HELPLINE 1-800-282-2886
Cleaning attachments
Tool Ideal for:
Straight
Nozzle
Crevices, corners, shower nozzles,
around faucets, sinks, toilet seats,
tile grout and hard to reach areas
Flat Wiper
with Fabric
Cover
Large sealed surfaces such as
countertops and bathtubs
Scraper Tool
Stuck on-debris on appropriate
stovetops, refrigerators and
microwaves.
Round Brush Sinks, countertops, microwave,
oven, stovetops and grout

www.eureka.com 11
Steam mop maintenance
To reduce the risk of fire, electric shock or injury, turn power OFF and disconnect from electrical
outlet before performing maintance of troubleshooting.
!
C A UTIO N
Note: We recommend replacing your mopping pad at least every 3 months following normal use.
If you notice loose threads you can trim, do not pull the thread.
1. Unplug the cord from the outlet and let steam mop cool down for 2-3 minutes before disassembling.
2. Remove mopping pad from floor nozzle.
3. Mopping pad can be machine or hand washed in warm water with a mild liquid detergent and
thoroughly rinsed. Pad can ben tumbled-dried on low or air dried for at 24 hours. Note: Do not use bleach,
fabric softeners or powdered detergents to clean the pad.
4. Empty the water tank and allow to dry thoroughly before storing, do not close plug.
5. Wipe any ezcess liquid from the bottom of the floor nozzle and the area under where the water tank
sits.
6. Allow hose and attachments to thoroughly dry for at least 24 hours.
7. Wrap the electrical cord around the cord wrap hooks.
8.Store the mop in a cool, dry place and make sure the mopping pad in NOT attached for storage.

12 Eureka Customer Service HELPLINE 1-800-282-2886
Problem solving
!
Make sure steam mop is turned off and power cord is unplugged before
assembling/disassembling or filling water tank.
Problem Possible Reasons Solutions
The light on
machine are not
lighting up
Unit may not be correctly plugged in Ensure the unit is fully plugged in and
the machine is powered on.
Steam isn’t
coming out
Water tank is empty Unplug the machine, ensure the unit is
completely cooled down, remove and
replace full water tank on the machine.
Debris build-up is blocking the water outlet Do not use tap water as it may lead to
mineral buildup in machine that may
block the water outlet. Always use
never use cleaning solutions, chemicals,
oils or vinegar as this may block or
damage the machine.
Steam button locked in handheld mode When using in handheld mode you
must hold down the spray trigger to
release steam.
Mop is hard to
push on carpet
The slide plate for carpet is not installed When using the steam mop on carpet,
always make sure that the sliding plate
attached mopping pad

www.eureka.com 13
The Eureka one-year limited warranty
Midea America Corp. (“Eureka”), subject to the terms
and conditions herein, warrants this steam mop to be
free from defects in material and workmanship for a
term of one year from the date of original purchase
when used in accordance with the Eureka operating
and maintenance instructions and under normal
household usage. This warranty is granted only to
the original purchaser and members of immediate
household, and is applicable only to original purchases
from Eureka authorized resellers.
What Eureka will do:
Eureka will, at its option, repair or replace a defective
steam mop or steam mop part that is covered by
this warranty. Repairs may be performed using new
or refurbished parts that meet or exceed Eureka
replace the steam mop, the replacement may be
a reconditioned unit. Depending on availability of
products, Eureka reserves the right to provide you
with a replacement product that is the same or similar,
or substitute equivalent of the original product. As a
matter of warranty policy, Eureka will not refund the
consumer’s purchase price.
This warranty does not cover:
• Normal wear and tear of the steam mop and steam
mop parts that require replacement under normal
use such as mopping pads and routine maintenance
components.
• Damages or malfunctions resulting from: improper or
unreasonable use or maintenance, abuse, negligence,
failure to follow instructions contained in any written
materials that accompany the product, deterioration
by reason of excess moisture, corrosive atmosphere,
lightning, power surges, connections to improper
voltage supply, unauthorized alteration, or other
external causes such as extremes in temperature or
accidents, misuse, or acts of God. This warranty also
does not cover damage resulting from repair or
attempted repair by anyone other than Eureka or an
authorized Eureka Warranty Station. This warranty is
not applicable to any product that has been altered
or on which the serial number has been defaced,
proof-of-purchase documents voids any applicable
product warranty.
Obtaining warranty service:
To obtain warranty service you must contact the Eureka
Service Team, toll free, at 1-800-282-2886 oremail
customerserviceusa@midea.com, to discuss the warranty
claim and procedures to be followed. All warranty
claims must include submission of proof-of-purchase
documentation. For additional information, you may also
visit www.eureka.com.
Shipping charges:
You will be responsible for any initial shipping and
insurance charges if the defective product(s) must be
shipped for warranty service or warranty evaluation;
however, Eureka or a Eureka Authorized Warranty
Station will pay the return shipping charges if repairs
are covered by the warranty. When returning parts for
repair, you must include the model, type and serial
number located on the rating plate on the lower
backside of the steam mop main body.
If any product submitted for warranty service is found
to be ineligible, an estimate of repair cost will be
furnished and the repair performed only if requested by
the owner and upon receipt of payment or acceptable
arrangements for payment.
Further limitations and exclusions:
Any warranty that may be implied in connection with
your purchase or use of the steam mop, including any
warranty of Merchantability or any warranty of Fitness
For A Particular Purpose is limited to the duration
of this limited warranty. Some states do not allow
limitations on how long an implied warranty lasts, so
the above limitations may not apply to you.
Your relief for the breach of this warranty is limited to
the relief expressly provided above. In no event shall
the manufacturer be liable for any consequential or
incidental damages you may incur in connection with
your purchase or use of the steam mop. Some states
do not allow the exclusion or limitation of incidental
or consequential damages, so the above limitation or
exclusion may not apply to you.
also have other rights, which may vary by state.
Midea America Corp.
Parsippany, NJ
USA

14 Eureka Customer Service HELPLINE 1-800-282-2886
Order genuine Eureka accessories and replacement parts
Visit www.eureka.com or call 1-800-282-2886
Image Part name Part # (Fits models)
S5010
S5001
S5011
S5009
S5005
S5003
S5007
S5006
Hose assembly
Mopping pad
Straight nozzle
attachment
Flat window attachment
Sliding carpet plate
Water tank
Scraper attachment
Small round brush
attachment

www.eureka.com 15
Do not return to the store, call
Eureka Customer Service
HELPLINE 1-800-282-2886
www.eureka.com
Eureka stands by
our Clean Promise seal.
Owner’s Guide
© 2018 Midea Corp. Printed in China 02155180_WMT_rev4
Table of contents
Other Eureka Steam Cleaner manuals

Eureka
Eureka 150 Series User manual

Eureka
Eureka 313A User manual

Eureka
Eureka 370 Series User manual

Eureka
Eureka Envor Steamer 300 Series User manual

Eureka
Eureka Atlantis 2590 Series User manual

Eureka
Eureka Atlantis 2590 Series User manual

Eureka
Eureka 313A User manual

Eureka
Eureka Deluxe Enviro Steamer 310 Series User manual

Eureka
Eureka 150 Series User manual