Euresys Picolo.net HD1 User manual

Picolo.net
Picolo.net HD1
USER GUIDE
© EURESYS s.a. 2018 - Document D303ET-Using a Picolo.net HD1-2.2.0.3019 built on 2018-08-06

2
Terms of Use
EURESYS s.a. shall retain all property rights, title and interest of the documentation of the hardware and the
software, and of the trademarks of EURESYS s.a.
All the names of companies and products mentioned in the documentation may be the trademarks of their
respective owners.
The licensing, use, leasing, loaning, translation, reproduction, copying or modification of the hardware or the
software, brands or documentation of EURESYS s.a. contained in this book, is not allowed without prior notice.
EURESYS s.a. may modify the product specification or change the information given in this documentation at any
time, at its discretion, and without prior notice.
EURESYS s.a. shall not be liable for any loss of or damage to revenues, profits, goodwill, data, information systems or
other special, incidental, indirect, consequential or punitive damages of any kind arising in connection with the use
of the hardware or the software of EURESYS s.a. or resulting of omissions or errors in this documentation.
This documentation is provided with Picolo.net 2.2.0 (doc build 3019).
© 2018 EURESYS s.a.
Picolo.net User Guide

3
Contents
1. Using the Web Interface 5
1.1. Introduction 5
1.2. Home Page 7
Login Page 10
1.3. Media Profiles Page 11
Media Profile Page 12
1.4. Configurations Page 17
Edit Video Encoder Configuration Page 26
Edit Audio Encoder Configuration Page 29
Edit Metadata Configuration Page 31
1.5. Digital Inputs & Relay Outputs Page 33
1.6. Audio Outputs Page 36
1.7. PTZ Page 37
1.8. Device Management Page 39
Network Tab 40
Time Tab 43
Discovery Tab 46
Maintenance Tab 47
1.9. Users Management Page 49
1.10. Storage Page 50
1.11. Layers Page 53
1.12. Hidden Pages 55
Check Status Page 55
2. Installing a Picolo.net 56
2.1. Declarations 56
CE Compliance (EMC Class A) 56
FCC Compliance (Class A) 56
KC Compliance 57
RoHS Compliance 57
WEEE 57
2.2. Precautions of Use 57
2.3. Installation 58
2.4. Connectors Location and Markings 59
2.5. Connections 60
2.6. Configuration 62
Picolo.net User Guide
4
2.7. Final Check 64
3. Maintaining the Product 65
3.1. Upgrading the Firmware 65
3.2. Configuring Backup and Restore 65
4. Application Notes 66
4.1. Encrypted Media Storage 66
Purpose 66
eCryptfs Encryption Layer 67
eCryptfs Header 68
Web Services 71
References 72
Appendix 73
4.2. [[[Missing Linked File System.LinkedHeader]]] 74
Coding Guidelines for VMS Application 74
Web Services 74
Encrypted Live Stream Support 76
Reference Documents 78
Picolo.net User Guide
5
1. Using the Web Interface
1.1. Introduction
URL
The Home Page URL is: http://[device-ip-address]
The web pages of 1669 Picolo.net HD1 are available in English (default), Japanese, Chinese and
Korean. The selection is automatic based on the 'Accept-Language' HTTP header sent by your web
browser (it usually depends on your operating system localization).
Page Layout
Page sample
1. Left panel: Navigation links
2. Main panel
3. Tab
4. Panel
5. Page title
6. Login
Picolo.net User Guide 1. Using the Web Interface
6
Navigation Links
Navigation Links
Navigation links provide a single-click access to the main page of each section
1. Select "Home Page" on the next page to view device information and display video source.
2. Select "Media Profiles Page" on page11 to view/edit/delete/create media profiles.
3. Select "Configurations Page" on page17 to view/edit configurations of video source, video
encoder, audio source, audio encoder, PTZ and metadata objects.
4. Select "Digital Inputs & Relay Outputs Page" on page33 to view/edit configuration of digital
input and relay output objects.
5. Select "Audio Outputs Page" on page36 to view/edit configuration of audio output object
6. Select "PTZ Page" on page37 to view/edit configuration of the serial port and the PTZNode
objects
7. Select "Device Management Page" on page39 to view/edit network, time and date and
discovery settings and perform maintenance tasks
8. Select "Users Management Page" on page49 to create/delete users and view/edit user
properties.
9. Select "Storage Page" on page50 to mount/unmount storage media,
enable/disable/start/stop recording and list/preview stored media files.
10.Select "Layers Page" on page53 to configure OSD (On Screen Display) location and content.
Picolo.net User Guide 1. Using the Web Interface

7
1.2. Home Page
View device information and display video source
Home page
The main pane of the Home page displays 2 panels:
□ADevice Information panel providing general information about the device
□ASources panel providing a mosaic display of all the video sources of the device
Picolo.net User Guide 1. Using the Web Interface
8
Device Information Panel
Device Information panel
Device Information panel fields description
Name Description
Model Product code and product name of the device
Manufacturer Manufacturer name of the device
Serial Number Serial number of the device
Firmware Version Major and minor version numbers of the firmware that is
currently on the device.
IP Address IPv4 address of the device currently assigned to the device
MAC Address MAC Address of the LAN port of the device
Picolo.net User Guide 1. Using the Web Interface
9
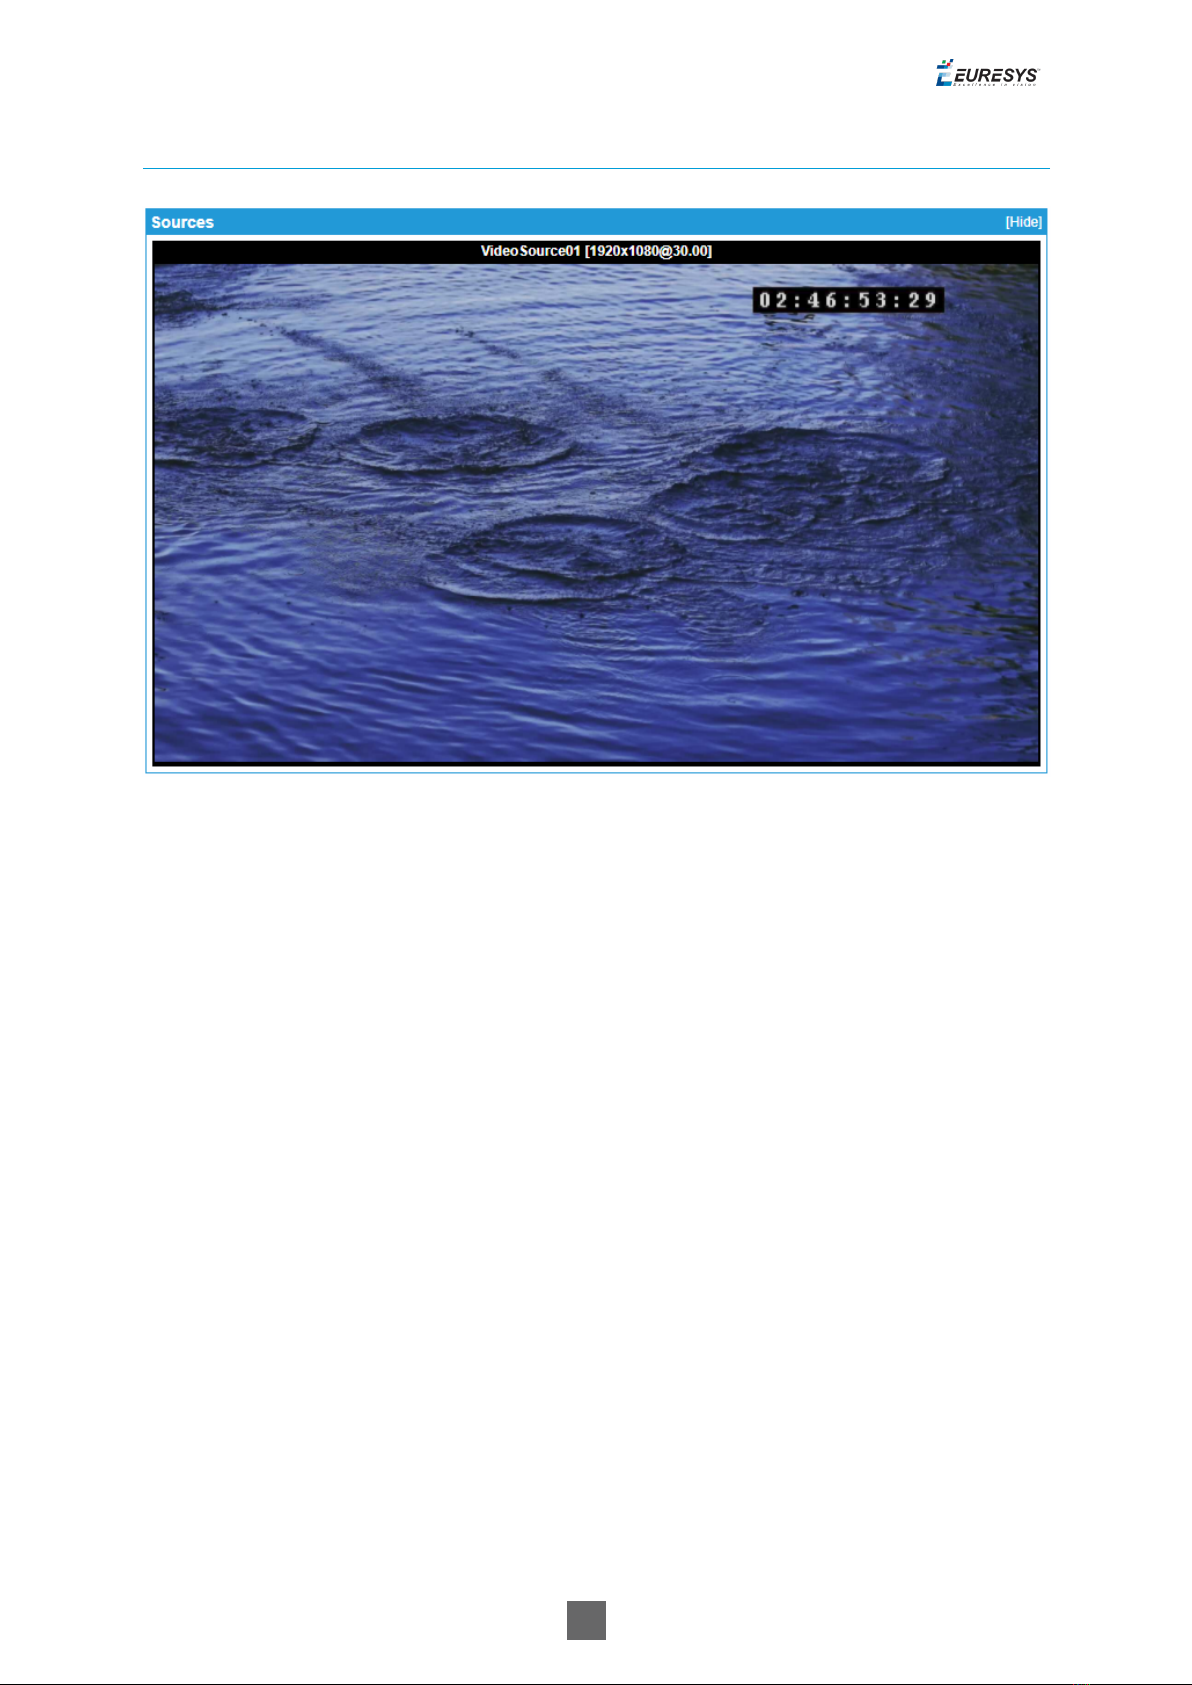
Sources Panel
Sources panel
The Sources panel shows a rectangular area containing:
□A title composed of the name, the native resolution, and the native frame rate of the
video source.
□A snapshot image providing that the source is referenced by a properly configured ONVIF
Media Profile.
Note: If the ONVIF Media Profile is not properly configured, the image is replaced by a black
background overlayed by a crossed rectangle.
If the source has no video, a blue image is displayed.
Clicking on the image brings the browser to the View/Edit Profile page for the profile that
generated the snapshot.
Picolo.net User Guide 1. Using the Web Interface
10
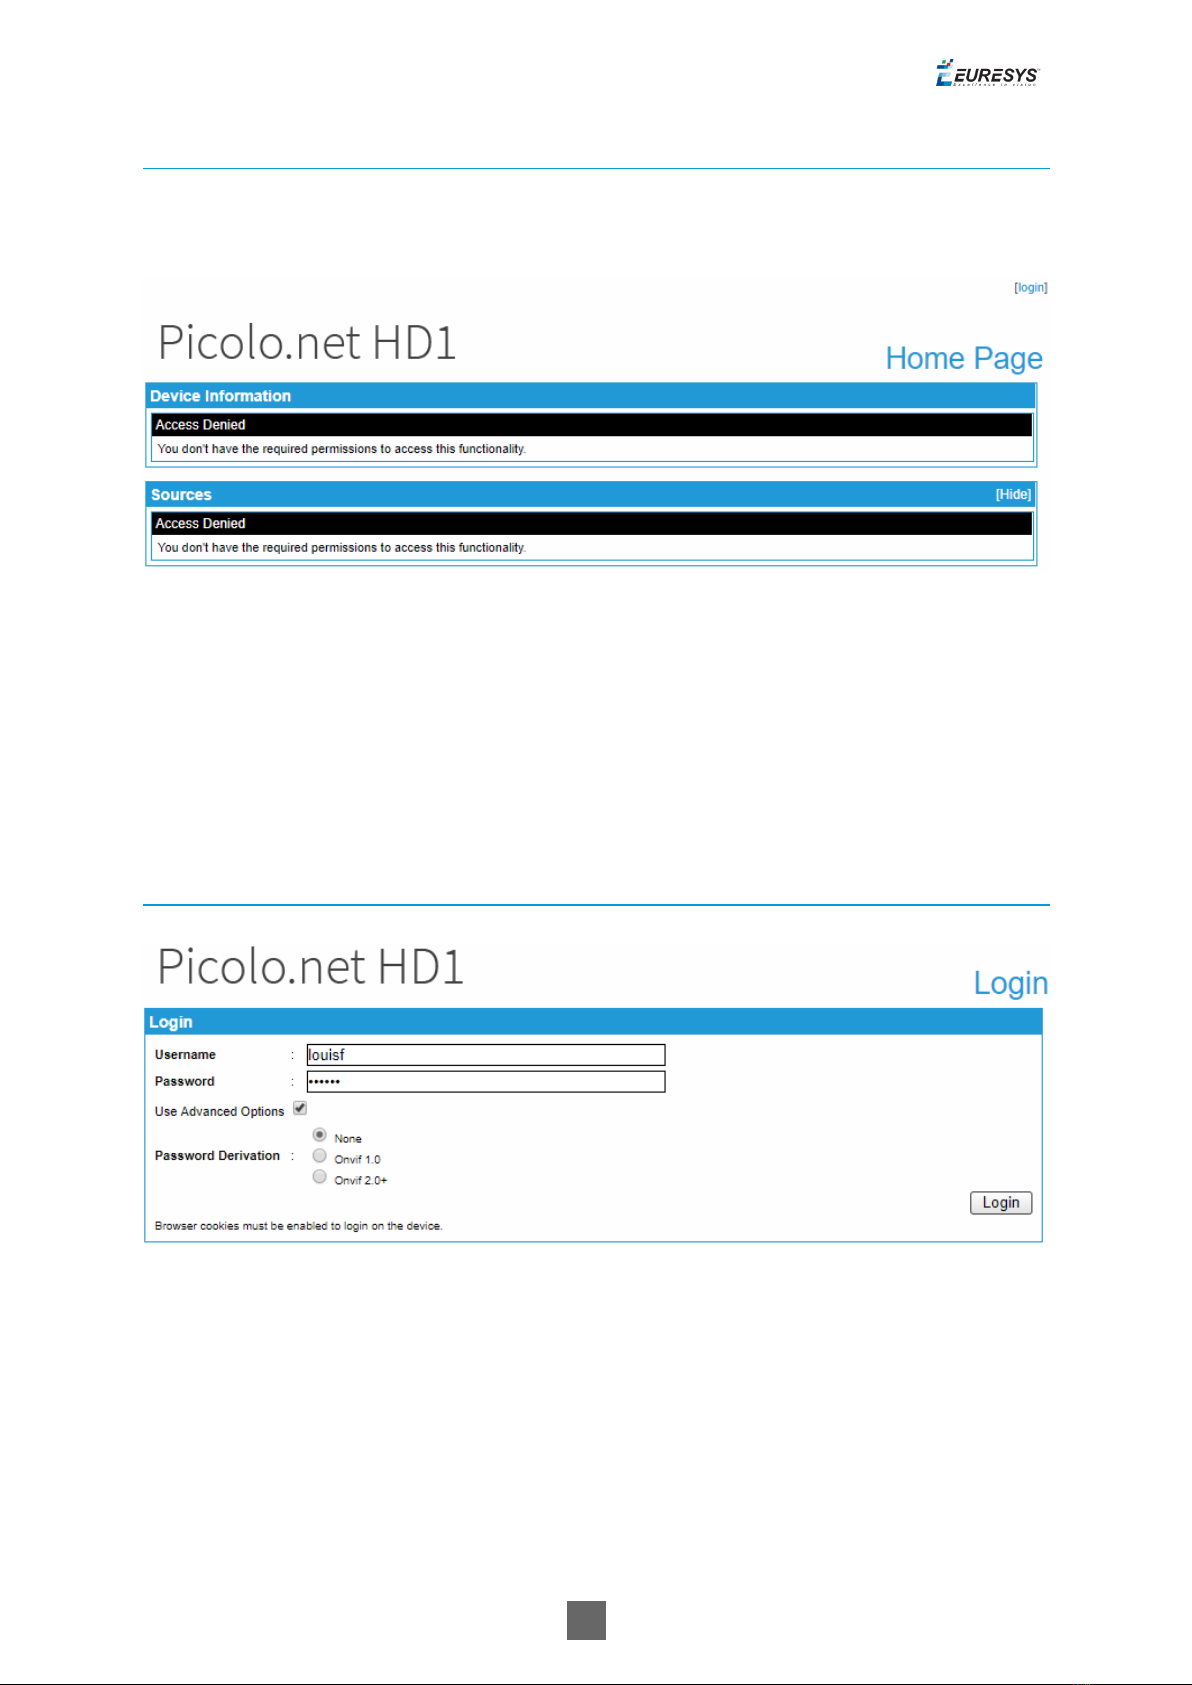
Access Denied Home Page
Once security is enabled, an anonymous user accessing the device Home page obtains the
following page:
Home page when access is denied
Clicking on the [login] hyperlink opens the Login page.
Login Page
The Login page displays the Login panel.
Login panel
Login panel
Picolo.net User Guide 1. Using the Web Interface

11
Login panel fields description
Name Description
Username User name
Password User password
Use Advanced Options Cross the checkbox if specific password derivations are required.
Password Derivation
Password derivation allows the user of multiple devices to type the same string when
authenticating on any device while the value stored on the device is actually different for each
device.
Value Description
None No password derivation, the device password is directly typed by the user. Default
setting.
Onvif
1.0
The password is computed (derived) from the device identity and the user-typed
string according to ONVIF 1.0 specification.
Onvif
2.0+
The password is computed (derived) from the device identity and the user-typed
string according to ONVIF 2.0 (or later) specification.
1.3. Media Profiles Page
The Media Profiles page displays the Media Profiles panel.
Media Profiles panel
Media Profiles panel
Profiles List
The Media Profiles panel lists all the existing ONVIF Media Profiles.
Each list item contains:
Picolo.net User Guide 1. Using the Web Interface

12
●A thumbnail image of the video source
●The name of the profile e.g. Profile01
●Between square brackets, a selection of profile properties including: name of the video
source, resolution, frame rate, encoding method, bit rate, and rate control method of the
encoded stream.
●AView/Edit button.
●ADelete button.
Clicking on the View/Edit button opens the Media Profile page allowing the user to view or edit
the profile properties.
Clicking on the Delete button deletes the profile.
Profile Creation & Auto Setup
The bottom right area of the Media Profiles panel contains two buttons:
●The Create New Profile button.
●The Auto Setup Profiles button.
Clicking on the Create New Profile button starts the profile creation procedure. First of all, the
procedure opens a dialog box requiring the name of the new profile. Then it displays the
Configurations page allowing the user to configure the ONVIF Media Profile.
Clicking on the Auto Setup Profiles button initiates the auto setup procedure. Before proceeding,
a dialog box opens requiring to confirm the action.
Warning: the auto setup procedure erases all the existing ONVIF Media Profiles!
Media Profile Page
The Media Profile page of the Web Server is relative to a single ONVIF Media Profile. It allows the
user to:
●View the encoded video stream in the Live Media panel
●View the properties of the components of an ONVIF Media Profile using the configuration
panels
●Modify the composition of ONVIF Media Profiles using the Media Profile Configuration panels
The panels composing this page can be hidden or shown individually by clicking on the [Hide]
or [Show] text. Initially, only the Live Media panel is shown.
Picolo.net User Guide 1. Using the Web Interface

13
Live Media Panel
Live Media panel
The Live Media panel provides a live display of the video source unicast stream using the VLC
plug-in of the Web Browser.
The panel title shows, between square brackets, the resolution and the frame rate of the
encoded video stream.
In the bottom area, the panel provides:
●The Unicast URL of the video stream
●The Multicast URL of the video stream
The Start Multicast button starts multicast streaming for the selected media profile.
□This is not necessary for clients that connect to the stream via the RTSP link provided.
□Multicast streaming continues until explicitly stopped (even after a reboot of the device).
Picolo.net User Guide 1. Using the Web Interface
14
□This button also starts RFC2974 session announcement messages for the corresponding
media profile.
The Play Fullscreen button enlarges the live video on the entire screen.
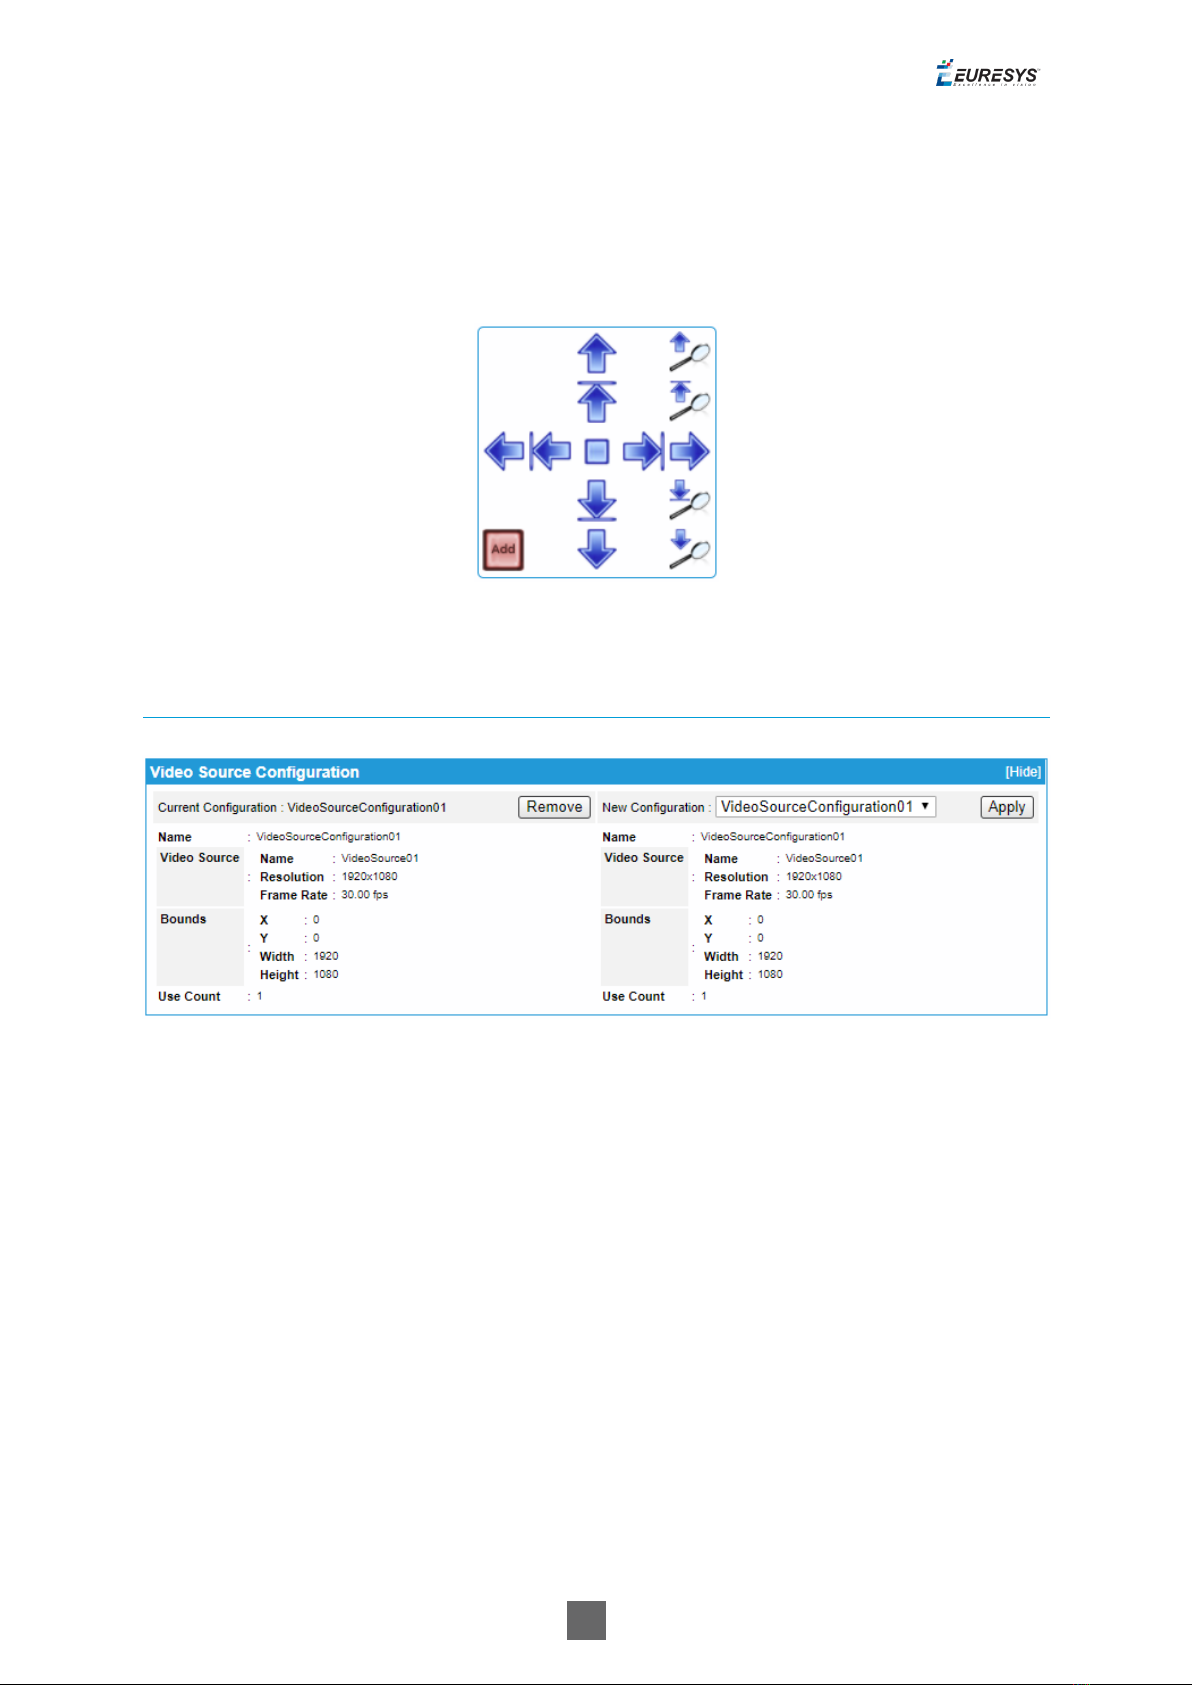
The Use PTZ button adds PTZ controls on the right side of the image as shown on the following
image:
PTZ controls
Media Profile Configuration Panels
Video Source Configuration panel
Picolo.net User Guide 1. Using the Web Interface
15
Video Encoder Configuration panel
Audio Source Configurations panel
Audio Encoder Configurations panel
Picolo.net User Guide 1. Using the Web Interface

16
PTZ Configuration panel
Metadata Configuration panel
●The configuration panels of the Media Profile page allow to:
□View the composition of the profile and the characteristics their components
□Modify the composition of the profile by addition or deletion of components.
●To facilitate the modification of existing ONVIF Media Profiles, each panel shows
simultaneously for each component:
□On the left side: the characteristics of the configuration that is currently used by the
ONVIF Media Profile
□On the right side: the characteristics of any selectable configuration
●Providing that the component is currently used in the profile, the upper left quadrant shows :
□The name of the current configuration
□ARemove button
□An Edit button (only on relevant panels)
●Clicking on the Remove button removes the component from the profile.
●Clicking on the Edit button opens the Edit Configuration panel of the component allowing the
user to edit its properties.
●The upper right quadrant shows:
Picolo.net User Guide 1. Using the Web Interface

17
□A drop-down box allowing the user to select a new configuration.
□An Apply button.
●Clicking on the Apply button applies the new configuration to the profile.
1.4. Configurations Page
The Configurations page allows the user to view or edit the configurations of all the software
objects. It provides six panels, one for each component type of an ONVIF Media Profile:
□"Configurations Page" above
□"Configurations Page" above
□"Configurations Page" above
□"Configurations Page" above
□"Configurations Page" above
□"Configurations Page" above
Note: All panels composing this pane can be hidden or shown individually by clicking on the
[Hide] or [Show] text.
Picolo.net User Guide 1. Using the Web Interface
18
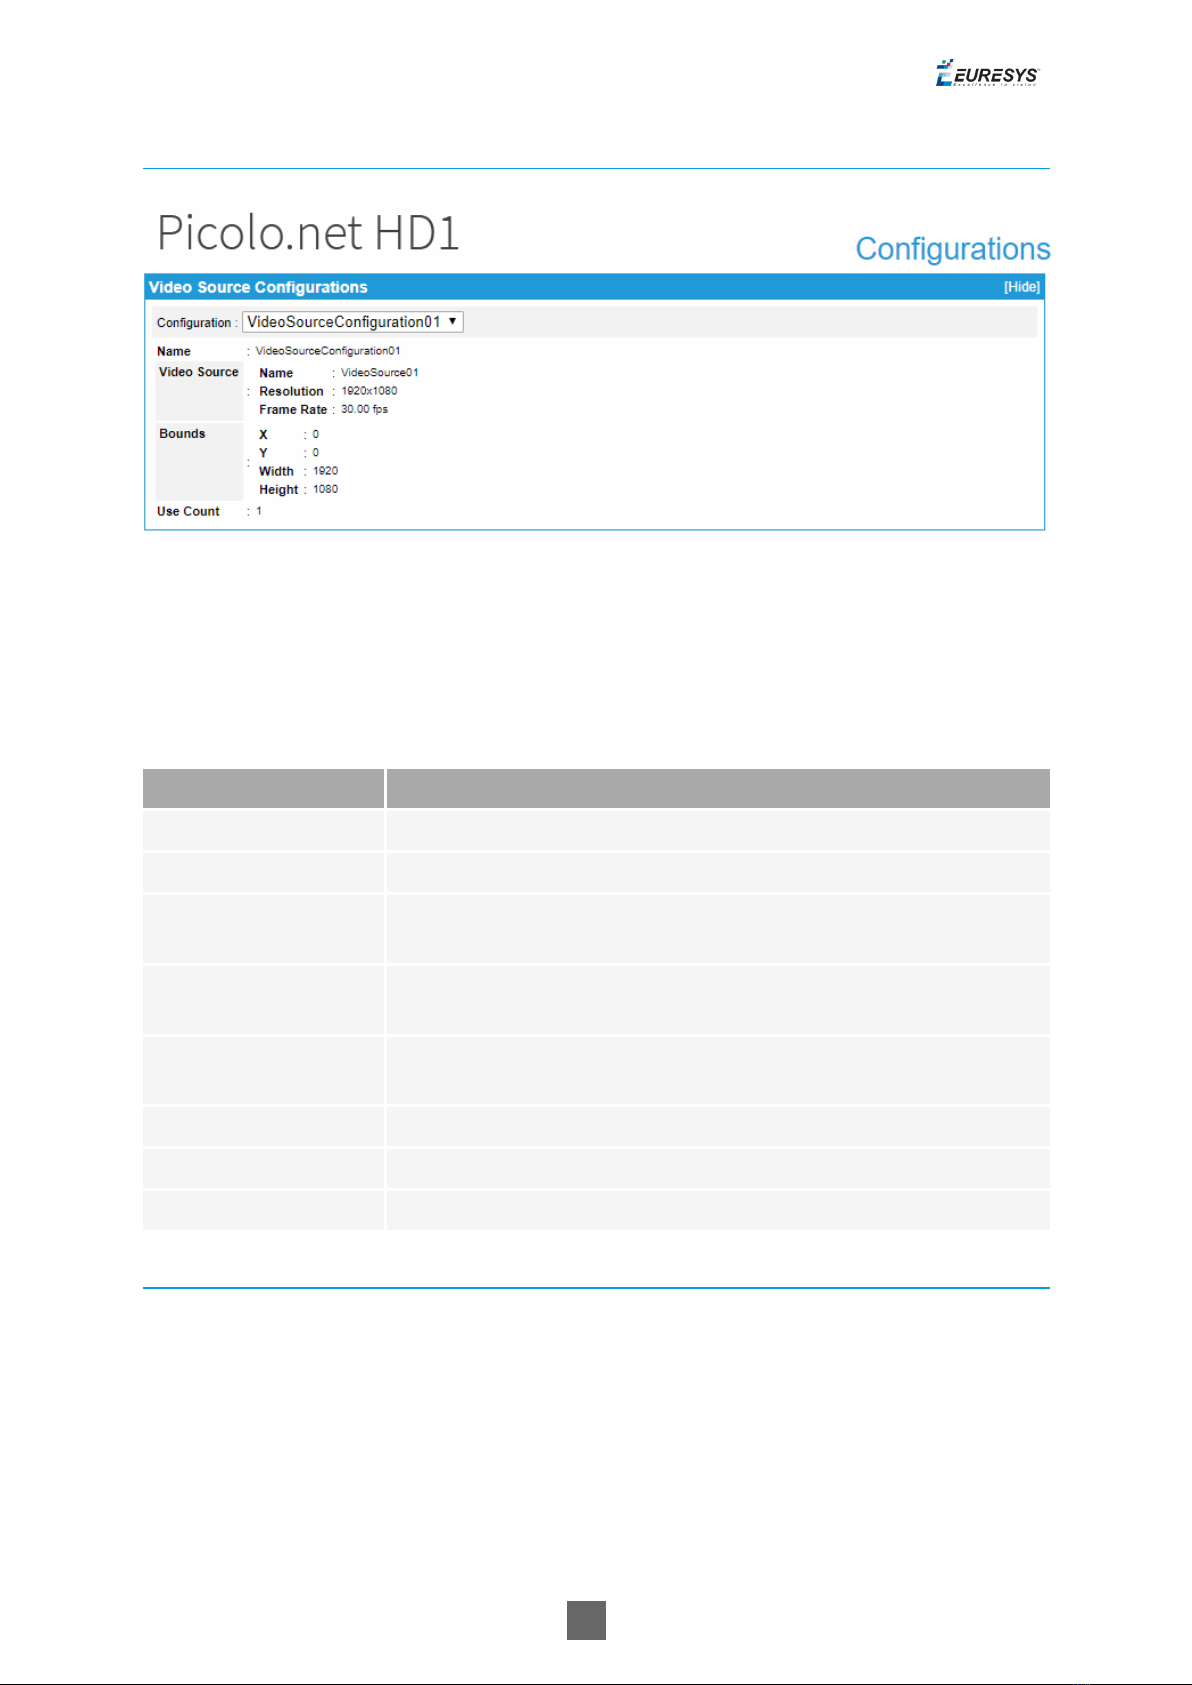
Video Source Configurations panel
Video Source Configurations panel
The drop-down box in the upper area allows to select one VideoSourceConfiguration
object.
Video Source Configurations panel fields description
Name Description
Name The name of the VideoSourceConfiguration object
Video Source - Name The name of the video source
Video Source -
Resolution The resolution [H x V] of the video source, e.g. 1920x1080
Video Source - Frame
Rate The frame rate of the video source, expressed in fps, e.g.30.00 fps
Bounds - X, Y The position offset of the acquired image relative to the camera
active area
Bounds - Width The number of columns of the acquired image
Bounds - Height The number of lines of the acquired image
Use Count The number of ONVIF Media Profiles using this object
Video Encoder Configurations Panels
The layout of the Video Encoder Configurations panel is specific to the video encoding method:
H.264/ H.265 or JPEG.
Picolo.net User Guide 1. Using the Web Interface

19
H.264/H.265 Video Encoder Configurations Panel
Video Encoder Configurations panel - H.264/H.265 case
●The drop-down box in the upper area allows to select one VideoEncoderConfiguration
object.
●Clicking the Edit button in the upper area of the panel opens the Video Encoder Configuration
Edition page.
●The lower area of the panel shows the properties of the selected object when it uses the
H.264 or the H.265 encoding method.
Video Source Configurations panel common fields description
Name Description
Name The token name of the VideoEncoderConfiguration object, e.g.
VideoEncoderConfiguration01
Encoding Used video codec.
Resolution - Width,
Height The image size of the encoded stream
Rate Control - Frame
Rate Limit Maximum output frame rate in fps.
Rate Control -
Encoding Interval Interval at which images are encoded and transmitted.
Rate Control - Bitrate
Limit The maximum output bit rate in kbps
Session Timeout The RTSP session timeout. The duration is expressed using the W3C
lexical representation: PnYn MnDTnH nMnS
Picolo.net User Guide 1. Using the Web Interface
20
Name Description
Use Count The number of ONVIF Media Profiles using that Video Encoder
Configuration.
Multicast - Enabled Indicates if the RTP multicast streaming of the encoded video is
properly configured with a non-zero IP address and port number.
Multicast - Address The IP address of the multicast group. In IPv4, addresses 224.0.0.0
through 239.255.255.255 are designated as multicast addresses.
Multicast - Port The port number of the multicast group.
Multicast - TTL The Time-To-Live of the multicast IP datagrams. Usually 1 since the
datagrams stops after the first router.
Multicast - AutoStart Indicates the persistence of multicast streaming. When true, the
multicast streaming starts automatically.
Video Source Configurations panel H.264/H.265 encoder specific fields description
Name Description
H264 - GOP Size Group of Pictures (or Video frames) length.
H264 - H264 Profile The H.264 profile: baseline, main or high.
H.264 - Rate Control Method
The rate control method of the H.264 method:
●VBR: Variable Bit Rate
●CBR: Constant Bit Rate
Picolo.net User Guide 1. Using the Web Interface
Other manuals for Picolo.net HD1
3
Table of contents
Other Euresys Media Converter manuals


