Euroflex monster IS 56 HS User manual

• Manuale d’istruzione
• Instruction Manual
• Gebrauchsanleitung
• Notice d’utilisation
• Manual de Instrucciones
IS 56 HS

2

3
INDICE PAGINA
Istruzioni di sicurezza ................................................. 4
Indicazioni in merito alle istruzioni ........................... 6
Disimballaggio .......................................................... 6
Descrizione ............................................................... 7
Alcuni preziosi consigli per effettuare una buona stiratura
8
Prima di stirare ........................................................... 8
Riempimento del serbatoio con acqua ................ 8
Inizio della stiratura ................................................... 8
Aggiunta di acqua – prosecuzione della stiratura 9
Accessori .................................................................... 9
Per stirare a secco .................................................... 9
Per stirare a vapore .................................................. 10
Stiratura verticale ...................................................... 10
Dopo la stiratura ........................................................ 11
Congratulazioni per la vostra scelta!
Gentili Signore e Signori, complimenti per aver acquistato il modello più moderno
esistente al mondo nel campo della stiratura. Stirerete così senza sforzi, ottenendo
risultati professionali e risparmiando soldi e tempo. IS 56 è un sistema di stiratura com-
posto da unità vapore e ferro da stiro professionale.

4
Prima dell’uso
• Leggere attentamente tutte le informazioni riportate di seguito. Contengono utili
indicazioni riguardo all’utilizzo, la sicurezza e la manutenzione dell’apparecchio.
Conservate con cura queste istruzioni ed eventualmente consegnatele ai futuri
proprietari.
• L’apparecchio è conforme alle normative di sicurezza CE e alle leggi vigenti in
materia di sicurezza degli apparecchi.
• Questi apparecchi soddisfano le condizioni delle direttive europee 2004/108/CEE
“compatibilità elettromagnetica” e 2006/95/CEE “ Sicurezza dei prodotti elettri-
ci”. L’apparecchio riporta sulla targhetta identificativa il marchio CE.
• Il costruttore si riserva il diritto di apportare modifiche di progettazione e dotazio-
ne dell’apparecchio senza preavviso
• Non accendere mai l’apparecchio se il tubo del vapore presenta danni evidenti
(crepe/tagli), se il cavo d’alimentazione è danneggiato o se si sospetta la presen-
za di danni non visibili (ad esempio in seguito ad una caduta).
• Collegate l’apparecchio solo dopo essersi assicurati che il voltaggio della rete
elettrica corrisponda a quello indicato sulla targhetta dell’apparecchio.
• La presa di corrente deve essere dotata d’interuttore automatico a 10A
• Se si usano prolunghe elettriche, verificare che siano idonee all’impiego e da
10A.
• Le prolunghe elettriche devono essere completamente srotolate prima dell’uso.
• Assicurarsi che la presa di corrente sia dotata di messa a terra.
• Assicurarsi prima di utilizzare gli accessori vapore che quest’ultimi siano saldamen-
te collegati tra loro. Nel caso in cui non fossero fissati correttamente, il vapore che
fuoriesce dalle giunzioni potrebbe causare scottature. Prestare molta attenzio-
ne.
Indicazioni generali
•
Il ferro deve essere utilizzato e lasciato a riposo su una superficie stabile.
•
Quando si ripone il ferro sul suo appoggiaferro, assicurarsi che la superficie su cui è
collocato l’appoggiaferro sia stabile
•
Il ferro non deve essere utilizzato se è stato fatto cadere, se vi sono segni di danni
visibili o perdite.
• Nel caso in cui l’apparecchio risulta danneggiato a seguito di un uso improprio,
di una riparazione o manutenzione non conforme, il costruttore declina ogni re-
sponsabilità per eventuali danni a cose e persone.
• Le riparazioni devono essere effettuate esclusivamente da parte di personale
autorizzato dall’azienda costruttrice. Gli apparecchi riparati da personale non
autorizzato rappresentano un pericolo per chi li utilizza e annullano la garanzia.
• Il cavo d’alimentazione deve essere sostituito esclusivamente dal personale dei
centri d’assistenza autorizzati dal costruttore.
• Riporre l’apparecchio in un luogo asciutto.
• Non riporre l’apparecchio all’aperto.
• Non esporre l’apparecchio ad agenti atmosferici, all’umidità o a fonti di calore.
• Per pulire l’apparecchio utilizzare un panno asciutto o leggermente umido.
• Utilizzare esclusivamente gli accessori raccomandati dal fabbricante.
Istruzioni di sicurezza

5
Indicazioni sulla sicurezza
• Il vapore fuoriesce dall’apparecchio a temperature molto elevate. L’apparec-
chio e gli accessori possono scottare. Evitare di toccarli. Il simbolo del vapore
(simbolo 5597 della IEC 60417-1) indica: Attenzione pericolo di scottature!
• L’apparecchio non deve essere utilizzato da bambini o disabili se non sotto stretta
sorveglianza.
• Questo apparecchio non è un giocattolo; l’utilizzo di questa apparecchiatura
elettricha in presenza dei bambini deve avvenire esclusivamente sotto la costan-
te sorveglianza di un adulto.
• Dopo l’ uso riporre il prodotto in un luogo sicuro e soprattutto fuori dalla portata
dei bambini.
• A seguito di una caduta dell’apparecchio, staccare immediatamente la spina
dalla corrente e rivolgersi ai centri d’assistenza tecnica autorizzata.
• Non tirare il cavo o l’apparecchio per disinserire la spina.
• Verificare che il cavo d’alimentazione non entri in contatto con spigoli taglienti.
• Le parti in tensione (interruttore, spina, componenti elettronici, ecc) non devono
entrare a contatto con l’acqua.
• Prima d’ogni operazione di manutenzione, di pulizia nonché dopo l’utilizzo, stac-
care l’apparecchio dalla presa di corrente. Lasciare raffreddare l’unità vapore.
• Non lasciare l’apparecchio acceso incustodito. Staccare la spina se necessario
assentarsi anche per pochi minuti.
• Aprire la caldaia solo quando l’apparecchio è spento, privo di pressione e raf-
freddato.Svitare leggermente il tappo della caldaia. Prima di aprirlo completa-
mente fare uscire tutto il vapore residuo.
• Utilizzare per il riempimento della caldaia esclusivamente acqua senza l’aggiunta
d’additivi, profumi e sostanze chimiche di qualsiasi genere.
• Durante l’utilizzo si raccomanda di non capovolgere o inclinare l’apparecchio.
• Non dirigere il getto di vapore verso persone, animali e piante.
• Non dirigere il getto di vapore su elettrodomestici o apparecchiature elettriche in
genere.
• Non inserire alcun oggetto nelle varie aperture e non utilizzare l’apparecchio con
qualsiasi apertura bloccata.
• Non utilizzare il prodotto con mani bagnate o a piedi nudi.
• Non utilizzare l’apparecchio vicino a sostanze infiammabili e/o esplosive
Indicazioni sullo smaltimento
• L’imballo e l’apparecchio non più utilizzabile devono essere smaltiti secondo le
norme vigenti nella vostra zona di residenza.
• I materiali d’imballaggio vanno gettati negli appositi cassonetti della raccolta
differenziata, affinché siano adeguatamente riciclati.
• L’apparecchio dismesso deve essere portato in un apposito centro di raccolta.
Istruzioni di sicurezza

6
Indicazioni in merito alle istruzioni
Disimballaggio
Queste istruzioni d’uso non possono te-
ner conto di ogni possibile impiego.
Per ulteriori informazioni o nel caso di
eventuali problemi che non vengono
approfonditi o trattati in queste istruzioni,
rivolgersi al Centro di assistenza tecnica
più vicino a voi.
Conservi accuratamente queste istruzio-
ni d’uso e le consegni comunque ad un
eventuale altro utente.
-
Togliere l’apparecchio dall’imballag-
gio
- Controllare che i seguenti elementi
siano presenti nell’imballaggio:
1. Ferro da stiro
2. Imbuto
Distruggere eventuali sacchetti di pla-
stica, poiché possono diventare un gio-
cattolo pericoloso per i bambini!
Consiglio:
Conservare l’imballaggio per eventuali
futuri trasporti (ad es. traslochi, riparazio-
ni, ecc.).
1
2

7
Descrizione
IS 56
1. Tappo serbatoio acqua
2. Base d’appoggio resistente al calore
3. Ferro da stiro
4. Pulsante vapore
5. Manopola termostato
6. Cavo e spina di alimentazione
7. Piastra
8. Interruttore
9. Ganci avvolgi-cavo
10. Gancio cinghia
11. Spia luminosa ferro da stiro
12. Cordone (cavo collegato al ferro)
13. Cinghia
14. Spia luminosa presenza acqua

8
Alcuni preziosi consigli per effettuare una buona stiratura
• Sui capi delicati fare uso del vapore sin dall’inizio della stiratura.
• Sui capi in lana spruzzare il vapore da una certa distanza, senza toccarli con la
piastra del ferro da stiro; rinfrescando le fibre, verrà in tal modo mantenuta la loro
elasticità. Non è necessario stirarli come gli altri capi di abbigliamento.
• Sui capi in velluto, si raccomanda di seguire la direzione delle fibre.
Prima di stirare
• Collocare il ferro da stiro sull’apposita base di appoggio resistente al calore (2),
dopo aver rimosso la protezione presente sulla piastra.
Riempimento del serbatoio con acqua
• Estrarre la spina dalla presa di corrente
• Riempire la caldaia con acqua svitando il tappo
di sicurezza (1) (eseguire questa operazione ogni
qualvolta si inizia a stirare per evitare inutili perdi-
te di tempo quando la macchina è calda)
• Chiudere il tappo di sicurezza.
INDICAZIONI
• La migliore acqua per stirare è l’acqua di rubinetto.
• Se l’acqua del rubinetto presenta un elevato grado di durezza, mescolatela
ad acqua distillata per ferri da stiro, nella proporzione di 1 a 3, oppure metà e
metà.
• Se la durezza dell’acqua è superiore a 3 mmol/l, utilizzare acqua distillata. Non
utilizzare acqua per batterie o acqua mescolata ad additivi (aromatici, deter-
genti, etc.), né acqua filtrata (con filtri chimici o domestici) o imbottigliata.
• Non utilizzare mai l’apparecchio senza acqua.

9
Inizio della stiratura
• Inserire la spina nella presa di corrente.
• Accendere l’interruttore (8); l’accensione sarà segnalata dall’apposita spia lumi-
nosa.
• Avendo precedentemente riempito il serbatoio con acqua, si accenderà anche
la spia luminosa presenza acqua (14).
• Quando la spia luminosa (verde) di «vapore pronto» (10) si accende e la spia
luminosa (11) si spegne, si può iniziare a stirare. Ciò avviene abitualmente in circa
2 minuti, fatta eccezione per il primo utilizzo o dopo aver eseguito le operazioni di
pulizia della caldaia. L’apparecchio inizia a funzionare in maniera regolare dopo
la seconda o la terza aspirazione della pompa.
Nel frattempo, sarà possibile udire il rumore prodotto dalla pompa stessa (drr-drr),
la quale aspira l’acqua dal serbatoio e la invia alla caldaia, per la conseguente
produzione di vapore. Si tratta di un suono che udirete ogniqualvolta la caldaia
“richiederà” l’invio di acqua.
Aggiunta di acqua – prosecuzione della stiratura
Finché è presente acqua nel serbatoio, l’apposita spia luminosa (14), rimane acce-
sa.
Prima di aggiungere acqua fare raffreddare il generatore.
Con l’interruttore ON/OFF spegnere la macchina, aspettare qualche minuto che
l’acqua all’interno della caldaia scenda di temperatura.
Svitare i tappo di sicurezza con cautela e lentamente lasciando sfiatare le rimanen-
ze di vapore, introdurre l’acqua e avvitare ben stretto il tappo di sicurezza.
Riattaccare la spina alla presa di corrente e aspettare alcuni minuti che l’acqua in
caldaia raggiunga la temperatura di esercizio, la spia dell’interruttore si spegne.
Se si dimentica di aggiungere acqua, il ferro da stiro cesserà di erogare vapore, la
pompa terminerà di alimentare la caldaia e la spia luminosa dell’acqua (14) si spe-
gnerà. In questa fase, non rivolgere mai il ferro da stiro verso altre persone, poiché
un improvviso scuotimento della caldaia può provocare automaticamente l’emis-
sione di vapore.
Accessori
Per trasportare e riporre il ferro da stiro in maniera sicura, fissare l’apposita cinghia
(13) ai due piccoli ganci (18) posti sulla base d’appoggio.
Inserendo il supporto (17) nel piccolo foro posto alla destra o alla sinistra del coper-
chio del serbatoio dell’acqua, sarà possibile sorreggere il cordone, in modo tale che
quest’ultimo non arrechi alcun disturbo durante l’effettuazione delle operazioni di
stiro.
Tirando i ganci (9), potrete così avvolgere i cavi attorno alla base dell’unità da stiro.
ATTENZIONE, NON UTILIZZARE DETTI GANCI PER EFFETTUARE IL TRASPORTO DELL’APPA-
RECCHIO.
Per stirare a secco
E’ possibile stirare a secco semplicemente accendendo il solo interruttore generale.
REGOLAZIONE DELLA TEMPERATURA DEL FERRO DA STIRO DURANTE LA STIRATURA A
SECCO.
La piastra del ferro da stiro si scalda molto velocemente, per poi raffreddarsi len-
tamente. Si consiglia pertanto di iniziare stirando quei capi che richiedono basse
temperature, regolando adeguatamente la manopola del termostato (5); per gli
altri capi di abbigliamento, sarà poi possibile aumentare la temperatura.

10
Per stirare a vapore
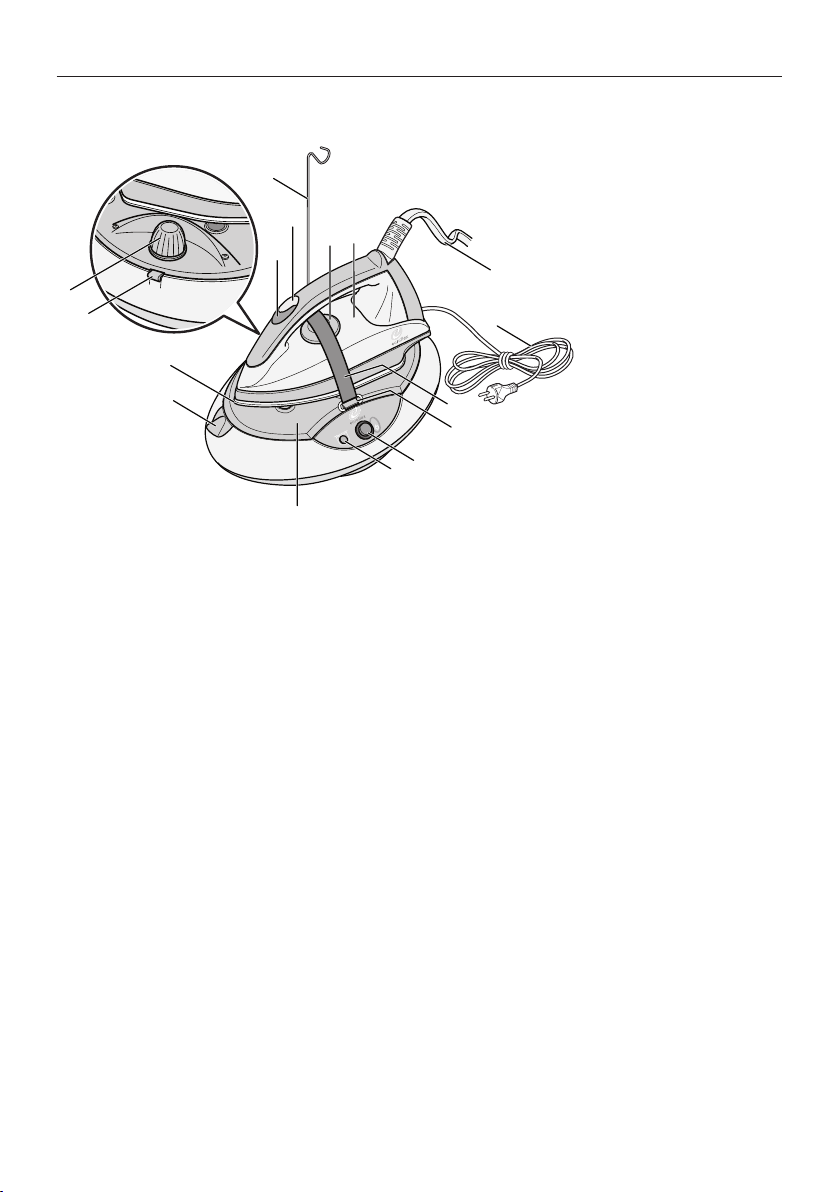
Se l’apparecchio viene utilizzato per la prima volta in assoluto, posizionare la manopo-
la del termostato (5) sulla posizione “nylon”; attendere cinque minutu e premere poi
ripetutamente il pulsante vapore del ferro da stiro (4), sino a provocare la fuoriuscita di
gocce d’acqua. Strofinare delicatamente la superficie della piastra con un panno pulito.
Ruotare poi la manopola del termostato (5) fino a raggiungere la posizione desiderata.
Quando la spia luminosa del ferro (11) si spegnerà, potrete iniziare a stirare. (Durante la
stiratura, questa spia si accende e si spegne; è il suo normale funzionamento). Ogni vol-
ta che si inizia a stirare o dopo una lunga pausa nella stiratura, dirigere il primo getto di
vapore verso il pavimento, poiché il vapore, ormai allo stato liquido, presente all’interno
del cavo collegato al ferro (cordone), residuo della stiratura precedente, potrebbe goc-
ciolare sul tessuto, e quindi macchiarlo.
Nel corso della stiratura a vapore, tutti i capi di abbigliamento possono essere stirati rego-
lando la manopola del termostato da ( ) fino al max. Il fattore determinante per stabilire
la quantità di vapore da erogare è che, in pratica, ogni getto di vapore dovrebbe essere
sempre ben visibile ed umido; si dovrebbe in ogni caso testare su ogni tipo di tessuto.
Sono molto importanti la temperatura ed il grado di umidità dell’ambiente.
In generale,
in estate si preferiscono temperature basse, mentre, al contrario, per l’inverno sono indicate
temperature alte.
Per spruzzare vapore dal ferro da stiro, premere sempre il pulsante vapore (4). Abitual-
mente, questo pulsante viene premuto e rilasciato, premuto e rilasciato. Se siete in pre-
senza di un capo di abbigliamento “difficile” da stirare potrete ottenere un getto di
vapore continuo tirando indietro, e quindi “bloccando” il pulsante del vapore (4). ATTEN-
ZIONE: durante le fasi preparatorie, questo pulsante specifico non deve essere “blocca-
to”, altrimenti inizierebbe a fuoriuscire acqua dal ferro da stiro.
AVVERTENZE
• Appoggiare il ferro da stiro caldo sulla base d’appoggio resistente al calore (2).
• Evitare il contatto della piastra del ferro da stiro con oggetti che potrebbero causare
dei graffi sulla stessa (ad esempio una cerniera lampo).
• Non effettuare operazioni di pulizia della piastra utilizzando materiali ruvidi.
• Quando si esegue la prima stiratura, dal ferro potrebbe uscire del fumo o del vapore
non completamente pulito. Dirigete pertanto il primo getto di vapore verso il pavimen-
to, per non macchiare il tessuto.
Se l’apparecchio non viene utilizzato per un lungo periodo di tempo, prima di riutiliz-
zarlo, inviate il getto di vapore, per circa un minuto, in direzione del pavimento.
Stiratura verticale
Potete stirare i vestiti posti sugli appendiabiti erogando vapore dall’alto in basso,
appoggiando la piastra del ferro sui capi di abbigliamento. Stirando capi delicati,
mantenere la piastra ad una distanza di alcuni centimetri da essi. Non vaporizzare
mai gli abiti quando sono indosso a persone.
• Dopo aver stirato, spegnere l’apparecchio.
• Disinserire la spina dalla presa di corrente. Attendere alcuni minuti, finché il ferro si
raffredda.
• Legare in maniera salda il ferro con l’apposita cinghia (13).
• Riporre l’apparecchio in posizione orizzontale.

11
Dopo la stiratura
Rimozione del calcare dalla caldaia
All’incirca ogni quattro mesi deve essere effettuata l’operazione di rimozione del
calcare dalla caldaia. Assicurarsi che l’apparecchio si sia raffreddato, 4 ore dopo
l’ultimo utilizzo. Svuotare l’acqua dal serbatoio, capovolgere l’apparecchio e svi-
tare il tappo della caldaia (1); l’acqua non pulita fuoriuscirà attraverso l’apposito
foro. Nei negozi di elettrodomestici, nei centri di assistenza tecnica, così come nei
supermercati, sono in vendita numerosi prodotti per rimuovere il calcare dalle unità
da stiro. Introdurre circa mezzo litro dell’apposita soluzione (seguire attentamente
le istruzioni per l’utilizzo del prodotto specifi co) attraverso il foro dal quale avrete
prima fatto fuoriuscire l’acqua non pulita. Successivamente, svuotare e risciacquare
la caldaia per 3-4 volte, fi nché l’acqua che fuoriesce non sia pulita. Introdurre un
bicchiere d’acqua ed avvitare correttamente il tappo della caldaia. Se vi assen-
tate per un lungo periodo, svuotare l’acqua presente sia nel serbatoio che nella
caldaia.
Rimozione del calcare dal ferro da stiro
Dopo ogni seconda pulizia della caldaia, quando siete pronti per stirare, solleva-
te verticalmente l’apparecchio, in maniera tale che il serbatoio sia rivolto verso il
basso, e dirigete il getto di vapore all’interno di un recipiente (in tal modo non pro-
durrete macchie sul pavimento). Fuoriuscirà dal ferro da stiro del vapore misto ad
acqua, che convoglierà verso l’esterno il calcare accumulatosi all’interno dell’ap-
parecchio. L’operazione potrà ritenersi completata non appena fuoriusciranno dal
ferro da stiro gocce di acqua pulita; pulire quindi delicatamente la piastra con un
panno inumidito.
ATTENZIONE: LE OPERAZIONI DI PULIZIA DELLA CALDAIA E DEL FERRO DA STIRO NON
SONO COPERTE DALLE CONDIZIONI DI GARANZIA.

12
INDEX PAGES
Safety instructions ......................................................13
About the instructions ...............................................15
Unpacking the appliance .......................................15
Description ...............................................................16
Various “TIPS” for the ironing .................................... 17
Before ironing ............................................................17
Filling with water ........................................................17
Starting ......................................................................18
Refilling with water - Continuation of ironing ......... 18
Accessories ................................................................18
Dry ironing .................................................................. 18
Steam ironing .............................................................19
Vertical ironing ..........................................................19
After ironing ............................................................... 19
Congratulation for your choice!
Dear Sir, dear Madam, Congratulations, you have bought the most modern existing
model in the world of ironing. Effortless ironing with professional results will save you
time and money. IS 56 it is an ironing system constituted of a steam station and a
professional plate iron.
For your safety please read the following information.
Warning: This appliance must be earthed.
The appliance must be connected to a 220-240 volts 50 cycle AC supply by means
of a three pin socket, suitably earthed and should be protected by a 13 amp fuse
in the plug.
The appliance is supplied with a rewireable 13 amp 3 pin plug fitted with a 13 amp
fuse. Should the fuse require replacement, it must be replaced with a fuse rated at
13 amp and approved to BS1362.
If the mains plug is unsuitable for the socket outlet in your home or is removed for
any other reason, then the cut off plug should be disposed of safely to prevent the
hazard of electric shock.
There is a danger of electric shock if the cut off plug is inserted into any 13 amp
socket outlet.
How to wire a 13 amp plug.
Important
The wires in the mains lead on this appliance are coloured in accordance with the
following code:
Green and Yellow - Earth
Blue – Neutral
Brown – Live
The green and yellow wire must be connected to
the terminal in the plug which is marked with the
letter E or with the earth symbol .
The blue wire must be connected to the terminal marked N.
The brown wire must be connected to the terminal marked L.
ELECTRICAL CONNECTION (UK ONLY)

13
Before use
• Read carefully all information set forth herein. It contains useful indications regard-
ing the use, safety and maintenance/care of the appliance. Save these instruc-
tions for future reference and, if possible, hand them over to the future owners of
the appliance.
• The appliance comply with European safety standards (CE) and current legisla-
tion as regards appliance safety.
• These appliances comply with the requirements of Directive2004/108/EEC on
“Electromagnetic compatibility” and Directive 2006/95/EEC on “Safety of electri-
cal equipment”. The appliance carries the CE safety standard label.
• The manufacturer reserves the right to modify the specifications of the appliance
or its basic kit without prior notice.
• Do not turn the appliance on if the steam hose or the power cord appear to be
damaged
• (cracks/slits) or if the appliance has been dropped and internal damage may
have occurred.
• Connect the appliance only after ensuring that the voltage on the rating plate
corresponds to the voltage in your home.
• The socket must be fitted with a 10 A automatic switch.
• Only use extension cables which are suitable for 10 A.
• All extension cables have to be completely unrolled prior to use.
• Make sure that the socket has an earth pin.Before operating the appliance please
check, that all accessories (steam-vacuum) have been put together correctly in
order to avoid that these can come off and the outcoming steam can lead to
scaldings. Please pay attention!
General instructions
• The iron must be used and rested on a stable surface.
• When placing the iron on its stand, ensure that the surface on which the stand is
placed is stable.
• The iron is not be used if it has been dropped, if there are visible signs of damage
or if it is leaking.
• The manufacturer can not be hold responsible of any personal and/or items dam-
age if the appliance is damaged due to improper use or unauthorized repair or
servicing.
• Any repair must be carried out solely by authorized technicians of the manufac-
turing company. Appliances repaired by unauthorised technicians can represent
a danger to the users and render the warranty void.
• If the supply cord is damaged, it must be replaced by the manufacturer, its serv-
ice agent or similarly qualified persons in order to avoid hazard.
• Store the appliance in a dry place.
• Do not store the appliance outdoors.
• Do not expose the appliance to atmospheric agents, humidity or heat sources.
• Clean the appliance with a dry or slightly damp cloth.
• Only accessories which have been recommended by the manufacturer are to
be used.
Safety instructions

14
Safety instructions
• The steam produced by the appliance can reach very high temperatures. The
appliance and the accessories may scorch. Avoid touching them. The steam
symbol ( 5597 of IEC 60417-1) has the following signification: Attention danger
of scalding!
•
The appliance is not intended for use by young children or infirm persons without su-
pervision
• This appliance is not a toy; the use of the electrical appliance in the presence of
children must be constantly supervised by an adult.
• The appliance must be stored in a safe place after use and out of the reach of
children.
• In case the appliance has fallen down please unplug the appliance from the
electrical socket and contact the authorised repair service.
• Do not yank cord or appliance to disconnect the plug.
• Ensure that the power cord does not come into contact with sharp edges.
• Live parts (switch, plug, electronic components, etc.) must not get in contact with
water.
• Before any maintenance or cleaning and also after use, disconnect the appli-
ance from the electrical socket and leave the steam unit to cool.
• Do not leave the appliance unattended while plugged in. Turn it off, even if you
need to leave for a short while.
• Only open the pressure tank when the appliance is off, has no pressure and it is
cool. Unscrew the cap of the pressure tank slightly and, before opening it com-
pletely make sure that all the steam has gone out.
• For refilling the pressure tank only use regular tap water without additives, without
perfumes and without any chemical substances!
• Do not turn the appliance upside down and do not drop it in use!
• Do not direct the steam towards persons, animals or plants!
• Do not direct the steam towards equipment containing electrical components or
electrical appliances in general!
• Do not insert any objects into the various openings of the appliance and do not
use the appliance in case one of the openings is blocked!
• Do not operate the appliance with wet hands or bare feet.
• Do not operate the appliance in the presence of inflamable and / or explosive
fiumes!
Recommended disposal procedures
• When the packaging and the appliance are no longer usable, they must be dis-
posed of in accordance with local waste disposal regulations.
• The packaging material must be disposed of in the appropriate containers which
have been specially designated, so that it can be adequately recycled.
• The discarded appliance must be taken to an appropriate collecting centre.
Safety instructions

15
About the instructions
Unpacking the appliance
These instructions cannot encompass
every possible use.
For further information or if you have any
problem not covered or covered only
unsatisfactorily in this handbook, please
contact the nearest Service Center.
Save these instructions for future refer-
ence and, if possible, hand them over to
the future owners of the appliance.
- Unpack the appliance
- Check that the following elements
are contained in the packing:
1. Iron
2. Funnel
To avoid danger of suffocation, keep
plastic bags away from children!
Note:
keep the package for future transporta-
tion (ex. removal, service, etc.)
1
2

16
Description
IS 56
1. Water tank cap
2. Heat-resistant iron pad
3. Iron
4. Steam button
5. Iron thermostat button
6. Wire – plug
7. Ironing soleplate
8. Switch
9. Hooks wrapping around the wires
10. Hooks for iron belt
11. Iron indicator light
12. Wire tube
13. Iron belt
14. Water light

17
Various “TIPS” for the ironing
• In the sensitive clothes press steam from the beginning.
• In the wool clothes sprinkle the steam from a distance without touching them
with the ironing soleplate refreshing their fibres maintaining their elasticity. It is not
necessary to ironing them like the other clothes.
• In velvet clothes follow the direction of their fibres.
Before ironing
• Put the iron into the Heat-resistance iron pad (2), after removing the protective
tape from its soleplate.
Filling with water
• Pull the plug out of the socket.
• Carefully unscrew the safety cap (1) and fill
the boiler with water (repeat this operation
any time you start ironing to avoid wasting time
when the appliance is warm)
• Screw the safety cap back.
• The best water to use for the ironing is the tap water.
• If tap water is very hard mix it with distillated water especially made for the ironing
in a proportion of 1 to 3 or half and a half.
• If the hardness of the water is above the 3 mmol/l use distillate water. Do not use
battery water or water mixed with various additives (aromatics, detergents, etc)
or by domestic or chemical filters or bottled.
• Never use the appliance without water.

18
Starting
• Put the plug into the socket.
• Switch on the switch (8), it turns on its light.
• Provided that you have fulfilled the water tank with water, it will also turn on the
water light (14).
• When the (green) light “steam ready” (10) turns on and the iron light (11) turns off,
you can start ironing. The time usually required is about 2 minutes, apart from the
very first time or after cleaning the boiler. The appliance works regularly after the
second or third pull off the pump.
In the meantime you may hear the sound of the pump (drr-drr) which pulls water
from the water tank and sends it to the boiler in order to create steam. This is a sound
you will hear each time that the boiler will ask for water.
Re-filling with water – continuation of ironing
As long as the tank is filled with water, the water light (14), remains turned on.
Let the appliance completely cools down before filling with water. Turn the appli-
ance OFF, wait until the water in the boiler cools down. Carefully unscrew the safety
cap making sure the steam has completed exhausted. Fill the boiler with water and
thoroughly screw the safety cap back. Insert the plug into the mains socket, wait
a few minutes until the water reaches the working temperature. The indicator light
comes off.
If you forget to supplement water, the iron will stop providing steam, the pump will
stop supplying the boiler and the water light (14) will turn off. In that phase do not
direct the iron towards people, as by a sudden shake of the boiler may automati-
cally remove steam.
ACCESSORIES
With the iron belt (13) tie up the iron from the two small hooks (18) on it’s base for a
safe transportation and storage.
Putting the wire support (17) in to a small hole from the left or the right side of the wa-
ter tank cap you can hand the wire tube so it doesn’t bother you during operation.
Pulling the hooks (9) off, you can wrap around the wires.
ATTENTION, THESE HOOKS SHOULD NOT BE USED FOR THE TRANSPORTATION OF THE
APPLIANCE.
Dry ironing
You can dry iron switching on only the general Switch.
TEMPERATURE REGULATION OF THE IRON DURING DRY IRONING.
The iron’s soleplate gets warm very fast but cools off slowly. So it is recommended to
start ironing clothes that need low temperature regulating proportionally the ther-
mostat button of the iron (5) and for the rest of the cloths then you can increase the
temperature.

19
Steam ironing
When you use for the very first time the appliance turn the thermostat button of the
iron (5) in the nylon position, wait five minutes and then press the steam button of the
iron (4) repetitively in order to come out drops of water. Sweep the soleplate of the
iron with a clean cloth. Then turn the thermostatbutton (5) in the desirable position.
When the iron light (11) turns off you can start ironing. (This light during ironing turns
on and off, this is a normal operation). Each time you start ironing or after a long in-
terruption of ironing throw the first steam towards the floor because due to liquefied
steam into the wire-tube from previous ironing it may droop from the iron water and
stain the cloths.
During steam ironing all cloths can be ironed regulating the thermostat button from
( ) up to max. You may have as a decisive factor for the quantity of the steam the
fact that you should always see steam, meaning to be humid and in any case test-
ing it on each quality of cloth. In every case it is very important the environmental
temperature and humidity. Generally in the summer time prefer low temperature
and on winter high temperature.
In order to spray steam from the iron always press the steam button (4). Usually you
press and leave, press and leave. If you have a “difficult” cloth to iron you can pull
the steam button (4) back in order to lock and you have continues steam.
ATTENTION: during preparation this specific button should not be locked otherwise
water will start running from the iron.
WARNINGS
• Lean the hot iron into the Heat –resistant iron pad (2).
• Do not contact the soleplate of the iron on objects that may scratch it (for exam-
ple zipper).
• Do not clean the soleplate using hard materials.
• At the first ironing it may come out some smoke or dirty steam from the iron. So
droop the first spray of steam towards the floor so you will not soil the cloth.
If the appliance is not in use for a long period of time, before re-using it droop for
about a minute the steam to the floor.
Vertical ironing
You can fresh the cloths in the hanger throwing steam from above to the bottom
leaning the soleplate in the cloths. When freshing sensitive cloths keep the soleplate
in a distance of some centimeters. Do not ever fresh clothes on a human body.
After ironing
• After ironing switch off the appliance.
• Remove the plug from the socket. Wait a few minutes until it cools of the iron.
• Tie up the iron with the iron belt (13).
• Store in horizontal position.
CLEANING THE BOILER FROM SALTS
Approximately every four-month period you should clean the boiler from salts. Be
certain that the appliance is cold, 4 hours after the last use. Empty the water from

20
the tank, turn the appliance upside-down and unscrew the boiler cap (15) and by
that hole empty the dirty water. In the electric type shops, in the technical assistant
centers as well as at the super markets they sell various materials for the salt clean-
ing of the ironing systems. Put half liter solution from such product, according to its
instructions, to the hole from which you empty the dirty water. Afterwards empty and
rinse the boiler 3-4 times until clean water comes out. Put a glass of water and screw
the boiler cap properly. If you are going to be absent for a long period of time empty
the water from the tank and the boiler.
CLEANING THE IRON FROM SALTS
Each second cleaning of the boiler, after you have fi nished its cleaning and you are
ready to iron, raise the appliance vertically so that the tank faces down and direct
the steam in to a bin (so you will not soil the fl oor). It comes out from the iron steam
with water that will sweep along the salts gathered into the iron. When from the iron
comesout clean drops of water you can stop and sweep the soleplate with a wet-
ted cloth.
ATTENTION THE CLEANING OF BOILER AND IRON ARE NOT COVERED BY THE GUARAN-
TEE.
Table of contents
Languages:
Other Euroflex Iron manuals

Euroflex
Euroflex monster IS 21 HS User manual

Euroflex
Euroflex Monster IB 40 CLASSIC-RA User manual

Euroflex
Euroflex AIRFLUX IB 10 VAPOR User manual

Euroflex
Euroflex monster IB 45 LX RAS Perfect User manual

Euroflex
Euroflex Monster IB 35 Active User manual

Euroflex
Euroflex IS 45 HST Installation instructions

Euroflex
Euroflex BT 3000 M User manual

Euroflex
Euroflex STIROSYSTEM IS 55 HSM/X User manual

Euroflex
Euroflex Monster IB 40 CLASSIC-RA User manual

Euroflex
Euroflex Monster IS 60 User manual