Euroflex monster IS 21 HS User manual

IS 21 HS
IS 21 HST
• Manuale d’istruzione
• Instruction Manual
• Gebrauchsanleitung
• Notice d’utilisation
• Manual de Instrucciones

2

3
Congratulazioni! Con l’acquisto di questo sistema stirante si è assicurato un prodotto
di alta qualità realizzato con la massima cura. Con un’adeguata manutenzione il
sistema stirante fornirà degli ottimi risultati per molto tempo. Prima della messa in
funzione iniziale, La preghiamo comunque di leggere attentamente le seguenti istru-
zioni d’uso e soprattutto di osservare in modo preciso le avvertenze di sicurezza.
INDICE PAGINA
Avvertenze di sicurezza ........................................................................ 4
Indicazioni in merito alle istruzioni ....................................................... 6
Disimballaggio ....................................................................................... 6
Elenco delle parti e degli elementi di comando .............................. 7
Istruzioni d’uso ........................................................................................ 8
Messa in funzione .................................................................................. 9
Guida alle temperature ....................................................................... 9
Pulizia ..................................................................................................... 10
Custodia ................................................................................................. 10
Manutenzione ....................................................................................... 10
Disturbi di funzionamento .................................................................... 10
Problemi e soluzioni ............................................................................... 11

4
AVVERTENZE DI SICUREZZA
Prima dell’uso
• Leggere attentamente tutte le informazioni riportate di seguito. Contengono
utili indicazioni riguardo all’utilizzo, la sicurezza e la manutenzione dell’appa-
recchio. Conservate con cura queste istruzioni ed eventualmente consegna-
tele ai futuri proprietari.
• Questi apparecchi soddisfano le condizioni delle direttive europee 89/336/
CEE “compatibilità elettromagnetica” e 2006/95/CEE “ Sicurezza dei prodotti
elettrici”. L’apparecchio riporta sulla targhetta identificativa il marchio CE.
• Il costruttore si riserva il diritto di apportare modifiche di progettazione e do-
tazione dell’apparecchio senza preavviso.
• Non accendere mai l’apparecchio se il tubo del vapore presenta danni evi-
denti (crepe/tagli), se il cavo d’alimentazione è danneggiato o se si sospetta
la presenza di danni non visibili (ad esempio in seguito ad una caduta).
• Collegate l’apparecchio solo dopo esservi assicurati che il voltaggio della
rete elettrica corrisponda a quello indicato sulla targhetta dell’apparec-
chio.
•
La presa di corrente deve essere dotata d’interruttore automatico a 16A.
• Se si usano prolunghe elettriche, verificare che siano idonee all’impiego e da
16A.
• Le prolunghe elettriche devono essere completamente srotolate prima del-
l’uso.
• Assicurarsi che la presa di corrente sia dotata di messa a terra.
• Assicurarsi prima di utilizzare gli accessori vapore che quest’ultimi siano sal-
damente collegati tra loro. Nel caso in cui non fossero fissati correttamente,
il vapore che fuoriesce dalle giunzioni potrebbe causare scottature. Prestare
molta attenzione.
Indicazioni generali
•
Il ferro deve essere utilizzato e lasciato a riposo su una superficie stabile.
•
Quando si ripone il ferro sul suo appoggiaferro, assicurarsi che la superficie su cui è
collocato l’appoggiaferro sia stabile
•
Il ferro non deve essere utilizzatose è stato fatto cadere, se vi sono segni di danni visibili
o se perde.
• Nel caso in cui l’apparecchio risultasse danneggiato a seguito di un uso improprio,
di una riparazione o manutenzione non conforme, il costruttore declina ogni re-
sponsabilità per eventuali danni a cose e persone.
•
Le riparazioni devono essere effettuate esclusivamente da parte di personale auto-
rizzato dall’azienda costruttrice. Gli apparecchi riparati da personale non autorizza-
to rappresentano un pericolo per chi li utilizza e annullano la garanzia.
• Il cavo d’alimentazione deve essere sostituito esclusivamente dal personale dei
centri d’assistenza autorizzati dal costruttore.
• Riporre l’apparecchio in un luogo asciutto.
• Non riporre l’apparecchio all’aperto.
•
Non esporre l’apparecchio ad agenti atmosferici, all’umidità o a fonti di calore
.
• Per pulire l’apparecchio utilizzare un panno asciutto o leggermente umido.
• Utilizzare esclusivamente gli accessori raccomandati dal fabbricante.

5
AVVERTENZE DI SICUREZZA
Indicazioni sulla sicurezza
• Il vapore fuoriesce dall’apparecchio a temperature molto elevate. L’appa-
recchio e gli accessori possono scottare. Evitare di toccarli. Il simbolo del va-
pore (simbolo 5597 della IEC 60417-1) indica: Attenzione pericolo di scotta-
ture!
• L’apparecchio non deve essere utilizzato da bambini o disabili se non sotto
stretta sorveglianza.
• Questo apparecchio non è adatto all’uso per persone (bambini compresi)
con possibilità fisiche, sensitive o mentali ridotte, o con mancanza di espe-
rienza e conoscenza, a meno che siano state date corrette istruzioni per l’uso
dell’apparecchio da una persona responsabile della loro sicurezza.
• I bambini dovrebbero essere sorvegliati per accertarsi che non giochino con
l’apparecchio.
• Dopo l’ uso riporre il prodotto in un luogo sicuro e soprattutto fuori dalla porta-
ta dei bambini.
• A seguito di una caduta dell’apparecchio, staccare immediatamente la spi-
na dalla corrente e rivolgersi ai centri d’assistenza tecnica autorizzata.
• Non tirare il cavo o l’apparecchio per disinserire la spina.
• Verificare che il cavo d’alimentazione non entri in contatto con spigoli
taglienti.
• Le parti in tensione (interruttore, spina, componenti elettronici, ecc) non
devono entrare a contatto con l’acqua.
• Prima d’ogni operazione di manutenzione, di pulizia nonché dopo l’utiliz-
zo, staccare l’apparecchio dalla presa di corrente. Lasciare raffreddare
l’unità vapore.
• Non lasciare l’apparecchio acceso incustodito. Staccare la spina se ne-
cessario assentarsi anche per pochi minuti.
•
Svitare il tappo di sicurezza solo quando l’apparecchio è spento, privo di
pressione e raffreddato.
Svitare leggermente il tappo della caldaia. Prima
di aprirlo completamente fare uscire tutto il vapore residuo.
• Utilizzare per il riempimento della caldaia esclusivamente acqua senza
l’aggiunta d’additivi, profumi e sostanze chimiche di qualsiasi genere.
• Durante l’utilizzo si raccomanda di non capovolgere o inclinare l’appa-
recchio.
• Non dirigere il getto di vapore verso persone, animali e piante.
• Non dirigere il getto di vapore su elettrodomestici o apparecchiature
elettriche in genere.
• Non inserire alcun oggetto nelle varie aperture e non utilizzare l’apparec-
chio con qualsiasi apertura bloccata.
• Non utilizzare il prodotto con mani bagnate o a piedi nudi.
• Non utilizzare l’apparecchio vicino a sostanze infiammabili e/o esplosive.

6
INDICAZIONI IN MERITO ALLE ISTRUZIONI
DISIMBALLAGGIO
Queste istruzioni d’uso non possono te-
ner conto di ogni possibile impiego.
Per ulteriori informazioni o nel caso di
eventuali problemi che non vengono
approfonditi o trattati in queste istruzioni,
rivolgersi al Centro di assistenza tecnica
più vicino a voi.
Conservi accuratamente queste istruzio-
ni d’uso e le consegni comunque ad un
eventuale altro utente.
– Togliere l’apparecchio
dall’imballaggio
– Controllare che i seguenti elementi
siano presenti nell’imballaggio:
1. Ferro da stiro
2. Imbuto
Distruggere eventuali sacchetti di
plastica, poiché possono diventare
un giocattolo pericoloso per i bambini!
Consiglio:
Conservare l’imballaggio per eventuali
futuri trasporti (ad es. traslochi, ripara-
zioni, ecc.).
2
1

7
ELENCO DELLE PARTI E DEGLI ELEMENTI DI COMANDO
1. Interruttore generale ON/OFF
2. Tappo di sicurezza
3. Tappetino appoggiaferro
4. Spia pronto vapore
5. Spia fi ne acqua
6. Manopola regolazione vapore
7. Spia alimentazione / Pronto stiro
8. Manopola regolazione
temperatura ferro
6
3
IS 21 HS
1
4
5
2IS 21 HST
1
2
3
4
7
8
EF 9
87
EF 8

8
ISTRUZIONI D’USO
1. Posizionamento
– Collocare l’apparecchio sul tappeti-
no appoggia ferro.
Scegliere una superfi cie asciutta, sta-
bile e piana vicino a una presa di cor-
rente elettrica.
– Impiegare il ferro soltanto in locali
asciutti.
2. Riempire d’acqua
• Prima di riempire d’acqua, spegnere
sempre l’apparecchio ed estrarre la
spina dalla presa di corrente.
• Non toccare la piastra del ferro in fun-
zione: pericolo di ustioni!
• La piastra del ferro da stiro non deve
mai entrare in contatto col cavo elet-
trico.
•
Fare attenzione che il vapore non col-
pisca altre persone: pericolo di ustioni!
• Pulire l’apparecchio soltanto quando
è disinserito e completamente raf-
freddato.
• Riempire la caldaia con acqua svitan-
do il tappo di sicurezza. Versare 0.8 l di
acqua utilizzando l’apposito imbuto in
dotazione.
• Chiudere il tappo di sicurezza.
3. Messa in funzione
–
Inserire la spina nella presa di corrente.
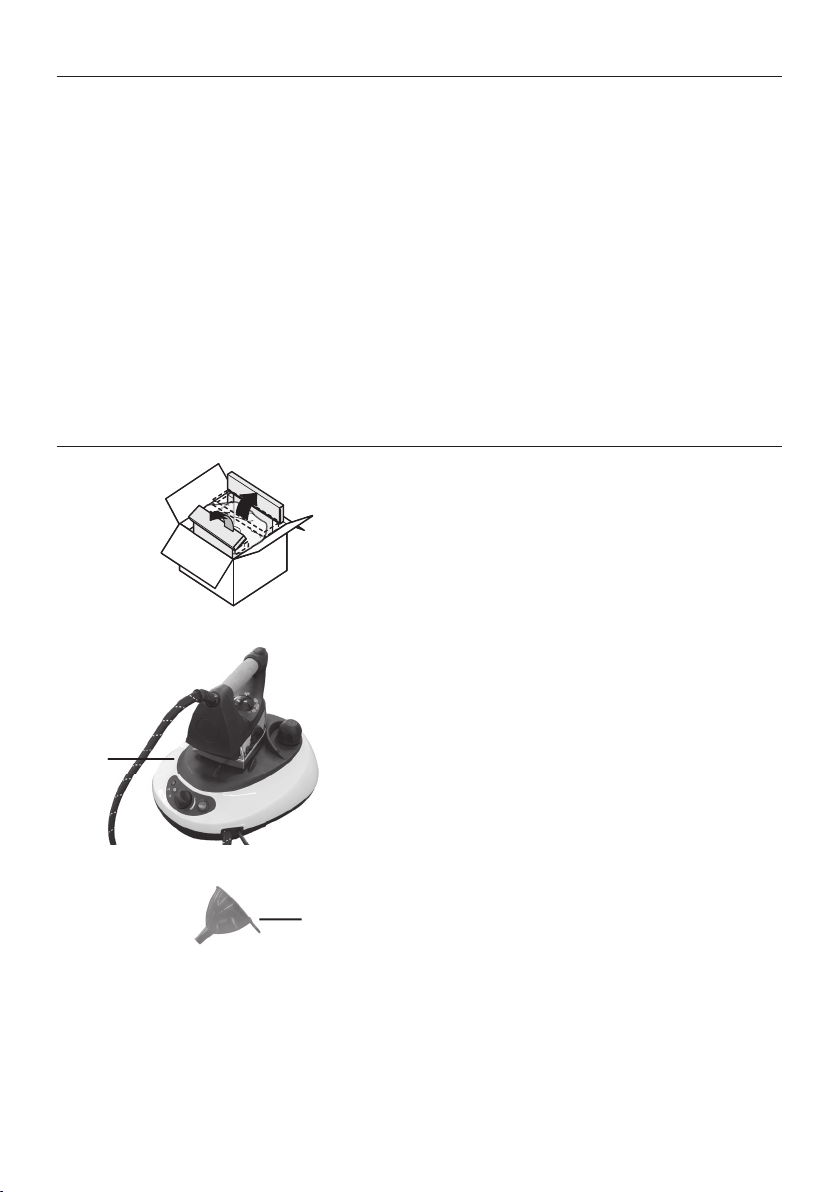
– Accendere la macchina tramite il ta-
sto ON/OFF e la spia dell’interruttore si
illumina.
– Col primo riscaldamento può uscire
un po‘ di fumo dal ferro da stiro.
E‘ un fatto puramente tecnico, che
non deve destare preoccupazione.
– Per stirare a vapore, girare la mano-
pola regolazione temperatura nel set-
tore compreso tra e «•••».
Aspettare alcuni minuti che l’acqua
in caldaia raggiunga la temperatura
di esercizio, fi no all’accensione della
spia pronto vapore.
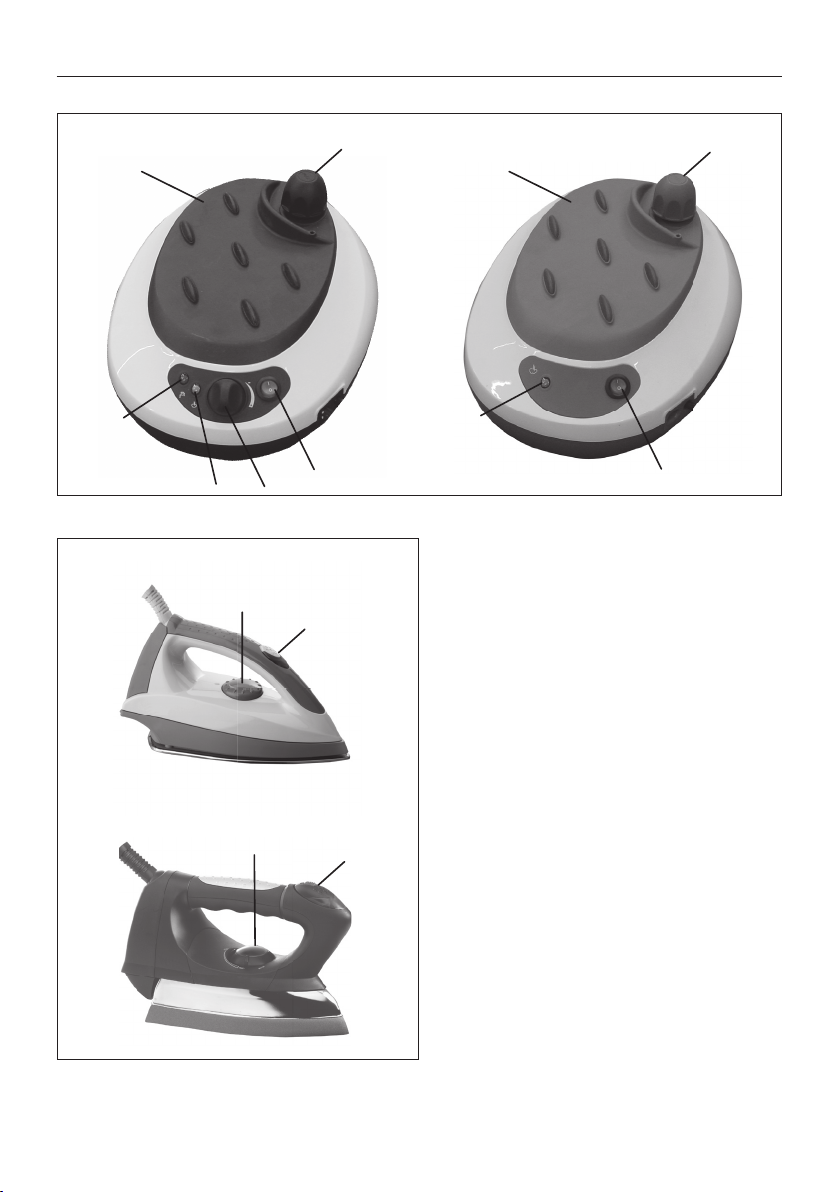
– Iniziare a stirare premendo il tasto va-
pore sul ferro se si desidera l’emissione
del vapore.
Attenzione: il vapore che fuoriesce è
bollente! Pericolo di ustioni!
– Dopo l’accensione o dopo una lunga
pausa di lavoro, dirigere il primo getto
di vapore in aria, e non sul capo da
stirare, in modo che l’eventuale ac-
qua di condensa venga espulsa sen-
za macchiare l’indumento.
– Durante l’espulsione del primo getto
di vapore, la pressione si abbassa ra-
pidamente. Non si tratta di un guasto,
ma del normale funzionamento.
4. Dopo aver stirato
– Premere il tasto ON/OFF.
– Attendere che l’apparecchio si sia
completamente raffreddato.
– Riporlo in un luogo asciutto e lontano
dalla presenza di bambini.
Tasto vapore Tasto vapore

9
MESSA IN FUNZIONE
5. Stirare a secco
Preparare l’apparecchio
− Appoggiare il ferro da stiro sul tappe-
tino appoggia ferro
− Separare i capi da stirare in base al
tipo di tessuto, rispettivamente alla
temperatura indicata sull’etichetta
degli indumenti. Stirare dapprima i
capi che richiedono la temperatura
più bassa.
Accensione dell’apparecchio
− Mettere il ferro da stiro sul tappetino
appoggiaferro.
− Inserire la spina nella presa di corren-
te.
− Girare la manopola regolazione tem-
peratura del ferro da stiro sulla tempe-
ratura desiderata.
Stirare a secco
– Stirare senza premere il tasto vapore.
Posizione del ferro da stiro
–
Durante le pause di lavoro appoggiare
il ferro sul tappetino appoggia ferro.
Dopo la stiratura a secco
– Premere il tasto ON/OFF (1).
– Attendere che l’apparecchio si sia
completamente raffreddato.
– Riporlo in un luogo asciutto e lontano
dalla presenza di bambini.
Importante: riporre l’apparecchio solo
quando si è raffreddato completamen-
te!
GUIDA ALLE TEMPERATURE
Simbolo
Posizioni della
manopola
regolazione
temperatura
Non stirare
120°C max
FREDDO
160°C max
TIEPIDO
210°C max
CALDO
Tessuto Nylon, acetato ad
es. acrilan, courtelle,
orlon, triacetato, ad
es. tricel/poliestere
Lana, combinazioni
con poliestere, ad es.
poliestere/cotone
Cotone, lino, rayon,
combinazioni con
rayon, ad es. rayon/lino
Stiratura Stirare al rovescio.
Per inumidire, utilizzare
un panno umido (non
acetato)
I tessuti che richiedono
questa impostazione
di solito necessitano
di vapore per cotone
pesante, tessuto jeans,
ecc.
Le impostazioni della temperatura sulla manopola regolazione vapore di tutti i ferri
corrispondono a quelle del codice di etichettatura internazionale per i tessuti.

10
PULIZIA
Attenzione:
– Prima di pulire l’apparecchio, toglie-
re sempre la spina dalla presa di cor-
rente. Pulire l’apparecchio soltanto
quando si è completamente raffred-
dato.
– Non immergere mai l’apparecchio
nell’acqua né pulirlo sotto l’acqua
corrente.
Attenzione:
– Non utilizzare mai le spugnette «verdi»
o «gialle» e non pulire mai effettuando
movimenti circolari, potrebbe graffi a-
re la piastra!
− Non impiegare detersivi abrasivi o
corrosivi.
Parti in materia plastica
– Le parti in materia plastica vanno puli-
te con un panno umido. Lasciar quin-
di asciugare. Non utilizzare mai abra-
sivi né prodotti chimici corrosivi per la
pulizia.
Quando l’apparecchio non viene uti-
lizzato, estrarre la spina dalla presa di
corrente. Conservare il ferro da stiro in
un luogo asciutto, fuori dalla portata dei
bambini. Il luogo di custodia non deve
avere una temperatura inferiore ai 5 °C,
per evitare eventuali danni provocati
dal congelamento dell‘acqua.
Se l’apparecchio non viene utilizzato per
un periodo prolungato, svuotare l‘ac-
qua residua dal serbatoio e proteggere
l’apparecchio da polvere, sporcizia e
umidità.
– Esaminare regolarmente il cavo di ali-
mentazione alla ricerca di eventuali
danneggiamenti. I cavi danneggiati
vanno fatti sostituire immediatamente
presso un centro di assistenza.
Importante:
– Non versare mai detergenti o deodo-
ranti di qualsiasi genere nel ferro da
stiro.
CUSTODIA
MANUTENZIONE
DISTURBI DI FUNZIONAMENTO
Nel caso di guasti, di apparecchio difet-
toso o se si sospetta un danno in seguito
a una caduta, staccare immediatamen-
te la spina dalla presa di corrente.
Le riparazioni vanno eseguite esclusi-
vamente presso un centro di assistenza
tecnico. Riparazioni eseguite da perso-
nale non specializzato possono compor-
tare gravi pericoli per l’utente.
Non si assumono responsabilità per
eventuali danni causati da riparazioni
eseguite da personale non specializza-
to. In questi casi cessa ogni diritto alla
garanzia.
Qualora non fosse possibile eliminare il
problema con l’aiuto della tabella sot-
tostante, rivolgersi al centro di assistenza
tecnico più vicino.

11
Problema
Non viene generato va-
pore
La piastra è fredda
La piastra gocciola
Possibile causa
Manca acqua nella cal-
daia
Il ferro da stiro non è pron-
to all’uso
Il ferro da stiro non è ac-
ceso
Selettore di temperatura
sulla posizione •
La piastra è troppo fred-
da per stirare a vapore
Soluzione
Rabbocco con acqua
Attendere che la spia
dell’interruttore si spenga
Girare il selettore di tem-
peratura sulla posizione
desiderata
Girare il selettore di tem-
peratura sulla posizione
desiderata
Portare il selettore di tem-
peratura sul settore mar-
cato tra e •••
PROBLEMI E SOLUZIONI

12
Congratulation for your choice! Buying this ironing system you have chosen a top-
quality product manufactured with the utmost care. To guarantee best results for a
long time, a regular maintenance of your ironing system is recommended. Please
carefully read the following indications regarding the use, safety and maintenance/
care of the appliance, before starting the appliance for the first time.
INDEX PAGE
Electrical connection (UK only) ........................................................... 13
Safety instruction ................................................................................... 14
About the instructions ........................................................................... 16
Unpacking the appliance .................................................................... 16
List of parts and control elements ....................................................... 17
Instructions for use ................................................................................. 18
Starting the appliance ......................................................................... 19
Temperature guide ............................................................................... 19
Cleaning the appliance ...................................................................... 20
Storage ................................................................................................... 20
Maintenance ......................................................................................... 20
Troubleshooting guide .......................................................................... 20
Probleme and solution ......................................................................... 21

13
For your safety please read the following information.
Warning: This appliance must be earthed.
The appliance must be connected to a 220-240 volts 50 cycle AC supply by means
of a three pin socket, suitably earthed and should be protected by a 13 amp fuse
in the plug.
The appliance is supplied with a rewireable 13 amp 3 pin plug fitted with a 13 amp
fuse. Should the fuse require replacement, it must be replaced with a fuse rated at
13 amp and approved to BS1362.
If the mains plug is unsuitable for the socket outlet in your home or is removed for
any other reason, then the cut off plug should be disposed of safely to prevent the
hazard of electric shock.
There is a danger of electric shock if the cut off plug is inserted into any 13 amp
socket outlet.
How to wire a 13 amp plug.
Important
The wires in the mains lead on this applian-
ce are coloured in accordance with the
following code:
Green and Yellow - Earth
Blue – Neutral
Brown – Live
The green and yellow wire must be connected to the terminal in the plug which is
marked with the letter E or with the earth symbol .
The blue wire must be connected to the terminal marked N.
The brown wire must be connected to the terminal marked L.
ELECTRICAL CONNECTION (UK ONLY)

14
SAFETY INSTRUCTION
Before use
• Read carefully all information set forth herein. It contains useful indications re-
garding the use, safety and maintenance/care of the appliance. Save these
instructions for future reference and, if possible, hand them over to the future
owners of the appliance.
• These appliances comply with the requirements of Directive 89/336/EEC on
“Electromagnetic compatibility” and Directive 2006/95/EEC on “Safety of
electrical equipment”. The appliance carries the CE safety standard label.
• The manufacturer reserves the right to modify the specifications of the applian-
ce or its basic kit without prior notice.
• Do not turn the appliance on if the steam hose or the power cord appear to
be damaged
• (cracks/slits) or if the appliance has been dropped and internal damage may
have occurred.
• Connect the appliance only after ensuring that the voltage on the rating plate
corresponds to the voltage in your home.
• The socket must be fitted with a 16 A automatic switch.
• Only use extension cables which are suitable for 16 A.
• All extension cables have to be completely unrolled prior to use.
• Make sure that the socket has an earth pin. Before operating the appliance
please check, that all accessories (steam-vacuum) have been put together
correctly in order to avoid that these can come off and the outcoming steam
can lead to scaldings. Please pay attention!
General instructions
• The iron must be used and rested on a stable surface.
• When placing the iron on its stand, ensure that surface on which the stand is
placed is stable.
• The iron is not to be used if it has been dropped, if there are visible signs of
damage or if it is leaking.
• The manufacturer can not be hold responsible of any personal and/or items
damage if the appliance is damaged due to improper use or unauthorized
repair or servicing.
• Any repair must be carried out solely by authorized technicians of the manu-
facturing company. Appliances repaired by unauthorised technicians can
represent a danger to the users and render the warranty void.
• The power cord must be replaced solely by a repair service centre authorised
by the manufacturer.
• Store the appliance in a dry place.
• Do not store the appliance outdoors.
• Do not expose the appliance to atmospheric agents, humidity or heat sour-
ces.
• Clean the appliance with a dry or slightly damp cloth.
• Only accessories which have been recommended by the manufacturer are
to be used.

15
SAFETY INSTRUCTION
Safety instructions
• The steam produced by the appliance can reach very high temperatures.
The appliance and the accessories may scorch. Avoid touching them. The
steam symbol (symbol 5597 of IEC 60417-1) has the following signification:
Attention danger of scalding!
•
The appliance is not intended for use by young children or infirm persons
without supervision.
• The use of this equipment is not suitable for people (including children) who
have reduced physical, sensitive or mental capabilities, or who have no expe-
rience and knowledge, unless they have been provided with the appropriate
instructions to use the equipment by a person in charge of their safety.
• Children should be attended to ascertain that they do not play with the equi-
pment.
• The appliance must be stored in a safe place after use and out of the
reach of children.
• In case the appliance has fallen down please unplug the appliance from
the electrical socket and contact the authorised repair service.
• Do not yank cord or appliance to disconnect the plug.
• Ensure that the power cord does not come into contact with sharp ed-
ges.
• Live parts (switch, plug, electronic components, etc.) must not get in con-
tact with water.
• Before any maintenance or cleaning and also after use, disconnect the
appliance from the electrical socket and leave the steam unit to cool.
• Do not leave the appliance unattended while plugged in. Turn it off, even
if you need to leave for a short while.
• Open the safety cup when the appliance is off, has no pressure and it is
cool. Unscrew the cap of the pressure tank slightly and, before opening it
completely make sure that all the steam has gone out.
• For refilling the pressure tank only use regular tap water without additives,
without perfumes and without any chemical substances!
• Do not turn the appliance upside down and do not drop it in use!
• Do not direct the steam towards persons, animals or plants!
• Do not direct the steam towards equipment containing electrical com-
ponents or electrical appliances in general!
• Do not insert any objects into the various openings of the appliance and
do not use the appliance in case one of the openings is blocked!
• Do not operate the appliance with wet hands or bare feet.
• Do not operate the appliance in the presence of inflamable and / or
explosive fiumes!

16
ABOUT THE INSTRUCTIONS
UNPACKING THE APPLIANCE
These instructions cannot encompass
every possible use.
For further information or if you have any
problem not covered or covered only
unsatisfactorily in this handbook, please
contact the nearest Service Center.
Save these instructions for future referen-
ce and, if possible, hand them over to
the future owners of the appliance.
- Unpack the appliance
- Check that the following elements
are contained in the packing:
1. Iron
2. Funnel
To avoid danger of suffocation, keep
plastic bags away from children!
Note:
keep the package for future transpor-
tation (ex. removal, service, etc.)
2
1

17
LIST OF PARTS AND CONTROL ELEMENTS
1. ON/OFF power switch
2. Safety cap
3. Iron-rest mat
4. Steam ready light
5. No water tank light
6. Handle grip regulation steam
7. Power indicator light / steam ready
8.
Thermostat knob
6
3
IS 21 HS
1
4
5
2IS 21 HST
1
2
3
4
7
8
EF 9
87
EF 8

18
INSTRUCTIONS FOR USE
1. Preparations
- place the iron on the iron-rest mat.
Choose a fl at, even, dry surface, near
a socket.
- use the appliance in dry rooms only.
2. Filling the boiler with water
• Before fi lling the appliance with water
always turn the appliance off and pull
the plug out of the socket.
• Never touch the iron soleplate when
in use: danger of scalding.
• The iron soleplate should never come
in contact with the power cord.
• Pay attention the steam is never di-
rected toward people or animals.
• Clean the appliance only when
unplugged and when it has comple-
tely cooled down.
• fi ll the boiler with water unscrewing the
safety cap. Pour 0.8 lt of water using
the special funnel in equipment.
• Screw the safety cap back.
3. Starting the appliance
- Insert the plug into the mains socket.
- Turn the appliance on [mains switch
(1)]. The ON/OFF indicator light of the
mains switch lights up.
- The appliance may give out some
smoke when using it for the fi rst time.
It is a technical phenomenon that will
cease after a short while.
- To steam iron always set the thermo-
stat knob control between and
«•••».
Wait a few minutes for the water to
reach the working temperature. The
steam ready light comes off.
- Start ironing by pushing the steam
button on the iron if you wish to emit
steam.
Warning: The steam emitted is very hot.
Danger of scalding!
- After turning the appliance on or af-
ter a long pause, direct the fi rst steam
jet toward the air or toward a piece
of cloth but not on the garment to be
ironed, so that any condensed water
still in the iron may be expelled without
staining the garment.
- After the fi rst steam jet the pressure
slows down rapidly. It is not a fault. This
is due to the emission of the air that
entered the boiler during the fi lling.
4. After ironing
- Turn the iron off (on/off switch (1)).
- Let the appliance completely cool
down.
- Store the appliance in a dry place
away from the reach of children.
Tasto vapore Tasto vapore

19
STARTING THE APPLIANCE
5. Dry ironing
Getting the appliance ready:
- Put the iron on the iron-rest mat.
- Divide the garments to iron according
to the ironing temperature indicated
in the label. It is recommended to start
ironing the articles that require the
lowest temperature.
Turning the appliance on
- Put the iron on the iron-rest mat.
- Insert the plug into the mains socket.
- set the thermostat knob to the requi-
red position.
Dry ironing
- Do not press the steam button.
Position of the iron
- During working breaks put the iron on
the iron-rest mat.
After dry ironing
- Turn off the appliance (on/off switch)
- Let the appliance completely cool
down.
- Store the appliance in a dry place
away from the reach of children.
Important: Store the appliance only
when it has completely cooled down.
TEMPERATURE GUIDE
Symbol
Control knob
position Do not iron
at all
120°C max
COOL
160°C max
WARM
210°C max
HOT
Fabric Nylon, Acetatese.
E.g. Acrilan Courtelle,
Orlon Triacetates,
e.g.Tricel/Polyester
Wool, Polyester mix-
tures e.g.Polyester/
Cotton
Cotton, Linen Rayon,
Rayon mixtures, e.g.
Rayon/Linen
Ironing Iron on wrong side
if moisturere quired
use damp cloth(Not
Acetate)
Fabrics requiring this
setting usually require-
steam pressing for hea-
vy cotton, denim etc.
Heat setting markings on the adjustable control dial of all irons match those of theIn-
ternational Textile Care Labelling Code.

20
CLEANING THE APPLIANCE
Attention:
- Before cleaning the appliance, always
pull the plug out of the mains socket.
Clean the appliance only when is has
completely cooled down.
- Never immerse the appliance in wa-
ter nor clean it under running water.
Attention:
- Never use “green” or “yellow” spon-
ges and never clean doing circular
movements. The iron soleplate may
be scratched.
- Do not use abrasive or corrosive de-
tergents.
Plastic parts
- Clean plastic parts with a damp cloth.
Let it dry. Never use abrasive or corro-
sive detergents.
When the appliance is not in use, pull the
plug out of the mains socket. Store the
iron in a dry place, away from the reach
of children. The storage room should not
have a temperature lower than 5°C to
avoid damages due to frozen water.
If the appliance is not used for a prolon-
ged period, empty the boiler and pro-
tect the appliance from dust, dirtiness
and humidity.
- Regularly check the power cord for
any damages. Damaged cords have
to be replaced at an authorised Servi-
ce Centre.
Important:
- Never pour detergents or dedeodo-
rance into the iron.
STORAGE
MAINTENANCE
TROUBLESHOOTING GUIDE
In case of faults, or faulted appliance or
if you suspect the appliance has been
damaged after falling down, immedia-
tely pull the plug out of the mains soc-
ket.
Repairs must be carried out only at an
authorised Service Centre. Repairs car-
ried out by unskilled personnel may result
in serious dangers for the user.
We take no responsibilities for damages
caused by repairs carried out by unskil-
led personnel. Unauthorized repairs ter-
minates the warranty.
In case the problem cannot be solved
using the table below, apply to the nea-
rest Service Centre.
This manual suits for next models
2
Table of contents
Languages:
Other Euroflex Iron manuals

Euroflex
Euroflex Monster IB 40 CLASSIC-RA User manual

Euroflex
Euroflex Monster IB 40 CLASSIC-RA User manual

Euroflex
Euroflex STIROSYSTEM IS 55 HSM/X User manual

Euroflex
Euroflex Monster IB 35 Active User manual

Euroflex
Euroflex BT 3000 M User manual

Euroflex
Euroflex Monster IS 60 User manual

Euroflex
Euroflex monster IB 45 LX RAS Perfect User manual

Euroflex
Euroflex monster IS 56 HS User manual

Euroflex
Euroflex AIRFLUX IB 10 VAPOR User manual

Euroflex
Euroflex SMOOTH B2S User manual