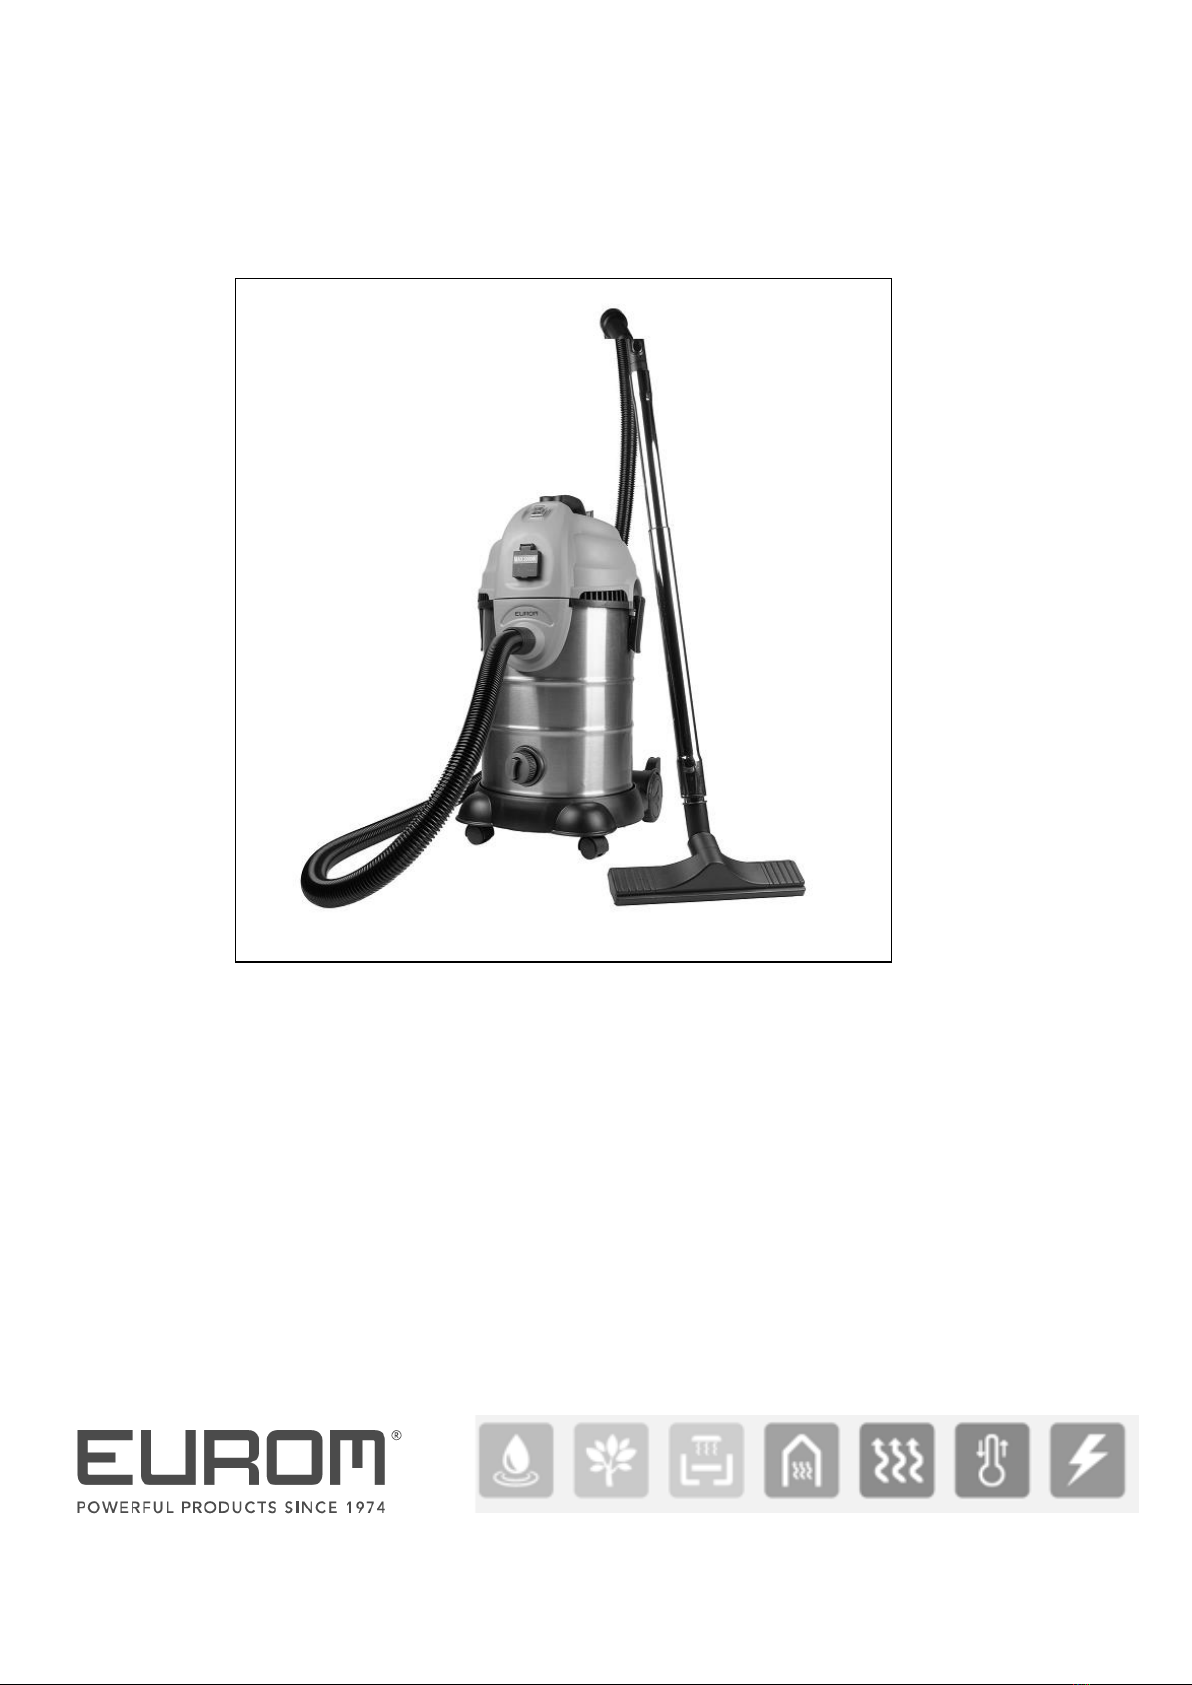
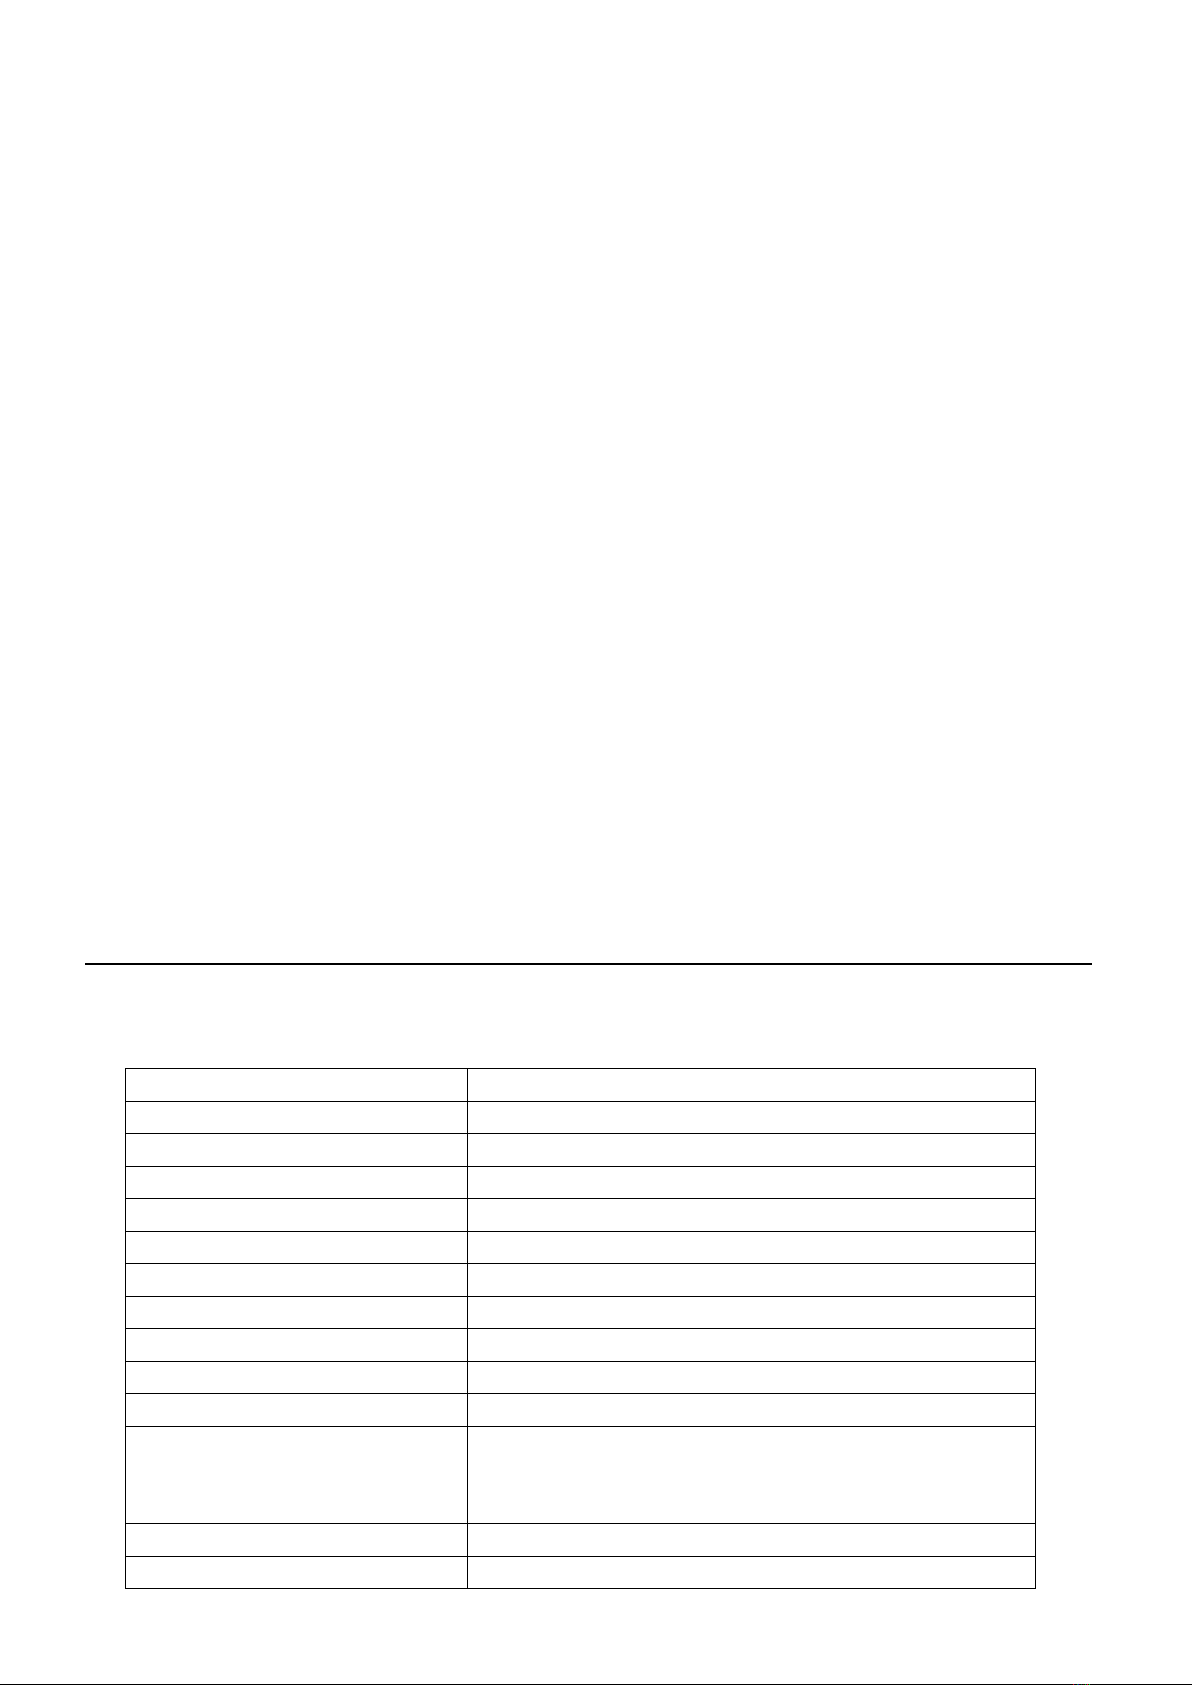
EUROM Force 1430S User manual

Gebruiksaanwijzing (NE) (pag. 3)
Instruction manual (EN) (page 11)
Gebrauchsanleitung (DE) (Seite 19)
Manuel d’utilisation (FR) (page 27)
Force 1430S wet/dry
Art.nr. 161335

2

3
Dank
Hartelijk dank dat u voor een EUROM apparaat hebt gekozen. U hebt daarmee een
goede keus gemaakt! Wij hopen dat hij tot uw volle tevredenheid zal functioneren.
Om het beste uit uw apparaat te halen is het belangrijk dat u deze
gebruiksaanwijzing vóór gebruik aandachtig en in zijn geheel doorleest en ook
begrijpt. Schenk daarbij speciaal aandacht aan de veiligheidsvoorschriften; die
worden vermeld ter bescherming van u en uw omgeving!
Bewaar de gebruiksaanwijzing vervolgens om het in de toekomst nog eens te
kunnen raadplegen. Bewaar ook de verpakking: dat is de beste bescherming voor
uw apparaat tijdens de opslag buiten het seizoen. En mocht u het apparaat ooit aan
iemand anders overdragen, lever er dan de gebruiksaanwijzing en de verpakking
bij.
Wij wensen u veel plezier met de Force stofzuiger!
Eurom
Kokosstraat 20
8281 JC Genemuiden (NL)
www.eurom.nl
Deze gebruiksaanwijzing is met de grootste zorg samengesteld. Niettemin
behouden wij ons het recht voor deze gebruiksaanwijzing op elk moment te
optimaliseren en technisch aan te passen. De gebruikte afbeeldingen kunnen
afwijken.
___________________________________________________________
Technische gegevens
Aansluitspanning
230V~50Hz
Vermogen
1400 Watt
Onderdruk
180 mbar
Luchtverplaatsing
30 l/s
Ketelinhoud
30 liter (RVS)
Filter
HEPA
Filterreiniging
+
Stopcontact
maximaal 2000 W
Elektrokabel
7 m.
Lengte slang
2,6 m met gebogen zuigbuis –32mm
Zuigbuis
telescoop –tot 116,6 cm
Accessoires
combi zuigmond
borstelmondstuk
kierenzuiger
Gewicht
8,5 kg
Afmetingen
41 x 35 x 71 cm

4
Veiligheidsvoorschriften
1. Controleer voor gebruik of de spanning die het stopcontact, waarop
u de stofzuiger wilt aansluiten, afgeeft, gelijk is aan het voltage dat
op het typeplaatje van de stofzuiger staat.
2. Controleer stofzuiger, stekker en elektrokabel voor gebruik op
beschadigingen. Gebruik geen beschadigd apparaat!
3. Gebruik geen verlengsnoeren met onvoldoende capaciteit.
4. Gebruik het apparaat niet buitenshuis!
5. Houd het apparaat uit de buurt van sterk zonlicht, kachels, open
vuur en hoge temperaturen. Dat zou het kunststof kunnen
vervormen of afbreken.
6. Gebruik het apparaat niet in een brandgevaarlijke omgeving zoals
nabij gastanks, gasleidingen of spuitbussen. Dat levert explosie- en
brandgevaar op!
7. De volgende voorwerpen en/of stoffen mogen niet met de EUROM
Force stofzuiger worden opgezogen:
Brandende, rokende of hete voorwerpen/stoffen als hete as,
gloeiende sigaretten, lucifer enz.
Te grote voorwerpen
Scherpe voorwerpen als scherven, spijkers enz.
Vluchtige stoffen, brandbare gassen, zuren, afval dat
explosiegevaar oplevert enz.
Gevaarlijke stoffen als asbest enz.
Licht-ontvlambare stoffen als benzine, gasolie enz. Gebruik het
apparaat niet in een ruimte waar deze stoffen aanwezig (kunnen)
zijn.
Materiaal dat zich aan het filter hecht zoals kalkhoudend-, gips-
of grafietpoeder. Dat belemmert de ventilatie en beschadigt de
motor.
8. Zorg ervoor dat er nooit water in de kap terechtkomt; water in de
motor kan schade of letsel veroorzaken! Laat het apparaat daarom
ook nooit overhellen wanneer u vloeistof opzuigt.
9. Steek geen voorwerpen door openingen het apparaat in. Gebruik
het apparaat niet als openingen geblokkeerd zijn. Houd het
apparaat vrij van stof, draden, haren of wat de luchtstroom dan ook
zou kunnen belemmeren.
10. Wees extra voorzichtig bij werkzaamheden op een trap!
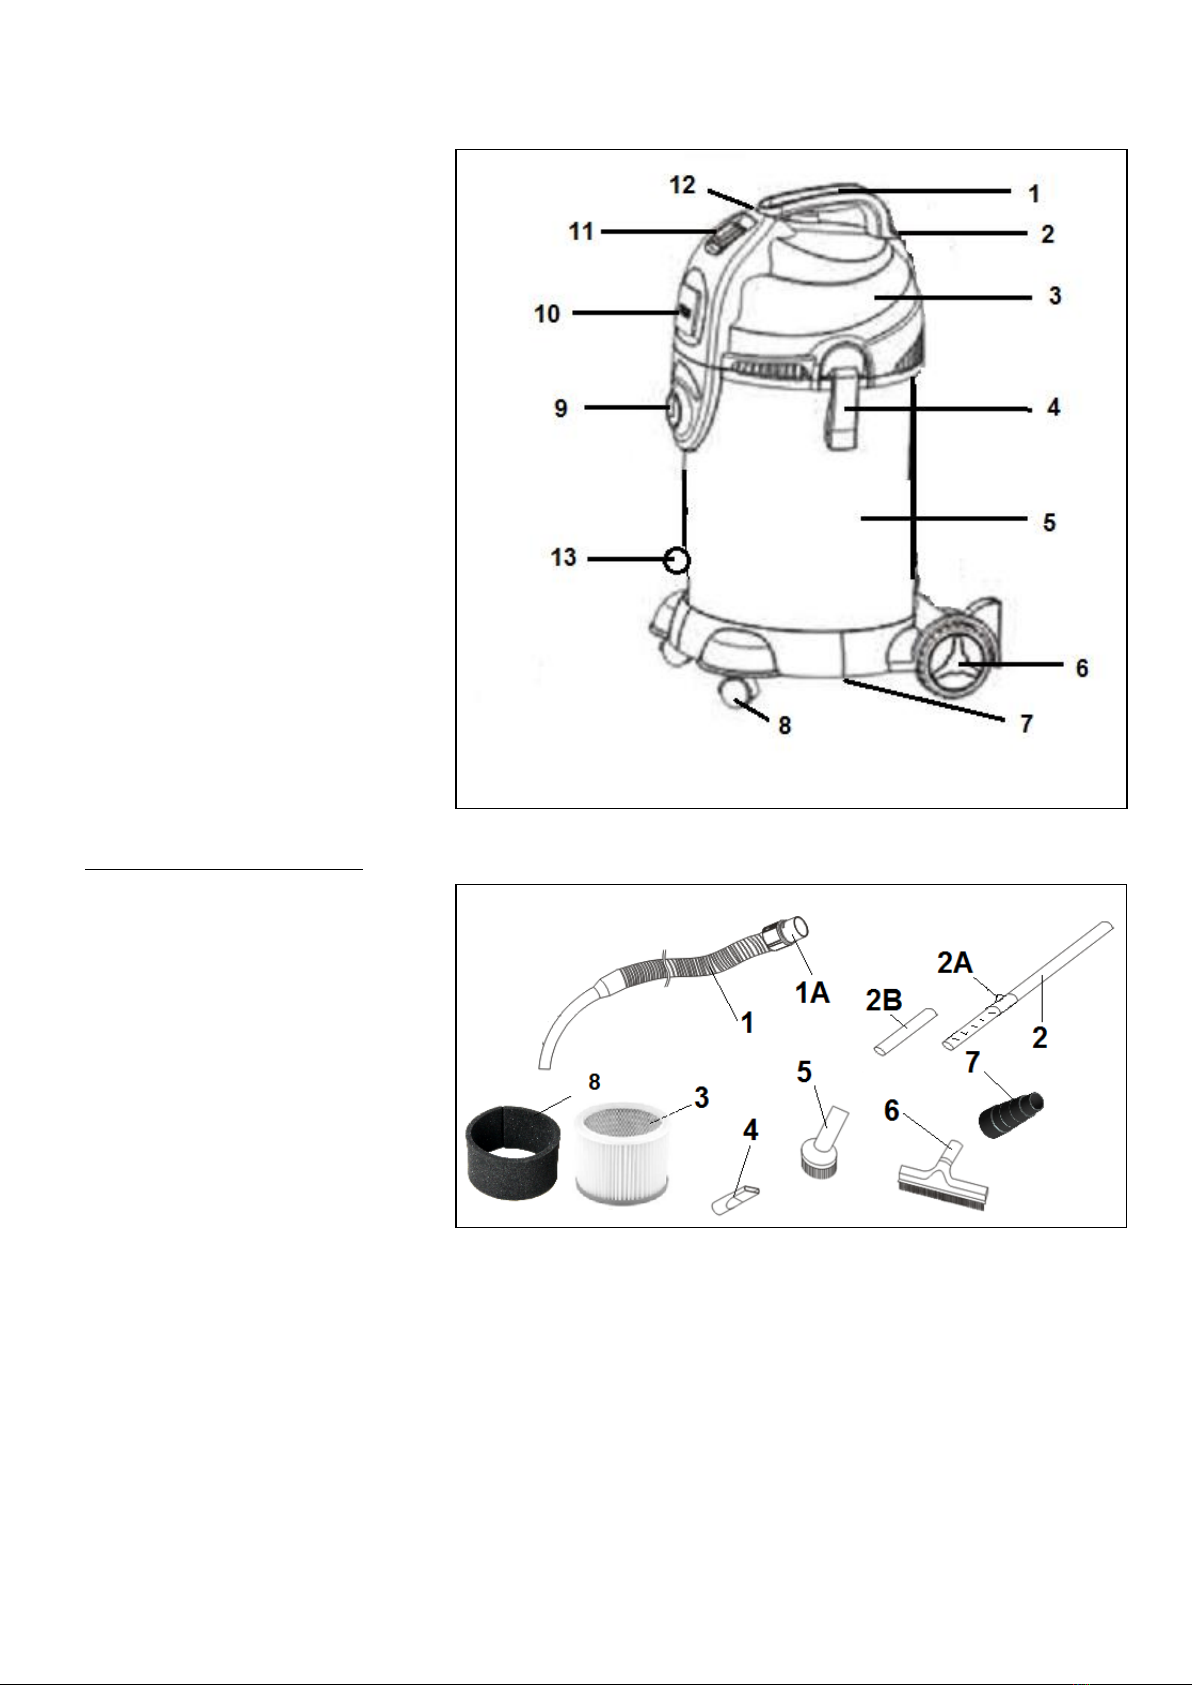
11. Verdraai de slang niet, rek hem niet te ver uit en zorg ervoor dat hij
niet beschadigd raakt. Gebruik nooit een beschadigde slang.

5
12. Trek of draag de stofzuiger nooit vooruit aan elektrokabel of slang.
Klem de kabel niet tussen een deur en trek het niet om scherpe
hoeken. Rij niet met het apparaat over de kabel, loop er niet over
en houd hem uit de buurt van hete oppervlakken.
13. Schakel het apparaat altijd eerst uit, voordat u de stekker uit het
stopcontact neemt.
14. Schakel de stofzuiger uit en neem de stekker uit het stopcontact
wanneer u de werkzaamheden stopt, de ruimte verlaat, de stofketel
ledigt of onderhoud aan het apparaat uitvoert.
15. Trek de stekker niet aan de elektrokabel uit het stopcontact, maar
neem daartoe de stekker in de hand.
16. Raak stekker en/of elektrokabel niet aan met natte handen en
gebruik de stofzuiger niet zonder schoenen aan uw voeten.
17. Zorg ervoor het apparaat elke 15 minuten voor minimaal 1 minuut
uit te schakelen, om de motor af te laten koelen. Het nalaten
hiervan kan schade aan de motor veroorzaken!
18. Gebruik dit apparaat niet voor meer dan 4 uur (incl. de
afkoelingsstops) per dag.
19. Dit apparaat is niet geschikt om te worden gebruikt door personen
(incl. kinderen) met verminderde lichamelijke-, zintuiglijke- of
mentale capaciteiten, of met gebrek aan ervaring en kennis, tenzij
iemand, verantwoordelijk voor hun veiligheid, toezicht houdt en
instructie geeft betreffende het gebruik van het apparaat.
20. Bij kinderen dient erop toe te worden gezien dat zij het apparaat
niet als speelgoed gebruiken.
21. Gebruik dit apparaat uitsluitend zoals beschreven in dit
instructieboekje. Gebruik uitsluitend door de fabrikant aanbevolen
accessoires.
22. Ruim uw stofzuiger binnenshuis op, in een koele, droge ruimte.
23. Wanneer stofzuiger, elektrokabel of stekker beschadigd raken of
storingen vertonen, gebruik hem dan niet langer maar laat hem
repareren/vervangen door een daartoe bevoegde elektricien. Voer
nooit zelf reparaties uit, dat doet garantie en aansprakelijkheid van
de leverancier vervallen!

6
Onderdelentekening
1. Handgreep
2. Kabelophanging met
kabel en stekker
3. Kap (met motor)
4. Klem (2x)
5. Ketel
6. Groot wiel (2x)
7. Onderstel
8. Klein zwenkwiel (2x)
9. Slangaansluiting
10. Stopcontact
11. AAN / UIT –schakelaar
12. Filterreinigingsknop
13. Tankdrain
Standaard accessoires
1. Zuigslang
1A. Slangaansluiting
2. Zuigbuis (telescoop)
2A. Schuifje telescoop
2B. Verlengstuk telescoop
3. HEPA-filter
4. Kierenzuiger
5. Borstelmondstuk
6. Combi-zuigmond
7. Adapter gereedschap
8. Waterfilter

7
Werking
Steek de slangaansluiting in het
apparaat in het apparaat; draai evt.
iets tot het smalle deel er helemaal
invalt. Draai vervolgens zo ver
mogelijk met de klok mee.
Sluit vervolgens met een draaiende
beweging naar wens accessoires
aan, zie afbeelding.
U kunt de lengte van de
telescoopbuis regelen door het
schuifje 2A naar beneden te duwen
en de onderste buis op de gewenste
lengte te trekken/duwen.
Steek de stekker in het geaard
stopcontact.
Druk de aan/uit knop op I om de stofzuiger aan te zetten.
Als ondergrond en werkzaamheden dit vereisen is de haarstrip of de rubber strip
van de zuigmond te verwijderen. Schuif daartoe de
schuifjes op de zuigmond naar buiten, neem de
striphouder uit de zuigmond, schuif de overbodige strip
eruit en plaats de houder terug.
Voor het opzuigen van vloeistof is de motor (die zich in
de kap bevindt) voorzien van een vlotter die a.h.w.
onderaan de motor in de ketel hangt. Voor het
opzuigen van droog vuil en stof is de motor voorzien
van een filter dat óm de vlotter sluit en zo voorkomt
dat er stof in het mechaniek komt. Wilt u vloeistof
opzuigen, verwijder dan het filter door de klemmen te
openen, de kap van de ketel te tillen en om te draaien,
het deksel van het filter te draaien (zie afb.) en het
filter van het vlotterframe te schuiven en te
verwijderen. Plaats de kap terug en sluit de clips weer.
Let op!
Zuig nooit stof op zonder HEPA-filter om de vlotter!
Zuig nooit vloeistof zonder waterfilter om de vlotter!
Tankdrain
De Force 1430S heeft de mogelijkheid het opgezogen water onderuit de ketel te
laten lopen. Plaats het apparaat daartoe bij een afvoerput o.i.d. en draai de
tankdrain los: het water loopt nu weg. Draai tenslotte de dop weer stevig vast.

8
Stopcontact
Om het stopcontact te gebruiken dient u het dekseltje op te tillen en de stekker in
het stopcontact te steken. Gebruik vervolgens de AAN/UIT-schakelaar om in te
schakelen wat u wilt:
I = apparaat werkt, stroom op het stopcontact.
O= apparaat uitgeschakeld, stroom op het stopcontact (max. 2000W).
II = stroom op het stopcontact, aangesloten apparatuur zal werken. Na 5-8
seconden start ook de stofzuiger. Wanneer u de aangesloten apparatuur
uitschakelt, zal de stofzuiger na 5-8 seconden ook stoppen.
Extra papieren filter
Bij het apparaat
wordt een extra
papieren filter
(stofzak) geleverd.
Het verdient
aanbeveling het
HEPA-filter door dit
filter te vervangen
wanneer er eens erg
veel fijn stof moet
worden opgezogen,
bijv. tijdens boor- of schuurwerkzaamheden. Dat voorkomt dat u het HEPA-filter
tijdens de werkzaamheden moet reinigen.
Ga voor de installatie van de papieren stofzak als volgt te werk:
Verwijder het HEPA filter (zie: Filter reinigen)
Verwijder het knietje op de luchtinlaat binnenin de ketel
Schuif de opening van de papieren stofzak over de luchtinlaat-opening
Bevestig de kap (zonder HEPA-filter) weer met de klemmen op zijn plaats
Opruimen
Schakel het apparaat uit en neem de stekker uit het
stopcontact. Wind de elektrokabel om de
kabelophanging; de bovenste bevat een gleuf waar u
de stekker in kunt haken. Plaats de accessoires op de
daarvoor bestemde doppen achterop het apparaat, zie
afbeelding.

9
Reiniging en onderhoud
Bij reiniging of onderhoud altijd het apparaat uitschakelen en de stekker uit het
stopcontact nemen!
Filterreinigingssysteem
Wanneer u merkt dat de
zuigkracht afneemt,
verwijder dan de zuigbuis
en houd uw hand voor de
zuigslang (terwijl het
apparaat werkt). Druk
ondertussen 10 tot 15 keer
op de filterreinigingsknop:
dit zal het filter reinigen en de zuigkracht herstellen.
Ketel ledigen
Open de beide klemmen (4) en neem het
deksel van de stofzuiger. Verwijder het stof
uit de ketel en maak de ketel zonodig schoon.
Plaats tenslotte het deksel terug en sluit de
klemmen.
Filter reinigen
Reinig het filter zelf ook regelmatig. Open daartoe de
beide klemmen en neem het deksel van de stofzuiger.
Draai het deksel van het filter, schuif het HEPA filter
van het frame en was het voorzichtig met lauw/warm
water schoon. Gebruik geen agressieve of schurende
schoonmaakmiddelen!
Laat het filter goed drogen voor u het weer
terugplaatst. Gebruik uw apparaat nooit zonder filter!
Onderhoud
Houd ketel, filter en accessoires schoon en controleer regelmatig of nergens
valse lucht wordt aangezogen.
Controleer elektrokabel en stekker regelmatig op beschadigingen. Gebruik het
apparaat niet met een beschadigde kabel en/of stekker maar laat deze door een
daartoe bevoegd monteur vervangen!
Controleer regelmatig of geen voorwerpen in de zuigmonden, slang of pijp de
aanzuiging belemmeren. Verwijder ze zonodig.
Gebruik het apparaat voorzichtig en met beleid; zorg dat het niet valt, stoot of
anderszins beschadigingen oploopt.

10
Berg het apparaat op in een droge omgeving.
Laat het apparaat niet te lang achter elkaar werken maar geef het regelmatig
gelegenheid af te koelen. Dat verlengt de levensduur.
Als het apparaat hapert, trilt, afwijkend geluid maakt of een branderige geur
verspreidt het gebruik onmiddellijk stoppen en het apparaat ter
controle/reparatie naar uw leverancier of servicepunt zenden.
Verwijdering
Binnen de EU betekent dit symbool dat dit product niet met het
normale huishoudelijke afval mag worden afgevoerd. Afgedankte
apparaten bevatten waardevolle materialen die hergebruikt
kunnen en moeten worden, om het milieu en de gezondheid niet
te schaden door ongereguleerde afvalinzameling. Breng
afgedankte apparatuur daarom naar een daarvoor aangewezen
inzamelpunt of wend u tot het bedrijf waar u het apparaat gekocht
hebt. Zij kunnen er voor zorgen dat zoveel mogelijk onderdelen
van het apparaat hergebruikt worden.
CE-verklaring
Zie pagina 35.

11
Thank you
Thank you very much for choosing for a EUROM device. You have made a good
choice! We hope you will be satisfied about its functioning.
To get maximum profit from your product, it is important to read this manual
attentive and totally before use, and to understand what is written. Read especially
the safety instructions: they are there to protect you and your environment.
Keep the manual in a safe place for future reference. Store also the package: that
is the best protection for your product in times of no-use. And if you at any time
pass the appliance on, pass on the manual and package too.
We wish you a lot of fun with the Force vacuum cleaner!
Eurom
Kokosstraat 20
8281 JC Genemuiden (NL)
www.eurom.nl
This manual has been complied with the utmost care. Nevertheless, we reserve the
right to optimize this manual at any time and to adjust it technically. The image
used may differ.
________________________________________________________
Technical specifications
Tension
230V~50Hz
Power
1400 Watt
Vacuum
180 mbar
Air flow
30 l/s
Capacity barrel
30 liter (SS)
Filter
HEPA
Filter cleaning system
+
Socket
maximum 2000 W
Cable - length
7 m
Flexible hose - length
2,6 m with curved pipe –32 mm
Suction tube
telescope –till 116,6 cm
Accessories
combi floor brush
dust brush
crevice tool
Weight
8,5 kg
Dimentions
41 x 35 x 71 cm

12
Important safeguards
1. Before use, check if the voltage complies with the specifications
marked on the voltage label attached at the vacuum cleaner.
2. Before use, please check the vacuum cleaner, the power cable and
plug for damage. Do not use a damaged machine!
3. Do not use extension cords with inadequate current carrying
capacity.
4. Do not use outdoors!
5. Keep the machine away from strong sunlight, ovens, stoves and
high temperatures. That can distort the plastic.
6. Don’t use the appliance in flammable ambience, such as near by
combustible gastanks, gastubes or spray cans. Danger of explosion
and fire!
7. Do not use vacuum cleaner EUROM Force to pick up:
burning, smoking or hot objects, such as coal and hot ash,
glowing cigarettes and match, etc.
to large objects
sharp objects like nails, parts of glass etc.
volatile liquid, combustible gas, acids, explosive garbage, etc.
dangerous materials like asbestos etc.
flammable or combustible liquids such as gasoline. Don’t use the
cleaner in areas where they may be present.
material which easily attach on the filter as calcareousness
powder, gesso and graphite powder. That will block the
ventilation and damage the motor.
8. Make sure that never water enters the barrel cap; water in the
motor can cause damage or personal injury. For the same reason
do not overturn the machine when you draw liquids.
9. Do not put any object into openings. Do not use with any opening
blocked; keep free of dust, lint, hair and anything that may reduce
the airflow.
10. Use extra care when cleaning on stairs.
11. Do not wrest, tramp or haul the hose. Do not use the hose if it is
broken.
12. Do not pull or carry the vacuum cleaner by its cord. Never close the
door on the cord, or pull the cord around sharp edges or corners.
Do not run the vacuum cleaner over the cord and don’t walk over it.
Keep the cord away from heated surfaces.
13. Turn off the equipment before unplugging.

13
14. Always switch off and unplug the vacuum cleaner when you stop
the work, leave the room and before emptying the barrel or
maintaining/cleaning the equipment.
15. Do not unplug by pulling the cord. To unplug, grasp the plug, not
the cord.
16. Do not touch plug and/or cable with wet hands and don’t use the
vacuumcleaner without wearing shoes.
17. Ensure you turn the unit off at very minimum every 15 minutes (for
1 minute) to let the motor cool down –failure to do so may cause
motor failure!
18. Do not use this unit for more than 4 hours (including rest breaks)
on any given day.
19. This appliance is not intended for use by persons (including
children) with reduced physical, sensory or mental capabilities, or
lack of experience and knowledge, unless they have been given
supervision or instruction concerning use of the appliance by a
person responsible for their safety.
20. Children should be supervised to ensure that they do not play with
the appliance.
21. Use only as described in this manual. Use only manufacturers’
recommended attachments.
22. Store your cleaner indoors in a cool, dry area.
23. If the vacuum cleaner, the power cord or the plug becomes
damaged or dysfunctions, do not use the vacuum cleaner anymore,
but take it to an authorized service agent to be repaired. Never
repair it by yourself, that lets expire the guarantee and the
responsibility of supplier.

14
Parts name
1. Handle
2. Cable suspension, cable and
plug
3. Cap (with motor)
4. Lock (2x)
5. Barrel
6. Big wheel (2x)
7. Base
8. Little castor (2x)
9. Connection hose
10. Socket
11. ON / OFF –switch
12. Filter cleaning button
13. Tank drain
Standard accessories
1. Hose
1A. Hose connection
2. Telescope tube
2A. Sliding block telescope
2B. Extension telescope
tube
3. HEPA filter
4. Crevice nozzle
5. Dust brush
6. Combi floor brush
7. Adapter tools
8. Water filter

15
Operation
Put the hose connection in the
machine; if necessary, turn it a bit
till the narrow part is in total in the
machine. Then turn it as far as
possible clockwise.
After this, connect the accessories
you wish with a twisting force, see
picture.
You can adjust the telescope tube
by pushing the sliding block 2A
down and and tracking/pushing the
lowest tube to the length you wish.
Insert the plug into the earthed
socket.
Press the switch on/off to I to turn on.
If necessary, due to the surface and task, the hair or rubber strips can be
removed from the suction mouth. In order to do so, slide the discs on the
suction mouth outwards, take the strip holder from the suction mouth, slide the
excess strip out and replace the holder.
For the vacuuming of liquid the motor (which is
situated in the cap) is provided with a floater that is
hanging under the motor, in the barrel. For the
vacuuming of dry dirt and dust the motor is provided
with a filter that the floater surrounds and in that way
prevents that dust enters the mechanic system. Do you
want to vacuum liquid, remove than the filter by
opening the locking blocks, to lift and turn the cap, to
turn the lid from the filter (see image), and to slide the
filter from the floaters frame. Now you can remove the
filter. Bring the cap back in its position and close the
blocks.
Be carefull!
Never vacuum dust without the HEPA filter around the floater!
Never vacuum liquid without the water filter around the floater!
Tank drain
The Force 1430S has the possibility to drain the sucked-up water by the tank drain
at the barrel. For this purpose, place the device at a sink or something like that and
loosen the tank drain: the water is now running away. Finally tighten the cap firmly
again.

16
Socket
In order to use the socket, you must lift the lid and insert the plug into the socket.
Then use the ON/OFF switch to select the appropriate setting:
I = device works, power from socket
O= device off, power to socket (max. 2000W)
II = power to socket, connected device will work. After 5-8 seconds the vacuum
clean will start. If the connected device is switched off, the vacuum cleaner
will also stop after 5-8 seconds.
Extra paper filter
An extra paper
filter (dust bag)
is supplied with
the device. You
are advised to
replace the HEPA
filter with this
filter if you
intend to clean
very fine
particles, e.g. in the event of drilling or sanding work. This will prevent you from
having to clean the HEPA filter during this type of work.
Install the paper dust bag as follows:
Remove the HEPA filter (see: Cleaning the filter)
Remove the 'knee' on the air inlet within the drum
Slide the opening in the paper dust bag over the air intake opening
Secure the cover (without HEPA filter, secure with clamps)
Cleaning up
Switch the device off and remove the plug from the
socket. Wind the electrical cable around the cable
hanger; the upper section provides a groove into
which you can wedge the plug. Place the accessories
at the appropriate locations behind the device, see
image.
Cleaning and maintenance
Before cleaning or maintenance: always switch off the equipment and unplug it.

17
Filter cleaning system
When you feel that the suction is
getting weaker, please remove the
tube and jam the hose by hand (while
the equipment is working). Then press
the filter cleaning button 10-15 times:
this will clean the filter and recover the
suction force.
Emptying barrel
Open both the locking blocks (4) en take the
up housing from the vacuum cleaner. Remove
the dust out of the barrel and clean the barrel
if necessary. At the end, place back the up
housing and close the locking blocks.
Cleaning the filter
Clean the filter regularly. Open both clips and remove
the lid of the vacuum cleaner. Turn the lid from the
filter, slide the HEPA filter off the frame and carefully
wash with lukewarm water. Do not use any aggressive
or abrasive cleaning agents!
Let the filter dry thoroughly before replacing. Never
use the device without a filter!
Maintenance
Keep the body of the device, the filter and accessories clean and regularly check
to ensure no excess air is being sucked in.
Check the cable and plug regularly for damage. Do not use the device if it has a
damaged cable and/or plug but take it to an authorised engineer to be replaced!
Regularly check to ensure no objects are stuck in the suction mouth, hose or
pipe. Remove them if necessary.
Use the device carefully; ensure it does not fall, bump into other objects or
become otherwise damaged.
Store the device in a dry environment.
Never use the device for too long in one go; give it regular opportunities to cool
down. This will extend its life expectancy.
If the device falters, vibrates, makes peculiar noises or emits a burning smell,
stop using it immediately and ask your supplier or service provider to
check/repair it.

18
Removal
In the EU this symbol indicates that this product may not be
disposed of as ordinary household waste. Old equipment contains
valuable materials, suitable for recycling. These materials should
be made suitable for reuse in order to prevent any adverse effects
to health and the environment caused by unregulated waste
collection. Therefore, please make sure that you bring old
equipment to a designated collection point. Alternatively, contact
the original supplier, who can make sure that as many of the
components as possible can be recycled.
CE-statement
See page 35.

19
Dank
Herzlichen Dank, dass Sie sich für eine EUROM Gerät entschieden haben. Sie haben
damit eine gute Wahl getroffen! Wir hoffen, dass sie zu Ihrer vollen Zufriedenheit
funktioniert.
Um Ihren Gerät optimal zu nutzen, ist es wichtig, dass Sie dieses Handbuch vor der
Nutzung aufmerksam und komplett lesen und auch verstehen. Achten Sie dabei
besonders auf die Sicherheitsvorschriften, die zu Ihrem persönlichen Schutz und
zum Schutz Ihrer Umgebung genannt werden.
Außerdem empfehlen wir Ihnen, dieses Handbuch aufzubewahren, um es bei Bedarf
in Zukunft noch einmal konsultieren zu können. Bewahren Sie auch die
Verpackung. Sie ist der beste Schutz für Ihren Gerät, wenn Sie das Gerät außerhalb
der Saison lagern. Und sollten Sie das Gerät irgendwann weitergeben, legen Sie das
Handbuch und die Verpackung bei.
Wir wünschen Ihnen viel Spaß mit dem Force Staubsauger!
Eurom
Kokosstraat 20
8281 JC Genemuiden (NL)
www.eurom.nl
Diese Gebrauchsanleitung wurde mit größtmöglicher Sorgfalt zusammengestellt.
Dennoch behalten wir uns vor, diese Anleitung jederzeit zu optimieren und
technisch anzupassen. Die verwendeten Bilder können abweichen.
________________________________________________________
Technische Daten
Spannung
230 V~50 Hz
Leistung
1400 Watt
Unterdruck
180 mbar
Luftverdrängung
30 l/s
Kesselinhalt
30 Liter (Edelstahl)
Filter
HEPA
Filterreinigung
+
Steckdose
Maximal 2000 W
Stromkabel
7 m
Länge Schlauch
2,6 m mit gebogenem Saugrohr –32 mm
Saugrohr
Teleskop –bis 116,6 cm
Zubehör
Kombi-Bodendüse
Bürstendüse
Fugendüse
Gewicht
8,5 kg
Maße
41 x 35 x 71 cm

20
Sicherheitsvorschriften
1. Prüfen Sie vor der Nutzung, ob die Spannung der Steckdose, an die
Sie den Staubsauger anschließen wollen, der auf dem Typenschild
genannten entspricht.
2. Kontrollieren Sie den Staubsauger, den Stecker und das Stromkabel
vor der Nutzung auf Beschädigungen. Verwenden Sie kein
beschädigtes Gerät!
3. Verwenden Sie keine Verlängerungskabel mit unzureichender
Kapazität.
4. Verwenden Sie das Gerät nicht außer Haus!
5. Halten Sie das Gerät von starkem Sonnenlicht, Öfen, offenem Feuer
und hohen Temperaturen fern. Dies könnte den Kunststoff
verformen oder abbrechen.
6. Verwenden Sie das Gerät nicht in einer feuergefährlichen
Umgebung wie in der Nähe von Gastanks, Gasleitungen oder
Spraydosen. Dies führt zu Explosions- und Feuergefahr!
7. Folgende Gegenstände/Stoffe dürfen mit dem EUROM Force
Staubsauger nicht aufgesaugt werden:
Brennende, rauchende oder heiße Gegenstände/Stoffe wie Asche,
glühende Zigaretten oder Streichhölzer
Zu große Gegenstände
Scharfe Gegenstände wie Scherben, Nägel usw.
Flüchtige Stoffe, entzündliche Gase, Säuren, Abfälle, die
Explosionsgefahr verursachen usw.
Gefährliche Stoffe wie Asbest usw.
Leicht entzündliche Stoffe wie Benzin, Heizöl usw. Verwenden Sie
das Gerät nicht in einem Raum, wo diese Stoffe vorhanden sind
oder sein können.
Material, das sich am Filter absetzt, wie kalk- oder gipshaltiges
Material oder Graphitpulver. Dies beeinträchtigt die Ventilation
und beschädigt den Motor.
8. Sorgen Sie dafür, dass niemals Wasser in die Haube kommt;
Wasser im Motor kann Schäden und Verletzungen verursachen!
Neigen Sie daher das Gerät nie, wenn Sie Flüssigkeiten aufsaugen.
9. Stecken Sie nichts in die Öffnungen des Geräts. Verwenden Sie das
Gerät nicht, wenn die Öffnungen blockiert sind. Halten Sie das
Gerät frei von Staub, Fäden, Haaren oder anderen Sachen, die den
Luftstrom behindern können.
10. Seien Sie bei der Arbeit auf einer Treppe besonders vorsichtig!
This manual suits for next models
1
Table of contents
Languages:
Other EUROM Vacuum Cleaner manuals
Popular Vacuum Cleaner manuals by other brands

KENT
KENT PV-1000H Operating, maintenance instructions & illustrated parts list

Schmalz
Schmalz VOC-AD-S-63 operating instructions

Esta
Esta DUSTOMAT-21 operating instructions

Scarlett
Scarlett INDIGO Innovation Line IS-VC82C02 instruction manual

Hoover
Hoover CAPTURE instruction manual

Bissell
Bissell Hercules Slim manual