12 13
Número de Catálogo BC40BE Contáctenos / 1-877-571-2391 Número de Catálogo BC40BE Contáctenos / 1-877-571-2391
• La protección del interruptor de corte por falla a tierra (GFCI) debe aplicarse a los
circuitos o los tomacorrientes que se utilizarán. Hay tomacorrientes con protección
GFCI incorporada que pueden utilizarse para tomar esta medida de seguridad.
PELIGRO: Nunca altere el cable o enchufe de CA suministrado – si no entra en
contacto, pida que un electricista calificado instale un tomacorriente adecuado. Una
conexión incorrecta puede resultar en un riesgo de descarga eléctrica.
Cables de extensión
• Un cable de extensión no debe ser utilizada a menos que absolutamente sea
necesario. El uso de un cable de extensión incorrecta podía dar lugar a un riesgo de
fuego y descarga eléctrica. Si se utiliza un cable de extensión, cerciórese de que los
pernos de la cuerda de extensión sean el mismo número, tamaño y forma que ésos
en el cargador.
• Asegúrese de que el cable de extensión esté en buenas condiciones. Cuando
utilice un cable de extensión, asegúrese de que tenga la capacidad para conducir
la corriente que su producto exige. Un cable de menor capacidad provocará una
disminución en el voltaje de la línea, lo cual producirá una pérdida de potencia y
sobrecalentamiento. La siguiente tabla muestra la medida correcta que debe utilizar
según la longitud del cable y la capacidad nominal en amperios indicada en la placa.
En caso de duda, utilice el calibre inmediatamente superior. Cuanto menor es el
número de calibre, más grueso es el cable.
Tamaño mínimo recomendado del AWG para los cables de extensión para los cargadores de batería
Grado de la entrada de la CA Tamaño de las normas americanas de cableado (AWG) del cable
Amperes Length of Cord, feet (m)
Igual a o Pero menos 25 (7.6) 50 (15.2) 100 (30.5) 150 (45.6)
mayor que que
0 2 18 18 18 16
2 3 18 18 16 14
3 4 18 18 16 14
4 5 18 18 14 12
5 6 18 16 14 12
6 8 18 16 12 10
8 10 18 14 12 10
10 12 16 14 10 8
12 14 16 12 10 8
14 16 16 12 10 8
16 18 14 12 8 8
18 20 14 12 8 6
Seguridad del cable eléctrico
La unidad tiene un enchufe polarizado (una pata es más ancha que la otra) como
característica de seguridad. Este enchufe se ajustará en un tomacorriente polarizado de
una sola manera. Si el enchufe no se conecta totalmente en el tomacorriente, invierta
el enchufe. Si aún así no se conecta, comuníquese con un electricista calificado. No
intente anular esta característica de seguridad.
INSTRUCCIONES DE SEGURIDAD ESPECÍFICAS PARA
CARGADORES DE BATERÍA
ADVERTENCIA – PELIGRO DE ESTALLIDO: No utilice la unidad para cargar las
baterías secas que se usan normalmente con los aparatos domésticos. Estas baterías
pueden estallar y provocar lesiones a las personas y daños a la propiedad. Use la
unidad para carga/refuerzo solamente de una batería de 12 voltios. No está diseñada
para proveer energía a un sistema eléctrico de bajo voltaje que no sea para arrancar
un motor.
• Uso de accesorios y dispositivos. El uso de accesorios o dispositivos no
recomendados para este aparato puede resultar peligroso.
• Manténgase alerta. Use el sentido común. No opere este equipo si está cansado o
con impedimentos.
• No funcione el cargador de batería cerca de líquidos inflamables o en atmósferas
gaseosas o explosivas. Los motores pueden chispear, y las chispas pudieron
encender gases inflamables.
• No funcione el cargador de batería si ha recibido un golpe fuerte, se ha caído o
dañado de cualquier manera. Devuélvala al fabricante para su reparación.
ADVERTENCIA – PARA REDUCIR EL RIESGO DE DESCARGA ELÉCTRICA:
• Nunca sumerja la unidad en el agua ni en ningún otro líquido, ni la utilice cuando esté
húmeda.
ADVERTENCIA: RIESGO DE GASES EXPLOSIVOS
• TRABAJAR CERCA DE UNA BATERÍA DE PLOMO ÁCIDO ES PELIGROSO. LAS
BATERÍAS GENERAN GASES EXPLOSIVOS DURANTE SU FUNCIONAMIENTO
NORMAL. POR ESTA RAZÓN, ES MUY IMPORTANTE QUE LEA ESTE MANUAL
SIEMPRE ANTES DE UTILIZAR LA BATERÍA DE URGENCIA Y QUE SIGA LAS
INSTRUCCIONES CON EXACTITUD.
• Para reducir el riesgo de explosión de la batería, siga estas instrucciones y las
publicadas por el fabricante de la batería y el fabricante de cualquier equipo que tenga
la intención de utilizar cerca de la batería. Revise las indicaciones sobre precauciones
en estos productos y en el motor.
• Este equipo emplea piezas (interruptores y relés) que producen arcos o chispas. Por
lo tanto, si utiliza la unidad en una cochera o un área cerrada, DEBE colocarla a no
menos de 46 cm (18 pulgadas) por encima del piso.
• PARA REDUCIR EL RIESGO DE LESIONES, ESTA UNIDAD SÓLO DEBE SER
OPERADA POR ADULTOS, NO FUE DISEÑADA PARA QUE LA UTILICEN LOS
NIÑOS.
ADVERTENCIA – PARA REDUCIR EL RIESGO DE INCENDIO:
• No opere cerca de materiales, vapores o gases inflamables.
• No lo exponga al calor extremo o a llamas.
PRECAUCIÓN – PARA REDUCIR EL RIESGO DE LESIONES O DAÑO A LA
PROPIEDAD:
• NUNCA INTENTE CARGAR UNA BATERÍA CONGELADA.
• No cargue la batería mientras el motor está en marcha.
• Manténgase alejado de las paletas de ventilador, correas, poleas y otras partes que
pueden provocar lesiones a las personas.
• Los vehículos que tienen sistemas computarizados incorporados pueden resultar
dañados si la batería del vehículo se arranca mediante puente. Antes de arrancar
mediante puente, lea el manual del cliente del vehículo para confirmar que la ayuda
externa para arrancar es adecuada.
• Cuando se trabaja con baterías de ácido de plomo, siempre asegúrese de que alguien
es suficientemente cerca como para proporcionar asistencia inmediata en caso de
accidente o emergencia.
• Utilice siempre protección para los ojos al emplear este producto; el contacto con
el ácido de la batería puede producir ceguera o quemaduras graves. Conozca los
procedimientos de primeros auxilios para el caso de contacto accidental con el ácido
de la batería.
• Mantenga cerca suficiente agua fresca y jabón en caso que el ácido de la batería entre
en contacto con la piel.
• Si el ácido de la batería entra en contacto con la piel o la ropa, enjuáguese
inmediatamente con agua y jabón durante por lo menos 10 minutos. Busque
asistencia médica de inmediato.
• Nunca fume, ni permita que hayan chispas o llamas cerca de la batería del vehículo,
del motor o del cargador.
• Quítese todos los artículos personales que sean de metal, como anillos, pulseras y
relojes cuando trabaje con una batería de ácido de plomo. Una batería de plomo
puede producir un cortocircuito lo suficientemente alto como para soldar un anillo o un
objeto metálico a la piel causando quemaduras graves.
• Sea extremadamente cuidadoso para evitar dejar caer una herramienta de metal sobre
la batería. Podría chispa o un cortocircuito en la batería o en otra parte eléctrica, y
esto puede provocar una explosión.
• Nunca permita que el ácido de la batería entre en contacto con esta unidad.
• No opere esta unidad en un área cerrada ni restrinja la ventilación de alguna forma.
• Apague siempre el cargador de batería desenchufándolo al no ser utilizado.
• No abra el cargador de batería: no hay piezas que el usuario pueda reparar en su
interior. Abrir el cargador de batería anulará la garantía del fabricante.
• Opere la unidad solamente como se describe en este manual de instrucciones.
• Revise el cargador de batería y sus componentes periódicamente por uso y desgaste.
Regrese al fabricante para el reemplazo de piezas desgastadas o defectuosas
inmediatamente.
PRIMEROS AUXILIOS
• Piel: Si el ácido de la batería entra en contacto con la piel, enjuáguese
inmediatamente con agua, luego lávese con agua y jabón. Si se presenta
enrojecimiento, dolor o irritación, busque asistencia médica de inmediato.
• Ojos: Si el ácido de la batería entra en contacto con los ojos, lávese los ojos
inmediatamente durante 15 minutos como mínimo y busque asistencia médica de
inmediato.
• LCD Pantalla de cristal líquido: Si el cristal líquido entra en contacto con
la piel: Lave el área por completo con agua abundante. Quítese la ropa contaminada.
Si el cristal líquido entra en contacto con los ojos: Lavar los ojos con agua limpia y
busque atención médica. Si se ingiere el cristal líquido: Lávese la boca con agua.
Tome grandes cantidades de agua e induzca el vómito. Luego busque atención
médica.
ADVERTENCIA – PARA REDUCIR EL RIESGO DE LESIONES:
Siga estas instrucciones y las publicadas por el fabricante de la batería y el fabricante
de cualquier equipo que tenga la intención de utilizar con esta unidad. Revise las
indicaciones sobre precauciones en estos productos y en el motor.
CONSERVE ESTAS
INSTRUCCIONES
PREPARACIÓN PARA
CARGAR
1. Asegure que el área alrededor de la batería es bien ventilada mientras la batería
se esta cargando.
2. Retire la batería totalmente del barco o del aeronave o cualquier espacio cerrado
antes de cargar.
3. Si es necesario retirar la batería del vehículo para cargarla, o para limpiar los
terminales, retire siempre primero de la batería el terminal puesto a tierra.
Asegúrese de que todos los accesorios del vehículo estén apagados, para no
causar un arco eléctrico.
4. Limpie las terminales de la batería, tenga cuidado y evite material corrosivo en
los ojos.
5. Agregue agua destilada en cada celda hasta que el ácido de la batería alcance
el nivel especifico en el manual del fabricante. Esto ayuda a purgar el exceso de
gas de las celdas. No llene en exceso. Para una batería sin tapas de celda (que
no requiere mantenimiento), siga cuidadosamente las instrucciones de carga del
fabricante.
6. Estudie todas las precauciones específicas del fabricante de la batería, tales como
si retirar o no las tapas de las celdas mientras se carga, y la velocidad de carga
recomendada.
7. Compruebe el voltaje de la batería que se cargará refiriendo al manual del vehículo.
Esta unidad es para cargar una batería de 12 voltios solamente.
Ubicación del cargador
• Ubique el cargador tan lejos de la batería como lo permitan los cables.
• Nunca ubique el cargador directamente sobre la batería que se está cargando; los
gases de la batería producirán corrosión y daños al cargador.
• Nunca permita que el ácido de la batería gotee sobre el cargador cuando lee la
gravedad o llena la batería.
• Nunca opere el cargador en un área cerrada ni restrinja la ventilación de manera
alguna.
• Una batería marina (de bote) se debe retirar y cargar en tierra. Cargarla a bordo exige
equipos diseñados especialmente para uso marino. Esta unidad NO está diseñada
para tal uso.
• No coloque una batería sobre el cargador.
Precauciones con la conexión
• Nunca permita que las pinzas se toquen entre sí.
• Conecte las pinzas de la batería y el chasis, tal como se indica en “Batería instalada
en el vehículo” los pasos 5 y 6, o en “Battery Fuera del vehículo” los pasos 2 a 5.
CARGANDO UNA BATERÍA INSTALADA EN UN VEHÍCULO
ADVERTENCIA – Una chispa cerca de la batería puede causar una explosión.
Para reducir riesgo de una chispa cerca de la batería:
1. Mantenga los cables de CA y CC alejados del capó, la puerta y las partes moviles
del motor.
2. Manténgase alejado de las paletas del ventilador, correas, poleas y otras partes
que pueden provocar lesiones a las personas.
3. Controle la polaridad de los bornes de la batería. El borne POSITIVO (POS, P, +) de
la batería generalmente tiene mayor diámetro que el borne NEGATIVO (NEG, N, –).
4. Determine qué borne de la batería está puesto a tierra (conectado) al bastidor. Si
el borne negativo está puesto a tierra en el bastidor (como en la mayoría de los
vehículos), vea 5. Si el borne positivo está puesto a tierra en el bastidor, vea 6.
5. Para un vehículo con tierra negativa, conecte la pinza del POSITIVO (ROJA)
del cargador de batería al borne sin conexión a tierra POSITIVO (POS, P, +) de
la batería. Conecte la pinza del NEGATIVO (NEGRA) al bastidor del vehículo o
al bloque del motor, lejos de la batería. No conecte la pinza al carburador, las
cañerías de combustible o a las partes de chapa de la carrocería. Conecte a una
pieza de metal sólida del bastidor o del bloque del motor.
6. Para un vehículo con tierra positivo, conecte la pinza del NEGATIVO (NEGRA) del
cargador de batería al borne sin conexión a tierra NEGATIVO (NEG, N, –) de la
batería. Conecte la pinza del POSITIVO (ROJA) al bastidor del vehículo o al bloque
del motor, lejos de la batería. No conecte la pinza al carburador, las cañerías de
combustible o a las partes de chapa de la carrocería. Conecte a una pieza de
metal sólida del bastidor o del bloque del motor.
7. Cuando desconecte el cargador, coloque todos los interruptores en apagado (Off),
desconecte el cable de CA, retire la pinza del bastidor del vehículo, y luego retire la
pinza del terminal de la batería.
8. No cargue la batería mientras el motor está en marcha.
9. Vea las instrucciones de operación para obtener información sobre la duración
de la carga.
CARGANDO UNA BATERÍA HA SIDO RETIRADA DEL
VEHÍCULO
ADVERTENCIA: Una chispa cerca de la batería puede causar una explosión. Para
reducir riesgo de una chispa cerca de la batería:
1. Verifique la polaridad de los bornes de la batería. El borne positivo (marcado
POS, P, +) generalmente tiene mayor diámetro que el borne negativo de la batería
(marcado NEG, N, –).
2. Conecte un cable de 60 cm (24 pulgadas)(longitud mínima) Nº 6 AWG aislado, para
batería al borne negativo de la batería (marcado NEG, N, –).
3. Conecte la pinza positiva (ROJA) de la batería al borne positivo de la batería
(marcado POS, P, + o rojo).
4. Conecte cuidadosamente la pinza NEGATIVA (NEGRA) del cargador al extremo
libre del cable de la batería conectado al terminal negativo.
5. Párese tan lejos de la batería como sea posible, y no se acerque a la batería hasta
que haya hecho la conexión final.
6. Cuando desconecta el cargador, hágalo siempre en la secuencia inversa del
procedimiento de conexión y se acerque la primera conexión estando tan lejos de
la batería como resulte posible.
INSTRUCCIONES DE
OPERACIÓN
CARGA DE BATERÍA
ADVERTENCIA – PARA REDUCIR EL RIESGO DE LESIONES O DAÑO A LA
PROPIEDAD:
• Desconecte siempre el enchufe de la CA del enchufe de la CA primero antes de
desconectar el cargador de la batería que se cargará.
• Asegúrese de que toda la instalación, instrucciones de funcionamiento y
precauciones de seguridad son comprendidos y respetados; a continuación,
siga los pasos descritos en la sección correspondiente (“Cargando una batería
instalada en un vehículo” o “Cargando una batería que ha sido retirado de un
vehículo”).
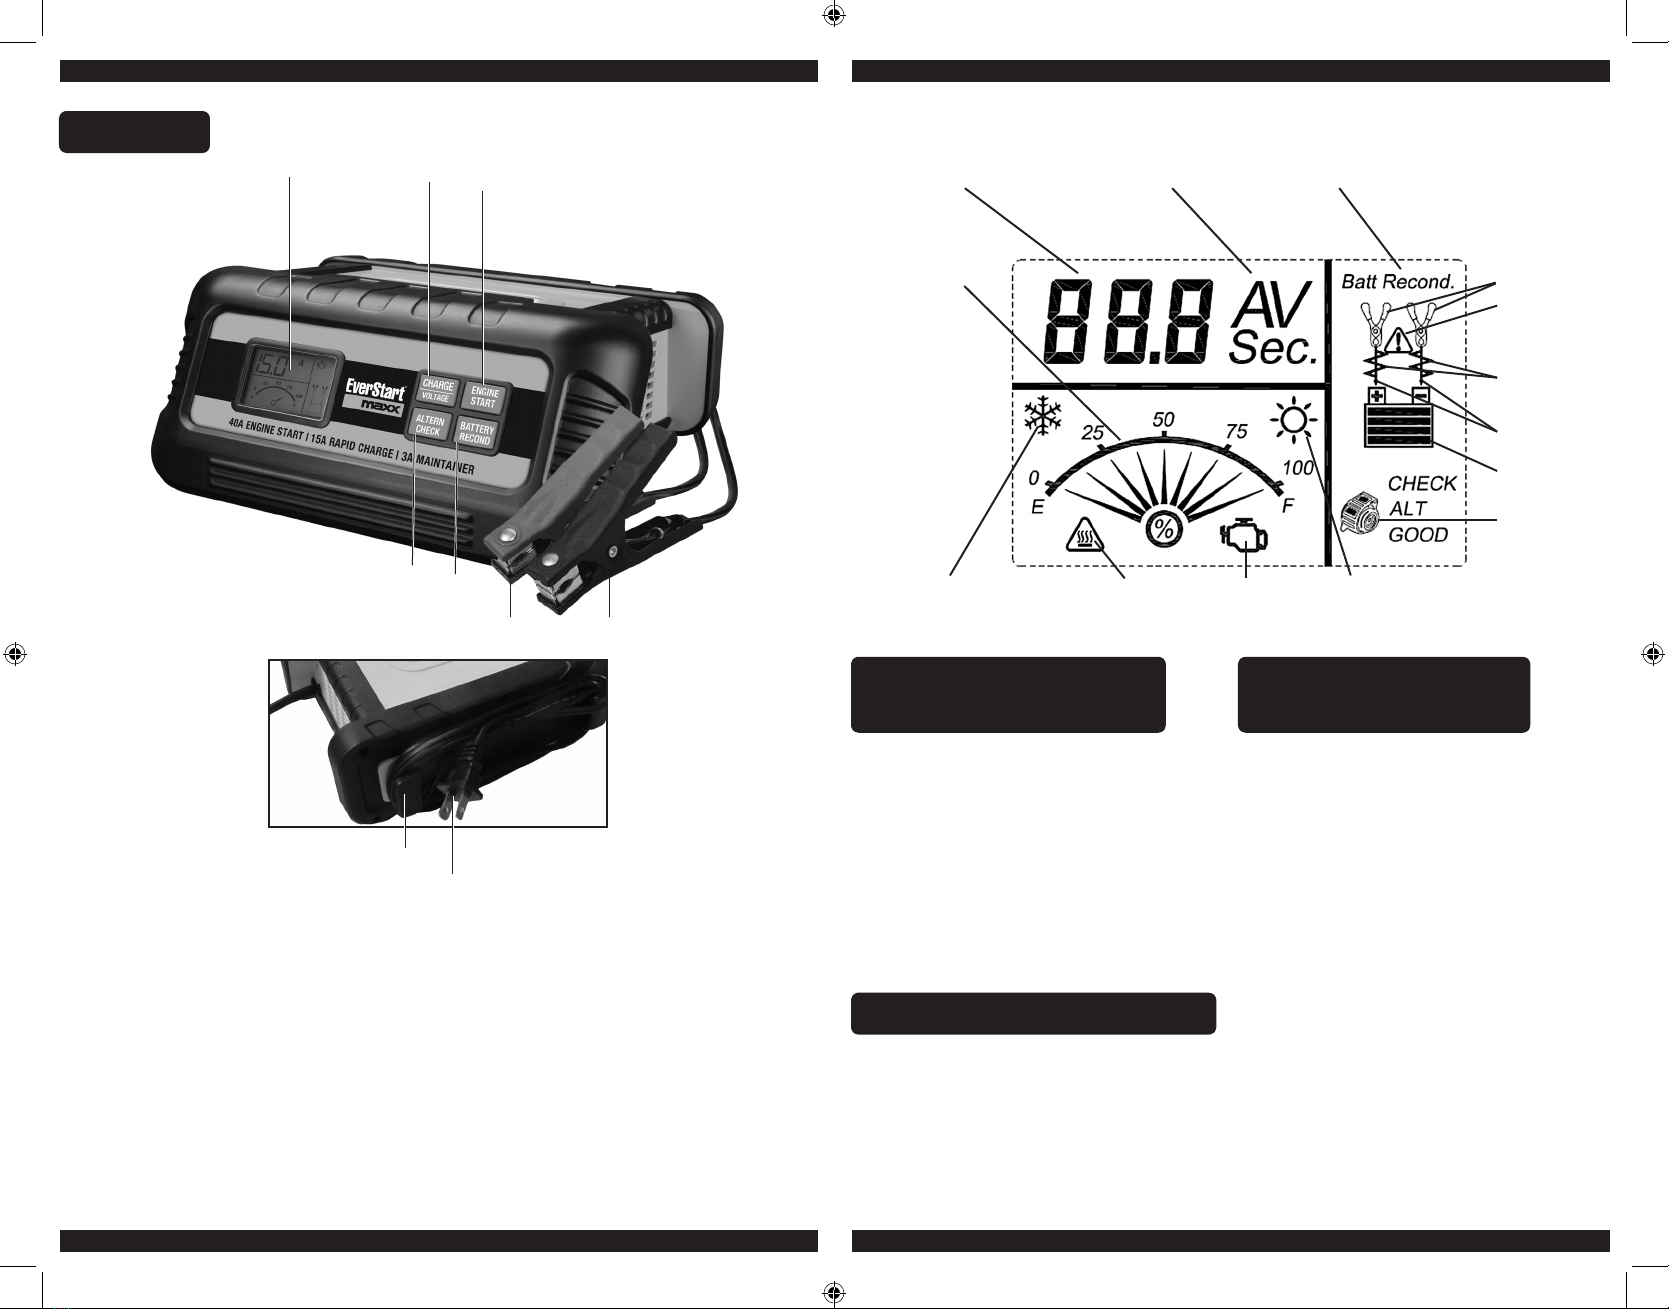
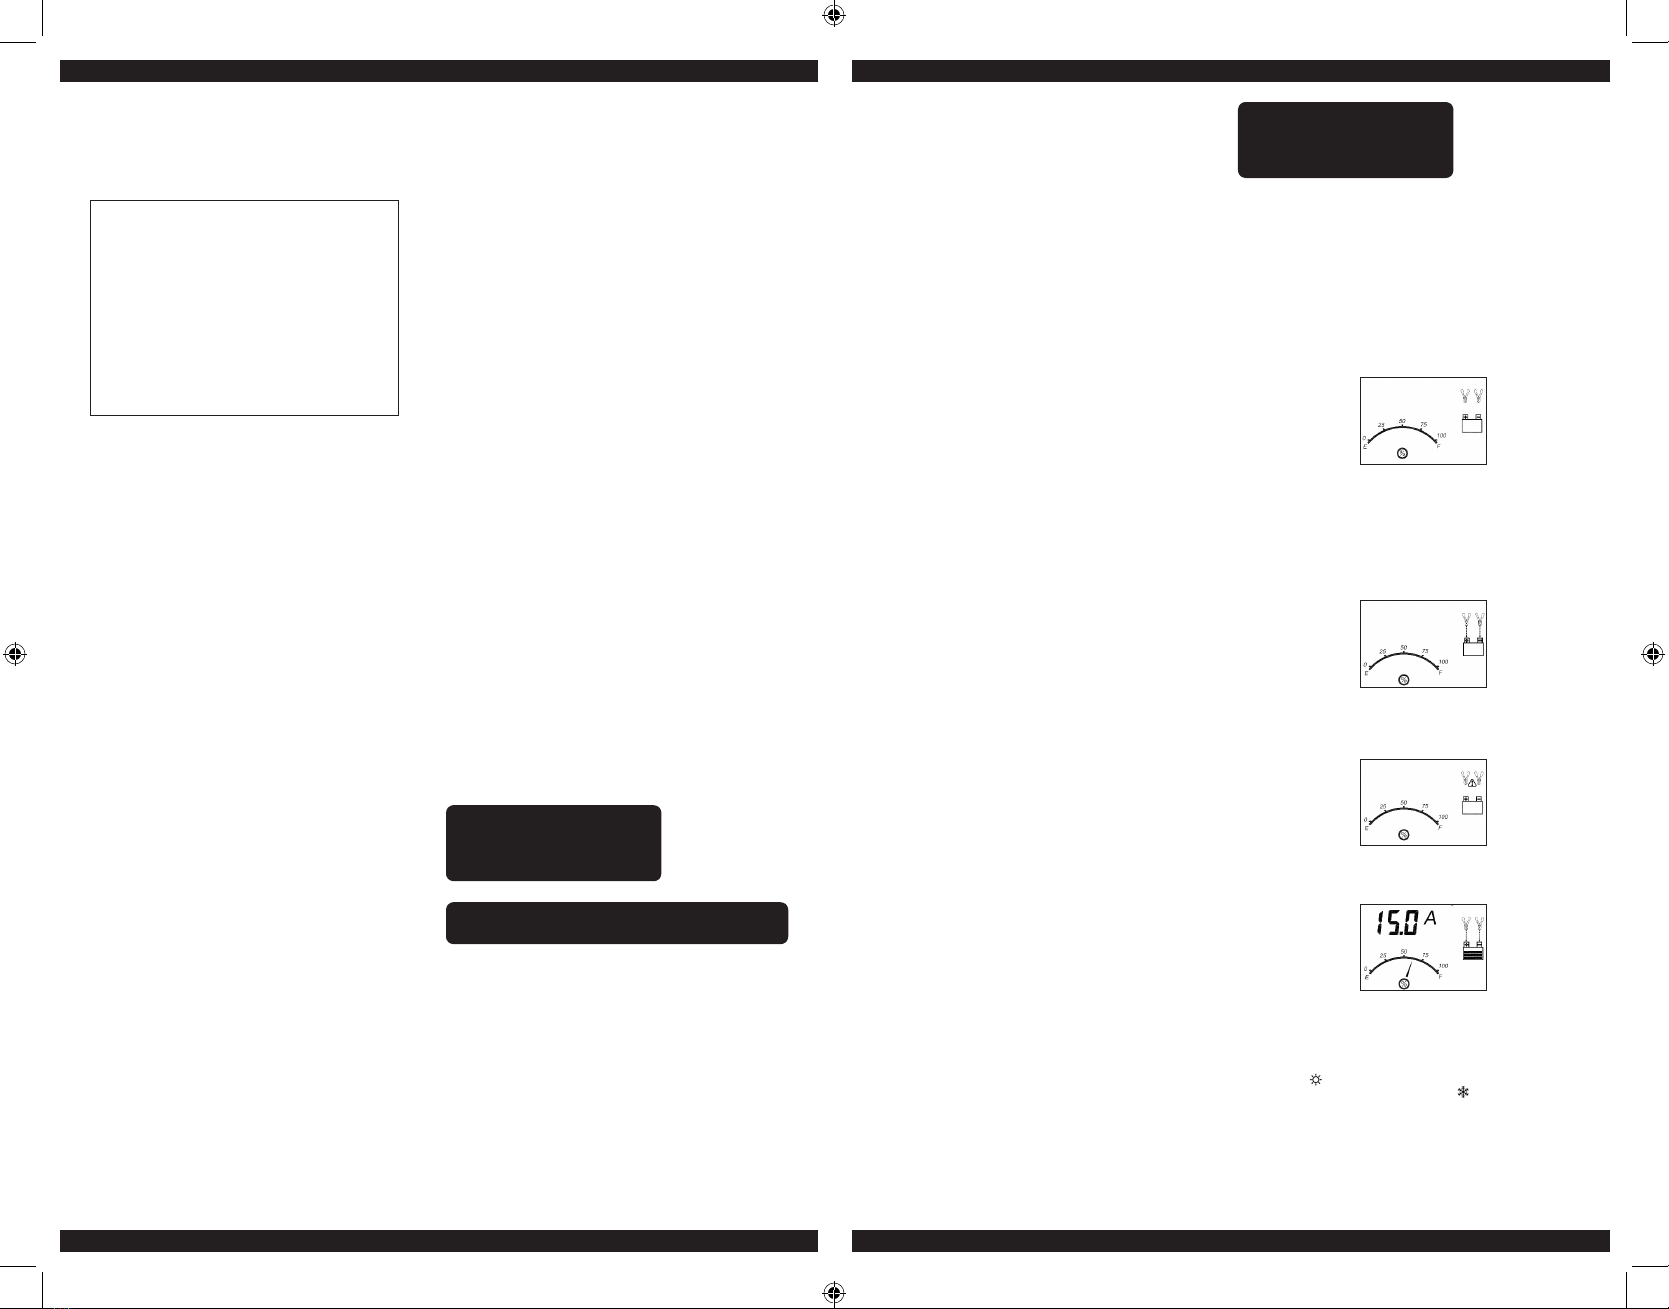
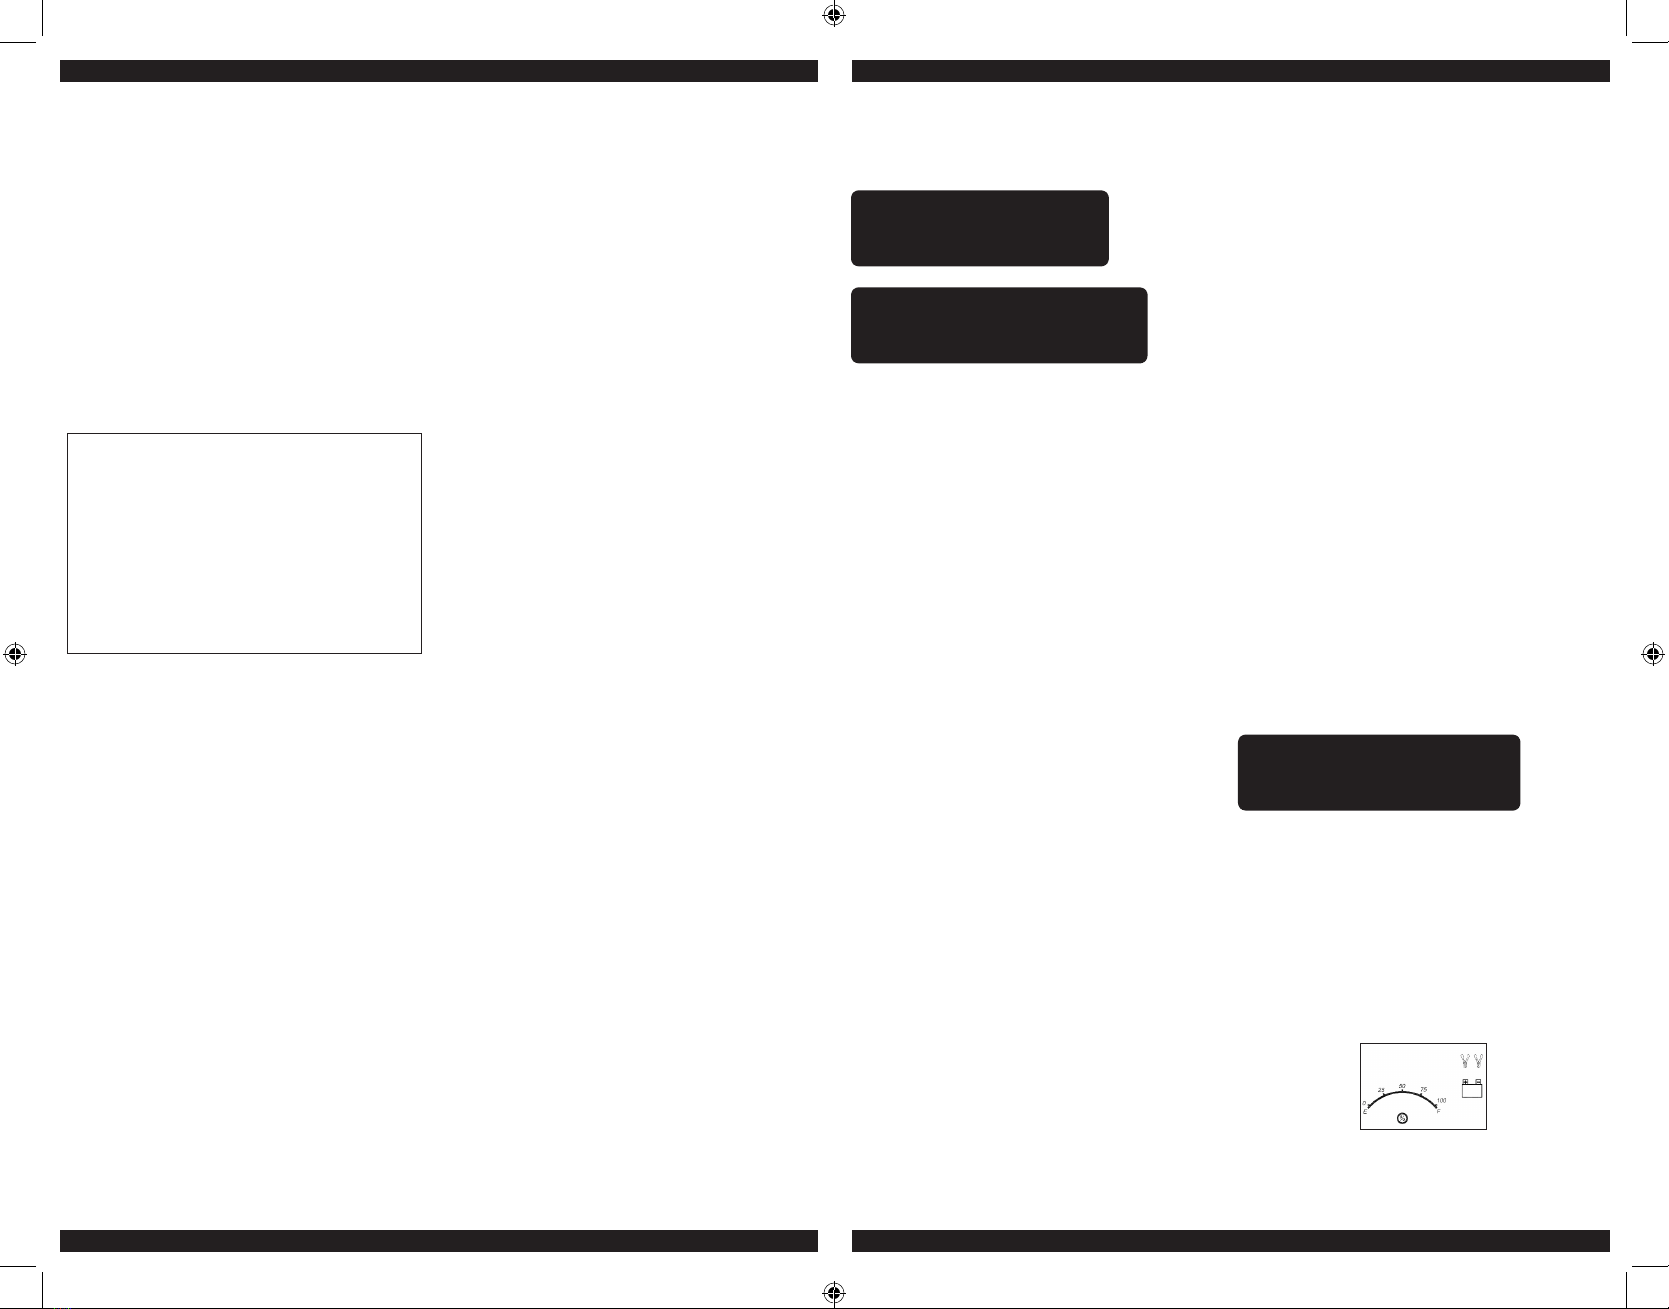
1. Conecte el cable eléctrico del cargador de batería en un enchufe de la CA. El
cargador está ahora en modo de espera. La pantalla del LCD exhibirá el siguiente
(el icono de la pinza destellará, el icono de batería vacía y el medidor sin el puntero
se iluminan):
2. Las pinzas del cargador de batería están codificadas de color. El rojo es positivo;
el negro es negativo. Conecte las abrazaderas de la batería correctamente con los
conectadores correspondientes en los postes de la batería después de los pasos
BC40BE_ManualENSP_032620.indd 12-13 3/27/2020 11:20:38 AM