manuals.online logo
Brands
  1. Home
  2. •
  3. Brands
  4. •
  5. Evervue
  6. •
  7. TV
  8. •
  9. Evervue Ocea Pro User manual

Evervue Ocea Pro User manual

Other Evervue TV manuals

Evervue BN185 User manual

Evervue

Evervue BN185 User manual

Evervue QAIO Flex User manual

Evervue

Evervue QAIO Flex User manual

Evervue MirrorVue User manual

Evervue

Evervue MirrorVue User manual

Evervue Ocea Pro User manual

Evervue

Evervue Ocea Pro User manual

Evervue QAIO User manual

Evervue

Evervue QAIO User manual

Evervue CabiTV CT-20 User manual

Evervue

Evervue CabiTV CT-20 User manual

Evervue Ocea Style User manual

Evervue

Evervue Ocea Style User manual

Evervue Ocea Pro User manual

Evervue

Evervue Ocea Pro User manual

Evervue MirrorVue User manual

Evervue

Evervue MirrorVue User manual

Evervue Decovue User manual

Evervue

Evervue Decovue User manual

Evervue CabiTV CT100 User manual

Evervue

Evervue CabiTV CT100 User manual

Evervue SPECTRUM User manual

Evervue

Evervue SPECTRUM User manual

Evervue COSMOS COSTV-50-MB User manual

Evervue

Evervue COSMOS COSTV-50-MB User manual

Evervue Ocea Pro User manual

Evervue

Evervue Ocea Pro User manual

Popular TV manuals by other brands

IKEA UPPLEVA user manual

IKEA

IKEA UPPLEVA user manual

Toshiba 19A20 Service manual

Toshiba

Toshiba 19A20 Service manual

Sony XBR-100Z9D reference guide

Sony

Sony XBR-100Z9D reference guide

Sony Trinitron KV-HR36M90 Service manual

Sony

Sony Trinitron KV-HR36M90 Service manual

JVC AV-14AG16 instructions

JVC

JVC AV-14AG16 instructions

Loewe Table Stand Reference 55 user guide

Loewe

Loewe Table Stand Reference 55 user guide

Panasonic Genus TX-G10 operating instructions

Panasonic

Panasonic Genus TX-G10 operating instructions

Samsung LN26C350D1D Service manual

Samsung

Samsung LN26C350D1D Service manual

BBK LT1516D Service manual

BBK

BBK LT1516D Service manual

Samsung 55S9 B Series Quick setup guide

Samsung

Samsung 55S9 B Series Quick setup guide

Sharp LC-40FI5012E user manual

Sharp

Sharp LC-40FI5012E user manual

North State TV2GO user guide

North State

North State TV2GO user guide

Toshiba CX35F70 owner's manual

Toshiba

Toshiba CX35F70 owner's manual

Magnavox PS1980 owner's manual

Magnavox

Magnavox PS1980 owner's manual

Philips 20HF5335D manual

Philips

Philips 20HF5335D manual

Panasonic QuintrixF TX-29AS1D operating instructions

Panasonic

Panasonic QuintrixF TX-29AS1D operating instructions

Samsung 4 Series Quick setup guide

Samsung

Samsung 4 Series Quick setup guide

Panasonic TX-21FG20R Service manual

Panasonic

Panasonic TX-21FG20R Service manual

manuals.online logo
manuals.online logoBrands
  • About & Mission
  • Contact us
  • Privacy Policy
  • Terms and Conditions

Copyright 2025 Manuals.Online. All Rights Reserved.

Evervue USA Inc.
5020 Campus Drive,
#121, Newport Beach, CA 92660, U.S.A.
Information is subject to change without prior notication.
© Copyright. Evervue USA Inc.
www.oceatv.com 1
Ocea Pro Swivel Mount - Installation Manual
Check the Items
Attach the Bracket to the Wall
Remove the Swivel and the VESA
Remove the Aluminum Frame
Mark the Holes
Remove the TV Wall Box
Upon receiving your order, open the crate and inspect the
contents. Damages must be reported within 24 hours.
Screw the swivel mount onto the wall.
Using a screwdriver, remove the swivel mount and VESA
bracket that are attached to your TV.
Using an allen key, remove the aluminum frame
attached on the TV.
Place the swivel mount against the wall and mark where
your screws should be. Then drill holes into the marked
areas.
Remove the TV wall box attached at the back.
1
4
2
5
3
6
TV
Remote
Allen Key Ocea Pro Standard TV
Aluminum
Frame
OK
O
K
Swivel Mount
Power Supply
Back view of Ocea Pro
Ocea Pro
TV
Aluminum Frame
TV Wall
Box
VESA
Swivel
Mount
Zepp Remote &
Accessories
(Located in the Compartment
on the back of Ocea Pro)
Evervue USA Inc.
5020 Campus Drive,
#121, Newport Beach, CA 92660, U.S.A.
Information is subject to change without prior notication.
© Copyright. Evervue USA Inc.
www.oceatv.com 2
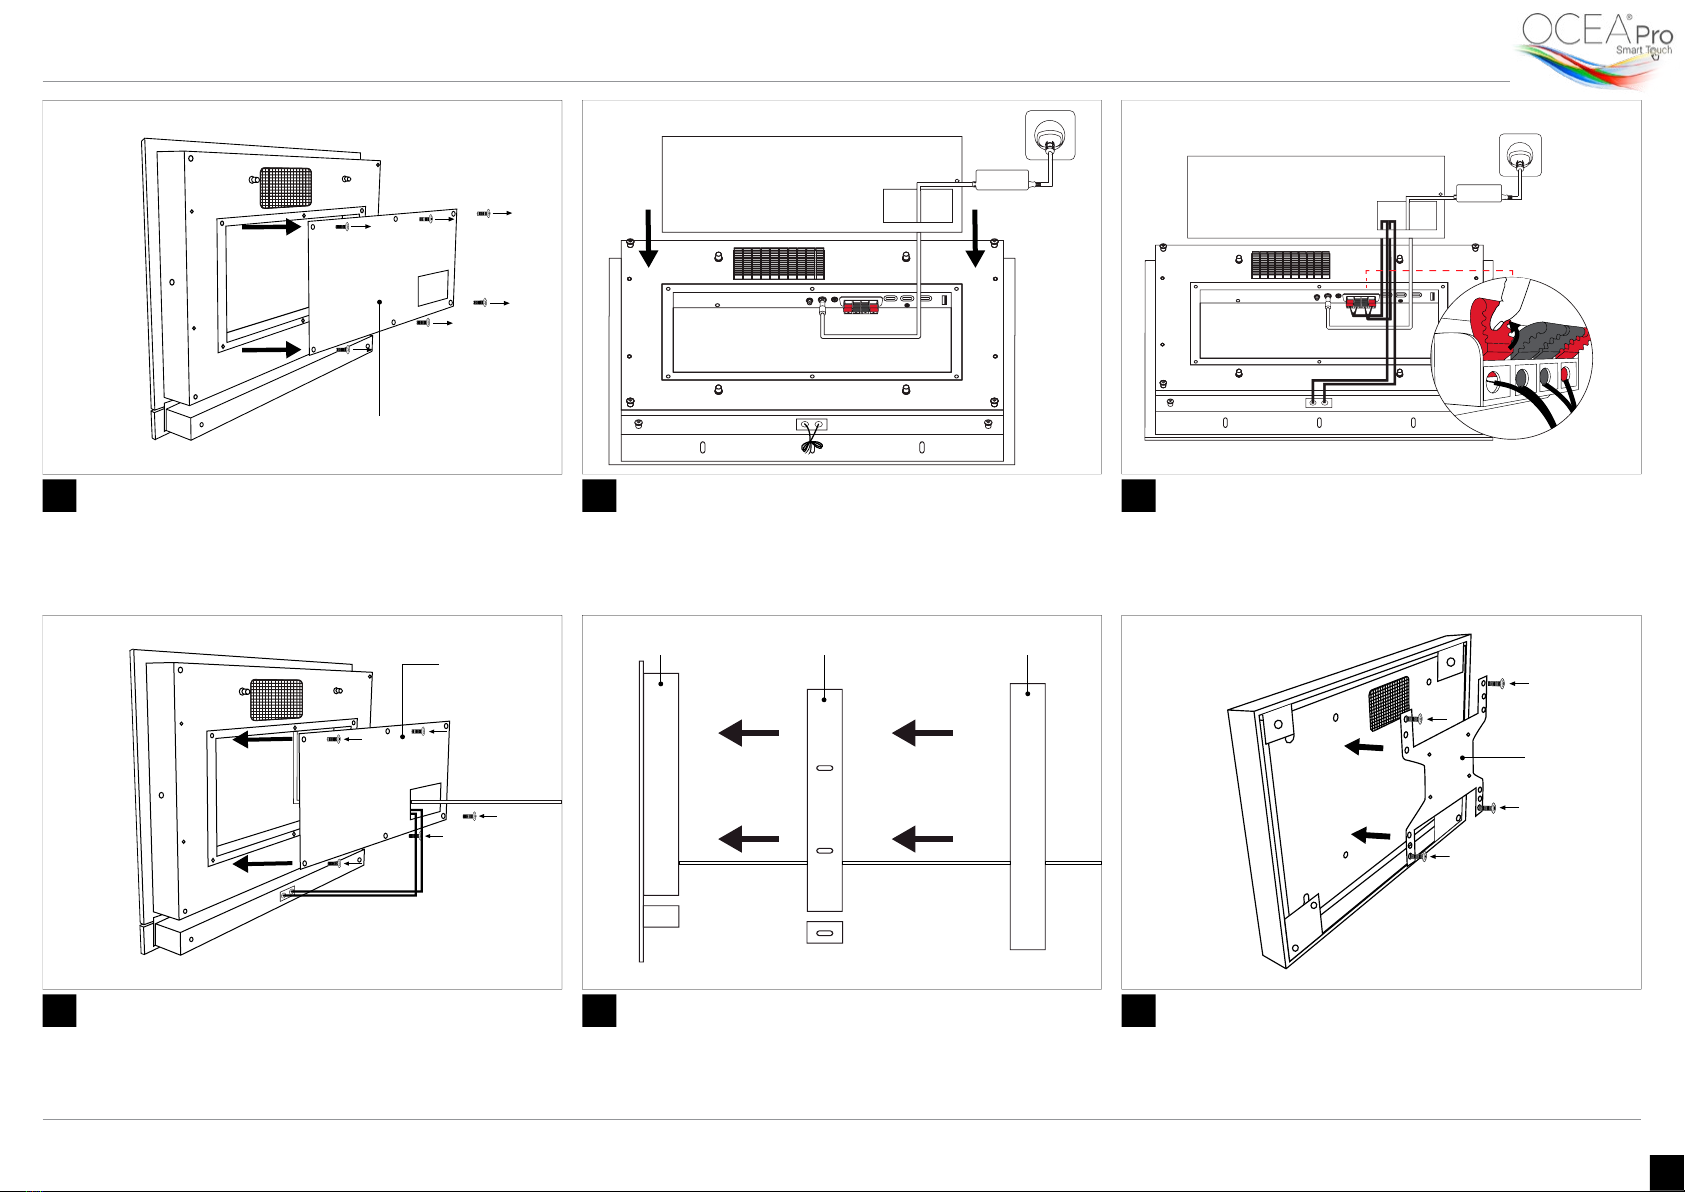
Remove the Compartment Cover
Cover the compartment
Plug the Power Cord
Re-attach the TV Wall Box and the Frame
Connect the Audio Cords
Re-attach the VESA Bracket
Use a screwdriver to remove the compartment cover
located at the back of the TV.
Re-attach the compartment cover. Tighten the
surrounding screws to make sure that they don’t fall during
the rest of the installation process.
Insert the power cord through the opening of the
compartment cover. Then plug it to the power input
port located at the back of the TV.
Slide the TV back into the TV wall box. Then place the
aluminum frame around the TV and tighten its allen
screws back in place.
Insert one end of the stipped audio cord into the red clip
and insert the other end of the cord into the black clip.
Then do the same for the other stripped audio cord.
Screw the VESA bracket back in its original place.
7
10
8
11
9
12
Ocea Pro Swivel Mount - Installation Manual
Compartment Cover
To Power Source
Power Cord
To Power
Source
Compartment
Cover
Audio Cord goes
through
Ocea Pro TV TV Wall Box Aluminum Frame
VESA
Evervue USA Inc.
5020 Campus Drive,
#121, Newport Beach, CA 92660, U.S.A.
Information is subject to change without prior notication.
© Copyright. Evervue USA Inc.
www.oceatv.com 3
Turn on via
Touch Screen Turn on via
Evervue Remote
Ocea Pro Swivel Mount - Installation Manual
Turn on Ocea Pro TV Control your TV
You can either turn your Ocea Pro TV on by simply touching
the power icon on the screen or by clicking the power
button on your Evervue remote.
On the Zepp remote included in the package, press the
mic/mouse button for 5 seconds to turn the remote on.
You can either use the remote as a mouse to control
the cursor on the screen (old remotes) or use the voice
command with the built-in microphone in the remote
(new remotes).
13 14 15
Screw the swivel mount at the back of your TV.
Re-attach the Swivel Mount
Personalize your Ocea Pro
Your Ocea Pro is ready. Use the Touch screen or the Zepp
remote to navigate the TV, install and manage apps,
and personalize your Ocea Pro.
16