Evident Olympus SZX2-ILLTQ User manual

Instructions
Notes
This instruction manual is for the Olympus LED Transmitted Light Illumination Base.
To ensure the safety, obtain optimum performance and to familiarize yourself fully with the use of
this product, we recommend that you study this manual thoroughly before operating this product,
and always keep this manual at hand when operating this product.
Retain this instruction manual in an easily accessible place near the work desk for future reference.
For details of products explained in this instruction manual, see page 8.
Quad Position / Single Position
LED Transmitted Light Illumination Base
SZX2-ILLTQ/ILLTS
Optical Microscope Accessory

This product is applied with the requirements of standard IEC/EN61326-1 concerning
electromagnetic compatibility.
- Immunity Applied to industrial and basic environment requirements.
NOTE: This product has been tested and found to comply with the limits for a Class A digital device,
pursuant to Part 15 of the FCC Rules. These limits are designed to provide reasonable protection
against harmful interference when the product is operated in a commercial environment. This product
generates, uses, and can radiate radio frequency energy and, if not installed and used in accordance
with the instruction manual, may cause harmful interference to radio communications.
Operation of this product in a residential area is likely to cause harmful interference in which case the
user will be required to correct the interference at his own expense.
FCC WARNING: Changes or modifications not expressly approved by the party responsible for compliance
could void the user’s authority to operate the product.
FCC Supplier's Declaration of Conformity
Hereby declares that the product
Product name: Optical Microscope Accessory
Model Number: SZX2-ILLTQ, SZX2-ILLTS
Conforms to the following specifications:
FCC Part 15, Subpart B, Section 15.107 and Section 15.109
Supplementary Information:
This device complies with part 15 of the FCC Rules. Operation is subject to the following
two conditions: (1) This device may not cause harmful interference, and (2) this device
must accept any interference received, including interference that may cause undesired
operation.
Responsible Party Name: Olympus Scientific Solutions Americas Corp.
Address: 48 Woerd Ave Waltham, MA 02453, U.S.A.
Phone Number: 781-419-3900
In accordance with European Directive on Waste Electrical and Electronic Equipment, this
symbol indicates that the product must not be disposed of as unsorted municipal waste, but
should be collected separately.
Refer to your local Olympus distributor in EU for return and/or collection systems available in
your country.
For Korea only
이 기기는 업무용 환경에서 사용할 목적으로 적합성평가를 받은 기기로서
가정용 환경에서 사용하는 경우 전파간섭의 우려가 있습니다.

SZX2-ILLTQ/ILLTS
Concept of this instruction manual............................................................................................. 1
Product Concept.......................................................................................................................................... 2
Safety precautions...................................................................................................................................... 3
Handling precautions............................................................................................................................... 6
Maintenance and storage ................................................................................................................... 7
1 Combination of the base and the stage .......................................................................... 8
2 Nomenclature of main operating units............................................................................... 9
3 Operating procedures of each portion .............................................................................11
1Turning ON the main switch and adjusting the brightness ................................................................. 11
2Changing the illumination .................................................................................................................................................. 11
3Adjusting Oblique (Oblique brightfield illumination).................................................................................... 11
4Adjusting for polarization observation..................................................................................................................... 12
5Using SZX2-CSH (Shade plate cartridge) ............................................................................................................ 12
6List of objectives applicable to each illumination cartridges............................................................. 13
4 Troubleshooting.....................................................................................................................................15
5 Specifications...........................................................................................................................................16
6 Assembly......................................................................................................................................................19
1Attaching the column.............................................................................................................................................................19
2Connecting the AC adapter and the power cord ......................................................................................... 19
3Attaching the illumination cartridge (Optional)................................................................................................20
4Attaching the photo sheet filter (commercially available)......................................................................21
5Attaching the focusing unit (Optional).....................................................................................................................22
6Attaching SZX2-AN (Analyzer) (Optional)..............................................................................................................22
7Attaching SZX2-ILLTSA (High stability adapter for ILLT) (Optional).................................................23
8Attaching the stage (Optional) ......................................................................................................................................26
Contents

1
SZX2-ILLTQ/ILLTS
i
GX53
1
1
2
を登りながら
6
6-1 OOOOOOOOOO
OOOOOOOO
OOOOOOOOOO
OOOOOOOOOOOOOOOOOOOOOOOOOOOOO
OOOOOOOOOOOOOOOOOOOOOOOOOOOOO
OOOOOOOOOOOOOOOOOOOOO
OOOOOOOOOOOOOOOOOOOOO
OOOOOOOOOOOOOOOOOOOOO
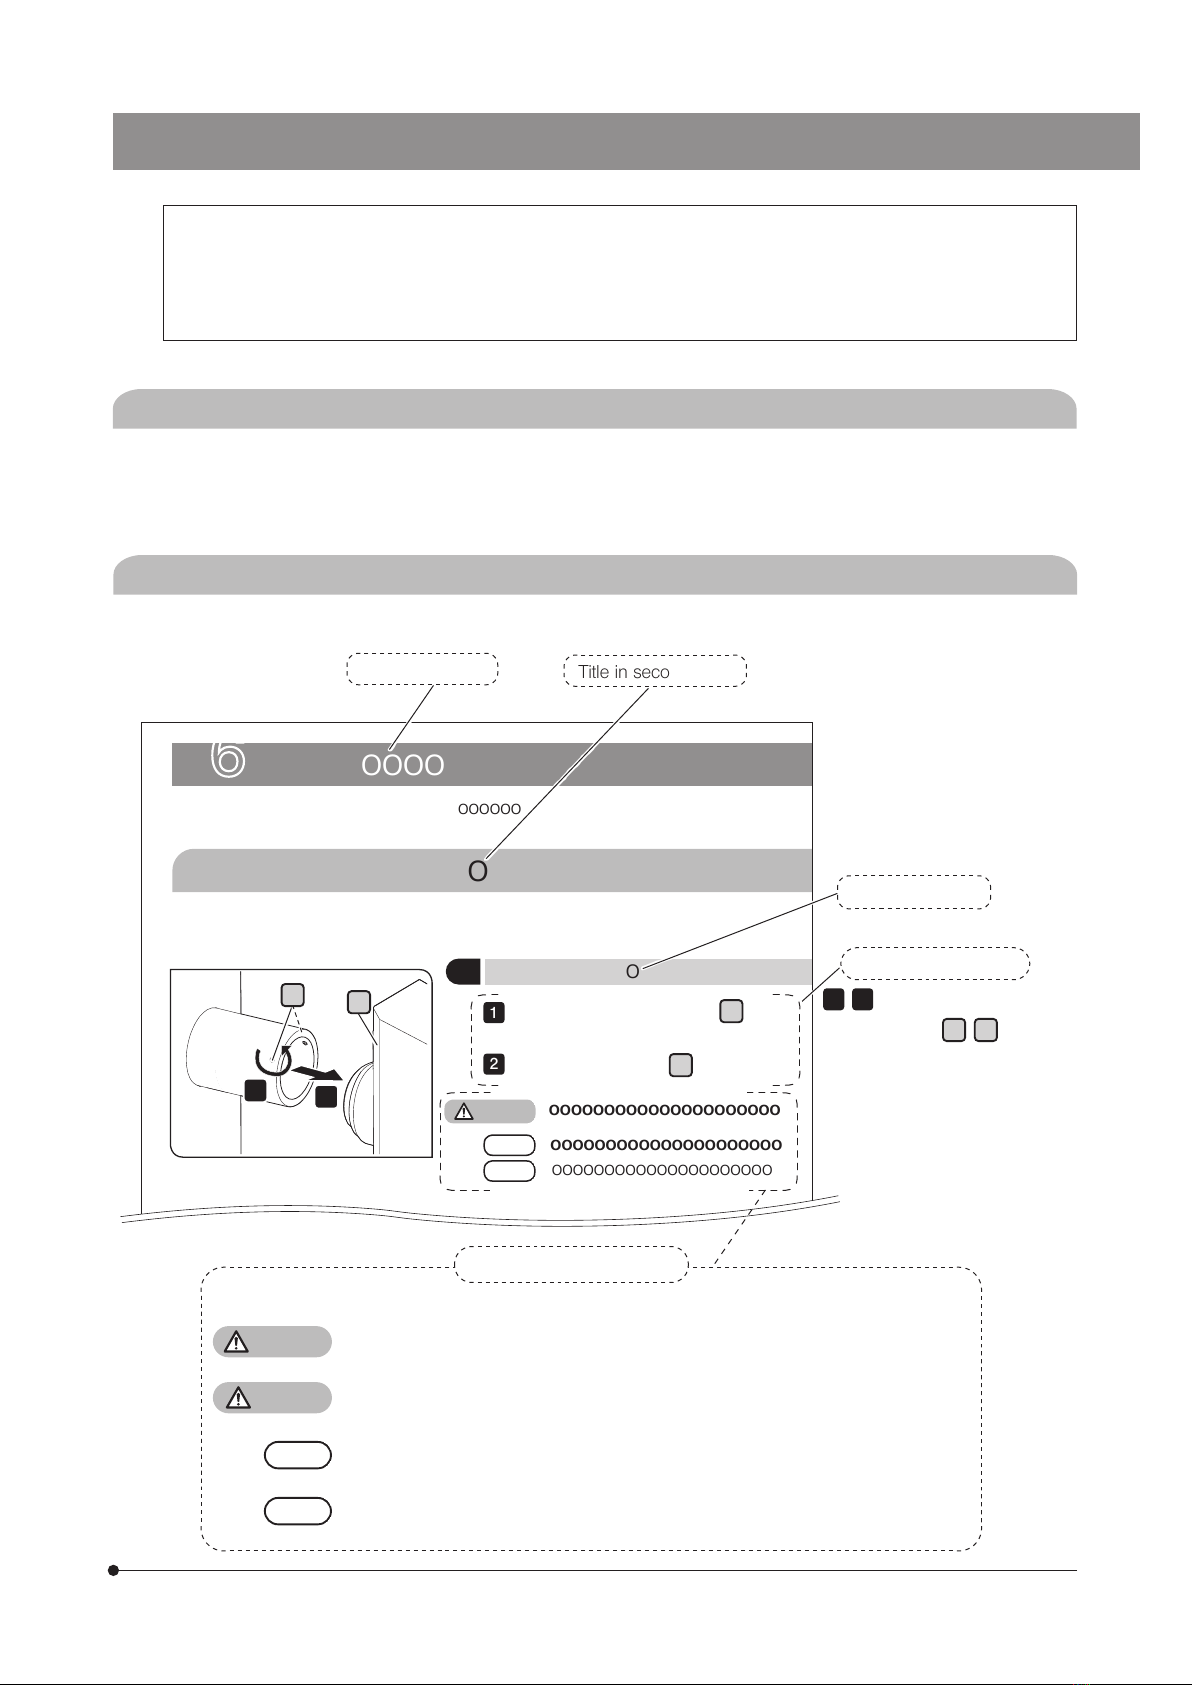
This instruction manual is created as follows.
How to read this instruction manual
Title in second layer
Title in third layer
Title in first layer
Concept of this instruction manual
Applicable user of this instruction manual
This instruction manual applies to users who use this product according to "Intended use" and Olympus distributors.
"Intended use" is determined depending on the system product to be combined.
2
1
1, 2... indicates the operating
procedure and A, B... indicates
the portion you operate.
Operating procedure
Loosen the
clamping screw
A
using
the screwdriver.
Remove the product
B
.
TIP
NOTE
CAUTION
B
A
The following symbols are used in this instruction manual.
WARNING : Indicates a potentially hazardous situation which, if not avoided, could result in
death or serious injury.
CAUTION : Indicates a potentially hazardous situation which, if not avoided, may result in
minor or moderate injury.
NOTE
: Indicates a potentially hazardous situation which, if not avoided, may result in
damage to the product or other property and/or may cause problems.
TIP
: Indicates the useful knowledge or information for use.
Cautions and references
This instruction manual describes only the contents related to Quad Position/Single Position LED Transmitted Light
Illumination Base.
When using this product, read all the instruction manuals supplied with the products (optional) you purchased together
with this manual.

2
Product outline
Product Concept
Cautions and confirmation before use
When you unpack the package, check all the included items referring to the list of accessories. If any item is missing or
damaged, contact Olympus.
This product is intended to used in combination as a system, refer to the instruction manual for the system product to be
combined.
Intended use
This product is a LED transmitted light illumination base used with SZX16, SZX10, SZX7, SZ61, SZ51 or MVX10 system.
SZX2-ILLTQ (Quad position LED transmitted light illumination base) has four illumination cartridge mounts.
SZX2-ILLTS (Single position LED transmitted light illumination base) has a single illumination cartridge mount.

3
SZX2-ILLTQ/ILLTS
Prevention of infection
Safety precautions
If the product is used in a manner not specified by this manual, the safety of the user may be imperiled. In addition, the
product may also be damaged. Always use the product according to this instruction manual.
·Wear the protective equipment such as gloves, etc.
When you observe specimens which have potentiality of infection, wear protective equipment such as gloves,
etc. to prevent the specimens from touching your skin directly.
When you maintain product which may have contacted specimens which have potentiality of infection, wear
protective equipment such as gloves, etc., or clean the product before operation.
·After observation, clean the portions where specimens contacted directly.
·Remove the specimen when moving the product.
When moving this product, be sure to remove the specimen first, since it is in danger of
dropping and spattering.
Hold the front hook of the base Awith one hand and the back hook of the
base Bwith the other hand to prevent the base from tilting.
Remove all attached items from SZX2-ILLTQ (Quad position LED
transmitted light illumination base) or SZX2-ILLTS (Single position LED
transmitted light illumination base) and reduce the weight before holding
the illumination base.
·Take appropriate actions to prevent the product from overturning.
Take proper measures to avoid the product from falling over. In case that the product falls over, the specimen
may be dropped and spattered.
·In case the specimen is damaged, promptly take the infection prevention measures.
·When disposing of the product, follow the regulations and rules of your local government.
When disposing of the product which contacted specimens which have potentiality of infection, follow the
regulations and rules of your local government.
WARNING
Installation
·Install the product on a sturdy, level table or bench.
Use the table where the angle of installation surface is 5° or less with respect to the horizontal surface.
·Align the direction to attach the microscope frame with the direction
of the illumination light. Even if you do not use the transmitted light
illumination, be sure to set the right/left deflection angle to 15° or
less in order to prevent the product from overturning.
CAUTION
15° or less
15° or less

4
Preventing eye injuries
·Do not look directly at the LED light for a long time.
The LED built in this product is basically eye-safe. However, do not look directly at the light for a long time,
since it may cause damage to your eyes.
·When using SZX2-ILLTQ (Quad position LED transmitted light illumination base), attach the dummy
cap provided with the base to the illumination cartridge mount where the illumination cartridge is not
attached.
CAUTION
Electric safety
·Always use the power cord provided by Olympus.
If the proper AC adapter and the power cord are not used, the electric safety and the EMC (Electromagnetic
Compatibility) performance of the product cannot be assured. If no power cord is provided, please select the
proper power cord by referring to the section “Proper selection of the power cord” at the end of this instruction
manual.
·Always connect the ground terminal.
Connect the ground terminal of the power cord and that of the power outlet.
If the product is not grounded, our intended electric safety and EMC performance of the product cannot be
assured.
·Do not use the product in close proximity to the sources of strong electromagnetic radiation.
Proper operation may be interfered. The electromagnetic environment should be evaluated prior to operation
of the product.
·Disconnect the power cord in case of emergency.
In case of emergency, disconnect the power cord from the power cord connector on the product or from the
power outlet.
Install the product at the location where you can reach the power cord connector or the power outlet at hand
to disconnect the power cord quickly.
·Do not connect or disconnect the power cord, cables and products (optional) while the power is on.
CAUTION
Prevention of electric shock
·Never disassemble each part of this product.
It could cause electric shock or failure of the product.
·Do not touch the product with wet hands.
In particular, if you touch the main switch of the power unit or the power cord with wet hands, electric shock,
ignition or failure of the product may be caused.
·Do not pull or tie the power cord/cables in a bundle.
Otherwise they could be damaged, causing a fire or an electric shock.
WARNING

5
SZX2-ILLTQ/ILLTS
The following symbols are placed on the product.
Study the meaning of the symbols and always use the product in the safest possible manner.
Symbol Meaning
Indicates a non-specific general hazard. Follow the description given after this symbol or
in the instruction manual.
Indicates that the seesaw type main switch is ON.
(Seesaw type is the type of switch that ON or OFF is selected by pressing it to ON or
OFF side.)
Indicates that the seesaw type main switch is OFF.
Label position and instruction
The labels are attached to the portions which require special cautions during use and operation. Be sure to follow these
instructions.
Label position Label Instructions in instruction
manual Page
Rear top of SZX2-ILLTQ/ILLTS Caution for electric safety 4
When caution labels are dirty or peeled off, contact Olympus for replacement or inquiries.
Safety warning symbols

6
Handling precautions
·This product is a precision instrument. Handle it with care and avoid subjecting it to a sudden or severe
impact.
·Never disassemble each part of this product. Otherwise, it could cause unexpected accidents or failure
of the product. Never disassemble the product.
·Do not use the product in areas where it may be subjected to direct sunlight, high temperature and/or
humidity, dust or vibrations.
(For conditions of operating environments, see “5 Specifications” (P.16).)
·For products (optional) attachable to this product, see page 8.
The use of this product in combination with other separately available items not only creates the risk
of abnormal operation, but it also may damage the product.
·Applying excess force to the position where the operation portion stops may damage the product.
· The power cord is for exclusive use of this product. Do not use it with other product.
· Before disposing of this product, be sure to follow the regulations and rules of your local government.
· This product is not compliant with ESD (Specifications to prevent electrostatic discharge).
NOTE
TIP
General

7
SZX2-ILLTQ/ILLTS
Maintenance and storage
Do not leave stains or fingerprints on the lenses and filters. If they get dirty, blow away dust with a
commercially available blower and gently wipe the lens or filter with a piece of cleaning paper (or clean
gauze).
Only when cleaning fingerprints and oil stains, slightly moisten a piece of cleaning paper with commercially
available absolute alcohol and wipe them off with it.
Since the absolute alcohol is highly flammable, it must be handled carefully. Be sure to keep it away
from open flames or potential sources of electrical sparks. For example, the electrical equipment that
is switched ON and OFF may cause the ignition of a fire. Also, always use absolute alcohol only in a
well-ventilated room.
Wipe the portions other than the lens with a dry soft cloth. If the dirt cannot be removed by dry-wiping,
moisten a soft cloth with diluted neutral detergent and wipe the dirty surface with it.
Do not use organic solvents because they may deteriorate the coated surface or plastic parts.
The stage surface is designed as a simple waterproof structure. However, in case of spilling water, set the main
switch to (OFF), disconnect the power cord and wipe off water from the stage immediately with a dry cloth, etc.
If water enters inside, contact Olympus for assistance and make sure of the electric safety.
WARNING
NOTE
Lifetime
The lifetime of this product is approximately 8 years after purchase if the product is used properly according to this
instruction manual (this does not apply to consumables).
If the rubber leg of SZX2-ILLTSA (High stability adapter for ILLT) is deteriorated, its anti-vibration property is decreased due
to the nature of the rubber. In this case, we recommend you to change the rubber leg of SZX2-ILLTSA.
There is a fee for replacing the rubber legs of SZX2-ILLTSA even within one year after delivery.
Cleaning of each unit

8
11Combination of the base and the stage
BH2-SH
(Horizontal knob stage)
SZH-SC
(Cup stage)
SZH-SG
(Gliding stage)
SZX-STAD1
(BX stage adapter type 1)
SZH-STAD1
(Stage adapter type 1)
SZX2-ILLTS
(Single position LED transmitted
light illumination base)
SZX2-ILLTSA
(High stability adapter for ILLT)
SZX2-STADM
(STAD mount for ILLT)
SZX2-ILLTQ
(Quad position LED
transmitted light illumination base)
Illumination
cartridge
SZX2-CBF
SZX2-CBFH
SZX2-CBFL
SZX2-COB
SZX2-COBH
SZX2-COBL
SZX2-CDF
SZX2-CSH
SZX2-CPO
U-SRP
(Rotational stage)
U-SRG2
(Rotational stage)
Stage
9
SZX2-ILLTQ/ILLTS
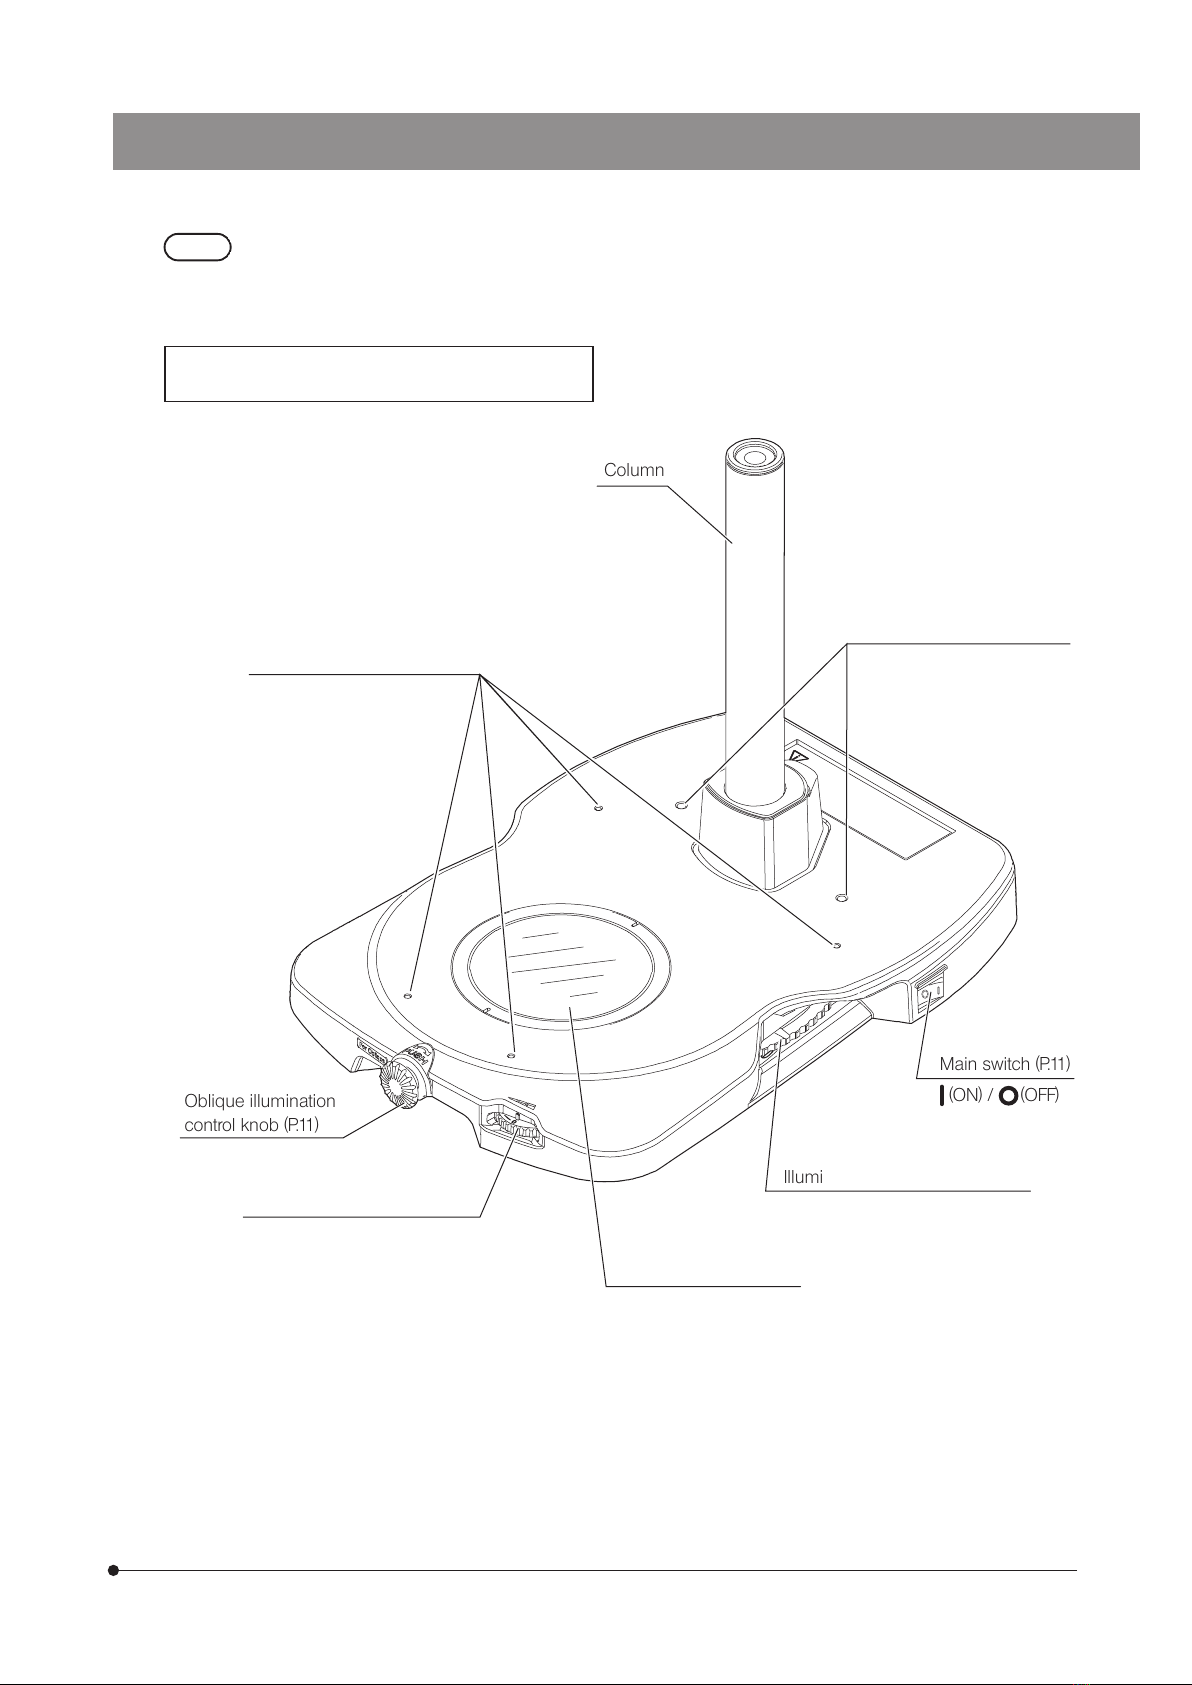
22Nomenclature of main operating units
Quad position LED transmitted light illumination base
SZX2-ILLTQ
Oblique illumination
control knob (P.11)
Brightness control knob (P.11)
Main switch (P.11)
(ON) / (OFF)
Illumination selection turret (P.11)
This section describes the nomenclature of main operating portions that composes the product.
If the assembly is not completed yet, see “6 Assembly” (P.19) first.
TIP
Column
Reserve screw holes (4 pcs.)
Diameter M4, depth 5 mm
Reserve screw holes (2 pcs.)
Diameter M6, depth 10 mm
Stage glass (with frame)
10
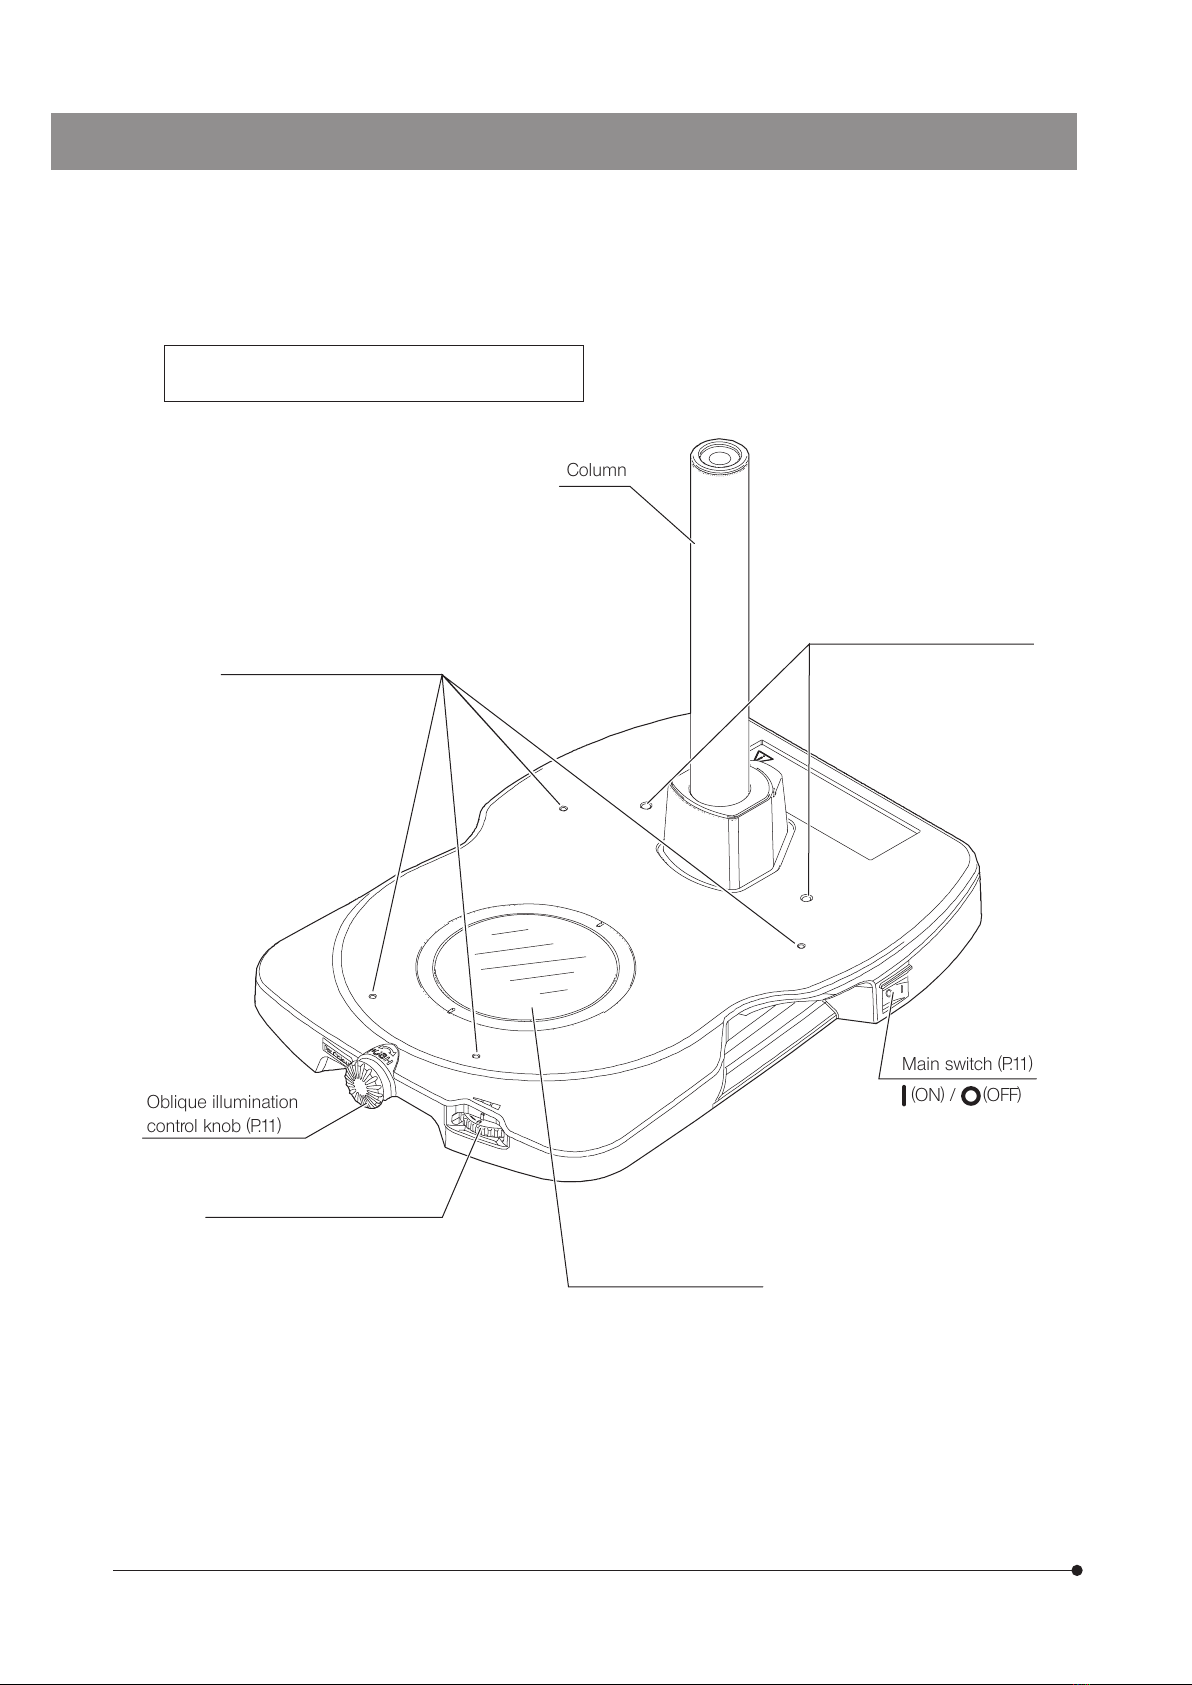
Single position LED transmitted light illumination base
SZX2-ILLTS
Oblique illumination
control knob (P.11)
Brightness control knob (P.11)
Main switch (P.11)
(ON) / (OFF)
Column
Stage glass (with frame)
Reserve screw holes (4 pcs.)
Diameter M4, depth 5 mm
Reserve screw holes (2 pcs.)
Diameter M6, depth 10 mm
11
SZX2-ILLTQ/ILLTS
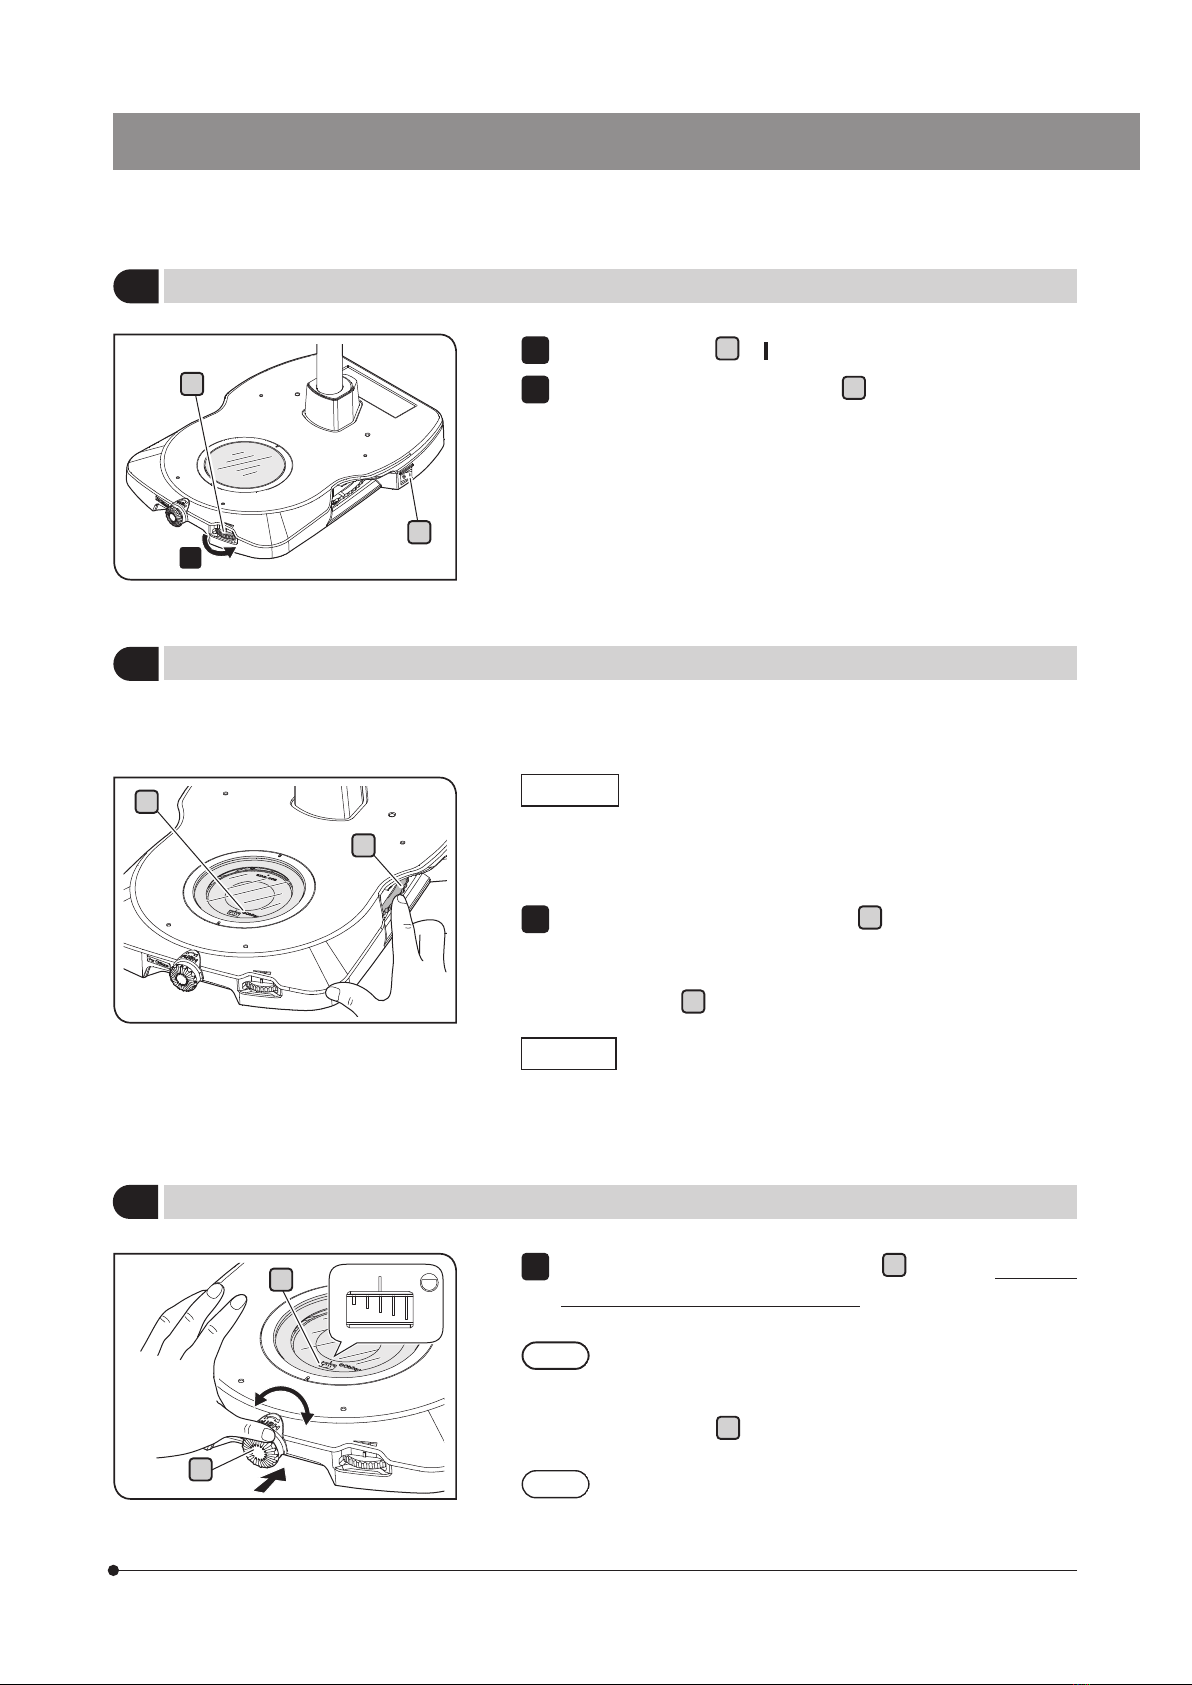
33Operating procedures of each portion
Set the main switch Ato (ON).
Rotating the brightness control knob Bin the direction of the arrow
increases the brightness of the illumination light
1
2
SZX2-ILLTQ
You can changetheilluminationmethodbyrotatingtheilluminationselectionturret.
Up to four illumination cartridges can be attached.
(For procedures to attach the illumination cartridge, see page 20.)
Rotate the illumination selection turret A(also available to operate
on the left side) to the click position.
You can confirm the selected illumination method by the illumination
cartridge name Bvisible through the stage glass.
SZX2-ILLTS
You can change the illumination method by replacing the illumination
cartridge. (For procedures to replace the illumination cartridge, see page 20.)
1
You can select the best illumination method by changing the illumination cartridge according to the sample. For compatible
cartridges, see page 18.
This section describes the basic operating procedure of each portion.
A
B
2
Rotate the oblique illumination control knob Aon the front by pushing
it in and then turning it to the left or right, and adjust the effectiveness
of oblique illumination.
· Adjust the effectiveness of oblique illumination when you use
the oblique cartridge (SZX2-COB, SZX2-COBH or SZX2-COBL).
· You can check the degree of oblique of the illumination
with the scale Bon the cartridge. The oblique range of the
illumination is between the short scale and the long scale.
Do not rotate the oblique illumination control knob with
excess force.
1
TIP
NOTE
1Turning ON the main switch and adjusting the brightness
2Changing the illumination
3Adjusting Oblique (Oblique brightfield illumination)
A
B
A
B

12
A
Engage SZX2-CPO (polarization plate cartridge) in the light path.
Rotate the analyzer rotation collar Ato move the field of view to the
position where it is completely dark (crossed nicols). (Remove the
sample in advance.)
Polarizer vibration
direction
(arrow direction)
Analyzer vibration
direction
(white point position)
Crossed nicols status
Place the sample on the stage glass and rotate the sample to perform
the polarization observation.
· You can also observe the sample by rotating U-SRP or U-SRG2.
· When observing the birefringent substance, a certain area of
the sample becomes dark or bright depending on the rotation
of the sample.
1
2
3
TIP
4Adjusting for polarization observation
5Using SZX2-CSH (Shade plate cartridge)
The transmitted simple polarization observation is available by combining SZX2-AN (Analyzer). You can check the transmitted
polarization properties (birefringence, polarization property) easily.
For reflected fluorescence observation, engage SZX2-CSH (Shade plate cartridge) in the light path.
·Do not perform the fluorescence observation with the dummy cap in the light path. The dummy cap may
be deformed by the illumination light of the fluorescence observation.
·If you engage the illumination cartridge other than SZX2-CSH (Shade plate cartridge) in the light path,
do not collect the illumination light during fluorescence observation onto the illumination cartridge.
The performance of the illumination cartridge may be deteriorated.
NOTE

13
SZX2-ILLTQ/ILLTS
6List of objectives applicable to each illumination cartridges
Combination where the insufficient illumination field occurs and zoom magnification
SZX16 (Research high-class stereo microscope)
Objective
Illumination cartridge
SDFPLFL
0.3X
SDFPLAPO
0.5XPF
SDFPLAPO
0.8X
SZX2-CBFL less than 1.25X less than 0.8X —
SZX2-CBF less than 2.5X less than 1.25X less than 0.8X
SZX2-CBFH less than 2.5X less than 1.25X less than 0.8X
SZX2-COB less than 2.5X less than 1.25X less than 0.8X
SZX2-COBH less than 2.5X less than 1.25X less than 0.8X
SZX2-COBL less than 2.5X less than 1.25X less than 0.8X
SZX2-CDF less than 2.5X less than 1.25X less than 0.8X
SZX2-CPO less than 2.5X less than 1.25X less than 0.8X
None less than 1.25X less than 0.8X —
SZX10 (Research high-class stereo microscope)
Objective
Illumination cartridge
DFPL
0.5X-4
DFPL
0.75X-4
SZX2-CBFL less than 0.8X —
SZX2-CBF less than 1.25X less than 0.8X
SZX2-CBFH less than 1.25X less than 0.8X
SZX2-COB less than 1.25X less than 0.8X
SZX2-COBH less than 1.25X less than 0.8X
SZX2-COBL less than 1.25X less than 0.8X
SZX2-CDF less than 1.25X less than 0.8X
SZX2-CPO less than 1.25X less than 0.8X
None less than 0.8X —
MVX10 (Research high-class stereo microscope)
Objective
Illumination cartridge
MVPLAPO
0.63X
SZX2-CBFL —
SZX2-CBF less than 1X
SZX2-CBFH less than 1X
SZX2-COB less than 1X
SZX2-COBH less than 1X
SZX2-COBL less than 1X
SZX2-CDF less than 1X
SZX2-CPO less than 1X
None —

14
Combination where the vignetting occurs in the field of view and zoom magnification
SZX16 (Research high-class stereo microscope)
Objective
Illumination cartridge
SDFPLAPO
1.6XPF
SDFPLAPO
2XPFC
SZX2-CBFL less than 1.25X less than 1.6X
SZX2-CBF less than 1.25X less than 2X
SZX2-CBFH less than 1.25X less than 2X
SZX2-COB less than 1.25X less than 2X
SZX2-COBH less than 1.25X less than 2X
SZX2-COBL less than 1.25X less than 2X
SZX2-CDF less than 1.25X less than 2X
SZX2-CPO less than 1.25X less than 2X
None less than 1.25X less than 1.6X
MVX10 (Research high-class stereo microscope)
Objective
Illumination cartridge
MVPLAPO
2XC
SZX2-CBFL less than 0.8X
SZX2-CBF less than 1X
SZX2-CBFH less than 1X
SZX2-COB less than 1X
SZX2-COBH less than 1X
SZX2-COBL less than 1X
SZX2-CDF less than 1X
SZX2-CPO less than 1X
None less than 0.8X
With SDFPLAPO1.6XPF and SDFPLAPO2XPFC, as the tip
of the objective is sharpened to secure the workability,
the vignetting appears at both ends of the field of view
(right end of right field of view and left end of the left field
of view) in the low zoom magnification area.

15
SZX2-ILLTQ/ILLTS
Problem Cause Remedy Page
A light is not emitted. The AC adapter is not connected. Connect the outlet plug to the AC
adapter properly.
19
Make sure that the outlet plug
is connected to the commercial
power supply and the DC power
jack is connected to the SZX2-
ILLTQ or SZX2-ILLTS properly.
19
The power is not supplied to the
AC adapter.
Check the commercial power
supply. –
The illumination unevenness is
noticeable.
The turret position is not
appropriate.
Rotate the turret to the click
position.
11
The oblique (Oblique brightfield
illumination) cannot be adjusted.
The oblique cartridge position is
not appropriate.
Attach the cartridge to the
appropriate position.
20
The dust/dirt is noticeable in the
field of view.
The stage glass is dirty. Clean the stage glass sufficiently. 7
44Troubleshooting
If problems occur, please review the following list and take remedial action as needed.
If you cannot solve the problem after checking the entire list, please contact Olympus for assistance.
Repair request
If you cannot solve the problems even though taking actions described in Troubleshooting, please contact Olympus
for assistance. At that time, please tell them the following information as well.
· Product name and abbreviation (Example: Quad position LED transmitted light illumination base
SZX2-ILLTQ)
· Product number
· Problem
This section describes the possible problems of this product and their remedies.

16
55Specifications
Item Specifications
Product name SZX2-ILLTQ SZX2-ILLTS
Applicable microscope SZX16 / SZX10 / SZX7 / SZ61 / SZ51 series
MVX10 series
Transmitted light illumination
light source
White light LED (built-in)
Lifetime of LED: Approx. 60,000 hours
(Value derived by calculating the LED element alone based on LM80/TM21)
Light intensity adjustment Continuous variable knob
(Scale: 0 (turned OFF) to 6)
Illumination method
Selection by changing the illumination cartridge (Illumination cartridge is an option.)
Number of attachable illumination cartridges:
4 (turret rotation type)
Number of attachable illumination cartridges:
1 (fixed type)
Oblique illumination
adjustment Continuous variable knob (push-in rotation)
Attachable filter Commercially available photo sheet filter (75 x 75 mm)
Up to two filters with the thickness of 0.1 mm or less
Power supply
Use AC adapter (optional)
Input: 100 - 240 V 50 - 60 Hz 1.2 A (Maximum)
Output: DC15 V 3.34 A (Maximum)
Rating Input rating: DC15V 1A
Power consumption: 15 W
Dimension Base:
268.4 (W) x 386.5 (D) x 41.5 (H) mm
Base:
268.4 (W) x 386.5 (D) x 41.5 (H) mm
Weight Approx. 4.1 kg Approx. 3.8 kg
Operating environment
· Indoor use
· Altitude: Max. 2000 meters
· Ambient temperature: 5 to 40 °C (41 to 104 °F)
· Relative humidity: Max 80% (31 °C (88 °F) or less) (without condensation)
In case of over 31 °C (88 °F), the relative humidity in operating environment is decreased
linearly through 70% at 34 °C (93 °F), 60% at 37 °C (99 °F), and to 50% at 40 °C (104 °F).
· Supply voltage fluctuation: ±10 %
· Pollution degree 2 (in accordance with IEC60664-1)
· Installation/Overvoltage category: II (in accordance with IEC60664-1)
This section describes detail specifications, such as shape, functions and performances, etc. of this product.
This manual suits for next models
1
Table of contents
Other Evident Microscope manuals


