Evistr L157 User manual
EVISTR VOICE RECORDER
http://blog.evistr.com support-us@evistr.com
Page - 1 - of -25 -
Mailto: support-us@evistr.com
Write us your issues, and model number or amazon order ID, so we could reply to you effectively
Thanks for purchasing EVISTR Digital Voice Recorder
EVISTR - to be the leading voice recorder brand
We hear from our user, do all our efforts to make better service
L57 Digital Voice Recorder
By
EVISTR
http://www.evistr.com
Support-us@evistr.com
REQUEST CUSTOMIZED VIDEO
L157 Package List
1) L157
2) Earphone
3) USB Cable
4) User Manual
5) VIP Card

EVISTR VOICE RECORDER
http://blog.evistr.com support-us@evistr.com
Page - 2 - of -25 -
CONTENT INDEX
CHAPTER ONE....................................................................................................................................... - 4 -
L157 Open the Box............................................................................................................................... - 4 -
1) The Package Information.........................................................................................................- 4 -
2) The Operation Guide Explain.................................................................................................. - 4 -
3) Quick Start Guide.....................................................................................................................- 5 -
4) Quick Menu Option Guide...................................................................................................... - 5 -
5) Important Notice Before Using The Device............................................................................- 6 -
CHAPTER TWO...................................................................................................................................... - 7 -
L157 Basic Operation Guide................................................................................................................. - 7 -
1) Charging Voice Recorder.......................................................................................................... - 7 -
2) Turn On Voice Recorder........................................................................................................... - 7 -
3) How to Recording.....................................................................................................................- 8 -
6) How to Pause and Resume Your Recording............................................................................. - 9 -
7) How to Playback Recordings.................................................................................................. - 10 -
8) How to Fast Forward / Rewind...............................................................................................- 10 -
9) How to Delete Recordings......................................................................................................- 10 -
10) How to Playback Music........................................................................................................ - 11 -
11) Restore to Factory Settings.................................................................................................. - 11 -
12) Format Device...................................................................................................................... - 12 -
13) How to Connect to Computer..............................................................................................- 12 -
14) Format EVISTR L57 Drive on Computer Directly..................................................................- 13 -
15) System Time & Date Setting.................................................................................................- 14 -
16) Go to Setting (Menu Options)..............................................................................................- 14 -
CHAPTER THREE..................................................................................................................................- 15 -
L157 Advanced Operation Guide....................................................................................................... - 15 -
1) Record Setting........................................................................................................................ - 15 -
1.1 Recording Quality......................................................................................................... - 15 -
1.2 Record Led.................................................................................................................... - 15 -
1.3 Subsection Recording...................................................................................................- 15 -
1.4 Voice Activated Recording............................................................................................- 16 -
1.5 Record Monitor............................................................................................................ - 16 -
1.6 Auto Record..................................................................................................................- 16 -
1.7 Exit................................................................................................................................ - 17 -
2) System Setting........................................................................................................................ - 17 -
2.1 Sleeper timer................................................................................................................ - 17 -
2.2 Backlight timer............................................................................................................. - 17 -
2.3 Brightness.....................................................................................................................- 17 -
2.4 Date and time...............................................................................................................- 17 -
2.5 Language.......................................................................................................................- 17 -

EVISTR VOICE RECORDER
http://blog.evistr.com support-us@evistr.com
Page - 3 - of -25 -
2.6 Information...................................................................................................................- 17 -
2.7 Format Device.............................................................................................................. - 18 -
2.8 Factory settings............................................................................................................ - 18 -
3) Play Setting............................................................................................................................. - 18 -
3.1 Play Mode.....................................................................................................................- 18 -
3.2 Sound Setting............................................................................................................... - 18 -
4) Folder View.............................................................................................................................- 19 -
CHAPTER FOUR...................................................................................................................................- 19 -
1) Failed Connect to computer...................................................................................................- 19 -
CHAPTER FIVE..................................................................................................................................... - 20 -
TROUBLE SHOOTING.......................................................................................................................... - 20 -
1) No Voice Recordings...............................................................................................................- 20 -
2) How to Close Record Light..................................................................................................... - 20 -
3) Format Error........................................................................................................................... - 20 -
4) Disk Error................................................................................................................................ - 21 -
5) How to connect to computer.................................................................................................- 21 -
6) Failed Connect to Computer.................................................................................................. - 21 -
7) Can I delete recordings from computer.................................................................................- 21 -
8) When Connect to computer, the buttons not work.............................................................. - 21 -
9) Cannot find my recordings in the recorder............................................................................- 22 -
10) How to open voice activated function.................................................................................- 22 -
11) How to Use the AVR Mode (Voice Activated Function).......................................................- 22 -
12) Press REC, it not recording................................................................................................... - 22 -
13) Press REC, it shows “OVER RECORD”................................................................................... - 23 -
14) Why it is only playing 10 seconds........................................................................................ - 23 -
15) Why it playback in random.................................................................................................. - 23 -
16) How to use the A-B repeat function.................................................................................... - 23 -
17) The recording is noise.......................................................................................................... - 23 -
18) It suddenly shows delete file............................................................................................... - 23 -
19) The recorder auto shut down when I am recording............................................................- 24 -
20) I Cannot Shut Off My Voice Recorder.................................................................................. - 24 -
21) How to format the recorder.................................................................................................- 24 -
22) Space is full...........................................................................................................................- 24 -
EVISTR VOICE RECORDER
http://blog.evistr.com support-us@evistr.com
Page - 4 - of -25 -
CHAPTER ONE
L157 Open the Box
1) The Package Information
The original package comes with film wrapped, and have bar code information (it should be 10
Letters)
Package List
1 x L157 Machine
1 x Earphone
1 x USB Cable (for data transfer and charging)
1 x VIP Card
We highly suggest you register from our BRAND site, to get extended warranty, verify the product
authentication and better customer service.
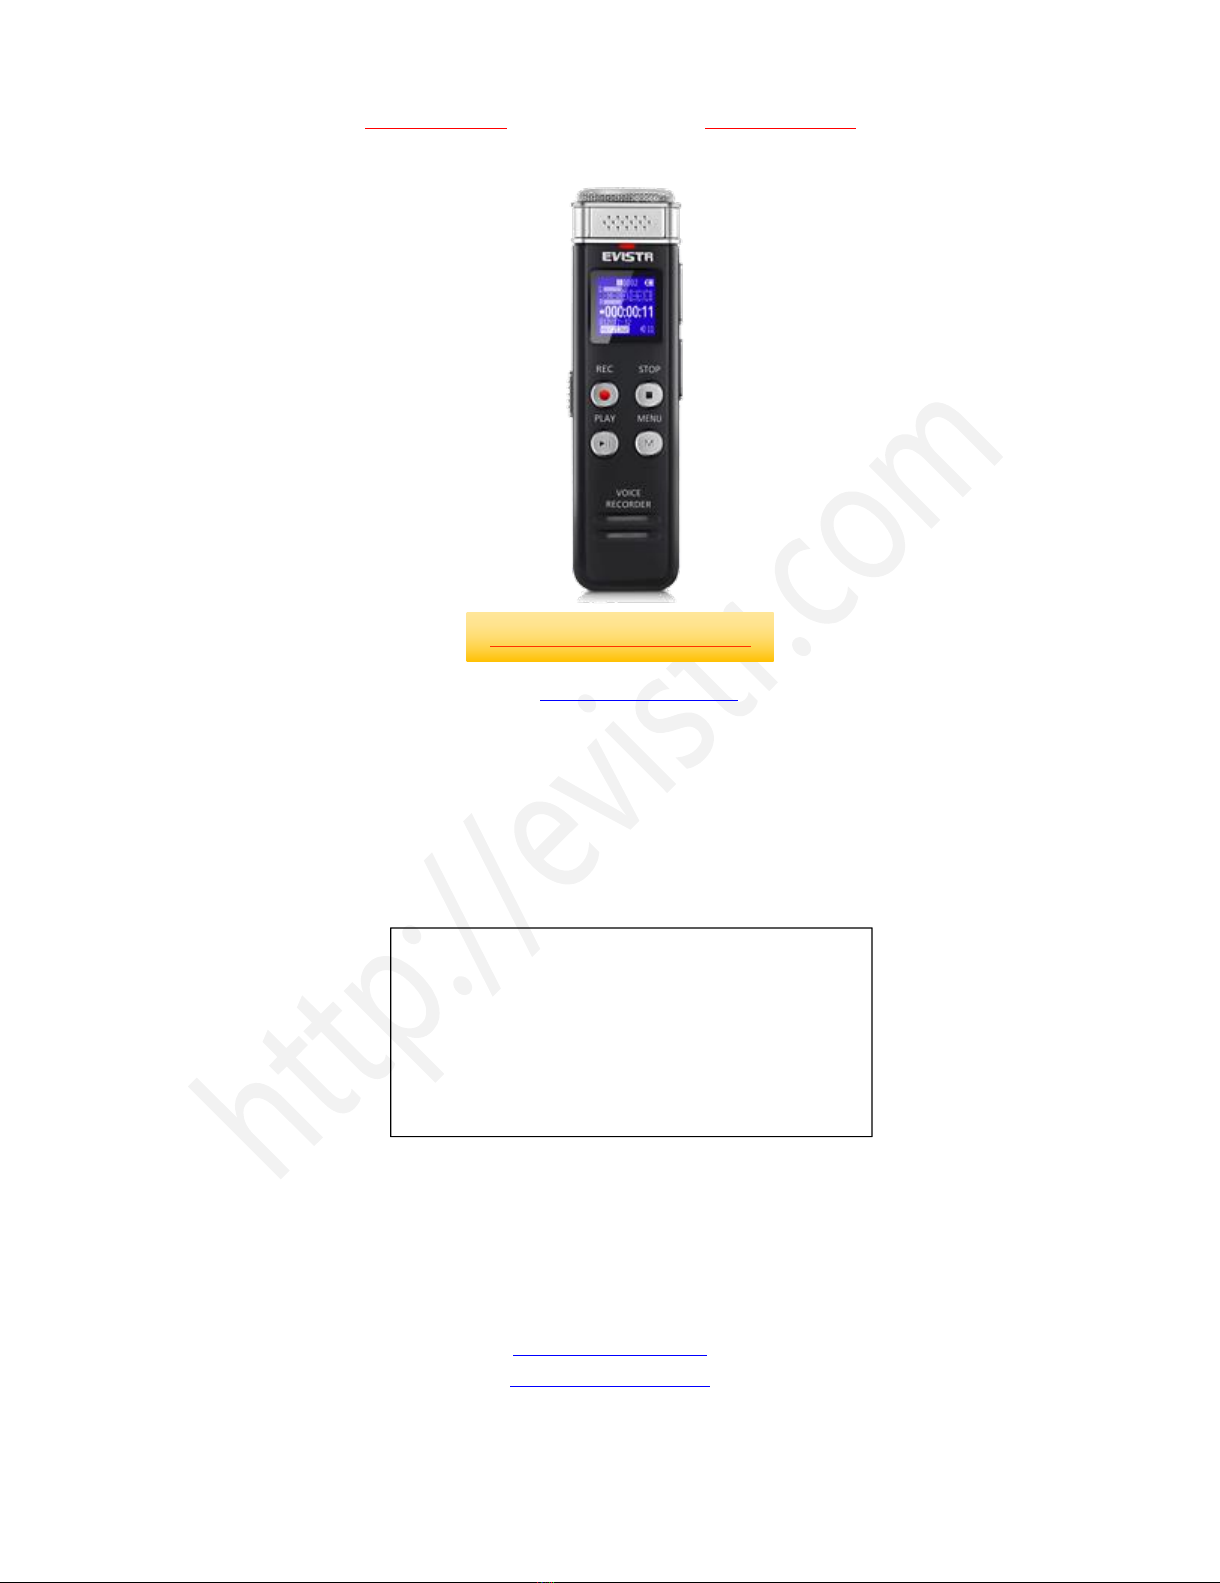
2) The Operation Guide Explain
Press: it means hit and release the button
Earphone Jack
USB Socket
POWER button
REW/FF select button
Vol + / Vol -
REC: Recording
PLAY: Playback
STOP: Save recording / RETURN
MENU: Menu, confirm, A-B repeat

EVISTR VOICE RECORDER
http://blog.evistr.com support-us@evistr.com
Page - 5 - of -25 -
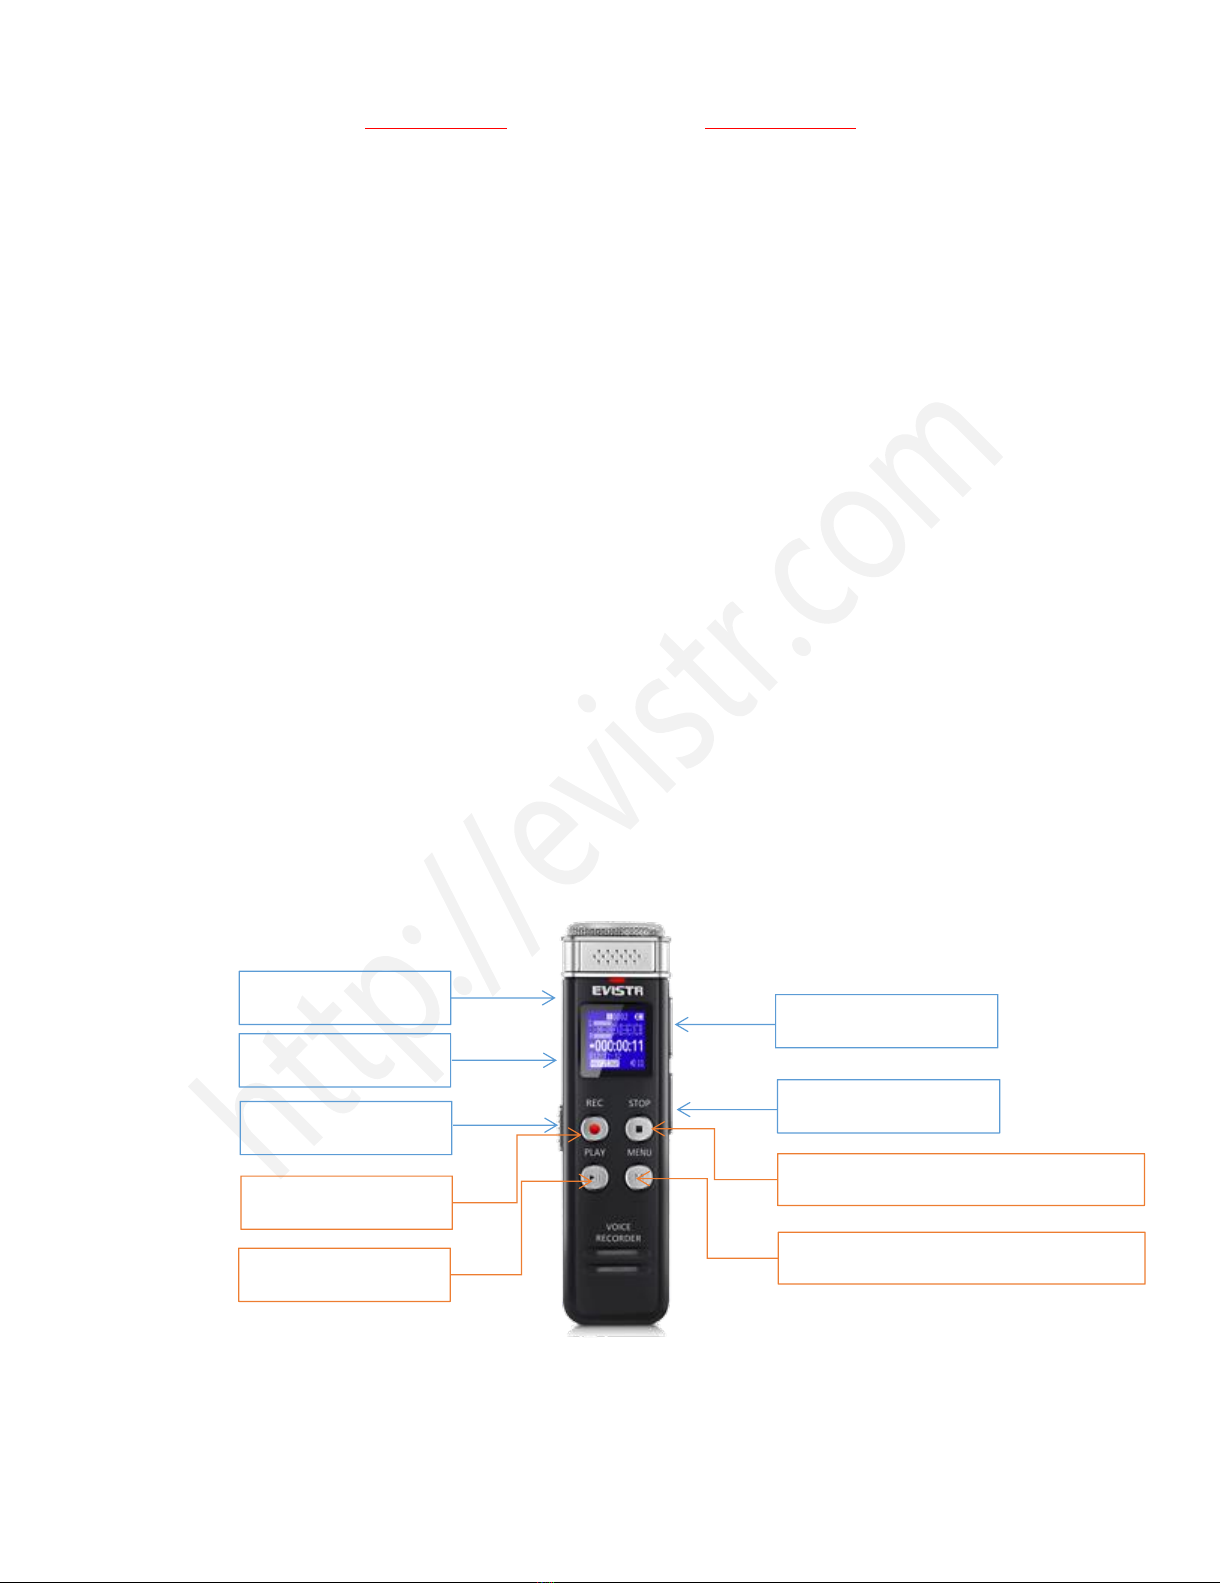
Press and Hold: it means press down the button, and hold it down 2-3 seconds till you see changes
on the screen display
ON/OFF: the power button
REC: Recording
STOP: Save recording / Stop play / Cancel /Return / Switch Between MUSIC and RECORD folder
PLAY: Playback / Pause / Switch ON/OFF the device
MENU: enter menu options and sub-menu / confirm / OK / A-B Repeat
REW/FF (UP,DOWN): up/down selection, Fast Forward/Rewind, Previous/Next
VOL+/VOL-: Vol Adjust
VOL+: Move to next when setting system time and date
3) Quick Start Guide
Turn ON the device: keep power button at ON position, press down PLAY button 2
seconds, turn on the device
Recording: press REC button start to record
Save Recording: press STOP button to save recording
Delete A Recording:
go to menu option -> Delete File -> Delete (it will delete single recording)
go to menu option -> Delete File -> Delete All (it will delete all recordings)
Play A Recording: press PLAY button, it will play
Play Next / Previous Recording: press the UP/ DOWN button
Fast Forward / Rewind: press down the UP / DOWN button, and hold it, do not release
4) Quick Menu Option Guide
Change Record Format / Quality: go to menu option -> record setting -> recording
quality -> (1536kpbs WAV format, 128kpbs / 64kpbs MP3 format)
Voice Activated Mode: go to menu option -> record setting -> AVR mode -> ON
Voice Activated Level: go to menu option -> record setting -> voice activated sensitivity
-> select from (level 1 to level 5)

EVISTR VOICE RECORDER
http://blog.evistr.com support-us@evistr.com
Page - 6 - of -25 -
Date and Time: go to menu option -> system setting -> date and time -> set time -> use
FF/REW and VOL+ to change time, and press M button to confirm
go to menu option -> system setting -> date and time -> set date -> use FF/REW and
VOL+ to change date, and press M button to confirm
5) Important Notice Before Using The Device
DOS
When first item got the device, push the left side power button to ON position, and in future,
we recommend you switch on / off the device by press and hold down the PLAY button
Backup data frequently as you could
Charging the device via its USB cable to computer or wall charger (charger input less than 5V
1A)
When battery low, save your recordings, and charge it immediately
Device support charging and recording at the same
Remember to Press STOP to save recording every time finished a recording
Recorder not make any noise during recording, except Record LED light flash (this function
could close)
Keep this EBOOK and its Booklet in the package safely for future reference
Customer satisfaction and warranty is our mostly important thing. Any issues, just directly
contact us support-us@evistr.com
Contact customer service with ORDER ID or System Firmware Version Information, Bar Code on
the package, so you will get more effectively reply
Register VIP service, get gifts, extend warranty, effectively customer service
DON’TS
Do not cut off the device’s power immediately when save a long time recording
Do not scratch the machine body, and typing, writing near the microphone, it will capture these
noise clearly
Do not format the device unless the file had backup
Do not cut off its power during format device
Do not delete file unless the file had backup
Do not press any buttons when connect to computer
Do not use non-original micro USB cable to transfer data from device to computer, not all kind
micro USB support data transfer function
Do not set view playing, unless you need, otherwise it will only play 10s seconds of each file
Do not use the Voice Activated Function, unless you need, otherwise it may not recording some
low decibel voice you need
Do not use the Auto Record Function, unless you need, otherwise, it will automatically boot on
to record when you don’t want

EVISTR VOICE RECORDER
http://blog.evistr.com support-us@evistr.com
Page - 7 - of -25 -
Do not turn on the sleeper time function, unless you need, this will force the device to shut
down no matter what you are doing with it.
Do not pause the device from long time, the device will automatically shut down when there is
no operation, and not playing or recording
CHAPTER TWO
L157 Basic Operation Guide
1) Charging Voice Recorder
Connect it to computer with enclosed cable, it will charge, once it has finished charging ( typically
around 1.5-2 hours), we could eject the device from the USB port
We could also connect the enclosed cable with our voice recorder and other USB socket for charging
(like USB wall charger, USB charge dock)
Charging Input: 5V 500mAh
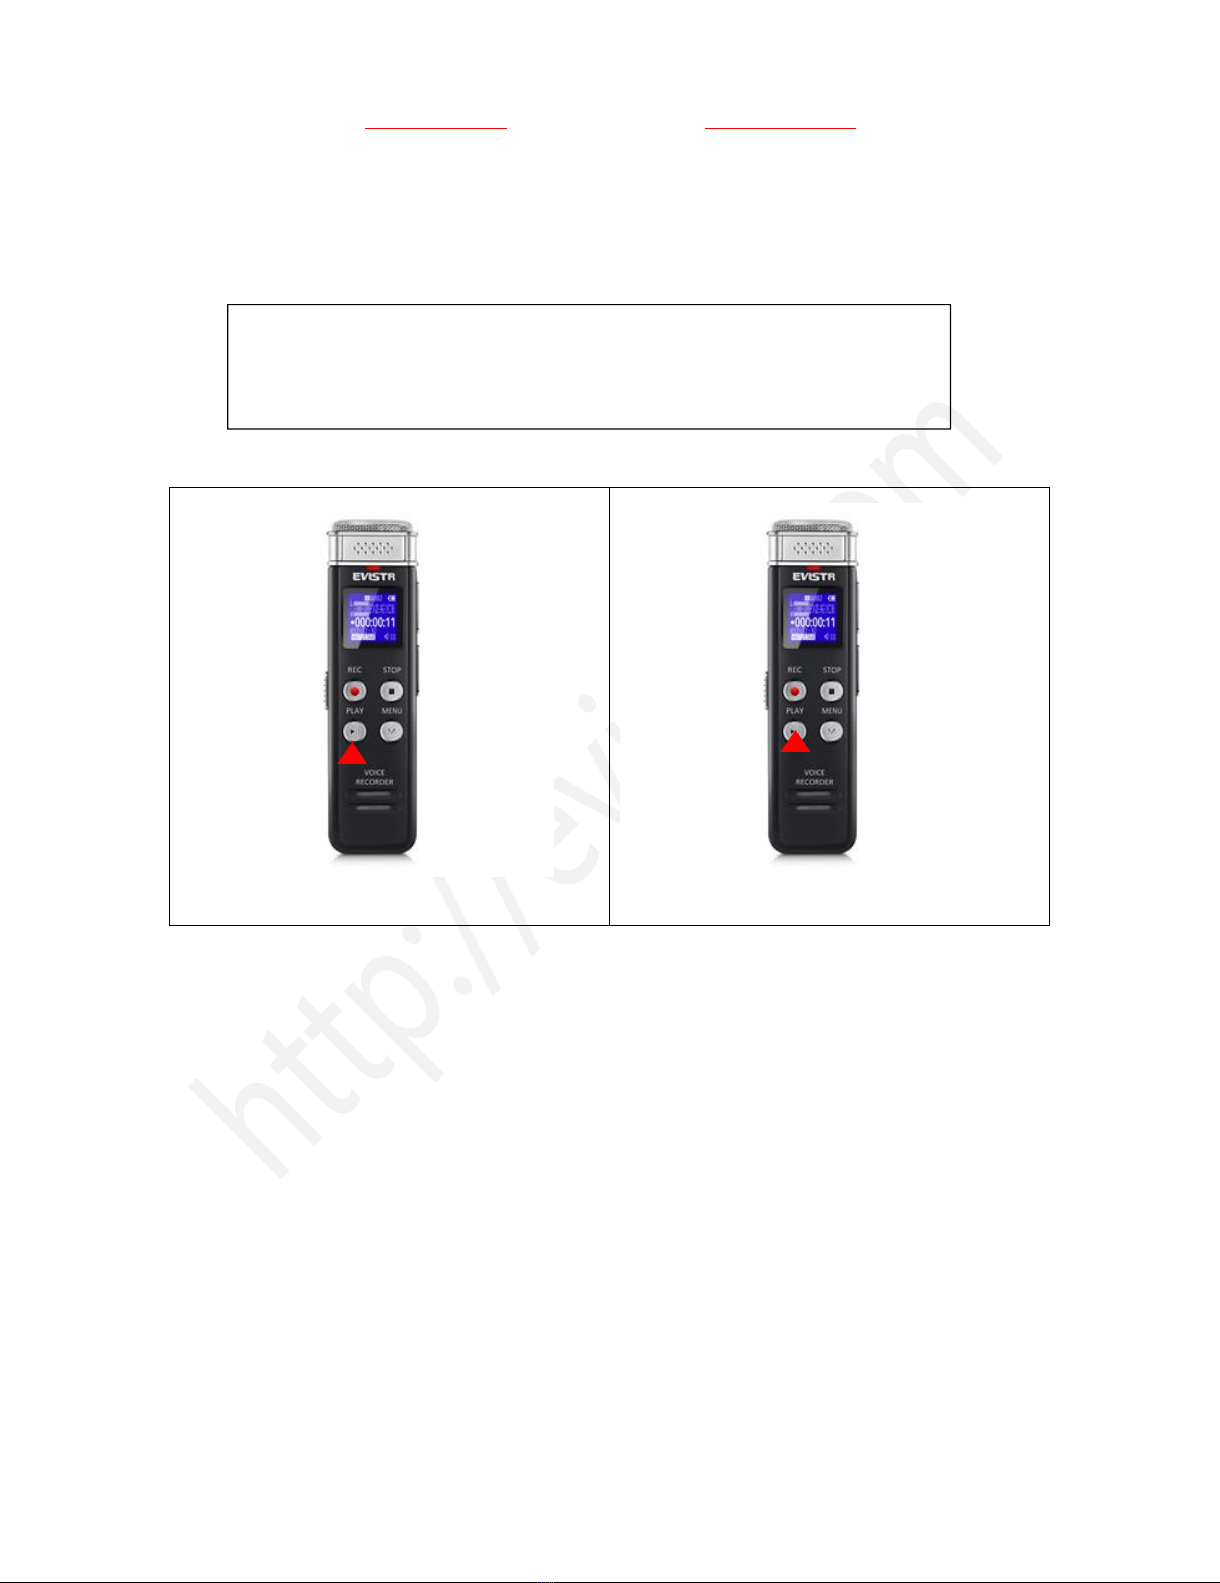
2) Turn On Voice Recorder
Simply push the switch power button (at left side ) to “ON” position, it will boot on ( screen light on,
and see EVISTR logo )
Switch it back to “OFF”, it will shut down
See below picture
NOTE: after first time we boot on the voice recorder by Push the hard switch to
“ON” position, we could press and hold PLAY button to switch ON / OFF in the next
time, we suggest you press and hold PLAY to switch ON / OFF your voice
recorder

EVISTR VOICE RECORDER
http://blog.evistr.com support-us@evistr.com
Page - 8 - of -25 -
ON: push up the power button to ON position
OFF: push it down to OFF position, totally shut
down
3) How to Recording
Press & hold PLAY button power on the voice recorder (NOTE: keep the left side POWER switch at
ON position, if it is at OFF position, we need to push it to ON position first)
Press REC, it starts to record
Press STOP, it saves the recordings
1) Press & hold PLAY to turn ON
2) Press REC, to record

EVISTR VOICE RECORDER
http://blog.evistr.com support-us@evistr.com
Page - 9 - of -25 -
3) Press STOP, save recordings
NOTE: do not directly switch off voice recorder.
During Recordings, we must press STOP to save
the recordings before turn off the device
If, for example, we press REC and STOP 3 times, the recorder will create 3 recorded files
corresponding to each time, and they will typically be named
Each recordings will be saved a file names with date in sequence,
but it has a time stamp
If we want to see the recorded date of file
“20180510162305.MP3”, we could click right button and view file
properties, we will see the recordings file time
File Name Format: Year-Month-Day-Hour-Minute-Seconds
See the right side picture shows:
6) How to Pause and Resume Your Recording
During recording, press PLAY pause recording
Press PLAY again, resume recording
EVISTR VOICE RECORDER
http://blog.evistr.com support-us@evistr.com
Page - 10 - of -25 -
7) How to Playback Recordings
Press and Hold PLAY boot on the voice recorder
Press PLAY, playback our recordings.
1) Press & Hold PLAY, open your voice recorder
2) Press PLAY to playback the recordings
8) How to Fast Forward / Rewind
During playback, Press and Hold FF/REW (UP / DOWN) to fast forward / rewind
9) How to Delete Recordings
Delete recordings, it could have 5 method
A. Format the recorder EVISTR L157 drive on your WINDOWS computer directly
B. Go to your EVISTR L157 DRIVE, find folder “RECORD”, select the recordings you want to delete on
computer
C. Format the recorder on the device directly
D. Delete single file on the device by enter delete mode
E. Delete all recordings on the device by enter delete mode
Now we introduce how to delete recordings on the device by enter delete mode. In pictures ,we
introduced how to Delete single recordings, and how to delete all recordings
NOTE: If we cannot find our recordings, please kindly check whether we have
switched to music folder or not. We could press and hold STOP (and wait a
moment) to switch between MUSIC and RECORD folder

EVISTR VOICE RECORDER
http://blog.evistr.com support-us@evistr.com
Page - 11 - of -25 -
Press M(menu) button enter Menu Choice, Find Delete File, Select Delete, it will delete What find
you just saw.
Select Delete All, it will delete All Files
Select your selection,and press M (menu) , it will ask you confirm, and select Yes, press M to confirm
your selection, it will delete the recordings as your selection
10) How to Playback Music
Open your voice recorder
Press and hold STOP, switch to music folder ( if you are at recordings folder)
Press PLAY to playback music
Notice:
if it shows “no songs” that mean there is no songs file in the recorder, or the song file format
are not supported.
Press and hold STOP button for 3 seconds, and then release the STOP button, wait a moment, it
will switch back to recordings folder
11) Restore to Factory Settings
When we mistakenly change settings in wrong way, and don’t know how to correct it. Restore to
factory settings, could be very helpful. All settings will be restored to default, some like the first day
you just saw the device.
Here is the steps to restore to factory settings
Open the voice recorder
Press M(menu), find & select “System Setting”
Press M(menu), enter System Setting, find & select "Factory Settings"
Press M(menu), enter it, find & select “Yes”
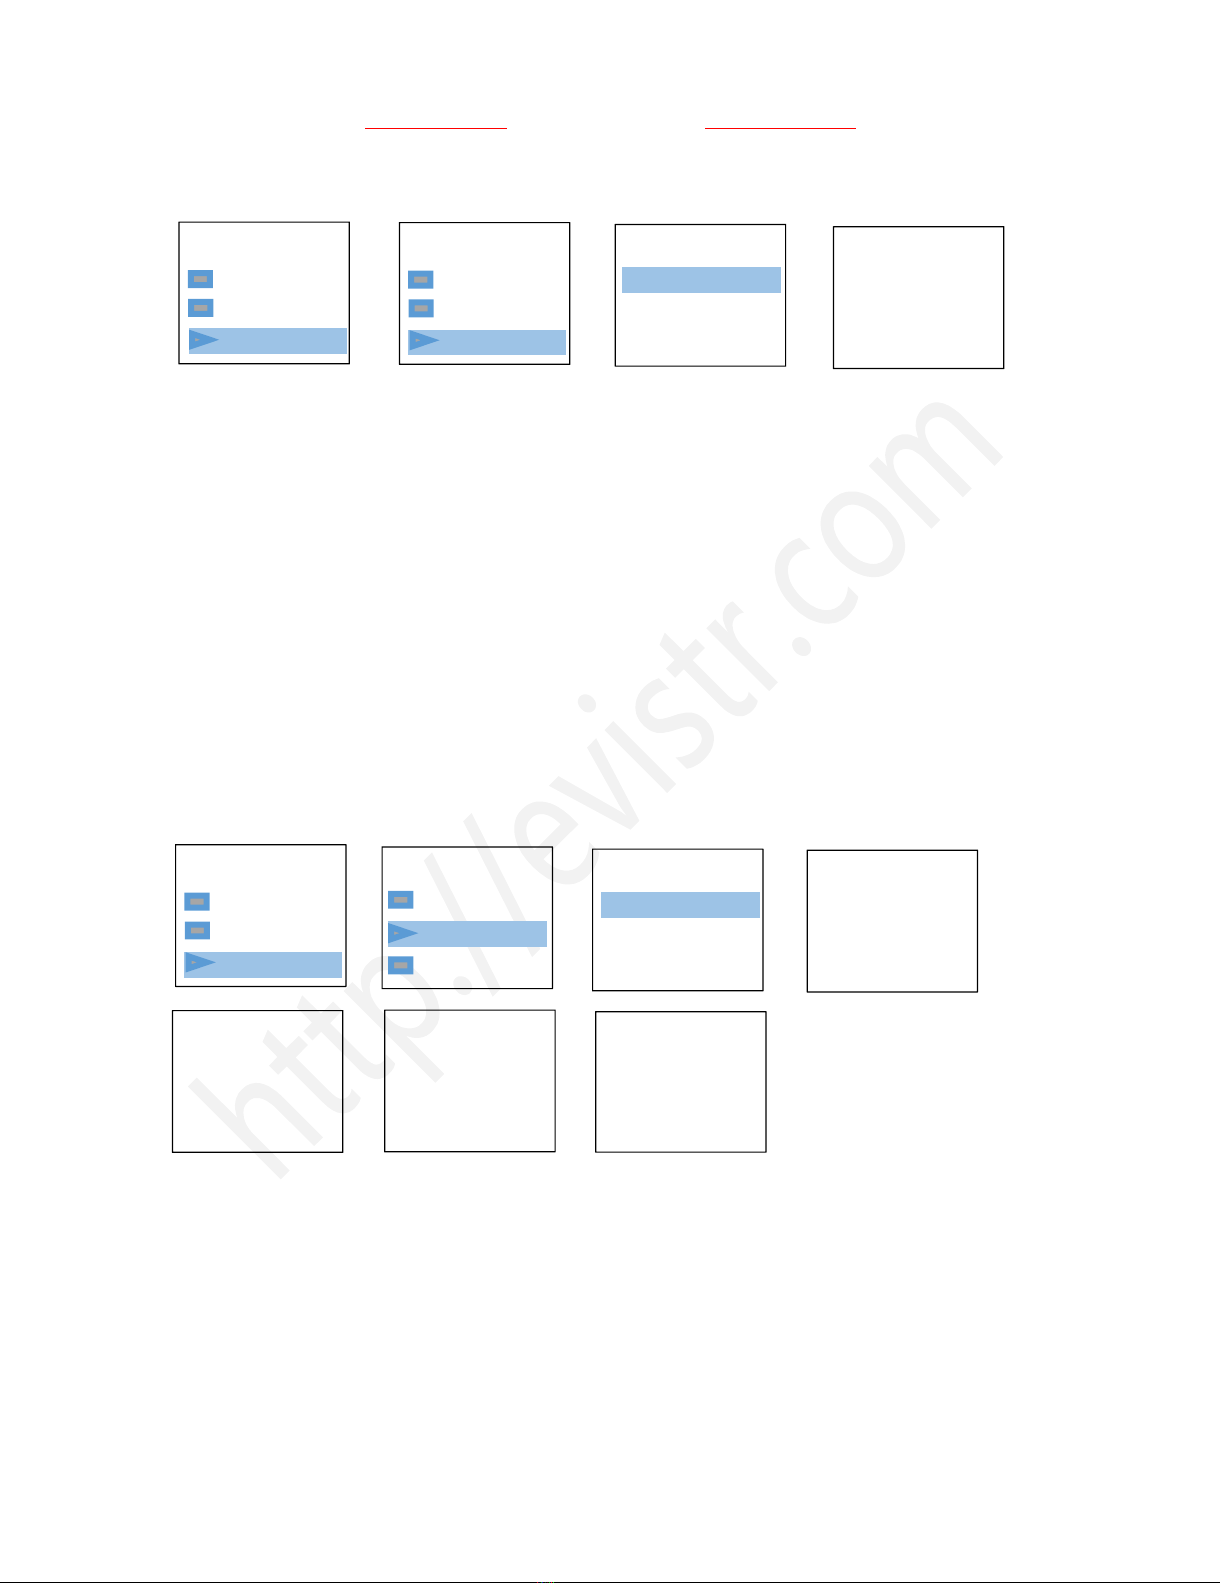
Menu Options
Delete file
Play setting
Folder View
Delete File
Delete
Delete All
“201805101...
Yes
No
EVISTR VOICE RECORDER
http://blog.evistr.com support-us@evistr.com
Page - 12 - of -25 -
Press M (menu), confirm your selection, and it starts to restore to factory settings.
When it succeed, screen will show “restored!”
12) Format Device
Format on the device directly
Here is the steps to format the recorder
Open your voice recorder
Press M (menu), find & select " System Setting"
Press M(menu), enter System Setting, find & select "Format Device"
Press M (menu), enter it, find & select "Yes"
Press M (menu), confirm your selection, and it starts to format
And everything on the recorder will be deleted, erased, and cannot be restored.
Screen will show “please wait”, after format completed, the device will restore settings, and reboot.
Do not shut down the device, until this procedure completed
WARNNING:
When format device, do not cut down the device power, unless formatting completed, and the
device could operate again
Backup all files you need before format the device, once format completed, all data will be erased
and cannot restore.
13) How to Connect to Computer
Restored!
Format finish,
reset...
Menu Options
Folder View
Record Se...
System settin
Format ?
Yes
No
System set
Information
Format Devic
Factory s...
Please wait..
Menu Options
Folder View
Record Se...
System settin
Menu Options
Information
Format de...
Factory setti
Restore
Yes
No
No voice
recordings
EVISTR

EVISTR VOICE RECORDER
http://blog.evistr.com support-us@evistr.com
Page - 13 - of -25 -
Use the enclosed Micro USB cable connect it between your computer and voice recorder, when
successfully connected, you will see the connection icon, see as following picture
After we successfully connected to a computer, we could delete the files in the recorder, copy file
from the recorder out to computer, copy file into our voice recorder device, it just like a normal flash
drive
1) Successfully connected to computer
2) We will see EVISTR L157 on our computer
14) Format EVISTR L57 Drive on Computer Directly
After we successfully connected to your computer, click the mouse right button, and format it

EVISTR VOICE RECORDER
http://blog.evistr.com support-us@evistr.com
Page - 14 - of -25 -
Notice: after format the device, all data will be erased utterly, so please backup before format device
15) System Time & Date Setting
Turn on the voice recorder
Press M (menu), find & select " System Setting"
Press M(menu), enter System Setting, find & select "Date and time"
Screen will display “set time”, “set date”
Set Time
1) Select Set time, Press M
(menu) enter it
2) Press UP / DOWN to adjust
hour, Press VOL+ / VOL- move
to next
3) Press UP / DOWN to adjust
Minutes, After setting Press
M(menu) to confirm
Set Date
Now we have successfully set time and date for the recorder
16) Go to Setting (Menu Options)
At the status of stop recording and playback, you could press M (menu), enter menu options
The buttons will performs like this
UP,DOWN: for selection
VOL+, VOL-: for move to next when in time setting
M(menu): for confirm selections, and adjust
STOP: return back
4) Select Set Date, Press M
(menu) enter it
5) Press UP / DOWN to adjust
Year, Press VOL+ / VOL- move
to next, month & day
6) After setting, Press
M(menu) to confirm
Set date
HH MM
YY MM DD
18 05 30
Set time
Date and time
Set time
Set date
HH MM
Date and time
Set time
Set date
Set time
16 42
YY MM DD
17 42
Set date
18 05 30

EVISTR VOICE RECORDER
http://blog.evistr.com support-us@evistr.com
Page - 15 - of -25 -
I have met some issues with my voice recorder, don’t worry, don’t give up just yet and assume that it
is defective
At Chapter FIVE, we offer some very common trouble shooting, just have a quick, based on our
customer feedback, mostly issues could be solved from below
If we still cannot get the issue fixed, don’t be hesitate to contact support@evistr.com with the order
ID, model number, so we could help to solve the question more effectively.
All products with 1 year warranty, and Customer satisfaction was guaranteed.
CHAPTER THREE
L157 Advanced Operation Guide
1) Record Setting
1.1 Recording Quality
When enter recording quality setting, it could select recording quality at 1536kpbs (WAV
format), 128kpbs (MP3 Format), 64kpbs (MP3 format)
1.2 Record Led
When enter record led setting, it could select open / close, when selected close, and press
M(menu), it will close the record led light, so during recording, the red light will not flash
1.3 Subsection Recording
When enter subsection recording, it could select Half hour, One half, Two hour, CLOSE, and
press M(menu) to confirm selection
What is subsection recording?
When select desired time length, and press M(menu) to confirm settings, now press REC to
recording, when time reached desired time length, it will automatically save recording, and
start a new recording again.
e.g. When select Half hour, each time, recording time length reached 30minutes, it will
automatically save the recording, and then start a new recording.

EVISTR VOICE RECORDER
http://blog.evistr.com support-us@evistr.com
Page - 16 - of -25 -
If want to close this function, select CLOSE, and press M(menu) to confirm & save settings.
1.4 Voice Activated Recording
What is Voice Activated Recording?
When select AVR mode ON, and confirm the changes. Press REC, screen will display VOX
information, it means the device successfully enter voice activated recording mode.
When voice activated recording is on, the recorder will only capture loud enough voice, for too
low decibel voice, it will not recorded.
So it saves device storage space, and save power, reduce blank snippets in recordings, and
reduce playback time.
How to Use this Function?
When AVR mode is on, we also need to select the desired voice activated sensitive level, so the
voice activated recording function could perform properly as desired.
It could select from level one to level five
Level one, is the mostly dumb level, it means the mic will be less sensitive, need louder voice to
active the recording, otherwise, the recording time is not counting, and it was pause recording.
While level five, is the mostly sensitive level, it means the mic is very sensitive, just a soft
speaking will be captured. It will be almost continuously recording, cannot see pause status.
NOTICE:
When voice activated recording is open, during recording screen will show VOX
During recording, if no voice detected, the time will not counting, that means the recorder was
automatically paused recording, when voice detected again, it will resume recording
automatically
Select desired MIC sensitive level according to demanding
1.5 Record Monitor
Select and open record monitor, during recording, plug earphone, it could hear what it is
recording.
1.6 Auto Record
What is Auto Record?
Select Auto Record ON, set start time, end time, record cycle, and Keep the POWER button at
ON position, so the record will automatically boot on and start to recording at specified time.
Start Time: Start to recording

EVISTR VOICE RECORDER
http://blog.evistr.com support-us@evistr.com
Page - 17 - of -25 -
End Time: end to recording and save recording
Record Cycle:
Once: only work 1 time
Daily: Auto recording everyday at specified time
Work Day: Auto recording work day at specified time
1.7 Exit
Exit record setting, return to up level menu
2) System Setting
2.1 Sleeper timer
When select sleeper time, it will force the device to be automatically switch off.
The options: OFF, 10minutes, 30minutes, 60minutes, 90minutes, 120minutes
2.2 Backlight timer
Backlight timer, it will control how long the screen will light up without any operation.
The options: 20seconds, 30seconds, Always on
Notice: we do not recommend to select at always on, because this will consume the battery
very fast
2.3 Brightness
Brightness: adjust the screen from dark to bright
The options: from 00 to 15
Notice: higher number means the screen will be brighter, and need to press M(menu) to
confirm the changes, otherwise the setting will not be effect.
2.4 Date and time
Set the system time of the recorder (set time, and set date)
FF/REW (UP/DOWN): to adjust the hour, minute, year, month, day
VOL+/VOL-: move to next
Notice:
Once set the correctly time, remember press M(menu) to confirm the changes.
Only set correctly time, and keep the POWER button at ON position, so the AUTO RECORD
function could work properly as desired
2.5 Language
Change the device display language
2.6 Information
Player Information: it will show the device firmware version, and system firmware upgraded
date
Disk Space: it will show the free space, and total space of the built-in memory

EVISTR VOICE RECORDER
http://blog.evistr.com support-us@evistr.com
Page - 18 - of -25 -
2.7 Format Device
Format device, it will erase all data on the device, and cannot be restore forever
Notice:
Do not format the device unless you have already backup the data on the device to computer,
and you are sure about this.
Do not cut off its power during format the device, otherwise it will meet fatal error
During format device, wait till it show completed information, and the device reboot, and then
you could switch off the device.
If unfortunately, cut off device power, and see DISK ERROR, Here is the rescue:
Please kindly cut off the device POWER from ON to OFF position, and connect to
WINDOWS computer, format the disk again from computer, and then things will be normal. And
all data will be erased thoroughly.
2.8 Factory settings
Factory settings: it will restore to default settings. This could be very helpful, when set the
device wrong, and do not know how to correct it.
Enter to Factory Settings, screen will show
“ Restore
Yes
No”
When select Yes, and press M(menu) to confirm the choice, so all settings will be restored to
default. Screen will show “Restored!”
3) Play Setting
3.1 Play Mode
Repeat:
Repeat off, Repeat One, Repeat All, View Playing
Repeat off: select and confirm this, it will play in normal, from first recording to the last one
Repeat One: select and confirm this, it will repeat on track again and again
Repeat All: select and confirm this, it will repeat from the first recordings to the last again and
again
View Playing: only play 10 seconds of each file and go to next
Shuffle:
When shuffle is on, it will playback all recordings or music in random, even you press FF/REW it
will not select to next or previous track, it will in random selection
3.2 Sound Setting
Sound Settings could adjust Equalizer (off, Rock, Pop, Soft, Jazz, Classical, Techno), Select and
confirm changes, it will becomes to effect.

EVISTR VOICE RECORDER
http://blog.evistr.com support-us@evistr.com
Page - 19 - of -25 -
4) Folder View
It will show how many folders on the recorder disk, and what kind files on the recorder
CHAPTER FOUR
1) Failed Connect to computer
Sometimes, you may met the failed connect to computer issue, it is normal like you failed connect
your flash drive to computer, so the solutions are same way for solve it. Here are some suggestion
for you fix this issue
A. Before connect voice recorder to computer, switch OFF the voice recorder
B. When connect the voice recorder to computer, do not press any buttons on the voice recorder, it
will exit connection mode
C. Do not swing the MicroUSB cable when connect to computer, in case of unstable connection
D. Sometimes failed connection due MicroUSB cable is broken or USB socket is loose, change a new
cable (like your android phone cable) or connect by another USB socket, or simply reboot your
computer
E. Even worse, still failed connection, here is an advanced solution
We could do debug as following:
1) On your computer, go to Computer manage
2) Computer Management
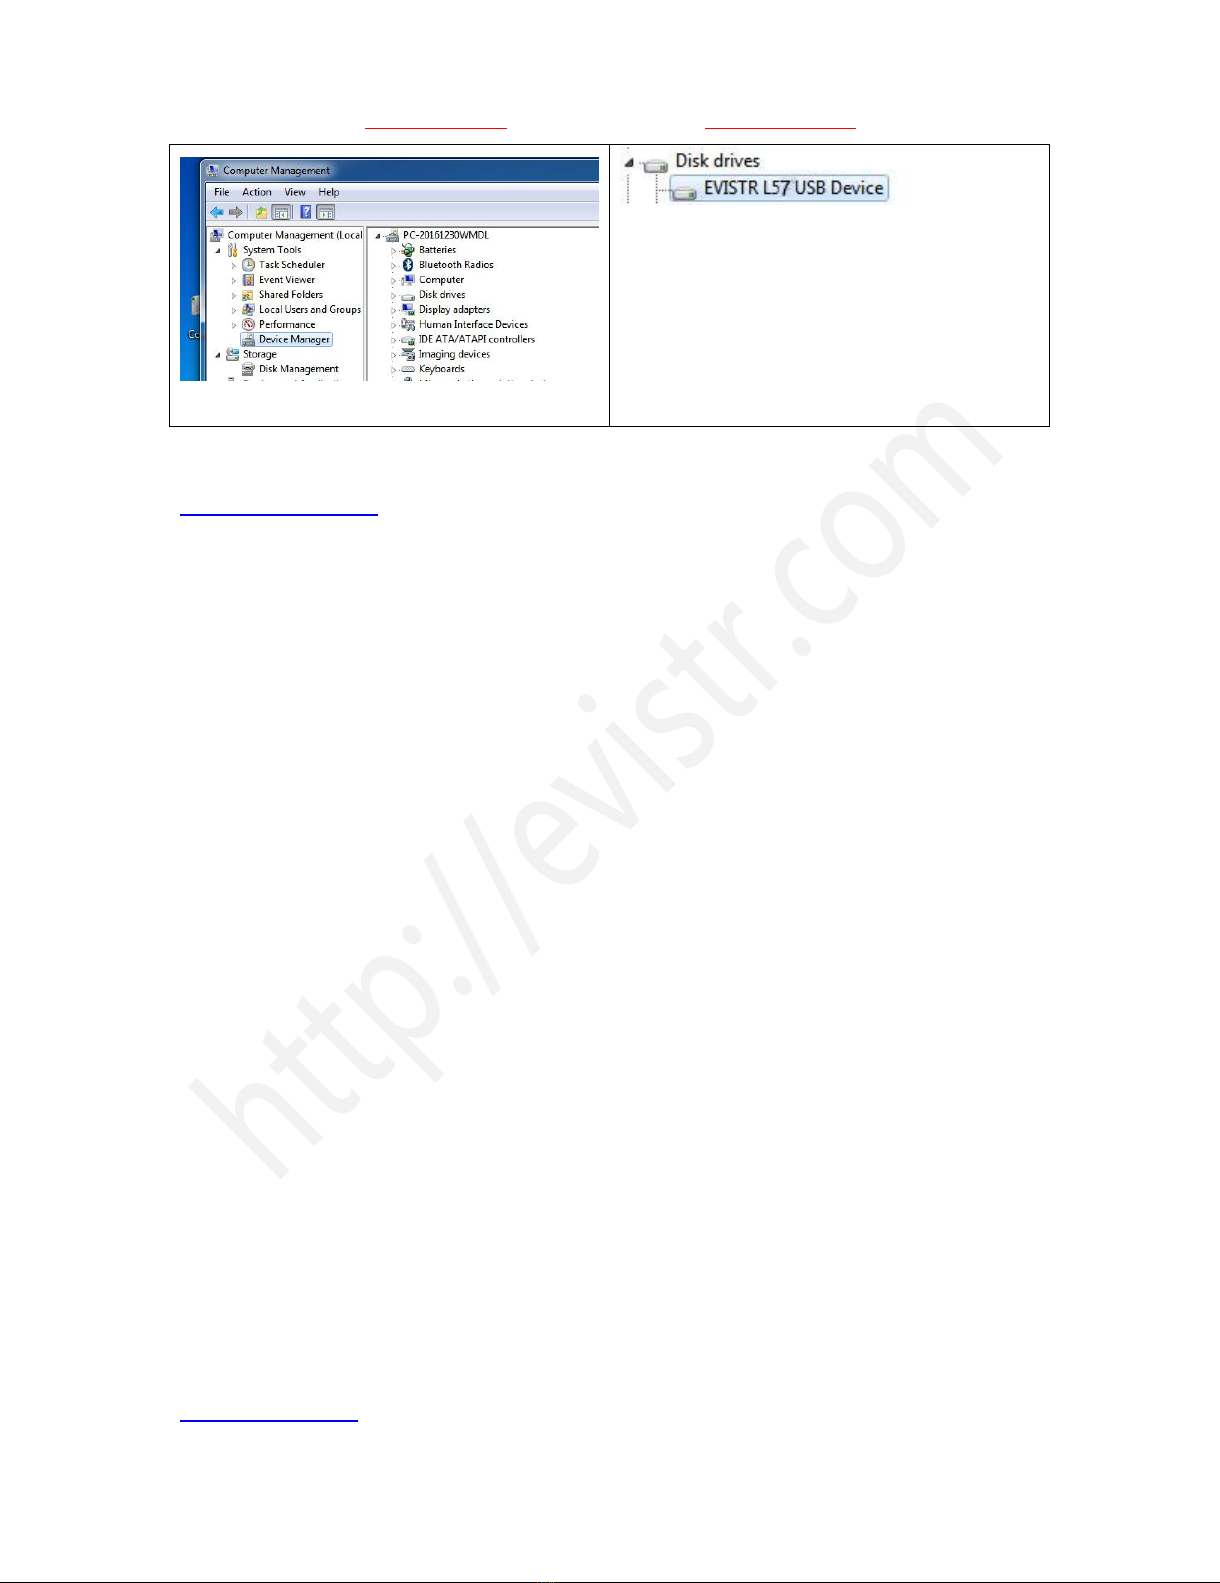
EVISTR VOICE RECORDER
http://blog.evistr.com support-us@evistr.com
Page - 20 - of -25 -
3) Find Device Manager
4) Click right mouse button, enable the recorder
device / or scan update hard drive changes to
help you find the recorder drive
If we still meet the failed connect to computer issues, please kindly contact to us
support-us@evistr.com
We will help soon.
CHAPTER FIVE
TROUBLE SHOOTING
1) No Voice Recordings
If there is no voice recordings, or you have deleted all recordings in your voice recorder, when you
open your voice recorder, you will see “ no voice recordings” or “no songs” on the screen. Don’t
worry, you could just go ahead to press REC or M (menu)
2) How to Close Record Light
Go to record setting -> Record led -> select close, so when recording, the record light will not light up
or flash
3) Format Error
Format Error, this usually happens from 3 aspect:
A. During recording, directly push down the POWER BUTTON to OFF position, that will cause file
damage, before switch off your voice recorder, you need to press STOP save the recordings first
B. The recordings time length is less than 5 seconds, like ZERO second recordings file
C. Computer do not support the .wav file. The recordings were saved as .wav format. For WINDOWS
10 or MAC user may encounter with this issue. Don’t worry
You could download the free MplayerX / VLC Media Player to solve this issue
http://mplayerx.org/
Other manuals for L157
2
Table of contents
Other Evistr Voice Recorder manuals


