Evo VEGA 3000 M User manual

VEGA 3000M
Quick Guide
C’less MSRICC Touch
screen
Printer Battery
Mobile Payment Terminal
Guide Version 3.0.2

VEGA 3000M Quick Guide 2
VEGA Description
VEGA 3000M is a new generation of payment
terminals combining ergonomic design and the
latest technologies.
This combination ensures quick transaction
processing and superb user experience.
Cancel
button
Magnetic
stripe card
reader
Power
socket
Chip
card
reader
Power
button
Printer
Correction
button
OK
button
Colour
touch
screen
Contactless
card
reader
2

VEGA 3000M Quick Guide 3
Power ON, Power OFF
The terminal is switched ON by pressing and
holding the Power button for at least 2 seconds.
When the button is released terminal starts up.
The terminal boot takes approximately 1 minute.
The terminal is switched OFF again by pressing
and holding the Power button for at least 5
seconds. When the button is released terminal
is switched OFF.
Before you turn on the payment terminal, make
sure that the battery is charged OR power adapter
is connected.

VEGA 3000M Quick Guide 4
Insert paper to the printer
The graphical thermal printer is located in the
upper part, above the display of the payment
terminal.
Printer roll replacement:
– open the lid of the terminal
– remove the rest of the old roll
– insert a new roll
The free end of the tape is unwound from the
rear direction.
Paper roll dimensions:
– width 57 mm
– diameter 40 mm or less

VEGA 3000M Quick Guide 5
29/04/16 13:14:15 95%
Contactless
indicator
Introductory
graphics
Status
bar
Quick
pay
Quick
menu
Menu
1
2
3
4
5
6
Idle screen
The idle screen contains information about the
current state of the terminal and allows you to
run some basic operations. Information about the
date and time, connection type, signal strength and
battery status is placed in the status bar at the top
of the screen.
The green ashing area indicates the ability to
accept contactless transactions.
At the bottom of the screen, there are virtual
buttons that start a sale, enter the terminal menu
or enter the Quick Menu.
1 Status bar – The current status of the terminal
2 Contactless indicator – an indication of
readiness for acceptance of contactless
transactions
3 Introductory graphics – can choose from
several preset skins
4 Menu – to access the main menu of the terminal
5 Quick pay – triggers a sale transaction
6 Quick menu – frequently used terminal
functions

VEGA 3000M Quick Guide 6
29/04/16 13:14:15 95%
Bluetooth
Battery
Health
GSM
Date
Wi
ECR
connection
Server
connection
Time
Status bar description
Status bar contains all the important information
needed to operate the payment terminal.
1 Date – present date in format dd:mm:yy
2 Time – in format hh:mm:ss
3 ECR connection – an indication of a connection
with ECR
4 WIFI signal – on/off indication and information
of signal strength
5 Bluetooth – on/off indication and information
of BT connection
6 GPRS/GSM – connection via SIM card, network
type and signal strength
7 Server connection – an indication of a payment
server connection
8 Battery status – remaining battery capacity
and recharge status
1
2
4
3
6
7
8
5
Note: Only icons relevant for particular terminal con-
guration and model are shown (not all functions are
supported by all types of terminals).

VEGA 3000M Quick Guide 7
Menu items
The menu lists all functions of the terminal. To
enter this list, use the virtual key “Menu” located
in the middle at the bottom of the touch screen.
Select the necessary function by touching the item
on the display. You can scroll through the list by
pressing the “Screen Up” and “Screen Down” and
return to the previous menu by using the arrow
“Back”.
The list of available functions depends on the
specic terminal conguration.
Screen Up
Screen Down
Back
Menu Items
00 Sale
01 Pre-Authorization
02 Finish-Authorizat.
03 Reprint Receipt
04 Reverse last trans.
05 Refund

VEGA 3000M Quick Guide 8
Page
Down
Page
Up
Item
Up
Item
Down
Enter
Keyboard description
The keyboard is an alternative way to navigate
through the terminal without having to use a virtual
keyboard on the touch screen. The attached gure
describes the function keys.
Keyboards among other things is used for entering
a PIN, passwords, etc. 1QZ 2ABC 3DEF
4GHI 5JKL 6MNO
7PRS 8TUV 9WXY
0SP
OK
*#;

VEGA 3000M Quick Guide 9
3G/WiFi connection
The terminal supports GPRS and WiFi connection.
Switching between GPRS/Wi is performed by
selecting “Menu”, “Administration” (enter admin
PIN), and “Network settings” (or “Quick Menu” and
“Network”) “Change connectivity” and selecting the
required type.
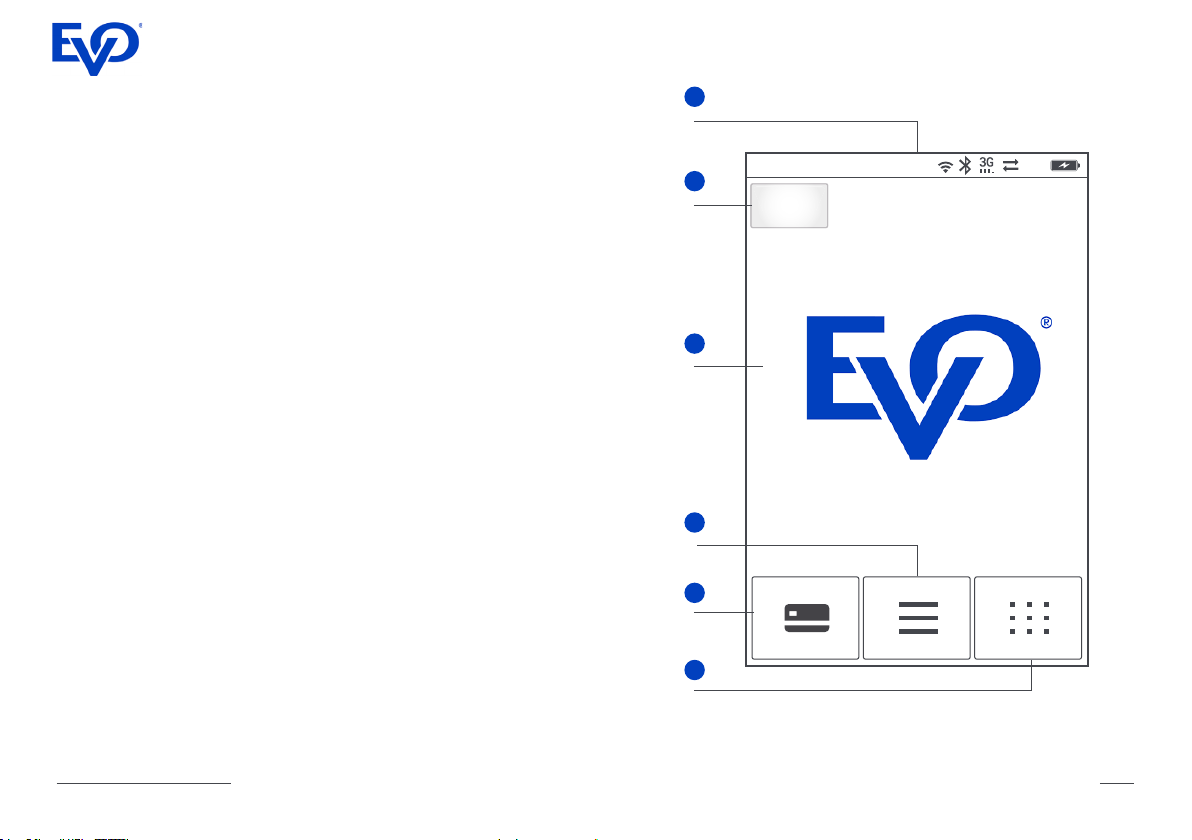
When the internet connection is established the
icon
is shown. If the connection is lost icon
is shown. The connection can be veried
selecting function “Handshake” in the “Menu” or
“Quick Menu”. If the handshake is approved the
internet connection is established.
WiFi connection setup
To connect to a WiFi network switch connection to
WiFi, select “Menu”, “Administration” (enter admin
PIN) and “Network settings” (or “Quick Menu”
and “Networks”), “Settings” and hit required WiFi
network from a list of available networks. For
typing, the password numerical keys are used by
a repeated press of the numerical key to select a
desired character (as used with keyboard phones).
00 Print shift totals 00 GPRS/WiFi info
01 Close shift 01 Change connectivity
02 Subtotal 02 Settings
03 Close batch 03 Restore connection
04 Factory reset
04 Trans. Journal
05 Network settings
Press twice
to type “B”
xbC89dfgb
Enter the password:

VEGA 3000M Quick Guide 10
First sale transaction
The terminal accepts contact, contactless and
magstripe cards or mobile device via NFC (Apple
Pay, Google Pay, etc.). Contactless card or NFC
device is placed to the top of the screen where the
contactless symbol is shown. The chip card reader
is located on the bottom of the terminal and is used
for chip card acceptance. For magnetic cards
acceptance, the magnetic card reader located on
the right side of the terminal is used.
The standard payment transaction can be triggered
by pressing the virtual button “Quick Pay” on the
terminal display, or by typing amount on the
numeric keypad. Another type of transaction can
be selected in selecting “Menu” or by the “Quick
Menu” button.
The result of a transaction will be printed on the
receipt.

VEGA 3000M Quick Guide 11
Receipt
For each transaction, the receipt is printed.
The receipt contains key information about
the transaction and serves as a proof of
transaction in the case of dispute claims.
1 Merchant name and address
2 STAN – Ordinal number of the transaction
within the terminal and batch.
3 Batch Number – Ordinal number of the
batch within the terminal. After closing the
batch, this number is increased.
4 Terminal ID – Unique identier of terminal .
5 Merchant ID – Unique identier of the
merchant within the acquirer bank. If the
merchant uses more terminals, each terminal
has got unique TID, however MID might be
the same for all terminals.
6 Bank Terminal ID – Unique identier of the
terminal within the acquirer bank. This might
differ from Terminal ID, or might be the same.
7 Card Brand – Card brand such as VISA,
MasterCard etc.
8 PAN – Unique number of the card contains
information about Card brand, Issuer bank
code and card number. Since this is sensitive
information it is masked.
9 Application ID (AID) and Name – Identier
number of application on the card and
its name. Corresponds with card type
(MasterCard, Maestro, VISA, VISA Electron,
V PAY etc.)
10 Transaction type – Type of transaction
such as Sale, Refund, Reverse last transac-
tion etc.
11 Transaction currency and Amount –
Amount and currency of the transaction. In
the case of DCC, it is the currency of the card,
otherwise the currency of the terminal.
12 Authorisation code – Unique code of
transaction. Used in case of dispute claims.
-------------------------
EVO
*TEST*
Castles VEGA3000
-------------------------
21.10.2016 11:56:11
000008/001/07
TICKET FOR THE CUSTOMER
-------------------------
Terminal:TID001
(MID001/BANKTID001/CA1)
Card:Maestro
xxxx xxxx xxxx 1234
AID:A0000000043060
MAESTRO
Sale
TOTAL EUR: 10.00
Authoris code 106669
-------------------------
Please retain for your
record
Thank you!
-------------------------
2
1
5
8
10
11
4
6
12
9
7
3

Table of contents
Other Evo Payment Terminal manuals