EXFO Power Blazer User manual
FTBx-88000 Series
Power Blazer and NetBlazer
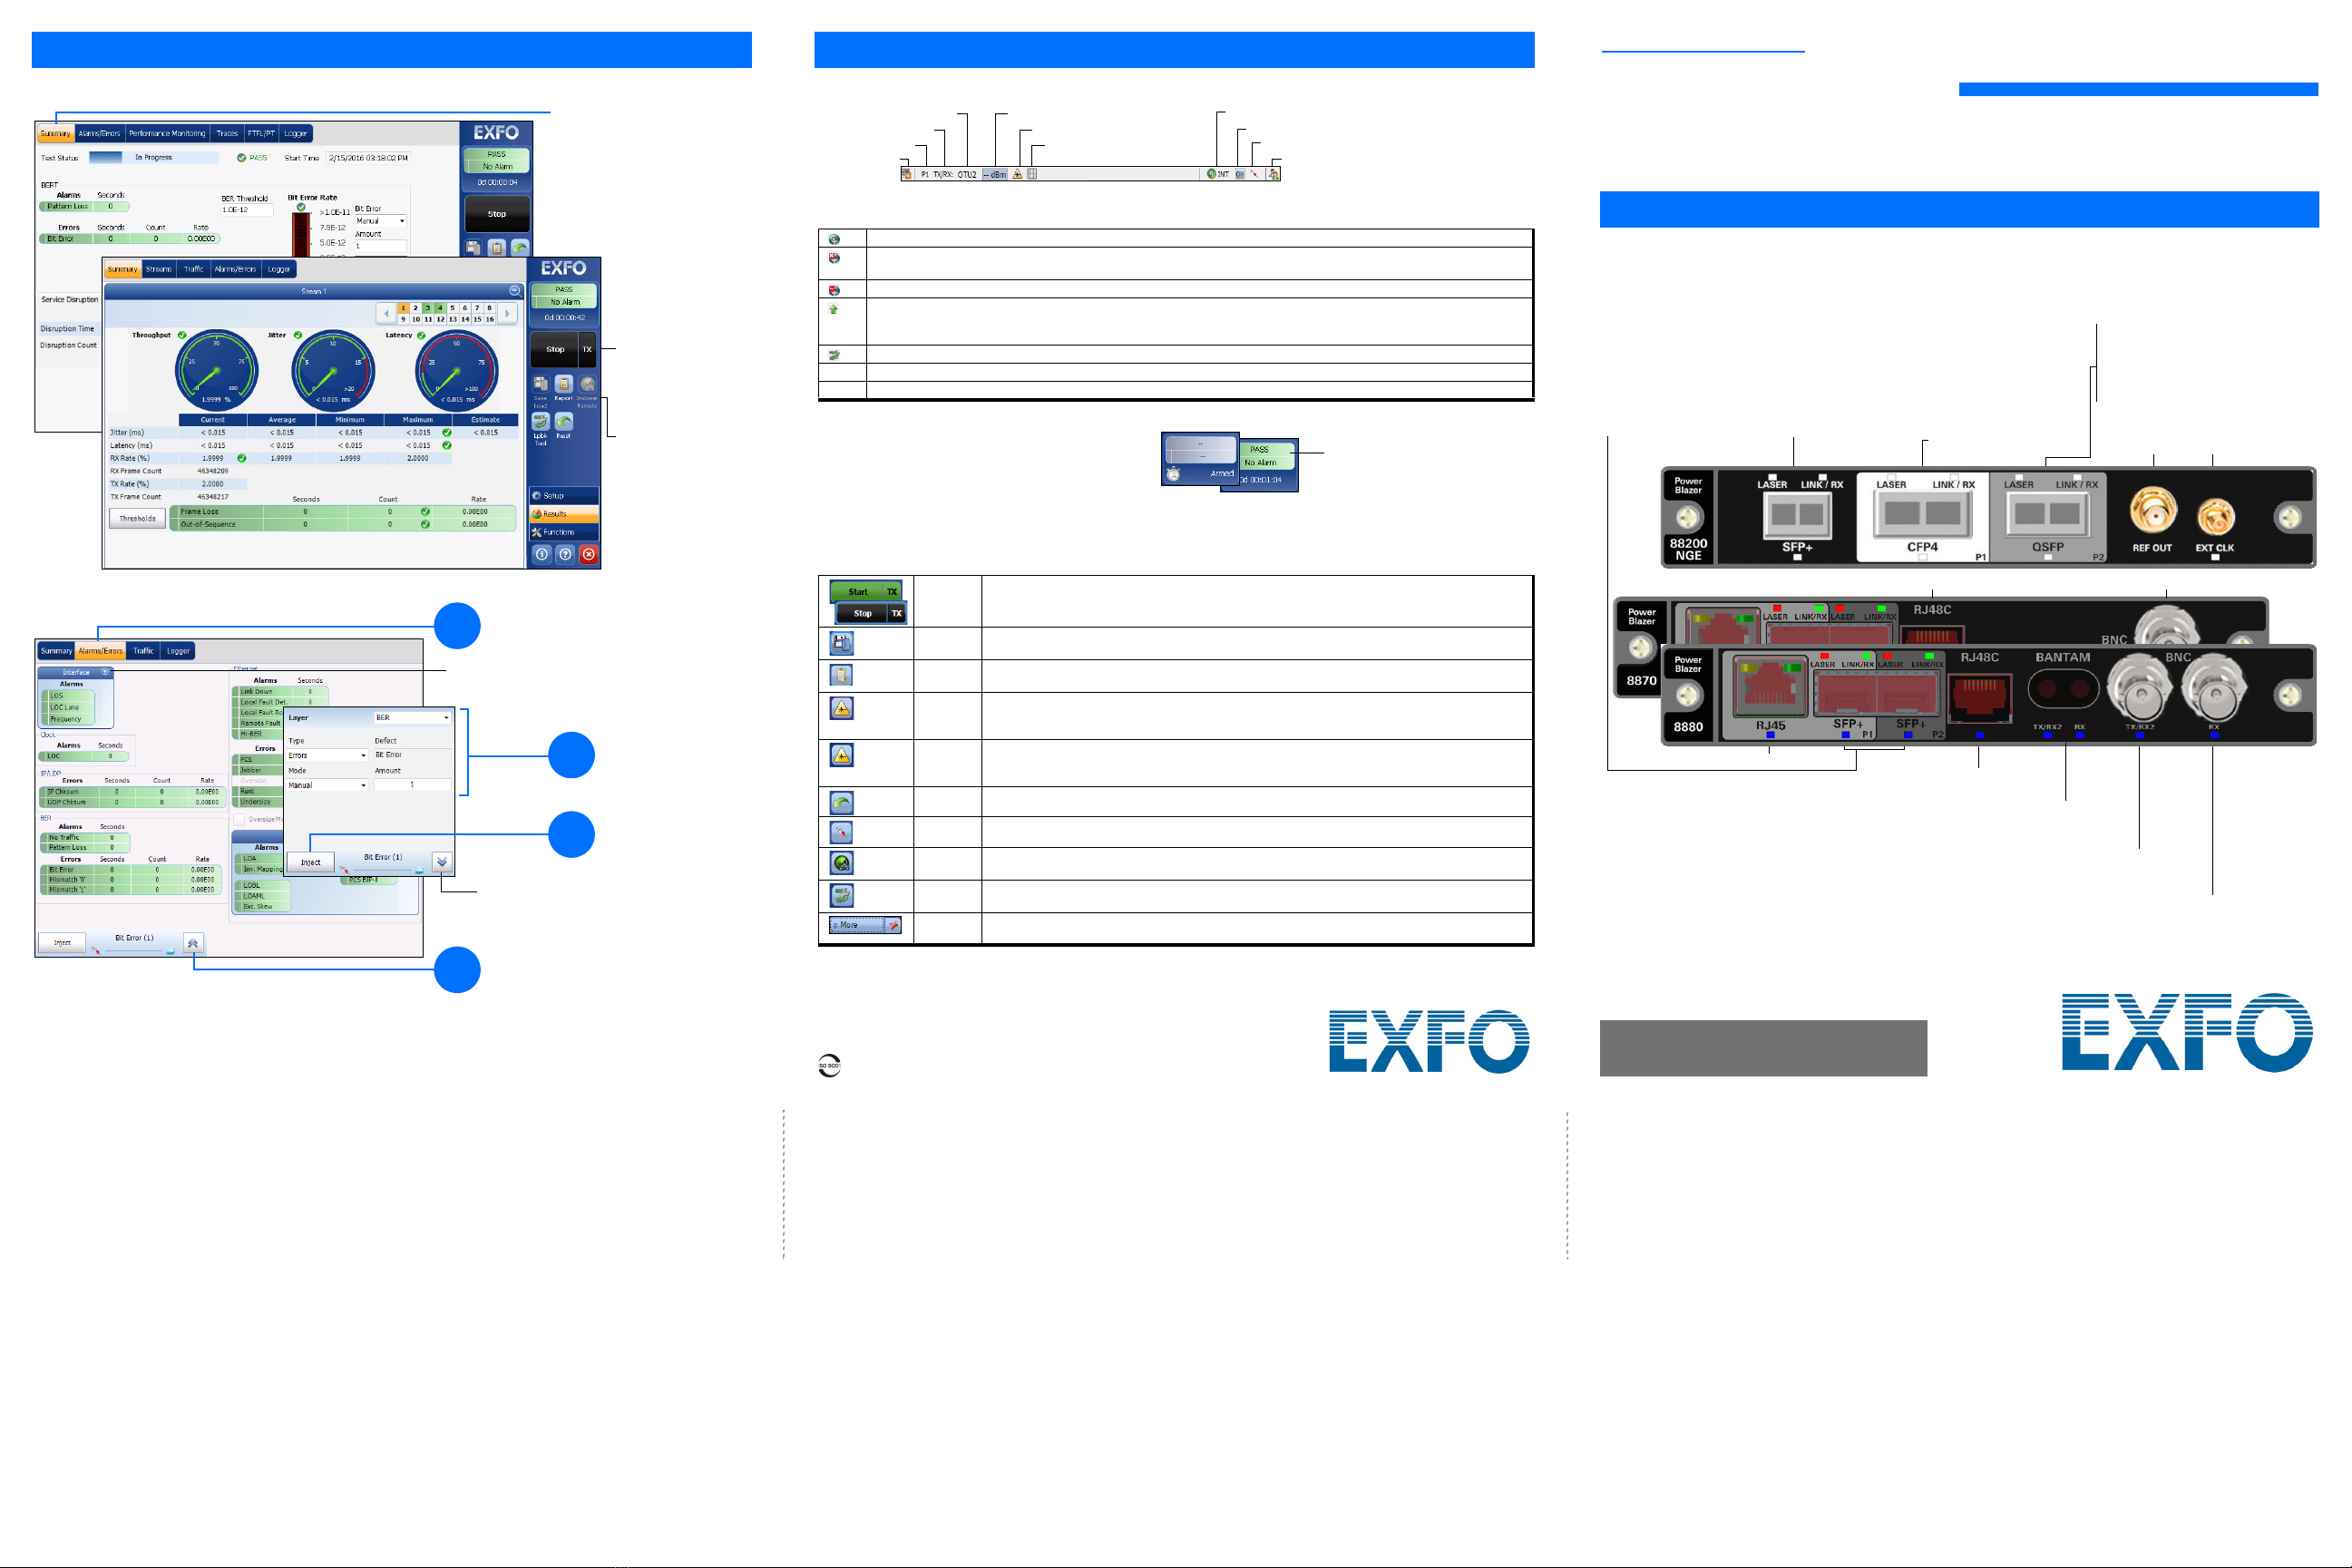
Getting Results
The Summary tab is automatically
displayed once the test is started.
Select a tab to get additional test
results.
Alarm/Error Injection
Test control buttons are
reconfigured according
to the test application
and status.
The Stop button is
displayed when the
test is running.
1Tap the Alarms/Errors tab.
3
Tap Inject.
Gives more information on this alarms/errors group.
Hides the alarm/error selection.
Status Bar
Additional Status Bar Symbols:
Test Control Buttons
Connection established between two testing units in Dual Test Set (DTS), EXFO|Worx Interop, or in Loop Up mode.
Connection not established between two testing units in Dual Test Set (DTS), EXFO|Worx Interop, or in Loop Up
mode.
Remote unit is busy (locked) in EXFO|Worx Interop operation mode.
LINK: Port link
PTP: 1588 PTP, PTP Frames
ESMC: SyncE, ESMC Frames
Loopback Tool (Only available with 8870/8880)
(BTS) CPRI, Base Station emulation mode
(RRH) CPRI, Remote Radio Head emulation mode
Start
Stop
TX
Starts test. Available when the test is not running.
Stops test. Available when the test is running.
Enables traffic generation and starts test. Available with Traffic Gen & Mon and eCPRI BERT.
Save
Load
Saves, loads, imports, exports, and deletes configuration file(s). Available when the test is not
running.
Report Saves, opens, imports, exports, and deletes test report(s). Available when the test is running or
stopped, but the report generation (save) is only possible when the test is stopped.
Laser (on) Indicates that the laser control is on (for at least one lane for parallel interface); the laser button
has a red border. Tapping this button will turn off the laser (for all lanes for parallel interface). Only
available with optical ports.
Laser (off) Indicates that the laser control is off (for all lanes for parallel interface). Tapping this button will
activate the laser immediately by emitting an optical laser signal (on all lanes for parallel
interface). Only available with optical ports.
Reset Clears results, statistics, and logger content. Available when the test is running.
Inject Injects alarms/errors based on settings from the Inject button from the Results - Alarms/Errors tab.
Discover
Remote
Discovers and connects to a remote module that loops back the traffic via Smart Loopback or
Dual Test Set (DTS).
Lpbk Tool Loops back the Ethernet frames/packets that are received on the port unused by the main test
application. Only available with 8870/8880.
More/
Less
The More/Less button appears when there is not enough room to display all available test control
buttons.
Tes t
Direction
Pattern Synchronization
Power Clock
Laser
Remote Control
Inject
Non-default OH
Interface/Signal
Port
Global Indicator Tap anywhere within the global
indicator area to view the
maximized view of these
indicators.
The global indicator displays the pass/fail verdict,
global alarm, timer, and/or test duration.
2Tap to select an alarm/error.
4
Select the alarm/error to
be injected and its
parameters.
Quick Reference Guide
HIGH-SPEED MULTISERVICE TEST MODULE
© 2020 EXFO Inc. All rights reserved.
Printed in Canada (2020-02)
P/N: 1079326 Version: 9.0.0.1 For more information,
refer to the user guide.
Physical Interfaces
TX: E1/2M, E3/34M, DS3/45M, STS-1e/STM-0e/52M, E4/140M, STS-3e/STM-1e/155M
RX2: DS3, 2 MHz, 10 MHz
Clock OUT: DS1/1.5M, E1/2M, 2MHz
Ethernet 10/100/1000 Mbit/s electrical
TX and RX: DS1/1.5M, E1/2M
RX2: DS1/1.5M
Clock IN/OUT: DS1/1.5M, E1/2M, 2MHz
E1/2M, E3/34M, DS3/45M, STS-1e/STM-0e/52M, E4/140M, STS-3e/STM-1e/155M, 1PPS, 2 MHz
Clock IN: DS1/1.5M, E1/2M, 2MHz, 10MHz, 1 PPS
DS1/1.5M, E1/2M, 1PPS, 2 MHz, 10 MHz
Clock IN/OUT: DS1/1.5M, E1/2M, 2MHz
External Clock:
DS1/1.5M, E1/2M,
2MHz, 1PPS
Reference
Output
QSFP+:
QSFP28:
QSFP56:
Ethernet 40 Gbit/s
OTU3e2, OTU3e1, OTU3
Ethernet 100 Gbit/s
OTU4
Ethernet 100 Gbit/s
1. Available on P1 for 88200NGE and on P2 for 8870/8880
2. Available on 88200NGE
Ethernet 100 Gbit/s
OTU4
Ethernet 100 Mbit/s, 1000 Mbit/s, 10 Gbit/s optical
Ethernet 10/100/1000 Mbit/s electrical (using active copper SFP)1
Fibre Channel 1X, 2X, 4X, 8X, 10X, 16X2
CPRI 1.2, 2.4, 3.1, 4.9, 6.1, 9.8, 10.1 Gbit/s
OBSAI 1.5, 3.1, 6.1 Gbit/s
OC-1/STM-0, OC-3/STM-1, OC-12/STM-4, OC-48/STM-16, OC-192/STM-64
OTU1, OTU2, OTU1e, OTU2e, OTU1f, OTU2f
Connect the signal to the corresponding interface on the module. For optical port, insert an EXFO supported
transceiver into the port’s slot then carefully connect optical fiber cables to the transceiver IN (RX) and OUT (TX)
ports.
DS1/1.5M, E1/2M Clock IN: DS1/1.5M, E1/2M, 2MHz, 1 PPS

For Intelligent Apps:
For Transport, Ethernet, Packet Sync, Fibre Channel, and Wireless:
7
Note: For advanced testing, tap the Functions button.
Tap the Modify Structure button to set the basic structure of the test such as
interface/rate, connector, etc.
Tap the interface block to configure the interface/signal parameters. Ensure
that the link is up (except for Transport applications) and the power level
(when supported) is present in the status bar before proceeding to the next
step.
Tap the clock block to configure the clock synchronization.
Tap the Start button to start the test.
For CFP4/QSFP interface, check for the CFP4/QSFP optical validation check
mark indicating that the CFP4/QSFP matches the configured
interface/rate.
3
Tap the test block to configure specific test settings.
This block is not present for all tests.
Tap the protocol block to configure either the frame structure and its
parameters for Ethernet test applications or the embedded signal for Transport
test applications. This block is not present for all tests.
8
4
5
2
6
Tap on a
test application. 1
Status Bar
Selecting, Configuring, and Starting a Test
Starting the Application
From ToolBox X, tap either the Power Blazer or the NetBlazer application button.
iSAM
2Select the basic port parameters or click on More for full settings. Ensure that the link is up
and the power level (when supported) is present in the status bar before proceeding to the
next step.
3Select the basic test parameters or click on More for all settings.
Select the remote operation mode: Dual Test
Set, Remote Loopback, or Manual
Loopback.
Select the basic remote
parameters or click on More
for full settings.
Tap the Start
button to start
the test.
6
5
4
iOptics
2Tap the desired
port icon.
5
3Once the transceiver is
correctly detected ,
select its rate. 4Select the test parameters
and thresholds.
Tap the Start button
to start the test.
Other manuals for Power Blazer
2
This manual suits for next models
2
Other EXFO Test Equipment manuals

EXFO
EXFO RTU-310 User manual

EXFO
EXFO FTB-3930 User manual

EXFO
EXFO MaxTester 635 User manual

EXFO
EXFO FTB-8500 Series User manual

EXFO
EXFO IQ-2600B User manual

EXFO
EXFO FOT-930 MaxTester User manual

EXFO
EXFO IQS-12001B User manual

EXFO
EXFO RTU-2 User manual

EXFO
EXFO AXS-200/850 User manual

EXFO
EXFO Fiber Guardian FG-750 User manual

EXFO
EXFO ConnectorMax MFS-12 User manual

EXFO
EXFO IQS-2600B User manual

EXFO
EXFO LTS-3900 User manual

EXFO
EXFO MaxTester 630G User manual

EXFO
EXFO FTB-610 User manual

EXFO
EXFO FTBx-88000 Series User manual

EXFO
EXFO FPM-300 User manual

EXFO
EXFO MaxTester 630G User manual

EXFO
EXFO BRT-320A User manual

EXFO
EXFO EX Series User manual


