Expert Electronics SunSDR2 Pro User manual

ASoftware Defined Radio
Expert Electronics
2015
V1.0
SunSDR2
DUC/DDC HF/6M/VHF SDR Transceiver
PRO
DUC/DDC HF/6M/VHF SDR Transceiver
PHONES MIC1 MIC2
PWR
EExpert Electronics
SunSDR2
PRO
Getting Started

Expert Electronics SunSDR2 PRO transceiver
Contents
Introduction..........................................................................................................................................3
1. Connection........................................................................................................................................4
2. Ethernet-connection settin .............................................................................................................5
3. Network Settin s..............................................................................................................................6
4. Transceiver's IP address chan in ....................................................................................................7
5. ExpertSDR2 software installation.....................................................................................................8
6. Software interface description.......................................................................................................11
Conclusion..........................................................................................................................................14

Expert Electronics SunSDR2 PRO transceiver
Introduction
Please, spend 5 minutes on reading this
document and you will be able to start wor with
SunSDR2 PRO transceiver quic ly and
broadcast in a new way today. This document
gives answers to the majority of the first
questions, which new users meet when start
wor ing with the transceiver of a new type.
You have bought the most up-to-date radio
amateur equipment which can be imagined
today. This transceiver is a compound software
defined radio, allowing to provide high quality of
signal processing both in receiving and
transmitting modes by modern digital methods.
PC used in transceiver allows to provide
qualitative service not only in
receiving/transmitting, but also to use the HAM
LOGs and DIGI software without wires.
Effective and quic mastering of SunSDR2 PRO
PC transceiver is possible on the condition that
the user has basic s ills in using PC. It is
considered that computer terms used in this
Getting Started document are familiar to the user
and won’t cause any difficulties in searching one
or another tab in Windows 7/8. For visualization
and simplicity, screenshots of dialogue windows
will be given here, necessary functions and fields
for editing will be outlined with coloured contour.
SunSDR2 PRO transceiver is a software defined
radio. It means that you will need PC or laptop for
wor with the transceiver. PC controls
transceiver, RX/TX modes, band switching and
data rate processing, coming from and to
transceiver. These rates by PC at the input and
output gives audio signal and receive
microphone signal and by transceiver they give
HF-signal, transmitting into the air.
The main feature of this transceiver and its basic
distinction from all the other recent output
transceivers is the use of absolutely new
principle of radio signal processing.
There are no frequency converting units in its
classical variant. The signal is converted almost
from the antenna, all the further signal
processing is in the software. The same process
is observed while transmitting. Forming of the
necessary signal modulation type is made by
digital method right at the required frequency.
From all the classical nodes there is only
preselector, power amplifier and low frequency
filter for PA in the scheme.
3

Expert Electronics SunSDR2 PRO transceiver
1. Connection
The following components are required for
starting SunSDR2 PRO transceiver's wor :
•Transceiver power supply unit;
•PC;
•CW ey (if it’s required);
•Microphone or telephone headset;
•Computer net LAN – cable;
•Antenna, tuned into radio amateur
frequencies.
Let’s have a loo at each component.
Power Supply unit must have power not less
than 75 W, provide constant voltage of 15 V at
the output with 5 A load current. Under 15 V
supply voltage transceiver gives full output power
of 20 W.
PC or notebook can be any modern
configuration, produced in the latest 2-3 years.
Recommended configuration:
•2 or 4 core processor Intel Core i3, Core
i5 or Core i7;
•4 GB or more RAM;
•40 GB hard dis free space for the
ExpertSDR2 software and the
accompanied programs;
•17 – 27" monitor;
•video card supporting OpenGL 1.5 and
higher.
ExpertSDR2 software will wor on less powerful
PCs with processors Core2Duo and Dual-Core,
but it will bring to the higher level of resource
loading. The more powerful the PC, the fewer
resources the program requires and the easier
and more colorful "waterfall" and panorama can
be drawn.
•Operating system: Windows XP 32/64 bit,
Windows 7 32/64 bit or Windows 8/8.1 32/64 bit.
The latest versions are preferable.
Microphone or elephone headset can be
either the simplest or the cheapest as, for
example, by Genius, or developed specially for
radio amateurs by Heil Sounds. There is a usual
6,3 mm slot for electret microphone connecting
on the transceiver's front panel. And also there is
a jac , compatible with Yaesu PTT-switches of
MH-31 type. This jac allows to connect PTT-
switches of such popular transceiver as Yaesu
FT-817/857/897 to transceiver.
Receiving/transmitting modes control is produced
by pushing the PTT-footswitch, connected to P
connector on the bac panel of the transceiver.
Computer net LAN – cable provides
transceiver's connection to PC by Ethernet-
connection. PC connection is also possible “by
air”, via wireless net. The easiest and the
quic est transceiver's connection to PC is by the
LAN-cable, supplied with the transceiver.
Antenna, tuned into radio amateur
frequencies must have impedance close to 50
Ohm at those bands where the wor is planned.
4

Expert Electronics SunSDR2 PRO transceiver
2. Ethernet-connection setting
To connect your transceiver to PC by wire net
connection there are two possible variants:J direct
connection to PC by wire Ethernet(LAN) interface
and by already wor ing local net via router.
he first way:
•Connect your transceiver to PC by LAN-
cable, supplied with transceiver.
•Switch on the transceiver.
•Set IP address in Windows as it is shown
in Section 3.
•Start ExpertSDR2 software for
SunSDR2 PRO transceiver by the
double clic .
•Press the button Start in the
program
If everything is done correctly you will see the
spectrum in the program's window and hear the
air noise. You can start the wor .
he second way:
If you already have local net with IP address not
192.168.16.ххх and you need to change IP
address in SunSDR2 PRO:
•Connect your transceiver to PC by LAN-
cable, supplied with transceiver.
•Switch on the transceiver.
•Set static IP address in Windows as it is
shown in Section 3.
•Start ExpertSDR2 software for SunSDR2
PRO transceiver by the double clic
•Press the button Start in the program
•Change IP address in SunSDR2 PRO as
it is shown in Section 4.
•Connect transceiver by LAN-cable to local
net. Now at any PC in local net
ExpertSDR2 software can be launched.
If everything is done correctly you will see the
spectrum in the program's window and hear the
air noise. You can start the wor .
5
Expert Electronics SunSDR2 PRO transceiver
3. Network Settings
Transceiver doesn't need the installation of
special drivers. The whole information exchange
is carried out by the LAN networ interface.
There is given information how to connect the
transceiver to PC using DHCP.
If your transceiver is connected directly to PC
you should chec that your PC's networ settings
are in the mode Obtain an IP address
automatically, to get it do the following steps. If
the networ connection is already set this way
leave this clause.
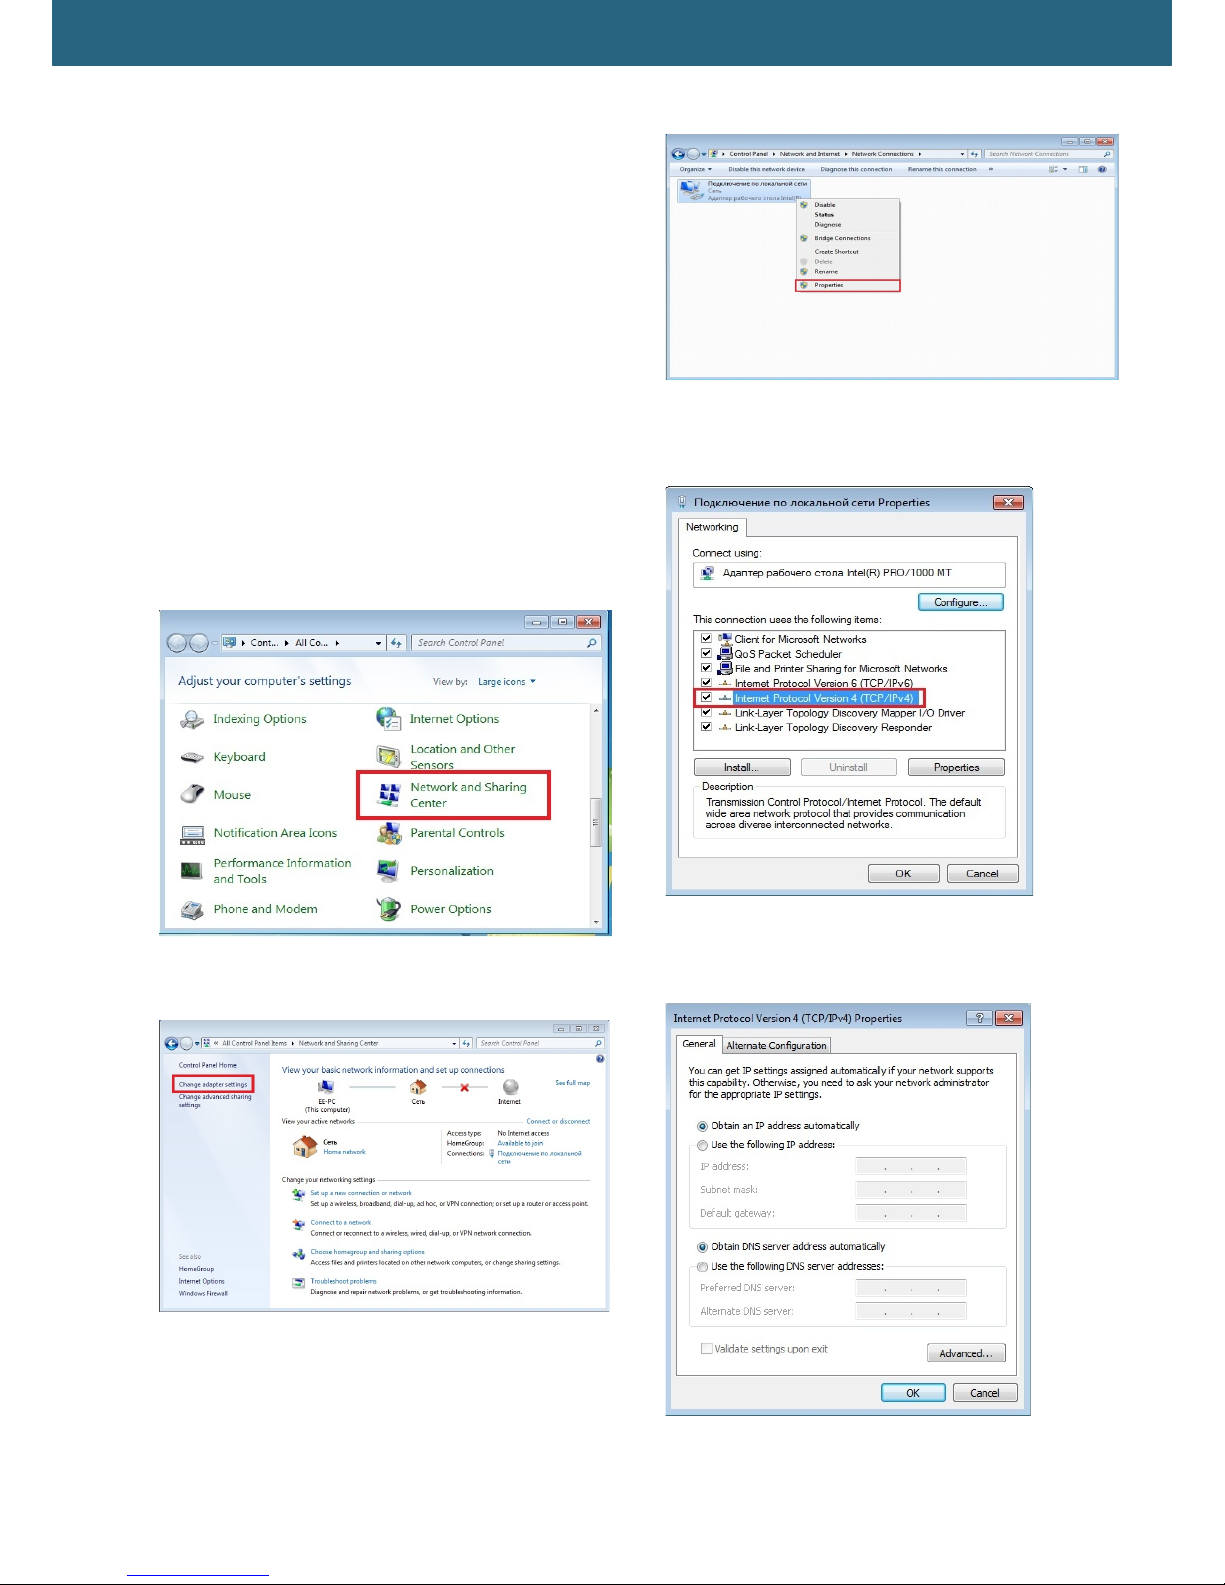
•Press the button Start in the low left
corner in Windows. Choose Control
Panel. Appear the menu, given at the
figure below. Choose Network and
Sharing Center;
•In the appeared window choose Change
adapter settings;
•Choose networ connection, where the
Transceiver is connected to. After that
clic the right button of the mouse on the
icon and in the drop-down menu choose
Properties;
•In the new window set the cursor on the
Internet Protocol Version 4 and press
the button Properties;
•Point Obtain an IP address
automatically and Obtain DNS server
address automatically;
The networ connection is set.
6

Expert Electronics SunSDR2 PRO transceiver
4. ransceiver's IP address
changing
•Launch ExpertSDR2 software and open
the settings menu Options.
•At the figure below is shown that the SDR
Address is now 192.168.16.200
•If you want to change the IP address in
the tab Expert at the field New IP
address set necessary IP-address, in our
case it is 192.168.16.198. And press the
button Set IP Address.
•In the appeared window, choose Yes.
•If everything is done correctly and IP
address is set, the new value of IP will be
written in the field SDR Address
7
Expert Electronics SunSDR2 PRO transceiver
5. ExpertSDR2 software installation
Software installation is done by running the
installation file, which is written on CD dis given
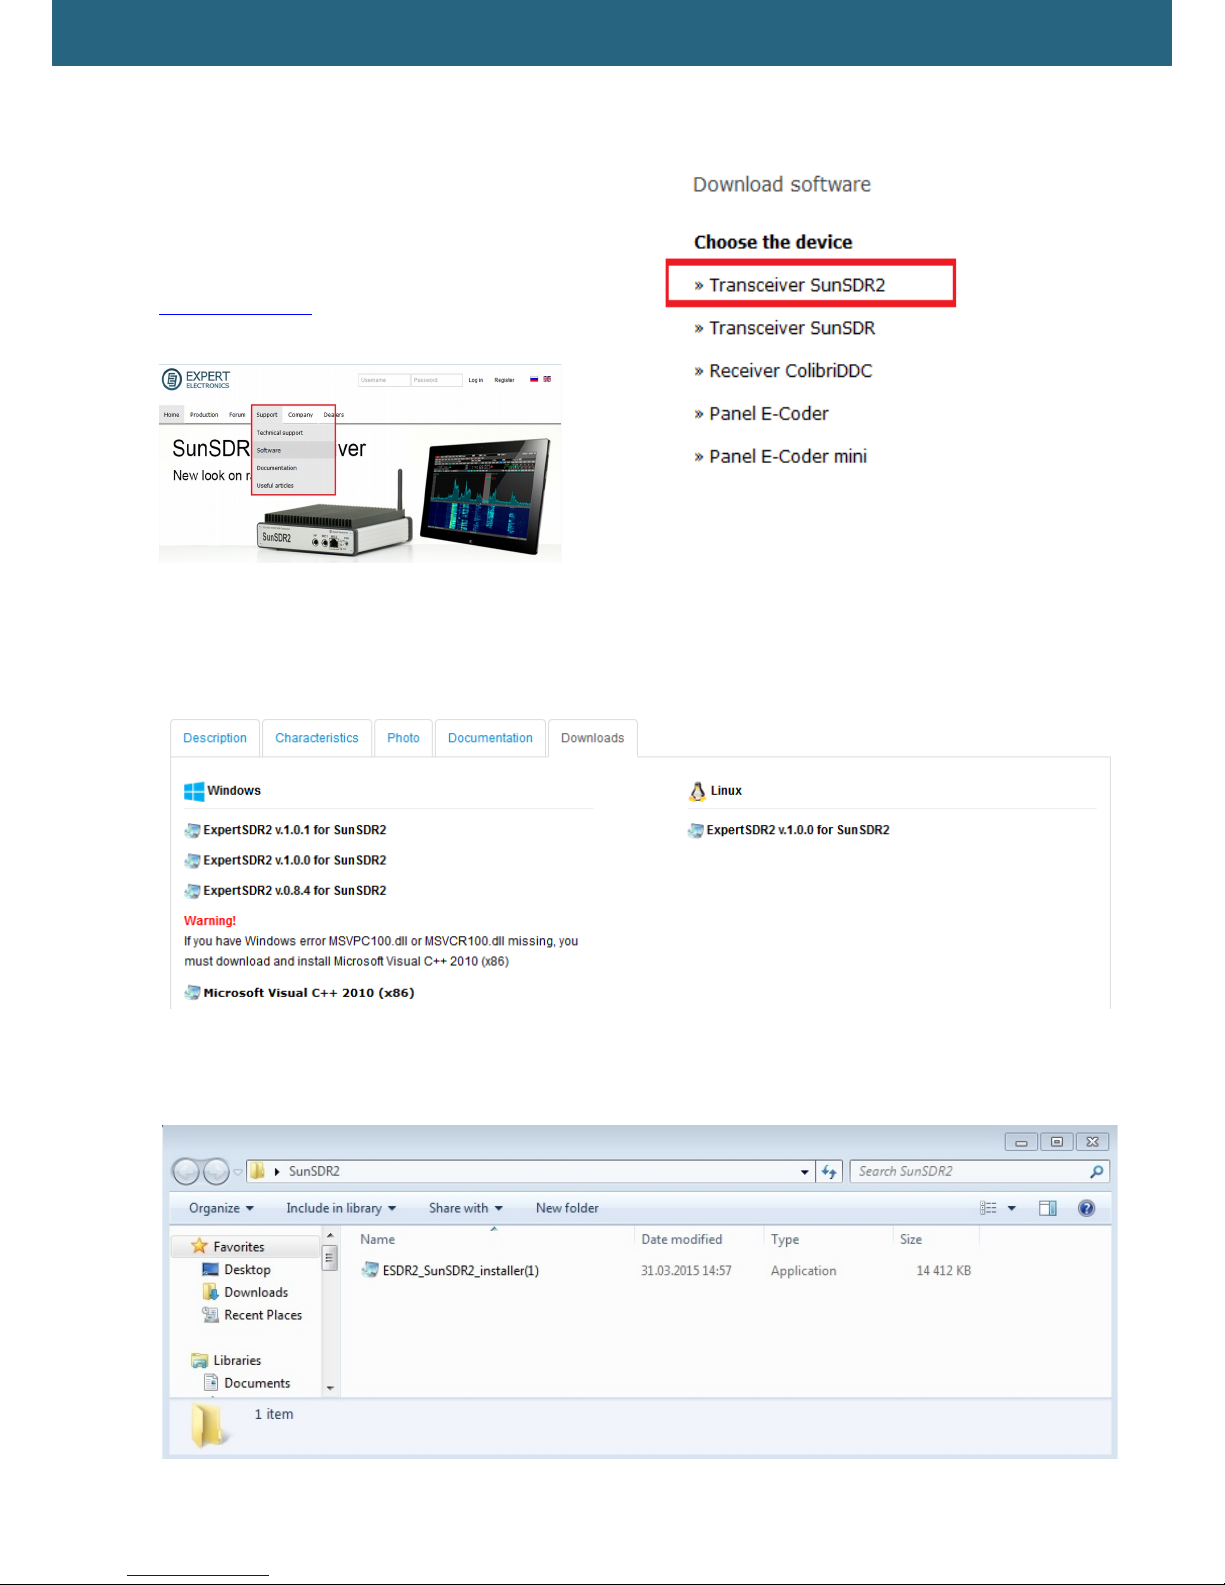
at the complete set. The latest version of the
software can be downloaded from our website
http://eesdr.com/. To download them, on the front
page of the site select Support -> Software.
Select the device you want to download the
software for:
Choose the necessary version of the installation
file for SunSDR2 PRO transceiver from the list.
Download installer version ExpertSDR2 for
SunSDR2 PRO transceiver on your PC.
8
Expert Electronics SunSDR2 PRO transceiver
If you are installing a newer version of the
software instead of the old one, firstly uninstall
the old program. For that go to the control panel
Windows and uninstall the old version of
ExpertSDR2 program.
After downloading, run the file:
ESDR2_SunSDR2_installer(1).еxe
Note! New software releases may differ in name
and numbers
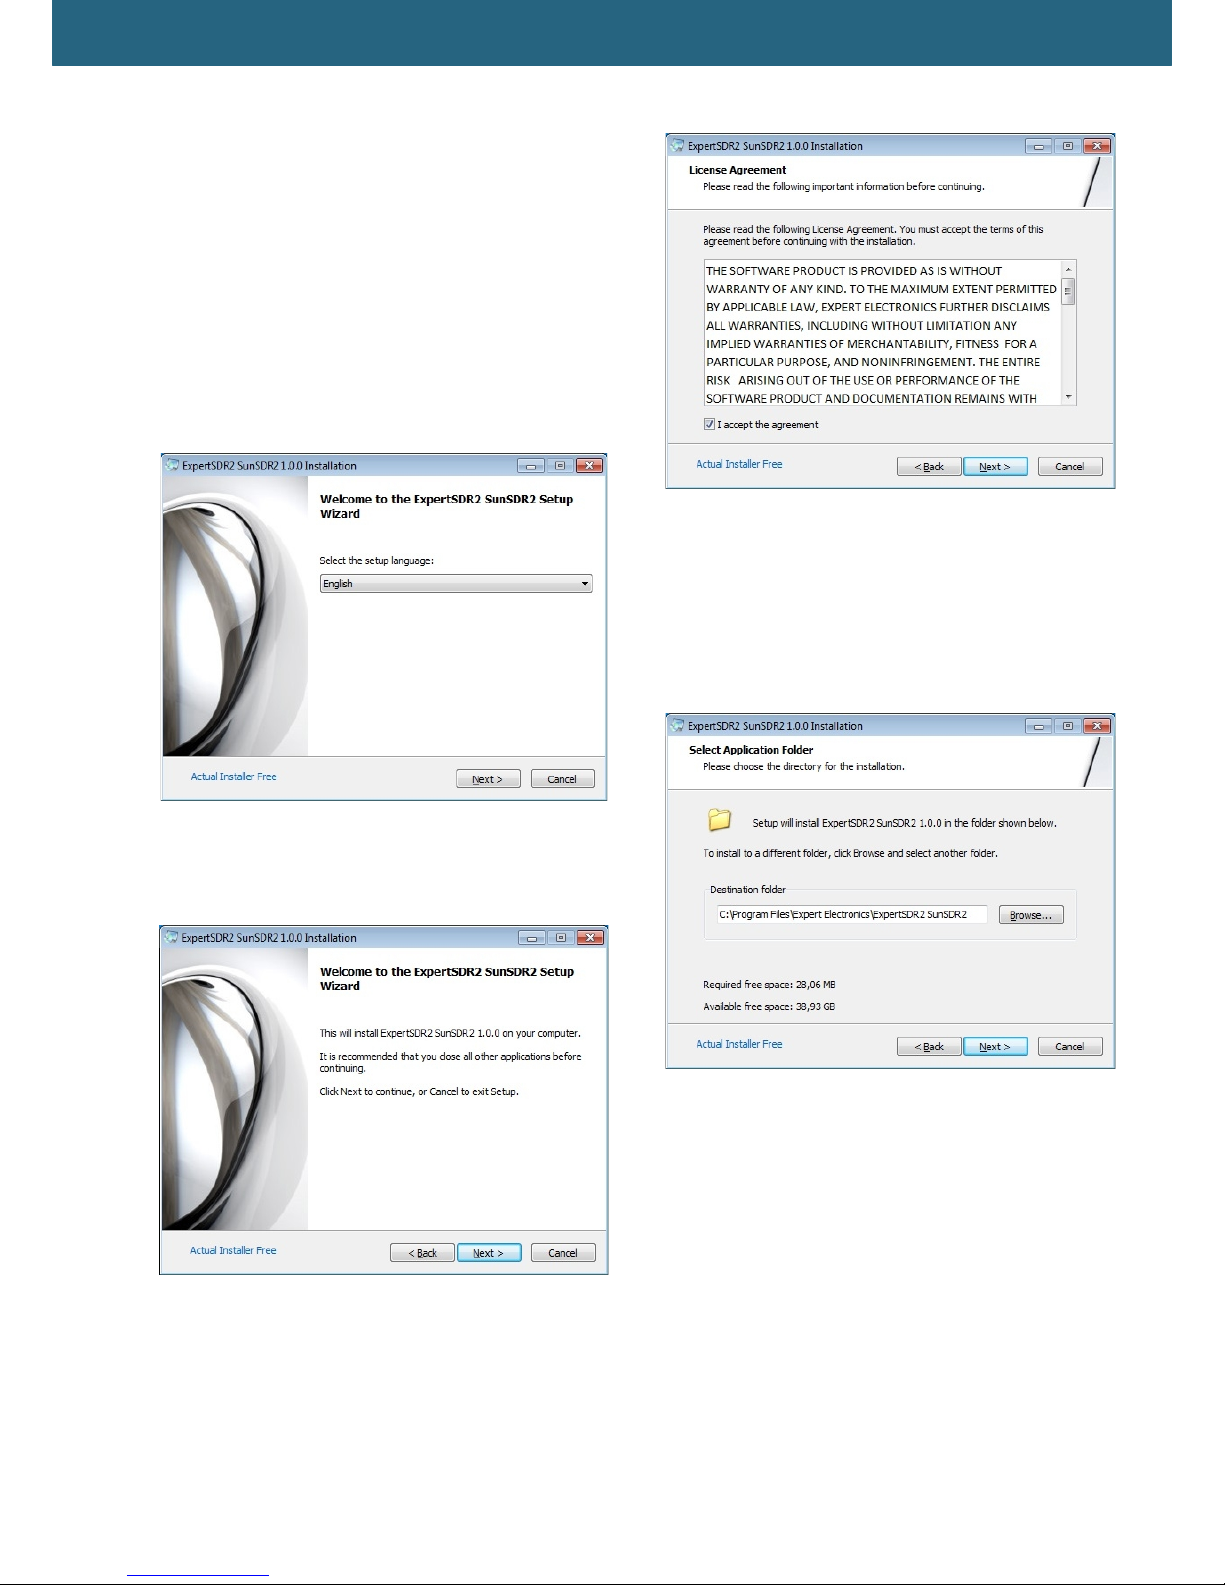
Double clic on the installer to start the setup
Wizard. Select the setup language
After selecting the language the main window of
the installer opens. Press Next to continue or
Cancel to exit Setup.
Accept the License Agreement. Press Next to
continue
Specify the location where the software will be
installed. By default, the program is installed on
drive C: in the folder
c:\Program Files\Expert Electronics\ExpertSD
R2 SunSDR2\. If necessary, you can choose
your installation directory. Press Next to
continue.
Select Program's Menu Folder. By default it will
be the same to the name of the installation folder
“ExpertSDR SunSDR2”
9

Expert Electronics SunSDR2 PRO transceiver
The installation wizard will inform you that it is
ready to install the program to a specified
location. Press Install to continue. If you want to
change the installation location of the program,
press Back to go bac one or two steps.
Installation process
After installation is complete you will see the
following window. Now you can run ExpertSDR2
automatically upon completion of installation. To
do this, leave the chec box Launch
ExpertSDR2 SunSDR2. If you plan to run the
program later, then clear the chec box and
press Finish.
Congratulations! You have successfully installed
the program. Folder with the label for running the
program will appear in START menu. The icon to
run the ExpertSDR2 SunSDR2 program will be
created on the des top
Double clic on the program icon and the
program will start.
10
Other manuals for SunSDR2 Pro
3
Table of contents
Other Expert Electronics Transceiver manuals

Expert Electronics
Expert Electronics MB1 User manual

Expert Electronics
Expert Electronics SunSDR2 Pro User manual

Expert Electronics
Expert Electronics SunSDR2 DX User manual

Expert Electronics
Expert Electronics SunSDR2 DX User manual

Expert Electronics
Expert Electronics SunSDR2 Pro User manual

Expert Electronics
Expert Electronics SunSDR2 DX User manual

Expert Electronics
Expert Electronics DUC/DDC SDR Series User manual

Expert Electronics
Expert Electronics MB1 User manual

Expert Electronics
Expert Electronics SunSDR2 QRP User manual


