manuals.online logo
Brands
  1. Home
  2. •
  3. Brands
  4. •
  5. Extron electronics
  6. •
  7. Projector Accessories
  8. •
  9. Extron electronics PMK 350 User manual

Extron electronics PMK 350 User manual

1
PMK 350 Projector Mounting Kit • Installation Guide
PRELIMINARY
Extron PMK 350 Installation Guide
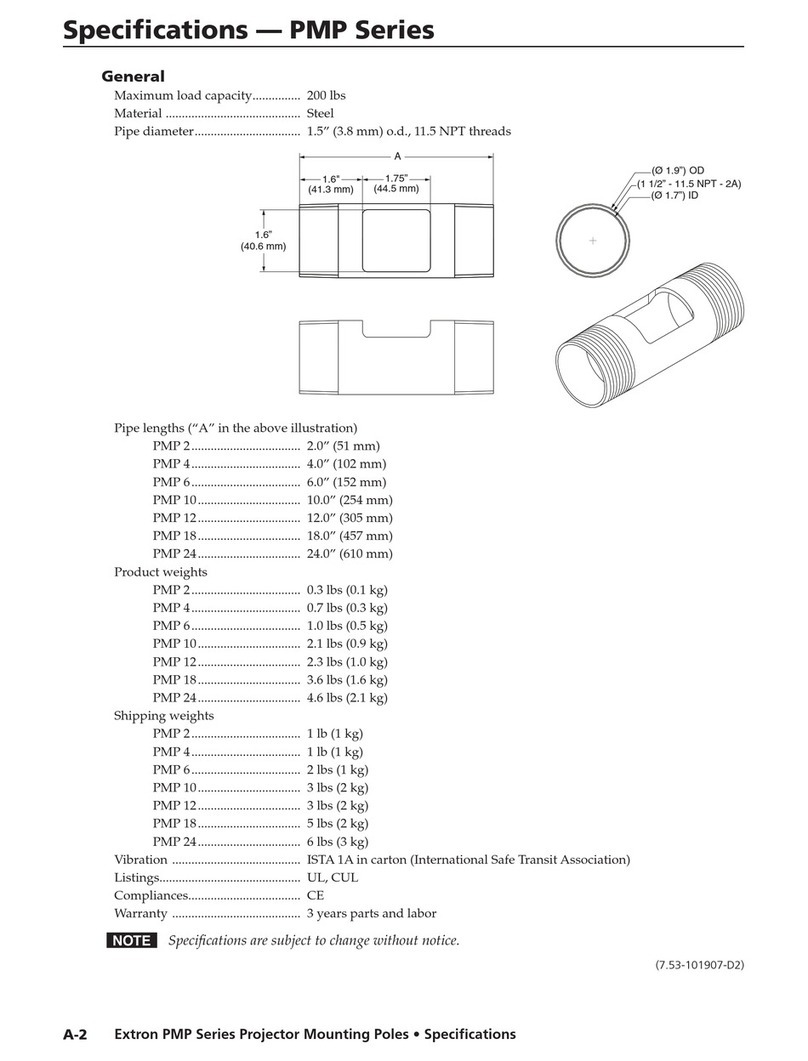
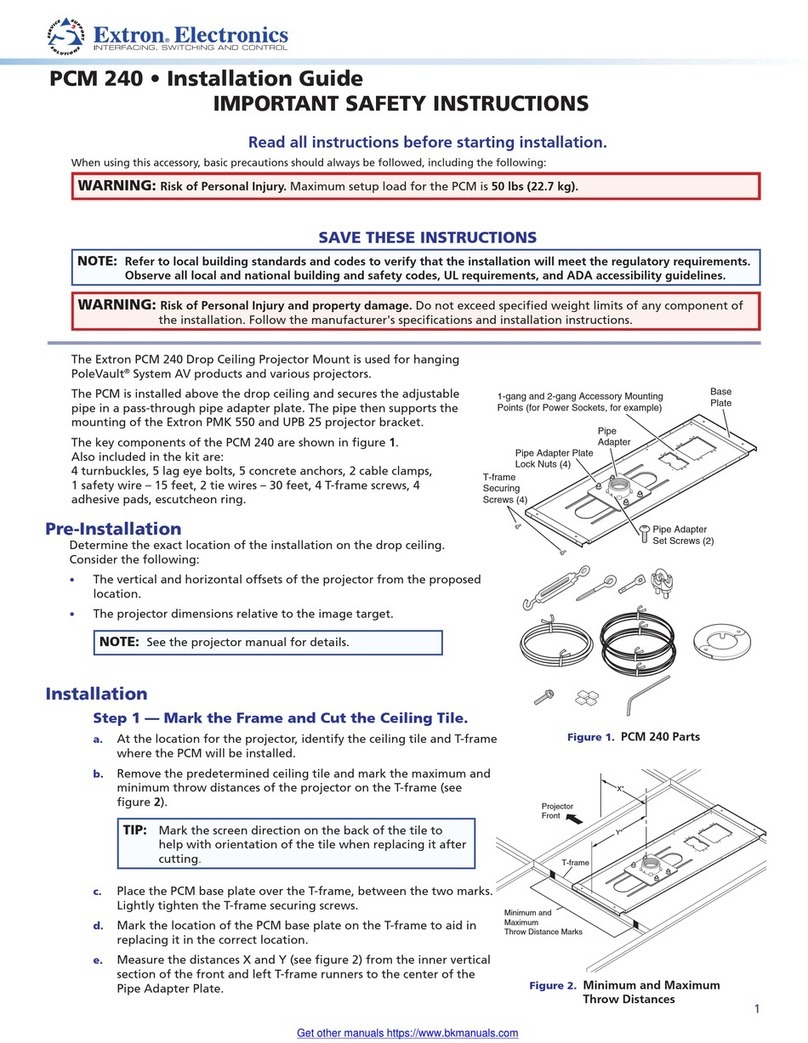
The PMK 350 Low Profile Multi-product Projector Mounting Kit is an above-
projector mounting kit that can hold multiple products of 1/8, 1/4, and 1/2 rack
sizes, and their power supplies. Each kit consists of a steel mounting tray that
is available in black (part #70-563-02) or white (part #70-563-03); a U-bolt with a
contoured brace bracket and an L bracket to secure the PMK to the projector pole;
and a plastic, adhesive-backed overlay sheet (either black or white), containing four
sizes of covers that can be torn out from the perforated sheet and applied over the
opening on the bottom of the mounting tray.
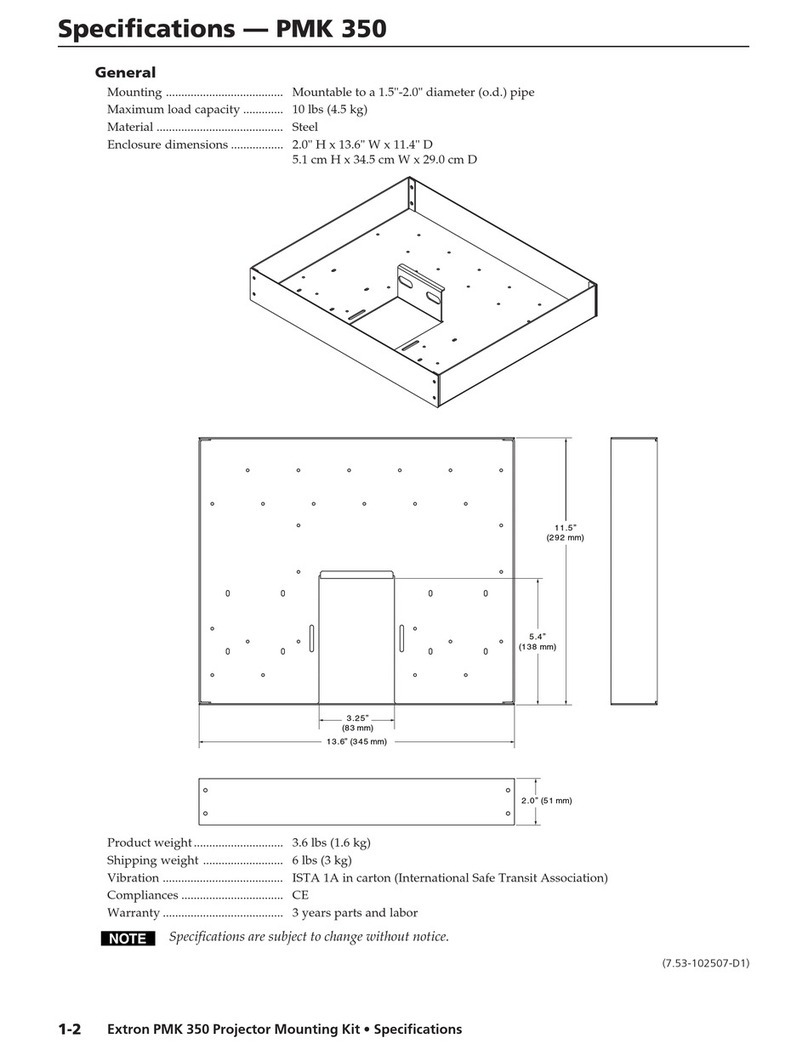
The PMK 350 attaches to a 1.5" to 2" diameter projector mounting pole. Its low 2"
height allows it to be mounted in tight spaces between the projector and the ceiling,
while its width of 13.6" and depth of 11.5" enable it to accommodate a variety of
device sizes.
Extron
PMK 350
Multi-product Projector
Mounting Kit
Cover Sheet
Front Plate
Rear Plate
U-bolt
L-shaped
Bracket
Contoured
Base
Extron
Power Supply
Extron
Quarter-rack
Sized Product
Mounting a quarter-rack sized product and its power supply
Mounting the PMK 350 to the Projector Pole
Mount products on the PMK 350 as follows:
1. Remove the front and back panels from the PMK 350, using a #2 Philips
screwdriver. Retain the four screws to reattach the plates when you are
finished.
2. Remove any rubber feet from the bottom of the device(s) to be mounted.
3. Secure a device to one side of the mounting tray, using two of the supplied
4-40 x 3/16" screws in opposite (diagonal) corners. Use an Extron Tweeker
(provided) or a Philips #1 screwdriver to tighten the screws.
4. If a power supply is connected to the device, use the two included cable tie
wraps to strap the power supply to the bracket; or attach additional device(s),
as described in step 3.
5. Place the PMK 350 around the projector ceiling mounting pole. (See the
illustration, above.)
68-1242-01, Rev A
07 06
PMK 350 Installation Guide, cont’d
PMK 350 Projector Mounting Kit • Installation Guide
2
PRELIMINARY
6. Pass the two legs of the U-bolt through the following parts in the order they
are listed below:
a. The slotted holes on the back side of the PMK 350 mount plate (then
around the ceiling pole)
b. The round holes in the rubberized contoured base
c. The round holes in the L bracket
7. Place the rubberized contoured base against the pole and opposite the back
plate. The pole should fit snugly into the depression in the center of the
contoured base.
8. Align the two holes in the bottom of the L bracket with the two slotted holes
in the base of the PMK 350, on either side of the opening for the pole; and
attach the L bracket to the base by inserting the two provided 6-32 x 5/16"
screws through the aligned slots. Tighten the screws slightly; you should
still be able to slide the L bracket to adjust it as needed. (See the illustration
below.)
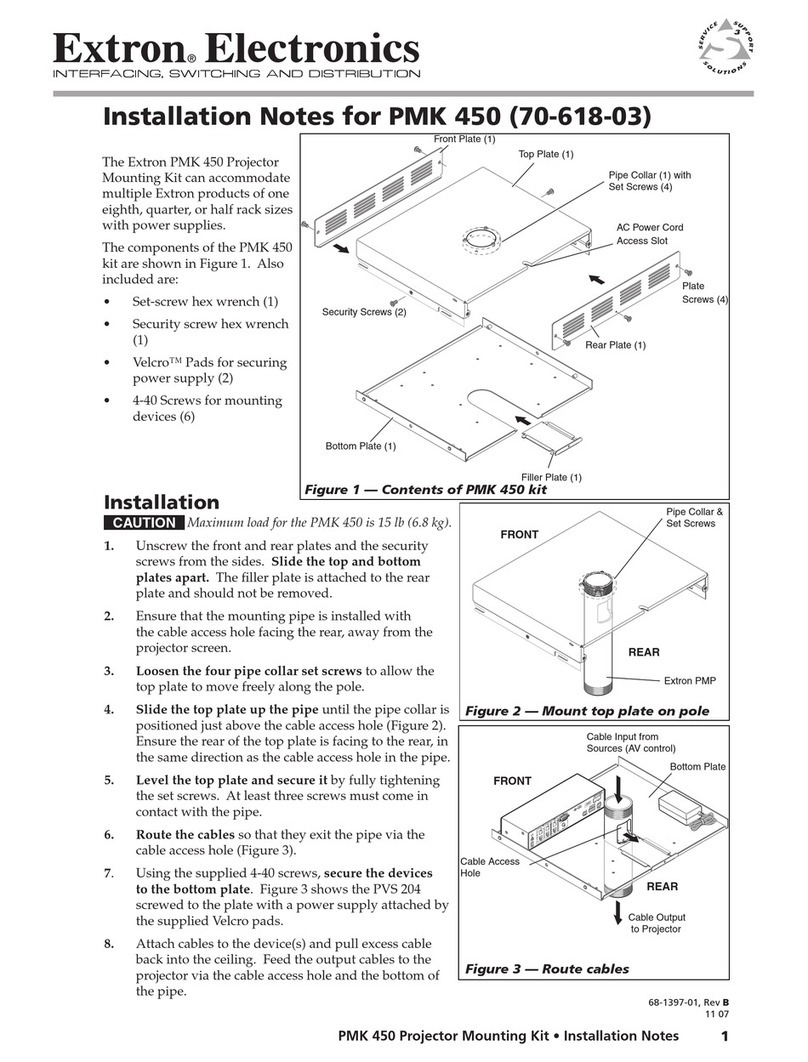
U-bolt
L-shaped
Bracket
L-shaped
Bracket Screws
Contoured
Base
Ceiling
Pole
Mount Plate
on PMK Tray
Attaching the U-bolt, contoured base, and L bracket to the ceiling pole
9. Move the PMK 350 up to the desired location on the ceiling pole, as close to
the ceiling as desired.
10. Secure the L bracket to the U-bolt, using the included hex nuts. Hand-tighten
the hex nuts, make any final adjustments to the PMK’s position, then tighten
the hex nuts securely, using an 11/16" deep socket or box-end ratchet wrench.
NBe sure to tighten the hex nuts securely enough that the PMK 350 does not slide
down the ceiling pole. It is recommended that you use a socket wrench to tighten
them.
11. Tighten the L bracket screws securely, using a Philips #2 screwdriver.
12. Secure the front panel to the mounting tray with four of the included #6
screws.
13. If desired, tear out one of the four perforated self-adhesive overlay sheets and
apply it to the underside of the mounting tray.
3
PMK 350 Projector Mounting Kit • SIS Programming and Control
PRELIMINARY
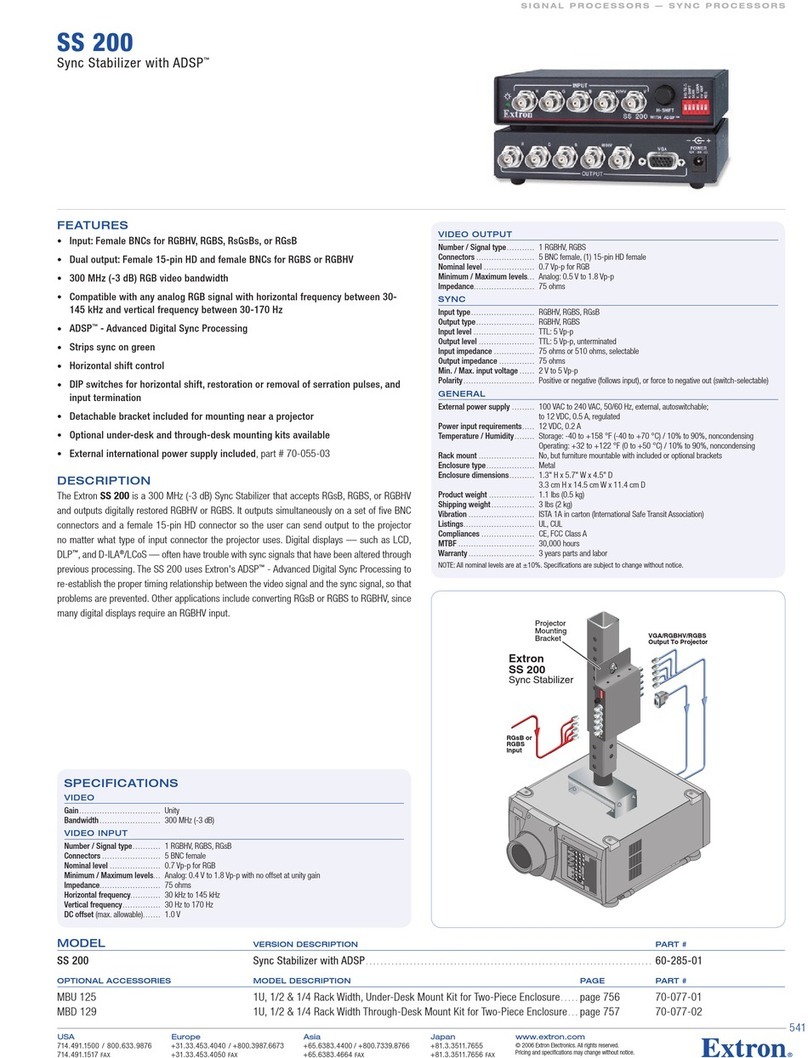
Application Diagrams
The following four diagrams show Extron products in a variety of sizes mounted
on the PMK 350.
BASS
LEVELTREBLE
MINIPOWERAMPLIFIER
MPA 181T
ON
OFF
LIMITER
Extron
PMK 350
Multi-product Projector
Mounting Kit
Cover Sheet
Front Plate
Rear Plate
U-bolt
Extron
Power Supply
Extron
MPA 181T
Mini Power
Amplifier (70 V)
Mounting the MPA 181T and its power supply on the PMK 350
Extron
TPS 204SA
Twisted Pair Switcher
LR
AUX/MIX IN
DONOTGROUND
ORSHORT
SPEAKEROUTPUTS!
1B
1A
I
N
P
U
T
S
O
U
T
P
U
T
S
2B
2A
3B
3A
RS-232 MLC/IR
DCVOL
4/8Ohms
AMPLIFIEDOUTPUTS
VOL/MUTE
Tx
ABC
Rx IR 12V
10V
POWER
12V
3AMAX
US
LISTED
17TT
AUDIO/VIDEO
APPARATUS
®
RGBVIDEORGB
VIDEO
Extron
PMK 350
Multi-product
Projector Mounting Kit
Extron
Power Supply
Plastic Tie
Cover Sheet
Front Plate
Rear Plate
Mounting the TPS 204SA and its power supply on the PMK 350
PMK 350 Installation Guide, cont’d
PMK 350 Projector Mounting Kit • Installation Guide
4
PRELIMINARY
SYNCCONVERTER/STABILIZERWITHADSP
SCS 300
H-SHIFT
OUTPUT
INPUT SYNC 10K
FORCE NEG SYNC
COMP SYNC OUT
SOG OUT
RsGsBs OUT
SERR REMOVAL
NO SYNC PROC
SPARE
Extron
PMK 350
Multi-product Projector
Mounting Kit
Extron
SCS 300
Sync Converter/Stabilizer
Extron
Power Supply
Mounting the SCS 300 and its power supply on the PMK 350
RED-OVERLOAD
P/S 124
12VDC4APOWERSUPPL
Y
BASS
LEVELTREBLE
MINI POWERAMPLIFIER
MPA 122
ON
OFF
LIMITER
STEREO
DUAL
MONO
Extron
PMK 350
Multi-product Projector
Mounting Kit
Extron
P/S 123
12 VDC, 3 A
Power Supply
Extron
IPL T S2
Ethernet Control
Interface
Extron
MPA 122
Mini Power Amplifier
COM1
LAN
UID#093012052
POWER
12V
.5AMAX
COM1
TXRXTXRX
COM2
COM2
Mounting multiple products on the PMK 350
©© 2006 Extron Electronics. All rights reserved.
Extron Electronics, USA
1230 South Lewis Street
Anaheim, CA 92805
USA
714.491.1500
Fax 714.491.1517
Extron Electronics, Europe
Beeldschermweg 6C
3821 AH Amersfoort
The Netherlands
+31.33.453.4040
Fax +31.33.453.4050
Extron Electronics, Asia
135 Joo Seng Road, #04-01
PM Industrial Building
Singapore 368363
+65.6383.4400
Fax +65.6383.4664
Extron Electronics, Japan
Kyodo Building
16 Ichibancho
Chiyoda-ku, Tokyo 102-0082 Japan
+81.3.3511.7655
Fax +81.3.3511.7656
www.extron.com

Other Extron electronics Projector Accessories manuals

Extron electronics System 8 Plus Instruction manual

Extron electronics

Extron electronics System 8 Plus Instruction manual

Extron electronics PCM 340 User manual

Extron electronics

Extron electronics PCM 340 User manual

Extron electronics MediaLink MLC Plus 100 User manual

Extron electronics

Extron electronics MediaLink MLC Plus 100 User manual

Extron electronics PMK 450 Quick start guide

Extron electronics

Extron electronics PMK 450 Quick start guide

Extron electronics PMK 350 User manual

Extron electronics

Extron electronics PMK 350 User manual

Extron electronics PMP Series User manual

Extron electronics

Extron electronics PMP Series User manual

Extron electronics Pole Mount Kit PMK 450 User manual

Extron electronics

Extron electronics Pole Mount Kit PMK 450 User manual

Extron electronics PCM 240 User manual

Extron electronics

Extron electronics PCM 240 User manual

Extron electronics PCM 240 User manual

Extron electronics

Extron electronics PCM 240 User manual

Extron electronics HC 403 EU User manual

Extron electronics

Extron electronics HC 403 EU User manual

Extron electronics PCM 240 User manual

Extron electronics

Extron electronics PCM 240 User manual

Extron electronics USFM 100 User manual

Extron electronics

Extron electronics USFM 100 User manual

Extron electronics Extron SS 200 User manual

Extron electronics

Extron electronics Extron SS 200 User manual

Extron electronics System 8/10 Plus Instruction manual

Extron electronics

Extron electronics System 8/10 Plus Instruction manual

Popular Projector Accessories manuals by other brands

Optoma 3D-XL Quick start card

Optoma

Optoma 3D-XL Quick start card

Barco R9802352 installation manual

Barco

Barco R9802352 installation manual

Optoma OWM855 Mounting instructions

Optoma

Optoma OWM855 Mounting instructions

Marantz Mount 12 installation instructions

Marantz

Marantz Mount 12 installation instructions

Panasonic ET-LAB50 Replacement instructions

Panasonic

Panasonic ET-LAB50 Replacement instructions

Wize PR24A instruction manual

Wize

Wize PR24A instruction manual

Mitsubishi OL-XD2000FR specification

Mitsubishi

Mitsubishi OL-XD2000FR specification

Premier Mounts PDS-URPM installation guide

Premier Mounts

Premier Mounts PDS-URPM installation guide

Sanyo LNS-W32 - Wide-angle Lens - 22.3 mm Replacement procedure

Sanyo

Sanyo LNS-W32 - Wide-angle Lens - 22.3 mm Replacement procedure

Vivitek NovoConnect Deployment guide

Vivitek

Vivitek NovoConnect Deployment guide

BenQ PointWrite PT20 user manual

BenQ

BenQ PointWrite PT20 user manual

Silver Ticket SIE-169106 instruction manual

Silver Ticket

Silver Ticket SIE-169106 instruction manual

Sharp AN-PH818EZ Operation manual

Sharp

Sharp AN-PH818EZ Operation manual

Sharp AN-PH50EZ Operation manual

Sharp

Sharp AN-PH50EZ Operation manual

Barco R9841810 installation manual

Barco

Barco R9841810 installation manual

LDI Spaces SAFCO Scoot 8945 Assembly instructions

LDI Spaces

LDI Spaces SAFCO Scoot 8945 Assembly instructions

Optoma CM-E75X installation instructions

Optoma

Optoma CM-E75X installation instructions

Christie ChristieNet Wireless Presentation Portal Technical manual

Christie

Christie ChristieNet Wireless Presentation Portal Technical manual

manuals.online logo
manuals.online logoBrands
  • About & Mission
  • Contact us
  • Privacy Policy
  • Terms and Conditions

Copyright 2025 Manuals.Online. All Rights Reserved.