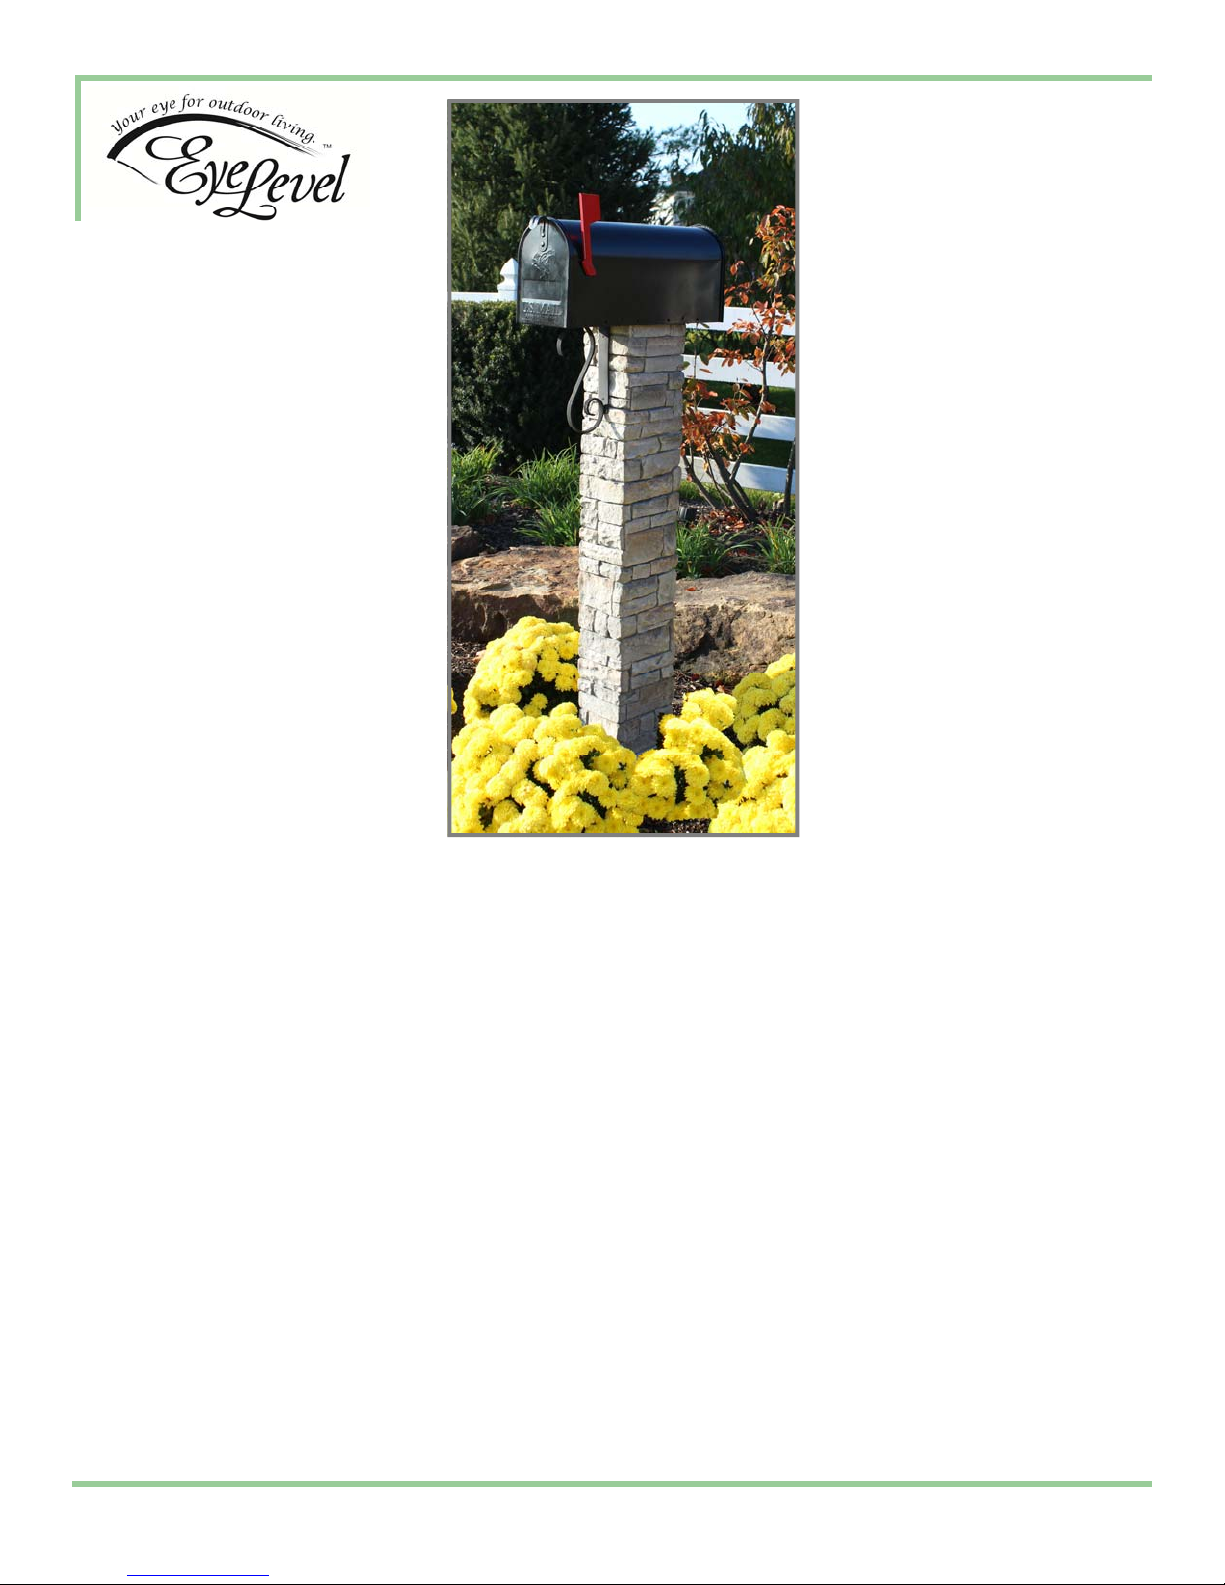
Eye Level 50-PK40SSGS User manual

ELCMBP_11_14
Cast Stone Mailbox Post
Poste para buzón de piedra moldeada
InstallationInstructions
Instruccionesparalainstalación
Model50‐PK40SSGS
Model50‐PK40SSBS
Modelo50‐PK40SSGS
Modelo50‐PK40SSBS

ELCMBP_11_14
InstallationInstructions
CastStoneMailboxPost
English
2
Readytomixconcrete
One4”x4”x8’or4”x6”x8’pressure
treatedwoodenpost
Shovelorpostholedigger
Tapemeasure
Powerdrill&bits
Level
Saw
Phillipsscrewdriver
Pencil
8”or12”Concreteformingtube(optional)
MaterialsandToolsRequired
ItemQuantityDescription
A.1MailboxPost
B.1MilledMailboxPlatform
C.1DecorativeScroll
D.1MountingBracket
E.6MountingScrews
F.1ScrollScrew
G.4MailboxScrews
H.1InstallationManual
PartsIncludedwiththisProduct
Congratulationsonyourpurchaseofthismailboxpostkit.
Beforeyoubegin,pleaserefertothepartslisttoensureallmaterialsneededforassemblyhavebeenreceived.
Questions?ContactyourlocalEyeLevelDealerorEyeLevelCustomerServiceat888.782.1760,option3.
EyeLevelRepresentativesareavailableweekdays8:00a.m.to5:00p.m.EST.
B.
A.
C.D.
F.
E.
G.

ELCMBP_11_14
InstallationInstructions
CastStoneMailboxPost
English
3
IMPORTANTNOTES:
*Beforedigging,checkforundergroundutilities.TheNorthAmericanOneCallReferralServiceat1.888.258.0808
connectsyoutoanationaldirectoryofutilitycompanies.
**TheUnitedStatesPostalServicerequiresmailboxestobeinstalledwiththebottomoftheboxataverticalheightof
between41to45inchesfromtheroadsurfaceand6to8inchesfromthefrontfaceofthecurbtothemailboxdoor.
ReadeachstepthoroughlypriortoinstallingtheCastStoneMailboxPost:
1:Digahole8"‐12”indiameterapproximately24”‐36”deep.*ReviewUSPSmailbox
requirementfromthecurb.**
2:Determinetheheightofthe4”x4”or4”x6”woodenpostbyaddingthedepthoftheholeplus
40”fromgroundlevel.Markwoodenpostaccordinglyandcutoffexcessmaterialwithasaw.
3:Placewoodenpostincenterofholeorconcreteformingtubeandfillevenlywith
pre‐mixedconcretetothetopofthehole.Usealeveltomakesurethewoodenpostisstraight
andsecureuntilconcretecures.Ifusinga4”x6”postmakesurethenarrowsideisfacingthe
street.
4:SlidetheCastStoneMailboxPost(A)overthewoodenpostwiththenarrowersidefacingthe
street.Positioncaststonepostflushtothegroundandflushtothemiddleofthewoodenpost
facingthestreet.
5:PositionMountingBracket(D)toMailboxPost(A)soitiscenteredandevenwiththe
topofthepost.Drillthroughthe2pre‐drilledholesonthemountingbracketand
throughthecaststonepost,andintothewoodenpostwithamasonrybit.Secure
MountingBracket(D)toMailboxPost(A)with2MountingScrews(E)intowooden
post.Drillingsmallpilotholesintowoodenpostwillmakeinsertingthescrewseasier.
6:AttachDecorativeScroll(C)toMailboxPlatform(B)usingScrollScrew(F).
7:PositionthemailboxplatformanddecorativescrollassembledinStep6ontopofthe
caststonemailboxpost.InsertMountingScrews(E)into4pre‐drilledholesin
MailboxPlatform(B)untilscrewtipsarevisiblethroughotherside.Alignthe4screws
withthewoodenpostandcenterdecorativescrollwithmountingbracket,then
securescrews.
8:MailboxInstallation:Toinstallmailboxontomailboxplatform,followthemailbox
manufacturer’sinstallationinstructions.
SideMount:CentermailboxanddrillpilotholesinMailboxPlatform(B)before
attaching.Attachstandardmailbox(notincluded)withMailboxMountingScrews(G).
Oversizedmailboxmayrequirelongerscrews(notincluded).
InsideMount:Centermailbox,markholelocation,anddrillpilotholesintopof
MailboxPlatform(B).Attachwithmailboxmanufacturer’sscrews.
Step5
Questions?ContactyourlocalEyeLevelDealerorEyeLevelCustomerServiceat888.782.1760,option3.
EyeLevelRepresentativesareavailableweekdays8:00a.m.to5:00p.m.EST.
CAREANDMAINTENANCE:
Tocleanthisproduct,useamildsoapinwatersolutionandrubgentlywithsponge.Rinsethoroughlywithwater.
Powerwashingandabrasivematerialsarenotrecommendedandcancausedamage.Mailboxpostismadefrom
GFRC.
Step6
Step7

ELCMBP_11_14
Instruccionesparainstalarelposte
parabuzóndepiedramoldeada
Español
2
Hormigónpremezclado
Postedemaderatratadaapresiónde4”x4”
x8”o4”x6”x8”
Palaoexcavadoraparaelpozodelposte
Cintamétrica
Taladroeléctricoybrocas
Nivel
Serrucho
DestornilladorPhillips
Lápiz
Tubomezcladordehormigónde8”o
12”(opcional)
MaterialsandToolsRequired
ÍtemCantidadDescripción
A.1Posteparabuzón
B.1Plataformaperforadaparaelbuzón
C.1Volutadecorativa
D.1Soporte
E.6Tornillosdemontaje
F.1Tornilloparalavoluta
G.4Tornillosparaelbuzón
H.1Manualdeinstalación
Partesincluidasenesteproducto
Lofelicitamosporcompraresteequipodeposteparabuzón.
Antesdecomenzar,consultelalistadepartesparaasegurarsedehaberrecibidotodoslosmaterialesnecesariosparala
instalación.
¿Preguntas?LlameasuvendedorlocaloalservicioalclientedeEyeLevelal888.782.1760,opción3.
HayrepresentantesdeEyeLeveldisponibleslosdíasdesemanade8a17(horadeleste).
B.
A.
C.D.
F.
E.
G.

ELCMBP_11_14
Instruccionesparainstalarelposte
parabuzóndepiedramoldeada
Español
3
NOTASIMPORTANTES:
*Antesdecomenzaraexcavar,verifiquequenohayainstalacionessubterráneasdeserviciospúblicos.ElServicioEstadounidense
deReferenciadeÚnicoLlamado(NorthAmericanOneCallReferralService)(tel.:1.888.258.0808)leofreceundirectorionacionalde
empresasproveedorasdeserviciospúblicos.
**ElServicioPostaldelosEstadosUnidosrequierequelosbuzonesseinstalenconelfondodelacajaaunaalturadeentre41”y
45”porencimadelasuperficiedelacalleydeentre6”y8”desdelacarafrontaldelbordillohastalapuertadelbuzón.
Leacadapasoconatenciónantesdeinstalarelposteparabuzóndepiedramoldeada:
1:Excaveunpozodeentre8"y12”dediámetroaproximadamenteydeentre24”y36”de
profundidad.*ReviselosrequerimientosparabuzonesdelServicioPostaldelosEstados
Unidosacercadeladistanciaconrespectoalbordillo.**
2:Determinelaalturadelpostedemaderade4”x4”o4”x6”sumandolaprofundidaddelpozomás40”a
partirdelniveldelsuelo.Marqueelposteapropiadamenteycorteelmaterialsobranteconunserrucho.
3:Coloqueelpostedemaderaenelcentrodelpozootubomezcladordehormigónyrelleneenforma
parejaconhormigónpremezcladohastalasuperficiedelpozo.Useunnivelparaasegurarsedequeel
postedelbuzónestéderechoynosemuevahastaqueseendurezcaelhormigón.Siutilizaunpostede4”
x6”,asegúresedequeelladomásestrechodéhacialacalle.
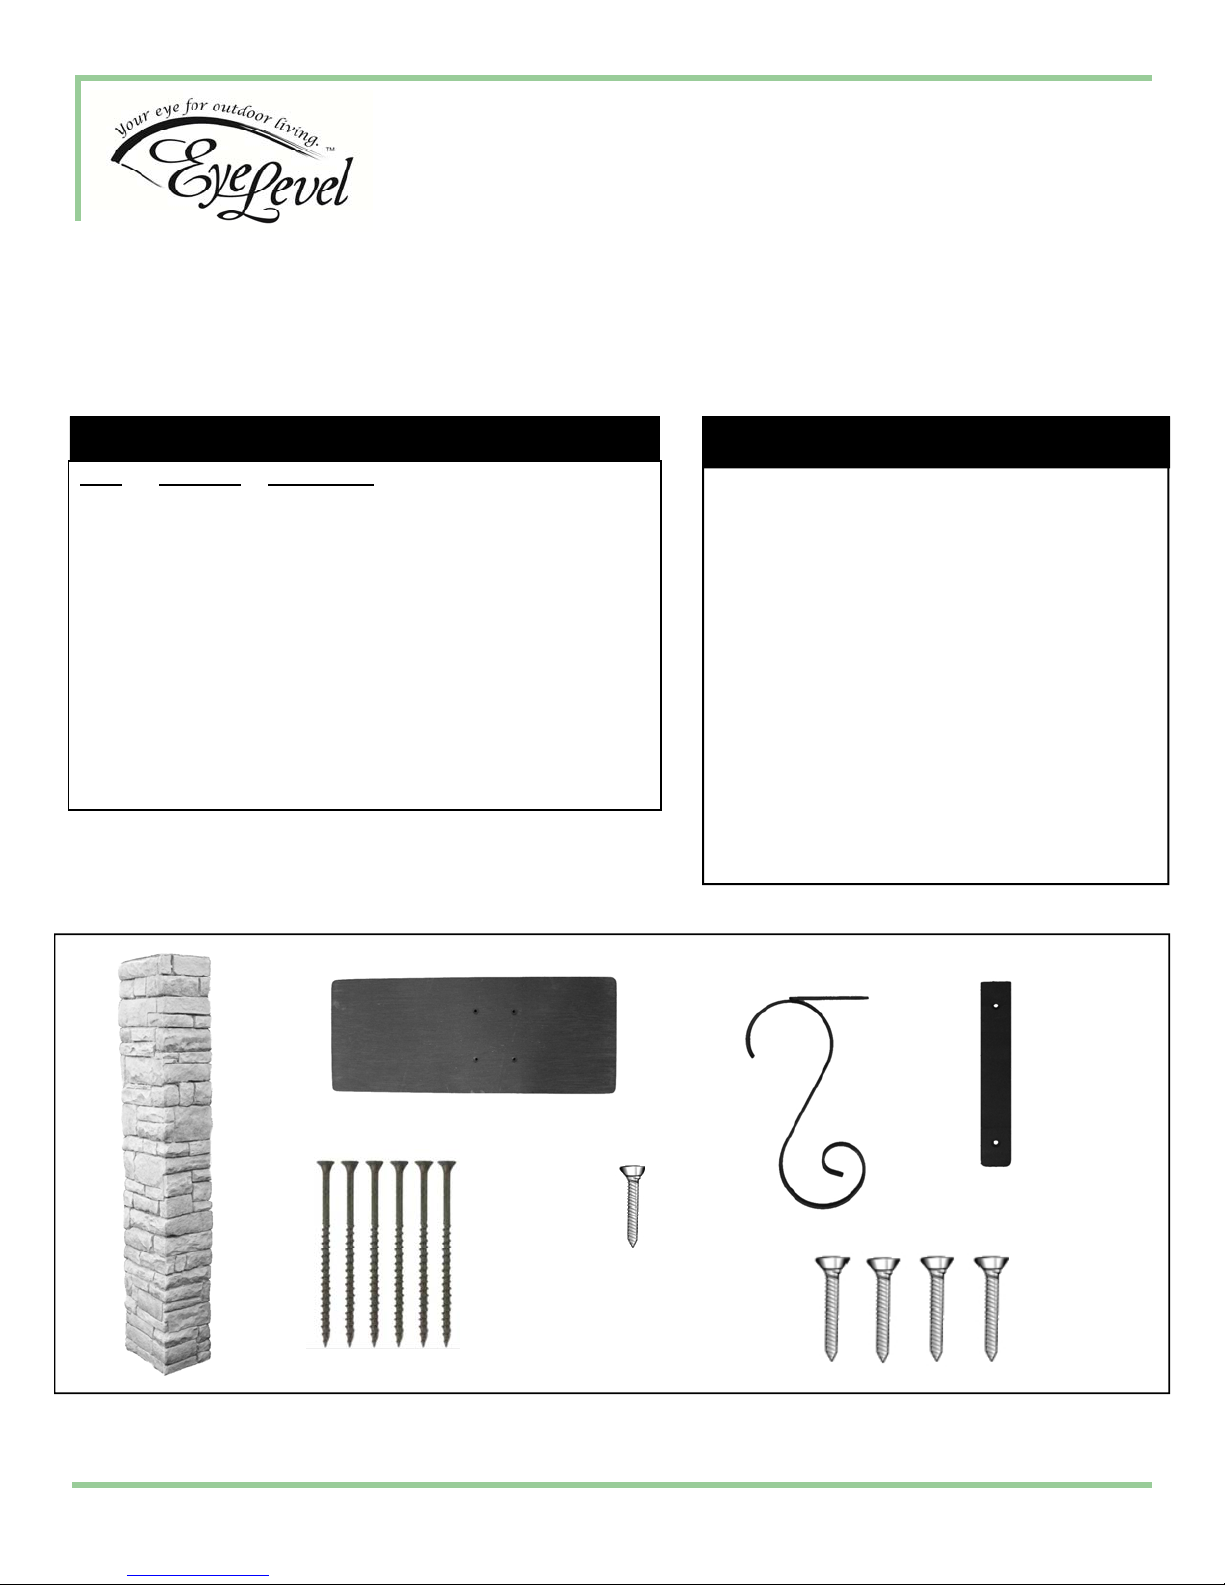
4:Desliceelposteparabuzóndepiedramoldeada(A)sobreelpostedemaderaconelladomásestrecho
mirandohacialacalle.Coloqueelpostedepiedramoldeadasobreelniveldelsueloyalniveldelamitad
delpostedemaderamirandohacialacalle.
5: Coloqueelsoporte(D)delposteparaelbuzón(A)deformaquequedecentradoyalniveldela
partesuperiordelposte.Taladresobrelos2agujerosenelsoporteatravésdelpostede
piedramoldeadayperforandoelpostedemaderaconunabrocaparahormigón.Sujeteel
soporte(D)delposteparaelbuzón(A)alpostedemaderacondostornillosdemontaje(E).Se
puedentaladrardosagujerosguíaenelpostedemaderaparaqueseamásfácilinsertarlos
tornillos.
6:
Ajustelavolutadecorativa(C)sobrelaplataformadelbuzón(B)coneltornilloparalavoluta(F).
7: Coloquelaplataformadelbuzónylavolutadecorativaunidosenelpaso6encimadelposte
parabuzóndepiedramoldeada.Insertelostornillosdemontaje(E)sobre4agujerosmarcados
contaladroenlaplataformadelbuzón(B)hastaquelaspuntasdelostornillosseanvisiblesdel
otrolado.Alineelos4tornillosconelpostedemaderaycoloquelavolutadecorativahaciael
centroconelsoporte;acontinuación,ajustelostornillos.
8: Instalacióndelbuzón:parainstalarelbuzónsobrelaplataforma,sigalasinstruccionesde
instalacióndelfabricantedelbuzón.
Instalaciónlateral:centreelbuzónytaladreagujerosguíaenlaplataforma(B)antesdeajustarlo.
Unaelbuzóndetamañoestándar(noincluido)conlostronillosparaelbuzón(G).Paraunbuzón
detamañoexcesivopuedensernecesariostornillosmáslargos(noincluidos).
Instalacióninterna:centreelbuzón,marquelaubicacióndelagujeroytaladreagujerosguíaenla
partesuperiordelaplataformaparaelbuzón(B).Ajusteconlostornillosdelfabricantedelbuzón.
Paso5
¿Preguntas?LlameasuvendedorlocaloalservicioalclientedeEyeLevelal888.782.1760,opción3.
HayrepresentantesdeEyeLeveldisponibleslosdíasdesemanade8a17(horadeleste).
CUIDADOYMANTENIMIENTO:
Paralimpiaresteproducto,utiliceunasolucióndébildejabónenaguayfrotesuavementeconunaesponja.Enjuaguebiencon
agua.Noserecomiendaellavadoapresiónniutilizarmaterialesabrasivos,yaquepuedencausardaños.Elposteparaelbuzón
estáfabricadoconhormigónreforzadoconvidrio.
Paso6
Paso7
This manual suits for next models
1
Table of contents
Languages: