FP Postbase Mini User manual

Franking machine
Operator Manual
Reference Guide

PostBase Mini
2
About this Manual
This Operator Manual is directed at the users of the
PostBase Mini franking machine.
This Operator Manual contains all relevant information on
handling the PostBase Mini. Functions that are described here
but are not available for each PostBase Mini (among other
things because of postal requirements in the individual coun-
tries) are identified as (not available in all countries).
Further documents The Installation instructions (flyer) and the First steps
manual which were supplied with your PostBase Mini contain
all relevant information on installing, commissioning and
handling the PostBase Mini.
Information on country-specific features and particularities can
be found in the Addendum to the Operator Manual (if available
in your country).
Safety tips The following keywords and signs identify the safety tips in this
manual:
Warning! indicates a potential hazard that may result in injury.
Caution! indicates a potential hazard that may result in dam-
age to the machine or impair the franking process.
In this manual, the product name appears in its plain form
‘PostBase Mini’.
Text features
and symbols
The following symbols and text features are used in this
manual:
• Bullets precede instructions.
– Dashes precede list items.
Menu names and options from the operating menu are written
in small capitals, e.g. MENU.
A tip offers advice or additional suggestions for improving the
operation.
Illustrations The display figures in this manual are generic examples that
may differ from the actual display on your PostBase Mini.
As currency, Euro is used exemplarily.

Contents 3
About this Manual _____________________________________________2
1 Safety tips ____________________________________________________6
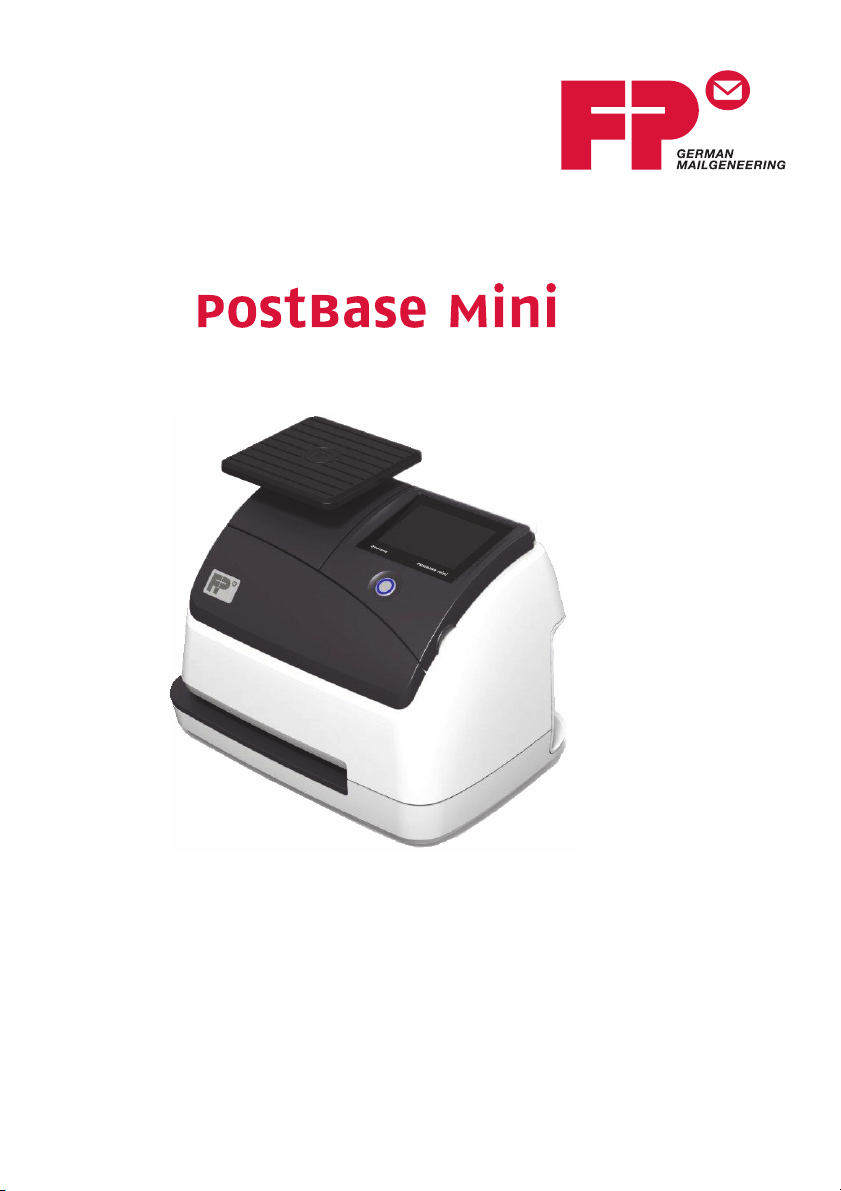
2 A short description of the PostBase Mini __________________________8
3 Installation and commissioning _________________________________11
Step 1: Unpacking and checking the contents of the package ___________11
Step 2: Assembling PostBase Mini _______________________________12
Step 3: Removing the transport fixture _____________________________13
Step 4: Connecting PostBase Mini ________________________________14
Step 5: Turning the PostBase Mini on _____________________________ 15
Step 6: Installing PostBase Mini __________________________________ 15
4 The basics of operation ________________________________________22
4.1 Turning the PostBase Mini on / off __________________________22
4.2 Standby ______________________________________________23
4.3 Screen elements and operation philosophy ___________________24
4.3.1 The touch screen _______________________________________24
4.3.2 The Home screen ______________________________________26
4.3.3 The Product calculation menu _____________________________27
4.3.4 The Menu _____________________________________________29
4.3.5 Lists _________________________________________________29
4.3.6 Adjustment menus ______________________________________30
4.3.7 Pop-up windows ________________________________________31
4.3.8 Procedures (wizards) ____________________________________32
5 Setting the franking imprint _____________________________________33
5.1 Product / postage _______________________________________34
5.1.1 Setting a product via shortcut _____________________________34
5.1.2 Setting mailing data _____________________________________35
5.1.3 Setting the weight – Weighing the mail piece _________________36
5.1.4 Setting the weight manually (not in all countries) __________________ 37
5.1.5 Setting the postage manually (not in all countries) ________________37
5.2 Advertising imprint ______________________________________38
5.3 Date (not changeable in all countries) ____________________________39
6 Franking ____________________________________________________40
6.1 Changing the user (optional) ________________________________40
6.2 Selecting / changing an account ___________________________41
6.3 Positioning and franking a letter ____________________________42
6.4 Displaying and resetting the piece counter ___________________43
6.5 Using PostBase Mini in ‘PC Mode’ (optional) ___________________44

PostBase Mini
4
7 Displaying and printing registers ________________________________ 45
8 Download postage (subject to country-specific regulations / not available in all countries) 47
9 Special functions _____________________________________________ 48
9.1 Print advert only _______________________________________ 48
9.2 Print Numbers _________________________________________ 49
10 Account administration ________________________________________ 51
10.1 Switch account function on / off ____________________________ 51
10.2 Display account information ______________________________ 52
10.3 Set one account to zero _________________________________ 52
10.4 Set all accounts to zero __________________________________ 52
11 Advanced settings & system information _________________________ 53
11.1 System information _____________________________________ 53
11.2 Display brightness ______________________________________ 53
11.3 Sound signals _________________________________________ 54
11.4 User interface language _________________________________ 55
11.5 Standby time __________________________________________ 55
11.6 Product after Standby (not in all countries) ______________________ 56
11.7 Auto Off ______________________________________________ 57
11.8 Meter type (not in all countries) _______________________________ 57
11.9 Connection to data centre ________________________________ 58
11.10 View contact information _________________________________ 61
11.11 Access control / PIN ____________________________________ 61
11.12 Auto Postage Download (not in all countries) ____________________ 62
11.13 Remote Services _______________________________________ 64
11.14 Change Postal Code (ZIP) / Re-authorisation (not in all countries) ____ 64
12 Maintenance and care _________________________________________ 65
12.1 Cleaning the PostBase Mini ______________________________ 65
12.2 Checking the ink level ___________________________________ 66
12.3 Changing the ink cartridge _______________________________ 66
12.4 Aligning the ink cartridge _________________________________ 71
12.5 Cleaning the print system ________________________________ 73
12.5.1 Starting automatic print system cleaning _____________________ 73
12.5.2 Cleaning ink cartridge by hand ____________________________ 74
12.6 Move the motor of the print system to reference position ________ 76
12.7 Calibrating the touch screen ______________________________ 76
12.8 Replacing the battery ___________________________________ 77

Contents 5
13 Tips for troubleshooting _______________________________________79
13.1 Error messages ________________________________________79
13.2 Problems and remedies __________________________________79
14 Withdrawal and disposal of the PostBase Mini _____________________85
Appendix
Technical Data ________________________________________________87
Declaration of conformity ________________________________________89
License ______________________________________________________90
Security Declaration for data usage ________________________________92
United States Patents ___________________________________________92
Graphical symbols and product safety labels _________________________93
User interface symbols (overview) _________________________________95
Index ________________________________________________________99
Customer Support / Warranty ____________________________________107

PostBase Mini
6
1 Safety tips
PostBase Mini is a digital franking machine with ink-jet print technology for franking
mail. PostBase Mini complies with the pertinent safety regulations for office informa-
tion equipment.
Please observe the following tips for your own safety:
Prevention of electrical hazards
• Operate the PostBase Mini only on a grounded single-phase power socket. Make
sure your office power supply conforms to the power requirements indicated on the
power supply unit’s serial number plate.
• Only use one of the power supply units specified in the appendix “Technical Data”.
Make sure that the power supply unit is not damaged.
• Make sure the socket for connecting the PostBase Mini is close by and easily
accessible at all times.
• Unplug the mains plug in case of an emergency. Call the Customer Support.
• Take special care that no foreign objects or liquids penetrate the interior of the
PostBase Mini.
• Unplug the mains plug prior to cleaning the PostBase Mini.
Prevention of mechanical hazards
• Do not remove any equipment related to safety or protection. Do not make them
inoperative or unable to function.
• Do not remove any parts of the housing.
Accessories and consumables
• We recommend to use only approved FP equipment and FP original parts. The
manufacturer FP has established reliability, safety and applicability. The manufac-
turer cannot assess the reliability, safety and applicability for products not approved
by FP, and therefore not vouch for such products. The full functioning of the
PostBase Mini franking machine at the time of delivery can only be guaranteed
when using original Francotyp-Postalia ink cartridges.
• Only use one of the power supply units specified in the appendix “Technical Data”.
Make sure that the power supply unit is not damaged.

Safety tips 7
• Use the supplied cables or cables that have been approved by Francotyp-Postalia.
Make sure that cables are not damaged.
• Ingestion of the ink can be hazardous to health. Avoid contact with the eyes. Keep
the ink cartridges away from children. Further instructions for use are enclosed with
the ink cartridge.
• We recommend to use only the batteries provided by Francotyp-Postalia.
The manufacturer FP has established reliability, safety and applicability.
Observe the instructions enclosed with the battery for correct use and disposal.
General safety tips
• Install the PostBase Mini according to the instructions.
• When you move the PostBase Mini from a cold environment (i.e. below 10 °C /
50 °F): Unpack the PostBase Mini and wait at least two hours before connecting
the PostBase Mini. The PostBase Mini requires this period to adapt to the ambient
conditions. Any condensation evaporates.
• Have maintenance and repair work done only by qualified personnel authorised by
Francotyp-Postalia. Otherwise, your warranty may become void.

PostBase Mini
8
2 A short description of the PostBase Mini
Connections (view from the right)
Scale with
weighing platform
Button
ON / OFF
Battery compartment
(at the bottom)
Letter slot
Display / touch screen
Operating panel
ink cartridge below it
Stylus for touch screen operation:
pull out to the right
Serial number plate
(at the bottom)
Connection for the external
power supply unit
LAN port / Network interface
PC connection
USB
Connection for an optional external device
USB
Only use power supply unit specified in
the appendix “Technical Data”.

A short description of the PostBase Mini 9
Things worth knowing about PostBase Mini
PostBase Mini is a digital franking machine for small
mail volumes featuring a touch screen. It stands out due
to its compact design and intuitive handling. The reliable
ink-jet technology delivers clean franking imprints.
Intuitive handling PostBase Mini makes do with only a single button,
arranged in the centre: for switching on and off. For all
other operations, the clearly designed user interface in
the 3.5 inch colour display guides you fast and easy to
the desired destination.
Franking Simply switch on the PostBase Mini, select a postal
product, position a letter – done!
Franking is possible on mail pieces made of ink-absorb-
ing material – postcards to 6 mm (0.23") thick letters in
ISO B4 format – and special self-adhesive labels.
Letters as advertising medium In addition to printing postage, you can print an adver-
tisement of your choice on every mail piece you send.
When using the optional PC control software, this can
also be a text message (if available in your country).
Download postage You conveniently download the postage for franking
online from the data centre into your franking machine.
If desired, PostBase Mini can also, by itself, make sure
there is always sufficient postage available and prompt
you automatically to download postage.
(Availability and handling of features relating to postage accounting
depend on the respective countries.)
Remote Services:
flexible and up to date
The PostBase Mini ensures you are always using the
current postal rates. Whether new postage rates, new
adverts or a software update – the franking machine
downloads current data from the data centre.

PostBase Mini
10
Additional functions Weighing – the space saving, integrated scale quickly
and reliably determines the weight of letters and par-
cels. The determined weight directly affects the product
settings.
Account function – PostBase Mini allows for registra-
tion and billing of postage costs to accounts.
Access control – PostBase Mini can be protected
against unauthorised use via a PIN (Personal Identifica-
tion Number).
Controlling PostBase Mini via PC software (optional).
Francotyp-Postalia offers software for controlling and
administration of the PostBase Mini franking machine
via PC, e.g. NavigatorBasic, NavigatorPlus,
RemoteOne, ReportOne (not available in all countries).

Installation and commissioning 11
3 Installation and commissioning
Step 1: Unpacking and checking the contents of the package
Warning! Do not start operating PostBase Mini if parts are damaged or
missing. Please contact the Customer Support.
Caution! Carry out the steps exactly in the given order. Also, consult the
installation instructions (fold-out).
1
2
3456
7
9
8
1 PostBase Mini franking machine
2 Ink cartridge
3 Power cable
4 Power supply unit
5 USB cable
6 Ethernet cable
7 ‘First steps’ manual
8 Installation instructions (flyer)
9 Weighing platform (version as ordered)

PostBase Mini
12
• Unpack the packages.
• Check that the contents of the packages
are complete and free from any damage.
Keep the packing. Use it again whenever you
need to transport your PostBase Mini, or
when sending it to the customer support.
Step 2: Assembling PostBase Mini
Caution! When you move PostBase Mini from a cold environment (i.e. below
10 °C / 50 °F): Unpack the PostBase Mini and wait at least 2 hours before
connecting PostBase Mini. PostBase Mini requires this period to adapt to the
ambient conditions.
• Choose an installation site with the follow-
ing ambient conditions:
– room temperature: 15 °C to 35 °C (59 °F
to 95 °F)
– no direct sunlight
– power socket in the immediate vicinity
– network connection with internet access.
• Place PostBase Mini on a firm, level, low
vibration and horizontal base.
• Remove the protective foil from the display.
Mounting the weighing platform
• Hold the weighing platform such that the
slot in the weighing platform foot points to
the back.
• Place the weighing platform onto the scale
receptacle from above. The slot of the
weighing platform must slide in the coun-
terpart on the scale receptacle.
• Press down slightly on the weighing plat-
form with your flat hand.
Slot

Installation and commissioning 13
Step 3: Removing the transport fixture
To protect the print system, the ink cartridge
holder is secured with tape (transport fixture).
Remove the transport fixture:
• Lift up the operating panel as far as it goes.
It snaps in this position.
• Loosen the tape from the housing and
carefully pull it to the left, peeling it off the
ink cartridge holder.
Note: Do not insert the ink cartridge until later
in the installation process (step 6)!
• Lower the operating panel back into
position.
Tape

PostBase Mini
14
Step 4: Connecting PostBase Mini
Warning! Only use one of the power supply units specified in the appendix
“Technical Data”. Make sure that the power supply unit is not damaged.
Use the cables provided with the PostBase Mini or approved by Francotyp-
Postalia. Make sure that cables are not damaged.
Connect PostBase Mini only to a grounded single-phase power socket. Make
sure your office power supply conforms to the power requirements indicated
on the power supply unit’s serial number plate.
Make sure the socket for connecting PostBase Mini is close by and easily
accessible at all times.
• Connect the franking machine to a local
area network (LAN).
• Connect the franking machine to a PC
(optional).
• Plug the mains plug of the power supply
unit into the power connection of the frank-
ing machine. Connect the power cable to
the power connection of the power supply
unit. Only then, plug the power cable into
the power socket.
Optional

Installation and commissioning 15
Step 5: Turning the PostBase Mini on
• Press the button on the operating panel.
The display lighting and button illumination
switch on. PostBase Mini performs a self test
and then starts the installation procedure.
Step 6: Installing PostBase Mini
PostBase Mini will guide you step by step
through the installation procedure. This
chapter covers a selection of the most impor-
tant steps. Follow the instructions on the
display.
For information on handling the touch screen
and an overview of screen elements, please
read chapter 4.3.
• Have the R-PIN ready (received seper-
ately).
• Touch the button with the desired
language.
• Confirm with the button and continue
the installation procedure.

PostBase Mini
16
PostBase Mini comes with pre-set connec-
tion settings that should work in most cases.
• Press the button to use these settings.
PostBase Mini tests the connection to the FP
Infrastructure.
If no connection can be established, the wiz-
ard for entering connection parameters is
opened.
• If necessary: Enter the connection para-
meters. If need be, ask your network
administrator for details.
For details on possible settings, please read
the appendix “Connection settings (Over-
view)” in the “First steps” Operator Manual.
Caution! PostBase Mini may reboot several
times during installation. Do not unplug the
machine!
• Enter the Repository-PIN (R-PIN).
• Confirm with the button.
PostBase Mini now downloads the software
and data, then reboots.
• Follow the instructions on the display.

Installation and commissioning 17
PostBase Mini then asks you to insert the
ink cartridge.
• Lift up the operating panel as far as it goes.
You can feel it engage.
• Remove the ink cartridge from the packing.
Do not remove the protection strip (nozzle
protection) yet.
To ensure the pigments, which may have
settled, immingle optimally:
• Shake the ink cartridge vigorously six
times.
• Remove the protection strip (nozzle pro-
tection) from the ink cartridge.

PostBase Mini
18
• Hold the ink cartridge so the contacts are
facing to the front of the franking machine.
• Insert the ink cartridge into the socket.
• Push the ink cartridge all the way down
until the little green latch locks it into place
with an audible click. While doing so, you
will have to overcome a slight spring pres-
sure.
The illustration on the left shows the
correct position of the latch.
• Lower the operating panel back into
position.
PostBase Mini calibrates the cartridge …

Installation and commissioning 19
… and prompts you to perform a test print.
• Place an empty envelope at the right hand
edge of the letter slot and push in as far as
it goes.
As soon as the sensor (in the back right hand
corner of the letter slot) detects the envelope,
the PostBase Mini grips the envelope tightly
and prints the test print.
Test print (example) • On the test print, determine the numbers
where
– the horizontal lines are as exactly next to
each other as possible and
– the vertical partial lines are as exactly
above each other as possible.
The ink cartridge is correctly aligned when
horizontal and vertical partial lines form one
line each at number 5.
• Confirm with the button.
When horizontal and / or vertical partial lines
do not form one line each at number 5:
• Press to continue the procedure of ink
cartridge alignment.

PostBase Mini
20
Adjust cartridge: horizontal line
• Type the number where the horizontal par-
tial lines are as exactly next to each other
as possible.
In the example, this is number ‘4’.
(If necessary: Press CE to clear the dis-
played number.)
• Confirm and continue with .
Adjust cartridge: vertical line
• Type the number where the vertical partial
lines are as exactly above each other as
possible.
In the example, this is number ‘7’.
(If necessary: Press CE to clear the dis-
played number.)
• Confirm and continue with .
• Place an empty envelope for another test
print.
• Assess the test print. If necessary, repeat
the alignment procedure until a correct
alignment has been obtained.
Other manuals for Postbase Mini
1
Table of contents
Other FP Postal Equipment manuals