EZee Life CH4036 User manual

CH4035 – Yellow
CH4036 – Red
CH4037 – Orange
EZee Life™ Products
34 Futurity Gate, Unit 15, Concord, Ontario L4K 1S6
Auto-Fold Scooter
User Manual
…...............................................

Thank you for choosing the Auto-Fold Folding Scooter
Please carefully read thorough this manual fully before operating the scooter.
Should you not understand the content well or need to help, please contact
the dealer nearby or contact with our after-service department directly.
This manual has brief introduction to the operational approach on every part
of the scooter, specification and how to deal with accidental conditions.
The following mark in the manual: 「★」in the manual stands for prohibited
action and behavior.
Please pay attention to the information on the paragraphs with words “Warning,
Attention and A device”
•This manual enclosed With A Warranty Form. Please always keep it along
with scooter.
•If you transfer this scooter to another person, please do not forget to pass
the manual to the next owner.
•The factory keeps the right to have design changes, all information and
pictures without further notification.
We hope that the electric folding scooter brings you more independent and
happier life.

Contents
1
Safety Information
3
2
Parts Description
4
3
Operating Instructions
5
4
Battery & Charging
7
5
Folding & Unfolding Adjustments
8
6
Inspection & Maintenance
9
7
Trouble Shooting
10
8
Specifications
10
9
Warranty
11
2

Safety Information
Please drive on the sidewalk. For roads where there is no sidewalk, drive facing
traffic as far off to the side of the road as possible.
Pay attention to traffic of other vehicles on the road when there is no sidewalk
available.
Please avoid driving on the road during heavy traffic.
No drinking or driving when over.
Avoid driving at night.
Obey traffic signs, local traffic laws and regulations.
Terrain
Electric scooters achieve their best stability when driven on flat solid surfaces
(such as floors, sidewalks, pavement, etc.).
They can be used in parks and grasslands safely.
Avoid driving on loose gravel, soft soil and similar surfaces.
If you cannot judge the condition of the road, do not drive on it.
Electric scooters can drive over obstacles with a low height. Drive slowly and
evenly when attempting to traverse any obstacle.
Warning: do not try to cross the slope beyond the angle listed in the manual,
please follow other requirements mentioned in this manual.
Safety Precautions
● Don’t try to drive before you read and fully understand the manual.
● This scooter is designed to only one person. No additional passenger is
allowed.
● Please switch off the power when the scooter is not in use.
● Please drive slowly when soft ground or rough terrain.
● Please slow down when you turn a corner.
● Please don’t drive on steep slopes or drive continuously 300 meters on slopes
above 9 degrees. The control system will automatically cut off the power
when the scooter exceeds 9 degrees. To restart he scooter turn the key of and
back on again.
3

● Drive carefully near curbs, slopes, soft terrains, obstacles, people, pets, furniture, etc.
● Any change and modification on initial setting and modification is prohibited.
● Please drive carefully when you are in the busy street, market and shopping center.
Driving on unsafe and non-permitted roads is prohibited. Please consult with local
Government agencies regarding the rules for an electric scooter.
● Do not sit on the scooter inside a moving vehicle.
● This product is equipped with lithium-ion battery, unqualified people are not
allowed to disassemble the internal parts of battery.
Further Precautions
● Repair and modification
If the repair or modification is needed, please contact the store or agent.
● Original parts
Please use the original parts from the manufacturer’s factory when the replacement is
needed.
Parts Information
4
1 Control Panel
6 Anti-Tipper
2 Tiller Connector
7 Free Wheel Lever
3 Aluminum Steering Post
8 Charger Socket
4 Wheel
9 Armrest
5 Footboard/Battery
Compartment
10 Leather Seat

Tiller Head Components
1. Speed Control
2. Horn Button
3. HUSB Interface
4. Control Lever
5. Key Switch
6. Battery Indicator
Operating Instructions
Power Switch
The key switch is operatied using the supplied keys. Turn key clockwise to turn
the scooter on and counter clockwise to turn the scooter off.
Warning!
1. Never enter or exit the scooter with the power turned on!
2. If the power is turned off while driving the scooter will come to an abrupt
stop which may be dangerous.
Battery Indicator
With the power on, the indicator will show the charge level of the battery.
Green lights indicate good power, Yellow lights indicate weaker and Red lights
indicate charging is required as soon as possible.
Speed Control
The speed control adjusts the maximum speed of the scooter from .2 kph to 6
kph. Turn right to increase the maximum speed and left to reduce the
maximum speed.
Control Lever
The control lever controls the direction the scooter will travel. Pull the lever
back on the left side to reverse and pull back on the riught side to go forward.
The scooter will beep while backing up. The further these levers are moved the
faster the scooter will move up to its maximum set speed like a gas pedal.
5

Horn Button
Pressing the horn button will sound the horn. Used to warn others in an emergency
where an accident seems imminent.
Battery Holder
The battery compartment contains the 24 volt 6 ah lithium Ion battery which powers
the scooter for driving and folding.
Controller
The controller is the electronics module set under the seat frame that enables the
scooter to run and react to signals sent form the tiller head control panel.
Free Wheel Lever
The brakes on the scooter are always on until the drive control lever is moved. In order
to push the scooter it has to be switched into the free wheeling mode by pushing it
towrds teh front of the scooter.
Warning!
Never have the scooter in the free wheeling mode on a hill. The
scooter will roll down the hill and the brakes will not work!
Driving
Ensure the tiller is locked in position and turn on power. The battery
indicator will show the battery charge and the power light will come on.
Check the battery level to know you will have enough power to go where
intended. If the power level is low, recharge the battery.
Adjust the speed control to the maximum speed level you are comfortable
with.
Ensure the conditions are safe for driving and nothing in the surrounding
environmet is a danger.
Push or pull the control lever to be gin moving inthe direction desired.
Remember that the farther you push the lever, the faster the scooter will
respond.
6

Caution:
Ensure the power is off when entering or exiting the scooter.
Do not operate the control lever with both hands at the same time.
Do not turn off power when moving.
Drive at low speed indoors, in crowds or when reversing.
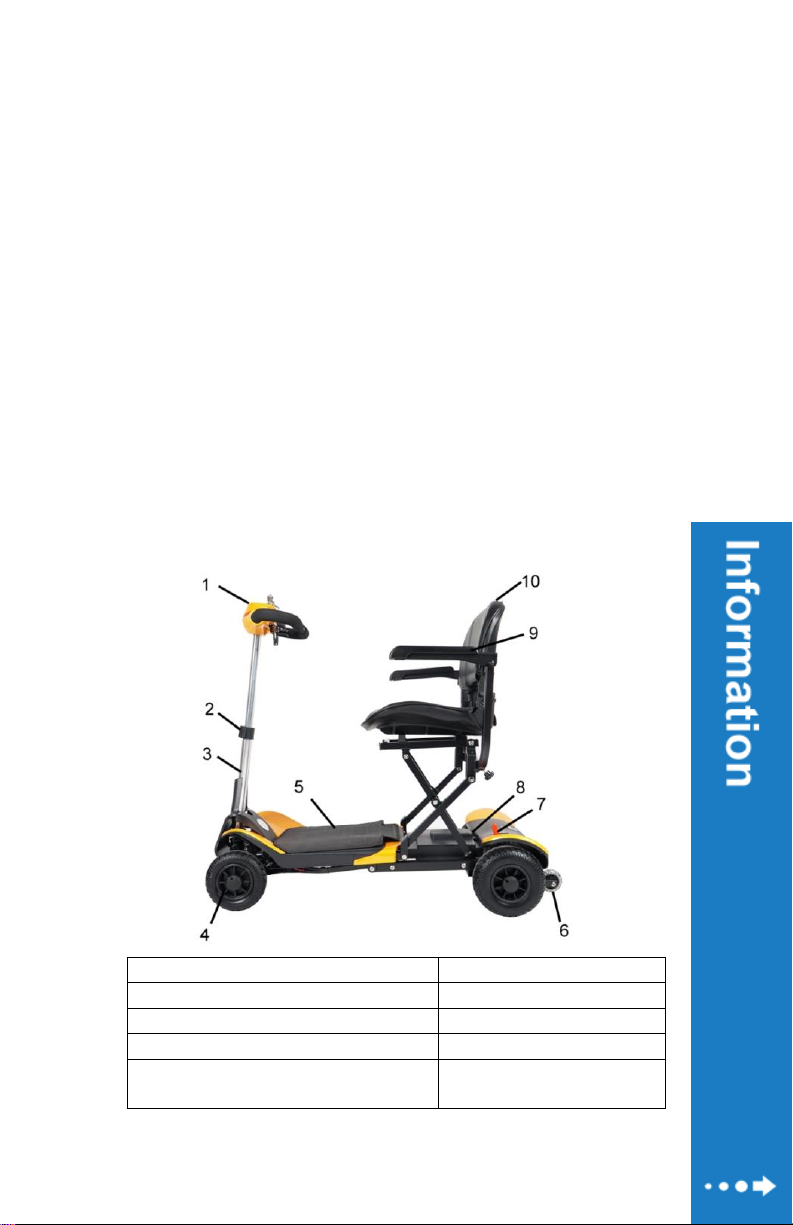
Stopping
The brakes will automatically engage when the control lever is released and it
returns to the neutral (center) position.
Caution: The braking distance will vary with the speed driven and the
condition of the ground. Ice and snow may casue the scooter to slide.
When not driving turn the scooter power off.
Charging and Battery Information:
24 v Lithium Ion Battery: Fully charge the battery before using for the first
time. Do not attempt to open or repair the battery. Call your dealer.
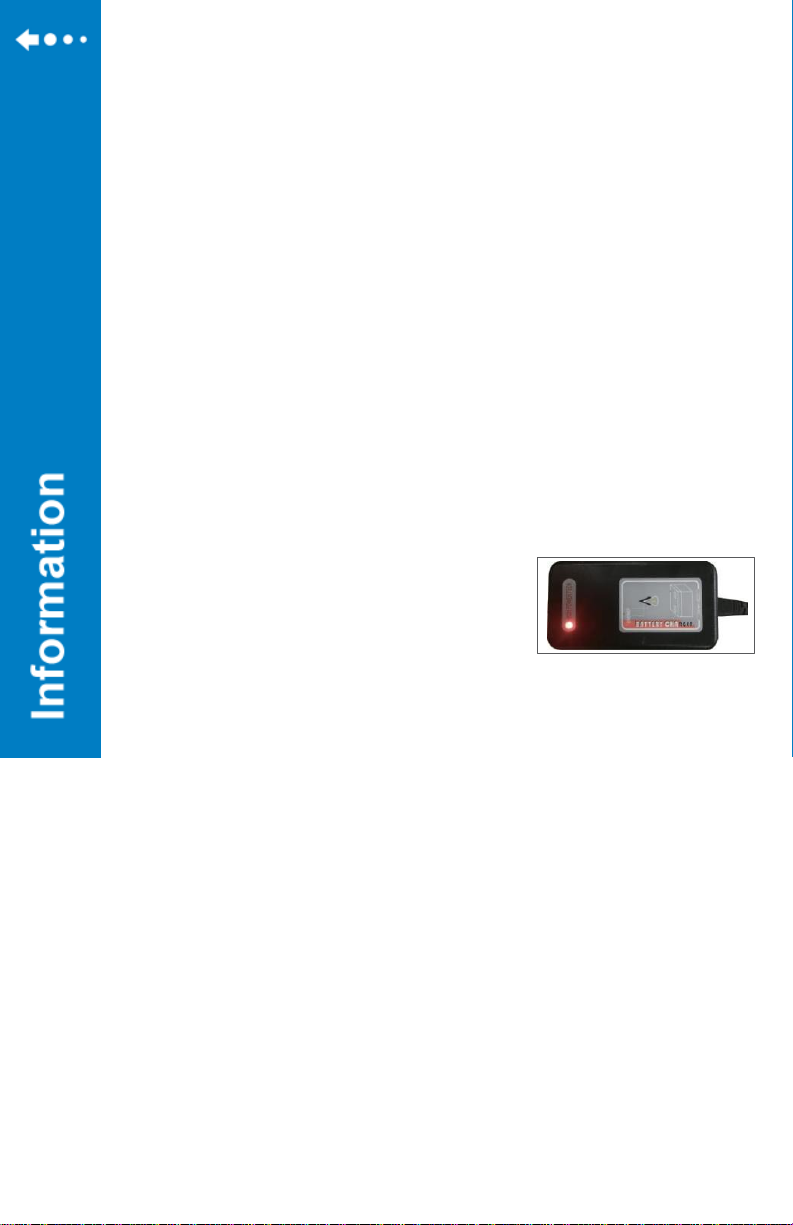
This scooter uses a 100-240VAC / 24 VDC / 2
amp. charger shown at right.
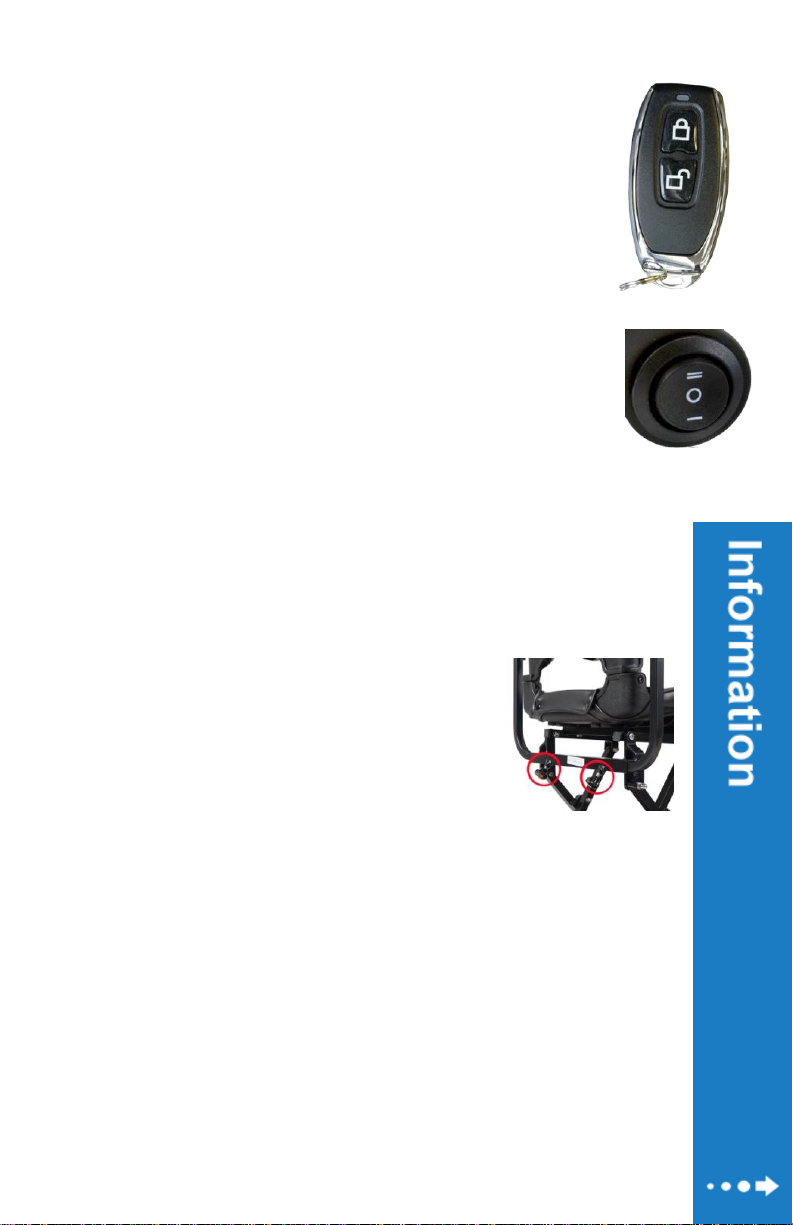
The scooter battery is charged on the scooter with the supplied charger:
1. Turn the scooter power off.
2. Insert the charger plug form the rear into the charger port under the
seat.
3. Insert the charger power cord into a wall outlet.
4. When charging, the indicator light will display in orange colour.
Charging will take beteen 5 and 8 hours.
5. When the battery is fully charged, the indicator light will turn green
and the charger will stop charging.
6. Disconnect charger before driving.
*Only use the charger supplied to charge the battery
*Do not disassemble or modify the charger
*Charge in a ventilated area out of direct sunlight
7

Folding and Unfolding the Scooter
Remote Control
•On the reomte control press and hold the lock button to
unfold the scooter.
•Press and hold the unlock button to fold the scooter.
The scooter can also be folded and unfolded manually by using
the switch found at the back on the shroud under the seat.
With the switch in the double bar position the scooter will
fold/open manually with the button on the right side of scooter.
With the switch in the single bar position the scooter will
fold/open using the remote.
When the switch is in the “O” position the scooter will not fold or
unfold. It is recommeded the switch is left in the “O” position at all times to prevent
accidental folding and unfolding.
When folding ensure there are no objects on or under the scooter.
Adjustments
Armrest Adjustment
The armrests can be adjusted in or out to fit the user
more comfortably in a range from 45 cm to 55 cm.
Loosen the turn screw found under the seat, adjust
the arms to the desired position, tighen the turn
screw.
8

Routine Inspection
Before driving please ensure the scooter is safe and working properly. Below
are a list of items that should be checked regularly.
If you feel there may be a problem call your dealer and do not use the scooter
until it has been checked over by a technician.
Battery Maintenance
This scooter uses a high performance lithium-ion battery. Re-charge the
battery after each use for best results. Do not allow the battery to become fully
discharged.
When not in use, the scooter should be charged monthly. It is recommended
that the battery be run down quite low and recharged once every three
months.
Maintenance Checks & Information
1 Check insulation on wires and check connectors regularly
2 Keep all electronic components away from moisture. if they get wet
ensure they have fully dried before using the scooter
3 Use a soft damp cloth for cleaning. Do not soak dodwn or spray with
water.
9
Inspection Item
Inspection Content
Tiller
Ensure the tiller is secure, locked in place
and turning properly.
Speed Adjuster
Ensure the speed control rotates
smoothly and operates correctly
Control Lever
Ensure the lever moves smoothy and
doesn’t stick or bind. It should rturn to
center eerytime it is released.
Brake Lever
Ensure the brake lever be moved easily
between the locked and free wheeling
positions
Battery Indicator
Ensure the laights are working and the
batttery is charged sufficiently

Troubleshooting
The controller is designd=ed to be trouble free and is equipped
with a system to diagnose common problems. A flashing LED
light on the control panel will give an indication of the problem.
Number
of flashes
Problem
Possible Solution
1
Low battery or bad connection
Check connections and try recharging
2
Motor problem
Check connections between the
control box under the seat and the
motors
7
Control lever not driving
scooter
Turn off the scooter and ensure the
level is in the center position. Once
centered turnt he scooter back on.
9
Barke lever failure
Check connection between the brake
lever and controller to ensure
connections are secure.
Specifications
Overall Dimensions 105 x 55 x 87 cm
Packing Dimensions 48 x 55 x 79 cm
Weight 29 kg
Front Wheels 7” PU
Rear Wheels 8” PU
Speed 0 – 6 kph
Range 20 km*
Spanning Height 4 cm
Drive Type Rear Wheel Drive
Brake Mode Electromagnetic brake
Load Capacity 120 kg
Ground Clearance 5 cm
Seat Height (from ground) 56 cm
Turning Radius 120 cm
Maximum Grade 6°±1°
Controller PG45A
Charger DC24V/2A AC100-240V
Battery 2 x 24V 6AH lithium-ion
10

Limited Warranty
This EZee Life™ product carries a three-year warranty against manufacturing defects,
faulty materials and workmanship only. Any alterations, misuse, abuse, or accidental
damage voids this warranty. EZee Life™ reserves the right to replace or repair any part
that has become defective.
The warranty does not extend to consequential costs resulting from the fault or defect
of the product: freight and travel costs, loss of earnings, or other expenses that one
may incur.
Warranty is valid for the original purchaser only and the original receipt must be
presented before any warranty options are considered. Please also be prepared to
provide the date of purchase and serial number.
Imported / Distributed by:
HPU Medical Wholesale
34 Futurity Gate, Unit # 15
Concord Ontario L4K 1S6
GTA: 416-739-1267
Toll Free: 888-634-5808
Fax: 416-739-7171
11
This manual suits for next models
2
Table of contents
Other EZee Life Scooter manuals