manuals.online logo
Brands
  1. Home
  2. •
  3. Brands
  4. •
  5. Ezzy
  6. •
  7. Windsurfing Equipment
  8. •
  9. Ezzy Cheetah Quick start guide

Ezzy Cheetah Quick start guide

1) Setting the Downhaul When You
Have the Correct Ezzy Mast:
a) First, check that the length of
your Ezzy mast falls within the recom-
mended lengths (chart 1).
Note: If your Ezzy mast combination
does not fall within the lengths in
Chart 1, then please refer to the
Troubleshooting section on the back
page of this guide.
b) Finally, downhaul your sail until
the calibration mark lines up with the
bottom of the mast (figure 1).
Which Calibration Line to Use?
- For extremely strong wind, use the
“Max” line.
- For mediumly powered conditions,
use the “Med” line.
-For light wind, use the “Min” line.
Additional Information:
- We have set the adjustable head
cap to its shortest setting. Do not re-
adjust the head webbing.
- Do not over-downhaul. Too much
downhaul will make the sail unstable.
-If you feel back-hand pressure, apply
more outhaul.
- It’s best to adjust the downhaul and
outhaul together. For example, if you
increase the downhaul for strong
wind, you should also increase the
outhaul. And, for light wind, to get
maximum power, reduce the outhaul
as well as the downhaul.
Tuning Guide for
the Ezzy Cheetah
Fig. 1: Downhaul until the
calibration mark lines up with
the bottom of the mast.
Chart 1: correct mast
combinations and lengths.
5.5 430 430.3 - 430.7
6.0 430 430.3 - 430.7
6.5 430 430.3 - 430.7
7.0 460 460.3 - 460.7
7.5 460 460.3 - 460.7
8.0 460 460.3 - 460.7
8.5 490 490.3 - 490.7
9.5 490 490.3 - 490.7
Correct Total Length
Ezzy Mast (including tip plug)
Med
Min
Max
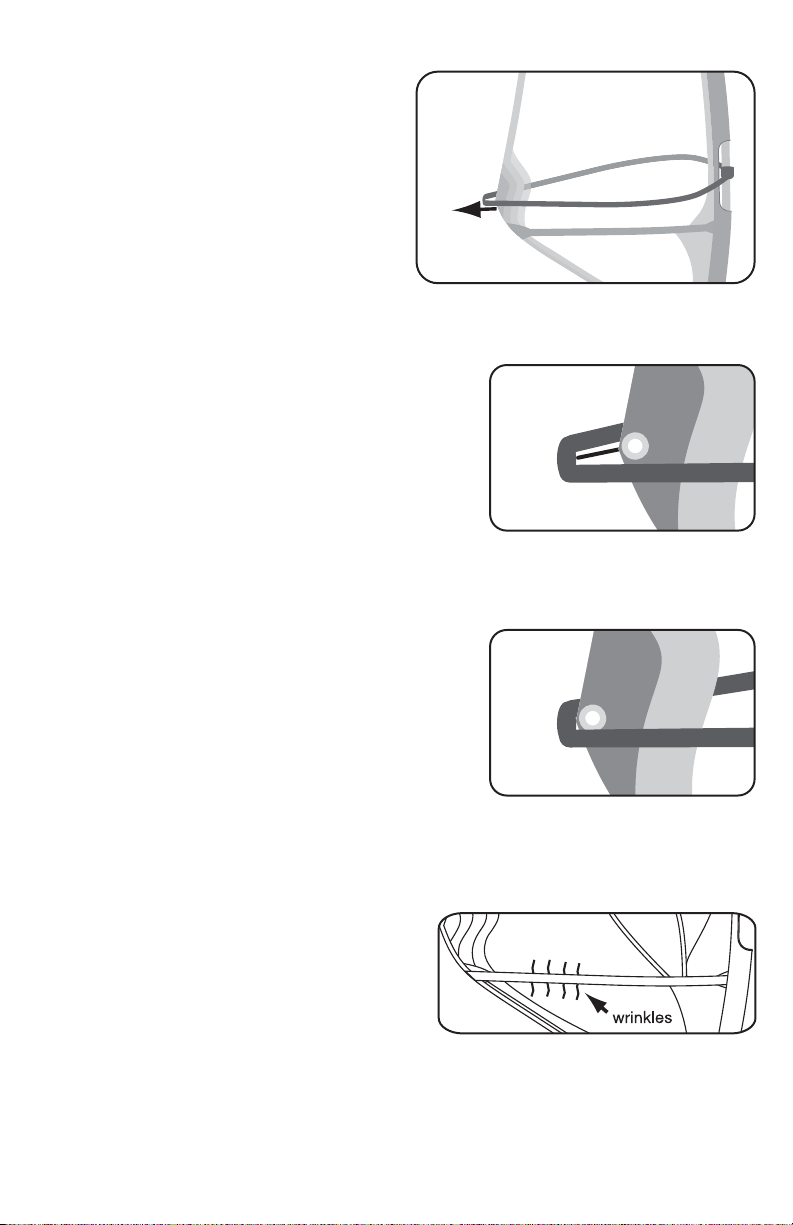
Fig. 4: Tension tack strap and
store downhaul line in mesh pocket.
Figure 2: With the leech lying
on the ground, downhaul until
the looseness extends to the
four dots.
Figure 3: Move the calibration
gauge so the medium mark
lines up with the bottom of
the mast.
2) Setting the Downhaul if You Don’t
Have the Correct Ezzy Mast:
a) First, make sure you have NO outhaul.
b) Then, downhaul until the looseness on
the leech extends to the four dots printed
between battens #2 and #3 (figure 2).
Note: to see the looseness, the leech at
the dots must be touching the ground.
c) This is the medium wind setting.
d) Next, move the downhaul gauge at the
bottom of the sail so that the medium
mark of the gauge lines line up with the
bottom of your mast (figure 3).
e) The downhaul gauge is now positioned
correctly. From now on, to set your down-
haul, just downhaul until the the gauge
lines up with the bottom of your mast.
Note: When observing the looseness at
the dots for this exercise, the sail must
have no outhaul. When you apply outhaul
the leech tightens.
Additional Information:
- Do not over-downhaul. Too much down-
haul will make the sail unstable.
-If you feel back-hand pressure, apply
more outhaul.
- If you change to a different mast, you
will need to repeat steps a) through e).
3) Tension the Tack Strap
After downhauling, thread the tack strap
through the buckle and pull the strap until
the foot gets tension. You will see a small
wrinkle running out from the corner of the
sail. Then, wrap the end of the tack strap
around your mast extension and loop the
end of the tack strap under itself and
secure the strap with the velcro. Store
your downhaul line in the mesh pocket
located inside the pad (fig. 4).
Med
Min
Max
wrinkle
tension
store line in
mesh pocket
Fig. 5: Positive outhaul
Fig. 6: Set the boom
length to the outhaul cord
Fig. 7: Outhaul sail to
the end of the boom
4) Setting the Outhaul:
The Cheetah requires more positive
outhaul than most sails (fig. 5).
The three cords sewn at the clew indicate
how much positive outhaul is needed for
varying wind conditions. The longest cord
shows the maximum outhaul for strong
wind; the shortest cord indicates the
minimum outhaul for light wind and the
middle cord shows a medium outhaul
setting.
Follow these steps to set the outhaul:
a) First, correctly set the downhaul.
b) Next, release all outhaul tension.
c) Then, gently pull on the outhaul cord
and set your boom to the end of the cord
(fig. 6).
d) Finally, outhaul your sail to the end of
the boom (fig. 7).
Additional Information:
- When setting your boom to the cord,
don’t pull the clew.
- We suggest starting with the medium
length cord. If you feel over-powered
(back-hand pressure), increase the
outhaul about 1 to 2 cm. If you feel
under-powered, reduce the outhaul by
about 1 to 2 cm.
5) Tensioning the battens:
Use the tensioner key that is stored in
the pad of the sail and tension the
battens until you eliminate any vertical
wrinkles that extend out from either side
of the batten pocket (figure 8).
Note: Your battens have already been
tuned by us in the factory and most likely
will not need further tuning. Be careful
not to over-tension your battens.
Figure 8: Tension the battens
until there are no vertical wrinkles
on either side of the batten pocket.
positive
outhaul
6) Sail Care:
- Creasing damages the sail cloth.
Avoid creasing your sail when rigging
and de-rigging.
- Sunlight kills all sail cloth. Keep your
sail out of the sun when not sailing.
- Don’t rig on sharp objects.
- After rolling the sail, tuck the pad so
it rests along the sail, wrap the tack
strap around the pad and the sail, then
attach the velcro (fig. 9).
- Insert your sail sleeve-end first into
the sail bag (fig. 10).
- Never store your sail upright resting
on the clew.
- Don’t roll your sail when it is wet with
fresh water. This will cause the
window vinyl to turn hazy blue. Allow
your sail dry thoroughly for the vinyl to
clear up.
7) Troubleshooting:
> I am using the correct Ezzy mast
combination, but my mast is
3.0mm longer than the lengths
listed on your chart, what should I
do?
a) Remove the downhaul gauge from
the sail and re-attach it 3.0mm lower.
> My Ezzy mast is 3.0mm shorter
than the lengths listed on your
chart, what should I do?
a) Move the downhaul gauge up by
3.0mm.
> My sail has too much back-hand
pressure.
a) Apply more outhaul.
b) Reduce downhaul.
Fig. 9: After rolling, tuck
the pad, then wrap with the tack
strap and secure the velcro.
Fig. 10:
Sleeve end
first into bag.
rigging videos: www.ezzy.com
email: info@ezzy.com
Fig. 11: Threading the tack pulley
for a Chinook-style extension.
Sail
Pulley
start
end
Base
Pulley

Other Ezzy Windsurfing Equipment manuals

Ezzy Power Race Quick start guide

Ezzy

Ezzy Power Race Quick start guide

Ezzy Power Slalom Quick start guide

Ezzy

Ezzy Power Slalom Quick start guide

Ezzy Transformer Bump & Jump Quick start guide

Ezzy

Ezzy Transformer Bump & Jump Quick start guide

Ezzy Hydra Sport User manual

Ezzy

Ezzy Hydra Sport User manual

Ezzy Power Wave 1999 Quick start guide

Ezzy

Ezzy Power Wave 1999 Quick start guide

Ezzy Legacy Series Quick start guide

Ezzy

Ezzy Legacy Series Quick start guide

Ezzy Transformer 1998 Quick start guide

Ezzy

Ezzy Transformer 1998 Quick start guide

Ezzy AXIS 2000 User manual

Ezzy

Ezzy AXIS 2000 User manual

Ezzy Infinity User manual

Ezzy

Ezzy Infinity User manual

Ezzy Ezzy Wave User manual

Ezzy

Ezzy Ezzy Wave User manual

Ezzy DUO 2000 User manual

Ezzy

Ezzy DUO 2000 User manual

Ezzy Slalom User manual

Ezzy

Ezzy Slalom User manual

Ezzy Transformer Wave Quick start guide

Ezzy

Ezzy Transformer Wave Quick start guide

Popular Windsurfing Equipment manuals by other brands

Glide Free Design GLIDE FREE FOILS manual

Glide Free Design

Glide Free Design GLIDE FREE FOILS manual

EZZY SAILS Infinity quick start guide

EZZY SAILS

EZZY SAILS Infinity quick start guide

Glide Free Design FOILS Setup

Glide Free Design

Glide Free Design FOILS Setup

EZZY SAILS FREESTYLE 2000 quick start guide

EZZY SAILS

EZZY SAILS FREESTYLE 2000 quick start guide

Cabrinha FUSION HYBRID user manual

Cabrinha

Cabrinha FUSION HYBRID user manual

NEILPRYDE RS:FLIGHT F4 Assembly manual

NEILPRYDE

NEILPRYDE RS:FLIGHT F4 Assembly manual

manuals.online logo
manuals.online logoBrands
  • About & Mission
  • Contact us
  • Privacy Policy
  • Terms and Conditions

Copyright 2025 Manuals.Online. All Rights Reserved.