Family inada chair i.1 HCP-i1 A User manual

Specifications
Specifications
Product name and model number
Power
Power consumption
Frequency
Rated time
Kneading speed
Tapping speed
Width between the right and left rollers
Vertical traveling speed
Traveling distance
Automatic programs
Manual selection
Lower body massage
Auto timer
Vibration function
Position of footrest
Reclining
Chair dimension
Weight
Upholstery
Accessories
inada chair i.1 HCP-i1 A
AC120V
210W
60Hz
30 minutes
6 levels: Min. approx. 17 times/min. Max. approx. 38 times/min
4 levels: Min. approx. 311 times/min. Max. approx. 615 times/min
3 levels (narrow, medium, wide)
Approx. 21 seconds for 1 round
Approx. 23 inches
(in the case of Partial rollers, automatic repetition will be performed in the range of approx. 6 inches)
5 Health programs / 3 Well-Being programs (with Automatic Massage Points Detecting function)
10 Upper body modes / 3 Lower body modes
Air pressure High: approx. 31 kPa Medium: approx. 26 kPa Low: approx. 21 kPa
Approx. 15 minutes (varies in the case of Automatic Programs)
Back・Seat 2types toggle between High and Low
Adjustable range: approx. 4 inches
Power recline to any position between about 120 and 170 degrees.
Width approx. 29 inches/Depth approx. 47(68) inches/Height approx. 45(29) inches
Approx. 167 lbs
PU Synthetic leather (specially processed treated for anti-bacteria and anti-contamination)
Remote control stand
31BZ0017
Upper body
Number of manufacturing permit
(medical tools)(Japan)
For technical assistance in the USA and Canada, you can reach us by calling our toll free number: 888.769.0555.
The direct dial number is 303.317.4356
We welcome comments and feedback about your buying experience and your experience in your INADA chair.
We invite you to email us at [email protected].
We hope you enjoy your new, world-class massage experience! 776932500
Massage points detected automatically
by optical sensors.
Massage program adapts
to your body size and purposes
for use.
Keep this manual nearby so that you can refer to it anytime.
Please read this Operating Manual before use.
* ( ) shows the value at maximum recline
when footrest is horizontal
Technical Assistance

Features And Benefits
1 2
Features And Benefits
Greetings
CONTENTS
Thank you for purchasing the inada chair i.1.
Features And Benefits ........................................................................ 2
Safety Precautions ①........................................................................ 3
Safety Precautions ②........................................................................ 5
Parts Descriptions .............................................................................. 7
Before Use ......................................................................................... 9
Massage Types And Features ............................................................
11
Automatic Programs ①/Massage Types ........................................... 12
Automatic Programs ②/Operation .................................................... 13
Manual Selection Modes ①/Liquid Crystal Display · Explanation Of Movements
.......
15
Manual Selection Modes ②/Operation .............................................. 17
Cleaning And Storage ........................................................................ 19
Troubleshooting Guide .......................................................................
21
Service ...............................................................................................
22
Specifications ....................................................................... Back Page
●
●
●
●
●
●
●
●
●
●
●
●
●
●
●
●
●
●
●
●
●
●
●
●
●
●
●
●
Features
Benefits
Provides a hybrid massage
function using roller pressure
and air pressure:
Four rollers provide professional-like
techniques for massaging the upper half of
your body.
14 air cells provide a delicate massage for
the lower half of your body.
Various massage courses/
programs:
●Five Healthcare programs.
●Three Well-Being programs.
●Automatic detection of massage points.
A remote control with a liquid
crystal display that gives you
comprehensive information on
the operation of the chair.
A stand to store the remote
control.
Equipped with a vibrator for
massaging your back and seat.
Equipped with an automatic
timer function for safety.
As a therapeutic massage device in the general
households, the inada chair i-1 provides the
following benefits:
l
Relaxes muscles
l
Relieves minor muscle aches and pains
The footrest is adjustable in
length so that you can place just
your calves on the footrest.
Power recline to any position
between 120 and 170 degrees
(relative to the floor).
Equipped with a pneumatic
device for raising/lowering the
footrest (available for both
independent operation and
linked operation with the power
recline).
The inada chair i.1 that you have purchased is the culmination of the best of our efforts. We have conceived
and implemented several new and unique functions into the inada chair i.1 that other massage chairs are
unable to offer. We deliver you the inada chair i.1 with utmost confidence, from the 'Birthplace of Massage
Chairs' --- Japan.
After using the inada chair i.1, we are sure that you will love it as the best partner for you health management,
providing you with the best and most professional-like massage techniques.

Safety Precautions ①
3 4
Safety Precautions ①
Remember to keep this Operating Manual in an easily accessible place.
Safety Precautions: Installation
l
Do not install the chair in an area of high hu-
midity such as a bathroom or sauna.
→Could result in injury or electric shock.
l
Do not use the chair outdoors.
Be sure that you have read these SAFETY PRECAUTIONS thoroughly before using your inada chair i-1 for the first time.The Operating
Manual contains important information about how to use the chair safely and correctly, avoiding possible damage to property or injury to
persons using the chair and others. The symbols shown below are used throughout the Operating Manual to highlight important safety in-
structions. Please adhere to all precautions.
This action could result in serious
injury or death.
Warning This action could result in personal
injury or damage to property.
Caution
l
Only install on a flat, level surface.
→Chair could tip over accidentally if placed on an uneven surface.
Required Action
Prohibited
Types of Symbols and Description
Display Warnings
Caution
Safety Precautions: Before Use
Required Action
Warning
Prohibited
Prohibited
l
The following persons must not use this massage chair:
l
Do not use the chair with anything other than an AC 120 V power source.
→May result in fire or electric shock.
l
Do not use with any type of transformer device.
→May result in injury or electric shock.
l
Do not use if the power cord or plug(s) is damaged, or if the wall outlet is loose.
→May result in electric shock, short circuit, or combustion.
→Using the chair with holes or tears in the covering could result in injury or electric shock.
¡
Persons who have been instructed by a doctor to avoid massage therapy. Ex. Thrombosis, severe aneurism, acute
varicosity, or dermatitis and/or skin infection including inflammation of the hypodermis.
¡
Persons with suspected acute neck sprain (whiplash injury).
l
Space Requirements
This product must be grounded. If it should malfunction or breakdown, grounding provides a path of least resistance for
electric current in order to reduce the risk of electric shock. This product is equipped with a cord having an equipment-
grounding conductor and a grounding plug. The plug must be plugged into an appropriate outlet that is properly installed and
grounded in accordance with all local codes and ordinances.
l
Improper connection of the equipment-grounding conductor can result in the risk of electric shock. Check
with a qualified electrician or serviceman if you are in doubt as to whether the product is properly grounded.
Do not modify the plug provided with the product if it will not fit the outlet; have a proper outlet installed by a
qualified electrician. This product is for use on a nominal AC 120V circuit and has a grounding plug that
looks like the plug illustrated in the figure to the right. Make sure that the product is connected to an outlet
having the same configuration as the plug. No adapter should be used with this product.
l
Persons with any of the following conditions should seek medical advice before using the chair.
¡
Serious heart conditions
¡
Sensory impairment caused by serious peripheral circulatory disorders due to diabetes and other diseases
¡
Osteoporosis, spinal fractures, acute pain and/or symptoms thereof
¡
Persons being treated for personal injuries
¡
High fever (100˚F or higher) Ex. Strong acute inflammation illness caused by fatigue, chills, blood pressure fluctuation, or asthenia
¡
Persons in the early stages of pregnancy, or immediately after giving birth
¡
Persons who have electronic medical device(s) easily susceptible to electromagnetic interference Ex. pacemaker
¡
Abnormal or curved spine
¡
Persons planning to use the chair for treatment or for rehabilitation purposes
¡
Persons with malignant tumor(s)
¡
Persons under bed rest orders
¡
Persons with acute gastro-intestinal complaints or ailments such as gastritis, enteritis, or hepatitis
¡
Persons under a doctor's care, or those experiencing unusual physical discomfort
¡
Joint dysfunction due to rheumatism, gout, or other diseases
¡
Persons with symptoms such as qualm, dizziness, or tinnitus
¡
Inflammation due to sprain or torn muscles
¡
Persons with thecitis or suspected thecitis
¡
Persons with thermoanesthesia
¡
Elderly people and persons with weak bones, even if they have no particular disease, should seek medical advice before using the chair.
¡
If your condition does not improve after use, consult a doctor or specialist.
¡
Do not drop or insert any object into any opening.
¡
To disconnect, switch all controls to the off position, then remove plug from outlet.
l
Before each use, check for holes or tears in the chair cover of the back pad. Also, check other parts for tear-
ing. Stop using the chair immediately if you find even the smallest tear. Unplug the chair and contact the ven-
dor for assistance.
l
Do not operate under blanket or pillow.
→May result in burns, fire, electric shock, or injury to persons.
l
Do not use outdoors.
→May result in burns, fire, electric shock, or injury to persons.
l
Do not operate where aerosal (spray) products are being used or where oxygen is being administered.
→May result in burns, fire, electric shock, or injury to persons.
Prohibited Do not
disassemble Do not touch
Required action Unplug the chair
Electrical
grounding
Warning or caution Do not use in
or near water
such as in a bathroom
Prohibited
Electrical
grounding
GROUNDED OUTLETS
GROUNDED OUTLET BOX
GROUNDING PIN
Caution
Required Action
Prohibited
Safety Precautions: Before Use
l
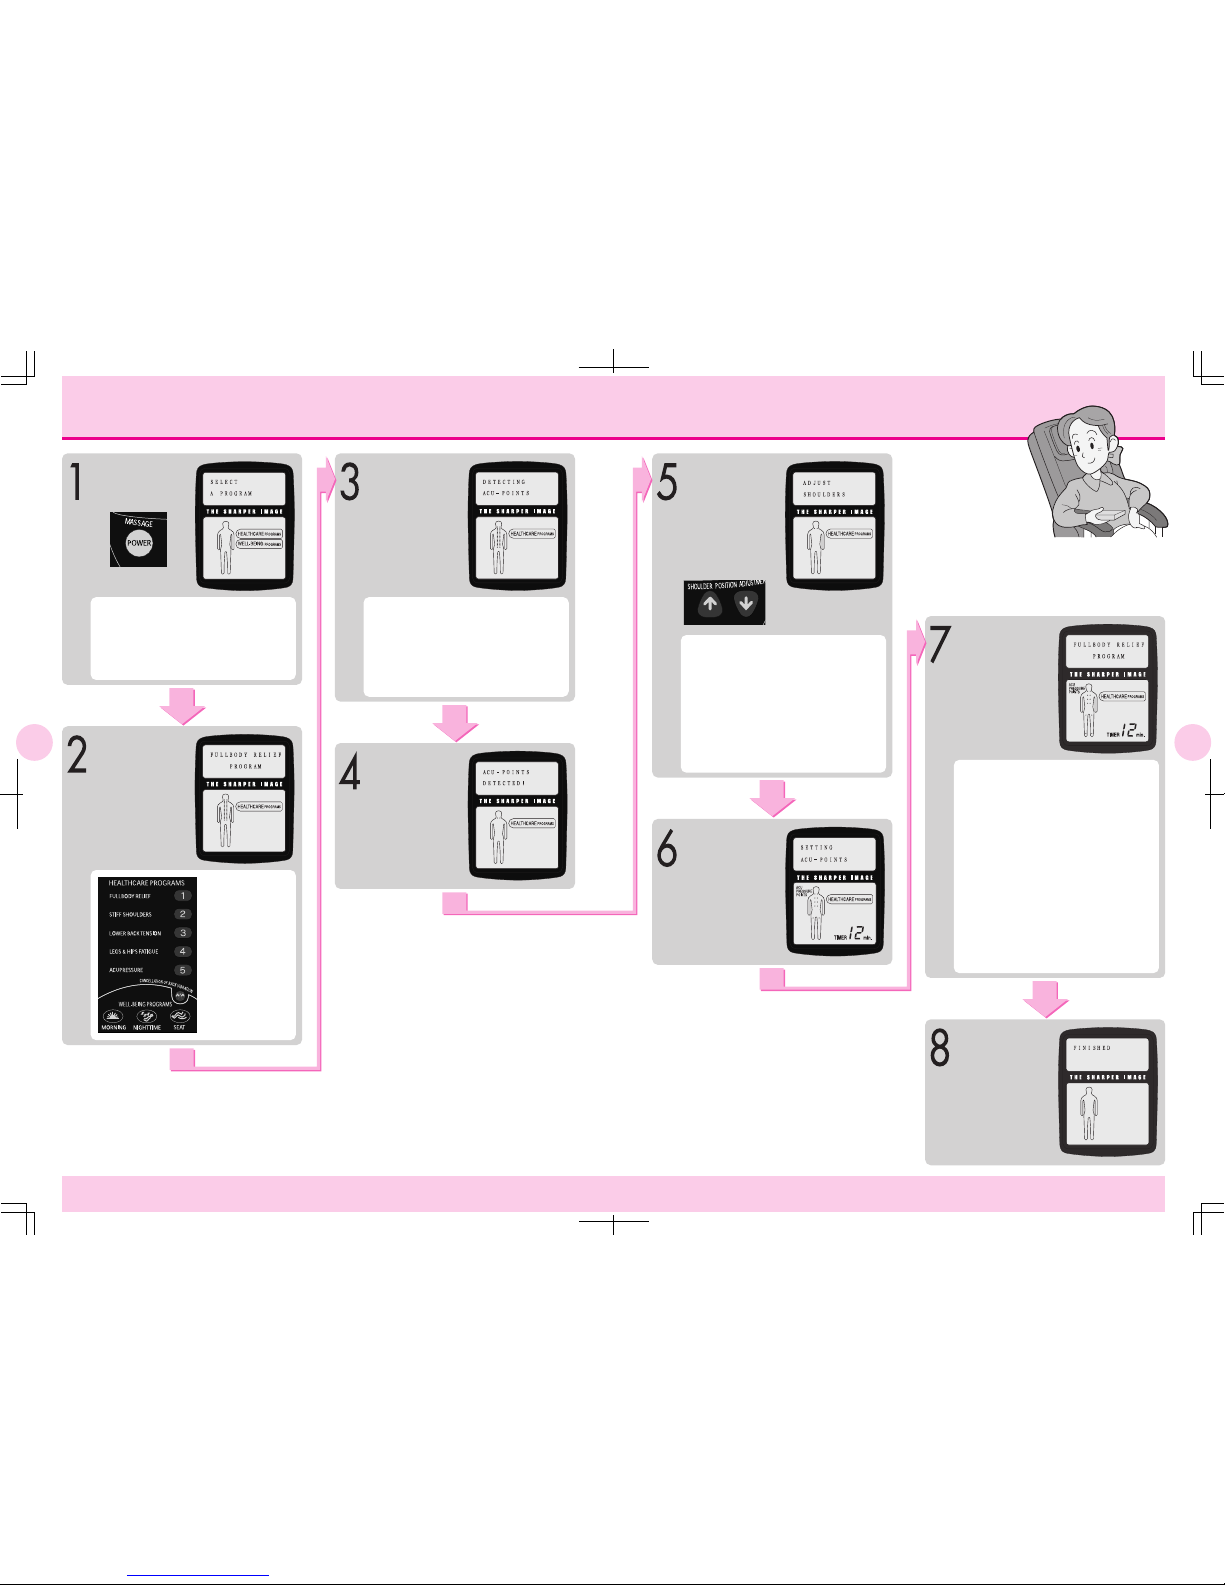
Before plugging the power cord into the wall outlet, make sure that the main POWER switch is set to OFF.
→May result in damage to the product or electric shock.
l
Make sure that the plugs on the power cord are inserted fully into the cord connector and the wall outlet.
→May result in electric shock, short circuit, or combustion.
l
Before using the chair for the first time, turn on all the power switches in order as indicated in this man-
ual to check that the chair is operating properly.
l
Before using, raise the reclining seat to its fully upright position. Then recline the seat back slowly to the
most comfortable position, remembering to start off with a lighter massage.
→Starting with a deep massage can result in injury. Elderly people and persons with weak bones should be especially careful
when selecting massage intensity.
l
When sitting down in the chair, do so slowly, ensuring that the spinal rollers are in the correct position at
either side of the spine. The backbone should lie comfortably between the rollers without having to turn
or twist the body.
l
Do not sit, stand, or lean on the footrest unless you are sitting in the chair or getting up from the chair.
→Personal injury or damage to the chair may result if the chair tips over.
l
If you will be using the chair after it has not been used for a long time, first read this Operating Manual again thor-
oughly and check if the chair operates properly.
l
Do not use the chair in any way not prescribed by the Operating Manual. Do not use the chair together
with any other therapeutic device or with an electric blanket.
→May result in injury or have a negative effect on health.
l
Do not move the chair while someone is in it.
→Accident or injury may result if the chair tips over.
l
Do not sit down on the chair with the footrest raised.
→
Any sudden heavyweight on the footrest could cause damage to the mechanism. Or, accident or injury may result if the chair tips over.
l
Do not use with anything other than the accessories supplied with this product.
Safety Precautions: Before Use
Warning

Safety Precautions②
5 6
Safety Precautions ②
Safety Precautions②
Safety Precautions: During Use
Safety Precautions: After Use or When Not in Use
Others Precautions
Caution
Required Action
Unplug
Unplug
Required Action
Required Action
Caution
Caution
Warning
Prohibited
Do not
disassemble
l
In an emergency, or if there is any sudden malfunction, push the STOP button on the remote control to
make the chair stop immediately.
l
If you begin to experience marked pain or other unusual physical discomfort while using the chair, seek
medical advice immediately and discontinue use of the chair.
l
If you feel the massage is too strong, reduce the stimulation according to this Operating Manual.
If this solution does not work, stop using and contact the vendor.
→May result in injury if you continue use with high stimulation under such circumstances.
l
Make sure to keep the back pad in place during massage. Do not use the chair without the back pad.
→May result in personal injury.
l
Do not fall asleep in the chair during a massage.
→May result in personal injury.
l
Keep massage sessions to no more than 15 minutes in length. Area Specific Massage of any particular
area on the body to no more than 5 minutes.
→Continual use for extended periods of time can result in over-stimulation, which could cause the opposite of the desired ef-
fect, or even injury. Set 30 minutes in total for reference per day and keep appropriate intervals between each massage ses-
sion. May result in personal injury.
l
If your leg or foot comes out of the footrest during the massage, do not try to force it back in.
→Undue force may result in damage to the mechanism.
l
If there is a power outage or the possibility of a power outage, stop the chair immediately and set the
main POWER switch to OFF. Unplug the chair from the wall outlet.
→Accident or injury may result if the chair is still in operating mode when the power resumes.
l
If there is a threat of lightning, stop the chair immediately and set the main POWER switch to OFF. Un-
plug the chair from the wall outlet.
l
If the chair does not start, or if there is any type of malfunction, to prevent accidents it is best to stop the chair
immediately and set the main POWER switch to OFF. Unplug the chair from the wall outlet. Contact the vendor
for assistance regarding repairs or maintenance.
→Electric shock or fire caused by a short circuit may result if the chair is left plugged in under such circumstances.
l
Be sure to set the main POWER switch to OFF after every use and to unplug the chair from the wall outlet.
→Accident or injury may result if children or pets try to play with the chair.
l
After using the chair, be sure to return the reclining seat back to its upright position and lower the foot-
rest to its lowest position.
l
Wipe the chair off after every use, and store your chair in a place free of excess humidity.
l
Do not place any object on the seat, reclining seat back, or footrest.
l
Do not pull on the power cord to unplug the chair from the wall outlet; make sure to grasp the plug firmly when unplugging.
→May result in electric shock or fire caused by short-circuiting.
l
When cleaning or caring for the chair, make sure to unplug the chair from the wall outlet first.
Do not plug or unpulug the power cord with wet hands.
l
If you will not be using the chair for some time, make sure to unplug it from the wall outlet.
→
Insulation degradation by dirt or moisture may occur and cause electric shock, or fire caused by short-circuiting may result.
l
Do not stand on the chair. Do not sit on any part of the chair other than the seat.
→Personal injury or damage to the chair may result if the chair tips over.
l
Do not stand on the control box and/or place any object on it.
l
Do not remodel the chair. Anyone other than an authorized serviceperson must not repair or disassem-
ble. Contact the vendor.
l
For safety reasons, if the power cord is damaged, contact the vendor for replacement.
l
Do not remodel the chair.
l
If you lend, sell, or otherwise transfer the chair to another party, make sure to include this Operating Man-
ual.
Safety Precautions: During Use
Required Action
Prohibited
Warning
Prohibited
Caution
l
Do not wrap the power cord or the remote control cord around the chair, or place the chair on top of either cord. Do
not scratch, tear, treat, unduly twist, stretch, or bend the power cord or the remote control cord.
→The cord may fray or tear, resulting in fire or electric shock.
l
Do not spill water and/or other liquids on the chair or the remote control.
→May result in electric shock, short circuit, or combustion.
l
Do not use the chair while the body is wet, or with wet hands.
→Could result in electric shock or damage to the chair.
l
Children should not use the chair. It is advisable to keep children and pets away from the chair (especial-
ly behind the reclining seat back or under the footrest). Children aged 14 years or over should use only
the Youth Program. In such a case, an adult must attend the child.
→Could result in accident or injury.
l
Do not use if the covering is torn. If it is, unplug the power cord from the wall outlet.
→Could result in injury, accident, or electric shock. Contact the vendor for repairs.
l
Be careful not to get hands, feet, or objects caught between the units of the footrest or between the foot-
rest and the chair. Be careful not to get hands or objects caught between the units of the armrest or be-
tween the armrest and the chair. Do not release hands suddenly while lifting the footrest hand.
→Accident, personal injury, or damage to the chair may result if hands, feet, or objects are caught.
l
Do not use the heater continuously for two hours or longer.
→May result in low-temperature burn.
l
Make sure no one, especially children or pets, is in the way when lowering the reclining seat back or low-
ering the footrest down. Be careful that people and/or objects are not caught behind the seat back or un-
der the footrest.
l
Do not use the chair unclothed.
l
Do not use the chair for purposes other than massage, or other than the ordinary uses of a chair.
→Could result in accident or injury.
l
Do not use the chair to massage the head, chest, stomach, and/or joints (knees, elbows).
Do not place hands, feet, or arms in between the rollers.
→May result in nausea or injury. Place a soft towel behind your neck if you want to avoid intense stimulation of the area.
l
Do not place hands or feet into the roller tracks, into the space between the seat back and the seat or into the
moving parts. Do not sit wearing hard objects, such as hair accessories, necklace, watch, bracelet, or ring.
→May result in personal injury.
l
Do not place anything other than legs and feet on the footrest.
→May result in personal injury.
l
Do not place anything other than upper arms and forearms in the Upper-Arm and Forearm Units. Do not
place anything other than shoulders against the Shoulder Massage Unit.
→May result in personal injury.
l
Do not operate the massage chair or leave it operating when there is no one in it.
→May result in accident or injury.

Parts Descriptions
7 8
Parts Descriptions
Parts Descriptions
Headrest
Massage roller/vibration
(in the backrest)
Seat
Footrest
Air cells for thighs (1)
Back pad
Armrest (left)
Footrest adjusting lever
Seat vibrator
Air cells for hip (3)
Air cells for legs (6)
Backrest
Armrest (right)
Remote control stand
Remote control
Caster
Metal fittings for folding backrest
Power cord
Power switch
Displays the operation being
performed. See the figure to
the right.
Adjust the reclining angle.
Well-Being
programs buttons
Power switch
Main body
Remote control
You can turn the power on
and off using the remote
control. If this switch is
pushed during operation, the
massage rollers will return
to the starting position
automatically.
Liquid crystal
display (small)
Displays the selected
program, current massaging
point, and time remaining.
See the figure to the right.
Five shoulder kneading
cycles at the position
detected by the optical
sensor during auto search.
If necessary, fine adjust the
position using the UP
and DOWN buttons.
(For automatic programs only)
Five programs are available.
1. Full body relief
2. Stiff shoulders
3. Lower back tension
4. Legs & hips fatigue
5. Acupressure
Three programs are
available
1. Morning
2. Nighttime
3. Seat
Liquid crystal
display (large)
Shoulder position
fine-adjustment
Power reclining
Healthcare Programs
See the internal buttons
layout shown to the right.
External panel
Cancels the back vibrating
operation in the automatic
operation mode.
Cancel 'Back Vibration'
Footrest buttons
You can adjust the angle of
the footrest using the UP
and DOWN buttons.
Acupressure point
(indicator)
Power reclining
Footrest buttons
Manual Selection
Mode
During an automatic
program, pressing the
Back vibration
cancellation button
will light the lamp and
pressing the button
again will turn off the
lamp.
Adjusts the speed of
Kneading, Tapping (1)
and Kneading &
Tapping operations.
Liquid crystal display (small)
●
Liquid crystal display (large)
●
Internal buttons layout
●
●Displays the current
operation using text
or graphics.
●For details of the
display, see page 17
and 18.
Kneading, Human Hands,
Double-kneading,
Kneading & Tapping,
Rhythm Acupressure (1
and 2), Tapping (1
and
2)
and Rolling (Partial and
Whole massage)
Width adjustment
buttons
Adjusts the width
between the right and
left massage points for
rhythm acupressure (1),
tapping (1 and 2), rolling
(
Par tial and Whole massage
)
and back vibration.
Acupressure Point
(back)
Acupressure Point
(seat)
Acupressure Point
(legs)
Back vibration
cancellation
Up/down---Use these
buttons to adjust the vertical
position of the rollers.
Roller vertical
position
Displays the time
remaining for the
current program.
Timer
Two options:
Back or Seat vibration.
Back/seat vibration
Speed adjustment
Low-medium-high buttons:
Use these buttons to
adjust the intensity of
the air massage, legs
or seat separately or
legs and seat together.
Select one of these
buttons to massage
your lower body only.
Lower body button
Program indicator
Warning Prohibited
Do not allow the remote control to get wet, and do not perform any
operation with wet hands, in order to prevent electric shock or fire.
●
To prevent damage and malfunction, do not sit on the remote control. Do not step on or place
any heavy objects on the remote control. Do not pull on the wire of the remote control.
●
To prevent damage to the remote control, do not use sharp or hard objects to press the
buttons on the control.
Caution:
The points being
massaged are lit
or blink.

Before Use
910
Before Use
Before Use
Armrest (right) rear
Stand for
the remote control
Screws for fitting
Main body of the
backrest
Back pad
Fabric of the
main body
Backrest
Metal fittings for folding
Min.
20 inch
Min.
12 inch
Footrest
adjusting lever UP
UP button UP button
DOWN button DOWN button
●This chair is delivered with the backrest folded down.
Before use, raise the backrest until a click is heard.
●Allow sufficient space for reclining.
●Allow at least 20 inches behind the chair for the
backrest to be fully reclined.
●Allow at least 12 inches in front of the chair for full
extension of the footrest.
Before using, please raise the back pad to
ensure that there is no tear in the fabric or
cover. Also, check the chair cover of the
other parts.
If any tear is found, no matter
how small, please stop using the
chair immediately. Disconnect
the plug and consult the vendor
at once.
Using the chair with a tear in the
fabric or texture may cause electric
shocks or injury.
Fit the stand firmly using the 2 screws included at the
rear of the right armrest of the main body, as shown in
the figure.
As shown in the figure,
raise the back pad and
make sure that the
cover of the main body
is not torn.
Press and hold the DOWN part of the reclining button
until the desired angle is obtained. The footrest will
automatically rise as the backrest reclines.
Press and hold the UP part of the reclining button until
the desired angle is obtained. The footrest will
automatically lower as the backrest rises.
How to fit the stand for the remote control
Check the fabric
Make sure that the footrest has been lowered completely. Normally the massage rollers stay at the upper part of the backrest, drawn
back and apart from each other, being separated into left and right positions. This is the home position or storage position. For your
safety, always check to see that the massage rollers do not project outward from the home position. If they do so, turn the power
switch at the seat off immediately so that the rollers return to the home position. Then sit down on the center of the chair slowly.
●
By raising up the metal fittings for folding, the backrest
can be folded down easily.
1. Connect the power plug to a wall receptacle (socket).
2. The power switch is on the right side of the backrest.
Turn the power on and the display on the remote
control will light up.
* Before connecting the plug to the wall receptacle, make sure that the
power switch is in the OFF position.
* If the massage rollers are in mid-motion when the power is turned off, they
will automatically return to the starting position.
Power on
Space requirements
How to use the power recline
How to fold down the backrest
How to adjust the footrest
After Use
Caution
●Place the chair on a carpet to protect the floor surface and to prevent noise when operating.
●Place the chair down carefully when putting it on the floor in order to prevent scratches. It is heavy.
●Place the chair at least 3 feet away from a TV, a radio or other AV equipment. It may cause noise to the equipment.
Warning
Prohibited
How to sit on the chair
Warning
Required Action
Do not sit or step on the footrest when it is raised, which could result in injury, malfunction and accidents.
Warning
Required Action
●When reclining, make sure that
nothing is behind the backrest.
●When reclining or lowering the
footrest, always be sure that
there are no persons, pets or
obstructions around.
Warning
●When lowering the footrest,
make sure that nothing is
caught between the seat and
footrest.
Warning
●Make sure that your fingers or
any other objects are not
caught between the footrest
and footrest adjusting lever to
avoid injury and accident.
●Do not let go of the footrest
suddenly after putting it up.
●Lowering the backrest:
●Raising the backrest:
■Reclining buttons ■Footrest buttons
Press and hold the UP button until the footrest reaches
the desired angle.
Press and hold the DOWN button until the footrest
reaches the desired angle.
●Raising the footrest:
While sitting in the chair with the footrest up, pull the lever
up toward the footrest. While the lever is up, you can
adjust the footrest so that your calves are resting on it.
Turn off the power switch and be sure to disconnect the
plug from the socket.
How to adjust the angle of the footrest
●Lowering the footrest:
Prohibited
Prohibited
Note:
The reclining and footrest operating functions are active by adjusting
the UP DOWN buttons even if the remote control is turned off.
Caution
●The auto timer function will
automatically stop the chair. However,
you should be familiar with how to
manually turn off the power switch after
use to prevent an accidental start of the
chair.
●To avoid accidents, turn off the power
and disconnect the power plug.

Automatic Programs①/Massage Types
Massage Types And Features
11 12
Massage Types And Features
Automatic Programs ①/Massage Types
Caution
Do not attempt to place your hands or feet between the massage rollers. The massage rollers exert strong pressure
and can cause injury.
●The chair can be operated in a variety of
automatic modes for pre-programmed massage
operations, and manual modes called Manual
Selection Mode.
Relaxes the muscles that affect your whole body and
alleviates fatigue by stimulating acupressure points.
Recommended for general fatigue and restlessness.
Press the program buttons
shown on the right to select
your desired massage
function.
On the internal panel, select your desired massage type: Kneading, Human
Hands Double-Kneading, Kneading & Tapping, Rhythm Acupressure (1 and
2), Tapping (1 and 2) and Rolling (Partial and Whole massage), lower body
massage, or any combination of any of them. Also, you can make
adjustments for the speed, the strength, the up-down position and the
movement of the massage. For details please refer to page 15.
Automatic
Operation
Manual
Selection
mode
FULLBODY RELIEF 1
Helps relieve tension and stiffness around the neck and
shoulders. Recommended for shoulder and neck fatigue.
STIFF SHOULDERS 2
Recommended for lower back muscle pain and fatigue.
LOWER BACK TENSION 3
Recommended to help relieve pain and numbness in the
hips and the legs.
LEGS & HIPS FATIGUE 4
Recommended for general recovery of fatigued muscles.
Uses Shiatsu techniques.
ACUPRESSURE 5
Recommended immediately after waking up to recover from
restless sleep and fatigue from the previous day.
MORNING
Combined vibration and air massage directly stimulates the
muscles of the seat area.
SEAT
Recommended before going to sleep at night.
NIGHTTIME
HEALTHCARE
PROGRAMS
WELL-BEING
PROGRAMS
To end the operation before completing
the program, press the power switch. The
operation will stop after the rollers return
to the home (storage) position.
●inada chair i.1 allows you to select your desired Automatic Program massage.
●There are five different Healthcare programs, and three Well-Being programs.
POWER switch
HEALTHCARE
PROGRAM buttons
Back Vibration
Cancellation button
Fine Tuning
Shoulder Position
Liquid crystal
display (large)
Liquid crystal
display (small)
WELL-BEING
PROGRAMS button
Automatic Programs
"Medium" has been preset when the
product was delivered, but you can select
your desired intensity from three options.
Back Vibration Cancellation button
The back vibration function that occurs in
the Healthcare and Wellness Programs
can be disa-
bled using this
button.
Changing Programs
You can switch to other massage types
anytime, even during the operation of a
program. However, the timer will be reset.
●From an automatic program to another
automatic program
During the operation of an auto-program, if you
select another automatic program, the rollers will
return to the home position, and then the function for
automatically detecting massage points will start.
●From an automatic program to the
Manual Selection Mode
During the operation of an automatic program, if you
select any button in the Manual Selection Mode on
the internal panel, the automatic program will be
interrupted, and the manual mode selected will start.
Strength adjustment for massaging
the lower half of your body
Ending the operation before
completing the program

13 14
Automatic Programs ②/Operation
Massage points will be detected during a once-
through operation of the rollers (a beeping
sound is heard during the detecting operation).
Caution:
During the operation of the detecting function, you must
stay seated in the chair with your head against the backrest.
The name of the
program selected
will be displayed.
※This illustration
shows that the
FULLBODY RELIEF
Program has been
selected.
●Liquid crystal display (small):
Shows a continuous description of the
selected program.
●Liquid crystal display (large):
The points being massaged are lighted or
are blinking in liquid crystal display (large).
The timer displays the approximate
remaining time of operation (actual time left
may vary slightly).
If you wish to stop the program during the
operation, press the Power switch. The
rollers will then return to the home position,
and the program will stop.
The display will be lit. To select an automatic
program, close the external panel on the
remote control. If no buttons are pushed for
five minutes, the power will be automatically
turned off.
When you hear the beeping sound (during
the operation of the rollers), you can adjust
the position of the shoulder rollers by using
the Shoulder Position Adjustment buttons.
The rollers move approximately 4 mm every
time presses the Shoulder Position
Adjustment button.
If the detected position is OK, do not press
the buttons.
Press the
button for
your desired
program.
Press Power
switch.
The function for
automatically
detecting
massage points
will start.
Massage
points have
been
detected.
You can now
fine-tune the
shoulder
position
(massage points).
Massage
points are
determined.
Massage will
start.
When the
massage ends,
the lights on
the display
will go out.

15 16
Manual Selection Modes①/Liquid Crystal Display·Explanation Of Movements
Manual Selection Modes ①/Liquid Crystal Display·Explanation Of Movements
Figure shows the remote control
with the external panel opened.
You can select from the following functions: Kneading, Human Hands, Double-kneading, kneading&Tapping, Rhythm Acupressure (1
and 2), Tapping (1 and 2) and Rolling (Partial and Whole massage), lower body air massage, or you can make any combination of
any of these. Also, you can make adjustments for the speed, the strength, the up-down position and the movement of the massage.
Manual Selection Modes
Standard program.
Types of rollers.
Press the program buttons to select your desired massage function.
You can change the operating program to another one by pushing the button of desired program.
During Rhythm Acupressure 1, Tapping 1 or 2, Rolling (Partial or
Whole) or Vibration (Back), you can adjust the width between rollers
using Width Adjustment buttons (Narrow, Medium and Wide).
During Kneading, Kneading & Tapping or Tapping 1, you can adjust the
operating speed using the High or Low button.
Width adjustment buttons
The Liquid Crystal Display displays the selected course, speed,
intensity, width, rotation, reverse rotation, and vertical position in words
for 3 seconds and then displays the relevant icons.
Liquid Crystal Display [Manual selection mode operation]
Kneading
Rhythm
Acupressure 2
Rhythm
Acupressure 1
Kneading &
Tapping
Double-
Kneading
Human
Hands
Tapping 1
Tapping 2
Normal massage;
the direction of the roller rotation is adjustable by pressing the button.
Roller operation feels like a hand massage;
the direction of the roller rotation is adjustable by pressing the button.
Simultaneous operation of kneading & tapping;
the direction of the roller rotation is adjustable by pressing the button.
Repeated slow pushing (simulating finger pressure);
Repeated slow pushing (simulating finger pressure) while the massage point varies horizontally;
Simple tapping;
A programmed, automatic operation of rollers using varying speeds;
Massaging the entire back
Massaging part of the back
Speed adjustment buttons
Speed and the vertical position are adjustable as well.
The vertical position of rollers is adjustable.
The width between rollers and their vertical position are adjustable.
The width and vertical position are adjustable.
The width between rollers is adjustable.
the width between rollers and their vertical position are adjustable.
The direction of the roller rotation, the speed and the vertical position are adjustable.
Speed
Back vibration
Seat vibration
The display shows the Kneading being set
at Speed 4.
*Note, the function of Width adjustment will not
work during the operation of: Kneading, Human
Hands, Kneading & Tapping, Double Kneading,
Rhythm Acupressure 2, and combinations of
Rolling and Back Vibration.
*You can adjust the center position of the
massage during the partial rolling massage.
You can adjust the Up/Down rolling movement
of the back rollers by pressing the Up/Down
buttons.
Vibration massage of the back will be operated.
Vibration massage of the hips will be
operated.
Levels of Speed adjustment:
You can select among six speeds for Kneading, and four speeds for
Kneading & Tapping and Tapping 1.
The illustration states that the respective operation is being done.
During Kneading, Human Hands, Double-Kneading, Kneading & Tapping, Rhythm
Acupressure 1 or 2, Tapping 1 or 2, Rolling (Partial) massage and Back vibration,
you can adjust the position of the rollers using Up/Down adjustment buttons.
Up/Down adjustment
rollers
move up
rollers
move down
UP
DOWN
Vibration massage of Back and Seat will be operated simultaneously.
You can adjust the intensity between High and Low by pressing the buttons respectively.
Back/Seat vibration
Legs massage
Seat massage
Massaging the legs using air pressure
Massaging the seat using air pressure
You can make a selection between Legs, Seat, and Legs & Seat air massages.
You can adjust the intensity using the Low, Medium, and High buttons even when operating.
Lower body air massage
Legs and Seat
massage
Rolling (Whole)
massage
Rolling (Partial)
massage
Massaging the legs and seat using air pressure
Narrow
Medium
Wide
A programmed, automatic roller operation that repeats a cycle of normal and reverse
rotation during which the speed varies; the vertical position of rollers is adjustable.
●Kneading
(Normal rotation・Speed 4)
●Rolling (Partial) massage
●Rollers width/[Wide]
●Back vibration/[High]
●Seat vibration/[High]
●Lower body air massage/
[Legs & Seat·High]
The width, speed and vertical position are adjustable.

17 18
Manual Selection Modes ②/Operation
Many of the Manual Selection Mode buttons toggle
between on and off. Others toggle among normal
rotation, reverse rotation and off. (The above
illustration shows a course for "Kneading; forward"
and "speed;3".) The liquid crystal display (small)
displays the name of the course selected for three
seconds and then displays the relevant icons (shown
on page 17 and 18). The liquid crystal display (large)
displays some information on the course selected,
and the remaining time of operation.
The display will be lit. To make a selection from the
Manual Selection Mode, open the external panel on
the remote control. If no buttons are pressed within five
minutes, the power will be automatically turned off.
The operation will stop, and
the display will turn off.
The rollers will return to the home (storage)
position.
To cancel the program during its operation, press
the Power switch. The program will end after the
rollers return to the home (storage) position.
Table showing the massage types which can be combined and the items which are adjustable.
Table of illustrations displayed.
You can select the desired massage type from the massage menu from 1 to 5. You can also make combinations among them.
●Adjustable items during operation will be marked ○(circle).
●Programs which the Width is not adjustable:
(Kneading, Human Hands, Kneading & Tapping, Double Kneading, Rhythm acupressure 2) and the combination of rollers and back
1·Standard program
(select any one of the massage adjustments)
Kneading
Human Hands
Double kneading
Kneading & Tapping
Rhythm Acupressure 1
Rhythm Acupressure 2
Tapping 1
Tapping 2
Massage adjustment
○
○
ー
○
ー
ー
ー
ー
Speed adjustment
○
Speed 1〜6 6 levels
ー
ー
○
Speed 1〜4 4 levels
ー
ー
○
Speed 1〜4 4 levels
ー
Width adjustment
ー
ー
ー
ー
○
Narrow・Medium・Wide 3 levels
ー
○
Narrow・Medium・Wide 3 levels
○
Narrow・Medium・Wide 3 levels
Adjusting vertical position
○
○
○
○
○
○
○
○
Intensity
ー
ー
ー
ー
ー
ー
ー
ー
5·Lower body air massage
(select any one of the massage adjustments)
Legs
Seat
Legs & Seat
ー
ー
ー
Speed adjustment
ー
ー
ー
Width adjustment
ー
ー
ー
Adjusting vertical position
ー
ー
ー
Intensity
○Low・Medium・High
○Low・Medium・High
○Low・Medium・High
2·Rollers
(select any one of the massage adjustments)
Roller (Whole)
Roller (Partial)
Roller types
Air massage
ー
ー
Speed adjustment
ー
ー
Width adjustment
○
Narrow・Medium・Wide 3 levels
○
Narrow・Medium・Wide 3 levels
Adjusting vertical position
○
Up/Down movement
○
Adjustment of center position
Intensity
ー
ー
3·Back vibration
Back vibration
ー
Speed adjustment
ー
Width adjustment
○
Narrow・Medium・Wide 3 levels
Adjusting vertical position
○
Intensity
○Low・High
4·Seat vibration
Seat vibration
ー
Speed adjustment
ー
Width adjustment
ー
Adjusting vertical position
ー
Intensity
○Low・High
Plus
Plus
Plus
Plus
Massage type Displayed icon
Rhythm Acupressure 1
Kneading & Tapping
Double Kneading
Human Hands
Massage type Displayed icon
Normal rotation
Reverse rotation
Tapping 2
Tapping 1
Massage type Displayed icon
Roller (Partial)
Back vibration
Roller (Whole)
Narrow
Wide
Medium
Changing Programs
You can switch to other massage types anytime
even during the operation of a program. However,
the timer will be reset.
●Manual Selection Mode to Auto-program
During any operation of the Manual Selection Mode, if you
select an auto-program on the external panel/door, the rollers
will return to the home position, and then the function for
automatically detecting massage points will start. Then the
auto-program selected will start.
Course/program
Rhythm Acupressure 1
Tapping 1, 2
Roller (Partial)
Roller (Whole)
Back vibration
Massage type Displayed icon Massage type Displayed icon
Lower body
(legs)
High
High
Low
Low
Seat vibration
Lower body
(Legs & Seat)
High
Medium
Low
High
Lower body
(seat)
During the Manual Selection Mode, the
operating status is displayed by relevant icons.
Massage Type Direction of rotation (normal or reverse)
Speed Roller Width between rollers
Back vibration (intensity) Seat vibration (intensity)
Lower body massage (intensity)
Back vibration
Low
Rhythm Acupressure 2
Low
Medium
Medium
High
Kneading
Kneading
Kneading & Tapping
Tapping 1 Speed
Press Power
switch.
Press the
button of
your desired
program.
The operation will
automatically
end 15 minutes
after starting.
Normal rotation/
Reverse rotation
Massage adjustment
Normal rotation/
Reverse rotation
Massage adjustment
Normal rotation/
Reverse rotation
Massage adjustment
Normal rotation/
Reverse rotation
Massage adjustment
Normal rotation/
Reverse rotation
POWER

19 20
Cleaning And Storage
●Store the chair in a dry area after cleaning
it.
●To keep it away from dust, please make
sure the cover is put on.
How to remove the footrest cover
Storage
How to remove covers
Caution
Do not keep the chair in a dusty
or high-temperature (104˚F/40˚C)
area.
Do not keep the chair near a stove
or in direct sunlight which may
cause discoloration or
degeneration of the external
parts.
Warning
When any cleaning is being carried
out, make sure that the plug is
disconnected from the socket. Do
not connect or disconnect the
power plug with wet hands. You
may be exposed to the danger of
electric shock and injury.
Before any cleaning is
carried out, make sure
that the power is turned
off and the plug is
disconnected from the
socket.
Cleaning
●Plastic parts, pipes, and fabric should be cleaned by wiping with a mild detergent and a damp cloth. Wipe
with a dry cloth to dry the chair surface.
Never use alcohol, solvents or abrasive agents. Using these chemicals may cause scratches, discoloration and/or cracks.
Main parts
●Remove stains by wiping with a mild detergent and a damp cloth. Wipe with a dry cloth to dry the chair
surface.
Caution
Caution
Long contact with vinyl or plastic material or wallpaper may cause discoloration.
Back pad Headrest Covers
①Remove the Velcro-fastened seat cover from the
sliding cover.
②Unzip the sliding cover from the footrest cover.
③Unzip the footrest cover from the main body of the
chair.
※To replace the footrest cover, repeat the above
procedure in the reverse order.
How to remove the seat cover
①Remove the Velcro-fastened seat cover from the
sliding cover.
②Remove the Velcro-fastened seat cover from the
main body of the chair (by undoing the six Velcro
pieces of tape)
※To replace the seat cover, repeat the above
procedure in the reverse order.
How to remove the backrest cover
①Undo the Velcro tapes that fasten the backrest cover to the
headrest. Remove the headrest.
②Unzip the back pad from the main body of the chair.
③Remove the backrest cover from the main body of the chair by
undoing the nine Velcro pieces of tape.
※To replace the backrest cover, repeat the above procedure in
the reverse order.
●Remove stains by using a dry cloth.
Caution Never use a wet cloth. Moisture can damage the control.
Remote control
Pulling
the plug
Zipper
Velcro
Sliding cover
Zipper
Footrest cover
Seat
Seat cover
Back side of
seat cover
Main parts of
the seat
Sliding cover Velcro
Velcro
Velcro for slide cover
Footrest
Velcro Zipper Backside of zipper
Headrest
Velcro
Backrest
Hardrest
Back pad
Backrest cover Back pad

21 22
Troubleshooting Guide Service
Troubleshooting Guide
Service
During use, the air massage
stops when the footrest is
moved up or down.
The air massage will stop when the
footrest is moved up or down to
ensure safety. The air massage will
start operating again when the
footrest stops moving.
The chair does not oper-
ate. Is it broken?
●Only qualified service
technicians should repair
the massage chair.
Automatic massage points
detected unsuccessfully.
The external panel on the
remote control came off.
If you try to open the external panel
too far, the panel may come off in
order to prevent it from being
damaged. Please attach it to the
remote control again.
The recliner moved in the
opposite direction from
what was chosen.
You may be pushing both of the
reclining buttons together at the
same time. Release the button
once and try again please.
How do I move the chair
when cleaning the room or
changing rooms?
The chair stops during use.
Press the power switch on the side
of the backrest and turn it on again
after about 5 seconds.
1)
If the chair recovers, continue use.
2)
If does not restart, stop using it,
disconnect the power plug and
contact the vendor.
The rollers have moved to
the upper position.
The rollers stop halfway.
The rollers may have been
restrained due to excessive forces.
Slow down the speed or try to
lightly lift your body.
This is the result of
alternate tapping
and is normal.
How can I increase the
level of stimulation?
Bend reclining seat, sit back deep
in the seat, and try to lean into the
back of the chair.
How can I decrease the
level of stimulation?
Raise reclining seat. If it is still too
strong, then apply a towel to the
place where it is being massaged.
This is because the height of the
person using the chair may be
different from the standard height
used for calculating the operation
time. This time discrepancy is not a
malfunction.
The message [Reset main
power switch] is shown on
the Liquid crystal display.
Turn off the power switch at the left
of the backrest and turn it on again
after about 5 seconds.
1)
If the chair recovers, continue use.
2)
If the same message is displayed
again, stop using the chair, discon-
nect the power plug and contact
the vendor.
There is noise during operation,
should use be continued?
The following sounds do not indicate
any trouble or malfunction. They may
occur during normal operation.
●Rattling during kneading or tapping.
●A sound (creak) due to rubbing
between the rollers and fabric in the
kneading operation.
●Whirring sound from the air pump.
●Whirring sound from the vibrator.
●When the backrest has been fully
reclined, the pump for operating the
footrest is working (a whirring
sound is heard).
●Whirring sound when reclining.
Warning
Do not move the chair
when someone is
sitting on it. Injury
may occur if the chair
falls over.
Prohibited
Please try the following operations.
1)Is the power plug securely
connected to a wall outlet?
2)Is the power switch (on the side of
the backrest) turned on completely?
When the massage finishes
operating as programmed by the
auto timer, the rollers move to the
upper position automatically to
prevent interfering with the body.
To continue the massage, press
the power switch button of the
remote control again.
Keep your body at the deepest position
in the chair and keep your head on the
headrest.
The Automatic massage points
detection will not function if the Manual
Selection Mode is operating. You can
adjust the width and vertical positions
of the rollers using the buttons when
the rollers are operating.
There are casters on the chair. Turn
off the power switch with the backrest
in the raised position, disconnect the
power plug from the socket, lift the
front part of the chair as shown in the
figure and move it with the casters.
In the auto-program, the actu-
al operation time differs from
that shown on the display of
the remote controller.
Please refer to the following Q&As
for checking your chair before
calling for service. If this does not
solve the problem, stop using the
chair immediately and disconnect
the power plug, and consult the
vendor.
The right and left rollers are
not positioned
horizontally.
Maximum approx.
0.6 inches
Maximum approx.0.6 inches
Please read the contents carefully and
keep it in a safe place. Please complate
and mail in the warranty card that was
incude with your chair.
If the chair is to be used outside the
home (in a commercial setting, for
example), fees will be charged for
repairs.
Regular inspections are essential for maintaining inada chair performance.
●The chair does not start with the power switch on.
●The power cable has been cracked or scratched.
●The power cable or plug becomes abnormally hot.
●The chair produces a burnt smell, abnormal sound or vibration.
●The auto timer function does not work in some cases.
●
The fabric is torn where the roller or air cell comes into contact with it.
●Other failures.
◆After about five years of use, a professional inspection should be performed even if there are no symptoms or problems.
For inspection fees, contact our technical service department on the back of this booklet.
Possible symptoms
Service
Safety inspections for inada chair
1.Warranty
Before calling for repairs or service, use the Troubleshooting guide on pages 21
to see if the problem can be solved easily.
If the problem persists, contact the vendor for assistance. Have the following
information ready.
1) Your name, address, and phone number
2) Product name and model number (see Back cover)
3) Serial No. (see the Serial No. label on the back cover of the chair)
4) Date of purchase
5) Trouble status
6) Proof of purchase
●If the warranty is valid:
A service charge may apply, subject to the nature of the trouble and/or repair
according to the terms of the warranty. See the warranty for full details.
●If the warranty has expired:
Contact our technical service department on the back of this booklet.
If the product can be repaired, the vendor will give you an estimate of the cost
to repair the product.
●Replacement parts stock:
We will stock service parts (except fabric) of this product for at least six years
after terminating the production of this model. Service parts refer to those
necessary for maintaining the intended performance of the product.
●For more information on service:
Please see the back of this booklet.
2.Repairs & Service
■If you see any of the symptoms or problems
shown at the left, stop using the chair,
disconnect the power plug and consult the
vendor to repair the product, and consult us
to repair the product.
Table of contents
Other Family Massager manuals
Popular Massager manuals by other brands

RELAXZEN
RELAXZEN Wesson 60-7040M11 Assembly instructions

HoMedics
HoMedics GSF-500H-EU instruction manual

Maspo
Maspo Vibramat operating instructions

Insportline
Insportline 21792 user manual

HoMedics
HoMedics TONY LITTLE'S DESTRESS FMS-200HTL Instruction manual and warranty information

HoMedics
HoMedics DEEPSOAKDUO FB-650 Instruction manual and warranty information