fasciotens Carrier HC010 User manual

Carrier www.fasciotens.de
Instructions for Use
Carrier

2
Instructions for Use Carrier
Introduction
Dear customer,
Thank you for using
Carrier
. products provide the highest quality, safety and state-of-the-art technology.
This product was developed in partnership with practising surgeons to meet a particular medical need.
To take full advantage of this product’s capability and to ensure its successful application, please read the Instructions for Use
carefully and use the product as instructed. Always follow standard safety precautions for general occupational safety, your
specific SOPs and all relevant regulatory requirements. We will not assume liability for any damage arising from improper use
or use contrary to its intended purpose or incorrect handling.
Any significant incidents occurring in connection with the product must be reported immediately to fasciotens GmbH
and the responsible national authority.
This medical device is reserved for use by medical professionals only. Please make sure that all persons using this
product only do so aer having read and understood the Instructions for Use.
Please keep the Instructions for Use in a safe place; you may want to reread them at a later date.
Simply reading these Instructions for Use is not in itself suicient to start using Carrier
immediately
.
Additional instruction by an expert in the handling of the product is required.
Company address:
fasciotens GmbH
Aachener Str. 1053-1055
D-50858 Cologne
Tel.: +49 (0)221 17738 500
Fax: +49 (0)221 17738 549
Email: info@fasciotens.de
Website: www.fasciotens.de

3
Instructions for Use
Carrier
Table of Contents
Table of Contents
For your safety ...................................................................................................................................................................................................................................................................................................................................................... 4
Intended purpose and indications .................................................................................................................................................................................................................................................................................... 5
Contraindications ........................................................................................................................................................................................................................................................................................................................................... 5
Component definitions ........................................................................................................................................................................................................................................................................................................................... 5
Product structure Carrier (HC010) ................................................................................................................................................................................................................................................ 6
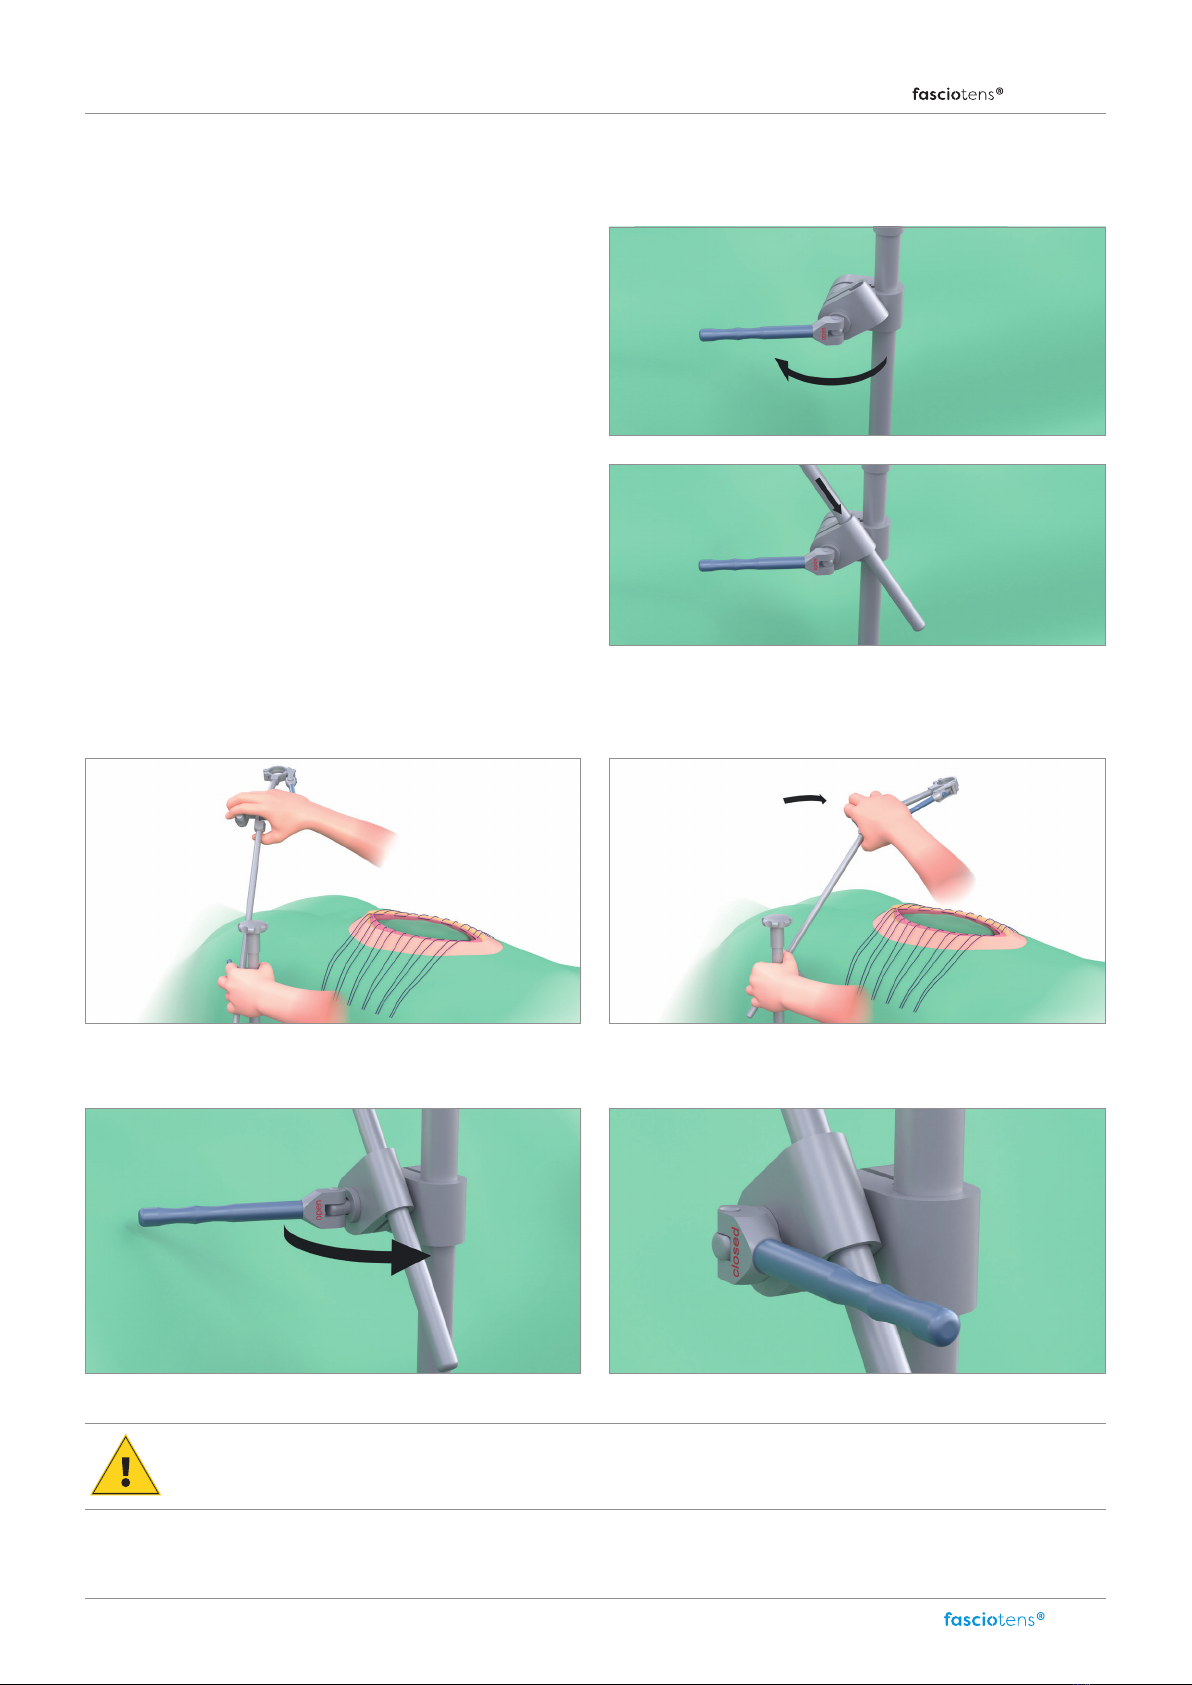
Assembly Carrier (HC010) ........................................................................................................................................................................................................................................................................ 7
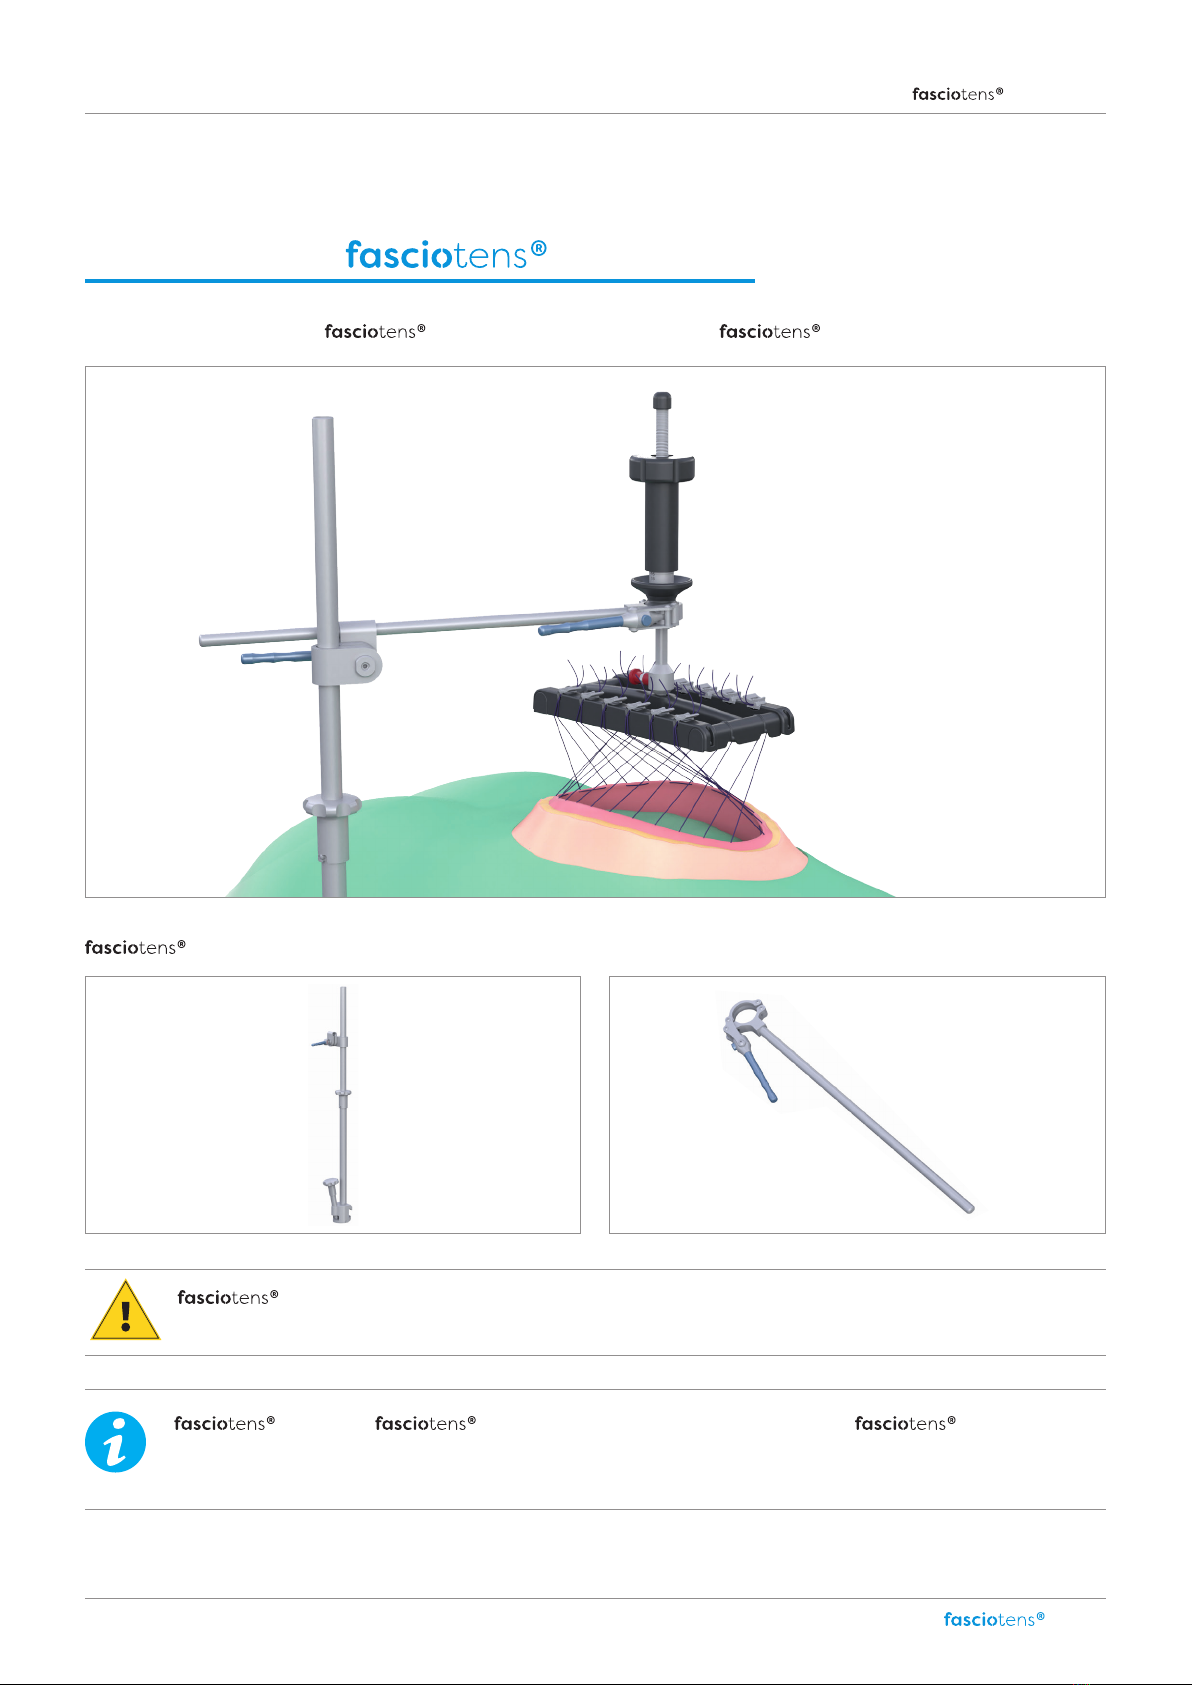
Product structure Carrier (HC020) ............................................................................................................................................................................................................................................ 10
Product assembly Carrier (HC020) ....................................................................................................................................................................................................................................... 11
Combination with Hernia .................................................................................................................................................................................................................................................................... 14
Processing instructions Carrier .................................................................................................................................................................................................................................................... 15
Service life ......................................................................................................................................................................................................................................................................................................................................................................15
Preparation ..................................................................................................................................................................................................................................................................................................................................................................15
Cleaning ..........................................................................................................................................................................................................................................................................................................................................................................16
Sterilisation ...............................................................................................................................................................................................................................................................................................................................................................17
Final instructions ..............................................................................................................................................................................................................................................................................................................................................17
Storage instructions .....................................................................................................................................................................................................................................................................................................................................18
Maintenance ............................................................................................................................................................................................................................................................................................................................................................18
Repairs ...............................................................................................................................................................................................................................................................................................................................................................................18
Template for returns ................................................................................................................................................................................................................................................................................................................................ 19
Warnings ..................................................................................................................................................................................................................................................................................................................................................................... 20
Warranty ...................................................................................................................................................................................................................................................................................................................................................................... 20
Support .......................................................................................................................................................................................................................................................................................................................................................................... 20

4
Instructions for Use Carrier
For your safety
For your safety
Please observe the Instructions for Use
Any application or handling of the product requires precise knowledge and observation of the Instructions for Use. The prod-
uct may only be used for the purpose described.
Statements of particular importance are flagged as follows in the Instructions for Use:
Liability for proper function and damage
Any liability for damage from using the product is transferred to the owner or operator of the device inasmuch as the product
has been used by persons who do not belong to the relevant professional groups or do not have the qualifications required
when operating the product or have not receive proper training in its use. In addition, liability is transferred to the user in
case of improper use or use that is not within its defined intended purpose.
Prior to use, the product is to be inspected to ensure it is intact and not damaged in any way.
The warranty and liability conditions of the terms and conditions of sale and delivery of fasciotens GmbH are not extended
by any previous or subsequent references.
Please ensure that the Instructions for Use are accessible at all times and that they are read and understood.
Warning!
This is a Warning alerting you to risk situations and dangers.
Ignoring such a warning may lead to life-threatening situations.
Warnings must be observed under all circumstances.
Information!
This is information about specific features that need to be considered under
all circumstances.

5
Instructions for Use
Carrier
Intended use and indications
Intended use
Carrier
The intended use for
Carrier
is as a holding device for fasciotens products, before, during and aer surgical proce-
dures.
Carrier
is a class I medical device.
The product is intended exclusively for human medical purposes and is used during surgery.
The product is approved for use in combination with
Hernia
.
Indications
• Combination with
products
• Combination with operating tables or standard rails
Contraindications
• No suiciently stable fastening rail
Intended purpose and indications / contraindications / component definitions
Components
Handwheel - post
Post
base (P1)
Post
extension (P2)
Handwheel
extension (P3)
Eccentric handle (P4) Crossbar
Crossbar
with bracket
and retaining bracket

6
Instructions for Use Carrier
Product structure
Carrier
HC010
Product structure Carrier HC010
Carrier and Hernia may only be used in a sterile condition. Carrier is sup-
plied in a non-sterile condition by the manufacturer and must be sterilised in the hospital before each use in the
operating room. Please follow the processing instructions. Please follow the storage instructions for the product.
Carrier must be sterilised before use by the CSSD according to the processing instructions.
Post
Crossbar
with bracket
and retaining bracket
Carrier
(HC010) consists of the following modules:
The figure below shows how Hernia is used in combination with Carrier.

7
Instructions for Use
Carrier
Assembly
Carrier
HC010
Assembly of the product
Carrier can be attached to all operating tables that have a standard rail. The post is mounted on the sterile cover
on the operating table. The position of the post can be determined by the user, but should not obstruct the surgeon. Make
sure that the product has been sterilised according to the processing instructions.
1. Remove the components from the tray and place them on the instrument table. Make sure that the clamp opening at
the lower end of the post is fully open.
2. Place the post on the standard rail of the operating table.
3. Lock the post on the standard rail of the operating table by turning the handwheel clockwise. Make sure that it is firmly
seated on the operating table.
Always hold the eccentric handle with one hand to prevent it from falling suddenly when not locked.
Make sure that the post is properly attached and
that there are no objects in the way which would
make proper attachment impossible (e.g. patient
blanket, catheter, ECG cable).
The operating table cover should have no more
than 2 layers.

8
Instructions for Use Carrier
Assembly
Carrier
HC010
4. Open the eccentric handle by flipping the clamping
lever. The word "open" will now be visible. Make sure
that the locking device on the eccentric handle engages
correctly.
5.
Move the eccentric handle on the post up or down to
position the product based on how corpulent the patient
is. We recommend positioning the ball holder 15-20 cm
above the abdomen.
6. Remove the crossbar from the packaging and insert
the crossbar into the eccentric handle.
7. Move the crossbar in the desired direction to find the optimal setting depending on the location of the defect.
8. Secure the post in the eccentric handle by flipping the clamping lever. The word "closed" will now be visible.
The post and the crossbar can cause pressure damage. Make sure that there is suicient space between the
patient and the crossbar.

9
Instructions for Use
Carrier
Assembly
Carrier
HC010
The crossbar has an individually adjustable angle, which can be set by means of a rotary wheel in front of the
ball holder.
Before each use, check that the product is intact and make sure that the post and the crossbar are attached
in a secure and sterile manner.

10
Instructions for Use Carrier
Product structure
Carrier
HC020
Product structure Carrier HC020
Carrier and Hernia may only be used in a sterile condition. Carrier is
supplied in a non-sterile condition by the manufacturer and must be sterilised in the hospital before each use in the
operating room. Please follow the processing instructions. Please follow the storage instructions for the product.
Carrier must be sterilised before use by the CSSD according
to the processing instructions.
Post HC021 Crossbar HC022
Carrier
(HC020) consists of the following modules:
The figure below shows how Hernia is used in combination with Carrier.

11
Instructions for Use
Carrier
Assembly
Carrier
HC020
Assembly of the product
Carrier
can be attached to all operating tables that have a standard rail. The post is mounted on the sterile cover
on the operating table. The position of the post can be determined by the user, but should not obstruct the surgeon. Make sure
that the product has been sterilised according to the processing instructions.
1. Remove the components from the tray and place them on the instrument
table. Make sure that the clamp opening at the lower end of the post is fully
open.
2. Turn the handwheel into the hole provided for this purpose at the lower end
of the central post.
3. Place the post on the standard rail of the operating table.
4.
Lock the post base (P1) on the standard rail of the op-
erating table by turning the handwheel clockwise.
5. Guide the post extension (P2) onto the upper end of the
part of the post attached to the operating table.
Make sure that the post is properly attached and that there are no ob-
jects in the way which would make proper attachment impossible (e.g.
patient blanket, catheter, ECG cable).
The operating table cover should have no more than 2 layers.
Make sure that it is firmly seated on the operating table.

12
Instructions for Use Carrier
Assembly
Carrier
HC020
6. Guide the handwheel extension (P3) with the opening onto the post extension and connect both parts of the post by
turning the handwheel.
7. Guide the eccentric handle (P4) onto the top of the
post extension and move it to the desired position.
8. Take the crossbar and insert it into the open eccentric handle.
Check that both components are firmly locked.
Always hold the eccentric handle with one hand
to prevent it from falling suddenly when not
locked.

13
Instructions for Use
Carrier
Assembly
Carrier
HC020
9. Align the crossbar over the patient based on the defect and the abdominal circumference.
10. Secure the crossbar in the eccentric handle by flipping the clamping lever.
The word "closed" will now be visible on the eccentric lock.
Before each use, check that the product is intact and make sure that the post and the crossbar are attached in a
secure and sterile manner.
The post and the crossbar can cause pressure damage. Make sure that there is always suicient space between the
patient and the crossbar.

14
Instructions for Use Carrier
Combination with Hernia
To combine with Hernia, release the lock on the ball holder of the crossbar by pressing the push button on the
clamping lever and opening the clamping lever at the same time.
Hernia can now be inserted into the ball holder from above.
Fasten the ball adapter by inserting it into the retaining bracket and closing the clamping lever.
For more information, please refer to the Instructions for Use for Hernia .
Always make sure that the ball adapter is firmly and securely seated.

15
Instructions for Use
Carrier
Processing
Carrier
Processing Carrier
Service life
Carrier
is a reusable medical device. Its service life depends on how much wear and damage it encounters. Fre-
quent processing has no eect on the performance of the product.
A passive coating forms on the instruments over time. This is influenced by factors such as material composition, surface
condition and processing conditions. The passive coating on the instruments is neither a quality defect nor does it aect the
function of the system. Experience has shown that the risk of corrosion tends to decrease as the passive coating becomes
thicker.
In order to keep the product functional and safe for a significant period, we recommend observing the following instructions
for the preparation of instruments supplied in non-sterile condition and the processing of contaminated instruments.
Preparation
We recommend processing the contaminated instruments as soon as possible aer they have been used. They should be
transported in a sealed container. Aer using reusable instruments, care should be taken not to damage them during trans-
port. The instruments must be disassembled as much as possible before cleaning and the eccentric locks must be loosened.
Disassembling the post
The post can be disassembled into individual parts for processing. This is indicated by the serial number of each part, which
always contains a "Z" (e.g. 0100 Z). In addition to the post base, the "clamp" and "threaded rod" assemblies are also marked
with the serial number. To disassemble the post, proceed as follows:
Disassembly of post with bracket and recess
To prepare the post, please open all screw connections and the ball holder. Proceed as follows:
When reassembling the post, care must be taken to ensure that the components have the same serial numbers.
Disassembly HC010 Disassembly HC020

16
Instructions for Use Carrier
Processing
Carrier
1. Release the lock on the ball holder of the crossbar by pressing the push button on the clamping lever and pulling the
clamping lever at the same time.
2. Turn the handwheel counterclockwise back to the furthest possible position
Avoid long waiting times before wet or dry processing (e.g. overnight or over the weekend) due to the risk of corrosion and
other factors which may make it diicult to clean the instruments. The Instrument Processing Working Group recom-
mends taking the instruments for sterilisation without them being submerged in liquid whenever possible. Experience has
shown that waiting times of up to 6 hours are unproblematic when the instruments are out of liquid.
Cleaning
Cleaning consists of 3 steps:
1. Manual cleaning
2. Ultrasonic cleaning
3. Machine cleaning (in a washer/disinfector).
We recommend the use of cleaners with prion decontamination (see manufacturer's instructions). In recent studies on de-
contamination procedures against infectious prion proteins, the most eective methods have been successive treatment
with an alkaline detergent (pH > 11) and disinfection or sterilisation.
1. Manual cleaning
Soak dirty parts in cold water for at least 10 minutes. Please note: The instruments should not be le in water and/or cleaning
agents / disinfectants for a long period of time, e.g. overnight / over the weekend.
• Immerse the parts and clean them with a brush. Make sure that you reach all of the surfaces. You should use a suitable
brush for cannulations and blind holes.
• Rinse the parts thoroughly under running water. The water must flow through the cannulations and blind holes must be
repeatedly filled and emptied.
• Dry the parts carefully with a clean cloth or a clean air jet. All articulated parts must be dried aer cleaning.
2. Cleaning in an ultrasonic cleaner
Place the pre-cleaned parts in an ultrasonic cleaner heated to 40 °C with 0.5% alkaline cleaner (e.g. Deconex 28 Alka One,
Borer Chemie) according to the manufacturer's instructions for use and then treat the instruments for 10 minutes.

17
Instructions for Use
Carrier
Processing
Carrier
3. Machine cleaning
Place the instruments on sieve baskets or racks suitable for cleaning purposes and ensure that the water jet can reach all
areas. A 0.5% alkaline cleaner (e.g. Deconex 28 Alka One, Borer Chemie) should be used according to the manufacturer's in-
structions for use. Pay attention to the correct dosage! Carrier
is approved for alkaline cleaning. Acidic cleaning
agents and disinfectants must not be used.
The device manufacturer's instructions must also be followed. A typical cycle should include the following steps:
• At least 2 minutes of pre-washing with cold water
• Treat for at least 5 minutes with 0.5% alkaline cleaner (e.g. Deconex 28 Alka One, Borer Chemie)
below protein coagulation temperature (<60 °C)
• At least 3 minutes neutralisation with warm, fully demineralised water (>40 °C)
• At least 2 minutes of rinsing with warm, fully demineralised water (>40 °C) to remove cleaning agent
• Hot wash disinfection (max. 93 °C)
• Dry cycle (max. 60 °C)
The precise parameters may vary depending on the load and the program.
The instruments should be removed from the machine immediately aer the end of the program and cooled to room tem-
perature. They should not be le in the washing machine aer the washing process.
Aer cleaning, check all parts for visible dirt (especially in cannulations and blind holes). If necessary, repeat the cycle or
clean manually. All articulated parts must be dried aer cleaning. Inspect parts for damage that could impair their function-
ality. Damaged and defective instruments must be identified and replaced. Instruments to be returned to fasciotens GmbH
for repair must also be sterilised beforehand (individual packaging, see section Sterilisation). Please use the template for
returns from your AEMP/ CSSD folder for this purpose.
Aer each cleaning and cooling cycle, areas such as joints, sutures, etc. must be treated with suitable care products (medic-
inal white oil).
Sterilisation
Instruments can be sterilised individually wrapped (in a standard sterilisation pouch) in appropriate container systems or
general purpose sterilisation containers. The containers should not be overloaded. Please pay attention to the manufactur-
er's instructions!
Sterilisation should be carried out in accordance with a validated procedure using steam with fractionated pre-vacuum (e.g.
steriliser according to EN 285 and validated according to DIN EN ISO 17665-1). An exposure time of at least 5 minutes must be
maintained at a temperature of 134 °C. All joints and eccentric closures must be open during sterilisation.
Final instructions
These instructions have been determined by fasciotens GmbH to be suitable in order to prepare Carrier
for re-
use. The processor is responsible for ensuring that the processing carried out with the equipment, materials and personnel
used in the processing facility achieves the desired results. This normally requires validation and routine monitoring of the
process. Likewise, any deviation from the instructions provided should be carefully evaluated by the processor to make sure
they are eective and to identify any potential adverse consequences.
We hereby confirm that no products leave our facility until appropriate quality control has been performed. Nevertheless,
issues are possible. Please check the goods are complete and functional and inform us immediately if you have any com-
plaints. Please do not use rejected goods!

18
Instructions for Use Carrier
Processing
Carrier
Repairs and returns of hired equipment will only be accepted in a cleaned and sterilised condition. Please use the template
(form) provided at the end of the Instructions for Use and attach it to the return documents or the return shipment.
fasciotens GmbH has determined that the instructions for the preparation of the instruments are suitable for processing.
Additional reference material:
• DIN Pocket Book 100/1 “Medical Instruments 1” (DIN Taschenbuch 100/1 “Medizinische Instrumente 1“), Beuth Verlag
GmbH Berlin, Vienna, Zurich, ISBN-13: 978-3-410-20746-7
• DIN Pocket Book 100/2 “Medical Instruments 2” (DIN Taschenbuch 100/1 “Medizinische Instrumente 1“), Beuth Verlag
GmbH Berlin, Vienna, Zurich, ISBN-13: 978-3-410-20749-8
• RKI recommendations: Hygiene requirements for the processing of medical devices Bundesgesundheitsblatt 2012 -
55:1244-1310 DOI 10.1007/s00103-012-1548-6
• Processing AKI instruments to preserve their condition, Issue 11
Storage instructions
In principle, Carrier
should:
• be stored in a clean, cool and dry location,
• be protected from mechanical damage,
• not be dropped and be handled with care.
The generally applicable regulations and recommendations apply; these include:
• DIN EN ISO 17664:2018-04
• RKI recommendations
• AKI - Instrument processing done right - storage of re-sterilisable instruments.
Maintenance
Careful handling, inspections and maintenance will keep the instruments functional and safe for many years. Inspections
ensure safety and minimise the risk of malfunctions. We therefore recommend having maintenance/revisions performed at
regular intervals.
Maintenance must be carried out by fasciotens GmbH.
Maintenance improves reliability. It plays a vital role in keeping the instruments functional and safe. We therefore recom-
mend that maintenance be carried out at regular intervals. If regular maintenance is carried out, the warranty will be extend-
ed for another 24 months.
Repairs
If you encounter any problems with the functionality of the instruments, contact our customer support team by email
(support@fasciotens.de) or phone (+49 (0)221 17738 500).
All repairs must be carried out by the manufacturer.

Template
For returns: Please note!
Carrier back
Return for repair
This confirmation must be enclosed with the return shipment Carrier!
We hereby confirm that the enclosed instrument set has been correctly disinfected, cleaned and sterilised.
Instrument set Confirmation/sticker
Hospital (address)
Department
Responsible Person
Date, stamp, signature

20
Instructions for Use Carrier
Warnings / Warranty / Support
© fasciotens GmbH. All rights reserved DEHCIFU2103REV002
fasciotens GmbH, Aachener Str. 1053-1055, D-50858 Cologne
Tel.: +49 (0)221 17738 500, Fax.: +49 (0)221 17738 549, Email: support@fasciotens.de
Support
If you have any issues or questions please contact our Customer Support team (support@fasciotens.de)
or by telephone on +49 (0)221 17738 500.
Warranty
The legal warranty period of 24 months applies to our products. Should any initial defect occur in your product within this
period, please inform our Customer Support immediately.
If there are any deficiencies that may result in a hazard for patients, sta or third parties,
the device must be replaced and le unused.
Damage resulting from improper use, external mechanical impacts, transport damage, applications
that do not comply with the intended purpose, or applications carried out by non-authorised persons
is not covered by this warranty, nor is it covered by the liability of fasciotens GmbH.
Warnings/labelling Carrier
This manual suits for next models
1
Table of contents
Other fasciotens Medical Equipment manuals
Popular Medical Equipment manuals by other brands

Mindray
Mindray Hepatus 7 Operator's manual

Stryker
Stryker F-ABSLT2BER Instructions for use

Brillinger
Brillinger COMFORT Ankle Support Instructions for use

Sunrise Medical
Sunrise Medical Guardian IC-6418 User instructions

Ambu
Ambu aScope Gastro Instructions for use

Arjo
Arjo Concerto electric Operating and Product Care Instructions