fasciotens Carrier User manual

Instructions for use
www.fasciotens.de


3
Instructions for use
Carrier
Introduction
Dear customer,
Thank you for choosing the
fasciotens®Carrier. fasciotens® products provide the highest quality, safety and state-of-the-art
technology.
This product was developed in partnership with practising surgeons.
To take full advantage of this product’s capability and to ensure its successful application, please read the Instructions for Use
carefully and use the product as instructed. Always follow standard safety precautions for general occupational safety, your
specic SOPs and all relevant regulatory requirements. We will not assume liability for any damage arising from improper use
or use contrary to its intended purpose or incorrect handling.
Any serious incidents that occur in connection with the product must be reported immediately to fasciotens GmbH
and the responsible national authority.
This medical device is reserved for use by medical professionals only. Please make sure that all persons using this
product only do so aer having read and understood the Instructions for Use.
Please keep the Instructions for Use in a safe place; you may want to reread them at a later date.
Company address:
fasciotens GmbH
Moltkeplatz 1
D-45138 Essen
Tel. +49 (0)201 99 999 630
Fax +49 (0)201 99 999 639
Email: info@fasciotens.de
Website: www.fasciotens.de

4
Instructions for use Carrier
Table of Contents
Table of Contents
For your safety ............................................................................................................................................................................................................................................ 5
Intended purpose, indications and contraindications.................................................................................................................................................... 6
Component denitions .......................................................................................................................................................................................................................... 6
Product design fasciotens®Carrier (HC020) ........................................................................................................................................................................... 7
Product assembly fasciotens®Carrier (HC020) ..................................................................................................................................................................... 8
Combination with fasciotens®Hernia .......................................................................................................................................................................................... 11
Processing fasciotens®Carrier ........................................................................................................................................................................................................... 12
Service life ......................................................................................................................................................................................................................................................... 12
Preparation ....................................................................................................................................................................................................................................................... 12
Cleaning ............................................................................................................................................................................................................................................................ 13
Sterilisation ..................................................................................................................................................................................................................................................... 15
Final instructions ......................................................................................................................................................................................................................................... 16
Storage instructions .................................................................................................................................................................................................................................. 16
Maintenance ................................................................................................................................................................................................................................................... 16
Template for returns ................................................................................................................................................................................................................................. 17
Repairs................................................................................................................................................................................................................................................................. 18
Disposal............................................................................................................................................................................................................................................................... 18
Warranty............................................................................................................................................................................................................................................................. 18
Support................................................................................................................................................................................................................................................................ 18
Symbols used.................................................................................................................................................................................................................................................. 19

5For your safety
Instructions for use
Carrier
For your safety
Please observe the Instructions for Use
Any application or handling of the medical device requires precise knowledge and observation of the Instructions for Use.
The product may only be used for the purpose described.
Statements of particular importance are agged as follows in the Instructions for Use:
Liability for proper function and damage
Any liability for damage caused by use of the product is always transferred to the operator or user, insofar as the product is
used by persons who do not belong to the relevant professional groups, who do not have the relevant qualications required
to operate the product or who have not received proper instruction in its use. In addition, liability is transferred to the user
in case of improper use or the product is used inappropriately.
Prior to use, the product is to be inspected to ensure it is intact and not damaged in any way.
The warranty and liability conditions of the terms and conditions of sale and delivery of fasciotens GmbH are not extended
by any previous or subsequent references.
Please ensure that the Instructions for Use are accessible at all times and that they are read and understood.
Warning!
This is a Warning alerting you to risk situations and dangers.
Ignoring such a warning may lead to life-threatening situations.
Warnings must be observed under all circumstances.
Information!
This is information about specific features that need to be considered under all
circumstances.

6
Instructions for use Carrier
Intended purpose, indications and contraindications/component denitions
Intended purpose, indications and contraindications
Intended purpose
The intended use for the fasciotens®Carrier is as a holding device for fasciotens products before, during and aer surgical pro-
cedures. fasciotens®Carrier is a class I medical device.
The product is intended exclusively for human medical purposes and is used during surgery.
The product is approved for use in combination with fasciotens®Hernia.
The combination with any products other than fasciotens®Hernia has not been verified and validated by
the manufacturer. The intended purpose does not include such a combination and is the responsibility
of the user.
Indications
• Combination with
fasciotens®
products
• Combination with operating tables or standard rails
Contraindications
• No suiciently stable fastening rail
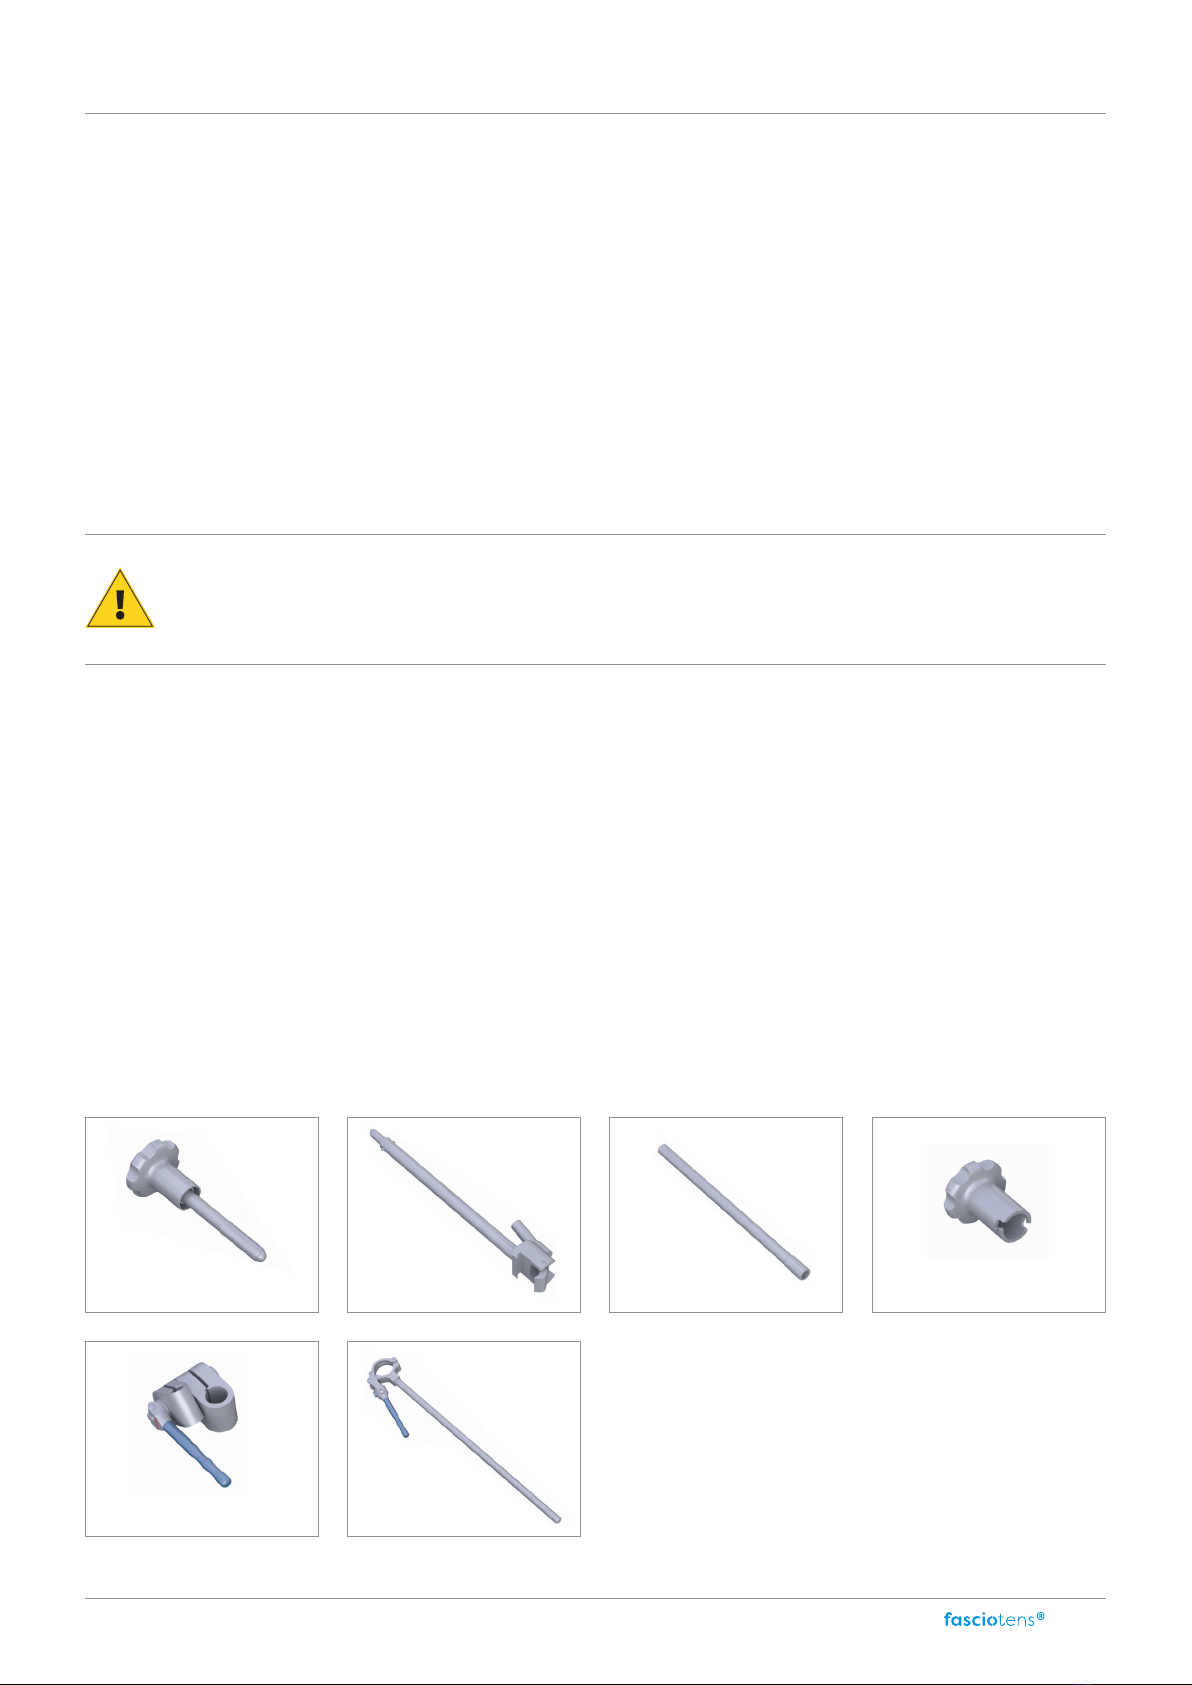
Components
Screw head post
Post
base (P1)
Post
extension (P2)
Screw head
extension (P3)
Eccentric handle (P4) Articulated arm

7
Instructions for use
Carrier
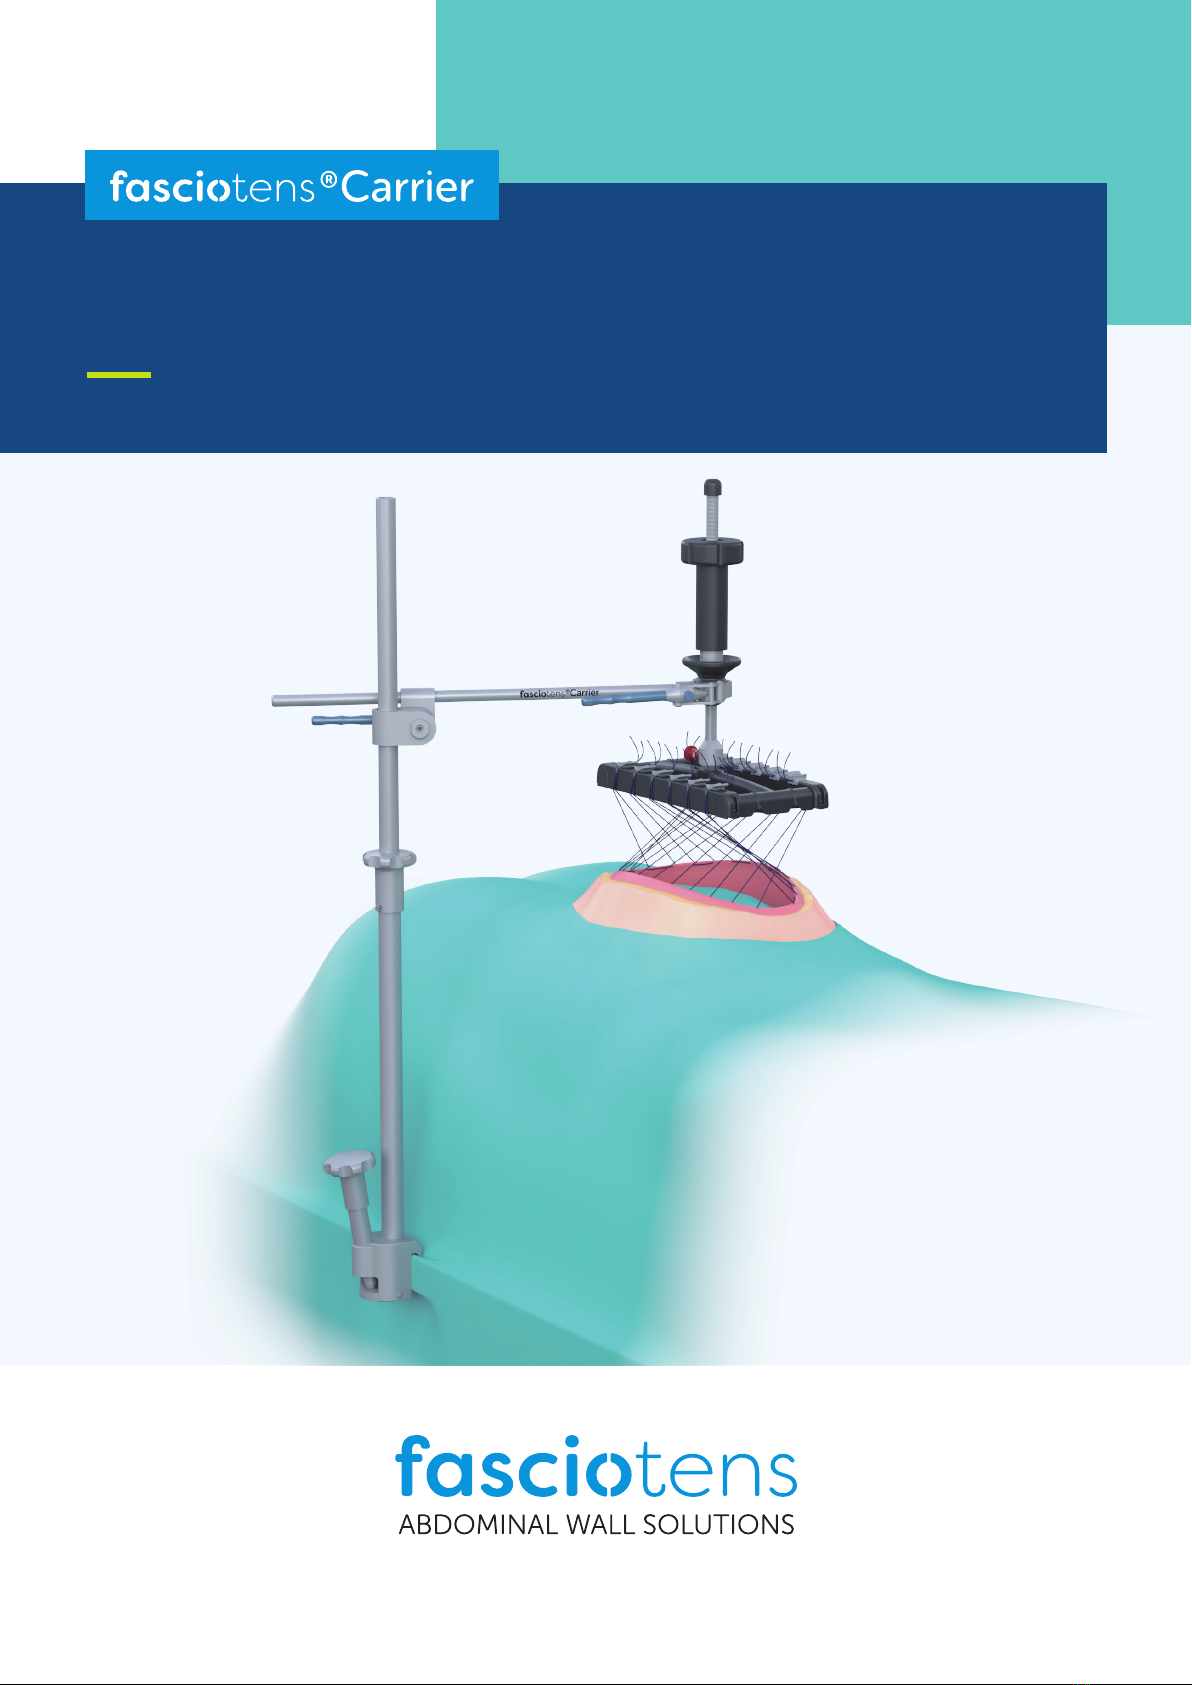
Product design fasciotens®Carrier HC020
Product design fasciotens
®
Carrier HC020
fasciotens®Carrier
and
fasciotens®Hernia
may only be used in a sterile condition.
fasciotens®Carrier
is supplied in a
non-sterile condition by the manufacturer and must be sterilised in the hospital before each use in the operating
room. Please follow the processing instructions. Please follow the storage instructions for the product.
fasciotens®Carrier
must be sterilised before use by the CSSD according to the processing instructions.
Post HC021 Articulated arm HC022
fasciotens®Carrier
(HC020) consists of the following modules:
The gure below shows how the product
fasciotens®Hernia
is used in combination with
fasciotens®Carrier.

8
Instructions for use Carrier
Product assembly
fasciotens®Carrier HC020
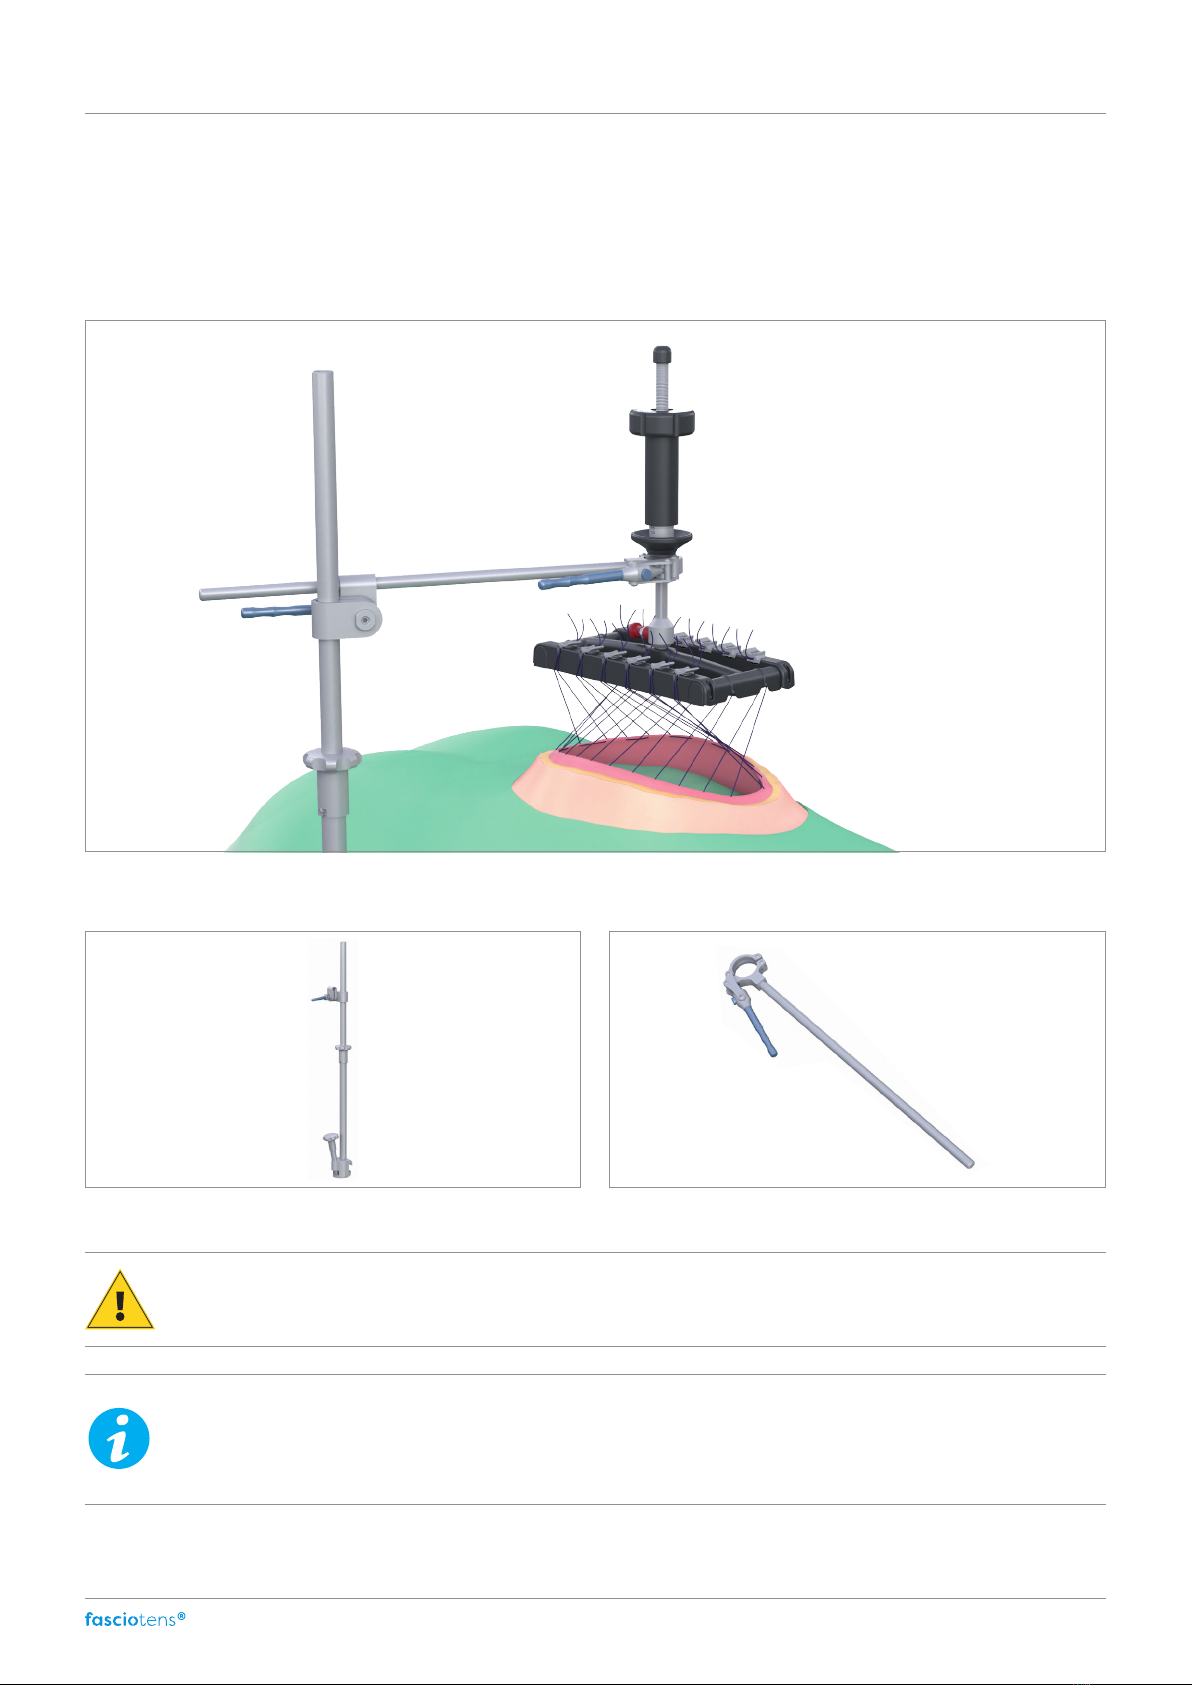
Assembly of the product
fasciotens®Carrier can be attached to all operating tables that have a standard rail. The post is mounted above the sterile
cover on the operating table. The position of the post can be determined by the user but should not obstruct the surgeon.
Make sure that the product has been sterilised beforehand according to the processing instructions.
1. Remove the components from the tray and place them on the instrument
table. Make sure that the clamp opening at the lower end of the post is fully
open.
2. Turn the screw head into the hole provided for this purpose at the lower end
of the central post.
3. Place the post on the standard rail of the operating table.
4.
Lock the post base (P1) on the standard rail of the
operating table by turning the screw head clockwise.
5. Guide the post extension (P2) onto the upper end of
the part of the post attached to the operating table.
Make sure that the post is properly attached and that there are no
objects in the way which would prevent/impair proper attachment
(e.g. patient blanket, catheter, ECG cable).
The operating table cover should have no more than 2 layers.
Check that it is firmly in place on the operating table.

9
Instructions for use
Carrier
Product assembly fasciotens®Carrier HC020
6. Guide the screw head extension (P3) with the opening onto the post extension and connect both parts of the post
by turning the screw head.
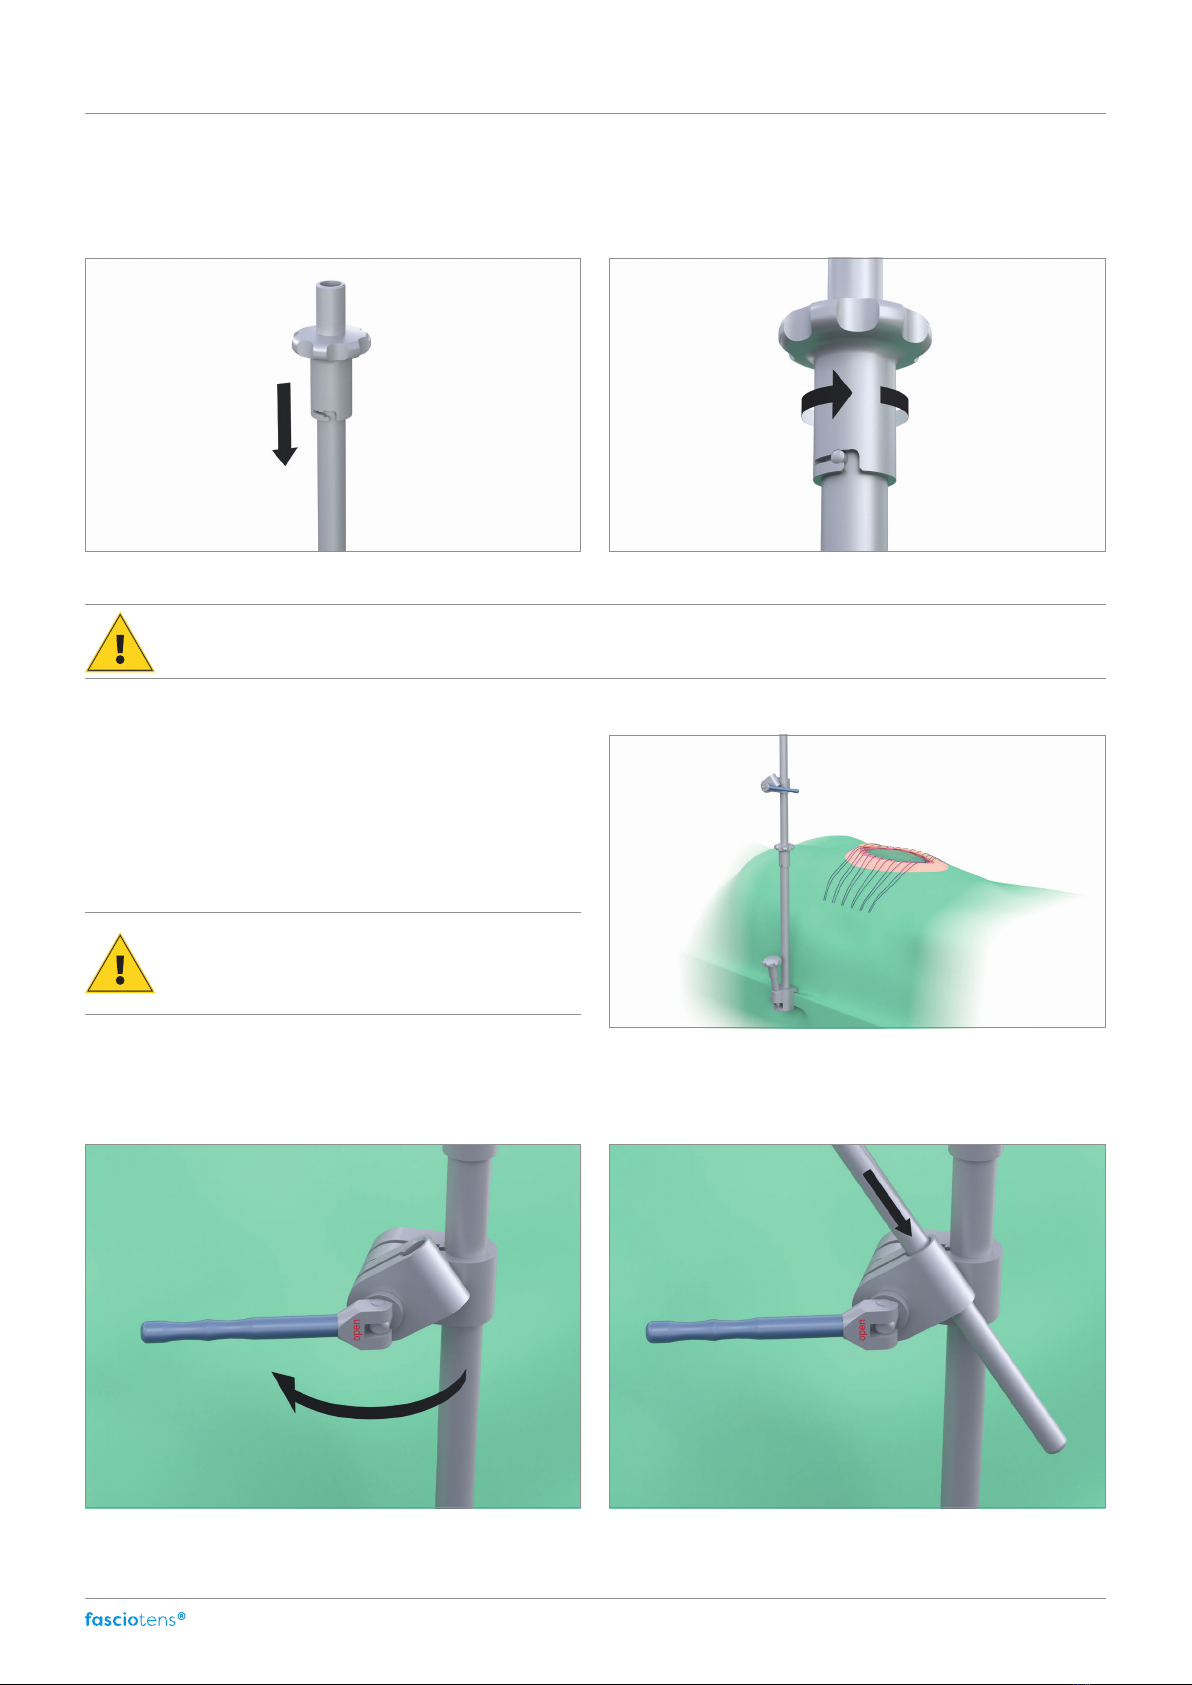
7. Guide the eccentric handle (P4) onto the top of the
post extension and move it to the desired position.
8. Insert the articulated arm into the open eccentric handle.
Check that both modules are firmly locked.
Always hold the eccentric handle with one hand to
prevent it from falling suddenly when not locked.

10
Instructions for use Carrier
Product assembly
fasciotens®Carrier HC020
9. Align the articulated arm over the patient based on the defect and the abdominal circumference.
10. Secure the articulated arm in the eccentric handle by ipping the clamping lever.
The word "closed" will now be visible on the eccentric lock.
Before each use, check that the product is intact and make sure that the post and the articulated arm are attached
in a secure and sterile manner.
The post and the articulated arm can cause pressure damage. Make sure that there is always suicient space
between the patient and the articulated arm.

11
Instructions for use
Carrier
Combination with fasciotens®Carrier
Combination with fasciotens®Hernia
To combine with fasciotens®Hernia, release the lock on the ball adapter retaining bracket of the articulated arm. To do this,
press the pushbutton on the clamping lever and open the clamping lever at the same time.
fasciotens®Hernia can now be inserted into the ball adapter retaining bracket from above.
Fasten the ball adapter by inserting it into the retaining bracket and closing the clamping lever.
Always check that the ball adapter is firmly and securely seated.
For more information, please refer to the fasciotens®Hernia instructions for use.

12
Instructions for use Carrier
Processing
fasciotens®Carrier
Processing fasciotens®Carrier
Service life
fasciotens®Carrier
is a reusable medical device. Its service life depends on how much wear and damage it encounters. Fre-
quent reprocessing has no eect on the performance of the product.
A passive coating forms on the instruments over time. This is inuenced by factors such as material composition, surface con-
dition and processing conditions. The passive coating on the instruments is neither a quality defect nor does it aect the func-
tion of the system. Experience has shown that the risk of corrosion tends to decrease as the passive coating becomes thicker.
In order to keep the product functional and safe for a signicant period, we recommend observing the following instructions
for the preparation of instruments supplied in non-sterile condition as well as for the re-conditioning of contaminated instru-
ments.
Preparation
We recommend processing the contaminated instruments as soon as possible aer they have been used. They should be
transported in a sealed container. Aer using reprocessable instruments, care should be taken not to damage them during
transport. The instruments must be disassembled into individual parts as much as possible before cleaning.
Due to the risk of corrosion and in order not to impair cleaning, long waiting times before reprocessing (e.g. overnight or over
the weekend) should be avoided. The Instrument Processing Working Group (AKI) recommends taking the instruments for
sterilisation without them being submerged in liquid when possible. Waiting times of up to 6 hours when the instruments
are out of liquid should be avoided.
Use a mechanical process for cleaning and disinfection. When selecting the detergent to be used, please pay attention to
material compatibility, suitability and eectiveness for cleaning medical devices. The concentrations, temperatures and ex-
posure times specied by the manufacturer of the cleaning agent or detergent and disinfectant as well as the specications
for rinsing must be observed.
Disassembling the post
The post can be disassembled into individual parts for processing. All individual components are provided with correspond-
ing serial numbers and can therefore be easily allocated. To disassemble the post, proceed as follows:
Cleaning
When reassembling the post, care must be taken
to ensure that the components have the same
serial numbers.
Disassembly HC020

13
Instructions for use
Carrier
Processing
fasciotens®Carrier
Cleaning consists of the following steps:
1. Pre-cleaning
1.1 Manual pre-cleaning
1.2 Pre-cleaning in an ultrasonic cleaner
2. Machine cleaning according to DIN EN ISO 15883-1 and -2 (in a washer-disinfector)
We recommend the use of cleaners with prion decontamination (see manufacturer's instructions). In recent studies on de-
contamination procedures against infectious prion proteins, the most eective methods have been successive treatment
with an alkaline detergent (pH > 10) and subsequent disinfection or sterilisation. Please carry out the cleaning steps accord-
ing to the cleaning agent manufacturer’s instructions. The following points refer to the alkaline cleaner Deconex 28 Alka One
by Borer Chemie, which was used for the processing validation.
1. Pre-cleaning
1.1 Manual pre-cleaning
Soak dirty parts in cold water (at least drinking water quality) for at least 10 minutes. Please note: The instruments should not
be le in water and/or cleaning agents/disinfectants for a long period of time, overnight or over the weekend.
Immerse the parts and clean them with a so brush for at least 1 minute. In case of heavy contamination, the duration of
pre-cleaning may dier. Make sure that you reach all of the surfaces. You should use a suitable brush for cannulations and
blind holes.
Rinse the parts thoroughly under running water (at least drinking water quality) for 1 minute. The water must ow through
the cannulations and blind holes must be repeatedly lled and emptied.
1.2 Pre-cleaning in an ultrasonic cleaner
Place the pre-cleaned parts in an ultrasonic cleaner heated to 40°C (frequency: 35 to 40 kHz) with an alkaline cleaner (e.g.
Deconex 28 Alka One, Borer Chemie) according to the manufacturer's instructions for use. Then treat the instruments with
ultrasound for 10 minutes. Aer cleaning in the ultrasonic cleaner, rinse the instruments for 1 minute under cold running
water (at least drinking water quality).
2. Machine cleaning (in a washer-disinfector according to DIN EN ISO 15883-1 and -2)
Before you start with the machine cleaning, you should have carried out a pre-cleaning according to Item 1. For
machine cleaning, place the instruments on sieve baskets or racks suitable for cleaning purposes. Ensure that the water jet
can reach all areas.
Avoid long waiting times before processing (e.g. overnight or over the weekend) due to the risk of corrosion and other
factors which may make it diicult to clean the instruments.
The
AKI
recommends taking the instruments for sterilisation without them being submerged in liquid. Experience has
shown that waiting times of up to 6 hours are unproblematic when the instruments are out of liquid.

14
Instructions for use Carrier
Processing
fasciotens®Carrier
Connect hollow-body instruments to the hollow-body rinsing systems of the washer-disinfectors. An alkaline cleaner
(pH > 10) should be used according to the manufacturer's instructions for use. Pay attention to the correct dosage! The prod-
ucts are approved for alkaline cleaning. Acidic cleaning agents and disinfectants must not be used.
The device manufacturer's instructions must be followed. A typical cycle should include the following steps and be carried
out according to the cleaning agent manufacturer’s instructions.
Example of a cleaning cycle, including disinfection:
(Please note the cleaning agent manufacturer’s instructions)
• Pre-wash with cold water for at least 2 minutes (at least drinking water quality and at max. 45°C)
• Treatment with alkaline cleaner for appropriate exposure time, according to the manufacturer's concentration and tem-
perature specications (e.g. at least 5 minutes with Deconex 28 Alka Onevon/Borer Chemie at 70°C)
• Carry out intermediate rinse(s) according to the cleaning agent manufacturer's instructions (e.g. 1 minute, with 40-45°C
warm drinking water, then 1 minute with deionised water (DI water)).
• Thermal disinfection with deionised water and max. 93°C – A0 value ≥ 3000 (e.g. 5 minutes at 90°C)
• Dry cycle (max. 120°C)
The above parameters may vary.
The instruments should be removed from the machine immediately aer the end of the program and cooled to room tem-
perature. They should not be le in the washing machine or the washer-disinfector aer the washing process.
Aer cleaning, check all parts for visible dirt (especially in cannulations and blind holes). If necessary, repeat the cycle or
clean manually.
All parts, especially joints, must be dried with clean compressed air aer cleaning.
Insuicient drying can lead to corrosion of the instruments. Therefore, please make sure that the
instruments are completely dry aer disinfection.
Aer disinfection, store the product under the following conditions: completely dry, protected from dust, in a closed container,
under low-germ conditions (see Storage section).
When storing for several days, disinfect the product again before sterilisation.

15
Instructions for use
Carrier
Processing
fasciotens®Carrier
For processing, the medical devices must be sterilised aer disinfection (see Sterilisation). Inspect parts for damage that
could impair their functionality. Damaged and defective instruments must be identied and replaced. Repairs are to be
carried out exclusively by the manufacturer. In this case, the corresponding instruments must be sterilised beforehand (in-
dividual packaging, see Sterilisation section). Please use our returns form at the end of these instructions for use. Aer each
cleaning and cooling cycle, areas such as joints, sutures, etc. must be treated with suitable care products (medicinal white
oil) depending on the manufacturer’s area of application.
Sterilisation
Instruments can be sterilised individually wrapped (in a standard sterilisation pouch) in appropriate container systems or
general purpose sterilisation containers. The containers should not be overloaded. Please pay attention to the manufactur-
er's instructions.
Sterilisation must be carried out in accordance with a validated procedure using steam with fractionated pre-vacuum (steriliser
at least according to EN 285 and validated according to DIN EN ISO 17665-1). An exposure time of at least 5 minutes must be
maintained at a temperature of 134 °C. All joints and eccentric closures must be open during sterilisation. Aer sterilisation,
store the product in sterile packaging protected from moisture, temperature uctuations, direct sunlight and dust.
Improper storage can lead to loss of sterility - the manufacturer accepts no liability on this point.

Carrier
16
Instructions for use
Final instructions
These instructions have been determined by fasciotens GmbH to be suitable in order to prepare fasciotens®Carrier for reuse.
The processor is responsible for ensuring that the processing carried out with the equipment, materials and personnel in
the processing facility achieves the desired results. This normally requires validation and routine monitoring of the process.
Similarly, the processor should carefully evaluate any deviation from the instructions for eectiveness and adverse conse-
quences.
We hereby conrm that all products leave our facility only aer an appropriate quality control. Nevertheless, issues are pos-
sible. Please check the goods are complete and functional and inform us immediately if you have any complaints. Please do
not use rejected goods!
Repairs and returns of hired equipment will only be accepted in a cleaned and sterilised condition. Please use the template
(form) provided at the end of the instructions for use and attach it to the return documents or the return shipment.
fasciotens GmbH has determined that the instructions for the preparation of the instruments are suitable for processing.
Additional reference material:
• DIN Pocket Book 100/1 “Medical Instruments 1” (DIN Taschenbuch 100/1 “Medizinische Instrumente 1”), Beuth Verlag
GmbH Berlin, Vienna, Zurich, ISBN-13: 978-3-410-20746-7
• DIN Pocket Book 100/2 “Medical Instruments 2” (DIN Taschenbuch 100/1 “Medizinische Instrumente 1”), Beuth Verlag
GmbH Berlin, Vienna, Zurich, ISBN-13: 978-3-410-20749-8
• RKI recommendations: Hygiene requirements for the processing of medical devices Bundesgesundheitsblatt 2012 -
55:1244-1310 DOI 10.1007/s00103-012-1548-6
• Processing AKI instruments to preserve their condition, Issue 11
Storage instructions
fasciotens Carrier may only be used if sterile. For storage, reprocessing and sterilisation of the system, follow the instructions
for use and processing.
fasciotens®Carrier
must
• be stored in a clean, cool and dry location,
• be protected from mechanical damage,
• not be dropped and be handled with care.
The generally applicable regulations and recommendations apply; these include:
• DIN EN ISO 17664:2018-04
• RKI recommendations
• AKI - Instrument processing done right - storage of re-sterilisable instruments.
Maintenance
Careful handling, inspections and maintenance will keep the instruments functional and safe for many years. Inspections
ensure safety and minimise the risk of malfunctions.
Maintenance must be carried out by fasciotens GmbH.
Maintenance improves reliability. It plays a vital role in keeping the instruments functional and safe. We therefore recom-
mend that maintenance be carried out at regular intervals. fasciotens GmbH oers a refurbishment of its systems aer the
warranty has expired.
Processing
fasciotens®Carrier

Carrier
Template
For returns: Please note!
fasciotens®Carrier return
Return for repair
This conrmation must be enclosed with the return shipment of fasciotens®Carrier.
We hereby conrm that the enclosed (leased) instrument set has been correctly disinfected, cleaned and sterilised.
Instrument set Proof/Adhesive label
Hospital (address)
Department
Responsible Person
Date, stamp, signature

18
Instructions for use Carrier
Repairs/Disposal/Warranty/Support
Repairs
If you encounter any problems with the functionality of the instruments, contact our customer support team by email
(support@fasciotens.de) or phone(+49 (0)221 17738 500).
All repairs must be carried out by fasciotens GmbH.
Disposal
You can dispose of the packaging in paper and household waste. In the design of the product, care was taken to avoid the
use of composite materials as far as possible. This design concept allows for a high degree of recycling. At the end of the
product’s service life, please dispose of it properly or send it to a recycling system. The national regulations and disposal
guidelines must be observed for all disposal measures.
Warranty
The legal warranty period of 24 months applies to our products. Should any initial defect occur in your product within this
period, please inform our Customer Support immediately.
If there are any deficiencies that may result in a hazard for patients, sta or third parties, the device must no longer
be used and must be replaced.
Damage resulting from improper use, external mechanical impacts, transport damage,
improper use, or applications carried out by non-authorised persons is not covered by this warranty,
nor is it covered by the liability of fasciotens GmbH.
Support
If you have any issues or questions please contact our Customer Support team by email (support@fasciotens.de) or call us
on +49 (0)221 17738 500.

19
Instructions for use
Carrier
Symbols used
Symbols Labelling
Labelling in accordance with standard
ISO 15223-1.
Symbol for “Product number”
Labelling in accordance with standard
ISO 15223-1.
Symbol for “Serial number”
Labelling in accordance with standard
ISO 15223-1.
Symbol for “Name and address of the manufacturer”
Labelling in accordance with standard
ISO 15223-1.
Symbol for “Please observe the Instructions for Use”
Labelling in accordance with standard
ISO 15223-1.
Symbol for “Product not sterile”
Labelling in accordance with standard
ISO 15223-1.
Symbol for “Medical Device”
Labelling of products placed on the market in accordance
with the relevant European legal
requirements.
Labelling in accordance with standard
ISO 15223-1.
Symbol for “Keep dry”
Labelling in accordance with standard
ISO 15223-1.
Symbol for “Protect from sunlight”
Symbols used

Instructions for use Carrier
© fasciotens GmbH. All rights reserved. Last updated: 09.02.2022 ENHCIFU2202REV003
Company address: fasciotens GmbH, Moltkeplatz 1, D-45138 Essen
Tel. +49 (0)201 99 999 630 Fax +49 (0)201 99 999 639 Email: info@fasciotens.de
This manual suits for next models
1
Table of contents
Other fasciotens Medical Equipment manuals
Popular Medical Equipment manuals by other brands

MD Orthopaedics
MD Orthopaedics Mitchell Ponseti Ankle Foot Orthosis Instructions for use

Nidek Medical
Nidek Medical TONOREF II Network setting manual

Graham Field
Graham Field Lumex LF1090 specification

Ultrasonix
Ultrasonix Sonix MDP Service manual

serva
serva BlueStain instruction manual

ARJO HUNTLEIGH
ARJO HUNTLEIGH Akron Streamline 2211 Instructions for use