FHF FernTel 3 User manual
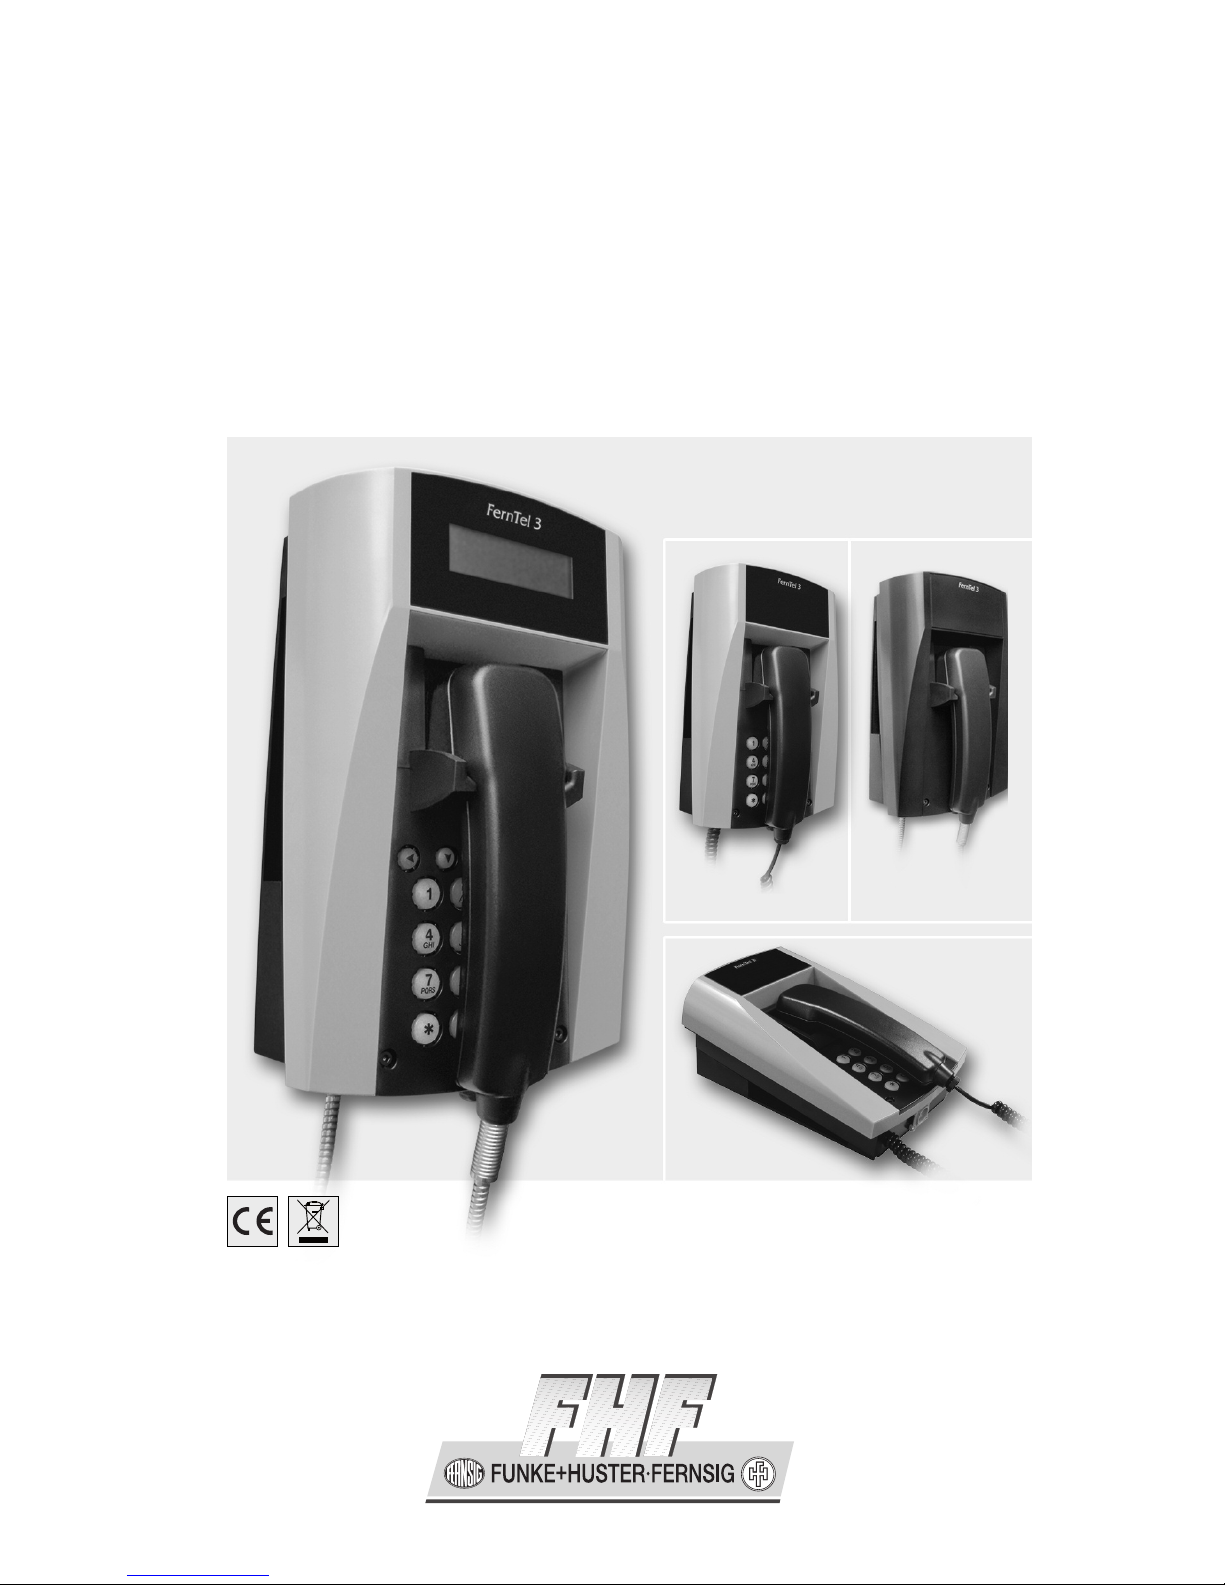
Weatherproof telephone
FHF BA 9620-62 07/14
Operating manual
FernTe l 3
Version 16 keys
without display Version without keys,
without display
Version 21 keys with display
Tabletop unit

2
Note
Please read the operating manual carefully before installing the device.
Please check the contents of the box for completeness.
Table of Contents
General operating notes.................................................................................... 4
Device overview / Dimensions........................................................................ 5
Device versions.................................................................................................... 5
Controls and indicators..................................................................................... 6
Version with keypad (21 keys) and display.......................................................... 6
Version with keypad (16 keys), without display.................................................... 7
Version without keypad, without display .............................................................. 7
As-delivered condition....................................................................................... 8
Box contents....................................................................................................... 8
Telephone presetting .......................................................................................... 8
Mounting and installing..................................................................................... 9
Wall version........................................................................................................ 9
Table version..................................................................................................... 1
Mounting the sling holder................................................................................... 11
Connection of a secondary sounder................................................................... 11
Version wit keypad (21 keys) and display....................................... 12
Operation ................................................................................................... 12
Seize (Make / answer a call) ........................................................................ 12
Receiver volume .......................................................................................... 12
Make a call .................................................................................................. 12
Short / Speed code dialling .......................................................................... 12
Number redial .............................................................................................. 12
Disconnect................................................................................................... 12
Enquiry call (dual-tone multifrequency only) ................................................. 12
Telephone book ........................................................................................... 12
Programming ............................................................................................. 13
Telephone book ........................................................................................... 14
Short / Speed code dialling .......................................................................... 14
Settings ....................................................................................................... 15
Ringing signal ........................................................................................ 15
Volume .................................................................................................. 15
Dialling mode ......................................................................................... 15
PBX ....................................................................................................... 15
As-delivered condition ............................................................................ 15
Menu ..................................................................................................... 15
Restrictions.................................................................................................. 16
Activate.................................................................................................. 16
None ................................................................................................ 16
Direct call ......................................................................................... 16
Operation and programming 12

3
Total lock ......................................................................................... 16
Telephone book ............................................................................... 16
Programming.................................................................................... 16
Direct call number .................................................................................. 16
PIN ........................................................................................................ 16
Version wit keypad (16 keys), wit out display.............................. 17
Operation................................................................................................. 17
Seize (Make / answer a call)...................................................................... 17
Amplified listening in receiver .................................................................... 17
Make a call ............................................................................................... 17
Last number redial .................................................................................... 17
Disconnect................................................................................................ 17
Enquiry call (dual-tone multifrequency only)............................................... 17
Programming .......................................................................................... 17
Allow settings modifications....................................................................... 17
Restrict settings modifications ................................................................... 18
Adjust ringing volume................................................................................ 18
Adjust the ringing melody .......................................................................... 18
Amplified listening in receiver, setting the levels ........................................ 18
Set dialling mode ...................................................................................... 19
Enter the exchange code........................................................................... 19
Delete the exchange code......................................................................... 19
Program pause following the exchange code............................................. 2
Program the Enquiry Key (flash time) ........................................................ 2
Restore to as-delivered condition .............................................................. 2
Change Personal Identification Number (PIN)............................................ 21
Signalling tones during programming ................................................... 21
Version wit out keypad and wit out display................................... 22
Operation................................................................................................. 22
Seize (Make / answer a call) and dialling ................................................... 22
Programming using device-internal
programming keypad ............................................................................. 22
Setting operating mode ............................................................................. 22
Enter speed code dialling number ............................................................. 22
Adjust ringing volume................................................................................ 22
Adjust the ringing melody .......................................................................... 23
Set dialling mode ...................................................................................... 23
Restore to as-delivered condition .............................................................. 23
Signalling tones during programming ................................................... 23
General information........................................................................................... 24
Service ............................................................................................................. 24
Care and maintenance..................................................................................... 24
Warnings and security information ................................................................ 24
Tec nical Data..................................................................................................... 25
EC Declaration of Conformity ........................................................................ 26
EMC-Directive ...................................................................................................... 26

4
General operating notes
1. The versions of FernTel 3 can be operated in the analogue, public telephone network
and connected to analogue terminals of branch exchanges.
2. The receiver is equipped with a leakage field spool for coupling of hearing aids. Users
of a hearing aid with inductive receiver may receive the signal from the receiver inset
directly.
3. The version without keypad does not offer you all the performance features available
in other versions.
4. The telephone has a receiver accommodation with a magnetic contact as hook
switch. To terminate an existing connection, the receiver must be replaced. For
disconnecting an existing connection, all you need to do is press the disconnect key
on the keypad.
5. When programming the settings, the handset must be off the hook. On the version
with 16 keys, you enter programming mode by simultaneously pressing the asterisk
and the hash key. For the version with 21 keys and a display, programming takes
place in the Select menu, which appears when the key is pressed.
6. If a procedure has been completed successfully, you will hear an acknowledgement
signal. An error tone informs you of any operating mistakes.
7. Should more than 2 minutes pass before you start dialling, the exchange may cut off
the power supply. The dial tone can no longer be heard. In this case you should put
the handset back on the hook and wait approximately 2 seconds before you lift it
again. Programming sessions that have been started, but have not been completed,
must be repeated.
8. If you get a call, the FernTel 3 rings with the volume and melody you have chosen.
The display version also signals the incoming call in the display.
9. Entering your personal identification number (PIN) you may partly or completely
restrict functions and settings. Forgetting your PIN can be compared to losing a key.
If you have forgotten your PIN, please contact our technical support service.

5
Device overview / Dimensions (mm / inc )
Device versions
The telephone FernTel 3 is available in three versions.
- with keypad (21 keys) and display
- with keypad (16 keys), without display
- without keypad, without display (with a device-internal programming keypad)
6
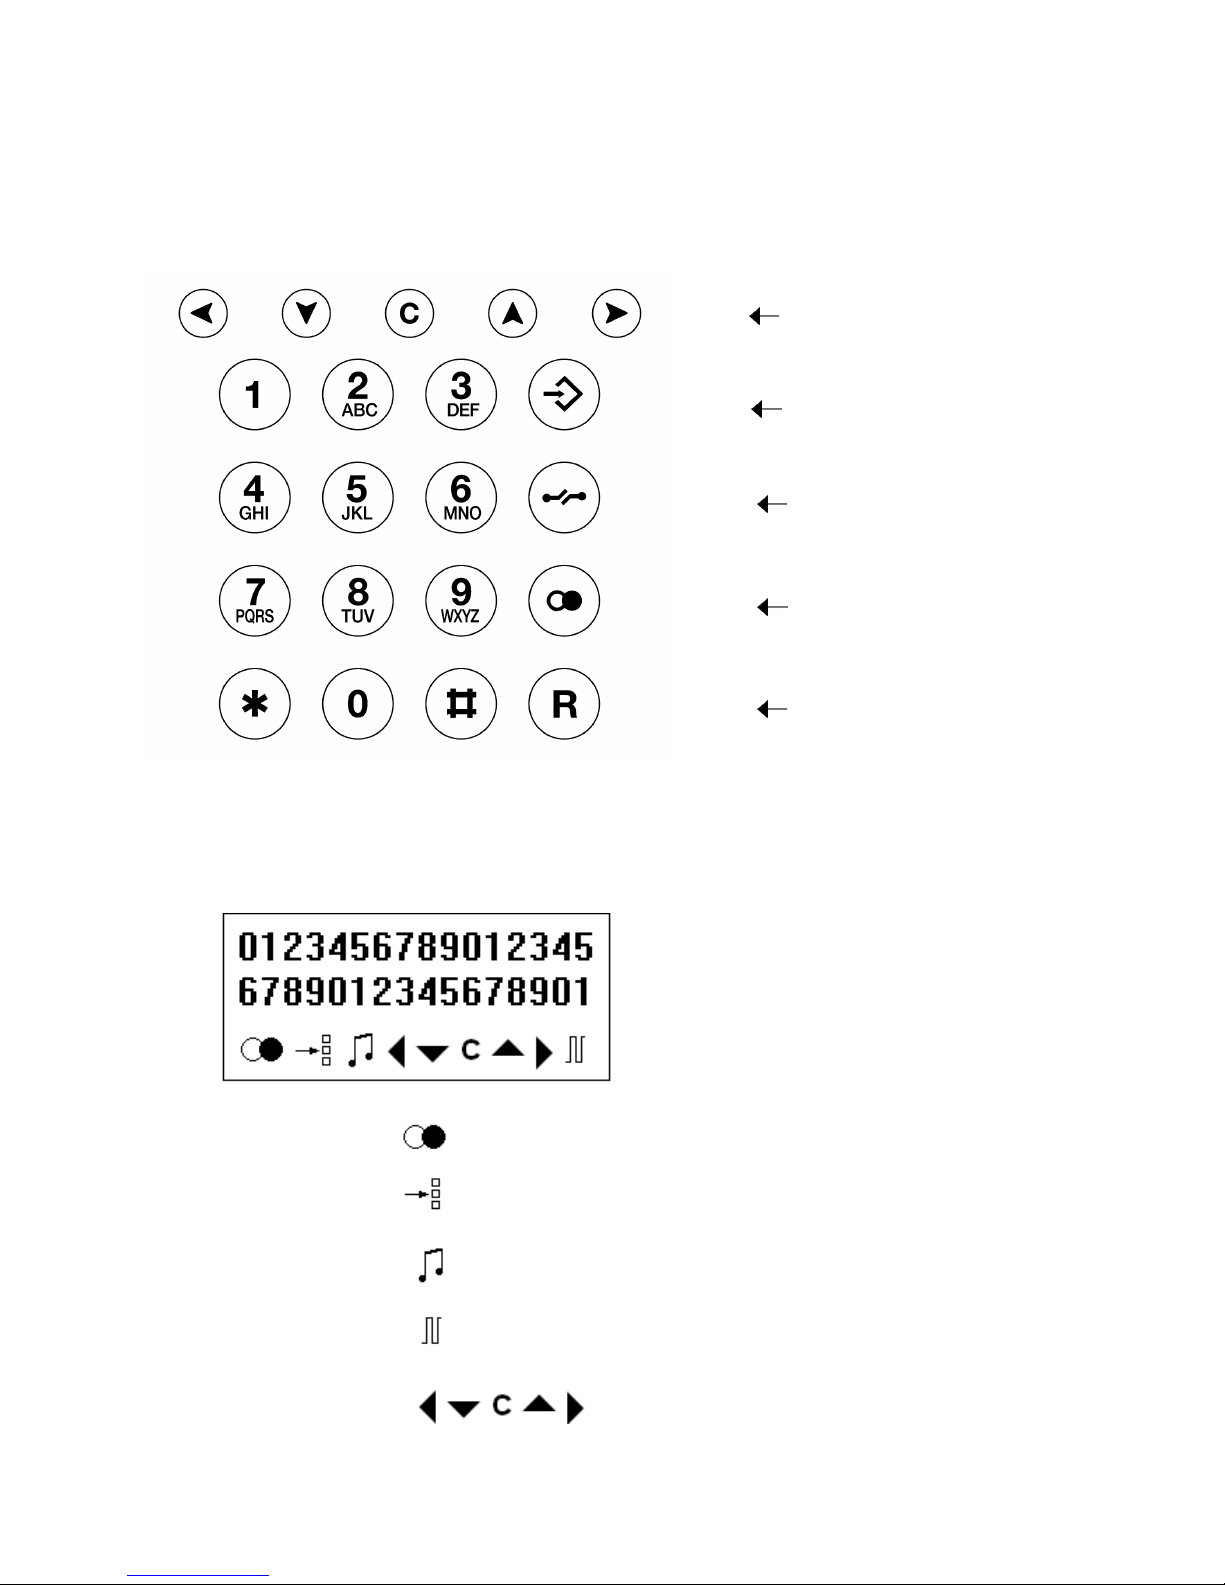
Controls and indicators
Version wit keypad (21 keys) and display
Keypad
Menu operations keys
Short / Speed code dialling
Disconnect
Last number redial
Enquiry key
________________________
Number keys
Display
The two uppermost lines display
numbers or the menu settings.
The lower line displays pictograms
that correspond to the functions.
Last number redial
Direct dialling
Dual-tone multifrequency (DTMF)
Pulse dialling
Menu operation

7
Version wit keypad (16 keys), wit out display
Keypad
Amplified listening in receiver
Disconnect
Last number redial
Enquiry key
________________________
Number keys
Version wit out keypad, wit out display
Device-internal programming keypad (12 keys)
123
456
789
* #

8
As-delivered condition
Box contents
The scope of the delivery includes:
- 1 telephone
- 1 telephone mount
- 1 handset accommodation for the table version with 2 screws
- 4 washers Ø 18 mm
- this operating manual
Telep one presetting
Valid for version
ABC
Dialling mode Dual-tone multifrequency (DTMF),
signal duration 9 ms
xxx
Enquiry key function (R key) Flash 12 ms xx
Exchange code none xx
Pause following exchange code 3 seconds xx
Last number redial memory Empty xx
Speed code dialling memory Empty x
x
x
Short code dialling memory
Mode key
Direct call memory
Empty
Speed code
Empty x
Restrictions Programming restricted xx
Amplified listening in receiver Two levels (6 dB / 12 dB) x
PIN xx
Ringing melody 7 xxx
Ringing volume 6 = max xxx
Receiver volume 1 = min, default value x
A) with keypad (21 keys) and display
B) with keypad (16 keys), without display
C) without keypad, without display (with a device-internal programming keypad)
Using the programming menu, you may reset this as-delivered condition at any time. The
PIN and the menu language, however, will not be altered by resetting.
9
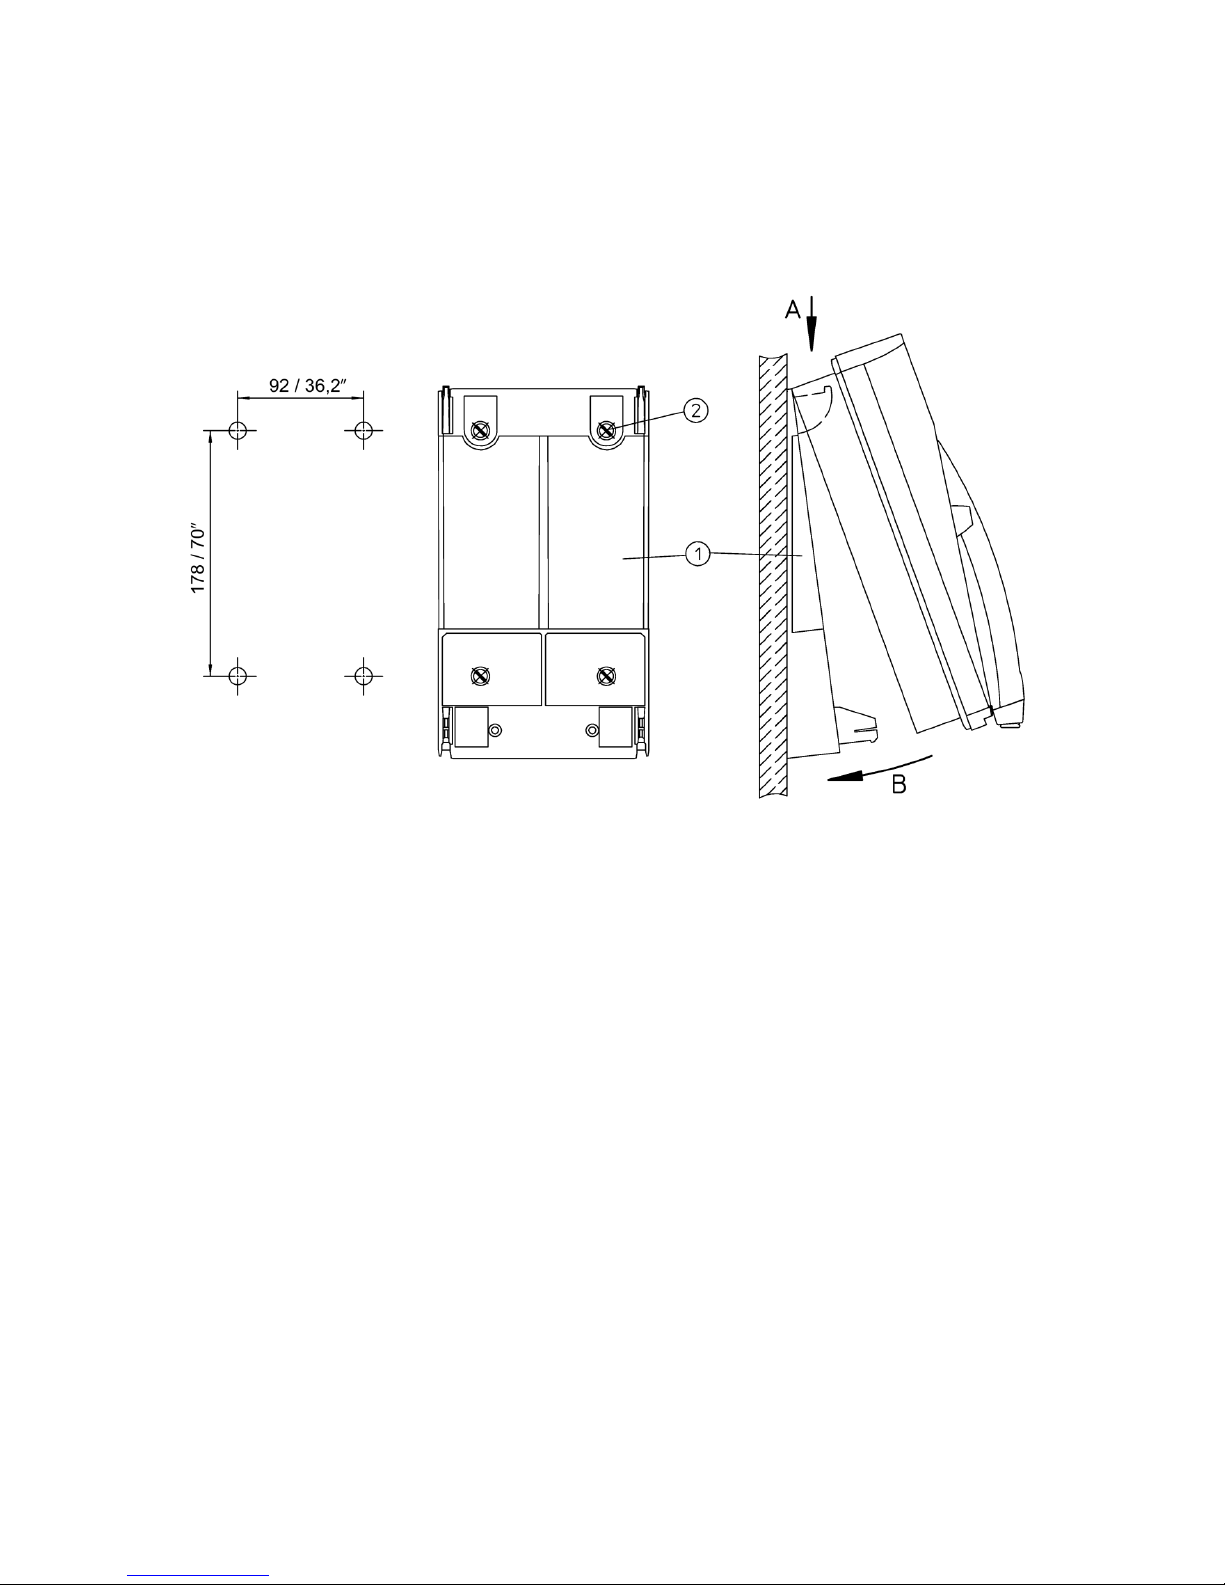
Mounting and installing
Wall version
Fasten the telephone mount with 4 screws (2). Place the provided washers Ø 18 mm under
the screw head.
Place the telephone in the upper latches (A), swing it downwards until the lower latches
audibly engage (B).
Remove the keypad plate (6), and tighten the two locking screws (3) as far as they will go.
Important: This preserves the IP65 degree of protection.
Pull the telephone line through the cable gland (4) and connect it with terminal (5) TCP/La -
TCP/Lb (TCP : Terminal Connection Point).
Use cables with a sheath diameter of 5 to 9 mm only, otherwise the IP65 degree of
protection can not be guaranteed.
Bore
illustration
(not to scale)

1
Plug the ribbon cable onto the pin contact strip (7) of the keypad plate.
Tighten the keypad plate (6) using four screws (8).
Table version
Place the telephone in the lower latches (A), swing it backwards until the upper latches
audibly engage (B).
Pull the telephone line through the cable gland (4) and connect it with terminal (5) TCP/La -
TCP/Lb.
Use cables with a sheath diameter of 5 to 9 mm only, otherwise the IP65 degree of
protection can not be guaranteed.
The standard handset accommodation (for the wall version) (9) can be replaced for the table
version.
After loosening the two screws (12) on the bottom of the keypad plate you can remove the
standard handset accommodation.
Fasten the table version handset accommodation (11) to the keypad plate by using the
included screws (12).
Plug the ribbon cable onto the pin contact strip (7) of the keypad plate. Tighten the keypad
plate (6) using four screws (8).
Lay the telephone cord according to the instructions, in order to prevent accidents.
11
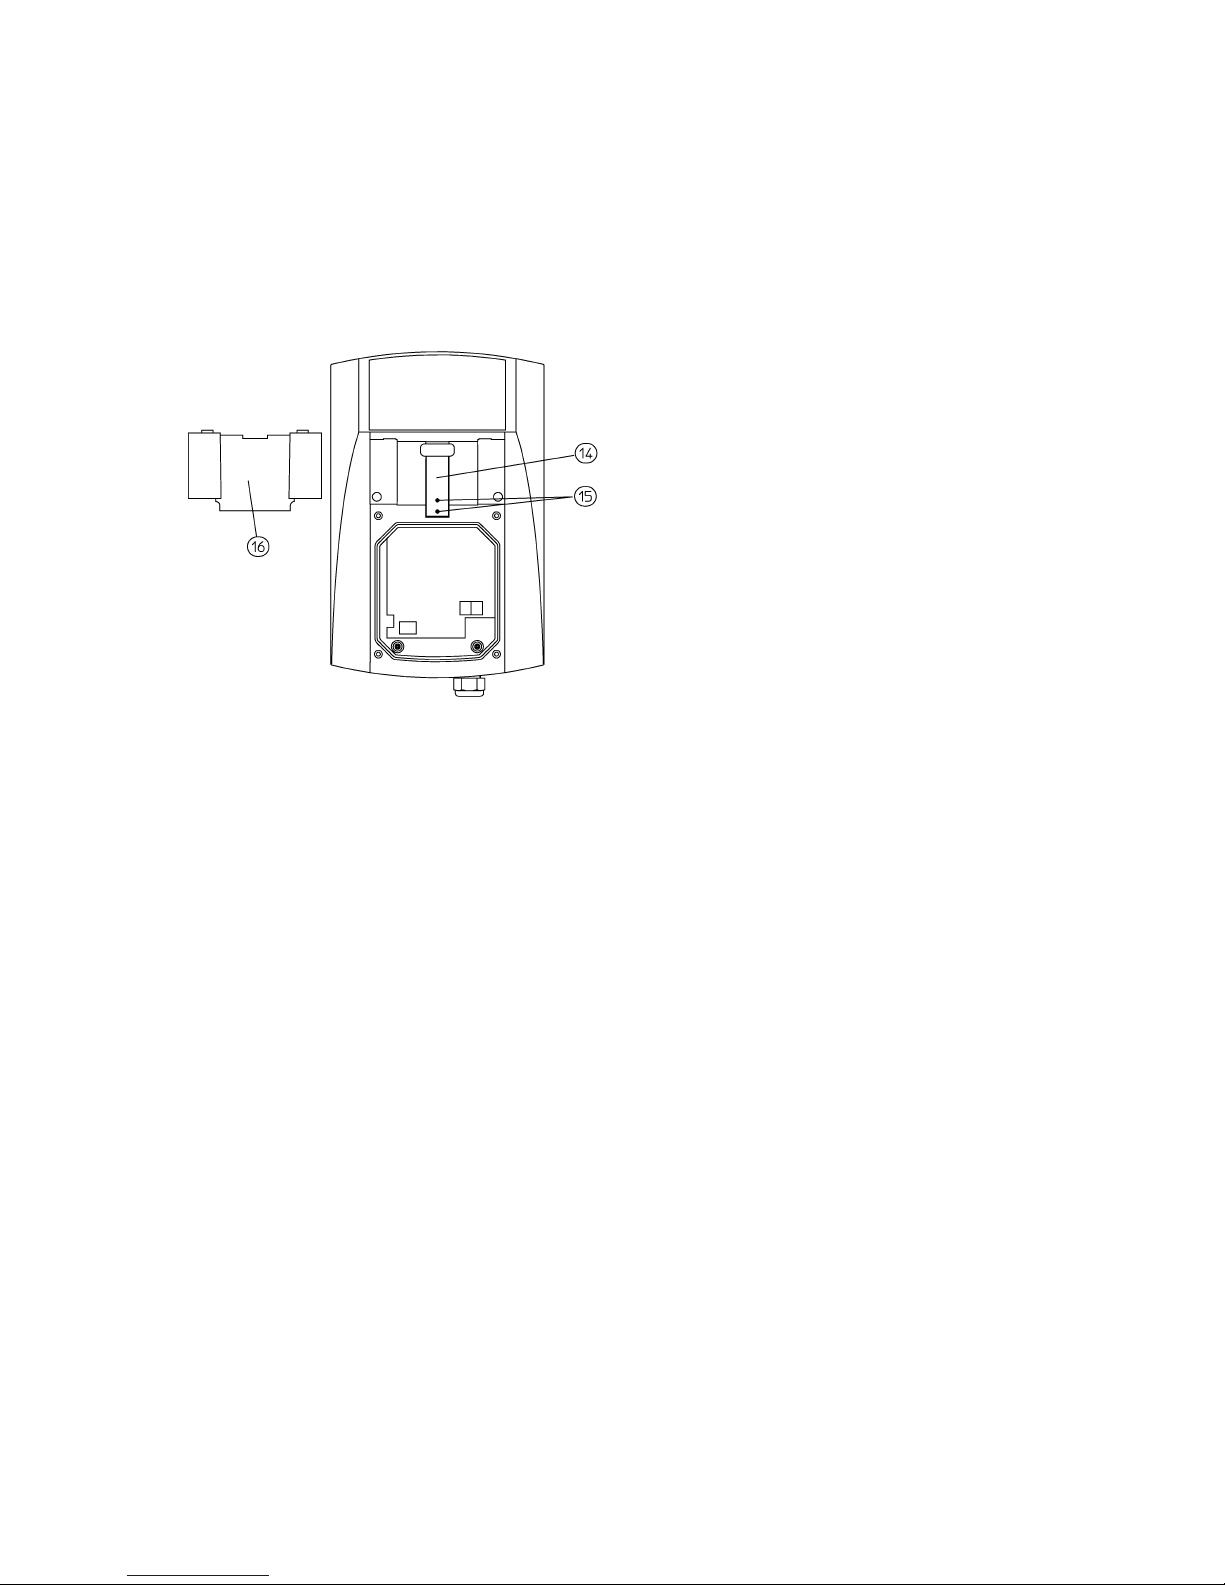
Mounting t e sling older (optional)
Remove the keypad plate (6) by loosening the screws (8).
Lever out the duct cover (13).
Fasten the sling holder (14) by using the two included screws (15).
Insert the duct cover (16) with groove.
Screw the keypad plate (6) back on again.
Connection of a secondary sounder
If you want the telephone to control a secondary sounder, the blind plug must be replaced by
a cable gland M2 x1.5 IP65. The cable diameter must correspond to the demands of the
cable gland, otherwise the IP degree of protection will not be reached. Remove the keypad
plate, install the cable gland and connect the secondary sounder to the terminals W and W1.
After all the connections are made, screw the keypad plate onto the housing again, using 4
screws (8).

12
Operation
Seize (Make / answer a call)
When you pick up the handset, you may answer a call or make a call to a conversation
partner.
Receiver volume
During a call you can adjust the volume in the receiver for the duration of the call, using the
keys and . If you want to change the receiver volume permanently, please use the
programming menu „Settings/Receiver volume“
Make a call
Dial the desired number by using the number keys. When using the dialling mode Pulse
dialling, the asterisk and hash keys have no function.
Speed code dialling
By pressing the key, a pre-programmed number can be dialled automatically.
S ort code dialling
One of 12 pre-programmed telephone numbers can be automatically dialled by pressing the
key and then pressing one of the number keys ( …9) or the asterisk key (*) or the pound
sign key (#).
You have to choose between Speed code dialling or Short code dialling. Select by programming
( Short / Speed code dialling Mode key). The as-delivered condition is Speed code dialling.
Last number redial
By pressing the last number redial key, the last entered number is automatically dialled.
Disconnect
To end a call and start a new call immediately afterwards, there is no need to put the handset
down, just press the disconnect key. When disconnecting, the old call ends, and after a short
while you hear the dialling tone. You may now enter the number for the new call.
Enquiry call (dual-tone multifrequency only)
If the telephone is connected to a private branch exchange, you may press the enquiry key R
in order to establish a connection with another subscriber, who is also connected to the
private branch exchange. By pressing this key a second time, you will be connected with the
first subscriber again.
Telep one book
You can dial numbers from the telephone book. Pick up the handset and press the key.
„Telephone book“ appears in the display. If you press the key again, the first of the stored
names is shown. Using the keys and you can scroll to the name you want on the
display. If you press the key, the number associated with the displayed name is dialled.
(„Telephone book“ appears in the display only if the telephone book contains one or more
entries.)
O
p
eration and
p
ro
g
rammin
g
V
ersion wit ke
y
pad
(
21 ke
y
s
)
and displa
y

13
Programming
General
Use the Programming menu to modify the operating settings of the telephone. After lifting the
handset or pressing the disconnect key, a welcome message appears in the display.
Begin the programming procedure by pressing the key.
In the top line of the display, the text „Main menu“ appears. In the second line, you see the
first menu item of the Main menu. The arrow > in front of the menu item indicates that this
item has been selected. Provided you have access to other menu items, pressing the key
takes you to the next menu items, one at a time. Pressing the key takes you back to the
top of the list of menu items.
The display shows a maximum of two menu items. When an arrow > is visible in front of an
item, it indicates that the item has been selected. The menu items denote further sub-menus.
Pressing the key activates a selected menu item.
Any sub-menu may contain further sub-menus as menu items. These sub-menus are
selected in the same manner as in the Main menu. Press the key to go to a higher menu,
or to leave the Main menu.
At the lower menu levels, so-called radio buttons are displayed for the selection of possible
settings.
Example:
Display Significance
---Activate--- Title line
( ) None Activated option
( ) Direct call Option
>( ) No calls Selected option
=== End=== End of menu list
Pressing the C key activates a selected option.
In certain menus, values may be changed. These changes are made by pressing the and
keys.
For all programming goes: Changes are applied and stored upon pressing the key only.
By pressing the key, you leave the menu without applying the changes.
If a programming session has not been completed, the telephone leaves the Programming
menu after a certain amount of time (time-out).
If you want to modify the settings, you will be required to enter a four-digit PIN. The PIN set
by the factory is .
Initial programming
In the as-delivered condition, the telephone already has a basic configuration enabling you to
make and answer calls. If you want certain settings regarding telephone book entries,
volume, dialling mode, or operation from private branch exchanges, you must use the
Programming menu.
Press the key to go to the Main menu.
The sub-menu „Programming“ appears. Pressing the key takes you to the next level,
where you may activate the sub-item „allow“ by pressing the C key. You will be prompted to
enter the PIN (factory setting ). Programming is now allowed, and the complete Main
menu is at your disposal, including the following items:
- Telephone book
- Short / Speed code dialling
- Settings
In order to
p
ro
g
ram t e tele
p
one,
y
ou ave to allow modifications of t e settin
g
s.

14
- Restrictions
- Programming
- SW version
Press the key to select a menu item.
Telep one book
In the telephone book, you press the and keys to display the entered names (and
numbers). Press the key to choose between the following sub-menus:
- dial
- modify
- add
- delete
- delete all
In case of an empty telephone book, only the sub-menu „add“ appears.
For using the menus „add“, „modify“, „delete“, „delete all“, you are also required to enter the
PIN.
How it works
dial
The number stored with the displayed name is dialled.
add
A new telephone book entry is added to the telephone book.
modify
Names and number of the displayed telephone book entry is modified.
delete
The displayed telephone book entry is deleted.
delete all
All entries of the telephone book are deleted.
S ort / Speed code dialling
Under Short / Speed code dialling you can decide if you want to use the key for Speed
code dialling ( key alone) or for Short code dialling ( key in combination with a further
key ( …9, +, #)).
The first sub menu shows if Speed code dialling or Short code dialling has been set.
Having pressed the key you may then program a telephone number in the Speed code
dialling memory, or a maximum of 12 telephone numbers in the Short code dialling memory.
The second sub menu „Mode key“ enables switching from Speed code dialling to Short
code dialling and the other way round.

15
Settings
Under Settings, use the and keys to display the following sub-menus:
- Ringing signal
- Volume
- Dialling mode
- PBX
- Menu
- As-delivered condition
- PIN
Ringing signal
The volume and melody of the ringing signal are set.
Volume
The receiver volume is set permanently.
Dialling mode
Here, one of four dialling modes is selected. The options are:
- Dual-tone multifrequency (DTMF) with a tone duration of 9 ms
- Dual-tone multifrequency (DTMF) with unlimited tone duration (corresponding to key
usage)
- Pulse dialling (PD) pulse duty ratio 1.5:1
- Pulse dialling (PD) pulse duty ratio 2:1
PBX
If the telephone is connected to a private branch exchange, this is where you perform the
following settings:
- Enter or delete an exchange code
- The duration of the pause following the exchange code
- The flash time upon operation of the enquiry key (dual-tone multifrequency dialling
only)
Menu
Here you can set the menu language, the welcome message and the display contrast.
As-delivered condition
The as-delivered condition is reset. This will not alter the PIN or the menu language.
PIN
Here you may change the 4-digit PIN. The PIN is upon delivery.

16
Restrictions
Under Restrictions, use the and keys to display the following sub-menus:
- Activate
- Direct call number
Activate
Choose from
- none The telephone is not restricted.
- Telephone book Numbers can be dialled from the telephone book
only.
- Direct call When pressed, all keys except the Disconnect key
and the key dial the direct call number.
- Total lock The telephone is fully restricted. Calls can be
received only.
Direct call number
Here, enter the number to call when Direct call is enabled.
Lift restrictions by pressing the key, in case of total lock, Direct call and exclusive dialling
from the telephone book. You may choose to lift the restrictions on the telephone for good or
just for this one call. You will be required to enter the PIN.
Programming
Using the key you reach the sub menu with the items:
- allowed
- restricted
If you modify the setting, you will be prompted to enter the PIN.
SW version
The software version is shown.
Signalling tones during programming
Tone Number Significance
Acknowledgement tone 1 long tone Completion of a correctly performed
procedure.
Error tone 4 short tones An error occurred within a procedure. The
procedure is cancelled.
PIN tone 1 short tone sequence Prompt to enter the PIN.

17
Operation
Seize (Make / answer a call)
When you pick up the handset, you may answer a call or make a call to a conversation
partner.
Amplified listening in receiver
Press the key to increase the receiver volume during a call. Depending on the presetting,
the volume is increased in one or two steps. Pressing the key one more time reduces the
volume to the previous level.
Make a call
Dial the desired number by using the number keys. When using the dialling mode Pulse
dialling, the asterisk and hash keys have no function.
Last number redial
By pressing the last number redial key, the last entered number is automatically dialled.
Disconnect
To end a call and start a new call immediately afterwards, there is no need to put the handset
down, just press the disconnect key. When disconnecting, the old call ends, and after a short
while you hear the dialling tone. You may now enter the number for the new call.
Enquiry call (dual-tone multifrequency only)
If the telephone is connected to a private branch exchange, you may press the enquiry key R
in order to establish a connection with another subscriber, who is also connected to the
private branch exchange. By pressing this key a second time, you will be connected with the
first subscriber again.
Programming
Allow settings modifications
- Lift the handset.
- Press the * and # keys simultaneously.
- Press the # and keys consecutively.
- Enter the PIN
- Press the key to allow settings modifications.
- Replace the handset.
(PIN)
V
ersion wit ke
yp
ad
(
16 ke
y
s
)
, wit out dis
p
la
y
In order to
p
ro
g
ram t e tele
p
one
,
y
ou ave to allow modifications of t e settin
g
s.
18
Restrict settings modifications
- Lift the handset.
- Press the * and # keys simultaneously.
- Press the # and 1 keys consecutively.
- Enter the PIN
- Press the key to disable settings modifications.
- Replace the handset.
(PIN)
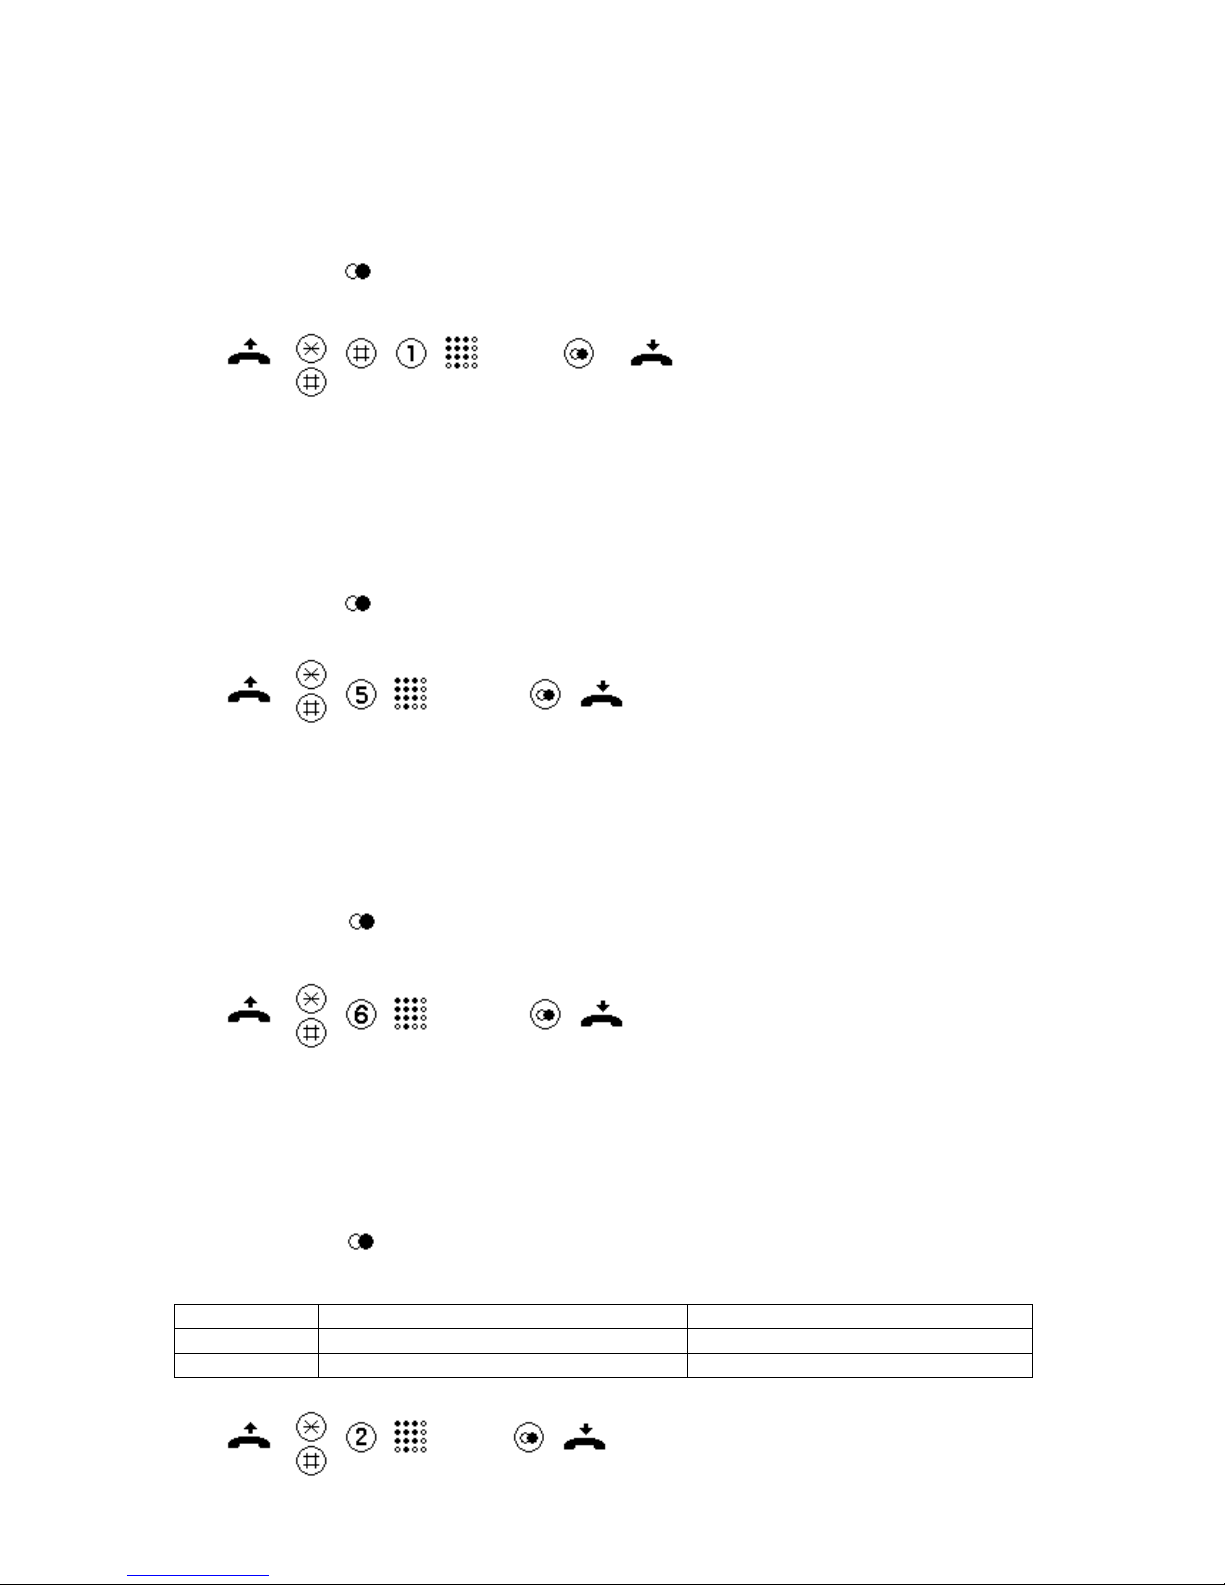
Adjust ringing volume
- Lift the handset.
- Press the * and # keys simultaneously.
- Press key 5 (the ringing sound is played back with the selected volume setting).
- Set the desired volume using the keys 1 to 6.
- Press the key to store the selected volume.
- Replace the handset.
(1…6)
Adjust t e ringing melody
- Lift the handset.
- Press the * and # keys simultaneously.
- Press key 6 (the set melody is played back)
- Set the desired melody using the keys 1 to 9.
- Press the key to store the selected melody.
- Replace the handset.
(1…9)
Amplified listening in receiver, setting t e levels
- Lift the handset.
- Press the * and # keys simultaneously.
- Press key 2.
- Set the code for the desired number of levels, or steps.
- Press the key to store the setting.
- Replace the handset.
Code / Key Amplified listening in receiver, levels Comment
1 1 level, 6 dB
2 2 levels, 6 dB, 12 dB As-delivered condition
(1, 2)

19
Set dialling mode
- Lift the handset.
- Press the * and # keys simultaneously.
- Press key 9.
- Enter the code for the desired dialling mode.
- Press the key to store the selected dialling mode.
- Replace the handset.
Code / Key Dialling mode Comment
1 Dual-tone multifrequency (DTMF),
unlimited tone duration
The DTMF tone is being generated as
long as the associated key is being
pressed.
2 Dual-tone multifrequency (DTMF),
tone duration 9 ms
As-delivered condition
3 Pulse dialling (PD), 1.5:1
4 Pulse dialling (PD), 2:1
(1, 2, 3, 4)
Enter t e exc ange code
- Lift the handset.
- Press the * and # keys simultaneously.
- Press key .
- Enter the exchange code (a digit or the R key;* and # not allowed)
- Press the key to store the entered exchange code.
- Replace the handset.
( …9, R)
Delete t e exc ange code
- Lift the handset.
- Press the * and # keys simultaneously.
- Press key .
- Press the # key.
- Press the key to delete.
- Replace the handset.

2
Program t e pause following t e exc ange code
- Lift the handset.
- Press the * and # keys simultaneously.
- Press key 1.
- Press a key from 1 to 5 (the key number corresponds to the duration in seconds)
- Press the key to store the entered duration of the pause.
- Replace the handset.
(1…5)
Program t e Enquiry Key (flas time)
For dual-tone multifrequency only. Pressing the enquiry key briefly interrupts the loop to the
private branch exchange (flash) to enable an enquiry to another private branch connection.
The flash time is programmable.
- Lift the handset.
- Press the * and # keys simultaneously.
- Press key 8.
- Enter the code for the desired flash time.
- Press the key to store the selected flash time.
- Replace the handset.
Code / Key Flash time Comment
1 8 ms
2 12 ms As-delivered condition
3 6 ms
(1, 2, 3)
Restore to as-delivered condition
- Lift the handset.
- Press the * and # keys simultaneously.
- Press key 3.
- Press the key to reset the as-delivered condition.
- Replace the handset.
Upon „Resetting to the as-delivered condition“ the PIN is not reset to .
Other manuals for FernTel 3
1
Table of contents
Other FHF Telephone manuals


