Fhiaba TriMode User manual

Wines cellars
User manual
Cave à Vins
Mode d’emploi


EN
1
1.1
1.2
1.3
IMPORTANT INSTRUCTIONS FOR SAFETY AND THE ENVIRONMENT
For your safety..................................................................................................................................................
Important information when using the appliance......................................................................................
Respect for the environment..........................................................................................................................
4
4
4
5
2
2.1
2.2
INSTALLATION
Installation..........................................................................................................................................................
Connection to the electrical mains...............................................................................................................
5
5
5
3
3.1
3.2
3.3
3.4
3.5
3.6
BEFORE STARTING
Getting to know the appliance.......................................................................................................................
Main components..............................................................................................................................................
Electronic Control.............................................................................................................................................
Main control panel............................................................................................................................................
6
6
7
9
9
10
10
4
4.1
4.2
4.3
TURNING THE APPLIANCE ON AND OFF
Turning on and off............................................................................................................................................
How to adjust the temperature to suit various needs..............................................................................
Information and malfunction signals on the display................................................................................
11
11
11
12
5
5.1
5.2
5.3
SETTINGS AND SPECIAL FUNCTIONS
Customization and Language Settings.......................................................................................................
Special functions activated through the Menu..........................................................................................
Basic settings of the Menu.............................................................................................................................
12
12
13
14
6
6.1
INTERNAL LAYOUT
Internal Layout (positioning, adjustment, removal)...................................................................................
16
16
7
7.1
LIGHTING
Lighting...............................................................................................................................................................
16
16
8
8.1
USE OF THE TRIMODE COMPARTMENT
Use of the TriMode compartment..................................................................................................................
16
16
9
9.1
9.2
9.3
9.4
9.5
CONSERVATION OF WINES
General directions............................................................................................................................................
Wine conservation temperature....................................................................................................................
Time of conservation.......................................................................................................................................
Consumption temperature..............................................................................................................................
Position of bottles.............................................................................................................................................
17
17
17
18
19
19
10
10.1
RECOMMENDED TIMES FOR FOOD CONSERVATION
Recommended times for food conservation...............................................................................................
20
20
11
11.1
11.2
11.3
CARE AND CLEANING
Care and Cleaning.............................................................................................................................................
Condenser cleaning..........................................................................................................................................
Internal cleaning...............................................................................................................................................
21
21
21
22
12
12.1
12.2
TROUBLESHOOTING GUIDE
Troubleshootingguide......................................................................................................................................
Malfunction indications appearing on the display.....................................................................................
22
22
24
13
13.1
13.2
FHIABA ACCESS MENU MAP
Functions............................................................................................................................................................
Settings...............................................................................................................................................................
25
25
26
INDEX

1.1For your safety
> If this appliance is replacing an existing appliance
which must be removed or disposed of, make sure
that it does not become a dangerous trap for children
by cutting its power supply cable and rendering it im-
possible to close the door. Use the same caution at
the end of the lifespan of the new appliance.
> This appliance is designed to refrigerate beverages
and foods and is destined for domestic use.
> The appliance must be installed by following the
instructions in the Installation Guide, particular care
should be taken not to obstruct the vent openings of
the appliance and of the built-in units.
> The appliance features a concentrated lighting sys-
tem with LED lamps. Do not stare into these lamps
when they are on to avoid possible eyesight damage.
This warning is also contained on the label attached
to the inside of the refrigerator door.
> When the freezer is functioning do not touch the
inner surfaces in stainless steel with wet or damp
hands, since skin may stick to the very cold surfaces.
> Do not use any type of electrical equipment inside
of the food conservation compartments.
> When positioning the shelves, do not place fingers
in the shelf slide guides.
> Do not position containers of flammable liquids
near the appliance.
> Completely switch o the appliance and unplug the
power supply cable during cleaning operations. If the
plug is not easily reached, it is a good idea to discon-
nect the omnipolar switch that controls the socket
that the appliance is connected to.
> The packaging parts can be dangerous for chil-
dren: do not allow children to play with the plastic
bags, plastic film or Styrofoam.
> Any repairs must be performed by a qualified Fhi-
aba Service technician.
> This appliance is not intended for use by persons
(including children) with reduced physical, sensory
or lack of experience and knowledge unless they
have been given supervision or instruction concern-
ing use of the appliance by a person responsible for
their safety. Children should be supervised to ensure
that they do not play with the appliance.
> Do not damage the appliance refrigerant circuit
pipes.
> Do not store explosive substances such as aerosol
cans with a flammable propellant in this appliance.
> If the power cord of this appliance is damaged, it
must be replaced by the manufacturer, customer
service or a similarly qualified person. Improper in-
stallations and repairs may put the user at consider-
able risk.
> Repairs may be performed by the manufacturer,
customer service or a similarly qualified person only.
Symbols used in the Guide:
Notes
Suggestions for proper use
of the appliance
Important
Instruction to prevent damage
to the appliance
Warning
Instructions for preventing personal injury
1.2 Important information when using
the appliance
> Never use electrical appliances inside the appli-
ance (e.g. heater, electric ice maker, etc.). Explosion
hazard!
> Never defrost or clean the appliance with a steam
cleaner! The steam may penetrate electrical parts
and cause a short-circuit. Risk of electric shock!
> Do not use pointed and sharp-edged implements
to remove frost or layers of ice. You could dam-
age the refrigerant tubes. Leaking refrigerant may
cause eye injuries or ignite.
> Do not store products which contain flammable
propellants (e.g. spray cans) or explosive substanc-
es in the appliance.
Explosion hazard!
> Do not stand on or lean heavily against base of
appliance, drawers or doors, etc.
> Before cleaning the appliance, pull out the power
cord plug or switch o the fuse. Do not pull out the
power cord plug by tugging on the power cord.
> Store high-percentage alcohol tightly closed and
standing up.
> Keep plastic parts and the door seal free of oil and
grease. Otherwise, parts and door seal will become
porous.
> Never cover or block the ventilation openings for
the appliance.
1. IMPORTANT INSTRUCTIONS FOR SAFETY AND THE ENVIRONMENT

EN
2.1 Installation
Make sure that installation is performed correct-
ly, adhering to all of the instructions in the specif-
ic installation guide provided with the appliance.
2.2 Connection to the electrical mains
The appliance operates at 115 V AC, 60 Hz and is
equipped with a power supply cord with a 3-prong
grounded plug, which must be connected to a cor-
responding 3-prong (15 Amp) grounding-type wall
receptacle.
Important
Do not use extension cords and/or
multiple adapters for connection.
1.3 Respect for the environment
> Make sure you dispose properly of all packing
materials.
> The appliance must not be disposed of with ur-
ban waste.
Contact local waste disposal authorities for infor-
mation on the disposal of recyclable waste.
> For disposal, cut the power supply cord and
make it impossible to close the door.
> During disposal, avoid damage to the refrigera-
tion circuit.
> Neither the refrigeration circuit nor the insula-
tion contain substances that are hazardous to the
ozone layer
2. INSTALLATION

3.1 Getting to know the appliance
Congratulations for having purchased your new Fh-
iaba: from now on you can use our innovative con-
servation system, which will allow you to keep all of
your food in the best way possible.
This manual will answer most of your questions
about the product’s features. Should you require
further information, please
> call us:
1-855-4-FHIABA (1-855-434-4222)
> write us an e-mail at fhiaba@adcoservice.com
>our website www.fhiaba.com
Important
Before calling, write down the model
type and serial number which are avail-
able on the warranty certificate and on
the rating plate located on the bottom
left-hand corner of the appliance, behind
the bottom drawer.
3. BEFORE STARTING

1
7
2
3
4
5
6
1
5
3
2
4
EN
1T Models
0F Models
3.2 Main components
1Structure in stainless
steel with aluminium
trim
2Wine Cellar and TriMode
control panels
3Sliding bottle shelfs,
mounted on wheels
for easy extraction
4 Cantina area
control panel
5 Wine Cellar
6Frezer compartment
that can be transformed
into a refrigerator
or Crisper-Fresco
compartment
(TriMode function)
7Led lighting
Cantina
TriMode Wine Cellar
Cantina
Wine Cellar

1
7
2
3
6
0H Models
1Structure in stainless
steel with aluminium
trim
2Wine Cellar and TriMode
control panels
3Sliding bottle shelfs,
mounted on wheels
for easy extraction
5Wine Cellar
6Frezer compartment
that can be transformed
into a refrigerator
or Crisper-Fresco
compartment
(TriMode function)
7Innovative lighting
Wine CellarTriMode
FridgeTriMode
3. BEFORE STARTING

12 34 5 67 98
ALARM
ENTER
WINE CELLAR
UNIT LIGHT
EN
3.3 Electronic Control
The innovative electronic control system designed by Fhiaba maintains constant temperature on the
three compartments and visualizes it on the control panel display. It also allows user interaction making
it possible to personalize settings of the various functions and to receive sound and/or visual messages
should any malfunction occur in the appliance.
3.4 Main control panel (1T and 0H models)
1Unit Allows complete shutdown and start-up of the appliance
(press for three seconds).
2Wine cellar Allows switching on and o only the Wine Cellar compartment (press for three seconds).
3Menu Allows access to the appliance functions menu.
4Up/down Wine
Cellar
Using the Up and Down buttons, it is possible to change the set temperature of the refrigerator
and scroll through the interactive menu.
5Display Displays the temperature of the Wine Cellar and TriMode compartments, the date and time,
Menu functions and visual messages.
6Up/Down
(TriMode)
By selecting Up/Down the preset temperature can be changed according to the selected function
mode (freezer, refrigerator, Crisper-Fresco) and scroll through the interactive menu.
7Enter Confirms activation or deactivation of the selections made in the Menu.
8Alarm Blinks to signal user alerts such as door left open, also in combination with a sound signal which
can be deactivated by pressing the button.
9Light Allows illumination of the Wine Cellar and Cantina compartments also when the door is closed.
Once activated, the light of the top compartment will automatically shut o after 6 hours.

12 34 5 67 98
ENTER
UNIT HUMIDITY ALARM
LIGHT
10 11 12 13
CANTINA HUMIDITY
10 Display Shows the temperature of the Cantina compartment.
11 Up/Down
Cantina
Using the Up and Down keys, it is possible to change the set temperature for the Cantina
compartment.
12 Cantina Allows switching on and off only the Cantina compartment on or off
(press for three seconds).
13 Humidity Allows adjustment of humidity in the Wine Cellar and Cantina compartments to three levels:
High, Medium, and Low.
3.6 Main control panel (0f models)
1Unit Allows complete shutdown and start-up of the appliance
(press for three seconds).
2Humidity Allows adjustment of humidity in the Wine Cellar and Cantina compartments to three levels:
High, Medium and Low.
3Menu Allows access to the appliance functions menu.
4Up/down
Cantina
Using the Up and Down buttons, it is possible to change the set temperature of the refrigerator
and scroll through the interactive menu.
5Display Displays the temperature of the Wine Cellar and TriMode compartments, the date and time, Menu
functions and visual messages.
6Up/Down
Wine Cella
Using the Up and Down keys, it is possible to change the set temperature for the Cantina com-
partment and scroll through the interactive menu.
7Enter Confirms activation or deactivation of the selections made in the Menu.
8Light Allows illumination of the Wine Cellar and Cantina compartments also when the door is closed.
Once activated, the light of the top compartment will automatically shut off after 6 hours.
9Alarm Blinks to signal user alerts such as door left open, also in combination with a sound signal which can
be deactivated by pressing the button.
3.5 Secondary control panel (1T Models)
3. BEFORE STARTING

EN
4.1 Turning on and o
First start-up
When the appliance is connected to the electrical
power supply but has not yet been turned on, the
display shows the message
This is a safety message to warn that power is
supplied to the appliance, while all of the keys on
the panel are off.
To switch on all the appliance compartments,
press the Unit button for three seconds.
Turning off the Wine Cellar compartment
Once you have turned on all of the compartments
of the appliance, you can turn off only the wine
cellar compartment by pressing the relevant key
for three seconds.
The TriMode compartment is always on and can-
not be turned off except by completely turning off
the appliance.
Turning the Wine Cellar compartment on again
Press again for three seconds the relevant key.
Complete shutdown
To shut down the unit completely for cleaning or
maintenance, press the Unit key for three sec-
onds.
Also take the plug out of the socket and turn off
the omnipolar switch that powers it.
Lengthy shutdown periods
After you have completely shut down the appli-
ance and unplugged it, empty it of all its contents,
clean it and dry it. Leave the doors and the draw-
ers ajar to prevent the formation of unpleasant
odours.
Note
To prevent accidental modification of set-
tings, the keypad locks automatically after a
certain period of time and the display shows
the message “keypad locked”. To re-activate
it, simultaneously press the keys Menu and
Up/Down (Down) for three seconds or Menu.
At the first start-up, if the message Standby
does not appear, it means that the appliance
has already started the cooling process. If this
is the case, deactivate any possible acoustic
signals by pressing the Alarm key , close
the door and wait until the set temperature is
reached.
During the first start-up, you will not be able
to use the Menu to modify factory settings un-
til the default temperature has been reached.
It is however possible to set the time and date
immediately; these parameters are required
to activate some of the special functions.
If only the Cantina or Wine Cellar compart-
ment is turned o, the corresponding fan will
continue to run independently to prevent the
formation of unpleasant odours and mould.
4.2 How to adjust the temperature
for suit various needs
To adjust the temperature in the various com-
partments, use the up/down key for that com-
partment (see chapter 3.5).
If the “keypad locked” message appear, simul-
taneously press the keys Menu and Up/Down
(Down) for 3 seconds or Menu .
Wines compartment
Each model has been carefully tested before
leaving the factory and is adjusted so as to en-
sure high performance and low consumption.
The ideal temperature for wine conservation does
however depend on the types of wine you want to
conserve, the method of conservation (Wine Cel-
lar for conservation and consumption, or Cantina
for the conservation and aging of prized bottles).
It also varies according to personal taste.
Please refer to the guide on wine conservation
included further ahead in this manual.
As needed, you can reset the temperatures as
follows:
> Cantina Compartment:
from +4° C to +18° C (from 39° F to 64° F).
The default temperature is +12° C (53° F).
> Wine Cellar compartment:
from +4° C to +18° C (from 39° F to 64° F).
The default temperature is +10° C (50° F).
TriMode compartment (1T/0T/0H models)
The TriMode compartment is default set to freez-
er mode but it can also be set to run as a refrig-
erator or cooler compartment.
Instructions for conversion are provided in the
paragraph on special functions and settings.
As needed, you can reset the temperatures as
follows:
4. TURNING THE APPLIANCE ON AND OFF

> Freezer compartment: from -13° C to -23° C
(from 9° F to -11° F), the default temperature,
which is recommended, is -18° (0° F)
> Refrigerator compartment: from +1° C to +7°
C (from 34° F to 46° F), the default temperature,
which is recommended, is +5° C (41° F).
> Cooler compartment: from -2° C to +2° C (from
28° F to 36° F), the default temperature, which is
recommended, is 0° C (32° F).
Warning
If the “keypad locked” message appear, si-
multaneously press the keys Menu and
Up/Down (Down) for 3 seconds.
Note
The displayed temperature may vary
slightly with respect to the set tempera-
ture if the doors are continuously opened
or insertion of room temperature food or
large quantities of food.
It takes 6 to 12 hours to reach the select-
ed temperature.
4.3 Information and malfunction
signals on the display
An integrated control system provides informa-
tion through luminous signals or text messages
shown on the display.
The information signal is always displayed with a
fixed text message, while a malfunction signal is
shown with blinking text.
The acoustic signal that accompanies some mal-
function signals can be deactivated by pressing
the Alarm key on the main control panel.
The list of malfunction signals is located in the
back of this manual.
5.1 Customization and Language
Settings
Note
To prevent an inadvertent change to the
settings the keypad is automatically
locked after a certain period of time.
To re-activate the Menu function, press si-
multaneously the Menu button and the
Down button for at least three seconds
or just press the Menu button again for
3 seconds.
The key lock can be disabled through the
specific function in the Settings menu.
It is possible to customized the functions of your
Fhiaba to adapt it to diverse usage needs, reset-
ting the main parameters (Settings) or activating
special functions (Functions).
Functions are visualized on the main display by
pressing the Menu button .
The Up/Down buttons permit scrolling the avail-
able functions, which can be selected by press-
ing the Enter button . The display visualizes the
current functioning status.
Using the Up/Down buttons , it is also possible
to scroll through the selected function, activating
or deactivating by pressing the Enter button .
Once the function is confirmed, the display will
automatically visualize the main menu to select
other functions.
At any time it is possible to return to the previous
selection through
the Menu button .
The language of the messages appearing on the
display can be changed by operating as follows:
Enter the Menu by pressing the Menu button
select Settings via the Up/Down buttons and
confirm via Enter .
Then select the Language function and the de-
sired language.
5. SETTINGS AND SPECIAL FUNCTIONS
FRIDGE
UNIT

EN
5.2 Special functions activated through
the Menu
To use special functions, select the Menu key and
use the Up/Down key to access the menu, con-
firming the selection
.
Dual Zone (0T, 0H models)
This function can be activated only on models fea-
turing a wine cellar without internal separator. It
allows to dierentiate the temperature in the up-
per part of the cellar (warmer and therefore better
suited to keep red wines) from the temperature in
the lower part (colder and therefore better suited to
keep white wines).
Shopping TriMode
This function must be activated at least 24 hours
before inserting room temperature items into the
freezer, or several hours before placing into the
freezer previously frozen items which have been
subject to a slight temperature rise. This func-
tion is automatically deactivated when the pro-
grammed time period expires.
It is possible o program timed activation of the
function.
After a prolonged interruption of the electrical
power, it is necessary to reactivate the function.
How to activate:
How to deactivate:
Vacation TriMode
This function (recommended in case of prolonged
absences since it allows considerable energy sav-
ings) brings the Tri-Mode compartment tempera-
ture to - 18°C (46.4°F).
It is possible to program the duration, or it can be
manually deactivated upon re-entry after a period
of absence.
This function remains active even if during the pe-
riod of absence there is a prolonged interruption of
electrical power.
It is possible to program a period from 1 to 90 days.
Bottle Cooler
This function can be activated when it is necessary
to cool o beverages quickly, by placing them inside
the freezer compartment.
It is possible to select a duration of 1 to 45 minutes.
A sound signal will indicated when the optimal tem-
perature has been reached.
After removing the beverages, deactivate the sound
signal by pressing the Alarm button .
How to activate:
How to deactivate:
How to program timed activation:
How to activate:
How to deactivate:
How to program the duration:
How to activate:
How to deactivate:
How to program the duration:

DATE
Set date
The display will visualize the date in the format
dd:mm:yy (day:month:year), the day will blink. Use
the Up/Down buttons to modify the setting, con-
firm with Enter to go on to the next setting; once
the year is confirmed the date will be set.
Show Date
Using this function it is possible to deactivate/acti-
vate the date visualization on the display.
Sabbath Mode (Optional)
The function makes it possible to comply to certain
religious observances requiring that the operation
of the appliance is not aected by the opening or
closing of the doors (the thermostatic control, the
inner lighting and the ice maker are deactivated).
How to activate:
How to deactivate:
Attention
If the default settings are restored, it is nec-
essary to reactivate the choice of operation
of the TriMode compartment in case it was
previously set as Fridge or Fresco.
5.3 Basic settings of the Menu
Select the Menu button and used the Up/Down
button to select .
TriMode Options
The freezer compartment can, if required, be con-
verted to the refrigeration o Crisper-Fresco operat-
ing mode.
How to set the Fridge function:
How to set the Crisper-Fresco function:
How to revert to the Freezer function:
How to reset default settings:
How to set the date:
How to activate the date:
How to deactivate the date:
Default Setting
This oers the possibility to reset default factory
settings and cancels any previous changes.
5. SETTINGS AND SPECIAL FUNCTIONS

EN
Keypad lock
Through this function it is possible to activate/de-
activate the keypad lock.
TIME
Set time
The display visualizes the hours and minutes in the
format hh:mm and with hh: blinking. Use the Up/
Down buttons to modify the setting and then con-
firm by pressing Enter to go on to the next setting.
Once the minutes are confirmed, the time will be
set.
How to set the time:
Set 12/24
This function selects the display at 12 or 24 h.
How to set the display to 12 h:
How to set the display to 24 h:
Show Time
Through this function it is possible to activate/de-
activate the constant visualization of the time.
How to activate the permanent time:
How to deactivate:
LANGUAGE
The function allows selection of the language for
the display messages.
Set °C/°F
This function permits visualizing the temperature
in Centigrade or Fahrenheit degrees. Normally, the
appliance is set for visualization in centigrade de-
grees.
How to set the temperature in Centigrade:
How to set the temperature in Fahrenheit:
How to activate:
keypad lock
How to deactivate:
keypad lock
Italian
English
French
German
Spanish

ICEMAKER
ENTER
FRIDGE
UNITICEMAKER
ENTER
FRIDGE
UNIT
ICEMAKER
ENTER
FRIDGE
UNIT
CRISPER
1T 0H 0F
6.1 Internal Layout
(positioning, adjustment, removal)
Wine shelf
The shelves can be easily removed for cleaning.
Remove the bottles, completely extract the shelf,
tilt it upward until the wheels are free of their
seat and extract it.
TriMode drawer (1T, 0T, 0H)
Fixed to the slide guides with two locking nuts
> to remove the drawer, unscrew the locking nuts
and remove the drawer.
> to remove the inner TriMode drawer unscrew
the locking nuts.
7.1 Lighting
To provide optimum interior lighting, LED strips
illuminate the refrigerator compartment from
the top and sets of LED lights directly illuminate
different areas of the refrigerator compartment,
of the Crisper-Fresco drawers and the freezer
drawer.
In case of malfunction and/or failure of the light-
ing system, you should contact an authorized
Fhiaba Service Agent.
Note
Once activated, the light of the top com-
partment will automatically shut off after
6 hours.
8.1 Use of the TriMode compartment
The TriMode compartment, used in conjunction
with the Wine Cellar and Cantina compartment,
allows great flexibility in the use of the appliance.
Some possible uses:
Freezer mode
> Liquors, such as vodka, gin, tequila, schnapps,
limoncello and the glasses to serve them
> Rapid cooling of beverages, by activating the
bottle cooler function
> Storage of large amounts of ice.
Refrigerator mode
> As expansion of the Wine Cellar or of the Can-
tina
> For refrigeration of beer and soft drinks
> For storage of cold dishes and snacks.
Cooler mode
> For conservation of ham, salmon
> gourmet preparations.
It comes without saying that, the compartment can
be used in a traditional manner. Suggestions and
instructions are provided to oer you best conser-
vation of your food over time in complete safety.
6. INTERNAL LAYOUT 7-8. LIGHTING

EN
9.1 General directions
As is known, wine can be stored for long periods
of time if this is done under the following condi-
tions:
> Suitable temperature without appreciable vari-
ations over time
> Controlled level of humidity
> Protection from light
> Absence of noise and vibrations
> Absence of odours
> Bottle kept horizontal.
All of these conditions are fully met in the Fhiaba
Wine Cellar.
9.2 Conservation temperature
The space offered by the Wine Cellar and Cantina
compartments, which can be expanded as neces-
sary by using the TriMode compartment as a wine
cellar, allows conservation of your best wines at
three different temperatures.
The three compartments are initially set to the
following temperatures:
> Cantina compartment
+12° C (53 ° F) - adjustable from +4° C to +18° C
(from 39° F to 64° F)
> Wine Cellar compartment
+10° C (50° F) - adjustable from +4° C to +18° C
(from 39° F to 64° F)
> TriMode drawer
-18° (0° F) - adjustable from -13° C to -23° C
(from 9° F to -11° F)
(freezer mode)
To transform the TriMode compartment into a
wine cellar space, you must access the Menu, set
it as a refrigerator compartment, and adjust it to
a temperature between +4° C and +8° C (from
39.2° F to 46.4° F).
All the temperatures can be modified accord-
ing to the characteristics of the wines and per-
sonal preferences. However, you should attempt
to keep the temperature as constant as possible
over time.
Rapid and large-scale temperature variations
can in fact cause dilation of the liquid and early
aging of the wine.
You should also avoid very low temperatures (be-
low 1° C - 34° F ) which may lead to the formation
of deposits and damage the aesthetic qualities of
the wine.
All the compartments offer optimal conditions
and take into account all these needs. It should
however be noted that the Cantina compartment,
in particular, is thermostatically controlled in a
very precise manner and ensures the utmost
care and attention over time of your most prized
bottles. When the Cantina compartment is set be-
low +10° C (50° F) the Wine Cellar must not be
set beyond +12° C (53° F).
Models with Cantina and Wine Cellar (1T)
Cantina
Wine Cellar
TriMode
> Cantina compartment
+12° C (53.6° F)
- adjustable from +4° C to +18° C (from
39° F to 64° F)
> Wine Cellar compartment
+10° C (50° F)
- adjustable from +4° C to +18° C (from
39° F to 64° F)
> TriMode drawer
-18° (0° F)
- adjustable from -13° C to -23° C (from
9° F to -11° F)(freezer mode)
Models with Wine Cellar (0H)
Wine Cellar
TriMode
> Wine Cellar compartment
+10° C (50° F)
- adjustable from +4° C to +18° C (from
39° F to 64° F)
> TriMode drawer
-18° (0° F)
- adjustable from -13° C to -23° C (from
9° F to -11° F)(freezer mode)
9. CONSERVATION OF WINES

Models with Cantina and Wine Cellar (0F)
Cantina
Wine Cellar
> Cantina compartment
+12° C (53.6° F)
- adjustable from +4° C to +18° C (from
39° F to 64° F)
> Wine Cellar compartment
+10° C (50° F)
- adjustable from +4° C to +18° C (from
39° F to 64° F)
9.3 Time of conservation
Improvement of wine over time and its duration usually depends on the character of the variety and its
type. The following chart shows the best period of conservation and aging for various types in ideal con-
servation conditions offered by your appliance.
However, you should always follow the instructions of the winemaker, especially for fine wines.
TYPE OF WINE CONSERVATION TEMPERATURE TIME OF CONSERVATION
New wines (Vin Nouveau) from 12° to 14° C 6 months
Sweet sparkling wines from 8° to 10° C 1 year
Rosé from 10° to 14° C 1 year
Semi-sparkling wines from 10° to 12° C 1 - 2 years
Normal white wines from 10° to 14° C 1 - 2 years
Light red wines from 12° to 14° C 2 years
Dry sparkling wines from 8° to 10° C 2 years
Classic sparkling wines from 8° to 10° C 3 - 4 years
Barrique and Vigorous white wines from 8° to 12° C 3 - 5 years
Normal red wines from 14° to 16° C 3 - 5 years
Barrique and Vigorous red wines from 14° to 18° C 7 - 10 years
Straw wines or Liquorous wines from 16° to 18° C 10 - 15 years
9. CONSERVATION OF WINES

EN
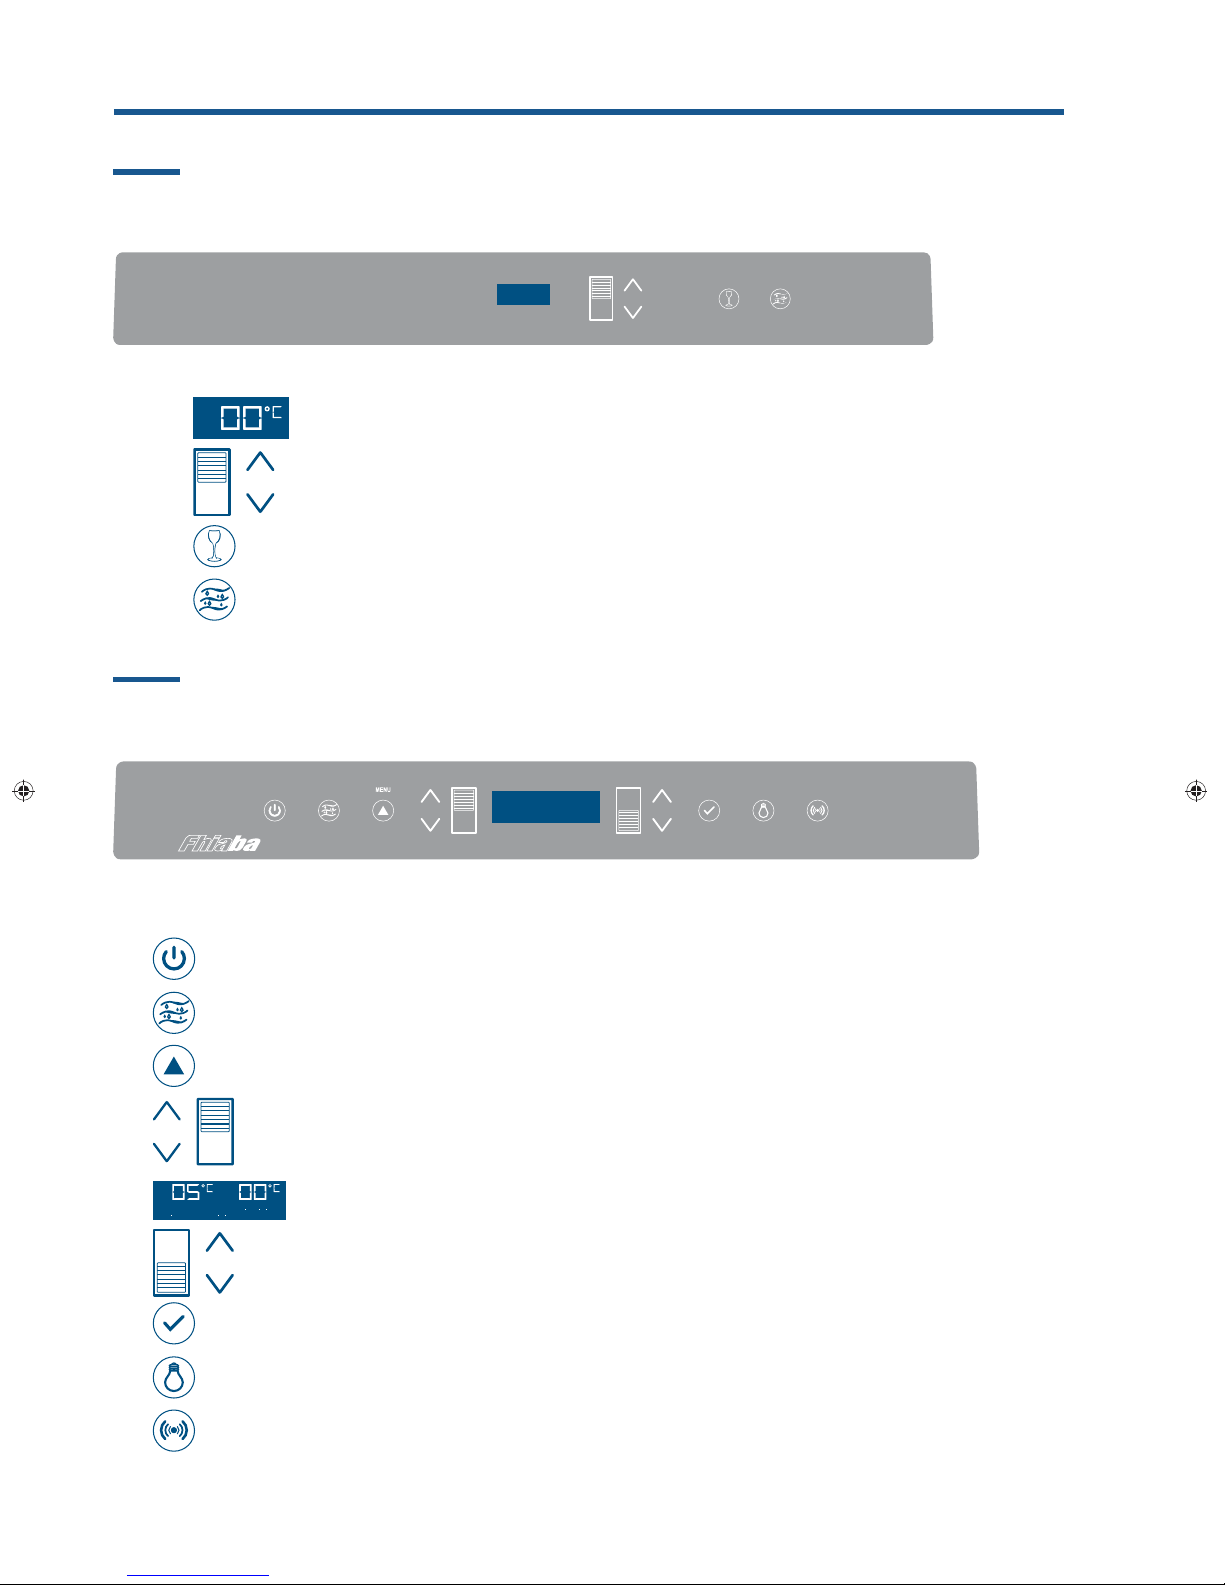
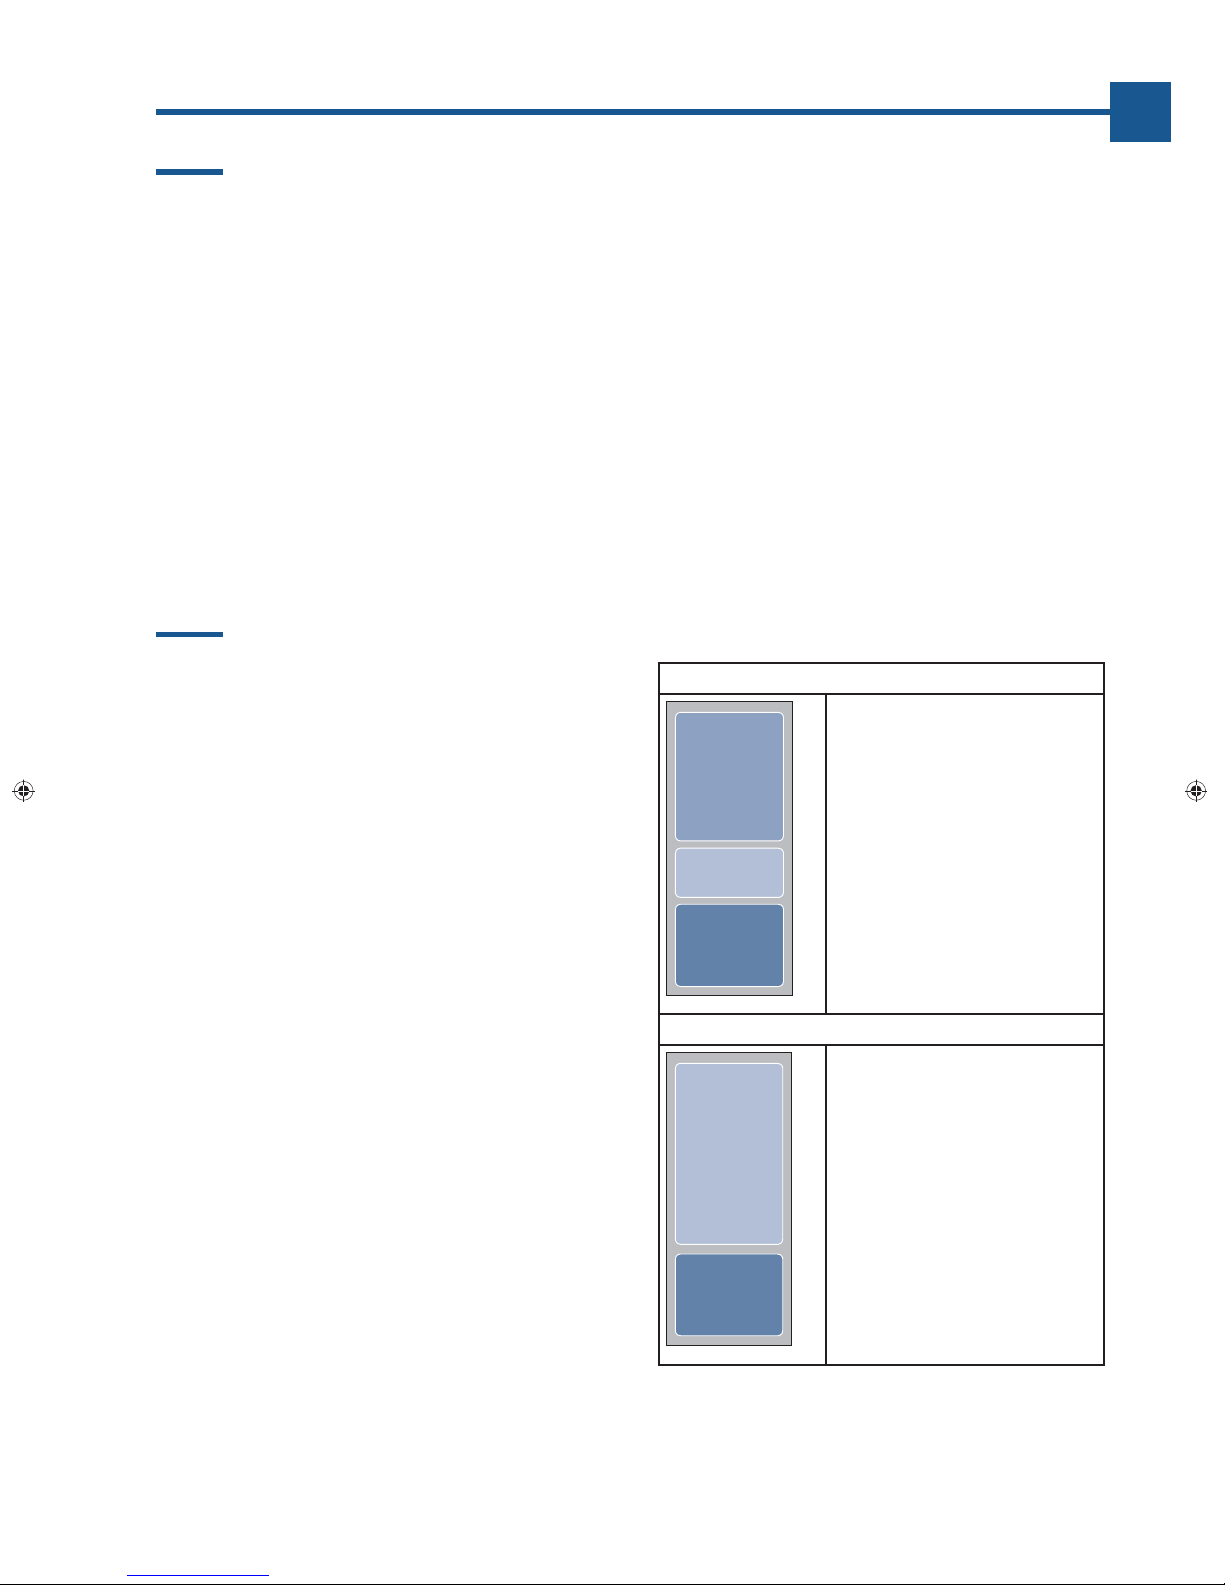
9.4 Consumption temperature
As a general rule, white wines should be served
at a temperature between 10 and 12° C (50 and
53,6°F) and red wines between 12 and 14° C (53,6
and 57,2°F).
Some wines may however be best enjoyed at
higher or lower temperatures.
You should also keep in mind that, during the
summer, wine is generally enjoyed at lower tem-
peratures than during the winter.
You should also consider the following:
White wines
White wines are normally not served at high tem-
peratures, since they are generally more acidic
that red wines and not very tannic. Therefore they
are more enjoyable at low temperatures.
It is preferable to serve these wines between
10° C and 14° C (50°F and 57,2°F). Young, fresh
and aromatic wines can also be served at 10° C
(50°F), while less aromatic ones are served at
12° C (53,6°F).
Temperatures between 12° C and 14° C (53,6°F
and 57,2°F) are for soft, mature white wines that
have been aged for some years in the bottle.
Higher temperatures would favour the exaltation
of the sweet character of the wine, at the expense
of the acidity and flavour, which are considered
pleasant and desirable characteristics of this
type of wine.
Rosé
Rosé wine is served at the same temperature as
white wines. It should be noted that these wines
may include a certain amount of tannin and may
therefore be preferable at higher temperatures.
Therefore, they are served between 10° C and
12° C (50°F and 53,6°F), if young and fresh, and
between 12° C and 14° C (53,6°F and 57,2°F) if
robust and mature.
New wines (Vin Nouveau)
Due to the special processing they undergo, new
vintage wines contain a low tannin content and
are therefore more enjoyable if served between
12° C and 14° C (53,6 and 57,2°F).
Red wines
Since they contain more tannin and are less acid-
ic, red wines are normally served at higher tem-
peratures.
Younger wines with less tannin are normally
served between 14° C and 16° C (57,2 and 60,8°F),
while more full-bodied ones that are more tan-
nic may be served at up to 18° C (64,4°F). Some
wines that have aged for years in the bottle, still
full-bodies and tannic, may be served at 18°C
(64,4°F) or even 20° C (68°F).
Young red wines with little tannin and slightly
structured may be enjoyable at lower tempera-
tures, between 12° C and 14° C (53,6 and 57,2°F).
Sparkling wines
It is difficult to provide instructions to cover the
wide variety of sparkling wines in available.
As a general rule, sweeter and more aromatic
sparkling wines should be served at lower tem-
peratures, down to 8° C (46,4°F), whereas more
tannic sparkling wines may be served at higher
temperatures, up to 14° C (57,2°F).
Dry sparkling wines are usually served between
8° C and 10° C (46,4 and 50°F).
“Classic” sparkling wines are normally served
at these temperatures, which may be as high as
12° C (53,6°F) for sparkling wines that have been
aged for some time.
It is however advisable, especially for finer wines,
to follow the suggestions and recommendations
of the winemaker on the bottle.
Liqueur and straw wines
These types of wines can be served at tempera-
tures between 16° C and 18° C (60,8 and 64,4°F),
depending on personal tastes, to attenuate the
sweet taste of straw wines, it can also be served
at 10° C (50°F).
9.5 Position of bottles
The sliding shelves are made of fine wood and
contoured so as to hold bottles of the most clas-
sical traditional shape or of the most modern
design.
Whether your collection holds fine bouteilles or
petit bouteilles, they will be right at home in the
Fhiaba Wine Cellar. A special accessory, avail-
able on request, will let you place them in an
inclined position, in order to display the labels
of your most prized items.
Also Magnum bouteilles can be stored, provided

you remove the shelf just above the one that will
hold them.
Warning
After a prolonged interruption of electri-
cal power, once the electrical power is re-
activated, an audible signal will indicate if
the temperature has raised above normal
levels. In addition to this the display will
show for one minute the highest temper-
10.1 Recommended times for food conservation
ature detected inside the compartments,
to allow the user to decide how to better
use the food items.
After one minute the display will resume
normal operation, while the Alarm button
will continue to blink.
Press the Alarm button to display the
highest recorded temperatures.
FRESH FOODS CONSERVATION AREA TIME
Raw meats
Large cuts Cooler Compartment 4 days
Steaks, poultry and wild game Cooler Compartment 3 days
Ground meat Cooler Compartment 1-2 days
Carpaccio Cooler Compartment Immediately
Cooked meat
Boiled meat and roasted meat Refrigerator Compartment 2 days
Meat sauce Refrigerator Compartment 6 days
Raw and cooked fish Cooler Compartment 2 days
Soups and broths Refrigerator Compartment 2 days
Pasta Refrigerator Compartment 2 days
Opened cold cuts Refrigerator Compartment 3 days
Fresh cheeses Refrigerator Compartment 2-3 days
Well protected aged cheeses Refrigerator Compartment Several months
Eggs (fresh and unwashed) Refrigerator Compartment 15 days
Opened containers Refrigerator Compartment 2-3 days
Raw vegetables (in perforated bags) Refrigerator Compartment 3-6 days
10. CONSERVAZIONE DEI CIBI
This manual suits for next models
3
Table of contents
Languages:
Other Fhiaba Wine Cooler manuals

Fhiaba
Fhiaba 1T User manual

Fhiaba
Fhiaba KS5990TWT User manual

Fhiaba
Fhiaba 1T User manual

Fhiaba
Fhiaba FP30WCC-RS1 User manual

Fhiaba
Fhiaba XS8991TWT6 User manual

Fhiaba
Fhiaba Wine Cellars User manual

Fhiaba
Fhiaba XS5991TWT6U User manual

Fhiaba
Fhiaba GranMaestro Series Assembly instructions

Fhiaba
Fhiaba Premium Series Assembly instructions

Fhiaba
Fhiaba StandPlus Series User manual