Devine BM-100 User manual

BM-100
Condenser studio microphone
User manual
All information and illustrations shown in this user manual are subject to change without further notice.
User manual version: 1.0 Creation date + author initials: 10-12-2015 RV Revision date + author initials: -
Introduction
Thank you for purchasing the Devine BM-100 condenser studio microphone. This studio microphone can be
used for recording instruments and vocals. A shock mount is included ith this microphone, hich isolates
the microphone and prevents vibrations.
The Devine BM-100 is a condenser studio microphone that requires +48V phantom po er from a source
such as an audio interface, PA mixer, preamp or similar device. The phantom po er ensures that the
microphone operates perfectly. When no +48V phantom po er is present, the microphone ill either not
ork, or produce a very eak signal.
The cardioid polar pattern of the BM-100 means that most of the sound is captured from the front of the
microphone. When recording a complete band, for example, the cardioid polar pattern keeps ambient sounds
and background noise (such as backing vocals, instruments, etc.) to a minimum.
Please note that the BM-100 microphone is a highly sensitive microphone and should be handled ith care
hen transported or installed. Impacts and/or severe vibrations may have a negative impact on the lifespan
and performance of the microphone.
Because the BM-100 microphone is highly sensitive, a shock mount is included to isolate it as much as
possible from its mounting surface hichs prevents capturing un anted vibrations or noise. It is therefore
recommended to use the included shock mount hen using this microphone.
Before unpacking all the received items, carefully read this manual to familiarise yourself ith the functions of
the microphone. Also, check the contents of the box to make sure all the necessary parts are included (see
the “Box contents” section of this user manual). If the microphone fails to operate properly, or if you
encounter any problems hile using it, disconnect it immediately and contact your local dealer for more
information and help.
WEEE: Dispose of this product properly. This product is part of the WEEE directive – the
Waste Electrical and Electronic Equipment directive. The requirements stated in this directive
apply to all manufacturers and producers of electronic equipment in the EU.
Do not dispose of this product together ith regular household rubbish. Contact your local
government representative for more information about proper disposal and recycling of
electronic products in your region. By recycling this product properly after use, e can ork
together to enjoy these products and protect our environment from pollution.
CE: The CE mark indicates that the product complies ith applicable European directives and
regulations.
Indoor use only: This device is designed to be used indoors only. The maximum ambient
temperature should not exceed 40 degrees Celsius (104 degrees Fahrenheit)
All information and illustrations shown in this user manual are subject to change without further notice.
User manual version: 1.0 Creation date + author initials: 10-12-2015 RV Revision date + author initials: -
Box contents
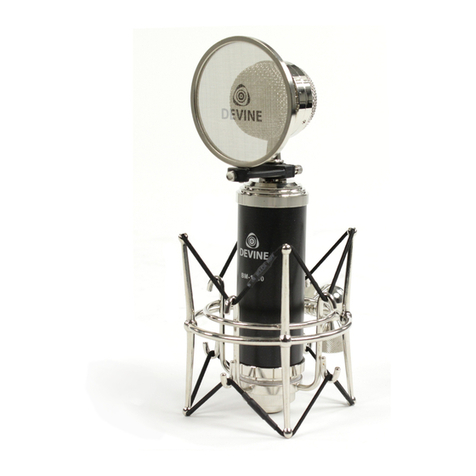
Box contents:
1x Devine BM-100 condenser studio microphone
1x shock mount
Unit and accessory inspection:
- If you do not plan to use the unit for an extended period of time, disconnect it and store it in a dust-free
environment.
- Al ays check the unit for possible damage before use. If you suspect that something is rong ith the unit,
do not connect it! If you suspect that your unit is broken or damaged, contact your local dealer or a certified
technician to inspect the unit.
Contact:
Devine pro audio and studio products
Verrijn Stuart eg 18
4462 GE Goes
The Netherlands
Please do not send any products directly to this address. If you wish to return a product for a refund or
repair, please contact your local dealer for an RMA (Return Material Authorisation)
All information and illustrations shown in this user manual are subject to change without further notice.
User manual version: 1.0 Creation date + author initials: 10-12-2015 RV Revision date + author initials: -

Using the microphone
The Devine BM-100 studio microphone is suitable for a variety of studio recording applications. It can be
used for vocals as ell as instrument recording. The BM-100 has a cardioid polar pattern, hich captures the
most sound directly from in front of the microphone.
IMP RTANT: Phantom power:
This studio microphone requires +48V phantom po er from a PA-mixer, studio-mixer, audio-interface or
phantom po er source. Consult the equipment manual or contact your local dealer to make sure your
equipment is capable of providing +48V voltage.
This microphone ill not ork properly ithout +48V voltage. Al ays check the po er source if you suspect
that the microphone might be damaged or broken.
Setting up the microphone:
The BM 100 includes a shock mount for optimal audio performance. The included shock mount is specifically
designed for the BM-100. Devine recommends al ays using the included shock mount to prevent audio
distortion and background or handling noise.
To insert the BM-100 microphone, use your middle finger and thumb to press the metal brackets to ards
each other (1), making the inner section of the shock mount slightly larger (2). Hold the shock mount ith
one hand and slide the microphone into the metal
brackets that are attached to the inner section.
The inner section is lined ith foam padding to prevent
scratches and damage to your microphone.
The microphone should be inserted ith the logo facing
to ards you and the shock mount angle adjustment
knob facing a ay from you. For the most optimal
position, insert the microphone so that that the brand
and type number is still visible.
The shock mount can easily be attached to a
microphone stand or microphone broadcasting arm. It
has a 5/8” thread and you can adjust the angle opposite
the mounting surface ith the tightening knob. If your
microphone stand or arm has a smaller thread, use a
3/8” inner thread to 5/8” outer thread adapter (not
included).
Connecting the microphone to a mixer or audio interface:
This microphone uses a 3-pin XLR plug connect to a mixer or audio-interface (cable not included). It is
recommended to check the follo ing settings on your audio equipment before connecting the microphone:
Mixer/Audio interface:
- Gain is set to 0
- Compression/lo-cut settings are set to 'Off' or neutral
- EQ set to neutral
- Pan/Balance set to neutral
- Volume fader or potentiometer set to the lo est possible position
- Phantom po er set to ‘On’ (usually a button per channel or group of channels)
All information and illustrations shown in this user manual are subject to change without further notice.
User manual version: 1.0 Creation date + author initials: 10-12-2015 RV Revision date + author initials: -
Microphone:
- Make sure the microphone is securely positioned on a microphone stand and inserted in the included
microphone shock mount.
- Position the audio source (vocalist or instrument) as close as possible to the microphone.
After you have checked the settings above, you can start recording. Positioning the audio source as close to
the microphone as possible provides the best possible audio quality and allo s you to reduce overall gain
settings, hich prevents audio feedback and noise.
Set the volume parameter (potentiometer or fader) to ‘0 dB’ for the best possible audio performance.
Gradually increase the gain until slight clipping or distortion is audible (usually indicated ith a (LED) VU
meter or LED).
Protecting the microphone:
This Devine microphone is equipped ith very sensitive electronics to provide optimal audio performance.
Make sure the microphone is not exposed to situations that may cause permanent damage as a result of
severe impacts, collision, or falls from high altitudes. Improper use of the microphone is not covered by
arranty. Al ays transport the microphone in the original packaging or in a flight case ith proper foam inlay.
This microphone is not intended for on-the-road use.
All information and illustrations shown in this user manual are subject to change without further notice.
User manual version: 1.0 Creation date + author initials: 10-12-2015 RV Revision date + author initials: -
Troubleshooting
Problem Possible Cause Solution
No sound, or very lo sound
signal
No phantom po er Connect or turn on phantom po er
supply
Volume set too lo Increase input volume and gain on
your mixer, interface or other
sound-processing device
Microphone/sound source
positioned too far a ay
Place the microphone closer to the
sound source or vice versa
Rattling and cracking sounds Moisture inside the microphone Allo the microphone to dry in
room temperature. Avoid use of
the microphone in humid or moist
environments. Do not let the
microphone come in contact ith
ater or liquids.
Loud, high frequencies coming
from the speakers
Microphone positioned too close to
the speakers and is causing
feedback
Move the microphone further a ay
from the speakers or change the
position of the microphone from
being aimed directly at the
speakers.
Microphone signal interrupted or
cut off
Loose or broken cable Check if the cable is plugged into
the microphone correctly. If that
does not solve the problem, try
replacing the cable.
Distortion and/or noise in the
captured sound
Too much airflo caused by vocals Use a pop filter or indshield (sold
separately)
All information and illustrations shown in this user manual are subject to change without further notice.
User manual version: 1.0 Creation date + author initials: 10-12-2015 RV Revision date + author initials: -
Technical specifications
- studio recording microphone
- condenser capsule ith 18 mm diaphragm
- polar pattern: uni-directional (cardioid)
- frequency response: 20 Hz – 20 kHz
- sensitivity: -38 dB +/- 2 dB (0 dB = 1 V/Pa @ 1 kHz)
- output impedance: 200 ohms +/- 30% (@ 1 kHz)
- load impedance: ≥ 1000 ohms
- self noise: 17 dBA
- S/N ratio: 77 dB
- body dimensions: 48 degrees (radius) x 165 mm (length)
- gold-plated XLR connector
- suitable for vocal and instrument recording
- eight: approx. 300 g
Included shock mount:
- shock mount reduces un anted noise
- foam-lined microphone holder prevents scratches
- angle-adjustable
- 5/8” thread
Frequency response and polar pattern graph:
All information and illustrations shown in this user manual are subject to change without further notice.
User manual version: 1.0 Creation date + author initials: 10-12-2015 RV Revision date + author initials: -
This manual suits for next models
1
Table of contents
Other Devine Microphone manuals

Devine
Devine BM-400 User manual

Devine
Devine USB-1 User manual

Devine
Devine RM 10 User manual

Devine
Devine BM-600 User manual

Devine
Devine USB-100 User manual

Devine
Devine M-Mic XLR W User manual

Devine
Devine DM 70 User manual

Devine
Devine DM 20 User manual

Devine
Devine PRO-USB1 User manual

Devine
Devine BM-500 User manual