Fiido D12 User manual

Made in China
NO.142 Fiido Industrial Park,Futong Rd. Yuanshan St. Longgang District, Shenzhen, China
SHENZHEN FIIDO TECHNOLOGY DEVELOPMENT CO.,LTD
https://www.fiido.com email:support@fiido.com
D12 User Manual

Fiido Electric Bicycle Catalog
I.Important Note
II.Bike Diagrams
III.How to adjust the saddle height
IV.Unfolding Instructions
V.Folding Instructions
VI.Specifications
VII.Daily maintenance and basic trouble shooting
2

E-Scooter and E-Bike laws differ by State - check your local
laws and only ride in legally permitted areas.
Use helmets, protective gear and always ride responsibly.
Riding Safety
As with other sports, bicycling involves risk of personal injury and damage of the bicycle. By choosing to ride a
bicycle, you assume the responsibility for that risk, so you need to know - and to practice - the rules of safe and
responsible riding and of proper use and maintenance. Proper use and maintenance of your bicycle reduces risk
of injury.
Because it is impossible to anticipate every situation or condition which can occur while riding, this Manual
makes no representation about the safe use of the bicycle under all conditions. There are risks associated with
the use of any bicycle which cannot be predicted or avoided, and which are the sole responsibility of the rider.
If you have any questions or do not understand something, take responsibility for your safety and consult with
the bike shop or the bicycle's manufacturer. It is important for rider to read carefully all instructions below
before your first ride.
3

This manual includes important safety performance and service information. Please make sure to read the following warnings
before using our products for the first time.
a) If you lend your e-bike to other people, please confirm that he/she has read this manual to decrease the risk of accident.
b) Please wear a suitable and safe helmet before riding, please wear clothes with fluorescent and reflective stripes when riding at night.
Follow the traffic rules and don't exceed the speed limits, which may cause accidents.
c) Don't touch or use metal to touch the charging port on the bike, otherwise it will cause a short circuit.
d) Following actions will cause huge power drops and reduce the riding distance:
1. Starting the bike by using the throttle.
1. Please use assist mode.
2. Brake only when necessary for safety, and don't use the throttle to start the bike.
3. Don't overload.
4. Before riding, please check the tire pressure and supply enough pressure.
2. Frequent braking.
3. Riding against the wind.
4. Overloading.
5. Insufficient tire pressure.
e) To extend the riding range :
f) When charging the e-bike, please make sure that there is nothing inside of the charging port. Connect the charger to the bike first and
then to the AC power source to avoid sparking.
g) Please consult your insurance company or insurance broker on the insurance coverage of riding an electric bike.
h) Generally, people must be 16 years old to ride an e-bike or three-wheel electric bikes. Please refer to local laws and regulations
when using this product in your country.
i) Bicycles are vehicles with certain risks, brake the rear wheel first, and then the front wheel in emergency braking, especially when
the cycling speed is too high, you may fall over if you use the front brake suddenly. Please ride carefully.
4
I.Important Note

Safety Guidelines
1. Always ride with both hands on the handle.
2. Do not park in building doors, evacuation staircases, walkways, and safety exits.
3. Do not charge inside residential building and park
4. Stay away from combustible when charging.
5. Please charge according to suggested time, do not charge for too long.
6. Use and store the batteries correct; batteries should never be disassembled.
7. Read all warning terms before riding or charging, only use original charger.
8. When adjusting the saddle position, do not exceed the safety line on the supporting
5
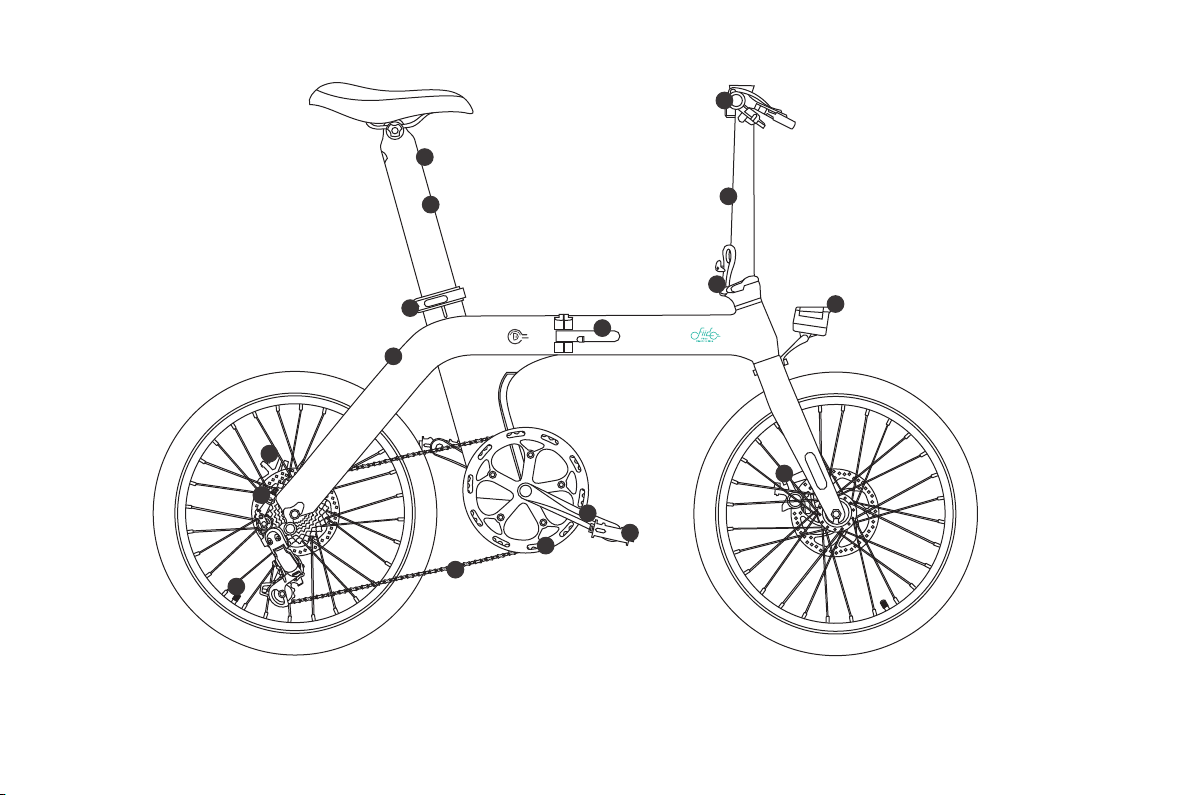
II.Bike Diagrams
1.Removable battery
2.Quick release
3.Brake disc
4.Hub motor
5.Valve
6.Folding system
7.Charge port
8.Controller box
9.Chain
10.Chain wheel
11.Pedal
12.Crank
13.Handle bar
14.Stem
15.Folding system
16.Headlight
17.Brake disc
6
1
2
3
4
5
6
7
8
10 11
12
13
14
15
17
16
9
7
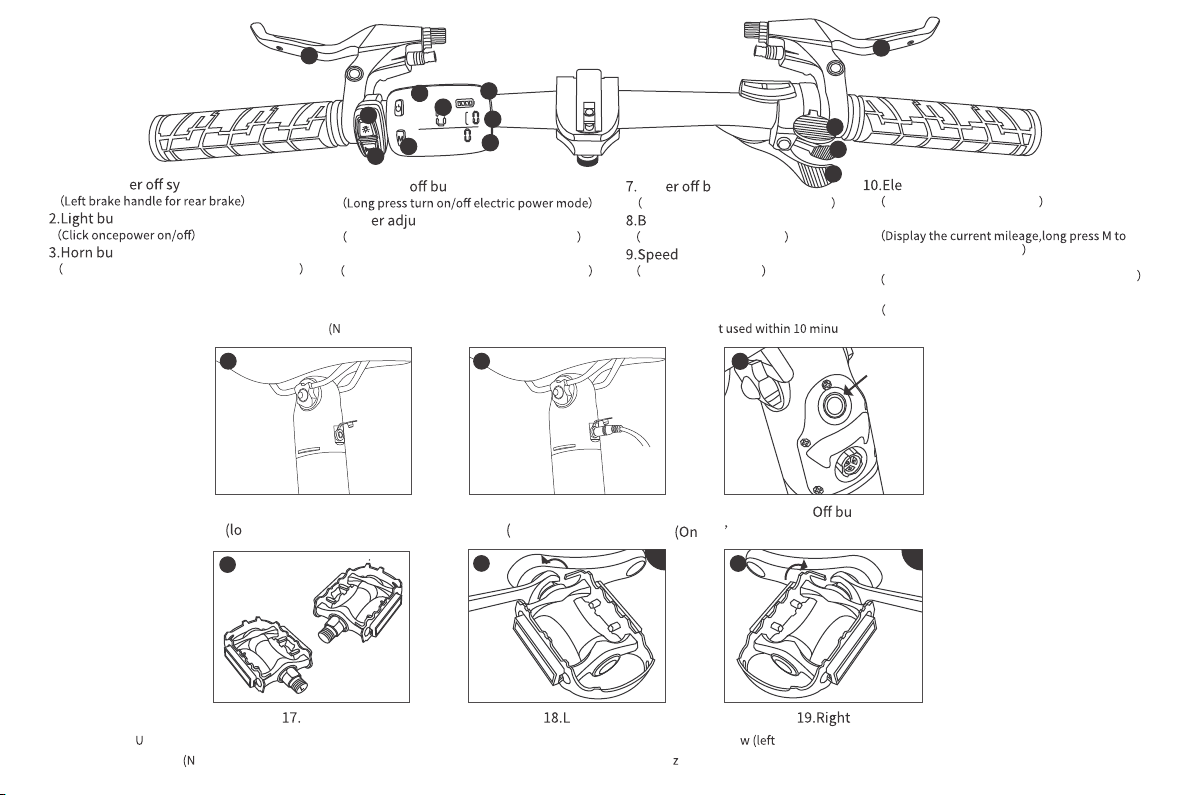
1.Brake pow stem
tton
tton
Click the button once to signal the whistle
4.Power on/ tton
5.Pow stment
Click once to shift gears, a total of 3 gears
6.Thumb shifter
Turn the handle outward to reduce the gear
Pow rake
Right brake handle for front brake
attery level
Display remaining battery
Display current speed
ctric assist gear
Display power gear number
11.Odometer
display the total mileage
12.Thumb shifter
Turn the handle outward to increase the gear
13.Electric-assist throttle
Provide electric assistant)
ote: The bike will automatically shut down when it is stationary if no tes.)
se a 15mm spanner to screw the pedal spindle into the thread hole and tighten it in the direction of the arro counterclockwise, right and clockwise, as shown).
ote: When installing the pedal, be aware of the left and right, align the installation hori ontally to prevent the pedal from slipping out of the crank.)
1
3
5
7
1
2
3
4
5
9
8
6
12
7
10
11
13
16.On/ tton
ce it s on, the tail light will turn on as well.)
16
18 LR
19
17
R
Pedal eft
14.Battery charging port
cated below the saddle)
15.Insert the charger port
Standard charger)
1514

III. How to adjust the saddle height
Open the seat tube quick release(Figure 2), pull the battery seat tube out of the frame, and adjust the height of the
battery seat tube up and down according to your needs.
When you adjust the height of the battery seat tube, then buckle the seat tube quick release.
Battery seat tube:
12 3
1.Open the seat tube quick release 2.Adjust to the right seat height for you 3.Adjust the height of the seat tube,
and finally buckle the seat tube for quick release
8

9
IV. Unfolding Instructions
4.For your safety, double check the following items are in position before riding: Frame/seat/handle tube locking positions, brake system function,
tires inflated, battery charge, and your safety gear.
5.Enjoy your D12 and have a fun ride on the world’s best electric bike.
steering tube lock and unlock
1.Unfold the D12 bike frame to straightened position and tighten the frame folding handle and safety clasp.
2.Unfold the handle bar tube to the upper position, lock the raised tube into position, and tighten the safety clasp. Adjust the T-handle bar into riding
position.
3.To insert the seatpost clamp into position, first open the seatpost clamp located on the bike frame, then insert the seatpost and adjust the tube into
position (note the marked lines on the seatpost). Adjust the bike seat height until you find the perfect riding position, then tighten the seatpost clamp
to lock into position.
insert to charge
Note :Please make sure the seatpost clamp should be tightened by Allen key insert to charge.
adjusting the handle bar
Note:Both the Rise and the Seat Tube are marked with a safe (MAX or MIN). For safety reasons, please use them in a safe range.

V.Folding Instructions
Step 1. Open up the lock at the base of the seatpost, then gently lower the seat to the bottom, and then close the clamp to lock it in position.
Step 2. Open up the lock at the base of the steering tube, then gently fold down the tube and handle bar.
Step 3. Open up the lock at in the centre of the bike frame, and then fold the D12 in half.
openedlocked openedlocked
10

11
* The above data allow for 5% manufacturing tolerances.
* After receiving the goods, there may be some differences between individual accessories and display drawings, which are different due to the different batches, and do not affect the use.
Name
Specification
Electric Bike System
FIIDO System
Power Assist System 3Gears Assist
Max Load weight 120kg
Maximum power assist speed 25km/h
Maximum Range Power assisted model up to 80-100KM
Battery High quality Lithium-ion 48V 11.6Ah
Battery adaptation DC 42V 2A
Recharge Time 7 hours
Display LCD Display
Drive Type Rear Drive
Frame Material Aluminum Alloy
Front Brake Mechanical Disc Brakes
Brake Type Mechanical Disc Brakes
Chainset Prowheel Steel 52 Tooth
Gears Shimano 7-speed gear
Chain KMC Z7
Rear Brake Mechanical Disc Brakes
Rear Hub/Rated Power XiongDa Motor/250W
Rims Alloy
Wheel Size 20”
Tyre Size 20”×1.75 inch
Tyres Cheng Shin Tire
Net Weight 17.5kg(with battery)
Unfold size 148cm×57cm×110m
Folding size 80cm x 74cm x 40cm
VI.Specifications

* When the battery is used up, it should be fully charged in time. The green light on the charger indicates full charge.Long-term underpowered storage will affect the performance of the battery.
* When cross the pool, water section, please pay attention to the wading height is not higher than the hub, prevent motor damage due to water inflow.Do not use high pressure water gun to clean,
so as not to damage the electronic components and wiring due to humidity.
* Add some lubricating oil to the chain and flywheel of the bike to avoid wading and rusting
* It is best to charge the battery in an ventilated, dry place.Direct sunlight or rain can have a bad effect on the performance of batteries and chargers.When charging,
the battery and charger should be away from other sources of heat.
* Connect the battery before charging, and then plug it into the electric supply .After charging, pull out the electricity first, and then pull out the battery end.If do not follow the steps,
it will cause a fire when connecting the battery end.
VII.Daily maintenance and basic trouble shooting
Brake abnormal sound or
wheel rotation resistance
Seat tube slide down
Difficulty in folding bicycle
Handlebars are not straight
Saddle loose (slide up and down)
Chain often falls off
1.Check whether the end of the brake cable is stuck.
2.Slight friction can be adjusted by fine-tuning the end of the line
3.Adjust the brakes to ensure that the brake pad and brake disc clearance is balanced
4.If the brake pads are worn, replace brake pads.
1.The set screw of the seat tube clamp is not tightened. Adjust the set screw.
2.Dry folding joints cause folding difficulties, can use lubricating oil to lubricate the joints.
1.Loosen the standpipe fixing screw, readjust the handlebar, and then tighten the standpipe fixing screw.
1.Check whether the saddle fixing screw is tightened. Retighten the saddle bottom fixing screw with the hex tool
2.The loose fixing screw of the saddle slides up and down, resulting in the sliding teeth
of the rack of the seat tube clamp code.It need to replace the seat tube clamp code.
1.Check whether the chainset is deformed and if the chainset is deformed ,it need to replace the chainset
2.Check whether the rear derailleur is loose,relock the rear derailleur and then lock the screw.
2.Check whether the anti-skid bushing inside the seat tube clamp is damaged ,if it's broken, replace the anti-skid bushing.
1.Check whether the spring at the folding joint is out of shape, or the spring is pulled
out without return, if the spring is damaged ,it needs to be replaced.
12
Fault code
E001
E002
E003
E004
E005
E006
Controller fault
Display communication fault
Motor hall fault
Handlebar fault
Motor fault
Motor phase fault
Table of contents
Other Fiido Scooter manuals


