Fiido T1 User manual
Fiido T1
Cargo Electric Bike
Dear users!Be sure to read this manual carefully befor riding,do understand the operations and keep
this manual and other material for further using.
WARNING:DO NOT USE THE BIKE BEFORE YOU KNOE HOW TO USE.


Safety precautions
1. Please follow the precautions in this instruction to effectively reduce risks. When you enter public areas,
please obey national and local regulations, remain vigilant while riding, and maintain a reasonable safe
distance from other people and vehicles.
2. Please operate by the instruction of the user manual, the loss caused by not following the instructions
shall be borne by oneself.
3. This product is not professional off-road vehicle, do not use this product according to off-road vehicle
standards.
4. For the first time riding, please do not choose the area with many children, pedestrians, pets, vehicles,
or other obstacles and potential hazards. Please be familiar with the bike before riding on public road.
5. Before each ride, please carefully check whether fasteners are loose or parts are damaged. If there’s any
unusual noise, please stop riding immediately, and contact after-sales team for assist.
6. To reduce the injury risk, please read and follow all "Caution", "Danger" and "warning" instructions in this
user manual. No speeding, and do not ride in motorized road under any circumstances.
7. For safety consideration, user must be over 16 years old. Users under the following circumstances are
strongly not recommended to use this product:
- People affected by alcohol or drugs.
- People who are unable to engage in strenuous physical activity due to illness.
- People who are unable to maintain balance or whose balance is impaired by motor skills.
- People whose weight exceeds the max load limit (max load is 120KG/265lb).
- Pregnant woman.
Dear user:
In this manual,we will introduce the specification,installation,usage,precautions,and maintenance of
FIIDO T1.Be sure you know everything you need to know about the bike that introduced in this manual.
Any questions,please contact Fiido After-sales Team or our Local Service Center,and a prompt reply and
feasible solution will be provided.

8. Please ride carefully in snow, rain, wet road, ice and other bad weather. Do not ride over too
high or too large obstacles, otherwise it’s very likely to lose balance or grip and cause injuries.
9. Do not attempt to charge while the charger or power supply is wet, please follow the local safety
regulations if you need to charge the bike in public area.
10. For effective protection and as convenient as possible for yourself, please be sure to use Fiido
specific parts.
11. If you need to retrofit your bike,Please follow the local laws and regulations, after consulting
with Fiido after-sales team, then proceed with caution. Serious injury and/or damage caused by
unauthorized modification will result in the void of warranty.

CONTENTS
1.Product introduction 2. Using guide
1.1 Bike overview
1.2 Packing list
1.3 Bike diagrams
1.4 Function DESC
2.1 Installation guide
2.2 First time using
2.3 Charging instructions
3. Maintenance precautions
3.1 Using precautions
3.2 Bike maintenance & repair
3.3 Motor maintenance & repair
3.4 Battery maintenance & repair
3.5 Reflex reflector cautions
4. Service directory
4.1 Troubleshooting methods
4.2 Specifications
4.3 Warranty coverage
4.4 Repair record
* All pictures are for reference only.

1.1 Bike overview
1.2 Packing list
1.3 Bike diagrams
1.4 Function DESC
1.Product introduction

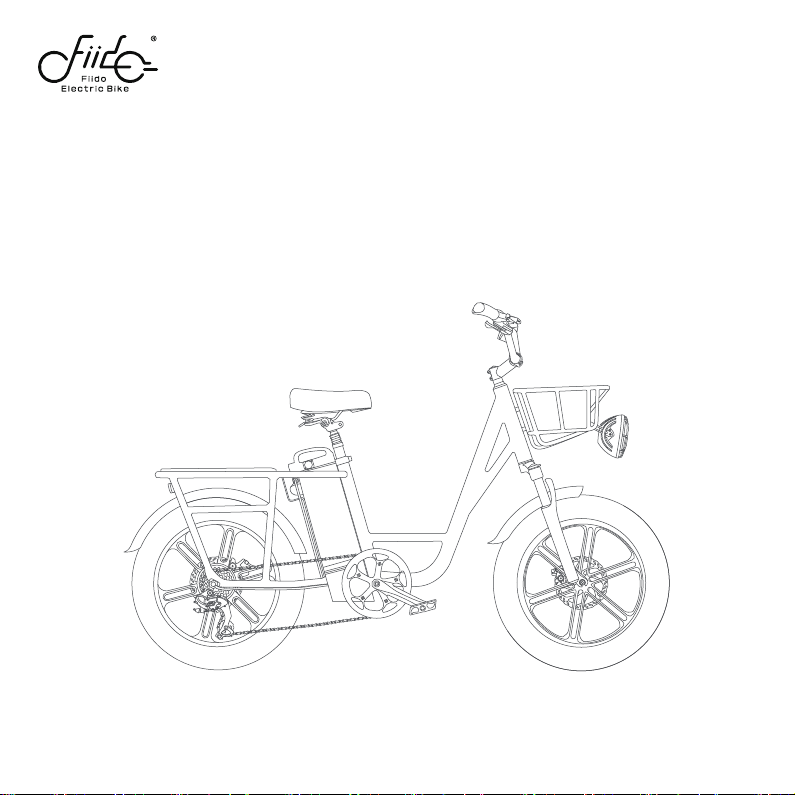
1.1 Bike overview
THE FUTURE STARTS HERE
As Fiido's first multi-functional electric cargo bike, T1 was designed to met different useing needs such as carry
cargo, short distance riding, commuting and pick up the child, providing users with the best cycling tool for more
effective and interesting travel. T1 can load 441lbs (maximum 265lbs for people, maximum 176lbs for cargo). With
the 48V 20Ah large capacity lithiumbattery, it can easily achieve a greater mileage of 60+ miles. The 750W motor
supports the max speed up to 28mph. Equipped with front fork shock absorption with locking system to ensure more
comfort. The 20-inch integrated wheel has better quality assurance than the ordinary spoke wheel. The large headlight
can be switched between lower beam and upper beam, to ownthe control of night riding vision
T1 has three riding modes, three electric assisted gear and seven-speed system, which can be rided by users of different
heights from 5 'to 6.5', to extend more nice life scenes.
2
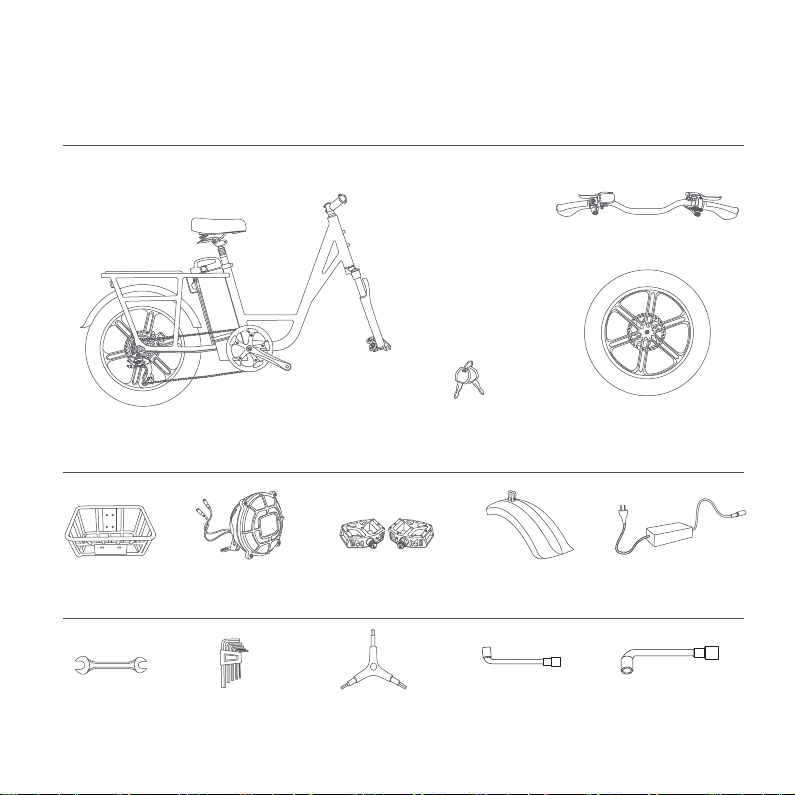
1.2 Packing list
Bike parts
Electric Bike*1
Fenders*1
Open spanner*1
Pendals*1Front basket*1 Front light*1
Hex wrench*5 Y-Type Allen Wrench*1 10# socket wrench*1 15# socket wrench*1
Charger*1
Front wheel*1
Handlebar*1
key*2
Bike accessories
Tools
*Please carefully check whether all items are complete and intact. If there is any problem such as missing or damaged,
please contact the official after-sales team asap.
3

1.3 Bike Diagrams
Battery
Shock-absorbent seatpost
Saddle
Rear Light
Charging Port
Disc Brake
Tire
Chain Chainwheel
Crank
Pedal
Motor
Charge
Valve
Rear
Derailleur
Handlebar
Headlight
Front suspension fork
Front Fender
Front wheel
Disc Brake
Basket
*Non professionals are forbidden to assistance and assemble the battery.
Please contact after-sales team for assistance.
4
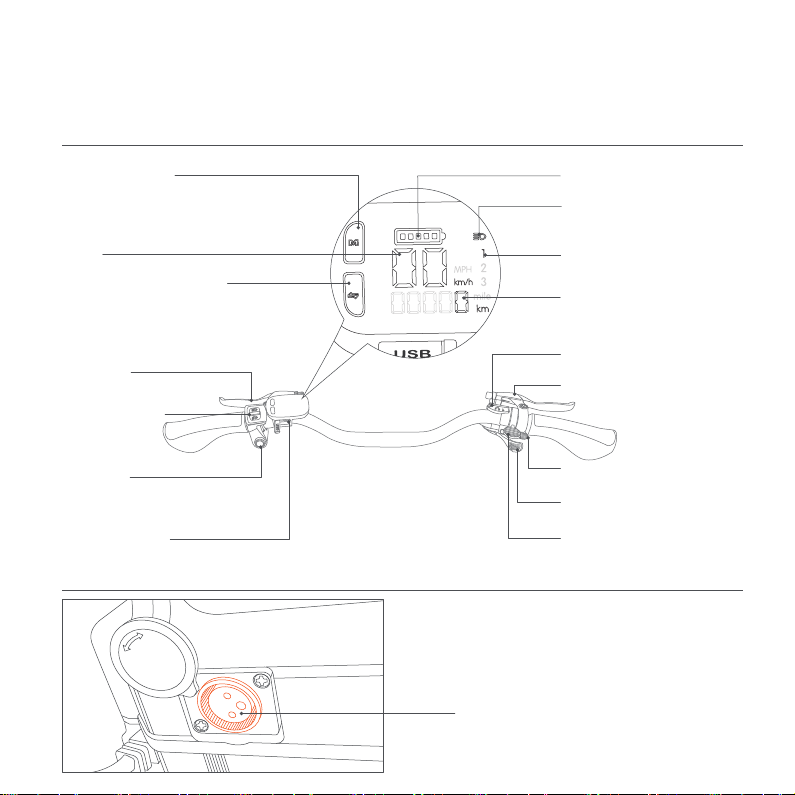
1.4 Function DESC
Handlebar
Battery
Front Brake
(The left side is front brake)
(Push up / down to
switch between
dipped beam and high beam)
(Pull the handle outward to shift down)
(Pull the handle outward to shift up)
(The right side is rear brake)
(For emergency charge ONLY)
(In case of overtaking, road section affecting
safety visibility or emergency, slow down and
ring the bell for signal)
Rear Brake
7 Speed Shirft Up
7 Speed Shift Down
(Gently press down the button to switch to
the pure electric mode, the stonger the press,
the faster the speed)
Electric mode button
USB Charging Port
Bell Button
Headlight button
ChargingPort
(Insert the Fiido charger ONLY)
(Display the current derailleur gear)
Speed Gear Display
(Display remaining power)
Battery Status
(Shows the status of the front
and rear light)
Lights
(Display the current power assisted gear.
For details please check Page12:step 3)
Power Assisted Gear Display
(Display the current range by default,
Double-click the Instrument Power button
to switch the total historical mileage display)
Range
(Display the current speed)
① Click to switch the gear and PAS 0, a total of 3 gears
② Double-click to switch KMH/MPH display.
③ Long press for 3 seconds, when the speed display
enters the flashing state, the cruise control function
can be started.
Power Assisted Gear Switch
Instrument Power
① Long press for more than 3 sec:turn on/off the
power assisted mode.
② Click to turn on/off the headlight and taillight
③ Double-click to display the total historical mileage.
Speed
5

2.1 Installation guide
2.2 First time using
2.3 Charging instructions
2.Using Guide
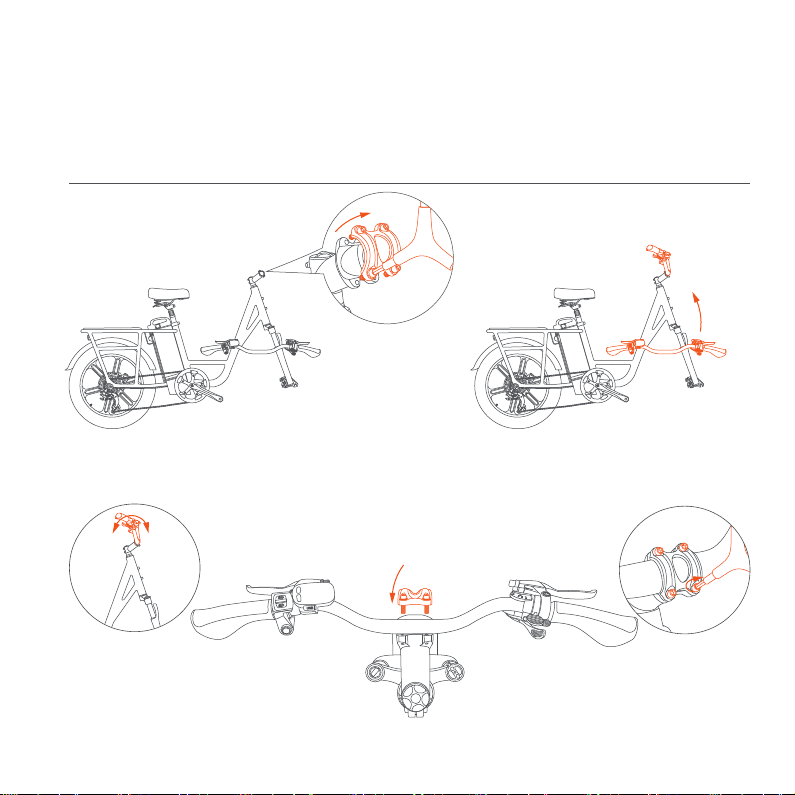
2.1 Installation guide
lnstall the handlebar
The basic installation of the bike has been completed before out ofr the factory.When you receive the bike.you only need to
install the handlebar.baskets,headlight, front wheel,pedals and lock the aeat saddle.
① First unscrew and open the handlebar clamp
③Adjust the handlebar to the right position,should be in a parallel with the fork;close the handlebar clamp
and tighten the screw.
(Caution:The screws should be tighten in case safety problems)
② Lift the handlebar upward to the right position
7
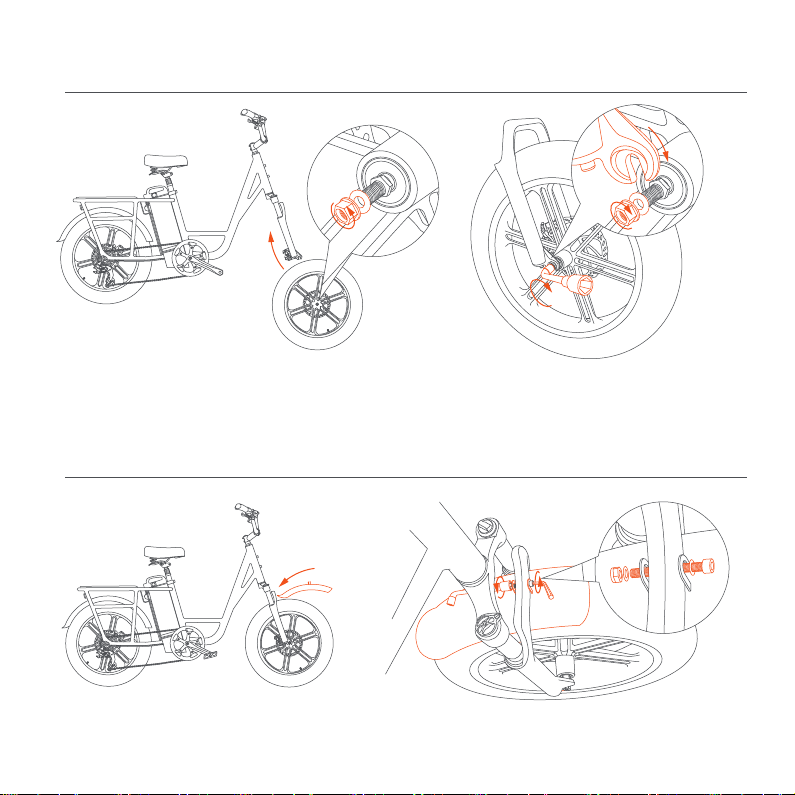
Install the front wheel
Install the Fender
① First take out the nut and collar on the wheel ② Then put the fork on the wheel axle,put in the collar
and tighten the nut
Put the front fender through the gap of the tire and fork, then screw tightenly.
8

Align the headlights with the front basket hole, put into screws and nuts then tighten, and then insert the the red line
and blue line of the headlights in accordance with the direction of the arrow
Align the four holes of the front basket with the four holes of the bike head, and tighten screws
Lnstall the front basket
Install the front light
9
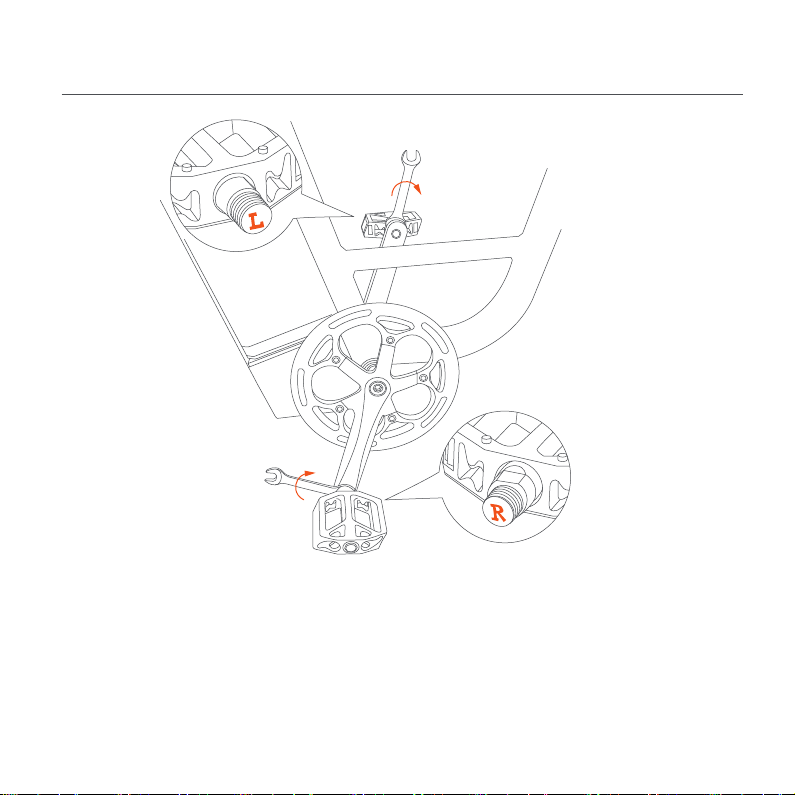
Use the open spanner of the tools bag, screw the pedal shaft into the threaded hole and tighten it in
the direction of the arrow.
Caution: While installing the pendal, pay attention to the left / right pendal corresponding to the left / right crank, the
pendal screw and the inside of the crank are respectively marked L(left) / R(right). Please install the pendal correctly to
prevent it from sliding out of the crank.
Install pendals
10

2.2 First time using
Before riding, please follow the installation guide to install components properly, check whether the firmware is loose,
ensure sufficient power, and take appropriate protection for riding.
Step 1:Adjust the seat
Please adjust the seat to the appropriate riding height according to your height.
(the recommended height is when the saddle is level with the user’s pelvis when standing naturally.
The height of the adjustment can NOT exceed the safety line)
① Unlock the battery to the“ON”position
② Press the“M”button for 3 seconds,when the display lights it start working,same instruction for
turning off the power
③ Adjust the front shock absorption according to riding requirements: rotate the left button of the front fork
to the direction of "+" to harden the front fork (faster rebound speed). Rotate to the direction of "-" to soften
the front fork(slower rebound speed);
Step 2:Turn on the power and adjust the suspension fork
11

Step 4:Start riding
Please take corresponding protection before starting riding.
Step 5:Braking introduction
Step 3:Adjust the power assisted gear
Switch and choose the riding mode according to the cycling road conditions and personal needs.
① Electric mode:Equipped with pure electric mode, gently press down the electric mode button to switch
to the pure electric mode, the stonger the press, the faster the speed
② Power assisted mode:Equipped with 3 power assisted gears, click the power assisted gear button to
switch the gear. The 1st gear is suitable for relatively flat road conditions, the more/higher the road slope,
the larger gear can be adjusted accordingly.
Attention: When the bike is on PAS 3 status, click the power assisted gear button again and the bike will be on
PAS 0 status, by then the gear display wont't be lighted and the The motor will be tuen off.But other components
can work as well. The bike will be on pedalling mode.
The left side is front brake, the right side is rear brake. While riding, it’s recommended to use the rear brake
first, then the front brake to slow down the speed to stop, in order to avoid falling accident caused by balance
problems from urgent front wheel brake.
12
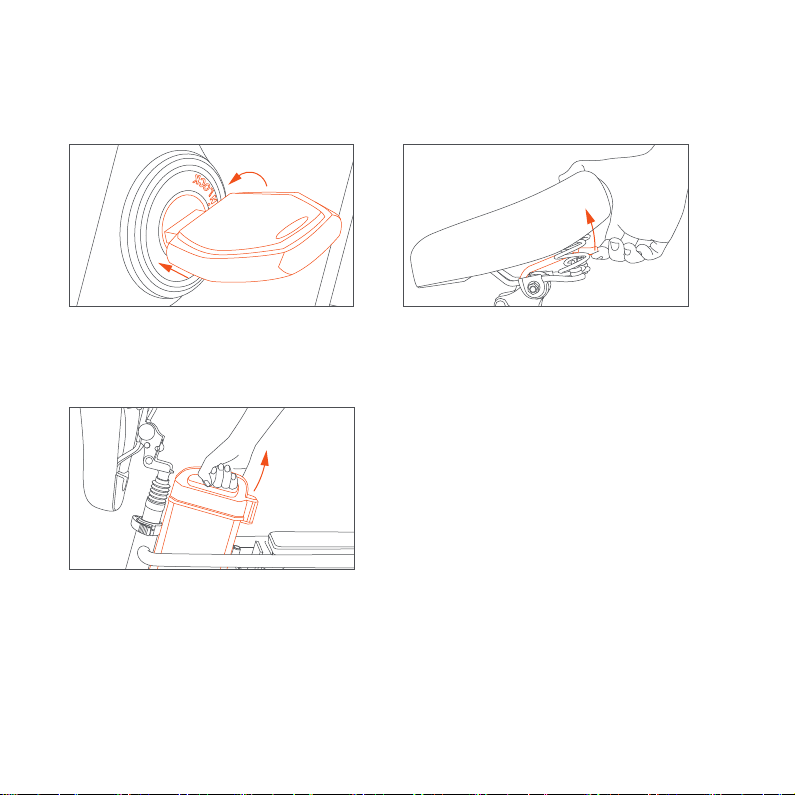
① Press and switch the key to “UNLOCK”position ② Press the bar and lift the saddle
③ Grip the handle and draw out the battery
Step 6:How to draw out the battery
13
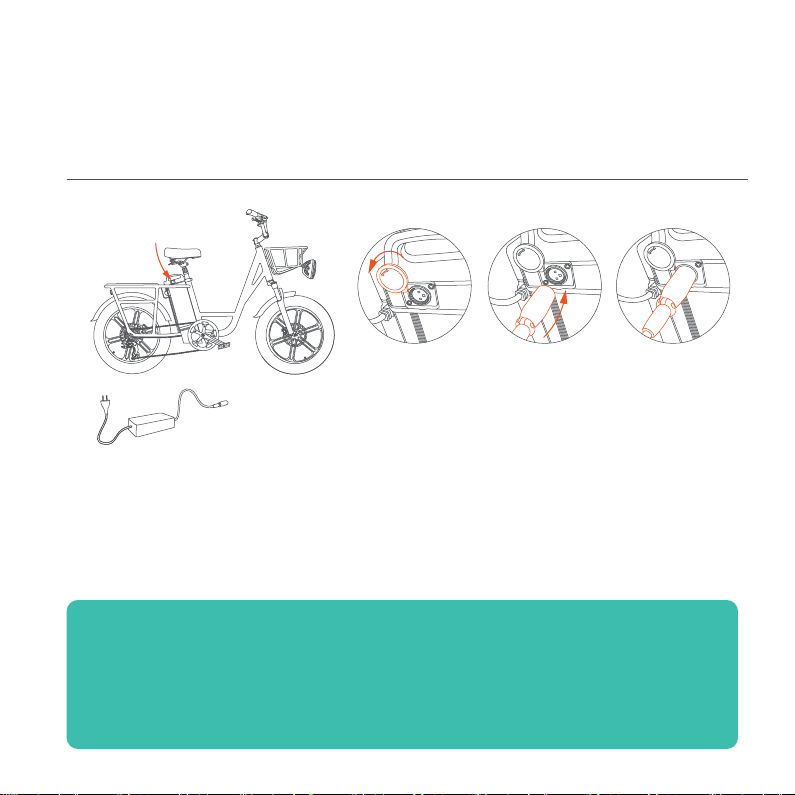
2.3 Charging instructions
The battery comes with a small amount of electricity, before the first time use, please make sure to charge it
to full power before riding.
1. Charging connection: Connect the charging interface of the charger to the charging port, then connect the power
plug of the charger to the power socket.
2. Fully charged:When the indicator light of the charger is red, means it’s normal charging. When the light is green,
means it’s fully charged.
3. Charging hour: Charging hour is around 7-9 hours, The duration depends on the situation.
4. Disconnect charging: When the indicator light turns green, means it’s fully charged. Unplug the power plug first,
then remove the charging interface from the battery. Close the battery dust cover.
5. Charging mode: The bike supports two charging modes: vehicle charging and disassembly battery charging. Please
see P13 for how to remove the battery.
Caution: Charger has high voltage device, DO NOT repair without permission. In order to avoid danger, battery and
charger should be placed away from children. There should be no inflammable and explosive objects
around the batteries (such as car seat cushions, sofas, etc.). Keep the battery in a ventilated and dry place,
and make sure NOT to charge in open-air place, to avoid electrical short circuit fire and other accidents
caused by rain and other factors, and to prevent liquid and metal particles into the electrical parts.
Danger: Charging can be allowed on public charging equipment, but the matching between the bettery and the
charging equipment should be fully considered.
Warning: If there’s any odor or high temperature during charging, please stop charging immediately and contact
after-sales team for assist.
Charging
14

3.1 Using precautions
3.2 Bike maintenance & repair
3.3 Motor maintenance & repair
3.4 Battery maintenance & repair
3.5 Reflex reflector cautions
3.Maintenance precautions
Table of contents
Other Fiido Scooter manuals


